1
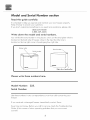
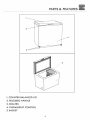
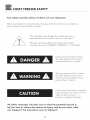
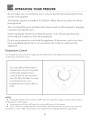
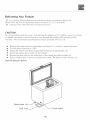
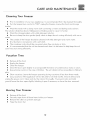
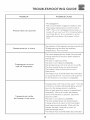
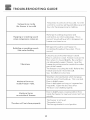
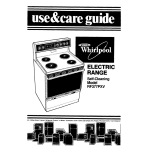
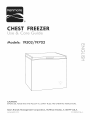
EST
Models:
EZ
19502/19702
!i!ii
.................
CAUTION:
BEFORE USE, PLEASE READ AND FOLLOW
Sears Brands Management
vvvvvv.sears.com
ALL SAFETY RULES AND OPERATING
Corporation,
Hoffman
INSTRUCTIONS.
Estates, IL 60179
U.S.A.
PN 318205132RevA
TABLE OF CONTENTS
Product
Warranty
ModeJ
and Serial
2
Number
section
3
Parts and Features
4
Chest
Safety
5
important
Safeguards
6
important
Safety
7
Freezer
Installation
instructions
Instructions
8
_" Before Using Your Freezer
_- installation of Your Freezer
Electrical Connection
Operating
Your Freezer
9
Temperature Control
_- Defrosting Your Freezer
_" The Freezer Compartment
Care
and Maintenance
12
Cleaning Your Freezer
Vacation
12
Time
Moving Your Freezer
_" Energy Saving Tips
Troubleshooting
Master
Protection
Guide
Agreements
14
16
KENMORE
LiMiTED
WARRANTY
When installed, operated and maintained according to all instructions supplied with the
product, if this appliance fails due to a defect in material and workmanship within one year from
the date of purchase, call 1-800-4-MY-HOME® to arrange for free repain
If this appliance is ever used for other than private family purposes, thiswarranty applies for
only 90 days from the date of purchase_
This warranty covers only defects in material and workmanship. Sears will NOT pay
for:
1_
Expendable items that can wear out from normal use,including but not limited to filters,
belts, light bulbs, and bags.
2_
A service technician to instruct the user in correct product installation, operation or
maintenance_
&
A service technician to clean or maintainthis product
4_
Damage to or failure of this product if it is not installed, operated or maintained according
to the all instructionssupplied with the product
5.
Damage to or failure of this product resultingfrom accident, abuse, misuseor use for other
than its intended purpose_
&
Damage to or failure of this product caused by the use of detergents, cleaners, chemicals
or utensilsother than those recommended in all instructionssupplied with the product
Z
Damage lo o_ failure of paris o_ syslems_esulling horn unaulho_ized modifications made
to this product
Disclaimer of implied warranties; limitation of remedies
Customer's sole and exclusive remedy under this limited warranty shall be product repair as
provided herein. Implied warranties, including warranties of merchantability or fitness for a
particular purpose, are limited to one year or the shortest period allowed by law. Sears shall
not be liable for incidental or consequential damages. Some states and provinces do not allow
the exclusion or limitation of incidental or consequential damages, or limitation on the duration
of implied warranties of merchantability or fitness,so these exclusions or limitations may not
apply to you.
This warranty applies only while this appliance is used in the United States or Canada.
This warranty gives you specific legal rights, and you may also have other rights which vary
from state to state.
Sears, Roebuck and Co., Hoffman Estates, IL 60179
Sears Canada Inc., Toronto, Ontario, Canada M5B 2B8
Model and Serial Number section
Read this guide
carefully.
It is intended to help you operate and maintainyour new freezer properly
Keep it handy to answer your questions
If you don't understand something or you need more assistance, please call:
1-800-4MY-HOME
(1-800-469-4663)
Write
down
the model
and
serial
numbers.
You will find the serial number in two places: one is on the serial plate which is
located on the back side of freezer, close to the top; the other one is
located on the top right corner of packaging box right side
Rating
Lable
Serial
Number
mber
I
BACI_[
FRONT
Eight side of packing
Box
Please write these numbers here:
Model
Number:
225.
Serial Number:
Usethese numbers in any correspondence or service calls concerning your
freezer.
If you received a damaged freezer, immediately contact Sears
Save time and money Before you call for service, check the Troubleshooting
Guide It listscauses of minor operating problems that you can correct
yourself
PARTS & FEATURES
1
2
4
3
1. COUNTER BALANCED
LID
2. RECESSED HANDLE
3. ROLLERS
4. THERMOSTAT CONTROL
5. BASKET
4
CHEST FREEZER SAFETY
Your safety and the safety of others are very important.
We have provided many important safety messagesin this manual and on your appliance.
Always read and obey all safety messages.
This is the Safety Alert Symbol. This symbol alerts you to
potential hazards that can kill or injure you and others.
All safety messageswill follow the Safety Alert Symbol
and either the words" DANGER"/WARNING" or "CAUTION".
Danger means that failure to heed
thissafety statement may result in
severe personal injury or death.
Warning means that failure to heed
thissafety statement may result in
extensive product damage, serious
personal injury, or death.
safety statement may result in minor or
Caution
that failure
moderatemeans
personal
injury, toorheed this
property or equipment damage.
'
All safety messages will alert you to what the potential hazard is,
tell you how to reduce the chance of injury, and let you know what
can happen if the instructions
are not followed.
iMPORTANT
SAFEGUARDS
Before the freezer is used, it mustbe properly positioned and
installed as described inthis manual, so read the manual
carefully. To reduce the riskof fire, electrical shock or injury
when using the freezer, follow basic precautions,
including the following:
®
Plug into a grounded 3-prong outlet. Do not remove grounding prong, do not use an adapter,
and do not use an extension cord. It is recommended that a separate circuit, serving only
your freezer, be provided. Usereceptacles that cannot be turned off by a switch or pull chain.
®
Never clean freezer parts with flammable fluids. These fumescan create a fire hazard
or explosion. And do not store or use gasoline or other flammable vapors and liquids in the
vicinity of this or any other appliance. The fumes can create a fire hazard or explosion.
@
Before proceeding with cleaning and maintenance operations, make sure the power cord
is unplugged.
•
Do not connect or disconnect the electric plug when your hands are wet.
o
Do not attempt to repair or replace any part of your freezer unlessit is specifically
recommended in this Use&Care Guide. All other servicing should be referred to a
qualified technician.
o
If the unit is unplugged, lost power, or turned off; you mustwait 3 to 5 minutes before
restarting the unit. If you attempt to restart before this time delay, the freezer will not start.
iMPORTANT
SAFETY INSTRUCTIONS
To reduce the risk of fire, electrical
WARNING
shock, or injury when using your
freezer, follow these basic precautions:
•
Read all instructionsbefore using the freezen
•
DANGER or WARNING:
•
Before you throw away your old freezer: Take off the top. Leave the
Riskof child entrapment.
basket in place so that children may not easily climb inside.
•
Never allow children to operate, play with, or crawl inside the freezen
•
Refrigerants: All refrigeration products contain refrigerants, which under
the guidelines of federal law must be removed before disposal of product. It is
the consumer's responsibility to comply with federal and local regulations when
disposing of this product.
•
Never clean freezer parts with flammable fluids. The fumescan create a
fire hazard or explosion.
•
Do not store or use gasoline or any other flammable vapors and liquids in
the vicinity of this or any other freezen The fumes can create a fire hazard or an
explosion.
iNSTALLATiON
Before
iNSTRUCTiONS
Using Your Freezer
Removethe exterior and interior packing.
Check to be sure you have all of the following parts:
1Storage Basket
1Divider
1Use&Care Guide
1Plastic Scraper
Before
connecting
the freezer
to the power
approximately
2 hours. This will reduce
cooling
from
system
handling
during
source,
the possibility
let it stand
transportation.
Clean the interior surface with lukewarm water using a soft cloth.
7
upright
of a malfunction
for
in the
installing
Your Freezer
• This appliance is designed to be free standing only, and should not be recessed or
built-in.
o Place your freezer on a floor that is strong enough to support the freezer when it is
fully loaded.
• Allow ,5.9inches(1,5cm) of space between the back and sides of the freezer, which
allows for the proper air circulation.
• Locate the freezer away from direct sunlight and sources of heat (stove, heater,
radiator, etc.). Direct sunlight may affect the acrylic coating and heat sources may
increase electrical consumption. The recomended operating ambient temperature
should be between 55°F(12.8°C) and 110°F(43.3 )°C.
®
Avoid locating the freezer in moist areas.
• Remove shipping material including base
Cut the packaging strap, then take off the packaging box and the interior protective plastic
bag. Removethe protective foams off the freezer and put them inside the upended
packaging box, uplift the freezer and remove the bottom protective pad under the
freezer.
o After plugging the appliance into a wall outlet, allow the unit to cool down for 2-3
hours before placing food inthe freezen
Electrical
Connection
WARNING
Improper use of the grounded plug can result in the riskof electrical shock. If the power
cord is damaged, have it replaced by an authorized Avanti Products service centen
Plug the freezer into an exclusive, properly installed-grounded wall outlet. Do not
under any circumstances cut or remove the third (ground) prong from the power
cord. Any questions concerning power and/or grounding should be directed
toward a certified electrician.
OPERATING
YOUR FREEZER
Do not under any circumstances cut or remove the third ground prong from the
power cord supplied.
This freezer requires a standard 115/120Volt-60Hz electrical outlet with threeprong ground.
The cord should be secured behind the freezer and not left exposed or dangling
to prevent accidental injur4
Never unplug the freezer by pulling the power cord. Always grip the plug
firmly and pull straight out from the receptacle.
Do not use an extension cord with this appliance. If the power cord is too short,
have a qualified electrician or service technician install an outlet near the
appliance.
Temperature
Control
Your freezer has one control for regulating the temperature. The temperature control is located
on the lower right hand cornen
You can adjust the freezer
temperature by turning and
setting the temperature
control dial to any position
from Cold to Colder. To stop
cooling function, turn
temperature control dial to
OFF.
NOTE:
o Turningthe temperature control to "OFF" position stops the cooling cycle but does not shut
off the power to the freezen
o Large amounts of food will lower the cooling efficiency of the freezen
e If you choose to change the thermostat setting, adjust thermostat control by one numerical
increment at a time. Allow several hours for temperature to stabilize between adjustments.
Defrosting
Your
Freezer
• For the most efficient operation and minimumenergy consumption, defrost the
freezer when the frost on the freezer walls is excessive ( r/4to r/'2inch thick).
• Choose a time when the stock of frozen food is low.
CAUTION
Do not use boiling water because it may damage the plastic parts. In addition, never use a sharp
or metallic instrumentto remove frost as it may damage the cooling coils and will void the
warranty. We recommend using the plastic scraper provided with your unit.
•
•
•
®
•
®
Removethe frozen food from the freezer and place it in a cooler to protect the food.
Turnthe thermostat knob to "OFF".
Unplug the freezen The Power Supply light should be off (green light out).
During defrosting, the ice melts into the cabinet.
Removethe drain plug on the inside floor of the freezer by pulling straight out.
Place a shallow pan or drip tray outside drain outlet. The defrost water will drain out.
(See the diagram below)
Drain
outlet
Drip
Drain
Tray
10
outlet
•
•
Check the pan occasionally so the water does not overflow_
Clean the interior of the freezen
•
•
Replace the plug on the inside floon
Plug in the eletrical cord.
•
•
e
Resetthe thermostat to desired setting.
Allow the cabinet to cool for one houn
Returnfood to the freezen
HELPFUL
HINT:
Defrosting usually takes a few hours. Leaving the door open will help speed the process. Also,
pouring warm water (not boiling) on the ice/frost will help speed melting.
If you mustuse a scraper, be extremely careful, because it is very easy to damage the
freezer compartment and void your warranty.
OPERATING
The Freezer
•
YOUR FREEZER
Compartment
This compartment is designed for the long-term storage of frozen food.
•
The storage life of frozen foods varies and the recommended storage time should not be
exceeded. The instructionsregarding the care of frozen foods should be followed when
defrosting the freezen
•
Pre-packed commercially frozen food should be stored in accordance with the frozen
foods manufacturer's instructions for a three star frozen food storage compartment or home
freezen
•
Place frozen food into the freezer as quickly as possible after purchase. If there are
instructionson the packet, carefully follow these instructionsregarding storage times.
•
The freezer door is susceptible to breaking due to excessive ice build up. Be sure to
defrost when the ice reaches r/4to r/'2inch (5 to 10mm) thick
•
A storage basket is provided for the organization of odd-shaped items. To reach other
packages inthe freezer, just slide the basket to one side, or lift it out.
11
CARE AND MAINTENANCE
Cleaning
Your Freezer
e Prior to installation of your new appliance, it is recommended that it be cleaned thoroughly.
• Turnthe temperature control to "OFF",unplug the freezer, remove the food and storage
basket.
• Wash the inside with a damp warm cloth containing a water and baking soda solution.
The solution should be about 2 tablespoons of baking soda to a quart of waten
• Wash the storage basket with a mild detergent solution.
• Be sure to keep the door gasket (seal) clean to keep the unit running efficiently with warm
waten
• The outside of the freezer should be cleaned with mild detergent and warm waten
• Dry the interior and exterior with a soft cloth.
• The condenser coils should be vacuumed when they are dusty or dirt4
• It is recommended that the unit be cleaned each time it is defrosted to help keep the unit
odor free and runningefficientl4
Vacation
®
0
®
0
®
Time
Removeall the food.
Unplug the freezen
Clean the freezen
Leave the door open slightly to avoid possible formation of condensation, mold, or odors.
Useextreme caution in the case of children. The unit should not be accessible to children's
play.
Short vacations: Leave the freezer operating during vacations of lessthan three weeks.
Longvacations: If the appliance will not be used for several months,remove all food and
unplug the power cord. Clean and dry the interior thoroughly. To prevent odor and mold
growth, leave the door open slightly: blocking it open if necessary or have the door removed.
®
®
Moving
®
•
•
•
Your Freezer
Removeallthe food.
Securely tape down all loose items inside your freezer.
Removethe rollers to prevent damage.
Tapethe doors shut.
12
Energy
Saving
Tips
e The freezer should be located in the coolest area of the room, away from heat producing
appliances or heating ducts, and out of the direct sunlight.
•
Let hot foods cool to room temperature before placing in the freezen Overloading the
freezer forces the compressor to run Iongen Foodsthat freeze too slowly may lose quality, or
spoil.
•
Be sure to wrap foods properly, and wipe containers dry before placing them in the
freezen This cuts down on frost build-up inside the freezen
•
Freezer storage bin should not be lined with aluminum foil, wax paper, or paper toweling.
Linersinterfere with cold air circulation, making the freezer lessefficient.
e Organize and label food to reduce door openings and extended searches. Removeas
many items as needed at one time, and close the door as soon as possible.
13
TROUBLESHOOTING
PROBLEM
Freezer
does
Freezer
exterior
not
GUIDE
POSSIBLE
Not plugged in.
The circuit breaker tripped or a blown fuse.
The freezer temperature control is set at
"OFF". If the unit is unplugged, lost power, or
turned off; you mustwait 3 to 5 minutes before
restarting the unit. If you attempt to restart
before this time delay, the freezer will not
staft.
operate
The exterior
is warm
CAUSE
of the freezer
may be as much as
30 degrees warmer than the ambient
temperature,
This is normal.
The room temperature
is hotter than normal.
A large amount of food has been added
the freezer.
to
The door is open too often.
The door is not closed completely.
Compressor
turns on
and off frequently.
The temperature
control is not set correctly.
The door gasket does not seal properly.
The freezer does not have the correct
clearances.
The freezer has recently been disconnected
for a period of time. Four hours are required
for the freezer
Temperature
to cool down completely.
control
is set too warm,
Turn the
control to a cooler setting and allow several
hours for the temperature
to stabilize.
Door is kept open too long or is opened too
frequently.
Warm air enters the freezer
Temperature
inside
the freezer
is too warm
every time the door is opened.
door less often.
Open the
The door is not closed completely_
The door gasket does not seal properly.
A large amount of warm or hot food might
have been stored recently. Wait until the
freezer has had a chance to reach its
selected
temperature.
The freezer
14
has recently
been disconnected
TROUBLESHOOTING
GUIDE
Temperature
Temperature
the
freezer
inside
is too
cold
Metal
Popping
when
or cracking
compressor
sound
comes
or gurgling
like water
is set too cold.
on
parts undergo
sound,
boiling
expansion
Turn the
several
and
contraction,
as in hot water pipes. This is
normal. Sound will level off or disappear as
freezer continues to run.
Refrigerant
Bubbling
control
control to a warmer setting and allow
hours for the temperature
to stabilize.
(used to cool freezer)
circulating
normal.
throughout
is
the system. This is
Check to assure that the freezer is level.
Floor is uneven or weak. Freezer rocks on the
floor when it is moved slightly. Be sure floor
can adequately
support freezer. Level the
Vibrations
freezer by putting wood
0art of the freezer.
or metal shims under
The freezer is touching the wall. Re-levet the
freezer and move it from the wall.
See Installation
Instructions
.
Weather
internal
Moisture
forms on
inside freezer
walls.
is hot and humid, which
rate of frost build-up.
increases
This is normal.
Door is slightly open.
Door is kept open too long, or is opened too
frequently.
Open the door less often.
The door is not sealed properly.
Moisture
forms
on outside of freezer
Door is slightly open, causing cold air from
inside the freezer to meet warm moist air from
outside.
The freezer
The
door
will
not
close
properly
is not level.
The gasket is dirty.
The storage basket is out of position.
15
MASTER PROTECTION
AGREEMENTS
Congratulations on making a smart purchase_ Your new Kenmore®product is designed and
manufactured for years of dependable opera-tion_ But like all products, it may require
preventive maintenance orrepair from time to time. That' s when having a Master
ProtectionAgreement can save you money and aggravation_ The Master Protection
Agreement also helps extend the life of yournew product
Here' s what the Agreement includes:
Parts and labor needed to help keep products operating prop erly under normal
use, not just defects. Our coverage goes wellbeyond the product warranty. No
deductibles,
no functional failure excluded from coverage--
real protection.
Expert service by a force of more than 10,000 authorized Sears service
technicians, which means someone you cantrust will be working on your product.
Unlimited service calls and nationwide
whenever you want us.
"No-lemon"
guarantee
service, as often asyou want us,
- replacement of your covered product iffouror
more product failures occur within twelve months.
Product replacement
if your covered product can' t be fixed.
Annual Preventive Maintenance
Check at your request -
noextra charge.
Fast help by phone - we call it Rapid Resolution - phone sup port from a
Sears representative on all products. Think of usas a "talking owner' s manual."
Power surge protection against electrical damage due to power fluctuations.
$250Food
Loss Protection annually for any food spoilage that is the result of
mechanical failure of any covered refrigerator or freezen
Rental reimbursement if repair of your covered product takes longer than
promised.
10°/0 discount
installed parts.
off the regular price of any non-covered repair service and related
Once you purchase the Agreement, a simple phone call is all that ittakes for you to schedule
service. You can call anytime day or night,or schedule a service appointment online.
The Master Protection Agreement is a risk free purchase. If you can-cel for any reason
during the product warranty period, we will providea full refund. Or, a prorated refund
anytime after the product warranty period expires. Purchase your Master Protection
Agreement today!
Some limitations and exclusions apply. For prices and additional
information in the U.S.A. call 1-800-827"-6655.
Coverage
in Canada
varies on
Sears Canada at 1-800-361-6665.
Sears installation
some
items.
For full
details
call
Service
For Sears professional installation of home appliances, garage door openers, water
heaters, and other major home items,in the U.S.A.or Canada call 1-800-4-MY-HOME®.
16
Your Home
iiiiiiiiiiiiiiii
iiiiiiiiiiiiiiii
For troubleshooting,
product manuals and home solutions advice:
iiiiiiiiiiiiiiii
iiiiiiiiiiiiiiii
iiiiiiiiiiiiiiii
iiiiiiiiiiiiiiii
iiiiiiiiiiiiiii
iiiiiiiiiiiiiii
iiiiiiiiiiiiiii
maHag÷ _h
o_e
.......
.....................................................................................
,_w.=°°°_o=,,o=o.com
iiiiiiiiiiiiiii
iiiiiiiiiiiiiii
For repair ? in your home ?of all major brand appliances,
lawn and garden equipment, or heating and cooling systems,
no matter who made it, no matter who sold it!
...........
For the replacement parts, accessories and
owner_H manuals that you reed to doAt-yourself.
...........
For Sears professional
installation of home appliances
and items like garage door openers and water heaters.
...........
1-800-4-M
Y-HOME (,.=00.,00.,0o3
Call anytime,
day or night (U.S.A.
www.sears.corn
and Canada)
..............
www.sears.ca
Our Home
For repair of carry-in items like vacuums, lawn equipment,
and electronics, call anytime for the location of your nearest
Sears Parts & Repair Service Center
1-800-488-1222
(U.S.A.)
1-800-469-4663
www.sears.com
(Canada)
www.sears,ca
To purchase a protection agreement on a product serviced by Sears:
1-800-827-6655
(U.S.A.)
1 =800-361-6665
Para pedir servicio de reparaci_(l_;,i
a domicitio, y para ordenar piezas:
1-888-SU-HOGAR
(1-888-784-6427
?Registered
?Marca
MC
Marque
Trademark
Registrada
de
M
/
Trademark
/ TM Marca
commerce
/
MD
/
de F_rica
Marque
dposa
Au Canada pour service en fran_i_}jis:
1-800-LE=FOYER Mc
(_-800-533-6937)
Sea/r_
www.sears.ca
SM
Service
Mark of Sears Brands,
/ SM Marca de Servicio
de Sears
de
Sears
Brands,
(Canada)
LLC
LLC
Brands,
LLC
?Sears
Brands,
LLC