1
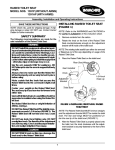
Service Manual
CLD
CYCLICAL LEVER DRIVE
(9000 WHEELCHAIRS)
WARNING
WARNING
W
A
R
N
I
N
G
DO NOT INSTALL THIS EQUIPMENT WITHOUT FIRST READING
AND UNDERSTANDING THIS MANUAL AND THE 9000
WHEELCHAIR OWNER'S MANUAL (PART NUMBER 1056953)
AND SERVICE MANUAL (PART NUMBER 1076155) . IF YOU ARE
UNABLE TO UNDERSTAND THE WARNINGS, CAUTIONS, AND
INSTRUCTIONS, CONTACT A HEALTHCARE PROFESSIONAL,
DEALER OR TECHNICAL PERSONNEL IF APPLICABLE BEFORE
ATTEMPTING TO USE THIS EQUIPMENT - OTHERWISE INJURY OR
DAMAGE MAY RESULT.
THE PROCEDURES IN THIS MANUAL MUST BE PERFORMED BY A
QUALIFIED TECHNICIAN.
SAVE THESE INSTRUCTIONS
2
CONTENTS
TABLE OF CONTENTS
SAFETY SUMMARY ................................................................................................................................ 4
MAINTENANCE ....................................................................................................................................... 4
PROCEDURE 1 - ASSEMBLY .................................................................................................................. 5
ASSEMBLIES .......................................................................................................................................... 5
TOOLS NEEDED ..................................................................................................................................... 5
PROCEDURE 2 - FORK ASSEMBLY ....................................................................................................... 6
INSTALLING CLD ON EXISTING WHEELCHAIR ...................................................................................... 6
REPLACING CLD FORK ASSEMBLY ....................................................................................................... 6
REMOVING FORK AND CASTER ............................................................................................................ 6
MOUNTING CASTER TO CLD FORK ASSEMBLY .................................................................................... 7
INSTALLING CLD FORK ASSEMBLY ONTO WHEELCHAIR ..................................................................... 7
PROCEDURE 3 - REAR WHEEL/TRANSMISSION ................................................................................... 8
INSTALLING CLD ON EXISTING WHEELCHAIR ...................................................................................... 8
REPLACING THE HUB ATTACHMENT ..................................................................................................... 8
REPLACING THE TRANSMISSION .......................................................................................................... 8
REMOVING EXISTING WHEEL LOCK ..................................................................................................... 8
REMOVING THE EXISTING REAR WHEEL ............................................................................................. 9
INSTALLING/REMOVING REAR WHEEL TO/FROM TRANSMISSION REAR HUB .................................... 9
INSTALLING/REMOVING THE HUB SUPPORT PLATES .......................................................................... 9
INSTALLING/REMOVING THE AXLE BOLT ............................................................................................ 10
PROCEDURE 4 - DRIVE ARM/SUPPORT BRACKET ............................................................................. 11
INSTALLING CLD ON EXISTING WHEELCHAIR .................................................................................... 11
REPLACING SUPPORT BRACKET ........................................................................................................ 11
REPLACING DRIVE ARM ASSEMBLY ................................................................................................... 11
MOUNTING/REMOVING SUPPORT BRACKET TO/FROM WHEELCHAIR .............................................. 11
REMOVING/INSTALLING SUPPORT BRACKET TO/FROM DRIVE ARM ASSEMBLY .............................. 12
INSTALLING/REMOVING DRIVE ARM ASSEMBLY TO/FROM TRANSMISSION ..................................... 13
INSTALLING/REMOVING DRIVE ARM .................................................................................................. 13
ADJUSTING DRIVE ARM RELEASE LEVER/BRACKET RELEASE LEVER ............................................ 14
ADJUSTING DRIVE ARM HEIGHT ......................................................................................................... 14
PROCEDURE 5 - WHEEL LOCK ........................................................................................................... 16
INSTALLING CLD ON EXISTING WHEELCHAIR .................................................................................... 16
REPLACING THE CLD WHEEL LOCK ................................................................................................... 16
INSTALLING/REMOVING THE CLD WHEEL LOCK ................................................................................ 16
ADJUSTING WHEEL LOCK ASSEMBLY POSITION ............................................................................... 16
ADJUSTING WHEEL LOCK ENGAGEMENT POSITION ......................................................................... 17
PROCEDURE 6 - STEERING LINK ........................................................................................................ 19
INSTALLING CLD ON EXISTING WHEELCHAIR .................................................................................... 19
REPLACING THE STEERING LINK ........................................................................................................ 19
CONNECTING/REMOVING STEERING LINK TO/FROM FORK .............................................................. 19
ADJUSTING CASTER AND DRIVE ARM ALIGNMENT ............................................................................ 19
REMOVING/INSTALLING STEERING LINK ............................................................................................ 21
PROCEDURE 7 - FRONT RIGGING ....................................................................................................... 22
INSTALLING CLD FRONT RIGGING RELEASE HANDLE ....................................................................... 22
LIMITED WARRANTY ............................................................................................................................ 23
3
C
O
N
T
E
N
T
S
SAFETY SUMMARY/MAINTENANCE
SAFETY SUMMARY
S
A
F
E
T
Y
S
U
M
M
A
R
Y
NOTE: Refer to the 9000 Wheelchair Owner's Manual, Part Number 1056953 and Service Manual, Part Number
1076155 for additional safety information and overall maintenance requirements.
STABILITY WARNINGS
CLD installation may require changes to the current configuration of the wheelchair with respect to
rear wheel and caster size. The back height, front caster size and/or position, seat-to-floor angle,
position and/or size of the rear wheels, correct anti-tipper as well as the end user's disability or end user's
physical condition and capabilities directly relate to the stability of the wheelchair. Any change to one
(1) or any combination of the ten (10) may cause the wheelchair to decrease in stability. These adjustments MUST be performed by a qualified technician.
Seat-to-floor heights have specific positions depending on rear wheel size, rear wheel position, front
caster position and seat-to-floor angle. These adjustments MUST be performed by a qualified technician.
If changing the seat-to-floor height with or without changing the rear wheel size, the correct anti-tippers
MUST be ordered to maintain a 1-1/2 to 2-inch ground clearance. Refer to the 9000 wheelchair owner's
manual , part number 1056953.
INSTALLATION WARNINGS
CLD installation MUST be performed on the side of the wheelchair specified when ordered.
GENERAL WARNINGS
After any adjustments, repair or service and before use, make sure all attaching hardware is tightened
securely - otherwise injury or damage may result.
When installing the CLD onto 9000 wheelchairs with specific measurements, the wheelchairs MUST be
equipped with the space saver arms. Refer to the chart on page 6 for specific measurements.
DO NOT operate the CLD on hills or inclines.
The weight limitation for the CLD is 250 lbs.
M
A
I
N
T
E
N
A
N
C
E
MAINTENANCE
EVERY THREE (3) MONTHS
®
Place a drop of oil on all linkage points (3-in-1 oil or equivalent).
Inspect and tighten bolts if loosened.
Clean chrome components with a soft cloth.
ANNUALLY
The CLD should be inspected by a qualified technician.
3-in-1 oil - Registered trademark of American Home Products Corporation.
4
ASSEMBLY
PROCEDURE 1
Wheelchairs Built AFTER 09/05/00
1. Transmission and Wheel Lock
2. Drive Arm Assembly, Support Bracket and Steering
Link
3. Upper Drive Arm
4. Fork Assembly
5. Rear Wheel Mounting Hardware
This Procedure includes the following:
Assemblies
Tools Needed
NOTE: The procedures in this manual should be performed on the specific side of the wheelchair the CLD
was ordered for.
TOOLS NEEDED
ASSEMBLIES (FIGURE 1)
NOTE: Have the following tools available.
The Cyclical Lever Device (CLD) consists of several assemblies shown in FIGURE 1 and described on this page.
For proper installation follow INSTALLING CLD ON EXISTING WHEELCHAIR in PROCEDURES 1-6 and perform PROCEDURE 7.
Torque Wrench
7/16-inch Socket or Box Wrench
7/16-inch Open End Wrench
1/2-inch Socket or Box Wrench
11/16-inch Socket or Box Wrench
3/4-inch Socket or Box Wrench
5/32 Hex Key
3/16 Hex Key
No. 1 Phillips Screw Driver
*M13 Socket or Box Wrench - Wheelchairs Built
BEFORE 09/05/00 ONLY
6MM Hex Key - Wheelchairs Built BEFORE 09/05/00
ONLY
The following five (5) items are included in each kit. Each
numbered line represents a complete assembly;
Wheelchairs Built BEFORE 09/05/00 1. Hub Attachment, Transmission and Wheel Lock
2. Drive Arm Assembly, Support Bracket, and Steering
Link
3. Drive Arm
4. Fork Assembly
5. Front Rigging Release Handle
*And adjustable wrench can be used in place of the M13
wrench.
Wheelchairs Built BEFORE 09/05/00
Drive Arm Assembly
Wheelchairs Built AFTER 09/05/00
Drive Arm Assembly
Drive
Arm
Transmission
Transmission
Upper
Drive
Arm
Support
Bracket
Hub
Attachment
Support
Bracket
Hub
Attachment
(Rear Wheel
Mounting
Hardware)
Wheel Lock
Steering Link
NOTE: Right side final assembly shown.
Fork
Assembly
Wheel Lock
Steering Link
NOTE: Right side final assembly shown.
FIGURE 1 - ASSEMBLIES
5
Fork
Assembly
A
S
S
E
M
B
L
Y
PROCEDURE 2
1. Remove the caster journal cap.
2. Remove the hex nut securing the fork to the caster
headtube.
3. Drop the caster and fork out of the caster headtube.
4. Remove the caster from the fork. Refer to REMOVING CASTER in this procedure of the Owner's Manual.
WARNING
Removing Caster
After any adjustments, repair or service and before use, make sure all attaching hardware is tightened securely - otherwise injury or damage may
result.
1. Remove the hex screw, washers and locknut securing the caster to the fork.
NOTE: Save the hex screw, washers and locknut for
installation on NEW fork.
INSTALLING CLD ON EXISTING
WHEELCHAIR
REMOVING EXISTING FORK
Dust Cover
1. Remove the EXISTING fork and caster. Refer to
REMOVING FORK AND CASTER in this procedure
of the manual.
Locknut
2. Mount the EXISTING caster onto the NEW CLD fork
assembly. Refer to MOUNTING CASTER TO CLD
FORK ASSEMBLY in this procedure of the manual.
Caster Headtube
3. Install the NEW CLD fork assembly (with the EXISTING caster) onto the wheelchair, Refer to INSTALLING CLD FORK ASSEMBLY ONTO WHEELCHAIR
in this procedure of the manual.
Front Caster
and Fork
REPLACING CLD FORK ASSEMBLY
REMOVING CLD FORK
1. Removing the EXISTING CLD fork and caster. Refer to REMOVING FORK AND CASTER in this procedure of the manual.
Caster
Journal
Cap
Caster
Headtube
2. Mount the EXISTING caster onto the NEW CLD Fork
Assembly. Refer to MOUNTING CASTER TO CLD
FORK ASSEMBLY in this procedure of the manual.
○
3. Install the NEW CLD fork assembly (with the EXISTING caster) onto the wheelchair, Refer to INSTALLING CLD FORK ASSEMBLY ONTO WHEELCHAIR
in this procedure of the manual.
○
Hex Nut
○
A
S
S
E
M
B
L
Y
Removing CLD Fork
This Procedure includes the following:
Installing CLD on Existing Wheelchair
Replacing CLD Fork Assembly
Removing Fork and Caster
Mounting Caster to CLD Fork Assembly
Installing CLD Fork Assembly onto Wheelchair
○
F
O
R
K
FORK ASSEMBLY
Fork
REMOVING FORK AND CASTER
(FIGURE 1)
REMOVING CASTER
EXISTING FORK
Removing Existing Fork
Front
Caster
1. Remove the dust cover.
2. Remove locknut that secures fork to caster headtube.
3. Drop front caster and fork out of caster headtube.
Fork
CLD FORK
Fork
Locknut
4. Remove the caster from the fork. Refer to REMOVING CASTER in this procedure of the Owner's Manual.
Hex
Screw
Hex
Screw
Front
Caster
Washers
FIGURE 1 - REMOVING FORK AND CASTER
6
FORK ASSEMBLY
PROCEDURE 2
MOUNTING CASTER TO CLD FORK
ASSEMBLY (FIGURE 2)
1. Refer to the chart below to determine which mounting position should be used.
2. Secure the caster to the CLD fork assembly in the
mounting position determined in STEP 1 with the hex
head bolt, washers and the hex nut as shown in FIGURE 2. Tighten securely.
WARNING
If not changing the wheelchair's current configuration (seat angle, caster size or seat-to-floor
height), refer to the chart below to determine
the caster and/or rear wheel mounting positions.
If changing the wheelchair's current configuration
(seat angle, caster size or seat-to-floor height), refer to the 9000 Wheelchair Service Manual, Part
Number 1076155.
CLD Fork
Assembly
Hex
Screw
When installing the CLD onto 9000 wheelchairs with
specific measurements, the wheelchairs MUST be
equipped with the space saver arms. Refer to the
chart below for specific measurements.
Hex Nut
Washers
FIGURE 2 - MOUNTING CASTER TO CLD FORK
ASSEMBLY
Caster Size
6
6
6
6
8
8
8
8
Seat-to-floor
15.5
16.5
17.5
17.5
17.5
17.5
18.5
19.5
9000 WHEELCHAIRS
Caster Mounting Position Rear Wheel Size
Top
20
Middle
22
Bottom
24
Bottom
20
Top
20
Top
24
Middle
22
Bottom
24
Rear Wheel Position
*Top
*Top
*Top
Bottom
Bottom
*Top
Bottom
Bottom
*Space Saver Arms required for 9000 wheelchairs.
NOTE: Measurements in the chart are in inches.
INSTALLING CLD FORK ASSEMBLY
ONTO WHEELCHAIR (FIGURE 3)
CLD Fork Stem
1. Remove the hex nut from the CLD fork stem.
Caster
Journal
Cap
2. Insert the CLD fork stem into the caster headtube.
3. Secure the CLD fork assembly to the caster headtube
with the hex nut.
Hex Nut
NOTE: DO NOT overtighten the hex nut. The CLD fork
should turn freely with no side to side play.
Caster
Headtube
4. Install the caster journal cap onto the caster headtube.
Fork
FIGURE 3 - INSTALLING CLD FORK ASSEMBLY
ONTO WHEELCHAIR
7
F
O
R
K
A
S
S
E
M
B
L
Y
PROCEDURE 3
R
E
A
R
W
H
E
E
L
REAR WHEEL/TRANSMISSION
4. Install the NEW hub support plates. Refer to INSTALLING/REMOVING THE HUB SUPPORT
PLATES in this procedure of the manual.
This procedure includes the following:
Installing CLD on Existing Wheelchair
Replacing the Hub Attachment
Replacing the Transmission
Removing Existing Wheel Lock
Removing the Existing Rear Wheel
Installing/Removing Rear Wheel to/from
Transmission Rear Hub
Installing/Removing the Hub Support Plates
Installing/Removing the Axle Bolt
REPLACING THE TRANSMISSION
1. Remove the EXISTING drive arm assembly from the
transmission rear hub. Refer to INSTALLING/REMOVING DRIVE ARM ASSEMBLY TO/FROM TRANSMISSION LEVER in PROCEDURE 4 of the manual.
2. Remove the EXISTING hub support plates. Refer to
INSTALLING/REMOVING THE HUB SUPPORT
PLATES in this procedure of the manual.
3. Remove the EXISTING axle bolt. Refer to INSTALLING/REMOVING THE AXLE BOLT in this procedure
of the manual.
WARNING
After ANY adjustments, repair or service and BEFORE use, make sure all attaching hardware is
tightened securely - otherwise injury or damage
may result.
4. Remove the EXISTING rear wheel from the transmission rear hub. Refer to INSTALLING/REMOVING REAR WHEEL TO/FROM THE TRANSMISSION REAR HUB in this procedure of the manual.
INSTALLING CLD ON EXISTING
WHEELCHAIR
5. Remove the EXISTING wheel lock. Refer to INSTALLING/REMOVING CLD WHEEL LOCK TO/FROM
TRANSMISSION in this procedure of the manual.
1. Remove the EXISTING wheel lock. Refer to REMOVING EXISTING WHEEL LOCK in this procedure of
the manual.
T
R
A
N
S
M
I
S
S
I
O
N
6. Install EXISTING or NEW wheel lock onto NEW rear
transmission hub. Refer to INSTALLING/REMOVING
CLD WHEEL LOCK TO/FROM TRANSMISSION
in this procedure of the manual.
2. Remove the EXISTING rear wheel. Refer to REMOVING THE EXISTING REAR WHEEL in this procedure of the manual.
7. Reinstall the EXISTING rear wheel onto the NEW
transmission rear hub. Refer to INSTALLING/REMOVING REAR WHEEL TO/FROM THE TRANSMISSION REAR HUB in this procedure of the manual.
3. Install the EXISTING rear wheel onto the transmission rear hub. Refer to INSTALLING/REMOVING
REAR WHEEL TO/FROM THE TRANSMISSION
REAR HUB in this procedure of the manual.
8. Reinstall the EXISTING hub support plates. Refer to
INSTALLING/REMOVING THE HUB SUPPORT
PLATES in this procedure of the manual.
4. Install the hub support plates onto the EXISTING
rear wheel/transmission rear hub. Refer to INSTALLING/REMOVING THE HUB SUPPORT PLATES in
this procedure of the manual.
9. Reinstall the EXISTING axle bolt. Refer to INSTALLING/REMOVING THE AXLE BOLT in this procedure
of the manual.
5. Install the EXISTING rear wheel/transmission rear
hub BACK onto the wheelchair. Refer to INSTALLING/REMOVING THE AXLE BOLT in this procedure
of the manual.
10. Reinstall the EXISTING drive arm assembly onto the
NEW transmission lever. Refer to INSTALLING/REMOVING DRIVE ARM ASSEMBLY TO/FROM TRANSMISSION LEVER in PROCEDURE 4 of the manual.
REPLACING THE HUB ATTACHMENT
NOTE: The hub attachment consists of the hub support
plates and the axle bolt.
REMOVING EXISTING WHEEL LOCK
(FIGURE 1)
1. Remove the EXISTING hub support plates. Refer to
INSTALLING/REMOVING THE HUB SUPPORT
PLATES in this procedure of the manual.
1. Remove the locknut and bolt securing the wheel lock
to the wheelchair frame.
2. Remove the wheel lock from the wheelchair frame.
2. Remove the EXISTING axle bolt. Refer to INSTALLING/REMOVING THE AXLE BOLT in this procedure
of the manual.
3. Install the NEW axle bolt. Refer to INSTALLING/REMOVING THE AXLE BOLT in this procedure of the manual.
8
PROCEDURE 3
REAR WHEEL/TRANSMISSION
Bolt and Locknut
Wheelchair
Frame
Axle Mounting Positions
Wheelchair
Frame
Axle Spacer
(Conventional
Arms Only)
QuickRelease Axle
Wheel
Lock
Rear Wheel
FIGURE 1 - REMOVING EXISTING WHEEL LOCK
FIGURE 3 - REMOVING THE EXISTING REAR
WHEEL - QUICK-RELEASE AXLES
REMOVING THE EXISTING REAR
WHEEL
1. Note the mounting position on the wheelchair frame
for proper reinstallation of the rear wheel.
Installing
1. Position rear wheel hub spokes in slots on transmission rear hub.
2. Slide NEW axle bolt through rear wheel bearing.
3. Install hub support plates. Refer to INSTALLING/REMOVING THE HUB SUPPORT PLATES in this procedure of the manual.
Removing
1. If necessary, remove the three (3) hub support plates.
Refer to INSTALLING/REMOVING THE HUB SUPPORT PLATES in this procedure of the manual.
2. Remove axle bolt. Refer to INSTALLING/REMOVING THE AXLE BOLT in this procedure of the manual.
3. Pull the rear wheel hub spokes off transmission rear
hub.
2. Remove dust cap (if applicable), mounting screw and
locknut that secure the rear wheel and axle spacer
(if applicable) to the wheelchair.
NOTE: Axle spacer is used only if wheelchair is equipped
with conventional arms.
Rear
Wheel
Locknut
Axle Mounting
Positions
Mounting
Screw
Dust Cap
W
H
E
E
L
INSTALLING/REMOVING REAR
WHEEL TO/FROM TRANSMISSION
REAR HUB (FIGURE 4)
Permanent Axles (FIGURE 2)
Wheelchair Frame
R
E
A
R
Axle Spacer
(Conventional Arms Only)
INSTALLING/REMOVING THE HUB
SUPPORT PLATES (FIGURE 4)
FIGURE 2 - REMOVING THE EXISTING REAR
WHEEL - PERMANENT AXLES
Installing
1. Align mounting holes in transmission rear hub with
holes in hub support plates.
2. Secure three (3) hub support plates to rear wheel
hub with three (3) pan head screws. Tighten securely.
Removing
1. Remove the three (3) pan head screws securing the
three (3) hub support plates to transmission rear hub.
2. Remove hub support plates.
Quick-Release Axles (FIGURE 3)
1. Push in the tip of the quick-release axle (with wheel)
and pull the axle out through the opening in the center of the rear wheel and axle spacer.
NOTE: The axle spacer is used only if wheelchair is
equipped with conventional arms.
2. Push in the tip of the quick release axle again and
pull the axle out of the rear wheel.
9
T
R
A
N
S
M
I
S
S
I
O
N
PROCEDURE 3
REAR WHEEL/TRANSMISSION
INSTALLING/REMOVING THE AXLE
BOLT (FIGURE 4)
R
E
A
R
W
H
E
E
L
4. Secure axle bolt to wheelchair side frame with hex
nut. Tighten securely.
Removing
1. Remove hex nut securing axle bolt to wheelchair side
frame.
2. Remove axle bolt from wheelchair side frame.
3. Remove inner hub spacer, axle washer and outer hub
spacer from axle bolt.
4. Remove axle bolt from rear wheel bearing.
Installing
1. If necessary, install rear wheel onto transmission rear
hub. Refer to INSTALLING/REMOVING THE REAR
WHEEL TO/FROM THE TRANSMISSION REAR
HUB in this procedure of the manual.
2. Insert axle bolt through rear wheel bearing.
3. Slide inner hub spacer, axle washer and outer hub
spacer over axle bolt.
Wheelchairs Built BEFORE 09/05/00
Wheelchair
Side Frame
Outer
Hub
Spacer
Axle Washer
Rear Wheel
Hub Spokes
Hex Nut
Rear Wheel
Bearing
T
R
A
N
S
M
I
S
S
I
O
N
Transmission
Assembly
Axle Bolt
Inner Hub Spacer
Transmission Rear Hub Slot
Pan Head Screw
Hub Support Plate Transmission Rear Hub
Wheelchairs Built AFTER 09/05/00
Rear Wheel
Hub Spokes
Axle Washer
Wheelchair
Side Frame
Outer
Hub
Spacer
Hex Nut
Rear Wheel
Bearing
Transmission
Assembly
Axle Bolt
Inner Hub Spacer
Transmission Rear Hub Slot
Pan Head Screw
Hub Support Plate
Transmission Rear Hub
FIGURE 4 - INSTALLING/REMOVING REAR WHEEL TO/FROM TRANSMISSION REAR HUB INSTALLING/REMOVING THE HUB SUPPORT PLATES - INSTALLING/REMOVING THE AXLE BOLT
10
DRIVE ARM/SUPPORT BRACKET
PROCEDURE 4
4. Install the NEW support bracket onto the wheelchair.
Refer to MOUNTING/REMOVING SUPPORT
BRACKET TO WHEELCHAIR in this procedure of
the manual.
This procedure includes the following:
Installing CLD on Existing Wheelchair
Replacing Support Bracket
Replacing Drive Arm Assembly
Mounting/Removing Support Bracket To/From
Wheelchair
Removing/Installing Support Bracket To/From
Drive Arm Assembly
Installing/Removing Drive Arm Assembly To/From
Transmission
Installing/Removing Drive Arm
Adjusting Drive Arm Release Lever/Bracket
Release Lever
Adjusting Drive Arm Height
REPLACING DRIVE ARM ASSEMBLY
WARNING
After ANY adjustments, repair or service and BEFORE
use, make sure all attaching hardware is tightened
securely - otherwise injury or damage may result.
INSTALLING CLD ON EXISTING
WHEELCHAIR
1. Mount the support bracket onto the wheelchair. Refer
to MOUNTING/REMOVING SUPPORT BRACKET
TO WHEELCHAIR in this procedure of the manual.
2. Install the drive arm assembly onto the transmission.
Refer to INSTALLING/REMOVING DRIVE ARM
ASSEMBLY TO/FROM TRANSMISSION in this procedure of the manual.
3. Install the drive arm. Refer to INSTALLING/REMOVING DRIVE ARM in this procedure of the manual.
4. Adjust the drive arm release lever. Refer to ADJUSTING DRIVE ARM RELEASE LEVER in this procedure
of the manual.
5. Adjust the drive arm height. Refer to ADJUSTING
DRIVE ARM HEIGHT in this procedure of the manual.
REPLACING SUPPORT BRACKET
1. Remove the EXISTING support bracket from the
wheelchair. Refer to MOUNTING/REMOVING SUPPORT BRACKET TO WHEELCHAIR in this procedure of the manual.
2. Remove the EXISTING support bracket from drive
arm assembly. Refer to REMOVING/INSTALLING
SUPPORT BRACKET TO/FROM DRIVE ARM ASSEMBLY in this procedure of the manual.
1. Remove the EXISTING support bracket. Perform
STEPS 5-6 in REMOVING/INSTALLING SUPPORT
BRACKET TO/FROM DRIVE ARM ASSEMBLY in
this procedure of the manual.
2. Remove the EXISTING steering link. Refer to REMOVING/INSTALLING STEERING LINK in PROCEDURE 6 of the manual.
3. Remove the EXISTING drive arm assembly from the
transmission. Refer to INSTALLING/REMOVING
DRIVE ARM ASSEMBLY TO/FROM TRANSMISSION
in PROCEDURE 6 of the manual.
4. Reinstall the EXISTING steering link. Refer to REMOVING/INSTALLING STEERING LINK in PROCEDURE 6 of the manual.
5. Reinstall the EXISTING support bracket onto the NEW
drive arm assembly. Perform STEPS 1, 2 AND 4 in
REMOVING/INSTALLING SUPPORT BRACKET TO/
FROM DRIVE ARM ASSEMBLY in this procedure of
the manual.
6. Install the NEW drive arm assembly onto the transmission. Refer to INSTALLING/REMOVING DRIVE
ARM ASSEMBLY TO/FROM TRANSMISSION in
this procedure of the manual.
MOUNTING/REMOVING SUPPORT
BRACKET TO/FROM WHEELCHAIR
(FIGURE 1)
Mounting
1. Secure the bottom clamp and the spacer plate to
the wheelchair and the support bracket with the two
(2) flat screws as shown in FIGURE 1. Torque to 7
ft./lb. (84 in./lb.).
2. Secure the 1 inch clamp to the wheelchair and the
support bracket with the two (2) hex screws, flat washers and hex nuts. Torque to 7 ft./lb. (84 in./lb.).
Removing
1. Remove the two (2) flat head screws securing the
bottom clamp and the spacer plate to the wheelchair.
2. Remove the two (2) hex screws, washers and hex
nuts securing the 1-inch clamp to the wheelchair.
3. Install the NEW support bracket onto drive arm assembly. Refer to REMOVING/INSTALLING SUPPORT BRACKET TO/FROM DRIVE ARM ASSEMBLY in this procedure of the manual.
11
D
R
I
V
E
A
R
M
S
U
P
P
O
R
T
B
R
A
C
K
E
T
PROCEDURE 4
DRIVE ARM/SUPPORT BRACKET
Wheelchairs Built BEFORE 09/05/00
REMOVING/INSTALLING SUPPORT
BRACKET TO/FROM DRIVE ARM
ASSEMBLY (FIGURE 2)
Drive Arm
Assembly
D
R
I
V
E
Wheelchair
Side Frame
Removing
Flat
Washer
Hex
Nut
1. Remove the locknut securing the drive arm assembly
bolt to the support bracket.
NOTE: DO NOT remove the drive arm assembly bolt,
spacer or washer from the drive arm assembly when
removing it from the support bracket.
Flat
Screw
A
R
M
2. Remove the drive arm assembly, including the drive
arm assembly bolt, spacer and washer from the support bracket.
3. Remove the support bracket.
Spacer
Plate
Support
Bracket
Hex
Screws
S
U
P
P
O
R
T
1-inch Clamp
Installing
1. Insert the drive arm assembly bolt, including the drive
arm assembly bolt, spacer and washer, through the
mounting hole in the support bracket.
2. Securely tighten locknut on drive arm assembly bolt.
Drive Arm Assembly
Bottom
Clamp
Wheelchair
Frame
Wheelchairs Built AFTER 09/05/00
Drive Arm
Assembly
Locknut
Wheelchair
Side Frame
B
R
A
C
K
E
T
Flat
Washer
Hex
Nut
Hex
Screws
Bolt
(DO NOT
remove)
Spacer
(DO NOT
Remove)
Flat
Screw
Bottom
Clamp
Mounting
Hole
Support Bracket
FIGURE 2 - REMOVING/INSTALLING SUPPORT
BRACKET TO/FROM DRIVE ARM ASSEMBLY
Spacer
Plate
1-inch Clamp
Washer
(DO NOT
Remove)
Support
Bracket
FIGURE 1 - MOUNTING/REMOVING SUPPORT
BRACKET TO/FROM WHEELCHAIR
12
DRIVE ARM/SUPPORT BRACKET
PROCEDURE 4
INSTALLING/REMOVING DRIVE
ARM ASSEMBLY TO/FROM
TRANSMISSION (FIGURE 3)
INSTALLING/REMOVING DRIVE
ARM (FIGURE 4)
Installing
WHEELCHAIRS BUILT BEFORE 09/05/00.
1. Secure the drive arm assembly to the transmission
lever and wheel lock support bracket with hex screw,
two (2) fender washers, shifter spacer and hex nut.
Tighten securely.
1. Loosen, but DO NOT remove the drive arm release
lever by rotating COUNTERCLOCKWISE.
Removing
3. Insert the drive arm into the plunger extension tube.
1. Remove the hex nut securing the hex screw to the
transmission lever.
4. Secure the drive arm to the plunger extension tube
by turning the drive arm release lever CLOCKWISE.
Tighten securely.
Installing
2. Remove the hex screw, fender washers and shifter
spacer from the transmission lever.
Wheelchairs Built BEFORE 09/05/00
Wheelchair
Wheel
Side Frame
Lock
Support
Bracket
Fender
Hex Nut
Washers
2. Rotate the drive arm to align the flat surface on the
drive arm with the drive arm release lever.
1. Remove the button screw located on the drive arm.
2. Align one (1) of the two (2) mounting holes in the
plunger tube with the button screw mounting hole in
the drive arm
3. Install the button screw into the drive arm and plunger
tube mounting hole to secure the drive arm to the
plunger tube. Tighten securely.
WHEELCHAIRS BUILT BEFORE 09/05/00.
Drive Arm
Assembly
Transmission
Lever
Shifter
Spacer
Wheelchairs Built AFTER 09/05/00
Wheel
Wheelchair
Lock
Side Frame
Support
Bracket
Fender
Washers
1. Loosen, but DO NOT remove the drive arm release
lever by rotating COUNTERCLOCKWISE.
2. Lift up on the drive arm to remove.
WHEELCHAIRS BUILT AFTER 09/05/00.
1. Remove the button screw located on the drive arm.
2. Lift up on the drive arm to remove.
Hex Nut
Hex
Screw
Transmission
Lever
Drive Arm
Assembly
A
R
M
WHEELCHAIRS BUILT AFTER 09/05/00.
Removing
Hex Screw
D
R
I
V
E
Shifter
Spacer
FIGURE 3 - INSTALLING/REMOVING DRIVE ARM
ASSEMBLY TO/FROM TRANSMISSION
13
S
U
P
P
O
R
T
B
R
A
C
K
E
T
PROCEDURE 4
DRIVE ARM/SUPPORT BRACKET
Wheelchairs Built BEFORE 09/05/00
D
R
I
V
E
Drive Arm
Flat
Surface
A
R
M
Plunger
Extension
Tube
Drive Arm
Release
Lever
Bracket
Release
Lever
Button
ADJUSTING DRIVE ARM RELEASE
LEVER/BRACKET RELEASE LEVER
(FIGURE 4)
NOTE: Wheelchair built BEFORE 09/05/00 are equipped
with a drive arm release lever AND a bracket release
elver, wheelchairs built AFTER 09/05/00 are equipped
with a bracket release lever ONLY.
NOTE: The drive arm release lever/ bracket release lever can be rotated to keep it from protruding from the
drive arm.
1. Depress and hold the button on the drive arm release lever/bracket release lever.
2. Rotate the drive arm release lever/bracket release
lever to the desired position.
3. Release the button to lock in place.
ADJUSTING DRIVE ARM HEIGHT
(FIGURE 5)
1. Remove the button screw located on the drive arm.
2. Lift up on the drive arm to expose the plunger tube.
S
U
P
P
O
R
T
B
R
A
C
K
E
T
Wheelchairs Built AFTER 09/05/00
NOTE: Wheelchairs built BEFORE 09/05/00 have three
(3) mounting holes in the plunger tube and wheelchairs
built AFTER 09/05/00 have two (2) mounting holes in
the plunger tube.
3. Align one (1) of the two (2) (or three (3)) mounting
holes in the plunger tube with the button screw mounting hole on the drive arm.
Button
Screw
Drive Arm
Mounting
Hole (NOT
Shown)
4. Install the button screw into the drive arm and plunger
tube mounting hole to secure the drive arm to the
plunger tube. Tighten securely.
Mounting Holes
Plunger
Tube
Button
Bracket
Release
Lever
FIGURE 4 - INSTALLING/REMOVING DRIVE ARM
- ADJUSTING DRIVE ARM RELEASE LEVER/
BRACKET RELEASE LEVER
14
DRIVE ARM/SUPPORT BRACKET
PROCEDURE 4
Wheelchairs Built BEFORE 09/05/00
Wheelchairs Built AFTER 09/05/00
Drive Arm
Button
Screw
Drive Arm
Button
Screw
Mounting
Hole (NOT
Shown)
Mounting
Hole
D
R
I
V
E
A
R
M
Plunger
Tube
Plunger
Tube
Mounting
Hole
FIGURE 5- ADJUSTING DRIVE ARM HEIGHT
S
U
P
P
O
R
T
B
R
A
C
K
E
T
15
PROCEDURE 5
W
H
E
E
L
L
O
C
K
WHEEL LOCK
ADJUSTING WHEEL LOCK
ASSEMBLY POSITION (FIGURE 2)
This procedure includes the following:
Installing CLD on Existing Wheelchair
Replacing the CLD Wheel Lock
Installing/Removing CLD Wheel Lock
Adjusting Wheel Lock Assembly Position
Adjusting Wheel Lock Engagement Position
NOTE: If wheels are pneumatic, before adjusting the
wheel lock, ensure that the tires are inflated to the recommended psi located on the side wall of the tire.
1. Refer to the chart on this page to determine the mounting position of the two (2) flat screws securing the wheel
lock adjustment rod to the wheel lock support bracket.
WARNING
After ANY adjustments, repair or service and BEFORE use, make sure all attaching hardware is
tightened securely - otherwise injury or damage
may result.
2. Secure wheel lock adjustment rod to the wheel lock
support bracket with the two (2) flat screws. Tighten
securely.
FRONT VIEW OF TRANSMISSION SUPPORT
BRACKET
INSTALLING CLD ON EXISTING
WHEELCHAIR
Wheelchairs Built BEFORE 09/05/00
1. Adjusting the wheel lock assembly position. Refer to
ADJUSTING WHEEL LOCK ASSEMBLY POSITION in this procedure of the manual.
2. Adjust the wheel lock engagement position. Refer
to ADJUSTING WHEEL LOCK ENGAGEMENT
POSITION in this procedure of the manual.
A
B
C
Wheel
Lock
Support
Bracket
Mounting
Holes
REPLACING THE CLD WHEEL LOCK
1. Remove the EXISTING CLD wheel lock. Refer to
INSTALLING/REMOVING THE CLD WHEEL LOCK
in this procedure of the manual.
Wheelchairs Built AFTER 09/05/00
Mounting
Holes
2. Install the NEW CLD wheel lock. Refer to INSTALLING/REMOVING THE CLD WHEEL LOCK in this
procedure of the manual.
Transmission
Support
Bracket
INSTALLING/REMOVING THE CLD
WHEEL LOCK (FIGURE 1)
Installing
1. Secure the wheel lock to the transmission support
bracket with the two (2) flat screws. Securely tighten.
Removing
1. Remove the two (2) flat screws securing the wheel
lock to the transmission support bracket.
2. Remove the wheel lock from the transmission support bracket.
Flat Screws
Wheel
Lock
Transmission
Bracket
FIGURE 1 - INSTALLING/REMOVING THE CLD
WHEEL LOCK
16
Mounting Hole Position for Flat Screws Wheelchairs Built BEFORE 09/05/00
Rear Wheel
Size
Hole-A
Hole-B
20
22
24
X
X
X
Hole-C
X
X
X
Mounting Hole Position for Flat Screws Wheelchairs Built AFTER 09/05/00
Rear Wheel
Size
Hole-A
Hole-B
20
22
24
X
X
X
Hole-C Hole-D
X
X
X
WHEEL LOCK
PROCEDURE 5
Wheelchairs Built BEFORE 09/05/00
Wheel Lock Adjustment Rod
Wheel
Lock
Support
Bracket
ADJUSTING WHEEL LOCK
ENGAGEMENT POSITION (FIGURE 3)
WARNING
The shift lever MUST be in the neutral position before
activating the wheel lock. Failure to do so can
cause accidental release and make it more difficult to disengage the wheel lock feature.
Flat Screws
Wheelchairs Built AFTER 09/05/00
Wheel Lock Adjustment Rod
Transmission
Support
Bracket
Flat Screws
FIGURE 2 - ADJUSTING WHEEL LOCK ASSEMBLY
POSITION
1. Place the shift lever in the neutral (center) position.
2. Perform one (1) of the following (DETAIL "A"):
A. HORIZONTAL POSITION - Perform the following:
i. Pull the knob on the wheel lock block OUT.
ii. Rotate the wheel lock block to the vertical position.
iii. Release the knob.
B. VERTICAL POSITION - Proceed to STEP 3.
3. Pull BACK on the drive arm until the wheel lock engages.
4. Ensure that there is a minimum of 1/4-inch engagement between the wheel lock block and the outside
edge of the rear tire (DETAIL "A").
5. If the engagement is less than 1/4-inch, perform the
following:
A. Push FORWARD on the drive arm to disengage
the wheel lock.
B. Loosen, but DO NOT remove the two (2) flat screws
securing the wheel lock adjustment rod.
C. Slide the wheel lock adjustment rod towards the
rear wheel.
D. Tighten the flat screws until secure.
E. Repeat STEPS 3-5 until there is a minimum of
1/4-inch engagement between the wheel lock block
and the outside edge of the rear tire.
17
W
H
E
E
L
L
O
C
K
PROCEDURE 5
WHEEL LOCK
Wheelchairs Built BEFORE 09/05/00
DETAIL "A"
W
H
E
E
L
L
O
C
K
Wheelchairs Built AFTER 09/05/00
Wheel Lock
Adjustment Rod
Drive
Arm
1/4-INCH
ENGAGEMENT
Wheel Lock
Adjustment Rod
DETAIL "A"
1/4-INCH
ENGAGEMENT
Outside
Edge of
Tire
Wheel
Lock
Block
Drive
Arm
Outside
Edge of
Tire
Wheel
Lock
Block
Flat
Screws
Flat
Screws
Shift Lever
Shift Lever
Rear Tire
Rear Tire
Knob
Knob
FIGURE 3- ADJUSTING WHEEL LOCK ENGAGEMENT POSITION
18
STEERING LINK
PROCEDURE 6
Removing
1. Compress and hold straight section of the fork spring
by pushing spring horizontally towards fork.
2. Pull up on the steering pin to remove from the fork.
This procedure includes the following:
Installing CLD on Existing Wheelchair
Replacing the Steering Link
Connecting/Removing Steering Link To/From Fork
Adjusting Caster and Drive Arm Alignment
Removing/Installing Steering Link
Steering Link
Steering Pin
(REMOVED)
WARNING
After ANY adjustments, repair or service and BEFORE
use, make sure all attaching hardware is tightened
securely - otherwise injury or damage may result.
Hole
Fork Spring
Straight Section
INSTALLING CLD ON EXISTING
WHEELCHAIR
Fork
1. Connect the steering link to the fork. Refer to CONNECTING/REMOVING THE STEERING LINK TO/
FROM THE FORK in this procedure of the manual.
2. Adjust the caster and drive arm alignment. Refer to
ADJUSTING CASTER AND DRIVE ARM ALIGNMENT in this procedure of the manual.
NOTE: Tracer wheelchair
shown for clarity.
FIGURE 1 - CONNECTING/REMOVING
STEERING LINK TO/FROM FORK
ADJUSTING CASTER AND DRIVE
ARM ALIGNMENT (FIGURE 2)
REPLACING THE STEERING LINK
1. Remove the EXISTING steering link from the fork. Refer
to CONNECTING/REMOVING THE STEERING LINK
TO/FROM THE FORK in this procedure of the manual.
2. Remove the existing steering link from the drive arm
assembly. Refer to REMOVING/INSTALLING
STEERING LINK in this procedure of the manual.
3. Install the NEW steering link onto the drive arm assembly. Refer to REMOVING/INSTALLING STEERING LINK in this procedure of the manual.
4. Connect the NEW steering link to the fork. Refer to
CONNECTING/REMOVING THE STEERING LINK
TO/FROM THE FORK in this procedure of the manual.
5. Adjust the caster and drive arm alignment. Refer to
ADJUSTING CASTER AND DRIVE ARM ALIGNMENT in this procedure of the manual.
CONNECTING/REMOVING STEERING
LINK TO/FROM FORK (FIGURE 1)
Connecting
1. Compress and hold the straight section of the fork spring
by pushing the spring horizontally towards the fork.
2. Insert the steering pin into the hole in the fork.
NOTE: It may be necessary to rotate the caster to align the
steering pin with the hole in the fork.
3. Release the straight section of the fork spring.
4. Ensure the spring has snapped into the groove on the
steering pin by lifting up on the steering link.
Aligning the Caster and Drive Arm
NOTE: The wheelchair should be on a flat surface when
examining the drive arm and caster alignment.
1. Position the drive arm so it is perpendicular to the
wheelchair frame.
2. Face the front of the wheelchair and examine the
caster and perform one (1) of the following:
A. CASTER POINTS STRAIGHT AHEAD - No adjustment is needed at this time.
B. CASTER POINTS TO INSIDE OF WHEELCHAIR- Steering link should be shortened. Continue to STEP 3.
C. CASTER POINTS TO OUTSIDE OF WHEELCHAIR - Steering link should be lengthened. Continue to STEP 3.
3. Remove the steering link from the fork. Refer to CONNECTING/REMOVING STEERING LINK TO/FROM
FORK in this procedure of the manual.
4. Loosen both steering link adjustment nuts.
5. Rotate the steering pin rod end to adjust the length
of the steering link.
Turning steering link:
CLOCKWISE - shortens the steering link.
COUNTERCLOCKWISE - lengthens the steering link.
6. Connect the steering link to the fork. Refer to CONNECTING/REMOVING STEERING LINK TO/FROM
FORK in this procedure of the manual.
19
S
T
E
E
R
I
N
G
L
I
N
K
PROCEDURE 6
S
T
E
E
R
I
N
G
L
I
N
K
STEERING LINK
7. Repeat STEPS 1-6 until the caster points straight
ahead.
8. Balance the steering link. Refer to BALANCING THE
STEERING LINK in this procedure of the manual.
Balancing the Steering Link
NOTE: The steering link MUST be balanced to ensure it
is properly secured to the rod ends.
1. Remove the steering link from the fork. Refer to CONNECTING/REMOVING STEERING LINK TO/FROM
FORK in this procedure of the manual.
2. Rotate the steering link adjustment nuts until they
are against the steering link as shown in FIGURE 2.
DO NOT tighten
3. Perform the following steps. Refer to CHART A for
an example of thread calculation.
A. Count the number of drive arm threads and steering pin threads between the rod ends and the
steering link.
B. Divide the number of threads determined in
STEP A in half.
C. Rotate the steering pin rod end and the steering
link until only the number of threads determined
STEP B are showing at each end.
4. Securely tighten both steering link adjustment nuts
against the steering link.
5. Connect the steering pin to the fork. Refer to CONNECTING/REMOVING STEERING LINK TO/FROM
FORK in this procedure of the manual.
ALIGNING THE CASTER AND DRIVE ARM
Steering Link
Adjustment
Nuts
Drive
Arm
Steering
Pin Rod
End
Steering Pin
(INSTALLED)
Drive
Arm
Rod
End
Steering Link
Front Caster
BALANCING THE STEERING LINK
Drive Arm
Rod End
Steering Link Adjustment Nuts
Steering Pin Rod End
CHART A - THREAD CALCULATION
Step
Steering Link
Steering Pin
Threads
Drive Arm Threads
NOTE: Threads are enlarged for clarity.
3A
3A
3B
3C
Description
Number
Drive Arm Threads
Steering Pin Threads
Total Number of Threads
Divide in Half
FIGURE 2 - ADJUSTING CASTER AND DRIVE ARM ALIGNMENT
20
5
6
11
5.5
STEERING LINK
PROCEDURE 6
Installing
REMOVING/INSTALLING STEERING
LINK (FIGURE 3)
1. Install the NEW rod end into the bracket at the bottom of the drive arm assembly.
Removing
1. Remove the locknut and washer securing the rod
end of the steering link to the bracket at the bottom
of the drive arm assembly.
2. Secure the new rod end to the drive arm assembly
bracket with the washer and locknut. Tighten securely.
2. Remove the rod end from the drive arm assembly.
Rod End
Drive Arm
Assembly
Bracket
Drive
Arm
Assembly
S
T
E
E
R
I
N
G
L
I
N
K
Steering Link
Washer
Locknut
FIGURE 3 - REMOVING/INSTALLING STEERING LINK
21
PROCEDURE 7
F
R
O
N
T
R
I
G
G
I
N
G
FRONT RIGGING
3. Secure the bushing to the CLD release handle with
a pan head screw and hex nut. Tighten securely.
This procedure includes the following:
Installing CLD Front Rigging Release Handle
4. Position mounting hole "A" UNDER mounting hole
"B".
WARNING
After ANY adjustments, repair or service and BEFORE use, make sure all attaching hardware is
tightened securely - otherwise injury or damage
may result.
5. Position the hole in the spring UNDER mounting hole
"A" in the orientation shown in FIGURE 1.
NOTE: The bent portion of the spring should hook over
the mounting plate as indicated in FIGURE 1 and the
straight end of the spring should rest inside the CLD release handle and point away from the tab.
INSTALLING CLD FRONT RIGGING
RELEASE HANDLE (FIGURE 1)
1. Remove the two (2) pan head screws, hex nut, riv
nut, bushing and spring from the EXISTING front
rigging release handle and retain for later use.
6. Secure the spring and CLD release handle to the
mounting plate with the remaining pan head screw
and riv nut. Tighten securely.
2. Position the bushing between the two (2) mounting
holes near the tab on the CLD release handle.
Mounting Hole "B"
CLD
EXISTING
Existing Release
Handle
Pan
Head
Screws
CLD Release
Handle
Pan
Head
Screws
Hex Nut Tab
Bushing
Mounting
Hole "A"
Bushing
Hex
Nut
Bent Portion
of Spring
Mounting
Plate
Straight
Portion
of Spring
Spring
HOOK
SPRING HERE
Riv Nut
Spring
Riv Nut
Front
Rigging
Front Rigging
FIGURE 1 - INSTALLING CLD FRONT RIGGING RELEASE HANDLE
22
LIMITED WARRANTY
PLEASE NOTE: THE WARRANTY BELOW HAS BEEN DRAFTED TO COMPLY WITH FEDERAL LAW APPLICABLE
TO PRODUCTS MANUFACTURED AFTER JULY 4, 1975.
This warranty is extended only to the original purchaser/user of our products.
This warranty gives you specific legal rights and you may also have other legal rights which vary from
state to state.
Invacare warrants its product to be free from defects in materials and workmanship for a period of one
(1) years from date of purchase. If within such warranty period any such product shall be proven to be
defective, such product shall be repaired or replaced, at Invacare’s option. This warranty does not
include any labor or shipping charges incurred in replacement part installation or repair of any such
product. Invacare’s sole obligation and your exclusive remedy under this warranty shall be limited to
such repair and/or replacement.
For warranty service, please contact the dealer from whom you purchased your Invacare product. In
the event you do not receive satisfactory warranty service, please write directly to Invacare at the
address below. Provide dealer’s name, address, the product model number, date of purchase, indicate nature of the defect and, if the product is serialized, indicate the serial number. Do not return
products to our factory without our prior consent.
LIMITATIONS AND EXCLUSIONS: THE FOREGOING WARRANTY SHALL NOT APPLY TO SERIAL NUMBERED
PRODUCTS IF THE SERIAL NUMBER HAS BEEN REMOVED OR DEFACED, PRODUCTS SUBJECTED TO NEGLIGENCE, ACCIDENT, IMPROPER OPERATION, MAINTENANCE OR STORAGE, PRODUCTS MODIFIED WITHOUT INVACARE’S EXPRESS WRITTEN CONSENT INCLUDING, BUT NOT LIMITED TO, MODIFICATION THROUGH
THE USE OF UNAUTHORIZED PARTS OR ATTACHMENTS; PRODUCTS DAMAGED BY REASON OF REPAIRS
MADE TO ANY COMPONENT WITHOUT THE SPECIFIC CONSENT OF INVACARE, OR TO A PRODUCT DAMAGED BY CIRCUMSTANCES BEYOND INVACARE’S CONTROL, AND SUCH EVALUATION WILL BE SOLELY
DETERMINED BY INVACARE. THE WARRANTY SHALL NOT APPLY TO PROBLEMS ARISING FROM NORMAL
WEAR OR FAILURE TO ADHERE TO THESE INSTRUCTIONS.
THE FOREGOING WARRANTY IS EXCLUSIVE AND IN LIEU OF ALL OTHER EXPRESS WARRANTIES. IMPLIED
WARRANTIES, IF ANY, INCLUDING THE IMPLIED WARRANTIES OF MERCHANTABILITY AND FITNESS FOR A
PARTICULAR PURPOSE, SHALL NOT EXTEND BEYOND THE DURATION OF THE EXPRESSED WARRANTY PROVIDED HEREIN AND THE REMEDY FOR VIOLATIONS OF ANY IMPLIED WARRANTY SHALL BE LIMITED TO
REPAIR OR REPLACEMENT OF THE DEFECTIVE PRODUCT PURSUANT TO THE TERMS CONTAINED HEREIN.
INVACARE SHALL NOT BE LIABLE FOR ANY CONSEQUENTIAL OR INCIDENTAL DAMAGES WHATSOEVER.
THIS WARRANTY SHALL BE EXTENDED TO COMPLY WITH STATE/PROVINCIAL LAWS AND REQUIREMENTS.
23
Invacare Corporation
www.invacare.com
USA
Canada
One Invacare Way
Elyria, Ohio USA
44036-2125
800-333-6900
5970 Chedworth Way
Mississauga, Ontario
L5R 3T9, Canada
905-890-8838
Invacare is a registered trademark of Invacare Corporation.
© 1999 Invacare Corporation
Form No. 99-225 Part No. 1087937
Rev B (1) - 08/00