1
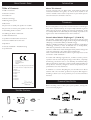
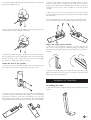
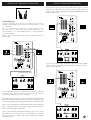
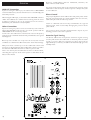
HOME CINEMA SYSTEM
Owner’s Guide
UK
INTRODUCTION
OREUS OWNER’S GUIDE
Table of Contents
About This Manual
2 Table of Contents
To start enjoying your new Oreus HCS, read and then follow all
instructions listed in this guide, as well as those found in the
owner’s manuals of associated components in your audio system.
Save all instructions for future reference.
2 This box contains
2 Introduction
2 Oreus Technology
2 Planning Your System
TECHNOLOGY
3 Placement
3 If you want to stand your speaker on a table
Oreus loudspeakers incorporate several innovative technologies
that, when implemented by our exceptionally talented engineers
after hours upon hours of subjective listening evaluations, result
in a loudspeaker that realistically and accurately reproduces the
signal source with minimal distortion and coloration.
4 If you want to mount your speaker on the wall
5 Assembling the floor stand
6 Installing the Oreus Subwoofer
7 Subwoofer Placement
Ceramic Metal Matrix Diaphragms™ (C.M.M.D.)
7 Speaker-Level Subwoofer Connection
For decades, loudspeaker engineers have known that the ideal
transducer should be stiff, yet light, and have high internal damping
(damping is a material’s ability to absorb energy).
Infinity’s C.M.M.D. transducer is a significant advance in transducer
technology. Ceramic, a class of material new to loudspeakers,
offers better performance than other materials.
Ceramic is stiffer than metals and lighter than plastics and typical
composite materials; it also offers improved damping.
These ceramic-based transducers take us a giant step closer to the
ever-elusive “ideal transducer.”
8 Line-Level Subwoofer Connection
9 Operation
9 Acoustic Feedback + Troubleshooting
9 Specifications
Declaration of Conformity
In woofer and midrange applications, it offers accurate pistonic
operation over the entire frequency range of the driver, completely
eliminating coloration due to cone breakup and dramatically
reducing distortion. And when ceramic-metal-matrix transducers
are exposed to moisture, sunlight or extreme temperatures, their
performance does not deteriorate.
We, Harman Consumer Internatonal
2, route de Tours
72500 Château-du-Loir
FRANCE
declare in own responsibility, that the product described
in this owner’s manual is in compliance with technical
standards:
In addition to ceramic diaphragms, the transducers in Oreus
satellite and center channel speakers incorporate full magnetic
shielding to allow use in close proximity to tv receivers and video
monitors.
EN 50081-1:1992
EN 50082-1:1992
EN 60065
EN 55013
EN 55020
EN 61000-3-2
EN 61000-3-3
PLANNING YOUR SYSTEM
R. Marshall
Harman Consumer International
FRANCE 08/02
Before deciding where to best place your speakers, survey your
room and study Figure 1.
THIS BOX CONTAINS
X1
X5
X1
2
X5
X 25
FIGURE 1– In this overhead view of a typical installation, satellite
speakers are used to reproduce sound for the front and surround
channels. The center channel reproduces sound and dialog.The
powered subwoofer provides extended bass for effects and music.
PLACEMENT
IF YOU WANT TO STAND YOUR SPEAKER ON TABLE
Feed speaker cable through the foot
1. The foot supplied with your Oreus satellites and center channel
is supplied assembled.
NOTE:
The satellite speakers can be placed directly on a shelf, or mounted
on a wall using the built-in base/bracket.
CAUTION:
The rubber feet can under certain conditions smudge or discolor
light colored and delicate surfaces. Please place a protective mat or
coaster under the rubber feet to prevent marking or discoloration.
2. Fit the five self-adhesive rubber feet to the foot.
For front left and right channels
For front left and right channels, place one satellite to the left and
another to the right of the television, as shown in Figure 1.
Since the speakers are magnetically shielded, you can place them
very close to the TV without worrying about the magnetic field
distorting the picture.
Center Channel
For the center channel, place the speaker directly on top of, or below,
your television. Use a shelf, if the television does not provide a
stable platform.
3. Remove the two fixing screws and lift the pivot cover plate off
the foot. Use the hex key supplied to loosen the screws.
Surround Channel
For surround left and right channels, place one speaker on the left
and another on the right, to the sides of or behind the listening area.
Subwoofer
Since the installation of a subwoofer can be somewhat more
complicated than installing full-range speakers, it is essential that
you read this section very carefully prior to connecting the subwoofer
to your system. Should you have questions relating to installation, it
is advisable to call your Infinity dealer for advice.
The performance of the subwoofer is directly related to its placement
in the listening room and how you align the subwoofer with the satellite
speakers. Setting the volume of the subwoofer in relation to the left
and right speakers is also of critical importance because it is essential
that the subwoofer integrate smoothly with the entire system.
Setting the subwoofer’s volume level too high will result in
an overpowering, boomy bass. Setting the volume level too low will
negate the benefits of the subwoofer.
Here are several additional facts on installation that may prove
useful. It is generally believed that low frequencies (below 125Hz)
are nondirectional and, therefore, placement of a subwoofer
within any listening room is not critical. While in theory it is true
that the larger wavelengths of extremely low frequencies are basically
non-directional, the fact is that, when installing a subwoofer
within the limited confines of a room, reflections, standing
waves and absorptions generated within the room will strongly
influence the performance of any subwoofer system.
As a result, specif ic location of the subwoofer becomes
important, and we strongly recommend that you experiment with
placement before choosing a final location. Placement will depend
upon your room (for example, whether or not your room permits
placement of the subwoofer near either satellite) and the amount
and quality of bass required.
4. Lift out the pivot.
5. Feed the speaker cable through the rear cable-entry hole in the
base and then through the pivot.
6. Put the pivot back into place. Re-fit the cover plate and replace
the two fixing screws. Do not fully tighten the screws at this stage
because you will need to rotate the pivot later in the assembly
procedure to angle your speakers correctly.
UK 3
Attach the foot to the speaker
Adjust the angle of your speaker
1. Remove the two screws and take off the rear cover plate from
the speaker. Use the hex key supplied to loosen the screws.
1. You can tilt your speaker up or down on its foot and you can
also rotate it. If you experience difficulty tilting or rotating your
speaker, try loosening the fixing screws for the pivot cover plate on
the foot.
2. The foot can be attached to the speaker at two different positions.
The first position allows the speaker to be used vertically (normal for
satellites), while the second allows it to be used horizontally (normal
for the center channel). Note the blanking plug which fills the
unused pivot hole on the rear of the speaker.
IF YOU WANT TO MOUNT YOUR SPEAKER ON THE WALL
Feed speaker cable through the foot
1. The foot supplied with your Oreus satellites and center channel
can also be used as a wall bracket. The foot is supplied assembled.
3. Connect the cable to the speaker terminals. Observe correct
polarity. Speaker cable is usually colour-coded (red or white for
positive) or provided with an identifying stripe or rib on the positive
conductor. Connect the positive conductor to the red speaker
terminal.
2. Remove the two fixing screws and lift the pivot cover plate off
the foot. Use the hex key supplied to loosen the screws.
4. Insert the pivot into one or other of the two pivot holes in the
speaker, depending on whether you wish to use the speaker
vertically or horizontally.
5. Fit the blanking plug into the unused pivot hole. Re-fit the rear
cover on the speaker and tighten the fixing screws.
3. Lift out the pivot.
4. Attach the base to the wall using suitable screws.
6. Your speaker should now look like this.
4
5. CAUTION:
please remember that your Oreus speakers are heavy and must
be adequately secured to the wall to avoid the risk of injury being
caused should they fall. Use longer fixing screws and suitable wall
plugs if necessary.
6. Feed the speaker cable through the cable-entry hole in the base
and then through the pivot.
3. Connect the cable to the speaker terminals. Observe correct
polarity. Speaker cable is usually colour-coded (red or white for
positive) or provided with an identifying stripe or rib on the positive
conductor. Connect the positive conductor to the red speaker
terminal.
4. Insert the pivot into one or other of the two pivot holes in the
speaker, depending on whether you wish to use the speaker vertically
or horizontally.
5. Fit the blanking plug into the unused pivot location hole and
then re-fit the rear cover on the speaker. Tighten the fixing screws.
7. If you want to hide the speaker cables in the wall you can use the
cable entry hole in the underside of the base.
Adjust the angle of your speaker
1. You can tilt your speaker up or down on its foot and you can
also rotate it. If you experience difficulty tilting or rotating your
speaker, try loosening the fixing screws for the pivot cover plate on
the foot.
8. Put the pivot back into place. Re-fit the cover plate and replace
the two fixing screws. Do not fully tighten the screws at this stage
because you will need to rotate the pivot later in the assembly
proceedure to angle your speakers correctly.
Attach the foot to the speaker
1. Remove the two screws and take off the rear cover plate from the
the speaker. Use the hex key supplied to loosen the screws.
2. Once you have adjusted your speaker the way you want it, fully
tighten the fixing screws of the pivot cover plate on the foot. This
will hold your chosen adjustment
ASSEMBLING THE FLOORSTAND
Assembling the stand
1. The Oreus stand is supplied with the base detached from the
column.
2. The foot can be attached to the speaker at two different
positions. The first position allows the speaker to be used vertically
(normal for satellites), while the second allows it to be used
horizontally (normal for the center channel). Note the blanking
plug which fills the unused pivot hole on the rear of the speaker.
UK 5
2. Feed your speaker cable through the stand column. The cable
can exit through the hole at the bottom rear of the stand column
or it can exit through the hole in the stand base.
3. Secure the stand base to the column and tighten the two fixing
screws. Use the hex key provided.
Attaching the stand to the speaker
1. Remove the two screws and take off the rear cover plate from
the speaker. Use the hex key supplied to loosen the screws.
Note the blanking plug which fills the unused pivot hole on the
rear of the speaker.
2. Connect the cable to the speaker terminals. Observe correct
polarity. Speaker cable is usually colour-coded (red or white for
positive) or provided with an identifying stripe or rib on the
positive conductor. Connect the positive conductor to the red
speaker terminal.
5. Your speaker should now look like this.
INSTALLING THE OREUS SUBWOOFER
The rear panel metal plate acts as a heatsink for the subwoofer’s
internal amplifier. There should be at least 10 cm of free space around
the heatsink for air circulation. Do not place pillows or other objects
against it.
We recommend placing the subwoofer at least 2 to 3 feet away from a
television or a computer’s disc-drive system to prevent smearing the
colors of the TV picture or erasing of the magnetic drive.
Placement will depend upon your room and the amount and quality
of bass required (for example, whether or not your room permits
placement of the subwoofer near one of the front satellites).
Careful experimentation will enable you to determine the best position
for the subwoofer. See suggestions on next page.
CAUTION:
The subwoofer's rubber feet can under certain conditions smudge
or discolor light colored and delicate surfaces. Please place a
protective mat or coaster under the rubber feet to prevent marking
or discoloration.
SUBWOOFER PLACEMENT
This view shows the subwoofer positioned behind the right channel
satellite speaker to re-create the actual location of bass instruments
in an orchestra.
3. Attach the speaker to the stand and tighten the two fixing
screws. Use the hex key supplied.
4. Fit the blanking plug into the unused foot pivot location
hole and then re-fit the rear cover on the speaker and tighten
the fixing screws.
6
Here are some useful hints:
- If the bass response seems inadequate, move the subwoofer
closer to a wall or corner.
- If the bass is too heavy, try moving the subwoofer futher from the wall.
It will take time and patience to find the most pleasing acoustic
location for your subwoofer. Testing for sonic balance and blending
should always be made for your normal listening position, using a
wide range of source material. As a startingpoint, initially place the
subwoofer behind your right channel satellite speaker, about 3 or
4 inches from the wall. We suggest trying this location first
because in an orchestra, the bass instruments are usually located
in the back and to the right.
SPEAKER-LEVEL SUBWOOFER CONNECTIONS
LINE-LEVEL SUBWOOFER CONNECTION
If your receiver has a pair of stereo subwoofer outputs, connect
interconnect cable from the receiver's left and right subwoofer
outputs to the corresponding inputs marked LINE LEVEL IN L and
R on the subwoofer.
Connection tips
Separate and strip the ends of the speaker wire as shown.
Speakers and amplifiers/receivers have corresponding (+) and
(–) terminals.
The (+) lead of the speaker wire is noted with a stripe.
It is important to connect all the speakers identically: (+)
on the speaker to (+) on the amplifier and (–) on the speaker to
(–) on the amplifier.
Wiring “out of phase”results in thin sound, weak bass and a poor
stereo image.
If your receiver has a single subwoofer output or a dedicated LFE
output, connect interconnect cable from this output to the LFE
input on the subwoofer.
Use Speaker-level connection only if your surround receiver does
not have line-level subwoofer or LFE outputs. If a line-level
connection is available, go to the next page.
For speaker-level connection, connect loudspeaker cable from the
front left and right loudspeaker outputs of your amplifier/receiver
to the corresponding left and right IN terminals on the subwoofer.
Then, connect loudspeaker cable from left and right loudspeaker
OUT on the subwoofer to the corresponding input terminals on
the front left and right loudspeakers.
Connect the remaining loudspeakers directly to the receiver. In the
surround processor set-up menu, the Left/ Right front speakers
must be selected as "Large." All other loudspeakers must be
selected as small.
UK 7
OPERATION
With LFE Connection
If you are using the LFE input, the subwoofer's CROSSOVER
control is NOT active, because this function is controlled by your
surround processor.
When using the LFE input, set the subwoofer's VOLUME control to
"Max" and calibrate the subwoofer level along with the other
speakers according to the set-up instructions in the owner's
manual for your surround receiver/amplifier.
Other Connections
If you are using any other connection method, start with the
subwoofer VOLUME control in the "9 o'clock" position and the
CROSSOVER in the 12 o'clock position.
To fine-tune the subwoofer's volume and crossover frequency
settings, listen to familiar material with powerful bass at a typical
listening level.
Bass response should not overpower the room, but instead
contribute to a harmonious blend across the entire musical range.
Many users have a tendency to set the subwoofer volume and
crossover too high, believing that a subwoofer is there to produce
lots of boom and shake the room to make its presence felt.
This is not entirely true.A subwoofer is there to enhance bass,
extending the response of the entire system so that bass can be
felt as well as heard.
8
However, overall balance must be maintained; otherwise, the
music will not sound natural.
An experienced listener will set the volume and crossover of the
subwoofer so that its impact on bass response is always there, but
is never obtrusive.
Phase Control
The proper adjustment of the subwoofer's rear panel phase switch
for your system depends on several variables such as room size,
subwoofer placement and listener position.
Listen to a familiar selection with powerful bass at a typical
listening level, while occasionally changing the position of the
phase switch.
The position which provides maximum bass output at your
listening position is the correct position.
Auto-On Signal Sensing
The Oreus Subwoofer incorporates automatic signal-sensing
circuitry which turns the subwoofer on instantly when an audio
signal is present. When a signal has not been detected for
approximately 1.5 minutes, the subwoofer automatically goes into
standby mode.
ACOUSTIC FEEDBACK
If the bass seems boomy, or you notice a rumbling sound when
listening to record albums, the cause may be acoustic feedback.
This means that low-frequency vibrations from your speakers are
reaching the turntable.To help isolate the turntable from these
vibrations, place the turntable on a heavy, solid support, as far
away as possible from the subwoofer. If you continue to experience
difficulties after experimenting with placement, consult your
Infinity dealer.
SPECIFICATIONS
Oreus HCS
Frequency Response:
Satellite
95 Hz – 22 Khz (±3dB)
Recommended Amplifier:
25 – 100 Watts
Sensitivity:
(2.83V @ 1 meter)
85 dB
Important!
Crossover Frequency:
3,5 Khz, 12 dB/Octave
CD/DVD players are also susceptible to vibrations and should be
placed on solid supports to isolate them acoustically. Another
method to isolate the CD/DVD player is to place it on four
isolation feet, available at your local dealer.
LF Drive Unit:
Dual 80 mm CMMD,
magnetically shielded
Tweeter:
10 mm, magnetically shielded
Satellite, Dimensions
(H x W x D):
Shelf position
362 x 120 x 106mm
Wall position
386 x 120 x 97mm
Stand position
811 x 200 x 170mm
Center, Dimensions
(H x W x D):
Shelf position
122 x 350 x 106mm
Wall position
146 x 350 x 97mm
Finish:
Silver gray
Weight (Unit):
2,5 kg
TROUBLESHOOTING
If the subwoofer sound is distorted, stops playing or otherwise
seems to be malfunctioning, first determine if the problem is in
the subwoofer or the wiring and/or other audio components.
If the problem also affects the satellite speakers, the cause is most
likely in your electronics. If it is only noticed in the subwoofer,
make sure that all connecting cables are correct and in proper
working condition. Make sure the subwoofer is plugged in and
turned on.
Important!
If everything seems to be in good working order and thesubwoofer
still malfunctions, DO NOT ATTEMPT ANY REPAIRS!
Contact your Infinity dealer and get the name of the authorized
Infinity service center near you.
Oreus Subwoofer
Drive Unit:
1 active 210 mm,
2 x 210 mm ABR
Amplifier Output:
100 Watts
Crossover Frequency:
Variable 50 - 150 Hz
Dimensions
(H x W x D):
367 x 251 x 445 mm
Finish:
Silver gray
Weight (Unit):
15,9 kg
Infinity continually strives to update and improve existing products,
as well as create new ones.The specifications and construction
details in this and related Infinity publications are therefore subject
to change without notice.
UK 9