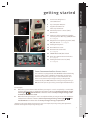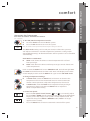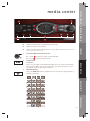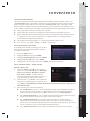
1
2010 Infiniti EX35
Quick Reference Guide
QUICK REFERENCE GUIDE
Introduction
This easy-to-use Quick Reference Guide will help you to more fully appreciate your
vehicle’s superior features, unique functions and advanced technology.
■
The Quick Reference Guide is intended to provide you with a user-friendly learning
experience to quickly acquaint you with your new INFINITI vehicle.
■
Refer to the Quick Reference Guide to learn how to personalize your vehicle’s
controls and equipment to maximize your driving comfort and convenience.
However, this guide is not intended to replace your vehicle Owner’s Manual. For
comprehensive vehicle safety information and product details, please refer to your
Owner’s Manual. It will help you to better understand the operation and proper
maintenance of your new INFINITI vehicle.
Both INFINITI and your INFINITI dealer are dedicated to serving all your automotive
needs. Your complete satisfaction is our primary concern. It is suggested that you read
this Quick Reference Guide and your vehicle Owner’s Manual thoroughly before contacting
your INFINITI dealer with related questions.
Page
Getting Started
INFINITI Intelligent KeyTM System ................2
In-Dash Intelligent Key Port, Lock/Unlock Operation Door Handle Request Switches,
Lockout Protection, Push Button Ignition Switch, INFINITI Intelligent KeyTM, Opening the Windows
................3
................4
................4
................4
To Adjust Driver’s and Passenger’s Seats, Power Rear Seats, Manual Folding Rear Seats
Auto-Dimming Inside (Rearview) Mirror
Instrument Panel Layout
Front Passenger Air Bag Status Light
Vehicle Control Center
................5
................6
................7
................8
INFINITI Controller, Information Display Screen, Buttons Surrounding the INFINITI Controller
Driving Controls
..............11
..............12
..............14
..............14
..............15
..............16
..............16
..............16
..............16
..............17
..............17
..............18
COMFORT
Steering Wheel Controls – Cruise Control/Intelligent Cruise Control
(Full-Speed Range)
Steering Wheel Controls – Audio & Bluetooth® Hands-free Phone Systems (if so equipped)
Vehicle Dynamic Control
Forward Collision Warning & Lane Departure Warning
Lane Departure Prevention (LDP) System
Distance Control Assist (if so equipped)
Intelligent Brake Assist (if so equipped)
All-Wheel Drive (AWD) (if so equipped)
Snow Mode On/Off Switch
Rearview Monitor (if so equipped)
Around View Monitor (if so equipped)
Sonar System
DRIVING CONTROLS
DR
Deactivating/Activating the Horn Alert Feature
Automatic Door Locks
Child Safety Rear Door Locks
Seat Adjustments
GETTING STARTED
contents
Comfort
Heater and Air Conditioner (Dual Zone Automatic Temperature Control) ..............19
Heated Front Seats ..............21
Media Center
Bluetooth® Streaming Audio ..............26
Bluetooth® Hands-free Phone System With Navigation (if so equipped) ..............27
®
Bluetooth Hands-free Phone System Without Navigation (if so equipped) ..............29
Navigation
INFINITI Navigation System ..............32
MEDIA CENTER
Audio System ..............22
AM/FM/SAT Radio with Compact Disc, How to Customize Radio Presets,
How to Customize Tone Settings, Music BoxTM, USB
Switching the Map View, Storing Your Home (and Other Addresses) in Your Address Book,
Store Current Location, Setting a Street Address as a Destination, Moving Around Within a Map,
Setting a Place as a Destination, Zagat® Restaurant Guide, XM NavWeather®
Convenience
Speaking Phone Numbers, Voice Recognition User Guide, Making a Phone Call, Receiving and
Ending a Phone Call, Programming a Destination – Street Address, Alternate Command Mode
Automatic Drive Positioner Memory System ..............39
Entry/Exit, Seat Synchronization Function
Opening the Fuel-Filler Door ..............40
Opening/Closing the Lift Gate ..............41
Lift Gate Release Lever
..............41
..............41
..............42
..............42
..............42
..............42
..............42
..............43
CONVENIENCE
12-Volt Power Outlet and Auxiliary Input Jacks
Seat-Mounted Retractable Coat Hanger
Sun Visor Adjustment
Vehicle Information Display
Welcome Lighting
Adaptive Front Lighting System
®
HomeLink Universal Transceiver
Important Customer Information – Aluminum-Alloy Wheels
NAVIGATION
INFINITI Voice Recognition System ..............36
INFINITI Intelligent KeyTM System
The INFINITI Intelligent KeyTM system allows you to lock and unlock
all doors (including the fuel-filler door), open the lift gate and open the
windows, without removing the Intelligent Key from your pocket or bag.
While inside the vehicle, it lets you start and stop the engine via push–
button ignition, and - if so equipped - it can signal the seat, steering wheel
and outside (side view) mirrors to adjust to your personalized memory settings.
Two Intelligent Keys are provided with your INFINITI vehicle. Several vehicle features
can be tied to a specific Intelligent Key.
In-Dash Intelligent Key Port
To start the vehicle if the Intelligent Key battery becomes
discharged; insert the Intelligent Key into the In-Dash Port.
Push the Intelligent Key completely into the port until you feel
it “engage.”
Notes:
The Intelligent Key port does not charge the Intelligent Key battery. Remove the Intelligent Key from the Intelligent Key
port after the ignition switch is pushed to the OFF position. If you leave the Intelligent Key in the port when the ignition
switch is toggled to LOCK (OFF) and the driver’s door is opened:
■
The amber indicator on both sides of the port will flash.
■
A repetitive beep tone will sound.
■
The Intelligent Key Removal indicator will illuminate on the dot matrix display between
the tachometer and speedometer.
Lock/Unlock Operation –
Door Handle Request Switches
To Lock the Doors: Push any door handle request switch once.
To Unlock the Doors: Push any door handle request switch once.
The corresponding door will unlock. Push the door handle request
switch again within 5 seconds to unlock all other doors.
Lockout Protection
A rapid beep tone will sound and the doors will not lock if you attempt to exit the vehicle
and lock the doors while the Intelligent Key is inside the vehicle.
Push Button Ignition Switch
To Start and Stop the Engine:
For Automatic Transmission Vehicles
1
Put the transmission in P (PARK).
2
Push the ignition switch while depressing the brake.
To stop the engine, put the transmission in P (PARK) and push the ignition
switch. The ignition switch LOCK (OFF) mode will illuminate.
2
GETTING STARTED
getting started
To Change Ignition Switch Modes:
(With the engine stopped and foot off brake)
DRIVING CONTROLS
DR
In LOCK (OFF) mode, push the ignition switch:
■
One time to change to ACC (Accessory) mode.
■
Two times to change to ON mode.
■
Three times to return to LOCK (OFF) mode.
INFINITI Intelligent KeyTM
LOCK Button
PANIC ALARM Button
Press and hold down for more
than 1 second to sound the horn
and flash the headlights. Press
any button on the Intelligent Key
to stop the panic alarm.
COMFORT
Press once to lock all doors, the
lift gate, and the fuel-filler door.
UNLOCK Button
Press once to unlock driver’s
door, lift-gate and the fuel-filler
lid. Press again within 1 minute
to unlock all other doors. Press
and hold down to open the
windows.
MEDIA CENTER
Key Ring Clip
Opening the Windows
Press and hold down the
button for at least 3 seconds, and continue pressing until the
button to stop the windows from opening.
windows are completely open. Release the
NAVIGATION
Deactivating/Activating the Horn Alert Feature
Your vehicle is set to sound the horn when locking the vehicle.
buttons together for at least 2 seconds.
To Deactivate: Press and hold down the and
The hazard indicators will flash three times to confirm the operation is complete.
buttons together for at least 2 seconds.
To Activate: Press and hold down the and
The hazard indicators will flash once and the horn will chirp once to confirm the
operation is complete.
CONVENIENCE
3
Automatic Door Locks
■
■
When enabled, the Automatic Door Lock system will automatically lock all doors
when the vehicle speed reaches 15 MPH.
When enabled, the Automatic Door Lock system will automatically unlock all doors
when the ignition switch is pushed to LOCK (OFF) mode.
To Turn ON/OFF the Automatic Door Lock Feature:
1
Close all doors.
2
Push the ignition switch to ON mode.
3
Within 20 seconds, push and hold the power door lock switch
to the position for more than 5 seconds.
4
When this feature is activated, the hazard indicator lights will flash twice. When
deactivated, the hazard indicator lights will flash once.
To Turn ON/OFF the Automatic Door Unlock Feature:
1
Close all doors.
2
Push the ignition switch to ON mode.
3
4
position for
Within 20 seconds, push and hold the power door lock switch to the
more than 5 seconds.
When this feature is activated, the hazard indicator lights will flash twice. When
deactivated, the hazard indicator lights will flash once.
Note: The ignition switch must be turned OFF and ON again between each setting change.
Child Safety Rear Door Locks
■
■
The child safety lock levers are located on the inside edge of
the rear doors.
When the lever is moved to the LOCK position, the door can
be opened only from the outside. If you cannot open a rear
door from the inside, check the child safety rear door lock lever.
Seat Adjustments
To Adjust Power Seats:
Forward and Backward – Move the switch forward or
backward to slide the seat forward or backward.
Seat Lifter – Press the front or rear side of the switch up
or down to adjust the angle and height of the seat cushion.
Seat Back Reclining – Press the top of the switch forward or backward to
adjust the seatback to the desired angle.
4
GETTING STARTED
getting started
To Adjust Lumbar Support:
Lumbar Support – Press the front or rear side of the switch forward or
backward to adjust lower back support.
DRIVING CONTROLS
DR
COMFORT
Power Rear Seats (if so equipped):
The rear seats can be folded down for maximum cargo hauling/
extra storage space.
1 Press and hold the front side DOWN of the rear
1
seat switch on the right or left side of the luggage
2
compartment. The corresponding rear seatback
will fold down automatically.
2 To return the seat to an upright position:
■
Press and hold the rear side UP portion of the
corresponding switch.
■
Or, push and hold a rear seatback return switch
located on the center console. The corresponding
rear seatback will be returned to its upright
position automatically.
Note: A beep will sound once and the rear seatback will rise up.
A beep will sound twice when the seatback is fully returned to the
upright position.
MEDIA CENTER
Manual Folding Rear Seats (if so equipped):
Pull the lever located on the outside of the seatback.
The corresponding seatback will fold.
To return the seatback to an upright position lift the seatback
manually until it securely locks in position.
NAVIGATION
Auto-Dimming Inside (Rearview) Mirror
To turn this feature OFF: Press the
button on the mirror. The green indicator light will
go out when the feature is turned OFF. Press the
button to turn the feature back ON.
5
CONVENIENCE
The anti-glare feature automatically changes reflection depending on the headlight intensity
of the vehicle behind you. This feature is automatically ON when the vehicle is started.
6
5
Behind steering
wheel on dash
1
Behind steering
wheel on dash
8
7
17
3
4
2
9
11 12
14 23
18
13
16
15 10
Behind steering
wheel on dash
Behind steering
wheel on Column
19
20
21
22
Instrument Panel Layout
1
Headlight, Fog Light and Turn Signal Switch
2
Steering Wheel Controls – Audio, Bluetooth®
3
Cruise Control Buttons
4
Intelligent Cruise Control (Full-Speed Range) Buttons – if so equipped
5
Instrument Brightness Control Buttons
6
Trip Computer Buttons
7
Trip/Reset Switch for Twin Trip Odometer
8
Windshield Wipers and Washer Switch
9
Push Button Ignition Switch
10 Vehicle Dynamic Control (VDC) OFF Button
11 Forward Collision Warning (FCW) & Lane Departure Warning (LDW) Button –
if so equipped
12 Adaptive Front Lighting System (AFS) ON/OFF Button – if so equipped
13 Steering Wheel Power Tilt/Telescopic Control – if so equipped
14 Intelligent Key Port
15 Hood Release Lever
16 Manual Telescopic Steering Wheel Lock Lever – if so equipped
17 Hazard Warning Lights Button
18 Distance Control Assist (DCA) & Lane Departure Prevention (LDP) Button – if so equipped
19 5-Speed Automatic Transmission Shift Lever with Manual Shift Mode
and Drive Sport Mode
20 Heated Front Seat Switches – if so equipped
21 SNOW Mode ON/OFF Switch
22 Rear Seat Power Return Switches
23 Intelligent Brake Assist (IBA) – if so equipped
6
GETTING STARTED
getting started
7
6
Trip Computer Buttons
7
Trip/Reset Button for
Twin Trip Odometer
10 Vehicle Dynamic Control (VDC)
OFF Button
11
12
23
Instrument Brightness
Control Buttons
DRIVING CONTROLS
DR
5
5
11 Forward Collision Warning (FCW) &
Lane Departure Warning (LDW) Button
(if so equipped)
12 Adaptive Front Lighting System (AFS)
ON/OFF Button - if so equipped
14
6
14 Intelligent Key Port
10
15 Hood Release Lever
COMFORT
15
20 Heated Front Seat Dials
(if so equipped)
21 SNOW Mode ON/OFF Switch
22 Rear Seat Power Return Switches
(if so equipped)
23 Intelligent Brake Assist (IBA)
(if so equipped)
22
21
22
20
MEDIA CENTER
20
Front Passenger Air Bag Status Light
NAVIGATION
This vehicle is equipped with the INFINITI Advanced Air Bag
System. Under some conditions, depending on pressure
detected on the front-passenger’s seat and how the seat
belt is used, the front passenger air bag is designed to
automatically turn OFF. When the front passenger air bag is
OFF, the front passenger air bag status light will illuminate.*
* When the system detects that the front-passenger’s seat is unoccupied, the passenger air bag status light will not
illuminate even though the front passenger air bag is OFF.
7
CONVENIENCE
For example:
■
When the system detects that the front-passenger’s seat is occupied by a small adult,
child or child restraint as outlined in the Owner’s Manual, the front passenger air bag
status light
will illuminate to indicate that the front passenger air bag is OFF
and will not inflate in a crash.
■
When the front-passenger’s seat is occupied and the passenger meets the conditions
will
outlined in the Owner’s Manual, the front passenger air bag status light
not illuminate to indicate that the front passenger air bag is operational.
Vehicle Control Center
The following buttons and controls are used together to operate most functions displayed on
the Information Display Screen:
■
INFINITI Controller
■
Buttons and controls surrounding the INFINITI Controller
■
Audio System Controls – refer to page 22
■
Heater and Air Conditioning Controls – refer to page 19
■
Touch Screen Operation (for Navigation-equipped vehicles ONLY)
Refer to your 2010 INFINITI Navigation System Owner’s Manual for more details about Touch Screen operations.
INFINITI Controller
Buttons located on the INFINITI Controller serve various
purposes for navigating around the Information Display
3
Screen and choosing options. As you use the vehicle
controls, you will find the control combination that best
suits your needs.
1
Center Dial
Turn the Center Dial to navigate UP, DOWN, and
5
ACROSS the Information Display Screen, highlight
items for additional information and to make changes
to settings.
8
4
1
6
2
2
Main Directional Buttons
Four Main Directional buttons (marked with arrows) on the face of the INFINITI
Controller can also be used to perform the same functions as the Center Dial.
3
Additional Directional Buttons (for vehicles with the INFINITI Navigation system)
Four additional buttons (marked with small dashes) are located between the Main
Directional buttons. When using the Navigation system for instance, these buttons can
be used in different ways to make “fine-tuned” movements around the Navigation
Map screen.
4
ENTER Button
When you use the Center Dial or Main Directional buttons to highlight a menu item, the
text will be highlighted. Press the ENTER button to select the highlighted item.
5
BACK Button
Press to return to the previous function shown on the Information Display Screen and
to delete characters when using the on-screen keyboard.
6
VOICE Button (for vehicles with the INFINITI Navigation system)
Press to repeat the Navigation instruction. Refer to the Navigation section of this guide
(beginning on page 32) for more detailed Navigation system information.
GETTING STARTED
getting started
Information Display Screen
Refer to the 2010 INFINITI Navigation System
Owner’s Manual for more details about this feature.
DRIVING CONTROLS
DR
Vehicle functions are viewed in menus
on the Information Display Screen.
As menu items are highlighted/selected,
additional information may display on
the screen. The “touch screen” feature
allows you to perform the same
operations controlled by the INFINITI
controller simply by touching menu items on the screen.
DEST Button (for vehicles with the INFINITI Navigation system)
Press to set a destination in the Navigation system. Refer to the Navigation
section of this guide (beginning on page 32) for more detailed Navigation
system information.
RADIO AM•FM Button (for vehicles without the INFINITI Navigation system)
Press to change radio bands: AM -> FM1 -> FM2 -> XM1 -> XM2 -> XM3 -> AM, etc.
(requires an active XM® satellite radio subscription)
COMFORT
RADIO AM•FM
AM•FM•SAT Button (for vehicles with the INFINITI Navigation system)
Press to change radio bands: AM -> FM1 -> FM2 -> XM1 -> XM2 -> XM3 -> AM, etc.
(requires an active XM® satellite radio subscription)
AUX
MEDIA CENTER
ROUTE Button (for vehicles with the INFINITI Navigation system)
Press to display Route related information and settings. Refer to the Navigation
section of this guide (beginning on page 32) for more detailed Navigation
system information.
AUX Button (for vehicles without the INFINITI Navigation system)
While an external device such as a portable DVD or iPod® player is being used
to play movies in the vehicle (by connecting to the auxiliary jacks, located in the
center console), press this button to switch the movie to the Information
Display Screen. When Setting is selected on the AUX screen, the display mode
can be set to Normal, Wide or Cinema.
MAP Button (for vehicles with the INFINITI Navigation system)
Press to display the Map screen.
NAVIGATION
DISC Button (for vehicles without the INFINITI Navigation system)
Press to activate and display the following modes:
■
iPod® (if so equipped and if a compatible device is connected)
■
Audio CD or CD with MP3/WMA/AAC in the in-dash CD player (if a disc is loaded
in the CD player)
■
USB Memory (if a compatible device is connected)
*XM NavWeather® and XM NavTraffic® is only available on vehicles equipped with optional XM® satellite
subscription service.
CONVENIENCE
9
DISC/AUX Button (for vehicles with the INFINITI Navigation system)
Press to activate and display the following modes:
■
Audio CD or CD with MP3/WMA/AAC in the in-dash CD player (if a disc is loaded
in the CD player)
■
DVD (if so equipped)
■
AUX (if an external device is connected)
■
iPod® (if a compatible device is connected)
■
Music Box™ (if songs are stored)
■
USB Memory (if a compatible device is connected)
■
Bluetooth® Streaming Audio (if a compatible device is connected)
Note: To view movies on the vehicle’s Information Display Screen, the transmission must be in P (PARK)
with the parking brake applied, and the ignition switch in ACC or ON mode. Press the DISC AUX button on
the instrument panel to display the movie.
STATUS Button (for vehicles with the INFINITI Navigation system)
Press repeatedly to display the status of audio, climate control, fuel consumption
and navigation system functions (if so equipped).
Note: If you are listening to a Satellite Radio channel, when you press the STATUS button you will be able to
view information about the music playing, including; SAT Channel name/music genre, artist and song title.
PHONE Button (for vehicles with the INFINITI Navigation system) – if so equipped
Press to display functions of the Bluetooth® Hands-free Phone system. Refer to
the Bluetooth® System for Vehicles with Navigation (beginning on page 27) for
more detailed system information.
INFO Button
Press to view specific vehicle and system information.
CAMERA
SETTING Button
Press to display the Settings menu.
CAMERA Button (for vehicles with the Around View Monitor system) – if so equipped
Press to operate the Around View Monitor and change views displayed on the
right side of the screen.
ZOOM OUT Button (for vehicles with the INFINITI Navigation system)
Press to increase the Map view, showing more area.
ZOOM IN Button (for vehicles with the INFINITI Navigation system)
Press to decrease the Map view, showing greater detail.
DAY/NIGHT/OFF/BRIGHTNESS Button
■ Press to switch the Information Display Screen between day view and night view.
■
While the adjustment bars appear on the screen, adjust the Information
Display Screen brightness UP or DOWN by turning the INFINITI Controller
Center Dial or pressing the brightness UP (+) or brightness DOWN (–) buttons.
■
Press and hold down to turn OFF the display entirely. To resume display,
press again.
10
GETTING STARTED
driving controls
Steering Wheel Controls
Cruise Control/Intelligent Cruise Control (Full-Speed Range)
DRIVING CONTROLS
Cruise Control
1
CANCEL Button
2
ACCEL/RES•COAST/SET Switch
3
ON/OFF Button
1
2
COMFORT
To Set Conventional Fixed-Speed Cruise:
1
Press the ON/OFF button. The CRUISE indicator light
3
(located on the dot matrix display between the
speedometer and tachometer) will illuminate.
2
Accelerate to the desired speed.
3
Push DOWN on the COAST/SET switch and release. The CRUISE SET indicator light
will illuminate. Cruise Control will be set to the desired speed.
Intelligent Cruise Control (Full-Speed Range)
(if so equipped)
1
2
3
MEDIA CENTER
1
CANCEL Button
2
ACCEL/RES•COAST/SET Switch
3
ON/OFF Button
4
Following Distance Button
The Intelligent Cruise Control system can be set to one of two
cruise modes:
■ Vehicle-to-vehicle distance-control cruise.
■ Conventional fixed-speed cruise control.
4
3
4
NAVIGATION
To Set Vehicle-to-Vehicle Distance-Control Cruise:
1
Press the ON/OFF button for less than 1.5 seconds. The CRUISE
indicator light
, the set distance and set vehicle speed indicator
lights (located on the dot matrix display between the speedometer
and tachometer) will illuminate in STANDBY mode.
2
Accelerate to the desired speed.
11
CONVENIENCE
Push DOWN on the COAST/SET switch and release. The CRUISE
SET indicator light
will illuminate. Cruise Control will be set
to the desired speed.
Press the Following Distance button repeatedly to change the set
distance to the vehicle ahead between long
, middle
and
short
.
■
When a vehicle IS NOT detected ahead of you in the travel lane,
the set speed will be maintained.
■
When a vehicle IS detected ahead of you in the travel lane, the
set speed will adjust to maintain the set distance.
Steering Wheel Controls Audio And
Bluetooth® Hands-free Phone Systems (if so equipped)
1
For Vehicles with the INFINITI Navigation System
2
1
SOURCE Select Button
Press the SOURCE Select Button to change between:
3
■
Radio bands AM, FM and SAT*
■
Audio CD or CD with MP3/WMA/AAC in the in-dash CD player
■
Music Box™ (if so equipped and if songs are stored)
4
■
USB/iPod® (if so equipped and when connected)
®
5
■
Bluetooth Streaming Audio (if so equipped and when
connected)
■
AUX (if an external device is connected)
2
SCREEN NAVIGATION and ENTER Switch
Push the ENTER switch UP or DOWN to navigate UP, DOWN and ACROSS the Information
Display Screen. When the desired item is highlighted on the screen, press ENTER to select.
For Radio:
Push the ENTER switch UP or DOWN for less than 1.5 seconds to page through
the radio preset stations on the bank (A, B, or C) currently selected.
■
Push the ENTER switch UP or DOWN for more than 1.5 seconds to seek the
previous/next radio station on the band (AM, FM) or music channel (SAT, if
Satellite Radio is activated) currently selected.
■
For Audio CD and CD with MP3/WMA/AAC:
Push the ENTER switch UP or DOWN for less than 1.5 seconds to return to the
beginning of the current track/folder/file or skip to the next track/folder/file. Push
several times to skip BACKWARD or FORWARD through multiple tracks/folders/files.
■
Push the ENTER switch UP or DOWN for more than 1.5 seconds to the
previous/next CD in the 6-Disc CD Changer (if so equipped) or to the next folder
on a CD/CompactFlash® card (with MP3/WMA).
■
For Music BoxTM (if so equipped):
Push the ENTER switch UP or DOWN for less than 1.5 seconds to return to the
beginning of the current track or skip to the next track.
■
Push the ENTER switch UP or DOWN for more than 1.5 seconds to change to
the previous/next playlist.
■
For iPod® (if so equipped):
■
Push the ENTER switch UP
previous/next track.
■
Push the ENTER switch UP
forward search.
For USB Memory:
Push the ENTER switch UP
the previous/next track.
■
■
or DOWN
for less than 1.5 seconds to skip to the
for more than 1.5 seconds to rewind/fast
or DOWN
for less than 1.5 seconds to skip to
or DOWN
for more than 1.5 seconds skip to the
For Bluetooth® Streaming Audio:
Push the ENTER switch UP or DOWN
previous/next track.
■
12
Push the ENTER switch UP
next folder number.
or DOWN
for less than 1.5 seconds to skip to the
GETTING STARTED
driving controls
VOLUME CONTROL Switch
Push the – or + side of the VOLUME CONTROL switch to decrease or increase the
volume of the audio source currently playing.
4
BACK Button
to return to the previous function shown on the Information
Press the BACK button
Display Screen, to cancel a function if it is not complete and to delete characters
when using the on-screen keyboard.
5
DRIVING CONTROLS
3
TALK Switch/PHONE Switch:
Push the TALK button
to activate the INFINITI Voice Recognition system.
■
If a Bluetooth®-enabled cellular phone has been connected to the vehicle and is
selected, push the PHONE button to initiate, answer or hang up a call.
■
For Vehicles without the INFINITI Navigation System
1
1
2
COMFORT
SOURCE Button
Radio bands AM, FM and SAT* (if so equipped)
■
An Audio CD or CD with MP3/WMA/AAC in the
in-dash CD player
■
AUX (if an external device is connected)
■
2
3
TUNING Switch
Use the Tuning Switch as follows:
MEDIA CENTER
For Radio:
■
Push the switch UP or DOWN for less than 1.5 seconds to page through the
radio preset stations on the bank (A, B, or C) currently selected.
■
Push the switch UP or DOWN for more than 1.5 seconds to seek the
previous/next radio station on the band currently selected AM, FM or previous/
next XM® category (SAT, if Satellite Radio is activated).
For iPod®:
■
Push the switch UP
/next track.
■
Push the switch UP
previous index.
or DOWN
for less than 1.5 seconds to skip to the previous
or DOWN
for more than 1.5 seconds to skip to the next or
NAVIGATION
For Audio CD and CD with MP3/WMA/AAC:
■
Push the switch UP or DOWN for less than 1.5 seconds to return to the
beginning of the current track/folder/file or skip to the next track/folder/file.
Push several times to skip BACKWARD or FORWARD through multiple tracks/
folders/files.
■
Push the switch UP or DOWN for more than 1.5 seconds to change to the
previous/next CD (for 6-Disc CD changers [if so equipped]) or the next folder on
the CD with MP3/WMA/AAC.
■
Push the switch UP or DOWN for less than 1.5 seconds to skip to the previous
/next track.
Push the switch UP or DOWN for more than 1.5 seconds skip to the next
folder number.
13
CONVENIENCE
For USB Memory:
■
3
4
VOLUME CONTROL Switch
Push the – or + side of the VOLUME CONTROL
the volume of the source currently playing.
switch to decrease or increase
TALK/PHONE & PHONE END Buttons (if so equipped)
Push the TALK/PHONE button
to activate the INFINITI Voice Recognition
system or to turn off voice guidance.
■
If a Bluetooth®-enabled cellular phone has been paired to the vehicle and is
to answer and initiate (via Voice
selected, push the TALK/PHONE button
Recognition) phone calls.
■
■
Push the PHONE END button
Voice recognition session.
to end phone calls or to cancel an INFINITI
Notes: *Requires an active XM® satellite radio subscription.
Vehicle Dynamic Control
The Vehicle Dynamic Control (VDC) system monitors driver inputs and vehicle motion. Under
certain conditions, it controls braking and engine output to help the driver in handling the
vehicle. VDC does not prevent accidents due to careless or dangerous driving techniques.
Always be mindful of vehicle speed and driving conditions. VDC may need to be temporarily
shut off if you are trying to free a vehicle stuck in snow or mud.
■
Push the Vehicle Dynamic Control (VDC) OFF switch to deactivate the VDC system.
The light will illuminate in the instrument panel gauge area.
■
■
Push the Vehicle dynamic control (VDC) OFF switch again to activate the VDC system.
The light will turn off in the instrument panel gauge area.
The VDC system is active while the vehicle is running until the switch is pushed to turn off.
Forward Collision Warning & Lane Departure Warning
(if so equipped)
The Forward Collision Warning (FCW) system generates a warning indicator
and sounds an audible warning when it judges that your vehicle is
getting close to a vehicle ahead in the travel lane.
■
When ON, this system will function only at vehicle speeds over 10 MPH.
The Lane Departure Warning (LDW) system generates visual and
audible warnings indicating that your vehicle is about to unintentionally move out of its
travel lane.
■
When ON, this system will function only while driving at speeds over 45 MPH and when
lane markers are clearly visible on the road.
■
If the system detects an unintentional lane departure, the Lane Departure Warning
indicator light
(located in the tachometer) will illuminate orange, blink and a
repetitive tone will sound.
■
The LDW indicator light and repetitive warning tone will not activate when the turn
signal is operated and the vehicle changes travel lanes in the direction of the signal.
FCW and LDW operate in one of two modes:
■
■
14
AUTOMATIC MODE
MANUAL (OFF) MODE
GETTING STARTED
driving controls
Automatic Mode
The FCW and LDW systems are automatically ON when you start the vehicle. The indicator
light on the FCW/LDW button will illuminate indicating the system is ON.
DRIVING CONTROLS
To Turn OFF FCW and LDW for One Drive ONLY:
Press the FCW/LDW button. The indicator light on the button will go out.
Manual (OFF) Mode
For your convenience, you may choose to manually override the FCW and LDW systems
so that they do not turn ON when you start the vehicle. In MANUAL (OFF) mode, there will
be no visible or audible warnings when your vehicle is about to move out of its travel lane
and/or is getting close to a vehicle ahead in the travel lane.
COMFORT
To Change from AUTOMATIC MODE to MANUAL (OFF) MODE:
1 Push the ignition switch to ON mode.
2 Verify the FCW/LDW button indicator light is illuminated after the 3-second self check.
3 Press the FCW/LDW button to turn OFF the system. The indicator light on the button will go out.
4 Press and hold down the FCW/LDW button for approximately 4 seconds until a repetitive
chime sounds.
MEDIA CENTER
To Change from MANUAL (OFF) MODE to AUTOMATIC MODE:
1 Push the ignition switch to ON mode.
2 Verify the FCW/LDW button indicator light is not illuminated after the 3-second self check.
3 Press and hold down the FCW/LDW button for approximately 4 seconds until a repetitive
chime sounds.
4 Press the FCW/LDW button to turn ON the system. The indicator light on the button
will illuminate.
Lane Departure Prevention (LDP) System
(if so equipped)
NAVIGATION
When the Lane Departure Prevention (LDP) system is ON and the feature senses unintentional
drift from your traveling lane, it will:
■
Generate visual and audible warnings. The Lane Departure Warning indicator light
(located inside the tachometer) will turn orange and blink and a repetitive tone will sound.
■
Automatically apply selected brakes for a short period of time to help ease your vehicle
back between the lines.
Note:
■
■
LDP warning and brake assist will not activate when the turn signal is operated and the vehicle changes travel lanes
in the direction of the turn signal.
The Lane Departure Warning and Lane Departure Prevention systems operate above approximately 45 mph, and
only when lane markings are clearly visible on the road. They will not prevent loss of control.
Note:
■
■
■
You can operate the Lane Departure Prevention feature while Lane Departure Warning is in Manual (OFF) mode.
Press the LDP button, the Distance Control Assist system will also turn on or off simultaneously.
The Lane Departure Prevention system can be individually set to on or off on the display. Refer to your vehicle
Owner’s Manual.
15
CONVENIENCE
To Turn ON/OFF LDP System:
1 Press the LDP button on the steering wheel. The LDP system indicator
light will illuminate green
when Lane Departure Prevention (LDP) is ON.
2 Press the LDP button again to turn OFF the system. The LDP indicator
light will go out.
Distance Control Assist
(if so equipped)
The Distance Control Assist (DCA) System senses your vehicle’s relative speed and distance
between it and the vehicle ahead in your traveling lane. When DCA is ON, the system can provide accelerator pedal feedback (prompting the driver to remove his/her foot from the pedal)
and apply automatic brake control (if his/her foot is removed from the accelerator pedal)
to decelerate the vehicle and help the driver with maintaining a safe following distance.
To Turn ON/OFF DCA:
1 Press the DCA button on the steering wheel. The DCA system indicator light will illuminate
(located on the dot matrix display between the tachometer and speedometer)
when Distance Control Assist (DCA) is ON.
2 Press the DCA button again to turn OFF the system. The DCA indicator light will go out.
Note:
■
■
■
This system is an aid in which only a portion of braking system capacity is used, and it should not be relied on to stop
the vehicle or keep the vehicle stationary. It is the driver’s responsibility to always maintain vehicle braking control.
Press the DCA button, the Lane Departure Prevention system will also turn on or off simultaneously.
The Distance Control Assist system can be individually set to on or off on the display. Refer to your vehicle Owner’s
Manual.
Intelligent Brake Assist
(if so equipped)
The Intelligent Brake Assist (IBA) system generates visual and audible warnings when
it detects that there is a risk of collision with the vehicle ahead in the traveling lane. IBA
will automatically turn ON when the vehicle is started. IBA functions when your vehicle
is driven at speeds of approximately 10 MPH and above and when the vehicle’s distance
sensor detects your vehicle speed is approximately 10 MPH faster than that of the vehicle
ahead in the travel lane. The vehicle ahead detection indicator light
in the speedometer
blinks and a warning chime sounds to alert the driver to take avoidance action immediately.
The system measures the distance to the vehicle ahead and applies the brakes when it
judges that a collision cannot be prevented to help reduce collision speed.
To Turn OFF IBA:
Press and hold the IBA button for more than 1 second after starting the vehicle. The
indicator light (located between the tachometer and the speedometer) will illuminate.
All-Wheel Drive (AWD)
(if so equipped)
The All-Wheel Drive (AWD) System enhances all-weather performance by supplying driving
power to the front wheels (in addition to the rear wheels) in various traction conditions.
Snow Mode On/Off Switch
Driver-selectable “Snow Mode” helps improve low speed traction for
slick weather conditions.
■
Push the SNOW switch ON for slick road conditions. By reducing
throttle sensitivity, drivability is enhanced. The indicator light on
the switch will illuminate when Snow Mode is ON.
■
16
Push the switch OFF for automatic AWD operation.
GETTING STARTED
driving controls
Rearview Monitor
(if so equipped)
DRIVING CONTROLS
When the transmission is in R (REVERSE),
the center Display Screen will automatically
change to view the area behind the vehicle.
Approximate Distance to Objects:
Green
= 7 - 10 feet
Yellow
= 3 feet
Red
= 1.5 feet
Around View Monitor (AVM)
(if so equipped)
COMFORT
The Around View Monitor (AVM) system is intended to help reduce the number of blind
spots for the driver when parking the vehicle. This system provides you with an overhead
360° view of other cars and objects but should be used only as a secondary means to
check areas surrounding the vehicle. Different views from around the vehicle can be shown
on the Information Display Screen. The Around View Monitor display consists of the left
and the right screens.
MEDIA CENTER
Operating the Around View Monitor
With the ignition switch in ON mode, press the CAMERA button or move the shift lever to
R (REVERSE).
When the shift lever is moved to R (REVERSE),
the Rear View will display on the left side of the
screen. When the shift lever is moved out of
R (REVERSE), the Front View will display.
Note: Front View will not operate when the vehicle is traveling
above 6 mph.
Right Side of the Screen
When the shift lever is moved to R (REVERSE), the Bird-Eye View will display on the right
side of the screen.
NAVIGATION
17
CONVENIENCE
To Switch Views Displayed on the Right Side of the Screen:
With the Around View Monitor ON:
■
Press the CAMERA button to switch to the
Front-Side View. Press the CAMERA button
again to switch back to the previous screen.
(While in reverse) Press the CAMERA button
to switch to the Front-Side View. Press the
CAMERA button again to switch Bird-eye View.
OR
■
Select a button below on the Information Display Screen to change view.
TOP (Bird-eye View), SIDE (Front-Side View) or Wide (Rear-Wide View (in reverse))
then press ENTER.
Customizing the Around View Monitor Settings
Predictive Course Lines, Camera View Priority,
Color/Brightness Combination, Blind-Spot Reminder
and Sensor Beep:
1 With the transmission in P (PARK), apply the
parking brake and push the ignition switch to
ACC or ON mode. Do not start the vehicle.
2 Press the SETTING button.
3 Highlight Others, then press ENTER.
4 Highlight Camera, then press ENTER.
5 Highlight the desired function, make the desired adjustments, then press ENTER.
Sonar System
When a corner of the vehicle moves close to an object and this feature is turned ON, an
indicator will display on the Front-Side View and Bird-eye View of the Information Display
Screen and a tone will sound to warn the driver. As the vehicle moves closer to an object,
the indicator color and blinking rate will change and the volume of the tone will increase.
Corner Sonar Sensitivity
Adjust the sensitivity level of the corner sonar on the Information Display screen, press (–)
for lower or (+) for higher, then press ENTER.
To Turn OFF the Warning Tone:
With the Around View Monitor ON, push the SETTING button and select Sonar beep then
press ENTER.
OR
Go to the Settings menu for Around View Monitor and select Sonar Beep then press ENTER.
Notes:
■
The Around View Monitor System cannot be adjusted while driving the vehicle.
■
To exit the Around View Monitor screen, press any button surrounding the INFINITI Controller other than the
CAMERA button.
■
Guiding lines and the Bird-Eye View may be affected by the number of vehicle occupants, fuel level, vehicle
position, road condition and road grade.
■
Objects that are above the cameras cannot be displayed. In the Bird-Eye View, tall objects near the edge of the
vehicle, such as a curb may be misaligned or not displayed at the seam of the views.
■
Do not use the Around View Monitor while the outside (sideview) mirrors are folded inward.
■
Keep the sonar sensors (located on the front and rear bumper fascia) free from snow, ice and accumulations of dirt.
18
GETTING STARTED
comfort
DRIVING CONTROLS
Heater and Air Conditioner
Dual Zone Automatic Temperature Control
(if so equipped)
To Turn ON/OFF the Temperature Controls:
■
Push the AUTO knob to turn ON the system.
■
Press the OFF button to turn OFF the system.
Note: The Climate Control system will activate using the settings last selected.
COMFORT
The AUTO mode setting can be used year round. It allows the system to
self adjust to maintain a selected temperature (automatic cooling and/or
dehumidified heating). Air flow distribution and fan speed are also controlled
automatically.
AUTO Mode vs. DUAL Mode
■
MEDIA CENTER
M
■
AUTO mode allows the driver to control temperature for self and
front passenger.
DUAL mode allows the driver and front-passenger control of their own
cabin temperatures.
Push or rotate the DUAL knob to turn ON DUAL mode. An indicator light near
the DUAL knob will illuminate and the word “Dual” will display on the Information Display Screen. Push the DUAL knob again to turn OFF DUAL mode.
To Change Temperature Settings:
In AUTO mode, rotate the AUTO knob to increase or decrease the
temperature and set it to the desired level. For normal automatic
climate control operation, adjust the temperature to about 75˚F.
■
In DUAL mode, rotate the DUAL knob to adjust the front-passenger
temperature setting and rotate the AUTO knob to adjust the
driver’s temperature setting.
NAVIGATION
■
19
CONVENIENCE
To Control Fan Speed:
1
Press the Fan Speed Control buttons,
+ or
– to manually adjust
fan speed UP or DOWN. The fan speed indicator symbol on the Information
Display screen will change as fan speed is increased/decreased. The
mode will change from AUTO to MANUAL mode (“AUTO” no longer
appears on the screen).
2
Press the AUTO knob to return to automatic control of fan speed.
To Turn ON the Air Conditioning:
Press the A/C button. The indicator light on the button will illuminate.
To Turn ON the Heat:
1
Press the A/C button until “A/C OFF” is displayed on the Information
Display Screen and the indicator light on the A/C button turns OFF.
2
Rotate the AUTO knob (in AUTO mode) or the AUTO knob and DUAL knob
(in DUAL mode) to increase or decrease cabin temperature.
Note: For optimum system operation, DO NOT set the inside cabin temperature lower than the outside
air temperature.
To Choose Fresh or Recirculated Air:
Press the Fresh Air/Air Recirculation (Intake Air Control) button to select between:
■
Fresh (outside) air for cooling/heating/defrosting. The indicator light
under the button icon will illuminate when fresh air is selected.
■
Recirculated (inside) air for maximum A/C cooling performance and to
prevent unwanted outside odors from entering the vehicle. The indicator
light under the button icon will illuminate when recirculated air is selected.
Notes:
■
■
■
On vehicles equipped with the Automatic Temperature Control system, the recirculated air mode
cannot be activated when the system is set to A/C and the Front Defroster is ON.
Extended use of recirculated air may cause the inside of the windows to fog up.
While in AUTO mode, intake air is also controlled automatically. To manually control intake air
while in AUTO mode, press the Intake Air Control button. To return to automatic control mode,
press and hold down the Intake Air Control button for approximately 2 seconds. Both indicator
lights on the button will flash twice. Intake air will once again be automatically controlled.
To Manually Change Air Flow:
Press the MODE button repeatedly to select air flow location.
Air flows from center and side vents.
Air flows from center, side and foot vents.
Air flows mainly from foot outlets.
Air flows from the front defroster and foot outlets.
Note: The air flow indicator symbols will illuminate on the Information Display screen.
To Turn ON/OFF the Front Defroster:
1
Press the Front Window Defroster button
light on the button will illuminate.
to turn it ON. The indicator
Notes:
■
■
2
3
4
20
Pressing the Front Window Defroster button provides the best possible defrost action. This is the
preferred method for quickly defrosting the window (rather than choosing the front defroster and
foot outlets in Manual Air Flow control mode, which is less efficient).
When you press this button, you may hear a click noise from the engine area. This is normal. The
Air Conditioner compressor is being activated. With the A/C ON, moisture is pulled from the air, helping
to defrost the inside of the windows more quickly.
Rotate the AUTO knob to set the desired temperature.
Press the + Fan Speed Control button
+ to set fan speed to maximum.
Press the Front Window Defroster button again to turn it OFF, or press the
AUTO knob to return to AUTO mode.
GETTING STARTED
comfort
DRIVING CONTROLS
To Turn ON/OFF the Rear Defroster:
to turn it ON. The indicator
1
Press the Rear Window Defroster button
light on the button will illuminate.
2
Press the button again to turn it OFF. Or, it will turn OFF automatically after
approximately 15 minutes.
Heated Front Seats
(if so equipped)
To Turn ON/OFF or Adjust the Driver’s or Front-Passenger’s
Heated Seats:
■
For high heat, press the HI side of the switch. For low
heat, press the LO side of the switch. The indicator
light on the switch will illuminate when LO or HI is selected.
■
To turn OFF the seat heater, press the seat heater switch to the level position. The
indicator light on the control dial will go out when the seat heater is OFF.
COMFORT
MEDIA CENTER
M
NAVIGATION
CONVENIENCE
21
AUDIO SYSTEM
AM•FM•SAT Radio with
Compact Disc (CD) Player
Note: No satellite radio reception
is available and no SAT-related
information will be displayed
when the RADIO AM·FM Button/
AM•FM·SAT Button is pressed
unless an XM® satellite radio
service subscription is active.
RADIO AM•FM
AUX
RADIO AM•FM Button (for vehicles without the INFINITI Navigation system)
Press to change radio bands: AM -> FM1 -> FM2 -> XM1 -> XM2 -> XM3 -> AM, etc.
(requires an active XM® satellite radio subscription)
AM•FM•SAT Button (for vehicles with the INFINITI Navigation system)
Press to change radio bands: AM -> FM1 -> FM2 -> XM1 -> XM2 -> XM3 -> AM, etc.
(requires an active XM® satellite radio subscription)
AUX Button (for vehicles without the INFINITI Navigation system)
While an external device such as a portable DVD player is being used to play
movies in the vehicle (by connecting to the auxiliary jacks, located in the center
console), press this button to switch the movie to the Information Display Screen.
Note: The vehicle must be stopped and the parking brake set. Individual settings for playback can be
made by selecting Settings on the Information Display Screen.
DISC Button (for vehicles without the INFINITI Navigation system)
Press to activate and display the following modes:
■
iPod® (if so equipped and if a compatible device is connected)
■
Audio CD or CD with MP3/WMA/AAC in the in-dash CD player (if a disc is
loaded in the CD player)
■
USB Memory
DISC•AUX Button (for vehicles with the INFINITI Navigation system)
Press to activate, display and play:
■
Audio CD or CD with MP3/WMA/AAC in the in-dash CD player (if a disc is
loaded in the CD player)
■
DVD (if so equipped)
■
AUX (if an external device is connected)
■
iPod® (if a compatible device is connected)
■
Music Box™ (if songs are stored)
■
USB Memory
■
Bluetooth® Streaming Audio (if a compatible device is connected)
Note: To view movies on the vehicle’s Information Display Screen, the transmission must be in P (PARK)
with the parking brake applied, and the ignition switch in ACC or ON mode. Press the DISC AUX button
on the instrument panel to display the movie.
STATUS Button
Press to display different views of vehicle systems information on the
Information Display Screen for example:
■
Audio
22
Note: If you are listening to a Satellite Radio channel, when you press the STATUS button you will be able to view
information about the music playing, including; SAT Channel name/music genre, artist and song title.
GETTING STARTED
media center
9
1
4
3
5
DRIVING CONTROLS
2
6
7
8
■
■
Audio and Heater/Air Conditioning information
Audio and Fuel Consumption
Audio and Navigation information (if equipped with the INFINITI Navigation system
COMFORT
■
and if a destination has been set)
1
2
MEDIA CENTER
3
VOL (VOLUME)/PUSH ON·OFF Knob
■
Push 1 to turn the audio system ON/OFF.
■
Turn 1 to adjust volume level.
SCAN Button
For Radio:
Press to scan within a band (AM, FM, SAT). The scan stops at each station
for 5 seconds. When you find a station that you want to listen to, press
the button again to stop at that station.
RDM/RPT Button
Press the RDM/RPT button multiple times to change the play pattern as
shown to the right.
NAVIGATION
1 DISC
RPT
CONVENIENCE
23
4
5
6
7
8
9
SEEK•CAT Button
Press and release –
■
For AM/FM: Seeks BACKWARD, stopping at the previous
broadcasting station.
■
For SAT: Push to tune to the previous XM® Satellite radio category.
■
For Audio CD, CD/with MP3/WMA/AAC, USB, Music BoxTM and
Bluetooth® Streaming Audio: The track currently playing will replay
from the beginning.
Press and hold down for more than 1.5 seconds –
■
For Audio CD, CD/with MP3/WMA/AAC, USB, Music BoxTM and Bluetooth®
Streaming Audio: Rewinds through the track currently playing.
TRACK Button
Press and release –
■
For AM/FM: Tracks FORWARD, stopping at the next broadcasting
station.
■
For SAT: Push to tune to the first channel of the next XM® Satellite
radio category.
■
For Audio CD, CD/with MP3/WMA/AAC, USB, Music BoxTM and
Bluetooth® Streaming Audio: Skips to the next track.
Press and hold down for more than 1.5 seconds –
■
For Audio CD, CD/with MP3/WMA/AAC, USB, Music BoxTM and
Bluetooth® Streaming Audio: Fast-forwards through the track
currently playing.
Station Preset Buttons (1-6)
Press to select preset radio stations.
CD Eject Button
■
Press the button to eject the CD.
CD Insert Slot
■
Insert a CD into the slot to load it into the player.
TUNE/FOLDER·PUSH/AUDIO Knob
■
Rotate to manually tune radio stations UP or DOWN (e.g. tune from
105.1 to 105.3).
■
Rotate to select different Music BoxTM songs by artist, category, etc., or
to select MP3/WMA/AAC folders if a CD with MP3/WMA/AAC is in the
CD player.
■
Push to display, then turn to adjust: Bass, Treble, Balance and Fade.
Note: When an iPod® is connected and a track is playing, turn the TUNE/FOLDER•PUSH/AUDIO knob to
adjust Bass, Treble, Balance and Fade.
How to Customize Radio Presets
With the SCAN button, you can program up to 18 radio stations (AM, FM and SAT*)
into three separate preset memory banks – six stations for each PRESET bank.
1
Press the SCAN button to select bank A, B or C.
Note: PRESET A, B or C will illuminate on the Information Display screen to show which bank
is activated.
RADIO AM•FM
2
24
Press the RADIO AM•FM button/AM•FM•SAT button to select the AM, FM
or SAT* radio band.
GETTING STARTED
media center
3
4
DRIVING CONTROLS
5
Tune to the desired station using the SEEK•CAT or TRACK buttons or the
TUNE/FOLDER•PUSH/AUDIO knob.
Press and hold down the desired Station Preset/Disc Select button
(1 through 6) until you hear a beep sound.
Repeat the above steps to program up to 18 stations.
Note: AM, FM and SAT* stations can be mixed within any of the A, B or C preset banks. *Only available
if an XM® satellite radio service subscription is active.
How to Customize Tone Settings
Bass, Treble, Balance, Fade, Speed Sensitive Volume,
Precision Phased Audio and Driver’s Audio Stage
(if so equipped)
Press the SETTING button
.
Select the “Audio” Key.
Select the feature to be adjusted using the touch
screen or INFINITI Controller.
COMFORT
1
2
3
Music Box™
(for vehicles with the INFINITI Navigation system)
MEDIA CENTER
The Music Box Hard Drive audio system can record and store songs from a CD being
played from the in-dash CD player. Refer to Audio System, beginning on page 22, and
Steering Wheel Controls, beginning on page 11, to view audio system button functions
applicable to Music Box™ operation.
To Record a CD to the Hard Drive:
1
Operate the audio system to play a CD.
2
Select the “Start Rec” or “Rec” Key.
NAVIGATION
To Automatically Record Songs to the Hard Drive:
If the “Automatic Recording” function is turned ON, recording starts when a CD is inserted
and playing in the CD player.
1
Press the DISC•AUX button until the Music Box™ mode displays on the Information
Display Screen.
2
Select the “Menu” Key.
3
Select the “Music Box Setting Info.”
4
Select the “Music Box Settings” Key.
5
Select the “Automatic Recording” Key.
25
CONVENIENCE
To Play Recorded Songs :
Activate the Music Box™ system by using one of the following methods:
1
Push the Source select switch on the steering wheel.
2
Push the DISC•AUX or DISC button until the Music Box™ mode displays on the Information
Display screen.
3
Give the “Music Box Play” voice command using the INFINITI Voice Recognition system.
To Stop Playback:
The Music Box™ system stops playing when:
1
Another mode (radio, CD, USB or AUX) is selected.
2
The audio system is turned off.
3
The ignition switch is pushed to the LOCK (OFF) mode.
4
The SEEK•CAT or TRACK button is pushed for more than 1.5 seconds while a track is
being played. When the button is released, the track will return to normal play speed.
5
The SEEK•CAT or TRACK button is pushed for less than 1.5 seconds while a track is
being played, (the next track or the beginning of the current track will be played).
Missing Song Information:
If the track, artist and album information is not displayed while using the Music BoxTM,
they may be available through an update. Visit www.INFINITI.com/music-update for
complete instructions.
USB Memory Operation
■
■
The USB input jack is located in the center console. Remove the protective cover
from the USB jack, then insert the USB device into the jack. When a compatible
storage device is plugged into the jack, such as an iPod®, compatible audio files on
the storage device can be played through the vehicle’s audio system.
Press the DISC•AUX button to switch to the USB memory mode. Depending on how
the audio files are encoded, information about the audio files (Folder, Song, Artist,
Track Number and Number of Total Tracks in the Folder) being played will be shown
on the display screen of the vehicle.
Playing an iPod®
Connect the cable that is supplied with your iPod® to the USB jack, and then attach the
other end of the cable to your iPod®. If compatible, the battery of your iPod® will charge
during the connection to the vehicle.
The interface for iPod® operation shown on the vehicle’s display screen is similar to the iPod®
interface. The iPod® can only be operated by the vehicle audio controls while connected.
Notes:
■
■
■
The iPod® can be operated only through the vehicle audio system and steering wheel controls while the iPod® is
connected to the vehicle.
The battery of your iPod® will charge when the connection is active and the ignition switch is in ON or ACC mode.
You can view videos on the Information Display screen by disconnecting the interface system cable and connecting
an A/V cable from your iPod® to the auxiliary input jacks located inside the center console. The transmission must
be in P (PARK) with the parking brake engaged to view images on the Information Display screen.
Bluetooth® Streaming Audio (for vehicles with INFINITI Navigation system)
Your INFINITI is equipped with Bluetooth® Streaming Audio. If you have a compatible
Bluetooth® device with streaming audio you can set up a wireless connection between your
Bluetooth® device and the in-vehicle audio system. This connection allows you to listen to
the audio from the Bluetooth® device using your vehicle speakers.
Connecting Procedure
1 Push the
button and select the “Bluetooth” key.
2 Select the “Connect Bluetooth” key.
26
GETTING STARTED
media center
3
4
5
DRIVING CONTROLS
A confirmation screen will be displayed. Select “No.”
Choose a PIN code and select the “OK” key.
The standby message screen will appear. Enter the PIN code into the Bluetooth® audio
device. When the connecting is completed, the screen will return to the Bluetooth®
setup display.
Bluetooth® Hands-free Phone System with Navigation
(if so equipped)
With an overhead microphone and sound transmitted through the audio system speakers,
the Bluetooth® Hands-free Phone System utilizes Bluetooth® wireless technology, a touchscreen and voice recognition to provide hands-free cellular phone communication.
■
■
■
■
To increase or decrease the volume of the voice prompts, push the + or – (volume) control
switch on the steering wheel or turn the VOL (volume) knob on the audio system while the
system is responding.
Speak in a clear and natural voice without pausing between words.
The “Help” command will bring up the voice recognition command list.
Please refer to the cellular phone manufacturer’s Owner’s Manual for detailed information
regarding your Bluetooth® phone.
For recommended phones and detailed instructions, please visit
www.infinitiusa.com/bluetooth.
MEDIA CENTER
■
COMFORT
System Operation Tips
■
Close all windows. Surrounding noises may interfere with system operation and performance.
■
Press the button on the steering wheel to activate voice recognition.
■
Wait for the “Would you like to access Phone, Navigation, Information, Audio or Help?”
prompt and the listening tone before speaking.
■
Begin speaking a command within 1.5 seconds of the listening tone.
■
To cancel a voice recognition session, press and hold the button for 2 seconds.
NAVIGATION
Connecting Your Phone
Before using the hands-free feature, you need to set up, or
connect, the system to recognize your compatible cellular
phone(s). Five compatible Bluetooth®-enabled phones
can be connected. After setup, the system automatically
connects with a connected phone when the ignition is in
the ACC or ON position, as long as the phone is on and in
the vehicle.
Connecting Procedure
NOTE: The vehicle must be stationary when connecting the phone.
Press the SETTING button and select the “Bluetooth” key.
Select the “Connect Bluetooth” key and a pop up box will appear.
Read the information and select “Yes.”
27
CONVENIENCE
1
2
3
4
5
Initiate connecting from the phone.
■
The connecting procedure for cellular phones varies according to each cellular phone
model. For detailed connecting instructions and compatible phones, please visit
www.infinitiusa.com/bluetooth.
■
The PIN code will appear on the screen (1234 is the default).
When the connecting is complete, the screen will return to the Bluetooth® screen.
Setting Up Your Phonebook - Adding New Entries
Up to 40 phone numbers can be stored in the phonebook.
NOTE: The vehicle must be stationary when adding new entries.
1
2
Press the SETTING button and select the “Phone” key,
then select the “Vehicle Phonebook” key.
Select the “Add New” key at the top of the display.
There are different methods to input a phone number.
Select one of the following options:
■
“Copy from Call History” to save a number from
the Outgoing, Incoming or Missed Calls lists.
■
“Copy from the Handset” to save a number that has
been downloaded from your handset to the vehicle.
■
“Enter Number by Keypad” to input the number
and name manually.
Many phones will support an automatic download of the cellular phone’s phonebook. This
process may take up to 5 minutes depending on the size of your phonebook. Once the
phonebook is downloaded, selecting “Handset Phonebook” will allow you to access your
downloaded phonebook (up to 1,000 entries) instead of using the “Vehicle Phonebook” key.
Making a Phone Call
To make a call, follow the procedures below:
1
Press the button on the steering wheel. The
“Phone” screen will appear on the display.
2
Select “Vehicle Phonebook,” “Call History” or
“Handset Phonebook.”
3
Select the registered person’s name from the list. Dialing will start.
Receiving/Ending a Phone Call
■
There are no voice commands for receiving or ending
a phone call.
■
To accept the call, press the button on the steering
wheel or select the “Answer” key. To reject the call,
select the “Reject Call” key. To hang-up, press the
button or select the “Hang-Up” key.
■
Pressing the
button during a connected phone call will allow you to send digits and
special characters. After speaking the desired digits, press the ENTER button to send
the recognized information.
28
GETTING STARTED
media center
■
Only single digits 0 (zero) to 9 (nine) can be spoken.
When saying the phone number 800-662-6200, the system will accept “eight hundred”
in addition to “eight zero zero” or “eight oh oh.” 500, 700 and 900 are also supported.
■
The long-distance calling prefix “1” is not required when making a call.
■
DRIVING CONTROLS
How To Say Numbers
The system provides two commands for entering and dialing a phone number: “DIAL” and
“INTERNATIONAL CALL.” The “DIAL” command is used for domestic phone numbers up to
10-digits in length, starting with the area code. The “INTERNATIONAL CALL” command is used
when more than 10-digits need to be dialed or when special characters are required, such as: *,
# or +. When using these two commands, please follow the phone digit speaking rules below:
COMFORT
“Dial” Command Only
■
You can say all the digits of a 7- or 10-digit phone number at one time.
■
For a 10-digit number, saying the phone number in groups of 3, 3 and 4 digits may
improve recognition for some speakers. To use this group dialing method, say only the
first 3 digits of the phone number. After the system recognizes the number, it will
request the next 3 digits and finally the last 4 digits.
■
If a phone number is incorrectly recognized, you can try entering the phone number
again using the 3-3-4 group dialing procedure by saying, “CHANGE NUMBER.”
MEDIA CENTER
"International Call" Command Only
■
You can say the entire phone number at once or in groups of any digit length.
■
For *, # and +, say “STAR,” “POUND” or “PLUS,” respectively.
Bluetooth® System for Vehicles without Navigation
(if so equipped)
With an overhead microphone and sound transmitted through the audio system speakers,
the Bluetooth® Hands-free Phone System utilizes Bluetooth® wireless technology and voice
recognition to provide hands-free cellular phone communication.
System Operating Tips
■
■
■
■
■
■
■
29
CONVENIENCE
■
NAVIGATION
■
Close all windows. Surrounding noises may interfere with system operation and
performance.
Press the
button on the steering wheel to activate voice recognition.
Wait for the tone before speaking.
Begin speaking a command within 5 seconds of the tone.
Speak in a clear and natural voice without pausing between words.
To go back to the previous command, say “Go back” or “Correction.”
To cancel a voice recognition session, simply wait 5 seconds, say “Cancel” or “Quit,”
or press the
button.
To increase or decrease the volume of the voice prompts, push the VOL (volume) control
switch + or – on the steering wheel or turn the POWER/VOLUME knob on the audio
system while the system is responding.
If the Voice Recognition system does not recognize your voice commands, train the system
using the Speaker Adaptation Mode. See your Owner’s Manual for detailed information.
■
■
■
■
Some commands are not available while the vehicle is in motion.
The “Help” command can be used in any menu to hear a list of available commands.
Please refer to the cellular phone manufacturer’s Owner’s Manual for detailed information
regarding your Bluetooth® phone.
For recommended phones and detailed instructions, please visit
www.infinitiusa.com/bluetooth.
Connecting Your Phone
To use the hands-free feature, you need to set up, or connect, the system to recognize your
cellular phone(s). Five compatible Bluetooth®-enabled phones can be connected. After
setup, the system automatically connects with a connected phone when the ignition is in the
ACC or ON position, as long as the phone is on and in the vehicle.
NOTE: Some cellular phones require the user to enable the automatic reconnection feature. Please refer to the cellular phone
manufacturer’s Owner’s Manual for Bluetooth® setup information.
Connecting Procedure
NOTE: The vehicle must be stationary when connecting the phone.
1
2
3
4
5
Press the
button on the steering wheel. The system announces the available
commands.
Say “Connect Phone.”
The system acknowledges the previous command and announces the next set of available
commands. Say “Add phone.”
Initiate connecting from the phone.
■
The connecting procedure varies according to each cellular phone model. For detailed
connecting instructions and a list of compatible phones, please visit
www.infinitiusa.com/bluetooth.
■
The PIN code will appear on the screen (1234 is the default).
Say a name for the phone when the system asks you to provide one. You can give the
phone a name of your choice.
Making a Phone Call
1 Press the
button.
2 After the tone, do one of the following:
■
Say “Call.” After the system responds, say the name of the person in the phonebook.
■
Say “Call Phone Number.” After waiting for the tone, say [number]. For example, say
“Call Phone Number.” After waiting for the tone, say “123-456-7891.”
■
Say “Redial” to redial the previous phone number.
■
Say “Call Phone Number.” After the system responds, say “Special Number” to dial
more than 10 digits or special characters.
■
You can say all the digits of a 7- or 10-digit phone number at one time.
■
For a 10-digit number, saying the phone number in groups of 3, 3 and 4 digits may
improve recognition for some speakers. To use this group dialing method, say only
the first 3 digits of the phone number. After the system recognizes the number, it will
request the next 3 digits and finally the last 4 digits.
30
GETTING STARTED
media center
■
■
If a phone number is incorrectly recognized, you can try entering the phone number
again using the 3–3–4 group dialing procedure by saying “Correction.”
When you have finished speaking the phone number wait for the system to repeat
it back to you, then say “Dial.”
DRIVING CONTROLS
Receiving/Ending a Phone Call
When you receive a phone call, a ring tone sounds through the audio system.
■
■
To accept the call, press the
button. To reject the call, press the
button.
To hang up the phone at the end of a call or to disconnect during call placement,
press the
button.
COMFORT
How To Say Numbers
INFINITI voice recognition permits numbers to be spoken in a variety of ways.
■
Say “zero” or “oh” for “0.” Example: 1-800-662-6200 – Say “one eight zero zero six
six two six two oh oh.”
■
Say “pound” for “#.” Say “star” for “*” (available when using the “Call Phone Number”
then “Special Number” command and the “Send” command during a call).
■
Say “plus” for “+” (available only when using the “Call Phone Number” then “Special
Number” command).
■
Say “pause” for a 2-second pause.
4
NAVIGATION
2
3
MEDIA CENTER
Using Your Phonebook
When a compatible phone is connected to the system, the phonebook is automatically
downloaded. This allows you to access your phonebook from the Bluetooth® system to call
contacts by name. Up to 1,000 phone numbers will be transferred. To access your phonebook:
button and wait for the tone.
1 Press the
2 Say “Phonebook.”
3 Wait for the tone, then say [a name] or say “List names.” The name must be said exactly
as it is entered in your phonebook for the system to recognize it. For example, say
“Phonebook” then after the system responds, say “Michelle.”
The phonebook can transfer multiple numbers for each entry. If you select a name with
multiple numbers, the system will ask you which number you want to dial.
The system allows for up to 40 voice tags to be recorded. You can record a voice tag for
phonebook entries that the system has difficulty recognizing or to directly dial an entry with
multiple numbers. To record a voice tag:
1 Press the
button and wait for the tone.
Say “Phonebook.”
Wait for the tone, then say [a name] or say “List names.” Select the name for which you
want to record a voice tag.
Say “Record Name.”
CONVENIENCE
31
1
10
7
9
15
13
4
16
2
17
5
3
14
6
11
8
12
INFINITI Navigation System
(if so equipped)
Refer to the 2010 INFINITI Navigation System Owner’s Manual for complete Navigation system operation instructions.
Note: The Navigation Mapping information currently installed in your vehicle is downloaded to the vehicle’s hard drive.
To order updated map data, contact the INFINTI NAVIGATION HELP DESK.
1
2
3
4
5
6
7
8
9
10
11
12
13
14
+
32
15
Information Display Screen – Displays Navigation menus and Map.
ZOOM OUT Button – Increases the Map view, showing more area.
ZOOM IN Button – Decreases the Map view, showing greater detail.
DEST (Destination) Button – Displays the Address Book and alternative
ways to program a destination (e.g. Street Address, Previous Destinations,
Points of Interest and other destination programming methods).
ROUTE Button – Displays route guidance control functions.
MAP Button – Displays the Navigation Map.
ENTER Button – Press to select menu items highlighted on the Information
Display Screen.
Center Dial – Turn the dial to navigate UP, DOWN and ACROSS the Information
Display Screen. When a Map is displayed, turn the dial to ZOOM OUT and
ZOOM IN.
Main Directional Buttons – Press to navigate UP, DOWN and ACROSS the
Information Display Screen.
Additional Directional Buttons – Depending on which map is displayed
(Plan View or Birdview™), use these buttons to make “fine tuned” movements
around the Information Display Screen.
BACK Button – Press to return to the previous function shown on the Information
Display Screen and to delete characters when using the on-screen keyboard.
VOICE Button – Press to repeat a Navigation instruction.
STATUS Button – Press to display the status of the audio, climate control
system, fuel consumption and Navigation system (if so equipped).
SETTING Button – Press to set Navigation preferences.
INCREASE BRIGHTNESS Button – Press to increase the Information Display
Screen brightness.
GETTING STARTED
navigation
16
DRIVING CONTROLS
DAY/NIGHT/OFF/BRIGHTNESS Button –
■
Press to switch the Information Display Screen between day view and
night view. Within approximately 5 seconds of pressing, you can adjust
the Information Display Screen brightness UP or DOWN by turning
the INFINITI Controller Center Dial or pressing the LEFT/RIGHT Main
Directional buttons.
Press and hold down to turn the display OFF entirely. To resume display,
press again.
DECREASE BRIGHTNESS Button – Press to decrease the Information
Display Screen brightness.
■
—
17
Switching The Map View
Press the MAP button. The current
location map screen is displayed.
2
3
4
5
Select the “Map Menu” key.
Select the “Map View” key.
Select the “Change View” key.
Select either one of the “2D” keys or one of
the “Birdview” keys to select the map view.
Press the MAP button or select the “Back”
key to accept the changes.
COMFORT
1
MEDIA CENTER
NAVIGATION
Storing Your Home (and Other Addresses)
In Your Address Book
1 Press the DEST button.
2 Select the “Home (Add New)” key. If you have
already stored your home this key may not appear.
3 When you select the “Home (Add New)” key,
a confirmation message is displayed. Touch
the “Yes” key.
4 Select the “Street Address” key. A character
input screen is displayed.
5 Enter the street number of your home, then
select the “OK” key.
6 Enter your street name, select the “List” key.
Select a destination from the displayed list.
The map screen is displayed.
7 Your home location is displayed at the center
of the map. Press the ENTER button to
confirm the location on the map.
8 A confirmation message is displayed, and the
system sets your home as the destination.
Select the “OK” key.
9 Press the MAP button to return to the current
location map screen.
CONVENIENCE
C
33
Store Current Location
You can store the current physical location of your
vehicle in your Address Book.
1 While the map screen is displayed, Press ENTER.
2 Highlight Store Location, then press ENTER.
A confirmation message will appear,
confirming that the location has been stored to
your Address Book. The location will be stored
in the first available position in your Address
Book and an icon representing the stored location is displayed on the map.
3 Press the MAP button or select the “Back” key to return to the Map screen.
Setting A Street Address As A Destination
1 Press the DEST button.
2 Select the “Street Address” key. A character
input screen is displayed.
3 Enter the house number; when finished select
the “OK” key. If you do not know the house
number, select the “No House #” key.
4 Enter the name of the street. After finishing
the entry, select the “List” key. A list of
possible street addresses is displayed.
5 Select the correct address of the destination
from the list. You might need to select the
“Up” or “Down” key to find the preferred
street address key.
6 The selected destination will be briefly
displayed before showing the entire route. Touch the “Start” key after confirming the
displayed route is acceptable. The voice guidance will begin shortly.
Moving Around Within A Map
You can manually move across the map to view the surrounding area or to view a preferred location.
1 Touch the screen in the direction that you want to move across the map. Once you begin
moving on the map, the cross pointer appears.
2 Press the MAP button or touch the “Back” key to return to the current location map
screen. The cross pointer disappears.
Setting A Place As A Destination
1 Press the DEST button.
2 Select the “Places” key.
34
GETTING STARTED
navigation
Select the preferred nearby category from
the list.
4
Select the preferred destination from the
list. The position of the selected location is
displayed on the right side of the screen.
DRIVING CONTROLS
3
NOTE: A maximum of 100 facilities can be displayed on the list screen.
If the suggested route is already set, by selecting the “Show Along
Route” key, the system displays only the facilities located along the route.
5
COMFORT
The selected destination will be briefly
displayed before showing the entire route.
Select the “Start” key after confirming the
displayed route is acceptable. The voice
guidance will begin shortly.
MEDIA CENTER
Zagat® Restaurant Guide
ZAGAT® Restaurant Guide allows you to search
restaurants registered in the ZAGAT® database. The
restaurants can be sorted by rating regarding food,
decor, cost, service, etc. To search using ZAGAT®:
1 Press the DEST button.
2 Select the “Places” key.
3 Select the “Zagat” key.
4 Select the desired state. Change the region before step 2 if needed.
5 Select a neighborhood closest to your preferred destination.
6 Select a restaurant to narrow down the cuisine type or select the “Choose name” key.
7 Select an order to sort the list.
8 Select a restaurant from the list.
9 After confirming the route, select the “Start” key to begin the route guidance.
NAVIGATION
XM NavWeather® Information
An XM® satellite radio subscription with XM NavWeather® has to be activated in order for
your vehicle to access XM NavWeather® Information.
CONVENIENCE
C
35
INFINITI Voice Recognition System
(for vehicles with the INFINITI Navigation system)
The voice recognition system allows hands-free operation of certain vehicle functions using
voice commands. Available commands are announced by the system and shown on the
vehicle’s Information Display Screen. Simply follow the instructional prompts given by the
system to complete the desired operation.
In Standard Mode (the default setting), the following systems can be operated using Voice Recognition commands:
Phone
Navigation
■
Information
■
Audio
■
Help
When the Alternate Command Mode is activated, advanced operation and an expanded list
of commands are available. Refer to “Alternate Command Mode” later in this section for
more information about this feature.
■
■
To Operate the Voice Recognition System:
1 Press the TALK button located on the steering wheel. The system will respond,
“Would you like to access Phone, Navigation, Information, Audio or Help?” and the
vehicle’s Information Display Screen will change to a list of available commands to
speak.
2 After the tone, say one of the command choices. The system will then proceed to the
next step. Continue listening to the prompts and responding with the requested
information until the operation is completed.
If you want to repeat a step or if the system incorrectly recognized your command, press
the BACK button on the steering wheel or on the INFINITI Controller.
If the system does not recognize your command, repeat the command. Avoid talking
extremely loud or slowly; the system may not recognize the command.
System Operating Tips
The interior of the vehicle should be as quiet as possible. Close the windows to eliminate
the surrounding noises.
■
Wait until the tone sounds before speaking a command.
■
Speak in a natural conversational voice with minimal pauses between words.
■
To give commands quickly, press the switch to interrupt the voice guidance.
■
When speaking an address or a phone number to dial, it is possible to transfer from
voice recognition to the button control by pressing the “Manual Controls” key on the
screen when it is displayed.
■
36
GETTING STARTED
convenience
■
■
DRIVING CONTROLS
Speaking Phone Numbers
The system provides two commands for entering and dialing a phone number: “DIAL” and
“INTERNATIONAL CALL.” The “DIAL” command is used for domestic phone numbers up to 10
digits in length starting with the area code. The “INTERNATIONAL CALL” command is used
when more than 10 digits need to be dialed or when special characters are required such as *,
#, or +. When using these two commands, please follow the phone digit speaking rules below:
■
Only single digits 0 (zero) to 9 (nine) can be spoken.
■
Speak digits at a normal pace. Speaking too slowly reduces recognition accuracy.
■
When saying the phone number 800-662-6200, the system will accept “eight zero zero”
or “eight oh oh.” 500, 700, and 900 are also supported. The 3-3-4 digit grouping is
recommended for improved recognition.
The long-distance dialing prefix “1” is not required when making a call.
For *, # and +, say “Star,” “Pound,” or “Plus,” respectively.
MEDIA CENTER
NAVIGATION
37
CONVENIENCE
Voice Command Usage – Phone System
Making a Phone Call
1 Press the TALK button on the steering
wheel. The system will respond, “Would you
like to access Phone, Navigation, Informtion, Audio or Help?” and the vehicle’s
Information Display Screen will change to
a list of available commands to speak.
2
After the tone, say “Phone.” The system will
display the available phone commands and
say “Please say Dial Number, Vehicle Phonebook, Handset Phonebook, Call History or
International Call.”
3 After the tone, do one of the following:
■
Say “Dial Number” to dial a 7- or 10- digit phone number only. Follow the prompts to
begin saying the phone number, starting with the area code. After the phone
number has been recognized, say “Dial.” If incorrect, say “Change Number.”
■
Say “Vehicle Phonebook” to say a number from the displayed list or the voice tag of
one of up to 40 phone numbers you have stored in the vehicle.
■
Say “Handset Phonebook” to say the name of one of up to 1,000 contacts
downloaded from your phone handset. (Note: The order of contact information
(first name, last name) transferred depends on the phone manufacturer. The name
must be spoken as shown in the Handset Phonebook list.)
■
Say “International Call” to dial a phone number that has more than 10 digits.
COMFORT
Voice Recognition User Guide
A simplified User Guide containing basic instructions for using the Voice Recognition system is
available for reference.
1 Press the INFO button.
2 Highlight Others, then press ENTER.
3 Highlight Voice Recognition, then press ENTER.
4 Highlight User Guide, then press ENTER.
5 Highlight the desired topic, then press ENTER. The tutorial will begin.
Receiving a Phone Call
■
There are no voice commands for receiving
or ending a phone call.
■
To accept the call, push the switch on the
steering wheel or select the “Answer” key
on the display. To reject the call, touch the
“Reject Call” key. To hang-up, push the
switch or select the “Hang-Up” key.
■
Pushing the switch during a connected
phone call will allow you to send digits and
special characters. After speaking the
desired digits, press the ENTER button to
send the recognized information.
Voice Command Usage – Navigation System
Programming a Destination – Street Address
1 Press the TALK button on the steering
wheel. The system will respond, “Would
you like to access Phone, Navigation,
Information, Audio or Help?” and the
vehicle’s Information Display Screen will
change to a list of available commands to
speak.
2 After the tone, say “Navigation.” The
system will respond, “Please say Home,
Address, Places, Address Book or Previous
Destinations.”
3 After the tone, say “Address.”
4 The system will prompt you for additional
information, such as the name of the state,
city, street, and house number. Follow the
prompts to complete the desired operation.
Notes:
■
To improve accuracy of street names, say the entire street name including Boulevard, Way, North, South, Road, etc.
■
If you do not know the house number when asked, say “No House Number,” and the system will route you to a
default location on the street.
■
If a list of choices appears, please say the number from the displayed list.
38
GETTING STARTED
convenience
DRIVING CONTROLS
Alternate Command Mode
For advanced operation, you can change to an
Alternate Command Mode that expands the available list of commands. When this mode is active,
all the Phone, Navigation, Information, Audio and
Help commands can also be spoken after pushing
the switch without first having to say the type of
command (e.g., Phone).
To Turn ON Alternate Command Mode:
1 Press the SETTING button.
2 Select the “Others” Key.
3 Select the “Voice Recognition” Key.
4 Select the “Alternate Command Mode” Key.
COMFORT
When the Alternate Command Mode is ON, perform the Speaker Adaptation procedure to train
the system to your voice. Refer to the 2010 INFINITI Navigation System Owner’s Manual for
detailed information on Speaker Adaptation and use of the Alternate Command Mode.
Automatic Drive Positioner Memory System –
Driver’s Seat, Steering & Outside Mirrors
(if so equipped)
MEDIA CENTER
When programmed, the Automatic Drive Positioner can
adjust the driver’s seat, steering column and outside mirrors
to two memorized positions.
NAVIGATION
To Set Customized Seat, Steering and Mirror Position Memory:
1
Push the ignition switch to ON mode. Keep the transmission in P (PARK).
2
Adjust the seat, steering wheel and outside mirrors to the desired positions.
3
Press the SET button. The indicator lights on both Memory buttons 1 and 2 will illuminate.
4
Within 5 seconds, press Memory button 1 or 2 and hold down for at least 1 second.
The indicator light on the Memory button you select will illuminate for approximately
5 seconds. Seat/steering/mirror memory is now set to your preference.
5
Link the seat/steering/mirror memory to your INFINITI Intelligent Key.
While the indicator light on the Memory button is illuminated (see step 4, above),
press the UNLOCK button on your Intelligent Key. The indicator light on the Memory
button chosen will blink ON and OFF approximately ten times. The memory is now
matched to the Intelligent Key. You may set the second seat/steering/mirror memory
positions to your other Intelligent Key by repeating the steps above.
Note: After step 5 is performed one time to link the seat/steering/mirror memory to your Intelligent Key, you DO NOT
need to perform this step again if new seat/steering/mirror memory positions are saved in the future. New memory
positions are automatically linked to your Intelligent Key after step 5 is performed one time.
CONVENIENCE
39
Entry/Exit Function
With the transmission in the P (PARK) position, the Memory system can automatically
move the driver’s seat BACKWARD and the steering wheel UP to make entering and exiting
the vehicle easier (Entry/Exit function).
To Turn ON/OFF Entry/Exit functions
1
With the ignition switch in ON mode, press ENTER.
2
Select Comfort & Conv.
To turn ON/OFF the Entry/Exit functions individually, highlight Lift Steering Wheel on Exit
or Slide Driver’s Seat Back on Exit, then press ENTER.
To Cancel or Activate Entry/Exit function
With the shift lever in the P (PARK) position and the ignition switch in the LOCK (OFF)
mode, hold the SET button down for more than 10 seconds. The indicator light on the
Memory buttons will blink twice to indicate ON, and once to indicate OFF.
Seat Synchronization Function
When the driver’s seat is moved to a new position, the steering column and outside
mirrors can be set to automatically adjust or “synchronize,” along with the seat position.
Notes:
■
■
Synchronization of the steering column and mirrors is set to OFF as the DEFAULT position in your vehicle at time
of delivery.
If the outside mirrors or the steering wheel reaches its operating limit of range, seat synchronization will suspend
operation. Operation can be restored by driving or by pressing the Memory button (if programmed).
To Turn ON or OFF Seat Synchronization: Hold the SET button down for more than 10
seconds with the ignition switch in LOCK (OFF) mode. The indicator light on the Memory
buttons will blink twice to indicate ON and once to indicate OFF.
To Turn OFF Seat Synchronization Functions Using the Information Display Screen:
1
Push the ignition switch to ON mode.
2
Put the shift lever in the P (PARK) position.
3
Press the SETTING button.
4
Highlight Comfort & Conv. and then press ENTER.
5
Highlight Lift Steering Wheel On Exit and turn OFF, the indicator will not illuminate
when the feature is turned OFF. Then press ENTER.
6
Highlight Slide Driver’s Seat Back On Exit, then turn it OFF. Then press ENTER.
Opening the Fuel-Filler Door
1
2
Unlock the doors with the INFINITI Intelligent Key, the Door
Handle Request switch, Power Door Lock switch or the
Mechanical Key.
Push in on the left-hand side of the fuel-filler door to open.
Note: You MUST use one of the methods noted above in step 1 to unlock the fuel-filler
door. If the driver or front-passenger uses the inside door lock knob to unlock and exit the
vehicle, the fuel-filler door will remain LOCKED and will not open.
40
GETTING STARTED
convenience
Opening/Closing the Lift Gate
1
■
■
DRIVING CONTROLS
2
Push the UNLOCK button on the INFINITI
Intelligent Key once and the driver’s door and
fuel-filler door will unlock.
Push the UNLOCK button on the Intelligent
Key again within 60 seconds and all doors,
including the lift gate, will unlock.
To open the lift gate, press the Lift Gate
Request switch. Then press the Opener
switch (located under the lift gate finisher above the rear license plate) and pull
up to open the lift gate.
To close, lower and push the lift gate down securely.
COMFORT
Lift Gate Release Lever
If you cannot open the lift gate using the Lift Gate Release switch due to a discharged battery:
1
Remove the cover inside the lift gate.
2
Pull up on the lift gate release lever to open the lift gate.
MEDIA CENTER
For Vehicle Valet Hand-Off
1
Remove the Mechanical Key from the INFINITI
Intelligent KeyTM and use it to lock the glove box.
2
Hand the Intelligent Key to the valet. Keep the
Mechanical Key on your person.
3
When you retrieve your vehicle and Intelligent Key from
the valet, unlock the glove box with the Mechanical Key
and reinsert the Mechanical Key into the Intelligent Key.
12-Volt Power Outlet and Auxiliary Input Jacks
A 12-volt power outlet is located within the center console. This outlet can be used for
accessories that do not exceed a 12-volt or 120W (10A) power draw. There are also auxiliary
input jacks located within the center console. NTSC compatible devices, such as: video
games, camcorders and portable video players can be connected to the auxiliary jacks.
NAVIGATION
The auxiliary jacks are color coded for identification purposes.
Yellow – video input
■
White – left channel audio input
■
Red – right channel audio input
■
Seat-Mounted Retractable Coat Hanger
(if so equipped)
41
CONVENIENCE
The driver’s seat is equipped with a head restraint
mounted retractable coat hanger. Pull the hanger out
until it locks in place.
Sun Visor Adjustment
To adjust the visor to block glare, slide the visor in or out on the mounting arm as needed.
Vehicle Information Display
Press the INFO button to access the following vehicle information:
■
Fuel Economy
■
Maintenance
■
Traffic Info. (vehicles with the INFINITI Navigation system)
■
Where Am I? (vehicles with the INFINITI Navigation system)
■
GPS Satellite Info. (vehicles with the INFINITI Navigation system)
■
Voice Recognition (vehicles with the INFINITI Navigation system)
■
Navigation Version (vehicles with the INFINITI Navigation system)
Welcome Lighting
When this feature is activated an exterior light and the interior
lights will illuminate automatically as you approach the vehicle
with the INFINITI Intelligent KeyTM on your person.
To Turn ON/OFF the Welcome Light Function:
1
Push the ignition switch to ON mode from the OFF (LOCK) mode.
2
Open the driver’s door.
3
Within 20 seconds of placing the ignition switch in the ON mode, press and hold down
the Driver’s Door Handle Request switch for longer than 5 seconds.
4
A chime will sound confirming the operation is complete.
Note: The welcome light function is set to deactivate automatically if it is not operated within a duration of 14 days.
Adaptive Front Lighting System (AFS)
(if so equipped)
As you turn LEFT or RIGHT, or drive along winding roads,
the Adaptive Front Lighting system (AFS) moves your
lowbeams LEFT or RIGHT, according to your vehicle’s steering pattern and speed. The lowbeams swivel to increase
visibility ahead of you and on the sides of the road.
To Turn AFS OFF: Push the bottom of the switch.
The AFS OFF indicator symbol
inside of the
speedometer will illuminate when AFS is OFF.
■
AFS will remain OFF until you push the switch back UP to the ON position.
■
Note: When the vehicle is stopped or traveling below 16 mph, the left headlight WILL NOT SWIVEL when you turn the
steering wheel to the LEFT.
Homelink® Universal Transceiver
(if so equipped)
This feature can memorize up to three unique signals to operate remote devices
such as garage door openers. Refer to your vehicle Owner’s Manual for
programming information.
42
GETTING STARTED
convenience
Important Customer Information
■
■
■
DRIVING CONTROLS
Aluminum- Alloy Wheels
Your vehicle is equipped with aluminum-alloy wheels that should be cleaned regularly with
a sponge dampened in a mild soap solution, especially during winter months in areas where
road salt is used. Salt could discolor the wheels if not removed. To help prevent damage to
your high-end aluminum-alloy wheels.
Do not use a cleaner that uses strong acid or alkali contents to clean the wheels.
Do not apply wheel cleaners to the wheels when they are hot. The wheel temperature
should be the same as the ambient temperature.
Rinse the wheel to completely remove the cleaner within 15 minutes of applying
the cleaner.
COMFORT
MEDIA CENTER
NAVIGATION
CONVENIENCE
43
Memo
Memo
Printing: August 2009 (01) / QR0E-0J50U0 / Printed in USA
All illustrations, photographs and specifications in this guide are based on the latest product
information; some vehicle parts cannot be shown in certain photographs. Some vehicles are
shown with optional equipment. See actual vehicles for complete accuracy. Infiniti Division of
Nissan North America, Inc. reserves the right to make changes at any time, without notice, in
prices, colors, materials, equipment, specifications and models, and to discontinue models or
equipment. Availability and delivery time for particular models and equipment combinations
may vary. For information on availability, additional options or accessories, contact your Infiniti
dealer. All specifications, options and accessories shown in this guide apply to the 49 continental
states. Specifications, options and accessories may differ in Hawaii, U.S. territories and other
countries. INFINITI, the Infiniti logo, and INFINITI model names are Nissan trademarks.