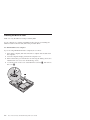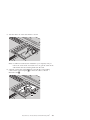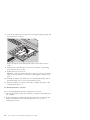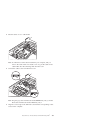
1
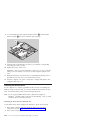
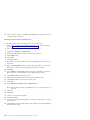
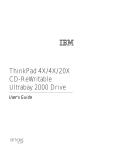
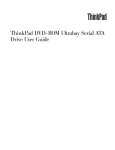
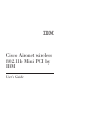
Cisco Aironet wireless 802.11b Mini PCI by IBM User’s Guide ATTENTION Refer to the documentation that comes with your computer before installing the product. Note Be sure to keep your proof of purchase, because it might be required for warranty services. (For more information, refer to the Product warranty and notices for Cisco Aironet Wireless 802.11b Mini PCI by IBM.) First Edition (July 2002) The following paragraph does not apply to the United Kingdom or any country where such provisions are inconsistent with local law: INTERNATIONAL BUSINESS MACHINES CORPORATION PROVIDES THIS PUBLICATION ″AS IS″ WITHOUT ANY WARRANTY OF ANY KIND, EITHER EXPRESS OR IMPLIED, INCLUDING, BUT NOT LIMITED TO, THE LIMITED WARRANTIES OF MERCHANTABILITY OR FITNESS FOR A PARTICULAR PURPOSE. Some states do not allow disclaimers or express or implied warranties in certain transactions; therefore, this statement may not apply to you. This publication could include technical inaccuracies or typographical errors. Changes are periodically made to the information herein; these changes will be incorporated in new editions of the publication. IBM may make improvements or changes in the products or the programs described in this publication at any time. It is possible that this publication may contain reference to, or information about, IBM products (machines and programs), programming, or services that are not announced in your country. Such references or information must not be construed to mean that IBM intends to announce such IBM products, programming, or services in your country. Requests for technical information about IBM products should be made to your IBM authorized dealer or your IBM marketing representative. © Copyright International Business Machines Corporation 2002. All rights reserved. US Government Users Restricted Rights – Use, duplication or disclosure restricted by GSA ADP Schedule Contract with IBM Corp. Safety: Read first Before installing this product, read the Safety Information. Antes de instalar este produto, leia as Informações de Segurança. Pred instalací tohoto produktu si prectete prírucku bezpecnostních instrukcí. Læs sikkerhedsforskrifterne, før du installerer dette produkt. Ennen kuin asennat tämän tuotteen, lue turvaohjeet kohdasta Safety Information. Avant d’installer ce produit, lisez les consignes de sécurité. Vor der Installation dieses Produkts die Sicherheitshinweise lesen. Prima di installare questo prodotto, leggere le Informazioni sulla Sicurezza. Lees voordat u dit product installeert eerst de veiligheidsvoorschriften. Les sikkerhetsinformasjonen (Safety Information) før du installerer dette produktet. © Copyright IBM Corp. 2002 iii Antes de instalar este produto, leia as Informações sobre Segurança. Pred inštaláciou tohto zariadenia si pečítaje Bezpečnostné predpisy. Antes de instalar este producto lea la información de seguridad. Läs säkerhetsinformationen innan du installerar den här produkten. iv Cisco Aironet wireless 802.11b Mini PCI by IBM: User’s Guide Contents Safety: Read first . . . . . . . . . . About the Cisco Aironet Wireless 802.11b Mini Product registration . . . . . . . . . . Product description . . . . . . . . . . Installing the Mini-PCI Card . . . . . . . Installing the device driver . . . . . . . Advanced Features . . . . . . . . . . © Copyright IBM Corp. 2002 . . . . . . . . . . iii PCI by IBM® . . . . 1-1 . . . . . . . . . 1-1 . . . . . . . . . 1-1 . . . . . . . . . 1-2 . . . . . . . . . 1-10 . . . . . . . . . 1-16 v vi Cisco Aironet wireless 802.11b Mini PCI by IBM: User’s Guide About the Cisco Aironet Wireless 802.11b Mini PCI by IBM ® This section provides information on registering, installing, and using the Cisco Aironet Wireless 802.11b Mini PCI by IBM. Product registration Thank you for purchasing this IBM product. Please take a few moments to register your product and provide us with information that will help IBM to serve you better in the future. Your feedback is valuable to us in developing products and services that are important to you, as well as in developing better ways to communicate with you. Register your option on the IBM Web site at: www.ibm.com/pc/register IBM will send you information and updates on your registered product unless you indicate on the Web site questionnaire that you do not want to receive further information. Product description If you are using a wireless upgradable model of an IBM ThinkPad® R32 Series computer, X30 Series computer, or T30 Series computer, you can install the Cisco Aironet Wireless 802.11b Mini PCI by IBM (hereafter called the Mini-PCI Card) in a Mini-PCI Card slot on your computer. The option kit includes: v Mini-PCI Card v CD-ROM (device drivers and User’s Guide) v Mini-PCI guide v Product warranty and notices for Cisco Aironet Wireless 802.11b Mini PCI by IBM © Copyright IBM Corp. 2002 1-1 Installing the Mini-PCI Card Note: Use only the Mini-PCI Card provided by IBM. If your computer is a wireless upgradable model, and you are installing the Mini-PCI Card for the first time, follow the procedure below. For ThinkPad R32 series computer If you are using ThinkPad R32 Series computer, do as follows: 1. Turn off the computer; then disconnect the ac adapter and all cables from the computer. 2. Close the computer display, and turn the computer over. 3. Remove the battery. (For information on removing the battery, refer to the ThinkPad R32 Series Service and Troubleshooting Guide.) 4. Loosen the screw on the cover of the Mini-PCI Card slot 1; then remove the cover 2. 1-2 Cisco Aironet wireless 802.11b Mini PCI by IBM: User’s Guide 5. Take the cables out of the cable holder as shown. Note: If a Mini-PCI Card has been installed in your computer, and you remove the Card and do not install a new one, put the cables in the cable holder after disconnecting them from the Card. 6. Align the contact edge of the Mini-PCI Card with the corresponding socket contact of the computer 1. Connect the cables to the new Mini-PCI Card 2. About the Cisco Aironet Wireless 802.11b Mini PCI by IBM® 1-3 7. Pivot the card until you can snap it into place by pressing the upper side of the connectors as shown. Make sure that the card is firmly fixed in the slot and does not move easily. 8. Align the tabs of the Mini-PCI Card slot cover with the corresponding slots; then press the cover flat. 9. Tighten the screw of the cover. Attention: After you install a Mini-PCI Card, do not use your computer until you have closed the cover. Never use the computer with the cover open. 10. Reinstall the battery. (For information on reinstalling the battery, refer to the ThinkPad R32 Series Service and Troubleshooting Guide.) 11. Turn the computer over again. Connect the ac adapter and cables to the computer; then turn it on. For ThinkPad X30 Series computer If you are using ThinkPad X30 Series computer, do as follows: 1. Turn off the computer. Then disconnect the ac adapter and all cables from the computer. 2. Remove the battery and the keyboard. (For information on removing the battery and keyboard, refer to the ThinkPad X30 Series Service and Troubleshooting Guide.) 1-4 Cisco Aironet wireless 802.11b Mini PCI by IBM: User’s Guide 3. Take the cables out of a cable holder. Note: If a Mini-PCI Card has been installed in your computer, and you remove the Card and do not install a new one, put the cables in the cable holder after disconnecting them from the Card. 4. Connect the cables to the new Mini-PCI Card. Note: Plug the gray cable with the tab marked MAIN into jack J1, and the black cable with the tab marked AUX into jack J2. 5. Align the contact edge of the Mini-PCI Card with the corresponding socket contact of the computer. About the Cisco Aironet Wireless 802.11b Mini PCI by IBM® 1-5 6. Pivot the Card until you can snap it into place by pressing the upper side of the connectors. Make sure that the card is firmly fixed in the slot and does not move easily. When attaching the Card, route the antenna cables to go under the cable guide as in a, and place the tabs as indicated by arrow b as in this figure. 1-6 Cisco Aironet wireless 802.11b Mini PCI by IBM: User’s Guide 7. Attach the Mini-PCI guide that comes with the option package. 8. Reinstall the battery and the keyboard. (For information on reinstalling the battery and the keyboard, refer to theThinkPad X30 Series Service and Troubleshooting Guide.) For ThinkPad T30 Series computer If you are using ThinkPad T30 Series computer, do as follows: 1. Turn off the computer; then disconnect the ac adapter and all cables from the computer. 2. Close the computer display, and turn the computer over. 3. Remove the battery. (For information on removing the battery, refer to the ThinkPad T30 Series Service and Troubleshooting Guide.) About the Cisco Aironet Wireless 802.11b Mini PCI by IBM® 1-7 4. Loosen the screws on the cover of the Mini-PCI Card slot 1; then remove the cover 2. 5. Open the insulation sheet 1, and take the cables out of the cable holder 2. Note: If a Mini-PCI Card has been installed in your computer, and you remove the Card and do not install a new one, put the cables in the cable holder after disconnecting them from the Card. 1-8 Cisco Aironet wireless 802.11b Mini PCI by IBM: User’s Guide 6. Align the contact edge of the Mini-PCI Card with the corresponding socket contact of the computer 1. Connect the cables to the Mini-PCI Card 2. 7. Pivot the card until you can snap it into place by pressing the upper side of the connectors as shown. Make sure that the card is firmly fixed in the slot and does not move easily. About the Cisco Aironet Wireless 802.11b Mini PCI by IBM® 1-9 8. Cover the Mini-PCI Card with the insulation sheet 1, and attach the Mini-PCI guide 2 that comes with the option package. 9. Align the tabs of the Mini-PCI Card slot cover with the corresponding slots; then press the cover flat. 10. Tighten the screws of the cover. Attention: After you install a Mini-PCI Card, do not use your computer until you have closed the cover. Never use the computer with the cover open. 11. Reinstall the battery. (For information on reinstalling the battery, refer to the ThinkPad T30 Series Service and Troubleshooting Guide.) 12. Turn the computer over again. Connect the ac adapter and cables to the computer; then turn it on. Installing the device driver If your computer is a wireless upgradable model, and you are installing the Mini-PCI Card for the first time, you need to install the device driver for the Card. To install the driver, refer to the following instructions. Note: If you are using ThinkPad X30 Series computer, attach the X3 UltraBase™ and then install a CD drive in the Ultrabay™ Plus, or attach a USB CD drive to the USB connector. Installing the device driver in Windows XP To install the device driver in Microsoft® Windows® XP, do the following: 1. Turn off the computer, and then install the Mini-PCI Card, using instructions given in “Installing the Mini-PCI Card” on page 1-2. 2. Turn on the computer. 1-10 Cisco Aironet wireless 802.11b Mini PCI by IBM: User’s Guide 3. The operating system automatically detects the client adapter and briefly opens the Found New Hardware window. 4. Click Next. 5. Select Install From A List or Specific Location. 6. Select Don’t search. I will choose the Driver to Install. Click Next. 7. Click Network adapters, and click Next. 8. Click Have Disk. 9. Insert the Cisco Aironet Wireless LAN Client Adapters CD into the CD or DVD drive. 10. Type D:\DRIVER\WINXP where D corresponds to the letter of your CD or DVD drive, or browse to the path where the driver is located. 11. Click OK. 12. Select Adapter, and click OK. Start Device Driver Installation, and click Next. 13. When the installation is complete, click Finish. When asked to restart, click Yes. 14. Click Start → Run. 15. Type D:\UTILITY\SETUP.EXE where D corresponds to the letter of your CD or DVD drive. 16. Click OK. The Aironet Client Utility Setup window and the InstallShield Wizard window open. 17. Follow the instructions in the installation wizard window (for default installation options, click Next until the Install Shield Wizard Complete window opens). After the software has been installed, click Finish to restart the computer. 18. Hardware Configuration: This section is used to perform your Wireless Network Configuration. You might need information from your network administrators, such as SSID name and encryption information. 19. Click Start → Connect To → Wireless Network Connections. 20. Click Advanced. The Wireless Network Properties window opens. 21. Click Add. 22. Enter Network Name (SSID), and configure any encryption or security information that might be part of the network configuration. Click OK. 23. Click OK. Your ThinkPad computer will now be configured and operational. Installing the device driver in Windows 2000 To install the device driver in Windows 2000 Professional, do the following: 1. Turn off the computer, and then install the Mini-PCI Card, using instructions given in “Installing the Mini-PCI Card” on page 1-2. About the Cisco Aironet Wireless 802.11b Mini PCI by IBM® 1-11 2. Turn on the computer. 3. The operating system automatically detects the client adapter and briefly opens the Found New Hardware window. 4. Click Next. 5. Select Display a list of the know drivers for this device so that I can choose a specific driver and click Next. 6. Click Network adapters, and click Next. 7. Click Have Disk. 8. Insert the Cisco Aironet Wireless LAN Client Adapters CD into the CD or DVD drive. 9. Enter D:\DRIVER\WIN2000 where D corresponds to the letter of your CD or DVD drive, or browse to the path where the driver is located. 10. Click OK. 11. Select Adapter, and click OK. Start Device Driver Installation, and click Next. 12. When the installation is complete, click Finish. When asked to restart, click Yes. 13. Click Start → Run. 14. Type D:\UTILITY\SETUP.EXE where D corresponds to the letter of your CD or DVD drive. 15. Click OK. The Aironet Client Utility Setup window and the InstallShield Wizard window open. 16. Follow the instructions in the installation wizard window (for default installation options, click Next until the Install Shield Wizard Complete window opens). After the software has been installed, click Finish to restart the computer. 17. Hardware Configuration: This section is used to perform your Wireless Network Configuration. You might need information from your network administrators, such as SSID name and encryption information. 18. Open Aironet Client Utility (ACU). 19. Click Profile Manager. 20. Under Profile Management, click Add, and enter your wireless network name in the box. Click Apply. The 350 Series Properties Window opens. 21. In the SSID1 box, enter your Network SSID. If additional network information is required, add now. Check with your network administrator for proper information. 22. After all data is entered, click OK. Your ThinkPad computer will now be configured and operational. 1-12 Cisco Aironet wireless 802.11b Mini PCI by IBM: User’s Guide Installing the device driver in Windows 98 Second Edition To install the device driver in Windows 98 Second Edition, do the following: 1. Turn off the computer, and then install the Mini-PCI Card, using instructions given in “Installing the Mini-PCI Card” on page 1-2. 2. Turn on the computer. 3. The operating system automatically detects the client adapter and briefly opens the Found New Hardware window. 4. Click Next. 5. Select Display a list of the know drivers for this device so that I can choose a specific driver, and click Next. 6. Click Network adapters, and click Next. 7. Click Have Disk. 8. Insert the Cisco Aironet Wireless LAN Client Adapters CD into the CD or DVD drive. 9. Type D:\DRIVER\WIN98 where D corresponds to the letter of your CD or DVD drive, or browse to the path where the driver is located. 10. Click OK. 11. Select Adapter, and click OK. Start Device Driver Installation, and click Next. 12. When the installation is complete, click Finish. When asked to restart, click Yes. 13. Click Start → Run. 14. Type D:\UTILITY\SETUP.EXE where D corresponds to the letter of your CD or DVD drive. 15. Click OK. The Aironet Client Utility Setup window and the InstallShield Wizard window open. 16. Follow the instructions in the installation wizard window (for default installation options, click Next until the Install Shield Wizard Complete window opens). After the software has installed, click Finish to restart the computer. 17. Hardware Configuration: This section is used to perform your Wireless Network Configuration. You might need information from your network administrators, such as SSID name and encryption information. 18. Open the Aironet Client Utility (ACU). 19. Click Profile Manager. 20. Under Profile Management, click Add. Enter your wireless network name in the box, and click Apply. The 350 Series Properties Window opens. 21. In the SSID1 box, enter your Network SSID. If additional network information is required add now. Check with your network administrator for proper information. About the Cisco Aironet Wireless 802.11b Mini PCI by IBM® 1-13 22. After all data is entered, click OK. Your ThinkPad computer will now be configured and operational. Installing the device driver in Windows NT To install the device driver in Windows NT®, do the following: 1. Turn off the computer, and install the Mini-PCI Card, using instructions given in “Installing the Mini-PCI Card” on page 1-2. 2. Turn on the computer. 3. Click Start → Settings → Control Panel. 4. Double click Network icon in the Control Panel window. 5. Click Adapter tab. 6. Click Add. 7. Click Have Disk. 8. Insert the Cisco Aironet Wireless LAN Client Adapters CD into the CD or DVD drive. 9. Type D:\DRIVER\WINNT4 where D corresponds to the letter of your CD or DVD drive, or browse to the path where the driver is located. 10. Click OK. 11. Select Adapter, and click OK. Start Device Driver Installation, and click Next. The Cisco Aironet Wireless LAN Adapter window opens. 12. Click OK. The Network window opens. 13. Click Close. The Microsoft TCP/IP Properties window opens. 14. Click OK. The Microsoft TCP/IP window opens. 15. Click OK. 16. Select Obtain an IP address from a DHCP Server. Note: Check with your network administrator if you are required to use a Static IP. 17. Click Yes. 18. Click OK. 19. Click Yes to restart the computer. 20. Click Start → Run. 21. Type D:\UTILITY\SETUP.EXE where D corresponds to the letter of your CD or DVD drive. 22. Click OK. The Aironet Client Utility Setup window and the InstallShield Wizard window open. 1-14 Cisco Aironet wireless 802.11b Mini PCI by IBM: User’s Guide 23. Follow the instructions in the installation wizard window (for default installation options, click Next until the Install Shield Wizard Complete window opens). After the software has been installed, click Finish to restart the computer. 24. Hardware Configuration: This section is used to perform your Wireless Network Configuration. You might need information from your network administrators, such as SSID name and encryption information. 25. Open the Aironet Client Utility (ACU). 26. Click Profile Manager. 27. Under Profile Management, click Add. Enter your wireless network name in the box, and click Apply. The 350 Series Properties window opens. 28. In the SSID1 box, enter your Network SSID. If additional network information is required add now. Check with your network administrator for proper information. 29. After all data is entered, click OK. Your ThinkPad computer will now be configured and operational. Installing the device driver in Windows Me To install the device driver in Windows Millennium Edition (Me), do the following: 1. Turn off the computer, and install the Mini-PCI Card, using instructions given in “Installing the Mini-PCI Card” on page 1-2. 2. Turn on the computer. 3. The operating system automatically detects the client adapter and briefly opens the Found New Hardware window. 4. Click Next. 5. Select Display a list of all the drivers in a specific location, so you can select the driver you want. Click Next. 6. Click Network adapters, and click Next. 7. Click Have Disk. 8. Insert the Cisco Aironet Wireless LAN Client Adapters CD into the CD or DVD drive. 9. Type D:\DRIVER\WINME where D corresponds to the letter of your CD or DVD drive, or browse to the path where the driver is located. 10. Click OK. 11. Select Adapter, and click OK. Start Device Driver Installation, and click Next. 12. When the installation is complete, click Finish. When asked to restart, click Yes. 13. Click Start → Run. About the Cisco Aironet Wireless 802.11b Mini PCI by IBM® 1-15 14. Type D:\UTILITY\SETUP.EXE where D corresponds to the letter of your CD or DVD drive. 15. Click OK. The Aironet Client Utility Setup window and the InstallShield Wizard window open. 16. Follow the instructions in the installation wizard window (for default installation options, click Next until the Install Shield Wizard Complete window opens). After the software has been installed, click Finish to restart the computer. 17. Hardware Configuration: This section is used to perform your Wireless Network Configuration. You might need information from your network administrators, such as SSID name and encryption information. 18. Open Aironet Client Utility (ACU). 19. Click Profile Manager. 20. Under Profile Management, click Add, enter your wireless network name in the box. Click Apply. The 350 Series Properties Window opens. 21. In the SSID1 box, enter your Network SSID. If additional network information is required, add now. Check with your network administrator for proper information. 22. After all data is entered, click OK. Your ThinkPad computer will now be configured and operational. Advanced Features For the advanced configuration information, click the Help button in the Aironet Client Utility, and follow the instructions on the screen. 1-16 Cisco Aironet wireless 802.11b Mini PCI by IBM: User’s Guide Part Number: 31P8313 Printed in U.S.A. (1P) P/N: 31P8313