1
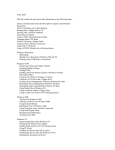
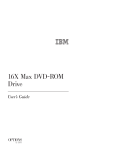
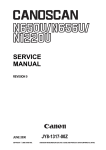
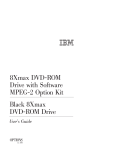
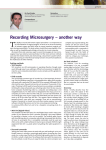
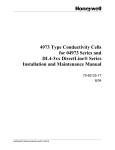
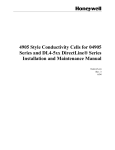
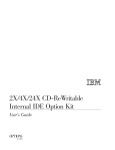
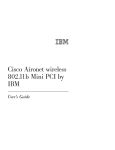
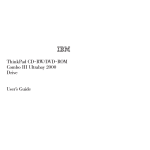
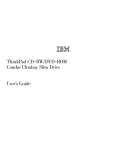
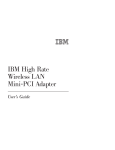
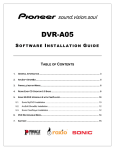
IBM 9.4/4.7 GB
DVD-RAM Drive
User’s Guide
OPTIONS
by IBM
Note: Before using this information and the product it supports, read the information
under Appendix C, ″Product warranties and notices″ on page C-1.
First Edition (August 2000)
© Copyright International Business Machines Corporation 2000. All rights reserved.
US Government Users Restricted Rights – Use, duplication or disclosure restricted by
GSA ADP Schedule Contract with IBM Corp.
Contents
Safety: Read first .
Preface
.
.
.
.
.
.
.
.
.
.
Installation and user’s guide.
.
.
.
.
.
.
.
.
.
.
.
.
.
.
.
.
.
.
.
.
.
.
.
.
.
.
.
.
.
.
. v
. vii
.
.
.
.
.
.
.
.
.
.
.
.
.
.
. 1-1
Appendix A. Problem solving .
.
.
.
.
.
.
.
.
.
.
.
.
.
. A-1
Appendix B. Help and service information .
.
.
.
.
.
.
.
.
.
. B-1
Appendix C. Product warranty and notices
.
.
.
.
.
.
.
.
.
. C-1
© Copyright IBM Corp. 2000
iii
iv
IBM 9.4/4.7 GB DVD-RAM Drive: User’s Guide
Safety: Read first
Before installing this product, read the Safety Information.
Antes de instalar este produto, leia as Informações de Segurança.
Pred instalací tohoto produktu si prectete prírucku bezpecnostních instrukcí.
Læs sikkerhedsforskrifterne, før du installerer dette produkt.
Ennen kuin asennat tämän tuotteen, lue turvaohjeet kohdasta Safety
Information.
Avant d’installer ce produit, lisez les consignes de sécurité.
Vor der Installation dieses Produkts die Sicherheitshinweise lesen.
Lees voordat u dit product installeert eerst de veiligheidsvoorschriften.
Les sikkerhetsinformasjonen (Safety Information) før du installerer dette
produktet.
© Copyright IBM Corp. 2000
v
Antes de instalar este produto, leia as Informações sobre Segurança.
Pred inštaláciou tohto zariadenia si pečítaje Bezpečnostné predpisy.
Antes de instalar este producto lea la información de seguridad.
Läs säkerhetsinformationen innan du installerar den här produkten.
Prima di installare questo prodotto, leggere le Informazioni sulla Sicurezza.
vi
IBM 9.4/4.7 GB DVD-RAM Drive: User’s Guide
Preface
This manual contains instructions for installing and using the IBM 9.4/4.7 GB
DVD-RAM Drive with Software MPEG-2 Option Kit. The manual is divided
into the following parts:
Part 1: Installation and user’s guide
This guide contains the product description and installation instructions in the
following languages:
v English
v French
v Spanish
v Italian
v Brazilian Portugese
v Traditional Chinese
v Simplified Chinese
v Japanese
Part 2: Appendixes
This section contains device-driver, problem-solving, help and service,
warranty, and notice information.
Note: The illustrations in this manual might be slightly different from your
hardware.
Registering your option
Thank you for purchasing OPTIONS by IBM. Please take a few moments to
register your product and provide us with information that will help IBM to
better serve you in the future. Your feedback is valuable to us in developing
products and services that are important to you, as well as in developing better
ways to communicate with you. Register your option on the IBM Web site at
http://www.ibm.com/pc/register
IBM will send you information and updates on your registered product unless
you indicate on the Web site questionnaire that you do not want to receive
further information.
© Copyright IBM Corp. 2000
vii
viii
IBM 9.4/4.7 GB DVD-RAM Drive: User’s Guide
Installation and user’s guide
This section contains the product description, hardware and software
®
installation instructions, and operating information for the IBM 9.4/4.7 GB
DVD-RAM Drive.
Product description
9.4/4.7 GB DVD-RAM Drive with MPEG-2 Software
This option package is intended for multimedia applications. The drive comes
with a CD containing MPEG-2 decoder software for Microsoft Windows 98,
Windows 95, Windows 2000, Windows NT, and Windows Me.
In addition to this guide, your option package includes the following:
v IBM 9.4/4.7 GB DVD-RAM Drive
v Four mounting screws (M3 x 5-mm, slotted)
v IDE cable for connecting two IDE devices
v Internal audio ″Y″ cable
v Safety information manual
v Laser safety guide
v MPEG-2 software CD
v VOB InstantWrite Software CD
Contact your place of purchase if an item is missing or damaged. Be sure to
retain your proof of purchase; it might be required to receive warranty service.
See “Appendix B. Help and service information” on page B-1 for technical
support information.
Your drive can read many DVD and CD formats, including DVD video, video
CD, and audio CD formats. However, you must install a video decoder to play
video files. The drive also reads multiple-session, extended architecture (XA)
CDs, such as the Kodak Photo CD. When used as a CD-ROM drive, this drive
delivers data at up to 24 times the standard CD-ROM drive speed (24X). The
DVD-RAM drive is designed for installation in a personal computer that uses
integrated drive electronics (IDE) or enhanced IDE (EIDE) architecture.
Software description
Your option package contains the following software:
v MPEG-2 software CD
© Copyright IBM Corp. 2000
1-1
With this MPEG-2 software, you do not need to install an MPEG-2 adapter
in your computer to view DVD video files. The software CD contains an
MPEG-2 decoder and programs that work with Windows 98, Windows 95
OSR2, Windows 2000, Windows NT 4.0, and Windows Me. You can use the
software to play high-resolution DVD movies or MPEG-2 files with MPEG-2
video and Dolby AC-3 audio on a multimedia computer.
v VOB InstantWrite Software CD
VOB InstantWrite makes it simple to use your DVD-RAM drive just like a
hard drive. With InstantWrite you can simply drag and drop files, create
new directories, or save files from any application (such as word processing,
graphics and accounting) directly to your DVD-RAM drive.
Installation requirements
Be sure that your computer meets the following system requirements before
installing the drive:
®
®
v Minimum microprocessor: Intel Pentium I 133MHz
v Minimum RAM: 32 MB
v Windows 98, Windows 95 OSR2, Windows 2000, Windows NT 4.0, or
Windows Me operating system if you will be using the MPEG-2 software
CD
v An available drive bay
v An available IDE connection
v 40 MB available hard disk space
v Audio adapter supporting 44.1 or 48 kHz sampling rate
v Optional stereo speakers
Before you begin
Before you install the DVD-RAM drive, read the information in this section on
handling precautions and on using the drive controls and connectors.
Handling precautions
Use the following handling precautions to protect your drive.
v Keep the DVD-RAM drive in the antistatic bag until you are ready to install
the drive. Limit your movement when installing; movement can cause static
electricity buildup.
v Handle the drive with care. Dropping or jarring the drive can damage the
components inside the drive housing.
v Do not force insertion of the IDE or power cables. Doing so might damage
the connector or the drive.
1-2
IBM 9.4/4.7 GB DVD-RAM Drive: User’s Guide
Drive controls and connectors
The following diagrams show the location and functions of the drive controls
and connectors.
Front view of the drive
1Disc drawer
This drawer is where you load and unload a disc.
2Headphone jack
This jack provides audio output to the headphones.
3Volume control
This dial controls the headphone volume.
4Busy indicator
This light comes on when the drive reads from, writes to, or plays a disc.
5Emergency eject hole
This hole provides access to the eject mechanism to remove a disc from the
drive.
6Open/Close button
This button opens and closes the disc drawer when you push it.
Installation and user’s guide
1-3
Rear view of the drive
Pin 1
1Reserved
2Audio-out connector
This connector transmits the analog audio signals to an audio adapter.
3Configuration pins
These pins are used to set the drive configuration.
4IDE port
This connects the DVD-RAM drive to the IDE cable.
5Power connector
This connects the DVD-RAM drive to the power cable.
Installing the drive
Follow these steps to install the DVD-RAM drive:
Step 1. Opening the computer
1. Turn off the computer and all attached devices.
2. Unplug all power cords from the computer and all attached devices.
3. Remove the cover from the computer. Refer to your computer
documentation for instructions on removing the computer cover.
Step 2. Unpacking the drive
1. Before opening the antistatic bag that the drive is packed in, touch the bag
to an unpainted metal surface for at least two seconds. This drains the
static electricity from the package and your body.
2. Remove the drive from the bag.
1-4
IBM 9.4/4.7 GB DVD-RAM Drive: User’s Guide
If you must put the drive down, place the antistatic bag on a flat, padded
surface, such as a magazine, and place the drive on the antistatic bag.
Step 3. Setting the configuration jumpers
You can configure your drive as master 1, slave 2, or cable-select 3, as
shown.
Use the following guidelines to determine the correct configuration for your
DVD-RAM drive.
v Configure the DVD-RAM drive as a master if it will be the only device that
is connected to an IDE cable. This is the preset configuration.
v Configure the DVD-RAM drive as a slave if it will be the second device on
an IDE cable. Be sure to configure the other device as a master. In some
cases, a hard disk drive might require a ″master with slave present″ jumper
setting when another device on the same cable is configured as a slave. For
more information on setting configuration jumpers on other devices, refer to
the documentation that comes with your computer device.
v Some non-IBM computers use special ATA cables with two wires reversed in
the device connectors so that the drives can be configured by the cable
instead of by jumper position. Use the cable-select position only for
computers that are equipped with these special cables. See the
documentation that comes with your computer to determine if your ATA
adapter requires that you place the jumpers in the cable-select position.
If you place the jumpers in the cable-select position, the IDE cable
automatically assigns the master and slave settings based on the position of
the drive on the cable. You must use the cable-select setting for this cabling
system whether the DVD-RAM drive is the only device or the second device
connected to the cable. The drive closest to the IDE controller is
automatically the master drive. Any other devices on the IDE cable must
also be set to cable-select.
Installation and user’s guide
1-5
Step 4. Mounting the drive in the bay
Attention: Be sure to use the M3 x 5-mm mounting screws in the option
package when you are driving screws directly into the drive. Using screws that
are too long might damage the drive.
You can mount the DVD-RAM drive horizontally or vertically in the computer.
If you mount the drive vertically, you must secure any discs that you place
into the drive before the drive tray is closed, or the DVD-RAM drive will not
be able to read the disc properly. For more information on securing discs in a
vertically mounted drive, go to ″Securing a disc in a vertically mounted drive″
on page 1-15.
1. Slide the drive into the bay. Your computer might have specific required
procedures for installing storage devices. For more information on storage
devices, refer to the documentation that comes with your computer.
2. Align the drive-bay screw holes with the threaded holes in the drive
housing or mounting bracket.
3. Thread the screws in loosely to check their position. Two screws are usually
used on each side. Verify that the alignment is correct; then tighten the
screws to secure the drive. Do not overtighten.
Step 5. Attaching the cables to the drive
The following diagram shows where to connect the cables to the drive.
The following is an illustration of the internal audio cable that comes with
your option package.
1-6
IBM 9.4/4.7 GB DVD-RAM Drive: User’s Guide
1. Connect the dual-connector end of the included internal audio cable 1to
the audio-out connector on the DVD-ROM drive.
2. Attach a 40-pin IDE-cable connector 2to the IDE connector on the drive.
Align the cable so that the color-coded edge is closest to the power cable
connector 3. Use the IDE cable that is provided with this option if there
is no cable attached to the IDE port or if there is only one device connector
on the computer IDE cable. The IDE cable can have up to three connectors.
For the best signal quality when you are connecting only one device to the
IDE cable, connect one end of the cable to the IDE port, and connect the
other end of the cable to the device. Do not use the middle connector.
If you are connecting two devices to the IDE cable, connect one end of the
cable to the IDE port, and connect the master and slave devices to the
remaining connectors on the other end. Many computers have two cables
for atttaching up to four ATA devices. For best performance, attach fast
devices (hard disk drives) to the cable that is connected to the primary IDE
port, and connect the DVD-RAM drive or other slower devices (CD-ROM
drives, tape drives, diskette drives) to the cable that is connected to the
secondary IDE port.
3. Attach a four-pin power cable 3to the power connector on the DVD-RAM
drive.
Be sure that the cables will not be pinched or crowded by the computer
cover and that all other cable and power connections are secure.
Step 6. Completing the hardware installation
1. Be sure that the DVD-RAM drive is securely mounted and that the
connectors are firmly attached.
2. Be sure that the cables do not interfere with the computer cover, and that
they do not block the power-supply fan blades or airflow paths.
3. Reinstall the computer cover.
4. Reconnect all external devices.
5. Plug all power cords into the wall outlets.
Step 7. Verifying device driver installation in Windows NT
Some IBM computers with preinstalled Windows NT 4.0 contain a PIIXIDE
device driver. This device driver replaces the Windows NT 4.0 native ATAPI
device driver and provides DMA support. The drive will not work if both the
ATAPI and PIIXIDE device drivers are enabled at the same time. If both device
drivers are enabled at the same time, open the Control Panel, and set the
Startup parameter of ATAPI.SYS to Disabled.
Step 8. Installing the InstantWrite software
To install the InstantWrite software, do the following:
Installation and user’s guide
1-7
1. Insert the InstantWrite SoftwareCD in the CD-ROM or DVD-RAM drive of
your computer.
2. Double-click My Computer.
3. Double-click the icon for your CD-ROM or DVD-RAM drive.
4. Double-click SETUP.EXE. The Install Wizard window opens.
5. Follow the on-screen instructions.
6. When you are prompted, restart your computer.
Step 9. Installing support software
If you will be using the drive as a data-only DVD-RAM drive or as a CD-ROM
drive, you have completed the installation and do not need to install support
software. For more information on maintaining your drive, see “Care and
maintenance” on page 1-17.
If you will be installing the MPEG-2 decoding software for Windows Me,
Windows 98 or Windows 95 OSR2, continue with Step 10.
If you will be installing the MPEG-2 decoding software for Windows NT 4.0,
go to “Step 12. Verifying device driver software for Windows NT 4.0” on page
1-9.
If you will be installing the MPEG-2 software for Windows 2000 go to “Step
13. Installing the MPEG-2 Decoding software for Windows NT 4.0 and
Windows 2000” on page 1-10.
Step 10. Enabling Direct Memory Access in Windows 98,
Windows 95 OSR2, or Windows ME
Before you install the MPEG-2 decoding software, be sure that the direct
memory access (DMA) of your DVD-RAM drive has been enabled in Windows
98, Windows 95 OSR2, or Windows Me, otherwise the video and audio
playback quality might be poor.
To enable DMA for Windows 98, Windows 95 OSR2, or Windows Me, do the
following:
1. Click Start.
2. Select Settings.
3. Click Control Panel.
4. Double-click System.
5. Click the Device Manager tab.
6. Double-click CD-ROM.
7. Select the DVD-RAM device in the menu display.
8. Click Properties.
9. Click the Settings tab to view the DMA option in the Options window.
10. Select the check box next to DMA.
1-8
IBM 9.4/4.7 GB DVD-RAM Drive: User’s Guide
11.
12.
13.
14.
Click OK.
Click OK again.
Click Close.
Restart your computer to enable the DMA of your DVD-RAM drive.
Step 11. Installing the MPEG-2 Decoding software for
Windows 98, Windows 95 OSR2, or Windows Me.
Note: Before installing MPEG-2 decodingsoftware, be sure to read “Changing
the DVD region code” on page 1-17to familiarize yourself with the
region-code concept.
To install the MPEG-2 Decoding software for Windows 98, Windows 95 OSR2,
or Windows Me, do the following:
1. Close any programs that are running.
2. Insert the MPEG-2 decoding software CD into your DVD-RAM drive.
3. If the Installation window opens automatically, go to step 8. Otherwise,
continue with step 4.
4. Click Start.
5. Click Run.
6. Type e:\SETUP.EXE, where e is the drive letter for your DVD-RAM drive.
7. Click OK.
8. Follow the on-screen instructions to complete the installation.
9. Restart Windows. The installation is complete.
For information on using MPEG-2 decoding software, go to “Using the
DVD-RAM drive with CDs and DVDs” on page 1-15.
Step 12. Verifying device driver software for Windows NT 4.0
If you are using Windows NT 4.0, refer to the documentation that comes with
your computer to determine if the IDE controller on your computer supports
DMA transfers.
If your computer IDE controller does not support DMA transfers, you must go
to the Web site for the manufacturer of the system board in your computer,
and download and install the Windows NT 4.0 DMA device driver, using
instructions that are provided on the Web site.
The following is a list of manufacturer Web sites that contain Windows NT 4.0
DMA device drivers for system boards:
v IBM: http://www.ibm.com
v Intel: http://www.intel.com
v VIA: http://via.com.tw
v ALi: http://ali.com.tw
Installation and user’s guide
1-9
Refer to the documentation that comes with your computer for information on
other system-board manufacturers.
When you have located the Windows NT 4.0 DMA device driver
recommended by your system board manufacturer, download and extract it to
a directory on your hard drive. For more directions, go to “Step 14. Enabling
DMA for Windows NT 4.0” on page 1-10.
Step 13. Installing the MPEG-2 Decoding software for
Windows NT 4.0 and Windows 2000
Note: Before installing MPEG-2 Decodingsoftware, be sure to read “Changing
the DVD region code” on page 1-17to familiarize yourself with the
region-code concept.
To install the MPEG-2 Decoding software for Windows NT 4.0, do the
following:
1. Close any programs that are running.
2. Insert the MPEG-2 Decoding software CD into your DVD-RAM drive.
3. If the Installation window opens, go to step 4. Otherwise, continue with
step 4. If the installation window does not open, double-click My
Computer, double-click the CD-ROM drive icon; then double-click the
Setup icon.
4. Follow the on-screen instructions to complete the installation.
5. Restart Windows.
6. If you have Windows NT use instructions given in “Step 14. Enabling DMA
for Windows NT 4.0” to enable DMA in Windows NT 4.0, or your video
and audio playback might be poor.
7. If you have Windows 2000, use instructions given in “Step 15. Enabling
DMA for Windows 2000 systems” on page 1-12.
Step 14. Enabling DMA for Windows NT 4.0
Note: Before enabling DMA for Windows NT 4.0, be sure to read “Step 12.
Verifying device driver software for Windows NT 4.0” on page 1-9 to
determine if your computer can perform this upgrade procedure. If you
do not perform this procedure correctly, your operating system might
lock up. Therefore, be sure to build an Emergency Repair Disk before
you use the following upgrade instructions. If you are not familiar with
the procedure for building an Emergency Repair Disk, press F1 to obtain
instructions from the Windows NT online help.
Note: Be sure that your Windows NT 4.0 operating system has the latest
Service Pack for Windows NT that is provided by Microsoft. Refer to the
documentation that comes with your computer to determine if there is
1-10
IBM 9.4/4.7 GB DVD-RAM Drive: User’s Guide
an Intel chipset in your computer. For more information on installing
Windows NT Service Packs, visit the Microsoft Web site at
http://www.microsoft.com.
To enable DMA in Windows NT 4.0, do the following:
1. Log on as an administrator.
2. Disable the CD-ROM device driver using the following instructions:
a. Double-click My Computer.
b. Click Start.
c. Select Settings.
d. Click Control Panel.
e. Double-click Devices.
f. Select the ATAPI device.
g. Click Startup.
h. Click Disabled; then click OK. Disregard displayed warnings.
i. Select the PIIXIDE device.
j. Click Startup.
k. Click Disabled; then click OK. Disregard displayed warnings.
l. Select the ATAPIdevice.
m. Click Startup.
n. Click Disabled and then click OK. Disregard displayed warnings.
3. Upgrade the CD-ROM device driver using the following instructions:
a. Double-click My Computer.
b. Click Start.
c. Select Settings.
d. Click Control Panel.
e. Double-click SCSI adapters.
f. Click the Drivers tab.
g. Select the IDE CD-ROM device driver; then click Remove and Yes.
h. Click Add.
i. Browse to the directory that was created in Step 12 (page 1-9) when
you visited the Web site for the system board manufacturer.
j. Select the system board manufacturer device driver and click Open.
The SCSI adapter will now be identified by your system board
manufacturer.
k. Click OK.
l. Click OK.
m. Click Yes to restart your computer. If your computer starts properly,
you have successfully completed the installation of the DMA device
drivers.
If your computer fails to start properly, go to the next step.
Installation and user’s guide
1-11
n. During the start process, select the Last Known Good option. If you
are unfamiliar with this technique, refer to the documentation that
comes with your Windows NT operating system or go to the Microsoft
Web site at http://www.microsoft.com for online help.
o. If your computer still does not start after following the procedure in
the previous step, use the Emergency Repair Disk you created in the
beginning of Step 14 on page 1-10 to restore the computer to a
working state.
Step 15. Enabling DMA for Windows 2000 systems
To enable DMA for Windows 2000, do the following:
1. Click Start, move cursor to Settings and click Control Panel.
2. Double-click System.
3. Click the Hardware tab.
4. Click the Device Manager button.
5. Click on the IDE ATA/ATAPI controller to open out the tree.
6. Click on the device that corresponds to the controller where your
DVD-RAM is located (Primary IDE or Secondary IDE).
7. Click the Advanced Settings tab.
8. Select the Transfer Mode pulldown menu and select DMA if available.
9. Click OK.
10. Click Close to close the System Properties window. A message appears
informing you that the system settings have changed.
11. Click OK to restart the system.
Using the DVD-RAM drive
This section contains information on using the DVD-RAM drive.
Write protecting the cartridge
DVD-RAM cartridges can be write protected to prevent accidental loss of data.
1. Insert the tip of a ball point pen into the hole located in the ″Protect″ slot of
the cartridge 1and push the slider towards the top of the cartridge 2to
1-12
IBM 9.4/4.7 GB DVD-RAM Drive: User’s Guide
protect the media.
2. Reverse the procedure to enable writing on the media again.
Using single- and double-sided DVD-RAM media
DVD-RAM media is available in single-sided and double-sided versions.
2.6 GB and 4.7 GB versions are single-sided and are available in Type I or Type
II cartridges. 5.2 GB and 9.4 GB versions are double-sided and are available in
Type II cartridges. To access the data on both sides of the media, you must
remove the cartridge from the drive, turn it over, and re-insert it in the drive.
For convenience, double-sided cartridges are labeled side A and side B.
Removing the disc from the cartridge
DVD-RAM Type II discs may be removed from the cartridge for use in
DVD-ROM drives.
Removing the disc from the cartridge
Using the tip of a ball point pen, push and break the lock pin tab1. To
remove the disc, use a ball point pen to push down on the cartridge lid lock
2and pull the cartridge lid 3out to eject the disc. With the cartridge lid
Installation and user’s guide
1-13
open the disc will eject. Do not touch the recording side of the disc when
handling the bare media.
1-14
IBM 9.4/4.7 GB DVD-RAM Drive: User’s Guide
Returning the disc to the cartridge
To return the disc to the cartridge, align the label side of disc 1with the
DVD-RAM cartridge label side. Insert the disc and close the cartridge lid 2.
A clicking sound will ensure the lid door is closed.
Precautions for handling
Be careful when handling the removed disc. Debris, dust particles, fingerprints,
smears, or scratches may effect and damage recording and playback of the
disc. To clean dust or other debris use a CD Cleaning Kit. Use a soft, dry cloth
to clean the disc. Do not use solvents to clean the disc surface. When labeling a
disc, write only on the printed label side using a soft felt-tip marker. Keep out
of direct sunlight, high temperatures, and humidity. Do not attach labels to
either side of the disc.
Using the DVD-RAM drive with CDs and DVDs
To read a data disc, do the following:
1. Turn on the computer.
2. Press the Open/Close button on the front of the DVD-RAM drive.
3. Insert the disc or cartridge in the tray with the label facing up.
4. Close the tray by pressing the Open/Close button or by gently pushing in
the loading tray.
Attention: Do not use force or insert foreign objects to open the loading
tray.
5. Wait for the DVD-RAM drive busy indicator to stop lighting; then
double-click My Computer.
6. Verify that the CD-ROM or DVD-RAM icon is displayed.
7. Double-click the CD-ROM or DVD-RAM icon.
8. Verify that you can view the disc files on the displayed list.
Securing a disc in a vertically mounted drive
Installation and user’s guide
1-15
The DVD-RAM drive has two plastic clips near the front of the loading tray
that must be lifted up to secure a bare disc for vertical mounting operation. To
raise the clips, open the tray, remove any discs that might be present, and push
the clips up using the side tabs by pushing from the underside of the tray.
To insert the disc, slide it forward against the spring-loaded tray until the disc
clears the front tabs, and then allow the spring to slide the disc back under the
tabs.
To remove the disc, slide it forward against the spring until it clears the front
tabs and lift it from the tray.
Note: If you insert a DVD-RAM cartridge, you will have to raise the clips
again before inserting a bare disc in the vertical orientation.
Manually ejecting a disc
If the drive becomes defective and will not allow the disc to eject, turn off the
computer and straighten a large paper clip to form a tool. The straightened
end must extend at least 45 mm (1.8 in.). Insert the extended end into the
emergency eject hole on the front of the drive (see ″Front viewof the drive″ on
page 1-3). Push the paper clip until the tray opens. Gently pull out the tray
until you can remove the disc.
Using the MPEG-2 decoding software
This section describes how to use and customize the MPEG-2 decoding
software. You can find current information on MPEG-2 decodingsoftware in the
readme file on the MPEG-2 decoding software CD.
1-16
IBM 9.4/4.7 GB DVD-RAM Drive: User’s Guide
Changing the DVD region code
Attention: Regionalization and Copy Protection (the DVD region code) uses
the content scramble system (CSS) standard to prevent unauthorized
duplication of the intellectual property rights distributed on DVDs. It was
originally requested by the Motion Picture Association of America (MPAA) to
address video piracy, but is applicable to any content. CSS works by inhibiting
the transmission of unencrypted data without proper authorization. Playback
systems must license CSS to decode the encrypted data.
The CSS specification divides the world into seven unique regions. Content
designated for one region cannot be read by playback systems in another
region. While CSS is used to prevent digital copies of the DVD content,
another technology devised by Macrovision is used to prevent analog copies of
the DVD content. The Macrovision standard is a scrambling system that has
been widely used by the movie industry to prevent unauthorized duplication
of video content using commercial VCRs. DVD playback systems must support
both CSS and Macrovision copy protection standards.
If you relocate to a different region of the world, you can use the MPEG-2
Decoding software to change the region code.
Note: You can change the DVD region code only five times. After you make
five region code changes, the drive can play only MPEG-2 video titles
that are associated with the fifth region code that you set.
To change the region code, do the following:
1. Turn on your computer and start your operating system.
2. Click Start.
3. Select Programs.
4. Click MPEG-2 Decoding Software.
5. Click the Properties icon to open the Properties window.
6. Click the General Properties tab.
7. Select the correct region code for your country.
8. Click OK so that changes take effect.
Care and maintenance
This section includes information on taking care of your DVD-RAM drive and
the CDs and DVDs that you use with the drive.
Installation and user’s guide
1-17
Caring for a CD or DVD
Digital discs are high-density media that must be handled with care and kept
clean to ensure that they remain readable. The following precautions help to
prolong the life of your discs.
Attention: Wiping a disc using a circular motion can damage the disc and
cause data loss.
v Handle the disc by the edges or the center hole. Do not touch the surface of
the disc.
v To remove dust or fingerprints, wipe the disc from the center to the edge
with a soft, lint-free cloth.
v Do not write on the surface.
v Do not place the disc in direct sunlight.
v Do not use commercial cleaners to clean the disc.
v Do not bend the disc.
Caring for the DVD-RAM drive
To protect your DVD-RAM drive during operation, observe the following
precautions:
v Do not move the drive when it is in use. Doing so might cause data error or
damage the drive.
v Avoid exposing the drive to the following conditions:
– High humidity
– High temperature
– Excessive dust
– Mechanical vibration
– Sudden shock or dropping
– Placement on an inclined surface
– Direct sunlight
– Sudden temperature changes
v Do not insert foreign objects into the drive.
v Do not stack objects on the drive.
v Do not remove the drive cover or attempt to service the drive.
v Remove any discs from the disc drawer and make sure that the drawer is
closed before moving the drive unit.
v Keep the original packing materials. If you need to ship the drive unit to a
different location, use the original packing materials to ensure that the drive
is transported safely.
1-18
IBM 9.4/4.7 GB DVD-RAM Drive: User’s Guide