1
Howtog thebestfrom
Aluminum Foil
Anti-TipBracket
ADDlianceRegistration
C~hningTipsCare and Cleaning
Clock/Timer
Energy-SavingTips
Features
I1
Installation Instructions
Leveling
Model and Serial Numbers
Oven
20
3,5
2
22-24
14
5
6-9
5
5
2
15-21
16,17
Baking, Baking Guide
~roi]ing, Broiling Guide
~o>z!
———
Control Settings
Door Removal
15
22
Light; Bulb Replacement 15,22
Roasting, Roasting Guide 18>19
Thermos@t Adjustment
VentDuct
Problem Solver
ReDairService
Safety Instructions
Sur-faceCooking
—.._
‘; -)
23
22
25
27
3,4
10-13
use
andcare
of
—
models
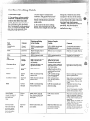
Read this bookcarefully.
It isintendedto help you operate
and maintainyour new ra~lge
properly.
Immediatelycontactthe dealer (or
builder) d~atsold you tile range.
Keep it handy for answersto your
questions.
If you don’tunderstand something
or need more help, write (include
your phone number):
Consumer Affairs
Hotpoint
Appliance Park
Louisville, KY 40225
Check the Problem Solveron
page 25. It lists causes of minor
operatingproblems that you can
correct yourself.
write
downthe model
YOU’11
find them on a label on
the front of the range behind the
oven door.
These numbers are also on the
Consumer Product Ownership
Registration Card that came with
your range. Before sending in this
card, please write these numbers
here:
Model Number
Serial Number
Use these numbers in any
correspondence or service calls
concerning your range.
,
I
2
..
ANTI-TIPbracket suppli~. To
check if tie bracket is inswd
and engagedproperly,removetie
drawer (on models so equipped)
and inspect tie rear levelingleg.
Make sure it fits securelyinto
tie slot in tie bracket.
For modelswithouta storage
drawer, carefilly tip @erange
forward to check if tie ANTITIP bracket is engagedwiti tie
Ievelhg leg.
If you pull the range out from tie
wafl for any reason, make sure
tie rear leg is re~rned to its
position in tie bracket when you
push he range back.
.,
-----.
.._.-—-—.
.. ... --. .————
.-
....
into
* Use cookwareof medium weight
ioverings
alumIinum,with tight-fittii~gcovers,
call Setfle
Soitfloor
such as !cushion@d vinyl or
When movingthe range
on this type of flooring, use care,
and it is recommended that these
simpleand inexpensiveinstructions
be followed.
The range should be installed on
a sheet of plywood (or similar
material) as follows: men the
floor coveting ends at $hefront of
the mnge, the area that the range
will rest on should be built up with
pIywoodto the same level or higher
than the floor covering. This will
allowthe range to be moved for
cleaning or servicing.
{:arpeting.
and flat bottomswhich completely
coverthe heated portion of the
surfaceunit.
@Cook fresh vegetableswith a
minimum.amount of water in a
coveredpan.
Q
Qzlt all the way, tilt up the front
and talfe it out.To K’eplaee
drawer, insert gliciesat back of
~~r~lver
beyond stop on range glides,
Ljft drawer if necessary to insert
easily. I.et front of drawer down,
then “push in to close.
..
- -—.-.—.-.—-..
.... ... —-—
--—
-—--.
- .--—---.
necessary.Idost foodswill cook
satisfactorilywithout preh~ating.
if you find preheatingis ncc~ssary,
watchthe indicatorIight, and put
food in ovenpromptly after the
light goes out.
@Alwaystirn ovenOFF before
removingfood.
@Watchfoods when bringingthem
quickly to tooting temperaturesat
HIGH heat. When food reaches
cooking temperature, reduce heat
immediatelyto lowestsettingthat
will keep it cooking.
@During baking, avoidfrequent
door openings. Keep door open as
short a time as possible if it is
opened.
* Use residud heat with surface
tooting whenever possible. For
e-pie,
w-hencooking eggsin the
shell, bring water and eggsto boil,
then turn to OFF position and
cover with lid to complete the
cooking.
@Use correct heat for cookingtask:
~~~ veling screws are located on
‘-ach corner of the base of the
range. Remove the bottom drawer
(on models so equipped) and you
can level the range on an uneven
floor with the use of a nutdriver.
To remove drawer, pull dra’wer-
OveaCoo]iimg
@Preheat oven o131ywhen
@Cook complete ovenmeals
instead of just one food item.
Potatoes, other vegetables,and
some desserts will cook together
with a main-dish casserole, ~meat
loaf, chicken or roast. Choose
foods that cook at the same
temperature and in approximately
the same time.
@Use residual heat in the oven
whenever possible to finish
tooting casseroles, oven meals,
etc. Also add.rolls oxprecooked
desserts to warm oven, using
residual heat to warm them.
HIGH—to start cooking (if time
allows, do not use HIGH heat to
start).
MEDIUM HI—quick browning.
MEDIUM—slow frying.
LOW—finishcooking most
quantities, simmer—double boiler
heat, finish cooking, and special
for small quantities.
WARM—tomaintain serving
temperature of most foods.
* Whe~Iboiling water for tea or
coffee, heat only amount needed.
1$is not economical to boil a
container full of water for one
or two cups.
—-——
.—v.
... _..
r_——
....O
1
o
“.. .-
*
**
+
.,
Models m5m,
M5UJ
*One su~ace unit ON indicator light on
Rfi5-ilJ, 4 onRA513J (one over each surface
unit control)
*“No oven light on RA511J
,/
@
Model
RB524J
@
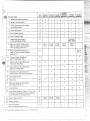
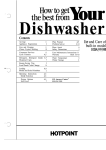
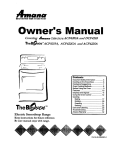
1 Model and Serial Numbers
2 SurfaceUnit Controls
i
e
3 “ON” Indicator Light/Lights
for Surface Units
4 Oven Set Control
5 Oven TernpControl
6 Oven CyclingLight
Clock&
MinaTlrner
7 AutomaticOven Timer,
Clock and Minute Timer
14
8 Stay-UpCalrod@SurfaceUnit
(,Maybe raisedbut not removed
whencleaningunderunit.)
23 ] 3 6-in.
1 8-in.
9 Plug-InCalrod@SurfaceUnit
(May be removedwhencleaning
underunit.)
23
3 6-in.
1 8-in.
22
11 Chrome-PlatedTrim Ringsand
AluminumDrip Pans
22
4
4
I
12 Oven VentDuct (Locatedunder
right rear surfaceunit.)
22
@
@
I
13 Oven InteriorLight (Comeson
automaticallywhen door is opened.)
22
I
14 Oven LightSwitch
15
I 15
I
4
e
Q
@
Broil Unit
Q
e
16 l~akeUnit (May be liftedgently
for wipingoven floor.)
/ 17 Oven Shelves
3 6-in.
18-in.
6-in.
1 8-in.
3
2 6-in.
2 8-in.
10 Chrome-PlatedTrim Rings
and PorcelainDrip Pans
I
3 6-in.
1 8-in.
2
I
@
I
2
I
18 Ovei~SheifSup~~orts
(LettersA, B, C and
‘
D indicalecookingpositionsfor shelvesas
z-ecommcndedon cookingguides.)
1
I
20 StorageDrawer
j ~~
I
I
I
Q
I
Q
—:
..,
.
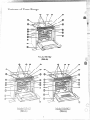
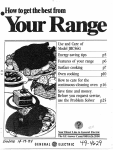
Model
RS42J
(slide-In)
e.
7
.
.,:
.{
-.-,
.
..
,
a
.
}
] 2 Surface Unit Controls
I
10
2
3 “ON” Indicator Light/Lights
for Surface Units
10
2
4 Oven Set Control
15
e
1 5 Oven Temp Control
15
6 Oven CyclingLight
15
7 AutomaticOven Timer,
Clock and Minute Timer
14
8 S&y-UpCalrod” Surface Unit
(May be raised but not removed
when cleaning under unit.)
23
3 6-in.
1 $-in.
3 6-in.
1 $-in.
3 6-in.
18-in.
9 Chrome-Plated Trim Ringsand
Aluminuin Drip Pans
22
4
4
4
10 Oven VentDuct (Located under
right rear surface unit.)
22
e
e
I
I
I 11 OverIInterior Light (Comes on
automatically when door is opened.)
IL
12 Oven Light Switch
I 13 Broil Unil
I
I
e
22
@
15
20
14 Bake Unit (Maybe lifted gently
for wiping oven floor.)
I 15 Oven SheIves
15
16 Oven Shelf Supports (Letters A, B, C and
D indicate cooking positions for shelves
as recommended on cooking guides.)
15
17 Broiler Pan and Rack
20
18 Storage Drawer
24
1
19 Anti-Tip Bracket
(See Installation Instrl]ctions)
2
I
2
I
3,5
=.,
“j
..-
1)
1
,
,0
Yoursurface unitsand controls
are designedto giveyouan infinite
choiceof heat setiingsfor surface
unit cooking.
At both OFF and HIGH positions,
there is a slightniche so control
“clicks” at thosepositions; “click”
on HIGH marks the highestsetting;
the lowestsettingis betweenthe
wordsWARMafidOFF. In a quiet
kitchen, you mayhear slight
“clicking” soundsduring cooking,
indicatingheat settingsselected
are being maintaind.
Switchingheatsto higher settings
alwaysshowsa quicker changethan
switchingto lower settings.
Step 1: Grasp controlknob and
push in.
Quickstartforcooking;
bringwaterto bofi.
Fastfry,panbrofl;mair~ti
fastboil on largeamount
of food.
Sauteand brown;maintain
slowboil on largeamou~~t
of food.
{;ookafier startingat
HIGH; cook with little
waterin coveredpan.
WARM Steamrice, cereal;
maintainserving
temperatureofmostfoods.
NmE:
1. At HIGH, MED HI, neverleave
food unattended. Boiloverscause
smoking; greasy spilloversmay
catch fire.
2. AtWA~, LOW,meltchocolate,
butter on small unit.
Step 2: Turn either clockwiseor
counterclockwise to desired heat
setting.
control mustbe pushed in toset
only fromOFF position. when
control isin any position other
than OFF, it maybe rotated
without pllshing in.
Be sure you turn control to OFF
when you finish cooking. An
indicator light will glowwhen
ANY heat on any sutiace unitis on.
.—— —.. -
-—--———
---------,- . . .. .
,,
1
..?
.
designedforcanningpurposes.Check
the manufacturer’sinstructionsand
recipesfor preserving foods.Be
sure canner is fiat-bottomeda~]d
fitsoverthe center of your Calrod@
unit. Since canning generateslarge
amountsof steam, be carefulto
avoidburns from steam or heat.
Canning should only be done on
surface units.
Q. Can I cover my drip
pans with
foil?
A. No. Clean as recommended in
Cleaning Guide.
A. Cookware without flat surfaces
is not recommended. The life of
your surface unit can be shortened
and the range top can be damaged
from the high heat needed for this
type of cooking.
Q. Why am I notgettingthe heat
1 need from my units even though
I have the knobs on the right
setting?
A. After turning surface unit off
and making sure it is cool, check to
make sure that your plug-in units
are securely fastened into the
surface connection.
why
Q.
is the porcelainfinish on
my cookware comingOffl
A. If you set your Calrod” unit
higher than required for the
cookware material, and leaveit, the
finish may smoke, crack, pop, or
burn depending on the pot or pan.
Also, a too high heat for long
periods, and small amounts of dry
food, may damage the finish.
1. Bring water to boil on HIGH
heat, then after boiling has begun,
adjust heat to lowest setting to
maintain boil (savesenergy and
best uses surface unit.)
4. When canning, use recipes from
reputable sources. Reliable recipes
are availablefrom the manufacturer
of your canner; manufacturers of
glassjars for canning, such as Ball
and Kerr; and the United States
Department of Agriculture
Extension Service.
2. Be sure canner fits over center
of surface unit, If your range does
not allow canner to be centered on
surface unit, use smaller-diameter
pOtS for goodcanningresults.
5. Remember, in following the
recipes, that canning is a process
that generates large amounts of
steam. Be careful while canning to
prevent burns from steam or heat.
3. Flat-bottomed canners give best
NOTE: If your range is being
operated on low power (voltage),
canning may take longer than
expected, even though directions
have been careful~yfollowed. The
process may be improved by:
(1)using a pressure canner, and
(2) for fastest heating of large
water quantities, begi~~with
HOT tap water.
observeFollowingPoints
incanning
In surface cooking of foodsother
than canning, the use of largediameter pots (extendingmore than
l-inch beyondedge of trim ring) is
not recommended, However,when
canning with water-bath or
pressure canner, large-diameter
pots may be used. This is because
l~oilingwater temperatures (even
under pressure) are not harmful to
cooktop surfi]cessurrounding
heating unit.
A. Because the s~lrfaceunit is
not flat. Make sure that the “feet”
on your Calrod@units are.sitting
tightlyin the rangetop indentation
and the reflector ring is flat on the
range surface.
canning results. Be sure bottom of
canner is flat or slight indentation
fits snugly over surface unit.
Canners with flanged or rippled
bottoms (often found in enamelware)
are not recommended.
T,
lfil~w~~~
~<~~~=j~
FAA
‘.
~~~~
1
——.-..
..— .2&.K.7ti%==.—
————-..,.-_,..—..
_.—__—”_.
—-.
,.. ..—
-——
—
1.usemedium-or heavy-weight
cookware. Aluminum cookware
conductsheat faster &an other
metals. Cast iron and coatedcast
iron cookwareis slow to absorb
heat, but generally cooks evenlyat
LOW or MEDIUM settings.Steel
pans may cook unevedy if not
combined with otier metals.
cooti. Flat ground~roceram”
saucepansor still.etscoated on the
bottom with aluminumgenerally
cook ~V~rdY.
2. Toconsene tie most tooting
energy,pans shouldbe flat on the
bottom, havestraightsides and tight
fitting lids. Match the size of the
sauc;pan to the size of the surface
unit. A pan that extendsmore than
an inch be~~ond
the edge of tl~etrim
ring traps heat which causes
“crazing” (fine hairline cracks) on
porcelain, and discoloration
ranging from blue to dark gray on
chrome trim rings.
Directionsand Setting
to stiti cooMng
Setting to Complete
cooking
comments
Covered
Saucepan
~GH. In wered pan bring
waterto boil beforeadding
ce~al.
LGWorWM, thenaddce~.
Finish timing according
to packagedirections.
Cereals bubble and expand as
they cook; use Iargeenough
saucepan to preventboilover.
Uncovered
Saucepan
HIGH. Stir togetherwateror
milk, cocoa ingredients.
Bringjust to a boil.
MED, to cook 1 or 2 minutes
to completelyblendingredients.
Milk boils over rapidly.Watchas
boiling point approaches.
Percolator
~GH. At fit perk, switch
heat to LOW.
LOW to maintaingentle but
steadyperk.
Percolate 8 to 10minutes for
8 cups, less for fewercups.
Cooked in shell
Covered
Saucepan
Fried sunny-side-up
Covered
Skillet
HIGH. Covereggswithcool
water.Cover pan, cook
until steaming.
MED HI. Melt butter, add
eggsand cover skillet.
Fried over easy
Uncovered
Skillet
HIGH. Melt butter.
Poached
Covered
Skillet
HIGH. In coveti pan bring
water to a boil.
Scrambled or omele~
Uncovered
Skillet
HIGH. Heat butteruntillight
golden in color.
LOW.Cook only 3 to 4
minutes for soft cooked;
15minutes for hard cooked.
Continue cooking at MED HI
until whi~s are just set, about
3 to 5 more minutes.
LOW, then add eggs. When
bottoms of ens havejust set,
carefully turn over to cook
other side.
LOW.Carefully add eggs.
Cook uncoveredabout 5
minutes at MED HI.
MED. Add egg mixture.
Cook, stirring to desired
doneness.
Covered
Saucepan
HIGH. In coved pan bring
fruit and water to boil.
LOW. Stir occasionally and
check for sticking,
Fresh fruit: Use 1/4to 1/2c~lp
water per pound of fruit.
Dried fruit: Use water as package
directs. Time depends on whether
fruit has been presoaked, If not,
allow more cooking time.
Covered
Skillet
HIGH. Melt fat, then add
Meat, Switch to MED HI to
brown meat. Add water or
tither liquid.
LOW. Simmer until fork
tender.
Uncovered
$killei
21GH. Preheat skillet, then
greaselightly.
MED HI or MED. Brown and
cook to desired doneness,
turning over as needed.
Meat can be seasoned and floured
before it is browned, if desired.
Liquid variations for flavor could
be wine, fruit or tomatojuice or
meat broth.
‘~irning:Steals 1 to 2-inches: 1 to
2 hours. Beef Stew: 2 to 3 hou~s.
Pot Roast: 2 Yzto 4 hours.
Pan frying is best for thin steaks
and chops. If rare is desired, preheat skillet before adding mea:.
Cereal
Cornmeal, grits,
oatmeal
Cocoa
Coffee
1
L
Eggs
Merits, mt%ltry
Braised: Pot roasts of
beef, lamb or veal;
pork steaks and
chops
——
If you do not cover skillet, baste
eggs with fat to cook tops evenly.
Removecooked e~s with slotted
spoon or pancake turner.
EWScontinue to set slightly after
cooking. For omelet do not stir
last few minutes. When set, fold
in half.
— —..——
— . .. . .
..”....-.
3. Deep Fat F~ing. Do not overfill
ketilewith fat tia~may spill over
wher}addi~~gfood. Frosty foods
bubblevigorously.Watchfoods
frying at HIGH temperaturesarid
keeprange and hood clean from
accum,~llatedgrease.
Fmd
Cookware
Dii%ctiollsand Setting
to Smt cooking
Setting to Complete
Cookiri~
Fnea Chicken
Covered
Skillet
HIGH. Melt fat. Switchto
MED HI to brownchicken.
LOW,Cover skiliet and
cook until tender.
Uncoverlast fewminutes.
Pan fried bacon
Uncovered
Skillet
HIGH. In cold skillet, amnge
bacon slices. Cookjust
until starting to sizzle.
HIGH. Melt fat. Switchto
MED to brown slowly.
MED HI. Cook, turning
over as needed.
For crisp dry chicken, cover only
afier switchingto LOW for 10
rninut.es.Uncoverand cook, turning
occasionally 10to 20 minutes.
A more attention-freemethod
is to start and cook at MED.
LOW.Coverand cook
until tender.
Meat may be breaded or
marinated in sauce before frying.
Covered
Dutch Oven,
Kettle or
Large
Saucepan
HIGH. Cover meat with water
and coverpan or kettle.
Cook until steaming.
LOW.Cook until fork
tender. (Watershouid
slowlyboil). For very large
loads, medium heat may
be n=ded.
Add sait or other seasoning
before cooking if meat has not
been smoked or otherwise
cured.
Melting chocolate,
butter,mambmallows
Small
Uncovered
Saucepan.
Use small
surfaceunit
WM.
fincakes or
Yrenchtoast
Skillet or
Griddle
MED HI. Heat skillet 8 to
10minutes. Grease lighdy.
Cook2 to 3 minutes~r side.
Thick batter takes slightly longer
time. ~m over pancakes when
bubbles rise to surface.
Covered
Large KettJe
or Pot
HIGH. In covered kettle, bring
saltedwater to a boil, uncover
and add pasta slowly so
boilingdoes not stop.
MED HI. Cook uncovered
until tender. For large
amounts, HIGH may be
needed to keep water at
rolling boil throughout
entire cooking time.
Use large enough kettle to
prevent boiiover. Pasta doubles
in size when cooked.
Pressure
Cooker or
Canner
HIGH. Heat until firstjiggle is
leard.
MED HI for foods cooking
10minutesor less. MED for
foods over 10minutes.
Cooker should jiggle 2 to 3 times
per minute.
Uncovered
Saucepan
31GH. Bringjust to boil.
LOW.To finish cooking.
Stir frequently to prevent
sticking.
Covered
Saucepan
31GH. Measure 1/2to i inch
vater in saucepan. Add
,altand prepared vegetable.
n covered saucepan bring
o boil.
IIGH. Measure water and salt
s above, Add frozen block
)fvegc~~ble,In covered
aucepan bring to boil.
iIGH. In skillet melt fat.
MED. Cook 1 pound 10
to 30 or more minutes,
depending on tenderness
of vegetable.
Uncovered pan requires more
water and longer time.
LOW. Cook according to
time on package.
Break up or stir as needed while
cooking.
MED. Add vegetable.
Cook until desired
tenderness is reached.
Turn over or stir vegewble as
necessary for even brow~~ing.
Sauteed: Less tender
thin steaks (chuck,
round, etc.); liver;
thick or whole fish
Simmeredor stewed
meat; chicken; corned
beef; smoked pork;
stewingbeefi tongue;
etc.
WSm
Noodles or spaghetti
Pressure Cooking
--%,
.J
. ----
Covered
Skillet
Frozen
Covered
Saucepan
Sauteed: Onions;
green peppers;
muslmms; celery; etc.
Uncovered
Skillet
i?;ce ilnd Griti;
Covered
S:]ucdpan
———-
When melting marshmallows, add
milk or water.
Allow10tofi minutesto
mek through. Stir to smooth.
WARM. Cover and cook
according to time.
....-
..—
—
—
Triple in volume after coolcing.
Time at WARYti.Rice: 1 cup rice
and 2 cups water-25 minutes.
Grits: 1 cup griis and 4 cups
water—~10minutes.
The automatictimer and clock on
your range are helpfuldevices~hat
serve severalpurposes.Theknob
locationson some rangemodels
may vary and will look likeone of
the two sets of timers below.
h~odels: RB536J, m46J and
RS47GJ
‘Ilnle Bak6 uses
Automatic mnler
Using AutomaticTimer, yOLJ
call
TIME BAKE with the ovenstarting
immediatelyand turning off at the
Stop Time set or set both DELAY
START(some models may say
START)and S~P dia~sto
automaticallystart aridstop oven
at a later time of day.It takes the
worry out of not being home to
start or stop the oven.
Settingthe dials for TIME BAKE
is explained in detailon page 16.
ModeI RB532GJ
clock and Minute Timer
To set
clock
~ SET THE CLOCK, push the
center knob in and turn the clock
hands to the correct time. (The
Minute Timer pointer wiil move
also, let knob out, turn the Timer
pointer to OFF.)
To set Minute
mmer
The Minute Timer has been
combined with the range clock.
Use it to time aj~your precise
cooking operations. You’ll
recognize the Minute Timer as the
pointer which is different in color
and shape than the cIock hands.
TO SET THE MINUTE TIMER,
turn the center knob, without
pushing in, until pointer reaches
number of minutes you wish to
time. (Minutes are marked, up to
60, in the center ring on the clock.)
At the end of the set time, a buzzer
sounds to tell you time is up. Turn
knob, v~ithout pushing in, until
pointer reaches OFF and buzzer
stops.
This modeI has a time of day clock
and minute timer but does not have
STARTand S~P dials needed for
TIME BAKE function.
QKBestiom
andAmwers
Q. Hovican I llse my Minute
miller to malLemy surface
cooking easier?
A. ‘YourMinuteTimer will help
time totalcookingwhich includes
time to boil foodand change
temperatures.Do notjudgecooking
time by visible steam only.Food
will cook in coveredcontainers
even though you can’tsee any
steam.
Q. Must the clock be set on
correct time of day when I wish
to use the Automatic Timer for
baking?
A. Yes,if you wish to set the
DELAY STARTor STOP dials to
turn on and off at set times during
timed functions.
Q. can I use the Minute Timer
during oven cooking?
A. The Minute Timer can be used
during any cooking function. The
AutomaticTimers (DELAY START
and S~P dials) are used with
TIME BAKE function only.
Q. can I Change the C1OQIK
while
I’m Tinle cooking in the oven?
A. No. The clock cannot be changed
during any program that uses the
oventimer, Youmust either stop
those programs or wait until they
are finished before.changing time.
-.
.
~:
\
~:
~
[
~
.
~
k
~
\
ii
I
I
1
- ..-—,..
... --- ....-—.--...
-—-—.
-
,,.-
0$’enInterior Slleivos
properly.Read over-thedirections
for the AutomaticOven Timer so
you understandits use with the
controls.
2. Check oven interior. Look at
the shelves. Take a practice run at
removingandreplactigthemproperly,
to givesure, sturdy support.
3. Read over information and tips
that follow,
4. Keep this book handy so you can
refer to it, especially during the
first weeks of getting acquainted
with your range.
oven
controls
The shelve(s)are designed with
StOp-IOCkS so that whe~~
plii~~d
correctly
on the shelf supports,
they (a) will stopbeforecoming
completely from the oven,and (b)
will not tilt when removingfood
from or placingfoodon them.
~ REMQ~ shelve(s)from the
oven, lift up rear of shelf, pull
forwardwith stop-locksalongtop
of shelf supports.Be certainthat
shelf is cool beforetouching.
~ ~PLACE shelve(s)in oven,
insert shelf with stop-locksresting
on shelf supports.Push shelftoward
rear of oven; it will fall intoplace.
men shelf is in proper position,
stop-lockson shelfwill run under
shelf support when shelf is pulled
forward.
——
~L.__.-y
The lightcomes on automatically
shelfPositiom
The oven has four shelf supports
marked A (bottom), B, C and D
(top). Shelf positions for cooking
food are suggestedon Baking,
Roasting and Broilingpages.
!
-—......——..
,
. f.<~~~eg
;~ ~
>J
.
\Vhencookinga food for the first
time in your new oven, use time
given on recipes as a guide. Oven
thermostats,over a period of’years,
may “drift” from the factorysetting
and differencesin timing between
an old and a new ovenof 5 to 10
minutesare not unusual and you
maybe inclinedto thinkthatthe new
ovenis not performing correctly.
However,your new ovenhas been
set correctly at the factory and is
more apt to be accurate than the
ovenit replaced.
How to set YoMr Ra~e
for Baking
Step 1: Place food in oven, being
certain to leave about 1 inch of
space between pans and walls of
oven for good circulation of heat.
Close oven door. During baking,
avoid frequent door openings to
prevent undesirable results.
Step 2: Turn OVEN SET knob to
BAKE and OVEN T’EMPknob to
temperature on recipe or on Baking
Guide.
Step 3: Check food for doneness
at minirnunl time on recipe. Cook
longer if necessary. Switch off heat
and reil~ovcfoods.
..
fi+atyouset. Examplesof Immediate
Start (oventurns on now a~~dyou
set ii to turn off automatically)or
Delay Start and Stop (sct[ingthe
ovento turn on automaticallyat a
later time and turn off at a preset
stop time) will be described.
How to&t -e&k
SW” and Automatic
stop
N~E: Before beginningmake
sure the hands of the range clock
show the correct time of day.
Immediate Start is simply setting
ovento start bakingnow and turning
off at a later time automatically.
Remember, foods continue cooking
after controls are off.
Step 1: To set Stop Time, push in
hob on STOP dial and turn pointer
to time you want oven to turn offi
for example 6:00. The DELAY
STARTdial (some models may say
START) should beat the same
positionas the time of day on clock.
Step 1: To set start time, push in
knob on DEI.AY STARTdial and
turn pointer to time you wantoven
to turn on, for example3:30.
Step 2: To set Stop Time, push in
knob on STOP dial and turn pointer
to time you wantovento turn off,
for example 6:00. This means your
recipe called for two and one-half
hours of baking time.
N~E: Time on STOP dial must
be later than time shown on range
clock and DELAY STARTdial.
Place food in oven, close the door
and automatically the oven will be
turned on and off at the times yoi]
have set. Turn OVEINSE~ to OFF
and remove food from oven.
OVEN INDICA~R L~G~T(s) at
TIME BAKEsetting may work
differently than they do at BAKE
setting. Carefully recheck the steps
given above. If all operations are
done as explained, OVCII
will
operate as it should.
i
~
\
!~
1
1i
~
-->,
(: ‘.~)
. ../’/
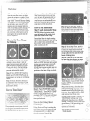
Roasting is COOking by clry heat.
Tender meat or poultry can be
roasted uncoveredin your oven.
Roastingtemperatures, which
should be lf)wand steady,keep
spatteringto a minimum. When
roasting, it is not necessary to
sear, baste, cover or add water
to your meat.
Roastingis really a baking
procedureused formeats.Therefore,
bven controls are set to BAKE.
(Youmay hear a siightclicking
sound, indicating the ovenis
workingproperly.) Roastingis
easy; just followthese steps:
I======
Step 1: Check weight of meat, and
place, fat side up, on roasting rack
in a shallowpan. (Broiler pan with
rack is a good pan for this.) Line
broiler pan with durninum foti when
using pan for marinating, cooking
with fruits, cooking heavily cured
meats, or for basting food during
cooking. Avoid spiIIingthese
materials on oven liner or door.
Step 2: Place in oven on shelf in
A or B position. No preheating is
necessary.
Step 4: Most meats continueto
cook slightlywhile standing,after
being removedfrom the oven.
Standingtime recommendedfor
roasts is 10to 20 minutesto allow
roast to firm up and make it easier
to carve. Internal temperature will
rise about5° to 10”F.;to compensate
for temperature rise, if desired,
removeroast fromovenat 5° to 10”F.
less than temperature on guide.
N~E: Youmay wish to use TIME
BAKE, as described on page 16,to
turn ovenon and off automatically.
Remember that food will continue
to cook in the hot ovenand therefore
shouldbe removedwhen the desired
internal temperature has been
reached.
For Rozen
Ross@
QFrozen roasts of beef, pork,
lamb, etc., can be started without
thawing, but allow 10to 25 minutes
per pound additional time (10
minutes per pound for roasts under
5 pounds, more time for larger
roasts).
@Thaw most frozen poult~ybefore
roasting to ensure even doneness.
Some commercial frozen poultry
can be cooked successfully without
t}lawing,Follow directions given
on packer’s label.
A. Checking the finished internal
temperatu~eat the compilationof
cooking time is recommended.
Temperaturesare shownin Roasting
Guide on opposite page. For roasts
over 8 pounds, cooked at 300”F.
with reduced time, check with
thermometer at half-hour intervals
after half the time has passed.
Q. v~hy is my !rQastCrumbling
when I try to carve it?
.A.Roasts are easier to slice if
allowed to cool 10to 20 minutes
after removing from oven. Be sure
to cut across the grain of the meat.
Q. Do I need to preheat my
oven each time I cook a roast
or poultry?
A. It is rarely necessary to preheat
your oven, only for very small
roasts, which cook a short length
of lime.
are
Q.when buy;.llga roast,
there any specialtipsthatwould
help nle COOIK
Mmore evenly’?
A. Yes. Buy a roast as even in
thickness as possible, or buy rolled
roasts.
Q. can I seal the sides of my foil
“tent” when roasting a turl<ey?
A. Sealing the foil will steam the
meat. Leaving it unsealed allowsthe
air to circulate and brow~~the meat.
(“’”—’
7 ‘2
ii?
.. . .. .
..——
.
-—--.——
-—-——.
--—-———
-..------
——-.——
———=
. .. . . . . .
.————————.
. . ..
---.,---———- ...... ... ... —..-.——
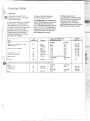
before roasti~]g.Use meat
probe for more accurate doneness.
Control signals when foodhas
reached set temperature. (Do not
place probe in stuffing.)
just
Type
temperaturerise, if desired, remove
Ioastfrom oven at5°t0100F. less
than temperature orIguide.
Oven
Temperature
Meat
Tender cuts; rib, highquality Sii lointip,
rump or top roundy
325°
Lamb Leg or bone-in shoulder*
325°
Vealshoulder, leg or loin*
Pork loin, rib or sh[julder*
Ham, precooked
325°
325°
325°
Ham, raw
325°
Doneness
;
Rare:
Medium:
WellDone:
Rare:
Medium:
Well Done:
WellDone:
WellDone:
To Warm:
Well Done:
ApproximateRoastingTime,
in Minutes per Wund
6 to $-lbs.
3 to S-lbs.
18-22
24-30
22-25
30-35
28-33
35-45
20-23
21-25
24-28
25-30
28-33
30-35
30-40
35-45
30-40
35-45
10minutesper pound (anyweight)
10to 15-Ibs.
Under 10-lbs.
17-20
20-30
Internal
Temperature‘F
130°-1400
150°-160”
170°-1850
130°-1400
150”-160°
170°-1850
170’-180°
1700-180°
125°-1300
160°
*For boneless rolled roastsover 6-inches thick, add 5 to 10minutesper pound to times given above.
Poultry
:hicken or Duck
:hicken picccs
325°
375”
Well Done:
Well Done:
rurkey
325°
Well Done:
3 to 5-]bs.
35-40
35-40
lo tO 15-Ibs.
20-25
Over 5-lbs.
30-35
Over M-lbs.
15-20
1850-190°
185°-190°
In thig!l:
185°-190°
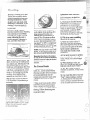
Broil;ngis cooking foodby intense
r~diantheat from the upper unit in
the oven. Most fish and tender cuts
of meat can be broiled. Follow
~hesesteps to keep spatteringand
smokingto a minimum.
Step 1: If meat has fator gristle near
edge, cut Verticalslashesthrough
both about 2“ apart. If desired, fat
may be trimmed, leavinglayer
about 1/8”thick.
Step 2: Place meat on broiler rack
in broiler pan which comes with
range. Alwaysuse rack so fat drips
intobroiler pan; otherwisejuices
maybecomehot enoughto catchfire.
Step 6: Turn foodonly once during
coolcing.Time foodsfor first side
per BroilingGuide.
Turn food, then use times given for
second side as a guideto preferred
doneness. (Where two thicknesses
and times are giventogether,use
first times given for thinnest food.)
Step % Turn OVEN SET knob
to OFF. Serve foodimmediately,
and leavepan outsideovento cool
during meal for easiestcleaning.
use of Aluminum
Foil
Step3: Wsitionshelfonrecommended
shelfpositionas su~ested in Broiling
Guide on opposite page. Most
broiling is done on C position, but
if your range is connected to 208
volts,you may wish to use higher
position.
1. If desired, broiler pan maybe
lined with foiland broiler rack may
be coveredwith foilfor broiling.
A~%~A~~
Step 4: Leavedoor ajar a fewinches
(except when broiling chicken).
The door staysopen by itse[f, yet
[he proper temperature is maintained
in the oven.
~~
c~~TA]~ ~
M-~~~
FOIL T’HOROUGHLYTO
BROILER RACK, AND SLIT
FOIL ~ CONFORM WITH
SLITS IN RACK. Broiler racks are
designed to minimize smokingand
spattering, and to keep drippings
cool during broiling. Stoppingfat
and meatjuices from draining to
the broiler pan preventsrack from
serving its purpose, andjuices may
become hot enough to catch fire.
2. DO N~ place a sheet of
aluminum foil on shelf. Todo so
may result in improperly cooked
foods, damage to ovenfinish and
increase in heat on outside surfaces
of the oven.
3. If desired, a sheet of aluminum
foi~maybe used on floor of the oven
u~tderthe bake unit. BE CERTAIN
F~~L DOES NOT TOUCH BAKE
IJhTIT, All]mi~~~~m
foilused in this
waymay sligl~tlyaffectthe browning
of some foods. ~Changefoil when it
becomes soiled.
...—.
A. Chickenis the only footi
recommendedfor closed-door
broiling. This is because chicken is
relativelythicker thnn other foods
you broil. Closing the door holds
more heat in the ovenwhich allows
chickento cook evenlythroughout.
Q. when broiling, is it necessary
to always use a rack in the pan?
A..Yes.Using the rack suspends
the meat over the pan. As the meat
cooks, the juices fall into the pan,
thus keeping meat drier. Juices
are protected by the rack and stay
cooler, thus preventingexcessive
spatter and smoking.
Q. shouldI saltthemeatbefore
broiling?
A..No. Salt drawsout the juices
and allowsthem to evaporate.
Always salt after cooking. Turn
meat with tongs; piercing meat
with a fork also allowsjuices to
escape. When broiling poultry
or fish, brush each side often
with butter.
Q. my ~~~
~Y~~~h~ott~~ti~g
outasbrown as they should?
In some areas, the power
(voltage)to the range maybe low.
In these cases, preheat the broil
unit for 10minutes before placing
broiler pan with food in oven.
Check to see if you are using the
recommended shelf position. Broil
for longest period o~time indicated
in the Broiling Guide. Turn food
only once dt~ringbroiling.
A.
Q. Do I need to grease mlybroi!e;f
~~~kto P~~YentEH@tfh”o~~ti~i<ing?
A. No. The broiler rack is designed
to reflect broiler l~eat,tl]t~skeeping
the surface cool enough to prevent
meat sticltingto tilesurface. l~owevez,
.,
: f$$~d<~~ways us: broiler partand rack
To slash, cut crosswisethrough
outer fat surfacejust to the edge of
the meat. Use tongs to turn meat
over to preventpiercing lneat and
losingjuices.
4. If desired, marinate meats or
chicken before broiling. Or brush
with barbecue sauce last 5 to 10
minutes only.
5. When arranging food on pan,
do not.let fatty edges hang over
sides, which could soil ovenwith
fat dripping.
JthdtCOmeSWithyour oven. It is
designedto minimizesmokingand
spatteringby trappingjuices in the
shieldedlower part of the pan.
2. Oven door should be ajar for all
foodsexcept chicken; there is a
specialposition on door which
holds door open correctly.
3. For steaks and chops, slash fat
evedy around outsideedgesof meat.
I
I
I
I
I
Food
Bacon
GroundBeef
WellDone
Quantity andior
Thickness
I
‘A-1b.(about8
thin slices)
I
l-lb. (4 patties)
I 1Ato %-in. thick
I
01
.&.~ Rare
~_&~. Medium
1k-in. thick
(2 to 2 %-lbs,)
WellDone
I First
Shelf
Position
Side
Time, M]nutes
c
I
c
I
I:
I
3%
I1---
I
hbs[ur Thils
(6 to 8-02. COCh)
2 to 4 slices
1pkg. (2)
2 (splil)
[
I
Z-4
\
I
c
7
I
Arrange in single layer.
4-5
Spaceevenly.
Up to 8 patties take about same time.
Steaksless than 1 inch cook through
beforebrowning. Pan frying is
recommended.
Slash fat.
B
3-4
13-16
10-15
‘A
1%-2
~
CommenK
3%
I:IE:
c
II
Second Side
Time, Minutes
I
!Chicken
ls~’’;”e
A 3’
Bakery I}roduct-s
Brcacl(’roast)or
‘IbastcrPastries
ErlglishMuffins
6. Broiler does not need to be
preheated. Howeverjfor very thin
foods, or LOincreasebrowning,
preheat if desired.
“$=
Frozeil steaks can be
conventionallybroiled by
positioningthe oven shelf at next
lowestshelf position and increasing
cookingtime given in this guide
IYztimes per side.
8. If your oven is connectedto
208 Volts,rare steaksmaybe broiled
by preheating broil heater and
positioningthe oven shelf one
position higher.
Reduce times about 5 to 10minutes per
side for cut-up chicken. Brush each side
with melted butter. Broil with skin
down first and broil witl]door closed.
Space evenly. Place English muffins
cut-side-up and brush with butter, if
desired.
I
Do not
turn over.
Cut through back of shell. Spread
open. Brush with melted butter
before and after half time.
.
Handie and turn very carefully.
Brush wit!l lemon butter before and
during cooking if desired. Preheat
broiler to increase browning.
Increase times 5 to 10minutes per side
for 1%-inchthick or home cured.
Z (Y2 inch)
2 (l-in. thick)
al)our 1 lb.
c
B
2 (1 inch)
~b(}ut10t[~!~ OZ.
c
c
c
~
2 (1M inch)
about 1 lb.
10
13
10
13
Slash fat.
I
—.
:
io
10
17
4-7
10
4-6
12-14
Slash fat.
If desired, split sausages in half
lengthwise: cut into 5 to 6-inch pieces,
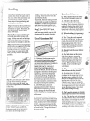
Proper care and cleaningare
importa~ltso yo~lrrange will give
you efficientand satisfactory
service. Followthese directions
carefilly in caring for your range to
assure safeand proper maintenance.
The porcelain enamel finish is
sturdy but breakable if misused.
This finish is acid-resistant.
However,any acid foods spilled
(such as fruitjuices, tomato or
vinegar) should not be permitted
to remain on the finish.
cleaningunder the Range
equipped Yvith
bottomdrawer)
(on models
The area under the range of models
equipped with a bottom drawer can
be reached easily for cleaning by
removing the bottom drawer. To
remove, pull drawer out all the way,
tilt up the front and remove it. To
replace, insert glides at back of
drawer beyondstop on range glides.
Lift drawer if riecessary to insert
easily. Let front of drawer down,
then push into close.
oven
vent
Duet
I
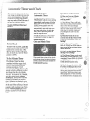
The ovenlamp (bulb) is covered
with a glass removablecoverwhich
is held in place with a bail-shaped
wire. Removeovendoor, if desired,
to reach cover easily.
To remove:
To remove:
@Make sure unit is cool.
* Lifi up right rear surface unit.
@Removedrip pan and ring.
@Lift out oven vent duct.
@Hold hand under cover so it
doesn’tfall when released. With
fingers of same hand, firmly push
back wire bail until it clears cover.
Lift off cover. DO NOT REMOVE
ANY Screws.
To replace:
@Place the part overthe oven vent
located below the cooktop with
opening of the duct under the round
opening in the drip pan. It is
important that the duct is in the
correct position so moisture and
vapors from the oven can be
released during ovenuse. N~E:
Never cover the hole in the oven
vent duct with aluminum foil or
any other material. This prevents
the oven vent from working
properly during any cooking cycle.
~ Replace bulb with 40-watthome
appliance bulb.
Lamp Replacement
(on Enodelsso equipped)
,-,
,,
..
..... ..————
.-..
>f
You~range is ventedthrough a duct
located under the right rear surface
unit. Clean the duc~often.
e.
j
-
To replace
Cover:
~ Place it into grooveof lamp
receptacle. Pull wire bail forward
to center of cover until it snaps into
place. When in place, wire holds
cover firmly. Be certain wire bail is
in depression in center of cover.
@Connect electric power to range.
surface
uti@
Clean the area under the drip pans
often. Built-up soil, especially
grease, may catch fire. To make
cleaning easier, stay-upu~litslifi up
and lock in the up position, and
plug-in units are removable.
-
.
Toincreasetemperature,turn tow~~fi
HI or WISE; to decrease turn
towardLo or LOWER. Each notch
changestemperature 10degrees.
Stay-upunits
camot be removed.
To replace
a plug-in unit:
Youcan lift a stay-upunit upward
about 6“ and it will lock in the up
position.
@First place the drip pan, then the
trim ring into the sutiace unit cavity
found on top of the coohop so the
unit receptacle can be seen through
the opening in the pan.
@Replace the drip pan and trim
ring into the recess in the cooktop.
@Insert the terminals of the plug-in
unit through the opening in tie drip
pan and into the receptacle.
~ Put the trim ring in place over the
drip pan. The drip pan must be
under the trim ring.
~ Guide the surface unit into place
so it fi~ evenly into the trim ring.
QGuide the surface unit into place
so it fits evenly into the trim ring.
Note: The drip pan must be under
the trim ring.
CAUTION
~Do not attempt to clean plug-in
surface units in an automatic
dishwasher.
@Do not immerse plug-in surface
units in liquids of any tind.
Plug-in units can be removed.
@Do not bend the plug-in surface
unit plug terminals.
~ Do not attempt to clean, adjust or
in any way repair the plug-in
receptacle.
-....—
--. - -——————
.. ... -—.—...
1. Removebob, andholdso
pointeris at top ofbob. Hold
“skjr-t”Ofhob firndy in one hand.
With other hand, turn bob to move
pointer toward Raise or Lower.
Pointer is designed not to move
easily. If it is seated so it is difficult
to move, pointer maybe loosened
slightly.bsert a thin screwdriver,
hife blade or similar instrument
and lift up end of pointer slightly.
2. After adjustment is made, press
pointer firdy against bob. Return
bob to rar]ge, matching flat area
on hob to range, matching flat
area on knob and shaft. Recheck
oven performance before mak~ng
art additiond adjustment.
WorOtIl@rmlodels
PART
I
Do not clean the bakeunit or broil unit. Allysoil will bum off when the unit is heated,
NOTE: The bake unit is hingedand can bc iifted eentlv:0 clean the ovenfloor. If
] spillover,residue,or ash ac;urnu]atesaround the~~ke’unit,gently
-.. wipearound the unit
with warm water.
Broiler %n and Rack
e Soapand Water
e Soap-FilledScouringPad
e CommercialOvenCleaner
Drain fat, cool pan and rack slightly.(Do not let soiledpan and rack standin ovento cool.)
Sprinkleon detergent.Fill the pan with ~varmwaterand spread cloth or paper towelover
the rack, Let pan and rack standfora fewminutes.Wash;scour if necessary.Rinseand dry.
O~ION: The broiler pan and rack mayalso be cleanedin a dishwasher.
Control~obs:
bilge Topand Oven
~ Mild Soap and Water
Pull off knobs. Washgentlybut do not soak. Dry and return controls to range makingsure
to matchflat area on the knob and shaft.
Outside Glass Finish
* Soapand Water
Washall glass withcloth dampenedin soapy water.Rinse and polishwith a dry cloth. If
knobsare removed,do notallowwaterto run downinsidethe su~ce of glasswhilecleaning.
Nietal, including
Brushed Chrome
Cooktop
~ Soapand Water
Wash, rinse, and then polish with a dry cloth. DO N~ USE steel wool, abrasives,
ammonia, acids, or commercialovencleaners which maydamagethe finish,
PorcelainEnamel
Surface
*Paper Towel
*Dry Cloth
9 Soapand Water
Avoidcleaningpowdersor harsh abrasiveswhich may scratch the enamel. If acids should
spill on the range while it is hot, use a dry paper towelor cloth to wipe up right away.
When tiresurface has cooled, washand rinse. For other spills, such as fat smatterings,etc.,
wash with soap and waterwhen cooled and then rinse. Polish with dry cloth.
Painted Surf2ces
~Soapand Water
Use a mild solutionof soap and water.Do not use any harsh abrasivesor cleaningpowders
which may scratchor mar surface.
Inside Oven Door*
*Soapand Water
~Soap-FilledScouringPad
ICommercialOven Cleaner
Toclean ovendoor; removeby openingto BROILposition and graspingdoor at sides. Lift
door up and awayfrom hinges. Clean with soap and water.Replaceby grasping door at
sides and lining up door with hinges. Push door firmly into place.
ISoap andWater
I Soap-FilledScouring Pad
Commercial Oven Cleaner
Cool beforecleaning.
FOR LIGHT SOIL: Frequent wiping with mild soap and water (especiallyafier cooking
meat) will prolongthe time between major cleaning. Rinse thoroughly.N(YI%:Soap left
on liner causes additionalstains when oven is reheated.
FOR HEAVYSOIL: Choose a non-abrasivecieaner and follow label instructions, using
thin layerof cleaner. Use of rubber gloves is recommended. Wipe or rub lightly on
stubborn spots. Rinse well. Wipe off any ovencleaner that gets on thermostat bulb. When
rinsing ovenafter cleaningalso wipe thermostat bulb.
OveIILiner*
(CAUTION: When in
use, light bulbs can
become warm enough to
break if touched with
mois[cloth or towel.
When cleaning, avoid
warm lamps with cleaning
cloths if lamp cover is
removecl.)
I
Oven VentDuct
Shelves
g Soapand Water
Removethe Oven VentDuct foundunder the right rear surface unit. Washin hot, soapy
water and dry and replace. (Opening should match opening in drip pan.)
QSoap and Water
~ Soap-Filled Scouring Pad
OCommercial Oven Cleaner
Yourshelvescan be cleaned by using any and all mentioned materials. Rinse thoroughly to
removeall materials after cleaning. NOTE: Some commercial ovencleaners cause
darkening and discoloration. When using for first time, test cleaner on small part of shelf
and check for discoloration before completely cleaning.
!
Spatters and spills bum awaywhen the coils are heated. At the end of a meai, removeall
utensils from the Calrod@unit and heat the soiled units at HI. Let the soil burn off about a
minute and switch the units to OFF. Avoidgetting cleaning materials on the coils, Wipe off
any cleaning materials with a damp paper towelbe~oreheating the Calrod” unit.
DO NOT handle the unit before completely cooled.
DO NOT immerse plug-in units in any kind of liquid.
Calrod(u)Surface
UIIil(Uoiis
- Soap and Water
t
I
—
For cleaning, removedrawer by pulling it all the way open, tilt up the front and lift out.
Wipe with damp cloth or sponge and replace. Never use harsh abrasives or scouring pads.
~ Soap and Water
~Stiff-Bristled Brush
~Soap-Filled Scouriilg Pad
(Non-metallic)
~~Soap and W.iier
I!s[):lp-~il]cdSCOUI
in~ Pad
~’Pltistic Scouring Rid
I ~ Dishwasher
‘SDilla2c(If :i\iirii}ii(ICs.
fruit juices, and bastit]y Iil:Lteri:ilS
Clean as described below or in the dishwasher. Wipe all rings after each cooking so
unnoticed spatter will not “burn on” next time you cook. To remove “burned-on” spatters
usc any or all cleaning materials mentioned. Rub ~igilriywith scouring PZ~d
to prevent
scratching of the surface.
Cool pan siightly. Sprinkle on detergent and wash or scour pan with warm water. Rinse
and dry. In addition. pan may also be cleaned in the dishwasher.
/=
1.
r
,1
containing
:]cids may C:IUSC discoloration.
Spillovers
should
be wiped
Up iinmediatcl:l,
with care being
I
..—.7
..
—-
I
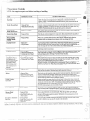
POSSIBLE CAUSE~D
MymDY
o%~ENWILL
NOT WORK
Plug on range is not completelyinserted in tie electrical outlet.
The circuit breaker in yourhouse has been tripped, or a fuse 1]2sbeen blown.
Oven controls not properly set.
OVEN LIGHT
DOES Nm wow
Ligl~tbulbis loose.
Bulb is defective.Replace.
Switch operating ovenlight is broken. Call for service.
FOODDOES Nm
BROIL PROPERLY
OVEN SET knob not set at BROIL.
OVEN TEMP knob not set at BROIL.
Door notIeftajaras recommended.
Improper she~fpositionbeing used. Check Broiling Guide.
Necessary preheating was net done.
Food is being cooked on hot pan.
Utensils are not suited for broiling.
Aluminum foil used on the broil pan rack has not been fitted properly and slit
as recommended.
FOOD DOES N~ ROAST
OR BAKE PROPERLY
OVEN SET knob not set on BA=.
OVEN TEMP knob not set correctly.
Shelf position is incorrect. Check Roastingor Baking Guides.
Oven shelf is not level.
Incorrect cookware or cookware of improper size is being used.
A foil tent was not used when needed to slowdown browning during roasti~~g.
r
CALROD@SURFACE UNITS
Nm FuNaIoNING
PRoPER~AY
L .—.——
Surface units are not pluggedin solidly.
Trim rings/drip pans are not set securely in the range top.
Surface unit controls are not properly set.
,-
We’reproudof our service and~
W~~t YOUtO be pleased. ]f for sOme
reason you are not happywith the
service you receive, here are three
steps to followfor firther help.
FIRST,contact thepeople who
serviced your appliance. Explain
why you are not pleased. In most
cases, this will solvethe problem.
NEXT, if you are still not pleased,
write all the details-including
your phone number—to:
.—
.
—..
~...5.
..
.—
i-.--H-—-—.
FINALLY, if your problem is still
not resolved, write:
Major Appliance
Consumer Action Panel
20 North Wacker Drive
Chicago, Illinois 60606
-1:..
k~—..y
--w“
q::-_–=_ _-––
~>-—.
WI”~.-= _-
.... ....
“;)
,=_
,-.’
...
/8 “:
..-+--
27
.,--
r———
I
YOURHOTPOINT
RANGE
I WHAT
Save proc3f of
WARRANTY
or~g~nal
purchasedatesuch as your
IS COVERED
sales slip or cancelled check to establish warranty periocf.
.—FULL ONE-YEARV$ARRANTY
For one yearfromdateoforiginal
—.
—
This warranty is extended to
theoriginalpurchaserandany
succeedingownerforproducts
purchase,wewillprovide,freeof
purchasedforordinaryhomeuse
charge,partsandservicelabor
inthe48 mainlandstates,Hawaii
inyourhometorepairorreplace ar]dWashington,
D.C.[nAlaskathe
anypartof therangethatfails
warranty
isthesameexcept
thatit is
becauseofamanufacturing
defect. LIMITEDbecauseyoumustpayto
shiptheproductto~heserviceshop
orfortheservicetechnician’stravel
I
costs to your home.
All warranty service will be provided
by our Factory Service Centers or
by ourauthorizedCustomerCare”
servicersduringnormalworKng
hours.
Look in the White or Yellow Pages
of your telephone directory for
HOTPOINT FACTORYSERVICE,
GENERAL ELECTRIC-HOTPO!NT
FACTORYSERVICEor HOTPOINT
CUSTOMER CARE@SERVICE.
~~~~~ !~ NOT e~v~~~~
~SerVicetripstoyour home to
teach you howtousetheproduct.
Read your Use and Cam material.
If you then have any questions
about operating the product,
please contact your dealer or our
~onsumer Affairs office at the
address below, or call, toll free:
GE Answer Cente@
800.626.2000
consumer information service
~ Replacement of house fuses or
resettingofcircuitbreakers.
~ Failure of the product if it is used
for other than its intended purpose
or used commercially.
@Damage to product caused
by accident, fire, floods or acts
OfGod.
WARRANTORIS PlOTRESPONSIBLE
FOR CONSEQUENTIAL DANIAGES.
s Improper installation.
If you have an installation problem,
contact your dealer or installer.
You are responsible for providing
adequate electrical, gas, exhausting
and other connecting facilities.
Some states do not allow the exclusion or limitation of incidental or consequential damages, so the above limitation or exclusion
may not apply to you. This warranty gives )Iou specific legal rights, and you may also have other rights which vary from state to state.
To know what your legal rights are in your state, consult your local or state consumer affairs office or your state’sAttorney General.
.... ..
,-.
-./,.,-...