1
m[ mJENN.AIR
Use& CareManual
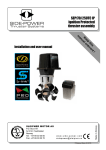
MODELS JRTE17fi, JRTE198, JRTE218, JRTDE228
Frost Free Refrigerators
I
....
i
Model JRTDE228
Printed in U.S.A.
1994 Jenn-Air
Part No. 109269-1
Cat. No. STUI76UA
2/'94
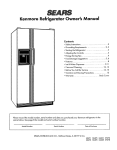
About Your
Jenn-Air Refrigerator
Your Jenn-Air frost-free refriclerator was designed, engineered,
and manufactured to the highest standards of qua ty and performance.
Since this manual
explains how you can obtain the best use of your Jenn-Air, it is essential
that
you follow the instructions
carefully.
Should you have any questions about using your Jenn-Air appliance,
us. Be sure to provide the model number of your appliance.
write to
Jenn-Air Customer Assistance
c/o Maytag Customer Service
PO Box 2370
Cleveland, TN 37320-2370
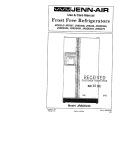
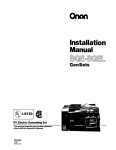
THE MODEL YOU HAVE SELECTED MAY NOT HAVE ALL OF THESE FEATURES SHOWN
Automatic Ice Maker Energy Saver
and Automatic
Switch
Light
Dispenser Bin
Freezer
Wine Refrigerator
Shelves
Rack
Control
Freezer Shelves
Shelf
Tender
Lift-OffDoor
Shelves
Humidity Control
Crisper
Cover
Adjustable Glass
Cantilever
Sealed
Crisper
Shelves
Drawer
Egg
Caddy
Dairy
Compartment
Base Grille
Sealed
Crisper
Model JRTDE228
2
Iottle
Retainer
Shelf
Tender
Safety
Precautions
1. Use the three-prongedplug only with a grounding receptacleto provide protectionfrom
electricalshock, This appliancemust be installedin accordancewith the installationand
grounding instructions on page 4-5.
2. Unplugyour refrigeratorbeforecleaningcondenser,replacinga light bulb,or makingany
repairs. Any servicing should be performed by a qualified technician.
3. In case of power failure, minimize door openings. If power failure is of long duration,
protect frozen food by placing blocks of dry ice on top of the packages, or check with a
local frozen foods locker plant about temporary storage. Frozen foods which have
l_hawedcompletely should not be refrozen.
4. Any electric service cord that becomes frayed or damaged should be immediately
repaired or replaced. Never unplug your appliance by pulling on the powercord.
5. Your refrigeratorshould not be operated in the presence of explosive fumes.
6. Remove the doors from any out-of-use refrigerator to prevent child entrapment and
suffocation.
7. Do not place fingers or hands on the automatic ice making mechanism while the
refrigeratorisplugged in. This will help protectyou from possibleinjury. It will alsoprevent
interferencewith moving parts of the ejector mechanism and the heating element that
releases the cubes.
Installation
Location
If you are installing your new refrigerator yourself, please followthese helpful suggestions.
1.
Removebase skids.
2.
Removeall exteriorand interiortapecarefullyand retainold
tape. Make a small padof this tapeto pickoff any remaining
tape residues. This will eliminate the need to use dangerous solvents of any kind.
._ldl
3. Remove and discard the cantilever shelf packing clips located just above each shelf
wherethey hook onto the frame. To remove the red plastic clip, wiggle it sideways and
pull straight out.
4.
Select a locationfor your new refrigeratorawayfrom any heatsources. Allow a free flow
of air throughthe front base grille.
5. Your model should not be installed where the room temperature will go below 55oF.
because it will not run frequently enough to maintain proper temperature in the freezer.
Leveling
Is Important
To enhance its appearance,maintain efficient performanceand for properfunction of the ice
maker,your refrigeratorshould be level. Usinga carpenter'slevel, checkyour refrigeratort¢
make sure it is level front to back and side to side. The front wheels were adjusted at the
factory so the cabinet wouldbe level. However,jarring in transit, or standing the refrigerator
on an unevenfloor may cause the cabinet to appear unlevel.
If leveling is necessary, remove the base
as shown.
-_-
RAISE
CABINET
CORNER
or bothlockingfeet, locatednear the front
TOlockthe
wheels.
Rear
cabinetin
levelerfeet
place,turn
are notclown
required.
one ,_
Ifthefloor is notleveland it isnecessaryto
grille and adjustthe wheelwith a screwdriver
raise the rear of the cabinet, we suggest
rollingthe rear wheels on to a piece of
plywoodor othershimmaterial.
_TURN
CLOCKWISE
TO
TURN
COUNTER-CLOCKWISE
TOLOWER
CABINET
CORNER
Electrical Connection
-_
and Grounding
Your refrigerator is designed to operate on a
nominal115volt, 15amp., 60cycle line. There
should be a separate, grounded circuit, serving this refrigerator only. DO NOT use an
extension cord.
po_._PPL_
co._I_
C'_OUNI_NG
w,T.3-_,o,6
PLtJG*
)
Your refrigerator is equipped with a threepronged grounding plug for your protection
against possibJeelectrical shock hazards. It
mustbe pluggedinto a grounding receptacle.
6,o_o_T_PC
WALL RECEPTACLE
Wherea standardtwo prongwall receptacleis
.Lo_.,o.
o_,,o_,o._, c_
encountered, it is the personal responsibility •
,,u_,_Y.
_,,.,_._
o.You,_oo_
TNAN
_NOWNHER_,
and obligation of the customer to have it
replaced with a properly grounded three-prong wall receptacle. DO NOT, under any
circumstances,cut or remove the third (ground) prong from the power cord.
DO NOT use an adapter plug.
Changing
Reversible
Doors
(Non-Dispenser
Models Only)
Your refrigeratormay have been built with the doors hinged to the right or hinged to the left.
Refer to the following instructionsfor door reversal.
Tools Required
Phillips screwdriver
End wrench (5/16")
5/16" Socket and ratchet
Putty knife
T25-TORXdriver
Changing
Doors
1. Turn the fresh food control to OFF and remove all food from the interior.
2. Using a 5/16" socket and ratchet, remove the screwsfrom the upper hinge. Carefullylift
the door (includingupper hinge) off of the center hinge and place it on a padded surface
to prevent scratching. Avoid losing the spacer that was between the hinge and the
cabinet top.
3. Unscrewthe hingepin outof the centerhinge onthe top
of the lower door. Carefully lift the lower door off the
lower hinge and place it on a padded surface. If the
metal hinge pin pulls out of the lower hinge when the
door is removed,pull it outof the door bottomand press
it back into the hinge.
4. Using a phillipsscrewdriver, removethe handles from
the door edges. Remove the handle end caps on
Models JRTE198 and JRTE218. To attach the handlesand end capsto the rightside, first removethe plug
buttons. Invertthe handles and end caps and attach _=
with screws. Press the plug buttons into the opposite
side of the door.
5. Usinga puttyknife,pry theplug button coverfrom the metal bushingatthe topof the door.
Save the cover for future use.
6. Lift theupper hingeand thespacer washersfrom thedoor and install themat the opposite
corner,
7. Positionthe plug button cover,saved from step 5, over the old hinge bushing and press
it into place.
8. Pry out the 3 plastic plugbuttons from the cabinet top and press them intothe opposite
corner.
9. With the T25 socket wrench and 5/16" socket and ratchet, remove the screws from the
center hinge and spacer from the cabinet. Transfer the (2) screws from the left end of
the divider bar to the right end, Installthe center hinge and spacer on the left end of the
dividerbar the sameway it was installed on the rightend. Tighten both screws untilthey
are just snug, then turn them one-half turn more.
10. Prythe plug cover from the metalbushing at the top of the lower door and press intothe
metal bushing on the opposite side of the door.
11. Removethe base grille by grasping at both ends and pulling it straight out.
12. Remove the hinge cover by squeezing both sides together.
13. Use a 5/16" socket and ratchet to remove the two screws from the bottomhinge. Save
the spacer.
"-
14. Pull the metal hinge pin from the sideof the lower hingeand place it, includingthe spacer
washer, into the top hole.
15. Pry out the two screw hole plug buttonson the bottomleft side of the top door and lower
door. Removethe door stops (metal plate) on the bottomof each door and install them
on oppositesides. Press in the plug buttons in the holes on the right side of bothdoors.
16. Set the lowerdoor on the bottom hinge,making sure the hinge pin enters the bushing in
the door bottom.
17. While holding the door in a closed position,take the center hingepin that was removed
in step 3 andinsert it through the left hole of the center hinge andinto the bottom door
bushing. Make sure the long pin goes into the bottomdoor and the short pin goes into
the top door.
18. Set the upper door on the center hinge, making sure the hinge pin enters the door
bushing. When you close the door, the gasket should hold it in place.
19. Makingsure to use the same numberof spacers that were originally used beneaththe
upperhinge, install the hinge mounting screws. Beforetightening these screws, make
sure the top of the door is level with the cabinet top, and the space between the door is
equidistantacrossthe entirefront. Avoidover-tighteningthese screws. Tighten both until
they are just snug, then turn them in another one-halfturn.
20. Examinethedoor gasketall around each door, makingsure no gaps are visible between
the gasket and cabinet. If a gap shows, try stretching the gasketaway from the door so
the magnet will contact the cabinet surface.
21. To replacethe basegrille, line up its springclips with the square openingsin the cabinet
and tap each end in until the gnlle locks in place. Replace hinge cover.
22. Replaceall food and return the fresh food control to its usual operating position.
Operation
tt;
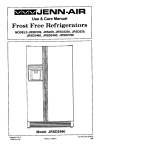
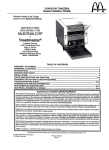
Controls
Your new refrigerator has two controls. One
for regulatingthe temperaturein thefresh food
compartment and one for the freezer. The
fresh food compartmentand the freezer cornparfmentcontrolsare locatedat thetop front of
the fresh food compartment, Turn both controis to "No. 5" to start your refrigerator.
9 is coldest [.
5
._
• [
Saves / %,Reduces
Exterior
Energy \ / _oisture
I._3
u_i_t,l']I
I
The "No.g" freezer control setting is recommended for short term use only.
_
9 is coldest
Your refrigerator may run for several hours when you first start it. This is normal and
shouldn't be cause for alarm.
Changingeither control will have some effect on the temperatureof the other compartment.
To start:
Set fresh food control
In a dayor two,you may decidethat one
on "5".
Setfreezercontrolon "5".
Turn fresh food control
to
or warmer.
bothcompartmentsshouldbe
colder Refrigerator tooWARM: nexthighernumber.
or
If so, adjustthe control(s)as
instructedin the accompanyingchart. Refrigerator too COLD:
Turn lower
fresh food
control to
next
number,
IMPORTANT: Except when starting,
Turn treezef control to rtext
do not changeeither control morethan Freezer
too WARM:
hlFhernumber.
one number at a time. Allow 24 hours
Turnfreezercontrolto next
for temperature to stabilize before re- Freezer
tooCOLD:
lowernumber.
setting.
Refrigerator
OFF:
Set fresh food control
to OFF.
Warm Cabinet Surfaces
At times, the frontsurfaces of your refrigeratorcabinet may be warm to the touch. This is a
normalfunctionof your refrigerator. This feature prevents moisturefrom condensing on th_
outside of your refrigerator during humid weather. This condition may be noticeable when"-"
you first start your refrigerator, during hot weather, and during excessive or lengthy door
openings.
Energy Saver Switch
The Energy Saver switch controls a heater designed to prevent moisture accumulation
betweenthe refrigeratorand freezer door frame. Duringhumidweather,moisturecollects on
objects that are cooler than the surrounding air. This condensation can be eliminated by
applying a small amount of heat to the surface upon which the water accumulates.
When the EnergySaver switch is on "SavesEnergy",no heat is applied to the surface. It is
saving both energy and money. If humidity increasesand condensationappears, turn the
EnergySaverswitchto "ReducesExteriorMoisture". Be sure toturn the EnergySaverswitch
back to "Saves Energy" as the humidity drops to save energy.
In areas of relatively high humidity, the Energy Saver Switch in the "Reduces Exterior
Moisture" position will minimize any collection of moisture on the outside surface of
the cabinet.
8
Energy Tips
For efficientenergy use:
1.
Be surethe refrigeratoris levelandventilationaroundthe frontgrilleis notblocked.
2.
Check door seals occasionallyfor leakage. Check at various places, top, bottom, and
sides.
3.
Check the temperature;avoid unnecessary cold settings.
4.
Keep the freezer full to near capacity; less cold air is lost during door openings.
5.
Let hot dishes cool before putting into refrigerator or freezer.
6.
Cover liquids; if uncovered,the unit must work longer.
7.
Clean refrigerator condenser coils at least twice a year.
Refrigerator
Compartment
Features
To maintain the natural flavor, moisture, and nutrition of fresh foods, we recommendthat
all dishes, trays, and containersof food be covered.
Shelves
suit your special needs. To removea shelf, lift the
rear straightup a fraction of an inch and pull straight
out. To lockinto anotherposition,tilt the shelfwith the
front up. Insert hooks into desired frame openings
and let the shelf settle into place. Make sure it
is securely locked at the rear.
Temp Control Drawer
TheTemp Control Drawer,betweenthe top and second shelves,provides shortterm storage
of fresh meats without freezing, This drawer will provideextra chilling only if the cantilever
shelfthat supportsthe Temp Control Draweris in the 2nd,3rd, or 4th shelf adjustingpositions.
Keep the drawertightly closed at all times.
The sliding lever on the back wall, above the drawer enables you to vary the internal
temperaturesinsidethe drawer. With the lever set at the "Cold"position,the temperature
insidethe drawerwill be coolerand you canstoremost goodqualitymeatsseveraldays.
All meatsor poultryshouldbe stored in their originalstorewrappingsor in plasticbags to _-reducethe evaporationof moisturefrom them.
To removetheTemp ControlDrawer,pullitout untilitstops. Thenapplya littlemorepressure
and pull completelyout.
Sealed Crispers
The Sealed Crispers are ideal for storing vegetables and fruit. Keep your crispers tightly
closed to insure freshness. Storing leafy vegetables, such as celery and lettuce in plastic
bags, reduces moisture evaporation.
The crispersslide outfor easy accessto foods stored within. They are completelyremovable
for cleaning (hand wash only) or for use elsewhere in your kitchen.
10
The crisper cover also serves as a refrigerator storage shelf. Below are directions for
removing the crisper cover for cleaning.
"_
Model JRTEt76: Lift thefront edge and pull straight out. To replacethe cover,set rear bars
on supports and push back until the front can be loweredinto place. If the crisper shelf is not
level, adjust the support leg (see below).
Models JRTE198, JRTE218,JRTDE228: Pushup on the glass cover from underneathand
carefully remove.
Leveling
Crisper Shelf
,____._
,-__>_"
If the crisper shelf is not level, adjust the support
(Model
JRTE176 Only)
leg as shown.
Humidity
_._
Control
(Most Models)
The humidity control levers are located on the shelf above the crisper drawers. The slide
control should generally be set at the "Low" setting for fruits and the "High" setting for
vegetables.
il
Wine Rack
To use your wine rack fit it along either
side of any refrigeratorshelf and lay the
,.-- wine bottle on the rack.
_
Defrostwater is used to maintainhumidity level and helpskeep food fresh longer.
Excess water drains into the defrost pan beneath the cabinet and evaporates.
Occasionally, you may notice water droplets on the back wall. This is normal.
11
Door Features
Egg Caddy
....
Your model has an egg caddy that fits securely on a door shelf. This egg caddy can be
removedand carriedto your working area.
Magnetic Door Gaskets
Doorgaskets are magnetizedto insurean air tight seal all around. These gaskets clingto the
cabinet front, once the doors are closed to within their magnetic range.
Lift-Off Door Shelves
(Most Models)
Lift-off door shelves may be easily adjusted to another position on the door. Lift the shelf
straight up until it clears the retainers on the door liner and pull straight out. Reverse this
procedurewhen replacing a shelf.
Bottle Retainer
Some models havea bottle retainer located on the lower refrigerator door shelf. It prevents
tall bottles from falling out when the door is opened or closed. The bottle retainer can be
adjusted to any position on the shelf by sliding sideways.
Shelf Tender
All models havea ShelfTender locatedon one of the refrigerator door shelves. It provides
uprightstorage for packagesor bottles. The Shelf Tendercan be adjustedto any position on
the shelf by sliding sideways.
"_
12
Freezer
Compartment Features
To maintain the natural flavor, moisture,and nutrition of frozen foods, and to prevent
freezer burn, we recommend that all foods be wrapped or sealed properly,
Freezer Shelf (ModelJRTE176)
the right end up and out of clip supports approximatelysix inches and (2) pulling the left
end bars outof the sockets in the left side wall.
Reversethe removal procedureto replacethe
shelf, making sure the right end bars are
pressed completely into the clip support.
Freezer Shelf
(Model
JRTDE228)
the right end up approximately " (2) push the
shelf to the right as far as it will go into the
sockets (3) lift the left end up approximately3"
and (4) pull the right end bars out of the
socket in the side wall.
Expandable
Freezer Shelf
Somemodelshavean expandable-widthfreezer
shelf which adjustssideways to open up a fullheight space for tall packages, such as pizza.
The right sideof the shelf is supported by a wide
"--leg
that slides sideways in channels on the
to
two heights.
requiresremoving
theadjust
shelf
undersideof
theThis
shelf.
The shelf can also
from the freezer, sliding the leg out of the chartnels, re-inserting it in the alternate height posiing on the alternative hooks. (Usually, the right
tion
supportsectionwill
and return}rigthe
beshe'f
expandedfully
tothe treezer,
tothehangright
wall
unleSSpackages
surface'
is
desJred,)ve
rtical
sto
rage
of
narrow
_'1
3
1'
FREEZER
SHELF
(Models
"\-.-,
I
JRTE198/JRTE218)
_.._
_
_Pl
.......................
_'_ ........... il.........
_J/////////I
/1__
"_._
il_
_
I
__-i
• __
! ......................
_
_J_=__ml_wl_:_a_j
1
[L_f.ql
L.
Tilt Out Freezer Basket (ModelsJRTE198/JRTE218)
Some modelshave a tilt out basketon the lower
she_ o_ the freezer door. Tilting the basket
forward by its upper edge provides easy access
to packages. A slight push upward will tilt the
basket back to its proper stored position.
13
[__
Ill I
Ice Cube Trays
(Non-dispenser
Models)
Your refrigeratorcomes equipped with ice cube trays and a storage bin, To releasefrozen
cubes, hold the trays upside down over the storage bin and twist both ends.
Optional
Automatic
Ice Maker
Some models are designed so an AutomaticIce Maker can be easily installed whenever
you want it. Order the ice maker kit number shown on the label on the cabinet back. The kit
contains installation instructions, water connection instructions and other information concerning the ice maker operation.
Automatic
Ice Maker
The water inlet tubing assembly required to complete the water connectionto the water
valve is located in the crisperdrawer in a bag. Connectthe ice maker to the water supply as
instructed in the separate instructions, furnished with the refrigerator.
The automatic ice maker is designedto furnish a continualsupply of ice cubes. The amount
of ice produceddepends on the temperaturein the freezer section of your refrigerator. The
co}der the freezer section, the more ice is produced. We suggest you start with your
refrigeratorandfreezercontrolsattheirmidsettings. }nmostcases, thisis satisfactory. Ifthe
door to the refrigerator or freezer is opened frequently or temperatures in the kitchen are
abnormally high, a colder setting may be necessary.
After your model has been installed and the water supply connected to the ice maker,it may
take 8 to 12 hoursbeforethe ice maker furnishes any usable ice cubes. The first one or two
harvestswill probablycontain undersizedand irregularcubes becauseof air in thesupply line.
The initial harvestmay also contain impuritiesfrom the new water supply piping. Therefore,
all cubes from the first two or three harvests should be discarded.
Under certain rare circumstances, ice cubes may be discolored, usually appearing with a
green-bluish hue. The cause of this unusual discoloration is apparently a combination of
factors such as certain characteristicsof local waters, householdplumbing and the accumulation of copper salts in an inactive water supply line which feeds the ice maker. Continued '_.consumptionof such discolored ice cubes may be injuriousto health. If such discoloration
is observed, discard the (ce cubes and contact the dealer from whom the ice maker or
refrigerator was purchased.
Ice cubes that have been in the ice storage for a considerablelength of time may pick up offflavor taste, stick together, and gradually become smaller. We suggestthat these cubes be
thrown away. We also suggest using an open box of baking soda in the refrigeratorfor food
odor absorption.
Certain sounds may accompany the various cycles of the ice maker. Examplesare: (1) The
motor may have a slight hum, (2) the cubes will rattle as they fall into an empty storage bin,
and (3) the water valve may click or "buzz" occasionally. All of these sounds are normaland
should be ignored.
Note- When dispensing ice cubes, it is importantthat you use only the ice supplied by this
ice maker. Ice from any other source could cause an ice jam. If this happens, remove and
discard all ice from the storage bin and any ice lodged in the ice chute.
14
Starting
---
or Stopping
Your Ice Maker
Your automaticicemaker is locatednear the top
of the freezer compartmentbehind the Ice
Access Panel. To gain access to the ice making
mechanism,rift the ice Access Panel.
AUTOMATIC
rCEMAKER
/
p
SENSOR
ARM
I
The ice maker has a wire sensor arm that is
_
the mechanismwhen the ice cube storage bin is
full, and restarts it after several ice cubes have
connectedto
a shut-off
armstop
stops
been used. You
can useswitch.
the stopThis
armto
all
productionof ice at any time. All you need to do
is raisethe arm into the OFF position.
_OFF
_
_
The ice maker should be turned off (arm up) when:
1.
Ice storage bin is to be removed for extended period of time.
2.
Refrigeratoris not to be used for a considerabletime, such as vacations. Also,turn off
the water supply to the ice maker in this instance, if practical.
3.
Water supply is to be shut-off for several hours.
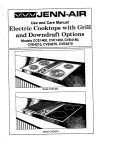
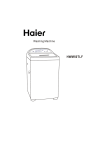
How the Ice Maker
Works
Water fills the empty cube mold (Fig. 1)
_
to freezing temperature. Cold air is forced
directly
over
mold.compartmenthas cooled
when the
freezer
_
""_
TUBE
"FILL
Flg
When frozen,the cubes are rotated up and
"-- out of the mold (Fig. 2). The sweeper arm
ejects them into the ice storage bin below.
,,,......
:
.._,:_
ICE
__Fig _-_"L_--7.,ql._._
.
.
7_
The sensor arm (Fig. 3) senses when the
bin is full and signals the ice maker to stop
ejecting more cubes.
However, the mold has been refilled and
cubes frozen so the new supply is ready
when needed. As soon as ice is removed
from the bin, the sensor arm signals that
more is needed. The ice maker resumes
operation by ejecting ready-and-waiting
frozen cubes.
F_
%
15
,
_ POSITION
iCE
BIN
Removing and Replacing
the Automatic Ice Cube Dispenser
Bin
Lift thefront of the AutomaticDispenserbin and pull itstraight out. Wash the bin occasionally
in mild soapand lukewarmwater. To replacethe bin, push it all the way back untilthe bottom of the bin is behindthe raisededge at the front of the shelf it rests upon. Make surethe tabs,
at the back of the bin, that turn the spiral auger are positionedbetween the prongs from the
auger motor.
Operating Your Automatic Ice Cube Dispenser
Prevent ice cubes from missingyour glass by holding it
as highas possible(just belowthe icechute). Pressthe
glass against the padded lever at the left side of the
fountain. To stop dispensing ice, release pressurejust
enoughto stopthe dispenser motor and leavethe glass
in placeto hold thedoor open untilicestops falling. With
a little practice, you will learn to anticipate when to
release pressure to prevent an unwanted dispense of
(-
ice, which
occurs each
one
and1one
seconds.
After
installation,
it may
take
to 2half
days
to fill the
Automatic Dispenserbin with ice cubes.
_
._-,z.L'_,_
_
Operating Your Water Dispenser
To dispense water, press a container against the padded lever at the right side of the fountain. To stop the
water flow, release pressure. To minimize splashing,
hold the container as high as possible.
When you first operate your dispenser or after reconnecting water to your refrigerator, air will escape from
the dispenser for a few minutes beforewater begins to
flow. Draw 10 glasses of water and empty them in the
kitchen sink. This will insure complete filling of the
reservoir with fresh water.
r-----
_
kt-,,=_.
''
Spill Tray
Donotdiscardwater intothegrille at the bottomofthe fountain. This isa spillarea, nota drain.
Normal spills will be evaporated in the recessed area below the spill shelf grille. Excessive
spills shouldbe removedwith an absorbentspongeor cloth. The spillarea should be cleaned
occasionally.
Fountain Light
The pushbutton light switch is locatedbehindthe panelat the topand on the rightsideof your
fountain. For replacement,use a 120v, 7 watt bulb.
Child Proof Lock
A child proof lock is located behindthe panel at the top and on the left side of the dispenser.
This push button switch will turn your ice and water dispenserson or off.
16
Cleaning
,_
It is recommendedthat you disconnect the powercord before cleaning.
Your refrigeratorcan be rolledout for cleaning. Turn the levelers,at each front cornerof the
cabinet, counterclockwise until they turn freely. Then pull the cabinet straightout. If you
have an installed Automatic Ice Maker, we recommend that you turn off the water supply
before moving the cabinet.
After cleaning behind your refrigerator, push it back and turn the levelers clockwise until
they touch the floor and lock the cabinet in place.
Outside
Use mildsoapandwater, DO NOTusescouring powders,automobilewax, or furniturepolish.
Rinse with clear water.
Door.gaskets may be cleaned with soap and water, a baking soda solution, or mild
scounng power.
Inside
Clean both compartmentsand inner door panels with mild soap and water. Do not use an
abrasive powder, solvent, polish cleaner or undiluted detergent.
You may notice a slight discolorationappearingat the topand near thecenter of the back wall
of the fresh food compartment. This is no cause for alarm, but it should be cleaned off
periodically.
When cleaninga glasscantilevershelf,you can remove it and submerge the entireassembly
in warm water. Never usehot water, Always allow glass to warm up to room temperature
before immersing in warm water.
Defrost
Pan
Defrostwater drains intoa shallow pan beneaththe cabinet and evaporates. Duringperiods
of high humidity, water could remain in the pan. This pan should be cleaned once a month
with a strong solution of soap and water.
;Z_L_/
bothends and pull it straightout. Slide the pan out
from underneaththe cabinet.
To replacethedefrostpan,positionthesideflanges
to
over the slide rails
push
untilgrille
it stops.
Tofitremovedefrost
pan,and
grasp
theit in
base
on
To replace the base grille, line up the springclips
on the base grillewiththe square openingson the
refrigerator. Tap each end in until the base grille
locks in place.
17
__.{_
II }_
SUPPORT
RAILS
IL_
/DEFROST
PAN_
1 { i-._/
_
_.r
Condenser
To a_lowyour refrigerator to run more efficiently,
the basegrille and the area around thecondenser
shouldbe cleanedat least one per year. The area
around the condenser can be cleaned whenever
the refrigerator is moved during routine house-
i/("_-
away from the wall. Vacuum the condenser and
cleaning.
Unplug
it
base
grille area
andthe
therefrigerator
area whereand
the move
cabinet
___'
ing.n°rmally
sits. Plug in the refrigeratorafter clean-
I
,
_-
-
__ ""
pAN
To cleanthe base grille, graspboth endsand pull
straight out, After cleaning, replace the base
grille.
18
_EFROS
OF
coNo_,s_,
T
OPEN END
-"_'-_S_G,,LL_
Other Hints On Caring
For Your Refrigerator
Replacing
Light Bulbs
It is recommended that you disconnect the power cord before replacing light bulbs.
Always use a 40 watt, standard base, appliance type bulb when replacing a light.
FormodelsJRTE198,JRTE218 &JRTDE228: Replacefreezerbulbby:(1) usingtwohands
spreadeachside ofthe lightcoveroutwardand pullto the front; (2) unscrewand replacebulb;
(3) push right hand side of lightcover toward back of freezer engaging tab in slot. Then push
left side toward back engaging left tab in slot.
Going On Vacation
If you will be gone for a month or less, leave the control knob at its usual setting.
During longer absences, (a) remove all food, (b) disconnect from electrical outlet, (c) clean
the refrigerator thoroughly, including defrost pan, (d) leave doors open to prevent odor
formation.
19
Before You Call
For Service
Problems? Save yourself the nuisance of unnecessary service calls; check these first:
Refrigerator runs too frequently.
• Frequent running provides more stable temperatures.
° Too many door openings.
• Prolonged door openings.
Refrigerator
runs too long.
•
Under normal conditions, due to larger size and colder temperatures,modern refrigerators run a greater percentage of the time.
° Prolonged or frequent door openings.
• Condenser needs cleaning.
• Poor air circulationaround condenser.
Refrigerator
won't run.
• Temperature controlturned to OFF.
• Powercord not plugged in.
• No power at electrical outlet.
• House fuse blown or circuit breakertripped.
Cabinet vibrates.
• Cabinet not level.
• Weak floor.
Warm air from cabinet bottom.
• Normal air flow for condenser circulation.
Front cabinet surface warm to touch.
• Special design to prevent condensationduring periods of high humidity.
Moisture on outside surface.
• Hot, humid weather increasescondensation. When humidity drops, condensationdisappears. During hot humidweather, turn the Energy Saver switch to "Reduces Exterior
Moisture".
Sizzling sound in freezer.
• Normal sound caused by defrost water dripping on defrost mechanism.
Water on floor under cabinet.
• Defrost pan missing or not positioned correctly.
Water in fresh food compartment
• Cabinet not level.
• Drain tube plugged.
bottom.
2O
Noisy operation.
• Fan noise perfectly normal in frost-free refrigerators. You may not be used to this if
previous model was manual defrost.
• Cabinet not level.
• Weak floor.
....
Defrost pan not positionedcorrectly.
Odor in cabinet.
• Defrost pan needs cleaning,
• Food left uncovered.
• Interior needs cleaning.
Foods dry out (Fresh or Frozen).
• Packages not wrapped or sealed properly.
• Crisper not tightly closed.
Fresh food compartment too cold.
• Refrigeratorcontrol set too cold.
Fresh food compartment too warm.
• Refrigeratorcontrol set too warm.
• Freezer control set at coldest position.
• Prolonged door openings.
Freezer compartment too warm.
• Freezer control set too warm.
• Prolongeddoor openings.
Ice cubes evaporate.
• Cold air moving over ice cubes causes shrinkage.
Automatic ice maker not operating
Stop arm in OFF position.
• Water supply turned off.
,_ • Water pressure too low.
Freezer too warm.
Ice Dispenser not operating.
• Ice jam in the dispenser.
• Ice maker not operating.
Water Dispenser not operating.
• Water supply turned off.
• Water pressure too low.
Cabinet light not working.
• Bulb burned out.
• No power at outlet.
Water appears oll back wall of fresh food compartment
• Normalfunction during defrost cycle. Water flows to the bottomof the compartment
and drains into the defrost pan.
21
If You Need
Service
• Call the dealer from whom your appliancewas purchasedor the authorized OennNr Service Contractor listed in the Yellow Pages. Your Jenn-Air Contractor can
providebetter and fasterservice if you can accuratelydescribe problems and give
modeland serial number of the appliance, Be sure to retain proof of purchaseto
verify warranty status. Refer to WARRANTY for further information of owner's
responsibilities for warranty service.
• If the dealer or service company cannot resolve the problem, write to Jenn-Air
CustomerAssistance,c/o MaytagCustomerService,PO Box2370, Cleveland,TN
37320-2370, 615o559-3646.
• Use and care manuals, service manuals,and parts catalogs are available from
Jenn-Air Customer Assistance, c/o Maytag Customer Service for a nominal
charge.
All specifications subject to change by manufacturer without notice.
22
...
Important
Information
Model Number
Serial Number
Bill of Material Number
Date Purchased
JENN-AIR DEALER FROMWHOM PURCHASED
Address
City
Phone
AUTHORIZEDSERVICECONTRACTOR
Address
City
Phone
IMPORTANT: Retainproof of purchase documents for warranty service
23