1
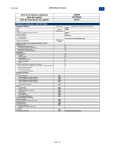
AIR DIE GRINDER
REAR EXHAUST
Model #52847
Operating and Maintenance Instructions
Distributed exclusively by
Harbor Freight Tools®.
3491 Mission Oaks Blvd., Camarillo, CA 93011
Visit our Web site at http://www.harborfreight.com
Copyright © 2001 by Harbor Freight Tools®. All rights reserved. No portion of this manual or any
artwork contained herein may be reproduced in any shape or form without the express written consent of Harbor Freight Tools.
For technical questions please call 1-800-444-3353
SPECIFICATIONS
ITEM
DESCRIPTION
Max. Air Pressure
90 PSI
Air Speed
25,000 RPM
Fitting Size
1/4” NPT
Collet Sizes
1/4”
Accessories
11 mm Collet Wrench (Qty: 1)
17 mm Collet Wrench (Qty: 1)
SAVE THIS MANUAL
You will need this manual for the safety warnings and precautions, operating and maintenance
procedures, parts lists and diagrams. Keep your invoice with this manual. Write the invoice
number on the inside of the front cover. Keep this manual and invoice in a safe and dry place
for future reference.
SAFETY WARNINGS AND PRECAUTIONS
1.
KEEP WORK AREA CLEAN AND DRY. Cluttered, damp or wet work areas invite injuries.
2.
KEEP CHILDREN AWAY FROM WORK AREA. Do not allow children to handle the AirDie
Grinder.
3.
STORE IDLE EQUIPMENT. When not in use, the Air Die Grinder should be stored in
a dry location to inhibit rust. Always lock up the Air Die Grinder and keep out of reach of
children.
4.
DO NOT USE THE AIR DIE GRINDER IF UNDER THE INFLUENCE OF ALCOHOL OR
DRUGS. Read warning labels on prescriptions to determine if your judgement or reflexes
are impaired while taking drugs. If there is any doubt, do not attempt to use this product.
5.
USE EYE AND HEARING PROTECTION. Wear ANSI approved safety impact eye glasses
and ANSI approved hearing protection when working with the Air Die Grinder. ANSI
approved safety impact eye glasses and hearing protection are available from Harbor
Freight Tools.
6.
DRESS SAFELY. Non-skid footwear or safety shoes should be used when working with
this product. Do not wear loose clothing or jewelry as they can become caught in moving
parts. Wear a protective hair covering to prevent long hair from becoming caught in moving
parts. If wearing a long sleeve shirt, roll the sleeves up above the elbows.
7.
DO NOT OVERREACH. Keep proper footing and balance at all times to prevent tripping,
falling, back injury, etcetera.
8.
STAY ALERT. Watch what you are doing at all times. Use common sense. Do not use the
Air Die Grinder when you are tired or distracted from the job at hand.
SKU 52847
PAGE 2
9.
CHECK FOR DAMAGED PARTS. Before using the Air Die Grinder, carefully check that it
will operate properly and perform its intended function. Check for damaged parts and any
other conditions that may affect the operation of the Air Die Grinder. Replace or repair damaged or worn parts immediately.
10.
REPLACEMENT PARTS AND ACCESSORIES. When servicing, use only identical replacement parts. Only use tools and accessories intended for use with this Air Die Grinder.
Approved tools and accessories are available from Harbor Freight Tools.
11.
MAINTAIN THESE PRODUCTS WITH CARE. Keep this tool and accessories clean and
dry for better and safer performance.
12.
MAINTENANCE: For your safety, service and maintenance should be performed regularly
by a qualified technician.
13.
USE THE RIGHT PRODUCTS FOR THE RIGHT JOB. There are certain applications for
which this Air Die Grinder was designed. Do not use a small tool or accessory to do the work
of a larger industrial tool or accessory. Do not use this Air Die Grinder for a purpose for
which it was not intended.
SPECIFIC PRODUCT WARNINGS AND PRECAUTIONS
1
USE CLEAN, DRY, REGULATED COMPRESSED AIR AT 90 PSI. Do not exceed the
recommended 90 PSI. Never use oxygen, carbon dioxide, combustible gases or any other
bottled gas as a power source for this tool.
2.
WHEN CONNECTING TO THE AIR SUPPLY:
A. If an automatic oiler is not used, add two drops of air tool oil into the air inlet
of the Air Die Grinder. (See Figure A.)
B. Turn on the compressor and set the regulator to the recommended 90 PSI for this tool.
3.
ALWAYS DISCONNECT TOOL FROM ITS AIR SUPPLY AND RELEASE ALL BUILT UP
AIR PRESSURE BEFORE PERFORMING ANY SERVICES OR MAINTENANCE such as
cleaning or changing accessories on the Air Die Grinder, leaving the work area, moving the
Air Die Grinder from one location to another, handing the Air Die Grinder to another person,
etcetera. (See Figure A, page 4)
4.
WARNING! Some dust created by power sanding, sawing, grinding, drilling, and other
construction activities, contain chemicals known (to the State of California) to cause cancer,
birth defects or other reproductive harm. Some examples of these chemicals are: lead from
lead-based paints, crystalline silica from bricks and cement or other masonry products,
arsenic and chromium from chemically treated lumber. Your risk from these exposures varies,
depending on how often you do this type of work. To reduce your exposure to these
chemicals: work in a well ventilated area, and work with approved safety equipment, such as
those dust masks that are specially designed to filter out microscopic particles. (California
Health & Safety Code § 25249.5, et seq.)
SKU 52847
PAGE 3
REV 02/06
FIGURE A
UNPACKING
When unpacking, check to make sure all parts shown on the Parts List and Assembly Diagram
are included. If any parts are missing or broken, please call Harbor Freight Tools at the number
shown on the cover of this manual as soon as possible.
OPERATING INSTRUCTIONS
ALL PARTS BELOW REFER TO THE PARTS LISTED AND SHOWN IN THIS MANUAL.
To Connect The Air Die Grinder To An Air Hose:
1.
The Air Die Grinder requires the attachment of a 1/4” NPT Quick Connector (available from
Harbor Freight Tools). (See Figure A)
2.
Wrap the male threads of the Quick Connector with about 3” of Teflon tape. Then, wrench
tighten the Quick Connector into the Air Inlet of the Air Die Grinder.
3.
Next, connect the Quick Coupler of an air hose onto the Quick Coupler of the Air Die Grinder.
The Air Die Grinder is now ready for use.
To Insert/Change Collets In The Air Die Grinder:
1.
The Air Die Grinder comes with a 1/4” Collet (part #27). This allows the Air Die Grinder to
accept grinding wheels with a 1/4” shank.
(See Assembly Diagram.)
SKU 52847
PAGE 4
2.
To change Collet (part #27) you will need to use the two accessory Collet Wrenches.
3.
With one Wrench hold the Collet Holder (part #24) in place. Use the other Wrench to turn
the Collet Nut (part #28) counterclockwise.
4.
Remove the Collet Nut (part #28) and insert the appropriate size Collet (part #27) into the
Collet Holder (part #24).
5.
With one Wrench, hold the Collet Holder (part #24) in place. Use the other Wrench to turn
the Collet Nut (part #28) clockwise to tighten and lock the Collet firmly in place.
To Install A Grinding Wheel:
1.
With one Wrench hold the Collect Holder (part #24) in place. Use the other Wrench and turn
the Collet Nut (part #28) counterclockwise to loosen.
(See Assembly Diagram.)
2.
Insert the shank of a grinding wheel in the Collet (part #27).
(See above for installing/changing Collets.)
3.
With one Wrench, hold the Collet Holder (part #24) in place. Use the other Wrench to turn
the Collet Nut (part #28) clockwise to tighten and lock the grinding wheel firmly in place.
CLEANING AND MAINTENANCE
1.
Before each use, examine the general condition of the entire compressor system. Inspect
guards, switches, power plug and cord assembly, extension cord, and air hoses for damage.
Check for loose screws, misalignment, binding of moving parts, improper mounting, broken
parts and any other condition that may affect its safe operation. If abnormal noise or vibration occurs, turn off the air compressor immediately and have the problem corrected before
further use. Do not use a damaged tool.
2.
Caution: Always disconnect the Air Die Grinder from its air supply source and release
all built up air pressure before performing any cleaning, servicing, or maintenance.
3.
To clean the outside of the Air Die Grinder, wipe with a clean, damp cloth and dry. If
necessary, use a mild detergent. Do not immerse the Air Die Grinder in liquids.
PLEASE READ THE FOLLOWING CAREFULLY
THE MANUFACTURER AND/OR DISTRIBUTOR HAS PROVIDED THE PARTS DIAGRAM IN THIS MANUAL AS A REFERENCE TOOL ONLY.
NEITHER THE MANUFACTURER NOR DISTRIBUTOR MAKES ANY REPRESENTATION OR WARRANTY OF ANY KIND TO THE BUYER
THAT HE OR SHE IS QUALIFIED TO MAKE ANY REPAIRS TO THE PRODUCT OR THAT HE OR SHE IS QUALIFIED TO REPLACE ANY
PARTS OF THE PRODUCT. IN FACT, THE MANUFACTURER AND/OR DISTRIBUTOR EXPRESSLY STATES THAT ALL REPAIRS AND
PARTS REPLACEMENTS SHOULD BE UNDERTAKEN BY CERTIFIED AND LICENSED TECHNICIANS AND NOT BY THE BUYER. THE
BUYER ASSUMES ALL RISK AND LIABILITY ARISING OUT OF HIS OR HER REPAIRS TO THE ORIGINAL PRODUCT OR REPLACEMENT
PARTS THERETO, OR ARISING OUT OF HIS OR HER INSTALLATION OF REPLACEMENT PARTS THERETO.
SKU 52847
PAGE 5
PARTS LIST / ASSEMBLY DIAGRAM
NOTE: Some parts are listed and shown for illustration purposes only, and are not available
individually as replacement parts.
SKU 52847
PAGE 6
REV 07k