1
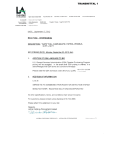
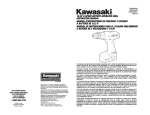
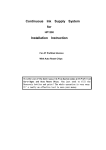
GUSR91DAB
DAB Radio With PLL FM Tuner
User Guide
IMPORTANT: Please read all instructions carefully before use and keep for future use
Introduction
Thank you for choosing this Grundig DAB Radio with Touch Screen Control
Panel.
Not only can it receive DAB radio stations, but you can also tune into FM radio stations or
connect an auxiliary device to it. Throughout this User Guide the DAB Radio with Touch Screen
Control Panel will be referred to as the DAB Radio
Safety is important
Use of any electrical equipment should be undertaken with care. Please read the safety section
on page 17 and 18 before using your DAB Radio. This appliance is for household use only.
1
What’s in the box?
DAB Radio
DAB With PL
R91
GUS B Radio
DA r Guide
Use
L FM
r
Tune
d ke
ep for
future
use
an
use
fore
y be
refull
s ca
ction
IMPO
T:
RTAN
d
e rea
Pleas
tru
all ins
This User Guide
AC Power Cord
Contents
01 Your DAB Radio ........................3
05 Specifications ..........................16
02 Get going ..................................4
06 Warnings .................................17
03 Daily use ...................................5
07 Guarantee ................................19
04 Trouble Shooting ....................15
2
01 Your DAB Radio
Rod Antenna
BBS button
Display button
Standby button
Volume
control knob
Preset button
Standby
Mute
BBS
Scan
10:00:00
23-7-2009
Display
Preset
Mode
Menu
Mute button
Select/Scroll up/
down
Menu button
Scan button
Mode button
LCD Display
AC Power Socket
ON/OFF switch
AUX In Socket
PHONE Socket
3
Get going
1
02
Connect the small end of the mains lead to the AC input socket on the rear of the unit.
Connect the 3 pin plug to a suitable wall socket.
2
Turn the power switch on the rear of the unit to the ON position.
3
Using Headphones
A pair of headphones (not supplied) with a 3.5mm diameter stereo plug and 8-32 ohm
impedance is required. Plug the headphones into the Headphone Socket on the side of
the DAB Radio.
When headphones are connected, the sound to the speakers is automatically turned
off.
4
Using the DAB Radio with Batteries
The DAB Radio can be powered by 6 “C” types Batteries. This allows the
DAB Radio to be used outside or away from wall sockets.
To remove the Battery Compartment Cover, press the 2 retaining clips firmly and pull
away from the DAB Radio.
Insert 6 “C” type batteries into the battery compartment, following the polarity
diagram on the inside.
Replace the Battery Compartment Cover.
5
Using AUX IN
Connect an audio cable (not supplied) to the AUX IN socket on the side of the DAB
Radio. Connect the other end to a suitable output socket on your auxiliary device.
4
03 Daily Use
Switching On
1
2
3
To turn on the DAB Radio, ensure the power switch on the rear of the unit is set
to the ON position.
Press the STANDBY button on the touch panel.
To turn the DAB Radio off press the STANDBY button again.
Adjusting the Volume
1
2
3
To increase the volume, turn the volume control knob clockwise.
To decrease the volume, turn the volume control knob anti-clockwise.
You can also press the MUTE button to turn the sound off. To turn the sound
back on, press the MUTE button again.
BBS function
The bass sounds can be enhanced by selecting the bass boost system.
1
2
Press the BBS button to enhance the bass frequencies
To turn off the bass boost system, press the BBS button again.
Listening to Radio
1
2
Press the STANDBY button to turn the DAB Radio on.
The following screen will be displayed. A bar graph indicates the progress of the
search - the number of stations found increases as the scan progresses.
Number of stations found
Progress bar
3
5
When the scan is complete, the DAB Radio will then select the first available
station - stations are listed in numerical then alphabetic order. The station list is
retained in memory so the next time you switch the DAB Radio on, the station
search does not take place. If there are no stations found, check that adequate
DAB coverage exists in your area.
Daily Use
03
Changing DAB Stations
1
2
Rotate the Scroll Up/Down knob to scroll through the stations in the station list.
Press the Scroll Up/Down button to select a new station from the list.
Push the SELECT button to confirm. The radio will tune to the new station.
DON’T FORGET!
If no new station is selected the DAB Radio will display the currently playing
station after 15 seconds.
From time to time new DAB stations may be added to the DAB station list.
If you wish to see if any new stations have been added, press the SCAN button to
activate a full scan.
Storing DAB Presets
You can preset up to 10 DAB stations for easy access as follows:
1
2
3
4
Tune to the station you wish to preset (see Changing DAB Stations).
Press and hold the PRESET button, preset position 1 will show in the display.
Rotate the SELECT/Scroll Up/Down button to select the required preset memory
position.
Push the SELECT button to save the current station into the specified preset
location.
Selecting a Preset Station
1
2
3
Press the PRESET button briefly, preset position 1 will show in the display.
Rotate the SELECT/Scroll Up/Down button to select the desired preset.
Push the SELECT button to confirm.
DON’T FORGET!
If you select a preset location that has not been programmed with a station,
"Preset empty" will be displayed.
The DAB Radio will return to the previously selected station after a few seconds.
6
03 Daily Use
Changing the DAB Station Information
It is possible to change the information displayed on the second line of the display
when listening to a DAB station. There are seven types of information
available as listed below with examples to the right.
Press DISPLAY Button
1
2
3
4
5
6
7
8
9
7
Dynamic Label Segment (DLS) This is scrolling text
information supplied by the DAB station. It may
comprise information on music titles or details of the
programme and is provided by the broadcaster.
Signal Bar Shows the transmission signal level.
Program Type (PTY) This is a description of the
type of programme provided by the DAB station and
is provided by the broadcaster.
Multiplex Name This will show the multiplex that is
broadcasting the programme you are listening to.
Channel and Frequency This displays the channel
number and the transmission frequency.
Signal Error Rate If the transmission signal contains
errors the system can apply correction.
The amount of signal correction can be displayed as a
numerical value between 0 and 99. As the value
increases, you will hear the signal degrade.
To improve reception, try adjusting the position of the
antenna. Please note a signal error rate of 30 or more
will make the station un-listenable.
Signal Information This shows the digital bit-rate
and the signal mode.
Time This shows the current time and is provided by
the broadcaster so will always be accurate.
Date This displays the date and is provided by the
broadcaster.
BBC Radio 5 Live
DLS scrolling
Press DISPLAY Button
BBC Radio 5 Live
Press DISPLAY Button
BBC Radio 5 Live
News
Press DISPLAY Button
BBC Radio 5 Live
BBC National DAB
Press DISPLAY Button
BBC Radio 5 Live
11C 220.352MHz
Press DISPLAY Button
BBC Radio 5 Live
Signal error 1
Press DISPLAY Button
BBC Radio 5 Live
80kbps Mono
Press DISPLAY Button
BBC Radio 5 Live
12:38:33 AM
Press DISPLAY Button
BBC Radio 5 Live
28/12/2009
Press DISPLAY Button
Daily Use
03
Using the MENU Control (DAB mode)
The MENU control allows you to change some of the system options on your DAB
Radio. These options are arranged in a menu structure as shown below.
BBC Radio 5 Live
RadioText
Return to Station list
Press MENU Button
DAB
<Full scan
Press SELECT Button
Scanning
0
>
Rotate the “SELECT”
button clockwise
DAB
<Manual tune
>
Press SELECT Button
Rotate the “SELECT” Button to
choose radio frequency, press
SELECT Button to confirm.
Rotate the “SELECT”
button clockwise
DAB
<DRC
>
Press SELECT Button
Rotate the “SELECT”
button clockwise
DAB
<Prune
Rotate the “SELECT”
button clockwise
DAB
<DRC off
>
Rotate the “SELECT” Button to
choose “DRC” off / high /low,
press select button to confirm
>
Press SELECT Button
Rotate the “SELECT”
button clockwise
DAB
<System
Manual tune
<5A 174.928MHz>
Prune?
<No> Yes
Rotate the “SELECT” Button to
choose “Prune” No/Yes, press
select button to confirm
>
Press SELECT Button
System
<Time
>
Rotate the “SELECT” Button to
choose “System” Time / Backlight /
factory reset / SW version, press
SELECT button to confirm
8
03 Daily Use
Using the Menu
Press the MENU button to enter the menu. Rotate the SELECT button to scroll
through the options described below.
Full Scan
1 Press the MENU button to access the menu.
2 Rotate the SELECT button until “Full scan” is displayed.
Push the SELECT button to activate a full scan for DAB stations.
Manual Tune
It is possible to manually tune to a specific channel/frequency and add this to the
station list. This function can be used to obtain the optimum reception for a specific
Channel/frequency.
1 Press the MENU button to access the menu.
2 Rotate the SELECT button until “Manual tune” is displayed.
Push the SELECT button to select.
3 Rotate the SELECT button to select the desired channel/frequency.
4 Push the SELECT button, a rectangle will be displayed on the second line of the
display.
The position of this rectangle indicates the signal strength (the further towards the
right, the greater the signal strength)
5
6
9
Adjust the position of the antenna to obtain the optimum signal strength.
Push the SELECT button to confirm.
Daily Use
03
Dynamic Range Control (DRC)
DRC adds or removes a degree of compression to compensate for the differences in
the dynamic range between radio stations. For example, a station broadcasting
popular music may have a high level of compression applied since the emphasis is
on a constant high listening level. Where as a station broadcasting classical music
will have little or no compression as the listener requires all of the highs and lows in
the music to define the detail.
There are three levels of compression:
DRC off = No compression applied
DRC high = Maximum compression applied (this is the default)
DRC low = Low compression applied
The best way to determine which of these settings suits you best is to experiment
with them on a variety of source material.
1 Press the MENU button to access the menu.
2 Rotate the SELECT button until “DRC” is displayed.
3 Push the SELECT button to select.
4 Rotate the SELECT button to select between the three DRC values. The available
options appear on line 2 of the display. When the required DRC value is displayed
push the SELECT button to confirm.
5 You should be able to hear the difference in compression immediately.
Station Prune
The Station Prune function allows you to remove stations from the station list that are
not active or cannot be received. These stations usually appear in the display with a "?".
1 Press the MENU button to access the menu.
2 Rotate the SELECT button until "Prune" is displayed.
3 Press the SELECT button to select.
4 Rotate the SELECT button to highlight either No or Yes
5 Press the SELECT button. If you have chosen to prune the station list, the
unwanted stations will be deleted.
System Settings
To make adjustments to the settings on the DAB Radio:
1 Press the MENU button to access the menu.
2 Rotate the SELECT button until "System" is displayed.
3 Press the SELECT button. The following options: Time, Backlight, Factory Reset
and Software (SW) version are available.
10
03 Daily Use
Time - Allows you to set the time and date manually or update automatically from the
DAB or FM radio broadcast.
Backlight - Allows you to set the backlight time-out from 10, 15, 30 and 60 seconds,
or constantly on.
DON’T FORGET!
When using battery power, the backlight time-out will be set to 10 seconds when
the DAB Radio is switched to standby. You can touch any button on the radio to
turn the backlight on for 10 seconds if you want to view the time.
If you are using mains power, the backlight will remain lit in standby mode.
Factory Reset - this will reset all preset values and begin a full scan for DAB stations.
Software Version - This displays information about the current software installed in
the DAB Radio.
Using the FM Radio
1 If the DAB Radio is in DAB mode, press the MODE button to select FM mode.
DON’T FORGET!
You may hear background noise as no station has been tuned in. The display will
show the frequency of the FM station.
Automatic Tuning
1 Press the SCAN button to automatically search for the next available station.
2 If the reception is poor, try Manual Tuning (see Manual Tuning below) to fine-tune
the station.
DON’T FORGET!
If the reception does not improve, try altering the position of the antenna. If the
reception is still poor, scan again to determine whether a stronger signal exists for
the desired frequency.
Manual Tuning
1 Rotate the SELECT button to manually tune through the frequency band.
2 The frequency will increase or decrease in steps of 0.05 MHz for each turn of the
SELECT button.
Storing FM Presets
You can preset up to 10 FM stations. The procedure for storing and recalling FM
presets is the same as described on page 6.
11
Daily Use
03
Changing the FM Station Information
It is possible to change the information that is displayed on the second line of the
display when listening to a FM station. There are six types of information available as
listed below with examples to the right.
Press DISPLAY Button
1 Radio text This is scrolling text information supplied
by the FM station. It may comprise information on
Radio 2
DLS scrolling
music titles or details of the programme and is
Press DISPLAY Button
provided by the broadcaster.
Radio 2
2 Program Type (PTY) This is a description of the
News
type of programme provided by the FM station and
Press DISPLAY Button
is provided by the broadcaster.
Radio 2
91.80MHz
3 Station name This is information of the station name /
Press DISPLAY Button
frequency of the current FM station.
Radio 2
4 Mono or Stereo This indicates if the current station is
Mono
Press DISPLAY Button
broadcast in stereo or mono.
91.80 MHz
5 Time This displays the current time and is provided
12:40:30 PM
by the broadcaster so will always be accurate.
Press DISPLAY Button
6 Date This displays the date and is provided by the
91.80 MHz
04-07-2009
broadcaster.
Press DISPLAY Button
12
03 Daily Use
Using the MENU Control (FM mode)
The MENU control allows you to change some of the system options on your DAB
Radio. These options are arranged in a menu structure as shown below.
Press MENU Button
FM
<Scan setting
Press SELECT Button
>
Audio setting
<All stations
>
Rotate the “SELECT” to choose
ALL Station/Stonge Station only,
press “SELECT” button to confirm.
Press MENU Button
Audio setting
<Strong station only>
FM
<Audio setting
Press SELECT Button
>
Audio setting
<Forced mono
Press MENU Button
Audio setting
<Stereo allowed
FM
<System
Press MENU Button
>
Rotate the “SELECT” to choose
Forced mono/stereo allowed,
press “SELECT” button to confirm.
Press SELECT Button
>
>
System
<Time
>
Rotate the “SELECT” to choose
12/24 hours mode, after press
“SELECT” button to confirm, you
can set the time and date.
System
<Backlight
>
Rotate the “SELECT” to choose
10/15/30/60 sec. Press “SELECT”
button to confirm.
13
System
<Factory reset
>
System
<SW version
>
Daily Use
03
Using the Menu
Press the MENU button to enter the menu. Rotate the SELECT button to scroll
through the options described below.
Scan
1 Press the MENU button to access the menu.
2 Rotate the SELECT button until “Scan setting” is displayed.
3 Push the SELECT button to select.
4 Rotate the SELECT button to select “All stations” or “Strong stations”.
5 Push the SELECT button to confirm.
DON’T FORGET!
All subsequent scans will be made according to the setting chosen.
A * will show next to the current scan setting.
Audio setting
1 Press the MENU button to access the menu.
2 Rotate the SELECT button until “Audio setting” is displayed.
3 Push the SELECT button to select.
4 Rotate the SELECT button to select “Stereo or allowed” or “Forced mono”.
5 Push the SELECT button to confirm.
DON’T FORGET!
Forced mono will present all FM stations in mono.
System Settings
To make adjustments to the settings in FM mode:
1 Press the MENU button to access the menu.
2 Rotate the SELECT button until "System" is displayed.
3 Press the SELECT button. The following options: Time, Backlight, Factory Reset
and Software (SW) version are available.
Further information on these settings can be found in the DAB mode section of this
User Guide.
14
04 Trouble Shooting
PROBLEM
POSSIBLE CAUSE
No sound
Volume not adjusted.
Headphones are connected.
Mains lead is not correctly
connected.
Microprocessor locked up.
The unit does react to
operation of any button
Poor radio reception
15
G
REMEDY
Adjust the Volume.
Disconnect the headphones.
Connect the mains lead
properly.
Turn off the unit,
disconnect the mains plug,
reconnect after a few seconds.
Weak radio signal
Ensure the telescopic antenna is
Interference from other electrical fully extended.
items.
Adjust the position of the
antenna.
Move the radio away from
sources of interference.
Need extra help?
Need a spare part?
Don’t worry we are just at the other end of
the phone. If you are experiencing problems
using your new product, before returning it
to the retailer, just call 0871 230 1777.
In the unlikely event of you needing spare
parts, please contact our spares department
on: 0871 230 0790
Specifications
05
Model Number
GUSR91DAB
Power Supply
AC Input 230 V 50Hz
or 6 X "C" (UM-2) batteries
Standby Power Consumption
2W
Max Power Consumption
13W
Max Power Output
1.2W
10% THD Power Output
1W
DAB section
Band III, 174 MHz to 240 MHz
FM section
87.5 MHz to 108 MHz
IMPORTANT: Due to continual revision and improvements to our products design,
specifications are subject to change without notice.
16
06 Warnings
WEEE
General Safety
This appliance is labelled in accordance
with European Directive 2002/96/EG
concerning used electrical and
electronic appliances (Waste Electrical
and Electronic Equipment - WEEE).
The guideline determines the
framework for the return and
recycling of used appliances.
This DAB Radio has been designed and
manufactured to meet European safety standards,
but like any electrical equipment, care must be
taken if you are to obtain the best results and
safety is to be assured.
Sound levels
Your hearing is very important to you and to us,
so please take care when using this DAB Radio.
It is strongly recommended that you follow the
listed guidelines in order to prevent possible
damage or loss of hearing.
Establish a safe sound level
Over time your hearing will adapt to continuous
loud sounds and will give the impression that the
volume has in fact been reduced. What seems
normal to you may in fact be harmful. To guard
against this before your hearing adapts, set
the volume to a low level.
Slowly increase the level until you can hear
comfortably and clearly and without distortion.
Damage to your hearing is accumulative and is
irreversible. Any ringing or discomfort in the ears
indicates that the volume is too loud.
Once you have established a comfortable
listening level, do not increase the sound level.
Do read these operating instructions before you
attempt to use the DAB Radio.
Do ensure that all electrical connections
(including the mains plug, extension leads and
interconnections between pieces of equipment)
are properly made in accordance with the
manufacturer’s instructions.
Switch off and remove the mains plug when
making or changing any connections.
Do consult your dealer if you are ever in doubt
about the installation, operation or safety of your
DAB Radio.
Don’t continue to operate the DAB Radio if you are
ever in doubt about it working normally, or if it is
damaged in any way. Switch it off, withdraw the
plug from the mains and consult your dealer.
Don’t remove any fixed covers as this may expose
you to dangerous voltages.
Don’t leave the DAB Radio switched On when it is
unattended for long periods of time, unless it is
specifically stated that it is designed for unattended
operation or has a standby mode.
Make sure that other people in your household are
conversant with the DAB Radio.
Don’t obstruct the ventilation vents on the
DAB Radio, for example with curtains or soft
furnishings.
Overheating will cause damage and shorten the
life of the product.
Don’t allow electrical equipment to be exposed to
rain or moisture.
17
G
Warnings
06
Electrical Information
Wiring Instructions
This DAB Radio is supplied with a mains lead
fitted with a BS1363/A 13 amp plug. If it is not
suitable for your supply sockets it must be
removed and replaced with an appropriate plug.
If the plug becomes damaged and/or needs to
be replaced please follow the wiring instructions
below.
The supply cable will be either 2-core or 3-core.
Follow the appropriate wiring instructions given
below. In both cases ensure that the outer sheath
of the cable is firmly held by the cable clamp.
The plug removed must be disposed of
immediately. It must not be plugged into a supply
socket as this will be an electrical hazard. If the
fuse needs to be replaced it must be of the same
rating and ASTA approved to BS1362. If the plug
is changed, a fuse of the appropriate rating must
be fitted in the plug, adapter or at the distribution
board. If the fuse in a moulded plug is replaced,
the fuse cover must be refitted before the
appliance can be used.
2-Core Plug
WARNING! Do not connect either wire to
the earth terminal.
This symbol indicates that this 2-core
appliance is Class II and does not
require an earth connection.
The wire coloured blue must be connected
to the terminal marked with the letter N or
coloured black.
The wire coloured brown must be connected
to the terminal marked with the letter L or
coloured brown.
FUSE
NEUTRAL
(Blue)
LIVE
(Brown)
3-Core Plug
WARNING! This appliance must be
earthed.
The wire coloured green and yellow must
be connected to the terminal marked with
the letter E, or by the earth symbol , or
coloured green and yellow.
The wire coloured blue must be connected
to the terminal marked with the letter N or
coloured black.
The wire coloured brown must be connected
to the terminal marked with the letter L or
coloured brown.
EARTH
(Green & Yellow)
FUSE
NEUTRAL
(Blue)
LIVE
(Brown)
18
07 Guarantee
The DAB Radio is guaranteed for twelve months from the date of original purchase. If there are
any defects due to faulty materials or workmanship, contact the Grundig Helpline. Have your
receipt of purchase on hand.
The guarantee is subject to the following provisions:
• It is only valid within the boundaries of the country of purchase.
• The product must be correctly installed and operated in accordance with the instructions
contained in this User Guide.
• The DAB Radio must be used solely for domestic purposes.
• The guarantee will be rendered invalid if the DAB Radio is re-sold or has been damaged by
inexpert repair.
• The manufacturer disclaims any liability for incidental or consequential damages.
• The guarantee is in addition to, and does not diminish, your statutory or legal rights.
19
G
Helpline 0871 230 1777
G