1
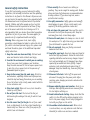
INSTRUCTION MANUAL
2000W
Heat Gun Paint/
Stripper Kit
• Melbourne • Perth • Auckland • Hong Kong • Shanghai
• Taipei • New York • Verona • London • Paris
HG2000K
030825 MA ED1
Contents
Warranty
Introduction
Environmental protection
Description of symbols
Specifications
General safety instructions
Safety rules for heat guns
Know your product
Accessories
Features
Variable Temperature Control
Temperature Indicator
Safety Cut Out
Assembling the Wire Stand
Unpacking
Full 2 Years Home Use Warranty
2
3
3
3
3
4
5
6
6
7
7
7
7
7
8
Whilst every effort is made to ensure your complete
satisfaction with this tool, occasionally, due to the mass
manufacturing techniques, a tool may not live up to our
required level of performance and you may need the
assistance of our service department.
This product is warranted for a 2-year period for home
domestic use from the date of the original purchase. If
found to be defective in materials or workmanship, the
tool or the offending faulty component will be replaced
free of charge with another of the same item. A small
freight charge may apply.
The warranty replacement unit is only made available by
returning the tool to the place of purchase with a
confirmed register receipt. Proof of purchase is essential.
We reserve the right to reject any claim where the
purchase cannot be verified.
This warranty does not include damage or defects to the
tool caused by or resulting from abuse, accidents,
alterations or commercial or business use.
It also does not cover any bonus accessories unless the
tool is a GMC Platinum Professional model.
Please ensure that you store your receipt in a safe place.
Conditions apply to the above warranty.
If you need direction of what constitutes a free of
charge warranty claim, please review the guide given on
the rear of the Receipt Holder. An indication is given as
to the types of claim that are permissible, and those
that are not.
2
Description of symbols
Dear Customer
The rating plate on your tool may show symbols. These
represent important information about the product or
instructions on its use.
Wear hearing protection.
Wear eye protection.
Wear breathing protection.
If you require any help with your product, whether it
is a Warranty claim, spare part or user information,
please phone our Help Line for an immediate response.
Phone 1300 880 001 in Australia or 0800 445 721 in
New Zealand.
Introduction
Double insulated
for additional protection.
Your new GMC power tool will more than satisfy your
expectations. It has been manufactured under stringent
GMC Quality Standards to meet superior performance
criteria.
You will find your new tool easy and safe to operate,
and, with proper care, it will give you many years of
dependable service.
Caution. Carefully read through this entire Instruction
Manual before using your new GMC Power Tool. Take
special care to heed the Cautions and Warnings.
Your GMC power tool has many features that will make
your job faster and easier. Safety, performance, and
dependability have been given top priority in the
development of this tool, making it easy to maintain
and operate.
Conforms to relevant
safety standards.
Specifications
Voltage:
Wattage:
Setting 1:
Setting 2:
Heat Setting Range:
Setting 1:
Setting 2:
Insulation:
Weight:
Environmental protection
Recycle unwanted materials instead of
disposing of them as waste. All tools, hoses
and packaging should be sorted, taken to
the local recycling centre and disposed of
in an environmentally safe way.
3
230–240Vac ~ 50Hz
2000W
1000W
2000W
0 - 650°C
50° - 550°C
50° - 650°C
Double insulated
0.85kg
General safety instructions
7. Dress correctly. Do not wear loose clothing or
jewellery. They can be caught in moving parts. Rubber
gloves and non-slip footwear are recommended when
working outdoors. If you have long hair, wear a
protective hair covering.
8. Use safety accessories. Safety glasses and earmuffs
should always be worn. A face or dust mask is also
required if the drilling operation creates dust.
9. Do not abuse the power cord. Never pull the cord to
disconnect the tool from the power point. Keep the
cord away from heat, oil and sharp edges.
10. Secure the work piece. Use clamps or a vice to hold
the work piece. It is safer than using your hand and
frees both hands to operate the tool.
11. Do not overreach. Keep your footing secure and
balanced at all times.
12. Look after your tools. Keep tools sharp and clean for
better and safer performance. Follow the instructions
regarding lubrication and accessory changes. Inspect
tool cords periodically and, if damaged, have them
repaired by an authorised service facility. Inspect
extension cords periodically and replace them if
damaged. Keep tool handles dry, clean and free from
oil and grease.
13. Disconnect idle tools. Switch off the power and
disconnect the plug from the power point before
servicing, when changing accessories and when the
tool is not in use.
14. Remove adjusting keys and wrenches. Check to see
that keys and adjusting wrenches are removed from
the tool before switching on.
15. Avoid unintentional starting. Always check that the
switch is in the OFF position before plugging in the
tool to the power supply. Do not carry a plugged in
tool with your finger on the switch.
16. Use outdoor rated extension cords. When a tool
is used outdoors, use only extension cords that are
intended for outdoor use and are so marked.
To use this tool properly, you must observe the safety
regulations, the assembly instructions and the operating
instructions to be found in this Manual. All persons who
use and service the machine have to be acquainted with
this Manual and must be informed about its potential
hazards. Children and infirm people must not use this
tool. Children should be supervised at all times if they
are in the area in which the tool is being used. It is
also imperative that you observe the accident prevention
regulations in force in your area. The same applies for
general rules of occupational health and safety.
Warning. When using power tools, basic safety
precautions should always be taken to reduce the risk of
fire, electric shock and personal injury. Also, please read
and heed the advice given in the additional important
safety instructions.
1. Keep the work area clean and tidy. Cluttered work
areas and benches invite accidents and injury.
2. Consider the environment in which you are working.
Do not use power tools in damp or wet locations.
Keep the work area well lit. Do not expose power tools
to rain. Do not use power tools in the presence of
flammable liquids or gases.
3. Keep visitors away from the work area. All visitors
and onlookers, especially children and infirm persons,
should be kept well away from where you are working.
Do not let others in the vicinity make contact with the
tool or extension cord.
4. Store tools safely. When not in use, tools should be
locked up out of reach.
5. Do not force the tool. The tool will do the job
better and safer working at the rate for which it was
designed.
6. Use the correct tool for the job. Do not force small
tools or attachments to do the job best handled by a
heavier duty tool. Never use a tool for a purpose for
which it was not intended.
4
17. Stay alert. Watch what you are doing. Use common
sense. Do not operate a power tool when you are
tired.
18. Check for damaged parts. Before using a tool,
check that there are no damaged parts. If a part is
slightly damaged, carefully determine if it will operate
properly and perform its intended function. Check for
alignment of moving parts, binding of moving parts,
breakage of parts, proper mounting and any other
conditions that may affect the operation of the tool.
A part that is damaged should be properly repaired
or replaced by an authorised service facility, unless
otherwise indicated in this Instruction Manual.
Defective switches must be replaced by an authorised
service facility. Do not use a tool if the switch does
not turn the tool on and off correctly.
19. Guard against electric shock. Prevent body contact
with grounded objects such as water pipes, radiators,
cookers and refrigerator enclosures.
20. Use only approved parts. When servicing, use only
identical replacement parts. Use an authorised service
facility to fit replacement parts.
WARNING. The use of an accessory or attachment, other
than those recommended in this Instruction Manual, may
present a risk of personal injury.
• Never leave the appliance unattended when in use.
Additional safety rules for Heat guns
WARNING: During application the heat nozzle must be
kept at least 16mm away from the work piece. This is to
allow air flow.
• Rags, cloths, cord, string, wood shavings and the like
•
•
•
•
•
•
•
•
• A fire may arise if the appliance is not use with care.
• Be careful when using the appliance in places where
there are combustible materials, such as inflammable
liquids, rags, wood shavings and the like.
• Do not apply the heat to the same place for a long
time.
• Do not use in the presence of an explosive atmosphere.
• Heat may be conducted to combustible materials which
are out of sight
• Place the appliance on its stand whenever you place it
down and after use and allow to cool before storage;
5
should never be left around the work area.
Support the work properly.
If you are interrupted when operating the appliance,
complete the process and switch off before looking up.
When using the appliance, use safety equipment
including safety goggles or shield, breathing mask and
protective clothing including safety gloves.
Wear goggles
Wear earmuffs
Wear a breathing mask
Never attempt to use the appliance to dry animals,
clothing or hair.
Never use this appliance as a hair dryer.
Always use in ventilated areas.
Do not leave the appliance unattended when in use.
This product is designed for light domestic use only, it
is not designed for industrial purposes and whilst every
care has been taken to make hot air gun safe, accidents
can happen. By following the simple safety guide you
can avoid accidents.
Know your product
2
1
3
4
5
1. Heat Nozzle
2. Guard Sleeve
3. Body
4. LED Temperature Indicator
5. Variable Temperature Control Dial
6. Two speed rocker switch
7. Wire Stand
8. Power Cord
Accessories
9. Heat Spreader
10. Heat Reflector
11. Heat Concentrator
12. Heat Deflector
13. Paint Scraper
14. Scraper Handle Scrapers
15. Scrapers
6
14
11
7
8
9
8
10
15
12
6
13
Features:
Temperature Indicator
The temperature indicator
gives the temperature during
operation. 6 LED’s are
placed on the box lid. Each
one represents a different
temperature range:
Two Speed Rocker Switch:
The rocker switch can be adjusted to 3 positions and
these are:
Position 0:
Stop/Off
Position 1:
50° - 550°C
LED No:
Colour
Temperature (C)
1
Yellow
50 o
2
Yellow
100 o
3
Green
200 o
4
Green
350 o
5
Red
500 o
6
Red
650 o
Note: The temperature indicator gives the temperature for
reference only.
Safety Cut Out
This unit is equipped with a safety cut-out device which
will operate if the internal temperature gets too high.
Should this feature activate, switch off the unit and wait
for the unit to cool down. When the unit has cooled
sufficiently normal operation can be resumed.
Position 2:
50° - 650°C
Variable Temperature Control
The variable temperature
control enables the
temperature to be set and
adjusted between 50°C and
650°C, depending upon the
type of material and the
work to be carried.
PLEASE NOTE: The reset time of the hot air gun’s safety
cut-out fuse is approximately 30 minutes, after which
normal operation can resume.
Assembling the Wire Stand
For convenience, the wire stand should be set up
before operating; therefore the tool can be rested when
7
necessary. A Phillips #1 screwdriver (not supplied) is
needed during the assembly.
1. Place the wire stand to
the bottom of the handle,
ensuring that the ends of
the stand align themselves
with the holes on the
handle.
2. Insert the Phillips screw
on one side between the
end of the stand and the
hole of the handle. Use the Phillips
screwdriver to secure the screw.
3. Repeat this process on the other side of the handle.
Note: Before you commence with the assembly, make sure
that the plug of the unit is disconnected from the mains
supply.
Unpacking
Due to modern mass production techniques, it is unlikely
that your GMC Power Tool is faulty or that a part is
missing. If you find anything wrong, do not operate the
tool until the parts have been replaced or the fault has
been rectified. Failure to do so could result in serious
personal injury.
8
Carefully read the entire Instruction Manual
before using this product.
Before returning this product for a
Warranty Claim or any other reason
Please Call 1300 880 001 (Australia)
or 0800 445 721 (New Zealand)
When you make your call, please have
the following information at hand:
With continuing product development changes may
have occurred which render the product received
slightly different to that shown in this instruction
manual. The manufacturer reserves the right to
change specifications without notice. Note:
Specifications may differ from country to country.
• GMC Product Type • GMC Product Code
A GMC Service Engineer will take your call and, in
most cases, will be able to solve your problem over
the phone.
You are welcome to use this phone-in service to
make suggestions or give comments about any
GMC product.
16 Scammel Street, Campbellfield
Victoria, Australia 3061
Tel: (03) 9303 2133
Fax: (03) 9308 7822
The GMC 777 Helpline operates from 7am to
7pm, 7 days a week (EST). This allows you
to contact GMC directly with any queries and
technical questions you have regarding
our products.
Save this Manual for future reference.