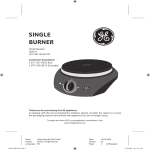
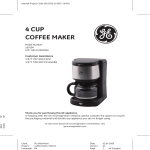
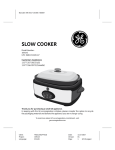
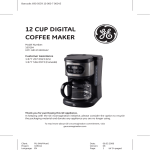
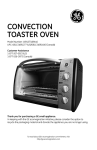
1
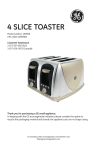
4 SLICE TOASTER
Model Number:
169211
UPC: 681131692113
Customer Assistance
1 877 207 0923 (US)
1 877 556 0973 (Canada)
Thank you for purchasing a small GE appliance.
In keeping with the GE ecomagination initiative, please consider the option to recycle
the packaging material and donate the appliance you are no longer using.
To read more about GE's ecomagination commitment, visit:
ge.ecomagination.com
Client:
Project:
Language:
169211-03 (EN).indd 1
Select Brands (Wal*Mart)
169211
EN (US)
Date:
Version:
Page:
26.06.2009
03
1
(of 11 pages)
6/26/09 12:50:56 PM
IMPORTANT SAFEGUARDS
When using electrical appliances, basic safety precautions should always be followed to
prevent the risk of fire, electric shock, burns, or other injuries or damages.
Read all instructions before use.
Do not touch hot surfaces. Use handles or knobs.
To protect against electrical shock do not immerse cord or plug in water or other
liquids.
• Close supervision is necessary when any appliance is used by or near children.
• Unplug from outlet when not in use and before cleaning. Allow it to cool before
putting on or taking off parts.
• Do not operate appliance with a damaged cord or plug, or after the appliance
malfunctions or has been dropped or damaged in any manner. Call our tollfree customer assistance number for information on examination, repair, or
adjustment.
• The use of accessory attachments not recommended by the appliance
manufacturer may cause injuries.
• Do not use outdoors.
• Do not let cord hang over edge of table or counter, or touch hot surfaces.
• Do not place on or near a hot gas or electric burner, or in a heated oven.
• To disconnect, turn every control to “off”, then remove plug from the wall outlet.
• Do not use this appliance for anything other than its intended use.
• Oversized foods, metal foil packages, or utensils must not be inserted in the toaster
as they may cause a risk of fire or electric shock.
• A fire may occur if the toaster is covered or touching flammable material, including
curtains, draperies, walls, etc., when in operation.
• Do not attempt to dislodge food when toaster is plugged in.
• Do not operate toaster unattended.
• Risk of fire if the crumb tray is not cleaned regularly.
• Do not use metal scouring pads for cleaning. Pieces can get broken, and there is a
risk of electric shock if the pad comes in contact with electrical parts.
• Do not cook, warm or toast rice cakes, fried foods, or non-bread items.
•
•
•
save these instructions!
2
Client:
Project:
Language:
169211-03 (EN).indd 2
Select Brands (Wal*Mart)
169211
EN (US)
Date:
Version:
Page:
26.06.2009
03
2
(of 11 pages)
6/26/09 12:50:56 PM
Additional Safeguards
This appliance is for HOUSEHOLD USE ONLY.
DO NOT OPERATE APPLIANCE IF THE LINE CORD SHOWS ANY DAMAGE, OR IF
APPLIANCE WORKS INTERMITTENTLY OR STOPS WORKING ENTIRELY.
Extension cord use
A short power-supply cord is to be provided to reduce the risk resulting from becoming
entangled in or tripping over a longer cord. Longer detachable power-supply cords or
extension cords are available and may be used if care is exercised in their use. If a longer
detachable power-supply cord or extension cord is used,
1) The marked electrical rating of the cord set or extension cord should be at least as
great as the electrical rating of the appliance, and
2) The cord should be arranged so that it will not drape over the countertop or tabletop
where it can be pulled on by children or tripped over unintentionally.
3) If the appliance is of the grounded type, the extension cord should be a groundingtype 3-wire cord.
GROUNDING INSTRUCTIONS
This appliance must be grounded while in use.
CAUTION: To ensure continued protection against risk of electric shock, connect to
properly ground outlets only.
GROUNDING INSTRUCTIONS – US ONLY
The appliance has a plug that looks like Figure A. An adaptor, as shown in Figure B, should
be used for connecting a 3-prong grounding plug to a 2-wire receptacle. The grounding
tab, which extends from the adaptor, must be connected to a permanent ground such
as a properly grounded receptacle as shown in Figure C, using a metal screw.
Circuit grounding conductor
connected properly
(A)
Metal mounting
screw
Adapter
(B)
(C)
Grounding means
AA220
Grounding prong
Cover of grounded
outlet box
3
Client:
Project:
Language:
169211-03 (EN).indd 3
Select Brands (Wal*Mart)
169211
EN (US)
Date:
Version:
Page:
26.06.2009
03
3
(of 11 pages)
6/26/09 12:50:56 PM
PARTS
1
2
3
4
10 9
1.
2.
3.
4.
5.
8
7
6
5
6.
7.
frozen button
Electronic browning control knob
(browning levels: 1 to 7)
8. Crumb tray
9.
bagel button
10.
cancel button
Slots with self-centering guides
Toast lift
Power cord with power plug
Cord storage
reheat button
NOTE: This toaster contains two independently operating toasting units. Each unit
consists of two toasting slots. Both units are controlled by an individual set of operation
buttons (ill. f ).
4
Client:
Project:
Language:
169211-03 (EN).indd 4
Select Brands (Wal*Mart)
169211
EN (US)
Date:
Version:
Page:
26.06.2009
03
4
(of 11 pages)
6/26/09 12:50:57 PM
ILLUSTRATIONS
a
b
c
d
e
f
g
h
i
j
k
l
5
Client:
Project:
Language:
169211-03 (EN).indd 5
Select Brands (Wal*Mart)
169211
EN (US)
Date:
Version:
Page:
26.06.2009
03
5
(of 11 pages)
6/26/09 12:51:04 PM
operation
Before first use
•
•
Remove all packaging material, labels and/or stickers from your toaster. Make sure
there is no packaging material remaining in the slots.
Clean toaster thoroughly before using it for the first time ( Cleaning).
NOTE: Due to the manufacturing process, the toaster may emit a slight burning odor.
Let the toaster complete a few toasting cycles without food, until no odor or smoke
is present. Note: use the toaster in a well ventilated area and select 7 as the highest
setting.
Operating instructions
•
•
•
Make sure no food or other objects are inside the slots (1). Place the toaster on a
flat, level, heat-resistant surface.
Make sure both crumb trays (8) are inserted properly (ill. a ).
Remove any protective wrappings from foods before placing them in the slots (1).
Do not toast torn food as it may become lodged in the slots (1).
NOTE: Both toasting units work independently from each other. You can, for example,
toast food with the left unit's two toasting slots (1), while simultainously toasting bagels
with the right unit.
•
•
•
•
•
Insert the bread slices in one of the slot pairs (1) (ill. b ). Select the desired browning
setting with the browning control knob (7) of the chosen toasting unit (ill. c ).
Choose between settings 1 to 7 according to your preference.
Insert the plug (3) into a 120 V~ 60Hz wall outlet (ill. d ).
Press down the toast lift (2) (ill. d ). The toasting process begins.
During the toasting cycle, the
cancel button (10) is illuminated blue. To stop or
interrupt a toasting cycle, press the
cancel button (ill. g ); toaster food will pop
up and the toaster will turn off.
The toaster food will pop up when it has reached the corresponding browning
level (ill. h ).
6
Client:
Project:
Language:
169211-03 (EN).indd 6
Select Brands (Wal*Mart)
169211
EN (US)
Date:
Version:
Page:
26.06.2009
03
6
(of 11 pages)
6/26/09 12:51:05 PM
operation
•
•
This toaster is equipped with an extra toast lift to assist in removing toaster food
from the slots (1). Pull the toast lift (2) upwards to lift the toaster food higher for ease
of removal (ill. i ).
Always unplug the toaster from the wall outlet when not in use.
NOTE: The toast lift (2) will not stay in the down position unless the toaster is connected
to an energized wall outlet.
Using the second slot pair
•
•
•
•
While the first slot pair (1) is in use, place food in the second slot pair (ill. e ).
Select the desired browning setting with the browning control knob (7) of the
chosen toasting unit (ill. c ). Choose between settings 1 to 7 according to your
preference.
Press down the toast lift (2) (ill. e ). The toasting process begins.
The toaster food will pop up when it has reached the corresponding browning
level (ill. h ).
Reheat
•
•
•
Place food in the slots (1) (ill. b ).
reheat button (5) (ill. g )
Lock the toast lift (2) in the down position and press the
within the next 5 seconds. The reheat button lights up blue.
The food will pop up when it has reached the corresponding browning
level (ill. h ).
Frozen food function
•
•
•
•
Place frozen food in the slots (1) (ill. b ).
After selecting the browning level with the browning control knob (7) (ill. c ), press
down the toast lift (2) (ill. d ) until it is locked in the down position.
Press the
frozen button (6) (ill. g ) within 5 seconds after the toast lift (2) is
locked down. The
frozen button (6) will light up blue after it is pressed.
The defrosted bread or food will pop up when it has reached the corresponding
browning level (ill. h ).
7
Client:
Project:
Language:
169211-03 (EN).indd 7
Select Brands (Wal*Mart)
169211
EN (US)
Date:
Version:
Page:
26.06.2009
03
7
(of 11 pages)
6/26/09 12:51:05 PM
operation
Toasting bagels and English muffins
•
•
•
•
Cut bagel or English muffin in half. Do not force bagel or English muffin into slots.
It may be necessary to cut food in slices to fit in comfortably. Place the bagel or
the English muffin in the slots (1) and turn the cut sides of the bagel or the English
muffin towards the middle of the toaster to achieve a better result.
After selecting the browning level with the browning control knob (8) (ill. c ), press
down the toast lift (2) (ill. d ) until it is locked in the down position.
Press the
bagel button (9) (ill. g ) within 5 seconds after the toast lift (2) is
bagel button will light up blue after being pressed.
locked down. The
The bagel or English muffin will pop up when it has reached the corresponding
browning level (ill. h ).
Combining programs
It is possible to combine the
bagel button (9) with the
frozen and
bagel button is pressed before or after the
reheat or
functions. If the
buttons, the toaster will operate on a lower power setting.
Reheat
reheat
frozen
Defrost
Bagel • Press
bagel (9) and reheat
(5) (ill. g ). Both buttons will
light up blue.
• Reheat will start with low
power setting.
• Adjust the browning level with the
browning control knob (7) (ill. c ).
bagel (9) and
frozen
• Press
(6) (ill. g ). Both buttons will light
up blue.
NOTE: Both buttons must be pressed within 5 seconds after the toast lift is locked in
down position.
CAUTION: Before cleaning and storing, unplug the toaster to prevent electric shock and
let the toaster cool down completely.
8
Client:
Project:
Language:
169211-03 (EN).indd 8
Select Brands (Wal*Mart)
169211
EN (US)
Date:
Version:
Page:
26.06.2009
03
8
(of 11 pages)
6/26/09 12:51:06 PM
CLEANING
Clean the toaster regularly. This appliance contains no user serviceable parts and
requires little maintenance. Leave any servicing or repairs to qualified personnel.
•
•
•
•
•
Never immerse toaster or power cord (3) in water or any other liquid.
Do not use a fork or other metallic utensils to remove lodged food as this may result
in electric shock or fire (ill. k ).
Use a soft cloth or a damp sponge and a mild detergent to clean the outside of the
toaster and the cord (3). Do not use any abrasive cleaning agents, metallic utensils,
metal scouring pads, etc.
To clean the crumb tray (8), pull it out completely and throw crumbs away.
Rinse the crumb tray with water and a little detergent, and dry it with a soft cloth
(ill. j ). Reinsert the crumb tray (8) (ill. a ) carefully.
Do not wrap the cord around the toaster (ill. l ). Store the cord in the cord storage
(4) underneath the toaster.
9
Client:
Project:
Language:
169211-03 (EN).indd 9
Select Brands (Wal*Mart)
169211
EN (US)
Date:
Version:
Page:
26.06.2009
03
9
(of 11 pages)
6/26/09 12:51:06 PM
Troubleshooting
Problem
Solution
Toaster is not working.
Check power connection. The plug (3) should be
inserted properly in the outlet.
Food stuck in the toaster.
Unplug the toaster and let cool. Carefully remove the
slice(s) from the toaster.
Toast too dark or too light.
The selected browning setting is too high or too low.
Toaster emits smoke.
The selected browning setting is too high for the type
of food which is being toasted. Press the cancel
button (10) (ill. g ) to stop the toasting cycle.
Food ejects very quickly.
Push down the toast lift (2) (ill. d ) completely.
If additional assistance is needed, please contact our Customer Assistance at
1.877.207.0923 (U.S.) or 1.877.556.0973 (Canada).
Technical data
Rated voltage:
Rated current:
Rated power input:
120V ~ , 60Hz
13.5A
1600W
10
Client:
Project:
Language:
169211-03 (EN).indd 10
Select Brands (Wal*Mart)
169211
EN (US)
Date:
Version:
Page:
26.06.2009
03
10 (of 11 pages)
6/26/09 12:51:06 PM
Customer Assistance
If you have a claim under this warranty, please call our Customer Assistance Number. For faster
service, please have the model number and product name ready for the operator to assist you. This
number can be found on the bottom of your appliance and on the front page of this manual.
Model Number: __________________
Product Name: __________________
Customer Assistance Number 1.877.207.0923 (U.S.) or 1.877.556.0973 (Canada).
Keep these numbers for future reference!
For more information, please visit us at WWW.GEHOUSEWARES.COM
product regularly in accordance with
Two-year limited warranty
manufacturer's instructions.
What does your warranty cover?
How does state law relate to this warranty?
• Any defect in material or workmanship.
• This warranty gives you specific legal
For how long after the original purchase?
rights, and you may also have other rights
• Two years.
which vary from state to state or province
to province.
What will we do?
• This warranty is in lieu of any other
• Provide you with a new one.
warranty or condition, whether express or
• For those items still under warranty but
implied, written or oral, including, without
no longer available, WAL-MART reserves
limitation, any statutory warranty or
the right to replace with a similar GE
condition of merchantability or fitness for
branded product of equal or greater
a particular purpose.
value.
• WAL-MART, GE and the product
How do you make a warranty claim?
manufacturer expressly disclaim all
• Save your receipt.
responsibility for special, incidental, and
• Properly pack your unit. We recommend
consequential damages or losses caused
using the original carton and packing
by use of this appliance. Any liability is
materials.
expressly limited to an amount equal to
• Return the product to your nearest
the purchase price paid whether a claim,
WAL-MART store or call Customer
however instituted, is based on contract,
Assistance at 1-877-207-0923 (U.S.)
indemnity, warranty, tort (including
or 1-877-556-0973 (Canada).
negligence), strict liability, or otherwise.
What does your warranty not cover?
Some states or provinces do not allow
this exclusion or limitation of incidental
• Parts subject to wear, including, without
or consequential losses, so the foregoing
limitation, glass parts, glass containers,
disclaimer may not apply to you.
cutter/strainer, blades, seals, gaskets,
clutches, motor brushes, and/or agitators,
What if you encounter a problem with this
etc.
product while using it outside the country of
• Commercial use or any other use not
purchase?
found in printed directions.
• The warranty is valid only in the country of
• Damage from misuse, abuse, or
purchase and if you follow the warranty
neglect, including failure to clean
claim procedure as noted.
is a trademark of General Electric
Company and is used under the
license by Wal-Mart Stores Inc.,
Bentonville, AR 72716
Client:
Project:
Language:
169211-03 (EN).indd 11
Select Brands (Wal*Mart)
169211
EN (US)
Marketed in Canada by:
Wal-Mart Canada Corp.
1940 Argentia Road, Mississauga,
Ontario L5N1P9
Date:
Version:
Page:
26.06.2009
03
11 (of 11 pages)
6/26/09 12:51:06 PM