1
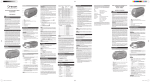
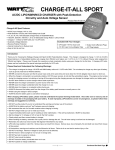
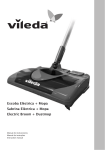
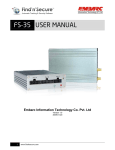
M7949
WARNING
www.fisher-price.com.au
IMPORTANT! KEEP
INSTRUCTIONS FOR
FUTURE REFERNCE.
Important!
WARNING
To prevent strangulation with power cord, never
place transmitter within reach of child.
CAUTION
This product cannot replace responsible
adult supervision.
CAUTION
To reduce the risk of electric shock, do not
expose to rain or moisture.
Important!
•For proper setup and use, please read these instructions.
•Please keep this instruction sheet for future reference, as it contains important information.
•Transmitter operates on AC current.
•Receiver operates on AC current (use enclosed AC adaptor) or a 3.6V, 350mAH nickel metal hydride
rechargeable battery pack (included).
•Before first-time use, charge the rechargeable battery pack for 10-12 hours (please see page 6 for instructions).
•Adult assembly is required to install battery pack (if used).
•Tool needed for battery pack installation: Phillips screwdriver (not included).
•This product is not intended to be used as a medical monitor and its use should not replace adult supervision.
•Test sound reception of receiver before first-time use and whenever you change location of transmitter.
•To prevent entanglement:
-Never place transmitter in a crib or playpen. Keep transmitter and receiver out of baby’s reach.
-Never use extension cords with the AC adaptor.
•Never use transmitter or receiver near water (ie.: bathtub, sink, laundry tub or wet basement, etc.).
•Always use transmitter and receiver where there is adequate ventilation. To prevent overheating, keep
transmitter and receiver away from heat sources such as radiators, heat registers, direct sunlight, fire,
stoves, amplifiers, or other appliances that produce heat.
•Fisher-Price® does not recommend the use of two monitors in one house.
•Always remember that you are using public airwaves when using your monitor. Conversations, even from rooms near transmitter, may broadcast to other nursery monitors, radios, cordless telephones, or scanners outside your home. To protect privacy of your home, always turn transmitter off when not in use.
Frequency: 915 - 920 MHz
•Do not disassemble the sealed battery pack. Do not recharge a battery pack that shows leakage or corrosion.
•Do not connect to more than the recommended power supplies.
•If you use a battery charger (enclosed AC adaptor), it should be examined regularly for damage to the cord, plug, enclosure and other parts. Do not use a damaged battery charger until it has been
properly repaired.
•Use only the provided AC adaptor to charge the battery pack.
•Product features and decoration may vary from photos.
Consumer Information
AUSTRALIA: Mattel Australia Pty. Ltd., 658 Church Street, Locked Bag #870, Richmond, Victoria 3121
Australia. Consumer Advisory Service 1300 135 312.
NEW ZEALAND: 16-18 William Pickering Drive, Albany 1331, Auckland.
Fisher-Price, Inc., a subsidiary of Mattel, Inc. East Aurora, New York 14052, U.S.A.
©2008 Mattel, Inc. All Rights Reserved. ® and ™ designate U.S. trademarks of Mattel, Inc.
M7949a-0729
PRINTED IN CHINA
Features
9
11
12
3
8
10
4
4
2
7
13
14
1
5
6
1 Transmitter
2 Power Indicator
3 LCD Screen – shows which channel you are on.
4 Channel Button
5 Power Button
6 Microphone
7 Receiver
8 On/Off/Volume Dial – Turns power on. Set volume to a comfortable level.
9 Clip (backside of receiver) – Fasten to your clothes to stay in touch with baby around the house or yard.
10 Channel Button
11 Sound Lights – let you see baby’s sounds.
12 Speaker
13 AC Adaptor (Charger) Socket
14 LCD Screen – shows channel, reception and low battery indicator.
Receiver Battery Installation
Socket
Battery Connector
•Locate the battery compartment door on the back of the receiver.
• Loosen the screws in the battery compartment door with a Phillips screwdriver. Remove the battery
compartment door.
• Plug the battery connector into the receiver socket.
Hint: If the battery connector will not plug into the socket, turn it over and try again. Do not force the
battery connector into the receiver socket.
• Replace the battery compartment door. Tighten the screws with a Phillips screwdriver.
Battery Safety Information
In exceptional circumstances, batteries may leak fluids that can cause a chemical burn injury or ruin your
product. To avoid battery leakage:
•Remove batteries during long periods of non-use. Always remove exhausted batteries from the product. Dispose of batteries safely. Do not dispose of this product in a fire. The batteries inside may explode or leak.
• Never short-circuit the battery terminals.
• Use only batteries of the same or equivalent type as recommended.
• Do not charge non-rechargeable batteries.
• If removeable, rechargeable batteries are used, they are only to be charged under adult supervision.
Charging the Battery
Even with proper care, the rechargeable battery will not last forever. The life of the rechargeable battery
depends on how well you follow these instructions and the total number of hours it is used. If you should
need to replace the rechargeable battery, contact Fisher-Price®.
•Use the power cord only in a wall outlet. Do not plug the power cord into a ceiling light.
•Insert the AC adaptor jack into the receiver and then plug into a wall outlet.
Full Charge
Half Charged
No Charge
• Charge the rechargeable battery for 10-12 hours. Do not overcharge your battery. After a first-time
charge, you will only need to charge the battery for 8 hours for a full charge.
Hint: When using the receiver with the AC adaptor, you will be charging the battery while monitoring
your baby!
Testing Sound Reception
Test transmitter transmission and receiver reception each time you change location of use.
Channel
LCD Screen
Power Button
• Place the transmitter in the room in which you intend to use it.
• Press the transmitter power button to turn power on. Power indicator lights and the LCD screen turns on.
• Press the channel buttons on the transmitter to select a channel.
• Look at the LCD screen to see which channel you have selected (you will adjust the receiver channel to
the same channel). Turn on a radio.
Testing Sound Reception
On/Off/Volume Dial
LCD Screen
• Place the receiver in the room in which you intend to use it.
• Rotate the receiver on/off/volume dial to turn power on. The LCD screen turns on.
• Look at the LCD screen to see current channel selected.
• Press the channel button on the receiver to select the same channel as the transmitter.
• Adjust receiver location.
Testing Sound Reception
Good Reception
No Reception/Out of Range
Check reception! If you see bars
on the LCD, you have reception. If you are out of range, the reception display will blink and you will hear a low pitched beep.
Full Charge
Half Charged
No Charge
Check to be sure there is enough battery power.
Hint: You will hear a high pitched beep if battery power is low. We recommend using the AC adaptor for
power source (and you’ll charge the battery too).
10
Testing Sound Reception
•Sound lights on the receiver turn on when sound is received by a receiver.
-One or two lights for shallow sounds.
-Three or more lights for louder sounds.
•If reception is poor, or there is no reception on one channel, change the channel on both units.
11
Setup & Use
IMPORTANT! Test sound reception of this monitor before first time use and whenever you change location
of transmitter (see page 8).
Adjust Channel
•Set transmitter channel switch to same channel as the receiver.
•Place transmitter in same room with child. Point the microphone directly toward crib or play area.
•Unwrap and fully extend power cord for best transmission. Plug power cord into wall outlet.
•Use the power cord only in a wall outlet. Do not plug the power cord into a ceiling outlet.
•Press the transmitter power button to turn power on.
12
Setup & Use
•Place the receiver where you will see or hear it.
• If desired, use the AC adaptor. Unwrap and fully extend the AC adaptor cord for best reception. Insert the AC adaptor jack into the receiver socket and plug into a wall outlet.
• Rotate the receiver on/off/volume dial to turn the power on. LCD screen turns on. Rotate the on/off/volume dial to adjust volume.
13
Setup & Use
•Clip the receiver to your clothes to stay in touch with baby around your house or yard.
Hint: Under permitting conditions, the receiver receives sounds up to 244 meters away from baby!
14
Problems & Solutions
Problem
You hear static or buzzing
Reception display on receiver LCD
screen flashes and you hear a low
pitched beep
Solution
There may be a physical obstruction or noise level causing interference.
Change the location of reciever or try a different channel. Range varies
depending on surrounding conditions such as noise levels, physical
obstructions and signal interference.
Transmitter power is off. Turn transmitter power on.
Transmitter and receiver are on different channels. Change both units to the
same channel.
Loose power cord connection and transmitter power is off. Check transmitter power cord plug-to-outlet connection.
No power to wall outlet and transmitter power is off. Make sure light switch
that controls power flow to wall outlet is on.
Power is off because circuit breaker for room is off. Make sure house fuses
and circuit breakers are on.
Receiver LCD screen does not turn on
Receiver power is off. Turn receiver power on.
Battery needs to be recharged. Charge the battery for 8 hours. Or, use the
AC adaptor as a power source (and charge the battery at the same time).
Power is off because circuit breaker for room is off. Make sure house fuses
and circuit breakers are on.
No power to wall outlet and power is off. Make sure light switch that controls power flow to wall outlet is on.
Receiver(s) LCD screen indicates low
and you hear battery power
a high pitched beep
Transmitter power indicator does
not light
Battery needs to be recharged. Charge the battery for 8 hours. Or, use the
AC adaptor as a power source (and charge the battery at the same time).
Transmitter power is off. Turn transmitter power on.
Loose power cord connection and transmitter power is off. Check transmitter power cord plug-to-outlet connection.
No power to wall outlet and transmitter power is off. Make sure light switch
that controls power flow to wall outlet is on.
Power is off because circuit breaker for baby’s room is off. Make sure house
fuses and circuit breakers are on.
You can hear conversations or sounds
from other homes
There is signal interference due to other nursery monitors on same channel
or cordless telephone use. Change the channel on all units.
Hint: If, after checking all of these solutions, you believe that your transmitter power cord or AC adaptor are
damaged, please contact Fisher-Price ® .
15
One (1) Year Limited Warranty
Mattel Australia Pty., Ltd., (658 Church Street, Locked Bag #870, Richmond, Victoria 3121 Australia)
warrants to the original owner that this product is free from all defects in material and workmanship when used under normal conditions for a period of one (1) year from the date of purchase.
Should the product fail to perform properly, we will repair replace it at our option, free of charge. Purchaser is responsible for shipping the product to the Fisher-Price Product Service Department at the
address indicated above and for all associated freight and insurance costs. Fisher-Price Inc., will bear
the cost of shipping the repaired or replacement item to you. The warranty is void if the owner repairs
or modifies the product. The is warranty excludes any liability other than that expressly stated above,
including, but not limited to, any incidental or consequential damages.
SOME STATES DO NOT ALLOW THE EXCLUSION OR LIMITATION OF INCIDENTAL OR CONSEQUENTIAL
DAMAGES, SO THE ABOVE LIMITATION OR EXCLUSION MAY NOT APPLY TO YOU.THIS WARRANTY GIVES YOU SPECIFIC LEGAL RIGHTS, AND YOU MAY ALSO HAVE OTHER RIGHTS WHICH MAY VARY FROM STATE TO STATE.
Consumer Advisory Service phone numbers are as follows:
Australia 1300 135 312
New Zealand 0800 174 063
Care
Excess dirt in transmitter microphone will hamper transmission of sound. Clean outer surface of
transmitter and receiver with a cloth lightly dampened with a mild cleaning solution. Never immerse
transmitter, receiver or AC adaptor.
16