1
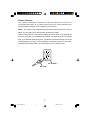
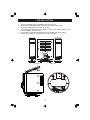
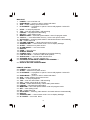
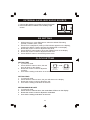
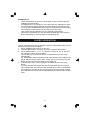
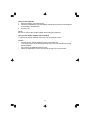
Multi-Media Audio System
with Digital Tuner, and Detachable
CD-R/RW, MP3, WMA Player
OWNER'S MANUAL
ES398
Visit our web site at www.emersonradio.com
ES398_042505.p65
50
25/4/2005, 11:29
CAUT I ON
TO PREVENT FIRE OR SHOCK HAZARD, DO NOT USE THIS PLUG WITH AN
EXTENSION CORD, RECEPTACLE OR OTHER OUTLET UNLESS THE BLADES
CAN BE FULLY INSERTED TO PREVENT BLADE EXPOSURE. TO PREVENT FIRE
OR SHOCK HAZARD, DO NOT EXPOSE THIS APPLIANCE TO RAIN OR MOISTURE.
C AU T I O N
RISK OF ELECTRIC SHOCK
DO NOT OPEN
The lightning flash with arrowhead symbol, within an equilateral triangle is intended to
alert the user to the presence
of uninsulated ‘dangerous voltage’
within the product’s enclosure
that may be of sufficient
magnitude to constitute a risk
of electric shock to persons.
WARNING: TO REDUCE THE
RISK OF ELECTRIC SHOCK
DO NOT REMOVE COVER
(OR BACK), NO USER
SERVICEABLE PARTS INSIDE
REFER SERVICING TO
QUALIFIED SERVICE
PERSONNEL.
!
The exclamation point within
an equilateral triangle is intended to alert the user to
the presence of important
operating and maintenance
(ser vi ci ng) instr ucti ons in
the liter ature accompanying the appl iance.
IMPORTANT SAFETY INSTRUCTIONS
1.)
2.)
3.)
4.)
5.)
6.)
7.)
8.)
9.)
10.)
11.)
12.)
13.)
14.)
15.)
16.)
17.)
18.)
Read these instructions.
Keep these instructions.
Heed all warnings.
Follow all instructions.
Do not use this apparatus near water.
Clean only with dry cloth.
Do not block any ventilation openings. Install in accordance with the manufacturer’s
instructions.
Do not install near any heat sources such as radiators, heat registers, stoves, or other
apparatus (including amplifiers) that produce heat.
Do not defeat the safety purpose of the polarized or grounding-type plug. A polarized plug has
two blades with one wider than the other. A grounding type plug has two blades and a third
grounding prong. The wide blade or the third prong is provided for your safety. If the provided
plug does not fit into your outlet, consult an electrician for replacement of the obsolete outlet.
Protect the power cord from being walked on or pinched particularly at plugs, convenience
receptacles, and the point where they exit from the apparatus.
Only use attachments / accessories specified by the manufacturer.
Unplug this apparatus during lightning storms or when unused for long periods of time.
Refer all servicing to qualified service personnel. Servicing is required when the apparatus
has been damaged in any way, such as power-supply cord or plug is damaged, liquid has
been spilled or objects have fallen into the apparatus, the apparatus has been exposed to rain
or moisture, does not operate normally, or has been dropped.
This appliance shall not be exposed to dripping or splashing water and no object filled with
liquids such as vases shall be placed on the apparatus.
Do not overload wall outlet. Use only power source as indicated.
Use replacement parts as specified by the manufacturer.
The product may be mounted to a wall only if recommended by the manufacturer.
Upon completion of any service or repairs to this product, ask the service technician to
perform safety checks.
1
ES398_042505.p65
1
25/4/2005, 11:28
Thank You… … … … … …
for purchasing the Emerson Research Audio System.
The detachacble CD player can play CD-R/RW, WMA, and MP3 encoded
CDs in addition to normal pre-recorded CDs. And the digital tuner will store
up to 30 of your favorite stations (15 FM / 15 AM) for easy and immediate
recall.
Finally, all functions of this system can be operated from the comfort of
your favorite chair with the ultra-slim 20-key remote control.
Please be sure to read this manual carefully and completely to make sure
you understand all of the exciting features and functions included in your
new system. We have taken great care to make sure that this system was
in perfect working order when it left our factory.
If you experience any problem with the set-up or operation of this system
please do not return it to the dealer. Please call the Emerson Customer
Service Hotline. toll-free, at 800-898-9020. One of our representatives will
try to diagnose and correct the problem for you. If that is not possible you
will be advised how to obtain a replacement.
Once again, all of us at Emerson Research thank you for your purchase.
2
ES398_042505.p65
2
25/4/2005, 11:28
IMPORTANT NOTES
• Avoid installing this unit in places
exposed to direct sunlight or close to
heat radiating appliances such as
electric heaters, on top of other stereo
equipment that radiates too much heat,
places lacking ventilation or dusty areas,
places subject to constant vibration and/
or humid or moist areas.
• Operate controls and switches as
described in the manual.
• Before turning ‘On’ the power, make
certain that power cord is properly
installed.
• Store your CDs, in a cool area to avoid
damage from heat.
• When moving the set, be sure to first
disconnect the power cord.
• Do not attempt to clean this unit with
chemical solvents as this might damage
the finish. Use a clean dry cloth.
CLASS 1 LASER PRODUCT
CLASS 1 LASER PRODUCT
APPAREIL Á LASER DE CLASSE 1
PRODUCTO LASER DE CLASE 1
CAUTION
INVISIBLE LASER RADIATION
WHEN OPEN AND INTERLOCKS
DEFEATED.
AVOID EXPOSURE TO BEAM
This product contains a low power Laser Device.
FCC INFORMATION
This equipment has been tested and found to comply with the limits for a Class B digital
device, pursuant to Part 15 of the FCC Rules. These limits are designed to provide
reasonable protection against harmful interference in a residential installation. This
equipment generates, uses, and can radiate radio frequency energy and, if not installed
and used in accordance with the instructions, may cause harmful interference to radio
communications. However, there is no guarantee that interference will not occur in a
particular installation. If this equipment does cause harmful interference to radio or television
reception, which can be determined by turning the equipment off and on, the user is
encouraged to try to correct the interference by one or more of the following measures:
• Reorient or relocate the receiving antenna.
• Increase the separation between the equipment and receiver.
• Connect the equipment into an outlet on a circuit different from that to which the receiver
is connected.
• Consult the dealer or an experienced radio/TV technician for help.
This device complies with Part 15 of the FCC Rules. Operation is subject to the following
two conditions:
(1) This device may not cause harmful interference, and
(2) This device must accept any interference received, including interference that
may cause undesired operation.
3
ES398_042505.p65
3
25/4/2005, 11:28
Power Source
This system is designed to operate on 120V AC 60Hz house current only.
Connecting this system to any other power source may cause damage to the
system and such damage is not covered by your warranty.
Note: The system has polarized AC plug with one wide blade and one narrow
blade. The plug will only fit into matching polarized AC outlets.
This is a safety feature to reduce the possibility of electric shock. If the plug will not
fit in your AC outlets, you probably have outdated non-polarized outlet. You should
have your outdated outlet changed by a qualified, licensed electrician. Do not file
the wide blade on the plug, or use an adapter to make the plug fit into your outlet.
This defeats the safety feature and could expose you to electric shock.
AC Outlet
AC Plug
4
ES398_042505.p65
9
28/4/2005, 16:49
Placement Of The System
The system should be placed on a stable, level surface such as a table, shelf, or
stand, convenient to a 120V 60Hz AC outlet, out of direct sunlight, and away from
sources of excess heat, dust, moisture, or vibration.
The speakers may be separated from the main as far the wires allow for maximum
stereo separation, or the may be placed to the immediate left and right of the main
unit.
Protect Your Furniture
This model is equipped with non-skid rubber 'feet' to prevent the product from
moving when you operate the controls. These 'feet' are made from non-migrating
rubber material specially formulated to avoid leaving any marks or stains on your
furniture. However certain types of oil based furniture polishes, wood preservatives,
or cleaning sprays may cause the rubber 'feet' to soften, and leave marks or a
rubber residue on the furniture. To prevent any damage to your furniture we strongly
recommend that you purchase small self-adhesive felt pads, available at hardware
stores and home improvement centers everywhere, and apply these pads to the
bottom of the rubber 'feet' before you place the product on fine wooden furniture.
5
ES398_042505.p65
10
28/4/2005, 16:49
INSTALLATION
1.
2.
3.
4.
Connect speaker plug to speaker jack of main unit
Make sure the power cord is fully inserted into the AC outlet
Place the CD player on the top of the unit
To activate the remote control's battery, remove the plastic tab from the
remote battery compartment.
5. For backup, install 2 AAA batteries (not included) into the backup
battery compartment on the bottom of the main unit.
PART NO.
IMPEDANCE
SPEAKERS 4 OHM
60-1433
4 OHM
MADE IN CHINA / FABRIQUÉ EN CHINE
PART NO.
IMPEDANCE
60-1433
4 OHM
MADE IN CHINA / FABRIQUÉ EN CHINE
6
LOCATION OF CONTROLS – MAIN UNIT
19
13
POWER
1
4
STOP
5
PLAY/
PAUSE
TUN
P-MODE
DIR/CH
AUX
RADIO/BAND
SELECT
MEMORY
AUTO
SEEK
EQ
PGM
6
12
10
11
14
7
2
8
3
15 16 17
18
9
25
27
26
30
28
32
31
34
33
29
SPEAKERS 4 OHM
35
20 22 23 24 23 22 21
7
36
39
37
42
40
38
41
MAIN UNIT
1. POWER — turn on/off the unit
2. RADIO/BAND — power on radio or select radio band
3. AUX — select auxiliary input sound source
4. PLAY/PAUSE — to playback / to pause / resume CD playback / select CD
function
5. STOP — to stop CD playback
6. TUN — tune into radio station / CD searching
7. P-MODE — CD playback mode setting
8. SELECT — enter setting mode
9. MEMORY/PGM — save radio preset station / enter CD program mode
10. -DIR/CH+ — select MP3/WMA directory / select radio preset station
11. AUTO SEEK — searching radio station in the band and save it automatically
12. EQ — select EQ mode
13. VOLUME CONTROL — adjust volume level up or down
14. SNOOZE/LIGHT — enter snooze mode / turn on display backlight
15. SLEEP — select time to power off unit
16. ALARM ON/OFF — turn on/off alarm
17. DISPLAY
18. OPEN — open CD door
19. REMOTE SENSOR
20. PHONES JACK — connect a headphone for private listening
21. LINE OUT JACK — connect to other audio product
22. AUX IN JACK — input from other sound source
23. SPEAKER JACK — connect speaker wire
24. EXTERNAL FM ANTENNA CONNECTION TERMINAL —
enhance FM reception strength
25. BACKUP BATTERY COMPARTMENT
REMOTE CONTROL
26. POWER — turn on/off the unit
27 SLEEP — select time to power off unit
28. PLAY/PAUSE — to playback / to pause / resume CD playback / select CD
function
29. RADIO/BAND — power on radio or select radio band
30. AUX — select auxiliary input sound source
31. STOP — to stop CD playback
32. TUN — tune into radio station / CD searching
33. VOL — adjust volume level up or down
34. CH/DIR — select MP3 directory / select radio preset station
35. P-MODE — CD playback mode setting
36. MEM/PGM — save radio preset station / enter CD program mode
37. SET — enter setting mode
38. EQ — select EQ mode
39. AUTO SEEK — searching radio station in the band and save it automatically
40. DISPLAY
41. SNOOZE/LIGHT — enter snooze mode / turn on display backlight
42. AL ON/OFF — turn on/off alarm
8
LISTENING TO THE RADIO
EXTERNAL ANTENNA
Use a screwdriver to attach the antenna to the connector
at the back of the unit. Reception quality relies on the
length of the antenna from the base of the unit to the
floor. The greater the distance, the stronger the reception
quality.
RADIO OPERATION
1. Press the RADIO/BAND button to activate the radio.
2. If necessary press the RADIO/BAND button again to select AM or FM band.
3. Press the TUN+ or TUN- button tuning to a desired station.
• Automatic Tuning:
Press and hold the TUN+ or TUN- button until the display starts to show
frequency scanning, and then release the button.
The tuner will stop on the first strong station it finds.
Repeat this procedure until the desired frequency appears on the display.
• Manual Tuning:
Repeatedly press the TUN+ or TUN- button to manually move the
frequency display up or down until it reaches the frequency of your desired
station.
If the FM Stereo reception is not good enough, press RADIO/BAND button
changing to FM MONO mode to obtain more stable sound output.
PRESET RADIO STATIONS
The unit allows you to store up to 15 AM and 15 FM stations in the tuner preset
memories for easy recall at any time.
1. Press the RADIO/BAND button to activate the radio.
2. If necessary press the RADIO/BAND button again to select AM or FM band.
3. Tune to a desired radio station using TUN+ or TUN- button.
4. Press the memory MEMORY/PGM button once, preset channel number
(e.g.01) will appear on display.
5. Use CH+ or CH - buttons to select desired preset channel number.
6. Press MEMORY/PGM button again to confirm setting.
AUTO SEEKING
The unit allows you to store up to 15 AM and 15 FM stations in the tuner
preset memories automatically.
1. Press the RADIO/BAND button to activate the radio.
2. If necessary press the RADIO/BAND button again to select AM or FM band.
3. Press the AUTO SEEK button to start the auto seeking and store the station
in the memories (CH1-CH15)
9
NOTE: This feature is useful if you live in a rural area with a limited number of
stations. However if you live in a major metropolitan area with many strong
stations, do not use the Auto-Preset feature. It will memorize the first 15 strong
stations it encounters and these will probably not be the same 15 stations that
you would select if you were memorizing stations manually.
LISTENING TO CD / MP3 / WMA – MAIN UNIT
LOADING A CD
1. Press the POWER button.
2. Open the CD door and press CD onto spindle.
3. Close the CD door to start CD playback.
PLAYBACK CD
1. Press PLAY/PAUSE button to start playback.
2. Adjust the sound level using VOLUME CONTROL.
PAUSE / STOP / TURN OFF THE CD
1. Press PLAY/PAUSE button to pause / resume CD playback.
2. Press STOP button to stop CD playback.
3. Press STOP button again to turn off the unit.
SKIP / SEARCH FUNCTION
1. Press TUN+ or TUN- button to skip to desired CD track.
2. Press and hold TUN+ or TUN- button for backward or forward search.
3. For MP3/WMA disc only, press DIR/CH button to select the directory.
PLAY MODE
For CD disc:
1. Repeat Playback:
Press P-MODE button once. “
” will appear for repeat playback of one
track.
Press P-MODE button twice, “
” will appear for repeat playback of the
whole disc.
2. Intro Play, playback the 1st 10 seconds of each track of the disc:
Press P-MODE button three times, then “INTRO” is displayed.
Press “PLAY/PAUSE” button then starts INTRO playback mode.
3. Random Play:
Press P-MODE button four times, then “SHUF” is displayed.
Press PLAY/PAUSE button then the track number is selected at random
and starts playback.
10
For MP3 / WMA disc:
1. Repeat Playback:
Press P-MODE button once. “
” will appear for repeat playback of one
track.
Press P-MODE button twice, “
” will appear for repeat playback of
whole directory.
Press P-MODE button three times, “
” will appear for repeat playback of
the whole disc.
2. Intro Play, playback the 1st 10 seconds of each track of the disc:
Press P-MODE button four times, then “INTRO” is displayed.
Press “PLAY/PAUSE” button then starts INTRO playback mode.
3. Random Play:
Press P-MODE button five times, then “SHUF” is displayed.
Press PLAY/PAUSE button then the track number is selected at random and
starts playback.
PROGRAM PLAYBACK
This feature allows you to program tracks that you would like to hear (up to total
30 tracks for each disc).
1. When CD playback stops, press MEMORY/PGM button once. “PGM” and
“000” (track number) indicators on display flash.
2. Press TUN+ or TUN- button to select track number. (For MP3 / WMA disc,
press DIR/CH button to select directory, if necessary)
3. When desired track number displayed, press MEMORY/PGM button to
register. Track number “000” indicator flashes on display again.
4. Repeat step2 & 3 until all desired (or up to 30) tracks have been entered.
5. Press PLAY/PAUSE button. MEMORY/PGM indicator stops flashing and
CD starts program playback.
NOTE: If you press the TUN+ and TUN- button during programmed playback,
the unit will skip forward to the next track in the program, not necessary the next
track on the disc.
1.
PGM repeat 1track:
During MEMORY/PGM playback, press P-MODE button once.
Unit will repeatedly playback current PGM tracks, “PGM” & “
” indicators
displayed.
2. Repeat playback ALL programmed track(s):
During MEMORY/PGM playback, press P-MODE button twice. Unit will
repeatedly playback all programmed tracks, “PGM” & “
” indicators
displayed.
3. Playback INTRO of programmed track(s):
During MEMORY/PGM playback, press P-MODE button 3 times, “INTRO”
indicator flashes.
Press PLAY/PAUSE button playback the 1st 10 seconds of each
programmed track, “PGM” & “INTRO” indicators displayed.
To cancel Playback / all Repeat modes at any time simply press the STOP
button.
11
EXTERNAL AUXILIARY AUDIO SOURCE
1. Connect the auxiliary input cable to the AUX IN jack
2. Press AUX button to switch to the auxiliary input
source.
EQ SETTING
1.
2.
3.
4.
5.
6.
While power is on, press EQ button to select the default EQ setting
(ROCK, CLASSIC, POP, JAZZ)
When EQ is in flat(EQ off) mode (no EQ indicator appears on the display),
pressing the SELECT button will show the BASS level on the display.
Rotate the volume control to adjust the bass level.
Press SELECT button again to show the TREBLE level on the display
Rotate the volume control to adjust the treble level.
Press SELECT button to exit the EQ preset mode.
CLOCK SETTING
SETTING TIME
1. In power off mode.
2. Press SELECT button 4 times, the real
time will show on the display.
3. Rotate the volume control to adjust the
real time.
4. Auto exit the setting mode after 10 seconds.
For Setting Value
VOLUME
KNOB
Turn the knob step
by step for
slow advance
Turn the knob deep
and quick for
fast advance
SETTING YEAR
1. In power off mode.
2. Press SELECT button 5 times, the year will show on the display.
3. Rotate the volume control to adjust the year.
4. Auto exit the setting mode after 10 seconds.
SETTING MONTH & DATE
1. In power off mode.
2. Press SELECT button 6 times, the month/date will show on the display.
3. Rotate the volume control to adjust the month/date
4. Auto exit the setting mode after 10 seconds.
12
ALARM CLOCK SETTING
SETTING ALARM
1. In power off mode
2. Press SELECT button once, and the display will flash.
3. Rotate the volume control to adjust the alarm time
4. Press SELECT button again and the alarm sound source will show on the
display.
5. Rotate the volume control to select the alarm sound source (BUZZER, FM,
AM, CD/MP3/WMA or AUX).
NOTE: When CD or MP3 or WMA disc is selected, make sure the desired
disc is loaded in the unit.
When FM or AM radio is selected, make sure the desired radio
station is tuned.
When Aux In make sure the external auxiliary source is properly
connected.
6. Press SELECT button again and the snooze time will show on the display.
7. Rotate the volume control to select the snooze time. (5-30 minutes)
8. Auto exit the setting mode after 10 seconds
9. Press ALARM ON/OFF button to enable the daily alarm, a “
” icon
will appear on the display.
ALARM TO BUZZER
•
Crescendo buzzer alarm will sound for one minute.
•
After the 1st alarm minute, it goes into Auto Snooze mode. It stops for the
snooze time and then comes on again.This operation will be repeated 3
times. After the fourth time the alarm shuts off until the next day.
•
You may also activate the Snooze function manually after the alarm sounds
by pressing the SNOOZE/LIGHT button. The buzzer stops for the snooze
time and then comes on again.This operation can be repeated 3 times. After
the Fourth time the alarm shuts off until the next day.
•
After the buzzer sounds you may also press ALARM ON / OFF button to
stop it immediately. It will reset itself for the following day.
ALARM TO RADIO
•
At the desired wake up time the radio turns “ON”. It starts softly and
gradually becomes louder.
•
It will play for 30 minutes and then shuts off and resets itself for the
following day.
•
You may press the SNOOZE/LIGHT button to activate the snooze function.
The radio stops for the snooze time and then turns “ON” again. This manual
snooze operation may be repeated a total of 3 times. Each time the radio
turns “ON”, it will play for 30 minutes (without pressing the SNOOZE/LIGHT
button).
•
After the radio sounds you may also press ALARM ON / OFF button to stop
it immediately. It will reset itself for the following day.
13
ALARM TO CD
•
At the desired wake up time the CD will begin to play. It starts softly and
gradually becomes louder.
•
It will playback for 30 minutes (or up to end of the disc, depends on which
one comes first) and then shuts off and resets itself for the following day.
•
You may press the SNOOZE/LIGHT button to activate the snooze function.
The CD stops for the snooze time and then turns “ON” again.
This manual snooze operation may be repeated a total 3 times.
•
During the CD playback you may also press ALARM ON / OFF button to
stop it immediately. It will reset itself for the following day.
SLEEP OPERATION
You can use the Sleep Timer to shut the system off automatically while you fall
asleep to the radio or the CD player.
1. Press “POWER” button to turn on the unit.
2. Load the desired CD in the player or tune to a desired radio station.
3. Press SLEEP button 1, 2, 3, 4, 5 or 6 times to select 15, 30, 45, 60, 90 or
120 minutes of Sleep Timer operation.
The unit will play for amount of time you selected and then shut “OFF”
automatically.
If a desired radio station has been tuned or the desired CD is loaded in the
player and the unit is in power “OFF” mode, you can just simply press the
SLEEP button to activate the Sleep Timer of the unit.
4. To shut the unit “OFF” sooner press the “POWER” button at any time.
NOTE:
If you set sleeping time longer than the CD's playback time, the unit will
only continue until the end of the disc and then shuts “OFF” automatically.
For example, if your disc is only 30 minutes long and 45 minutes of sleep
time selected, the unit will shut off approximately 30 seconds after the disc
ends.
14
LOCATION OF CONTROLS – PORTABLE CD PLAYER
EQ
7
P-MODE PGM
4 5
DIR
VOL
OPEN
6
9
VOL
HOLD
10
1
PHONES
11
2
3
8
DC IN 4.5V
12
13
OPEN
MADE IN CHINA
ZZ
23
24
16
20
16
21
21
25
18
17
22
19
19
15
14
15
26
PORTABLE CD PLAYER:
1. PLAY/PAUSE — to playback / to pause / resume CD playback / turn on CD
playback
2. STOP — to stop CD playback
3.
/
— CD searching
4. P-MODE — CD play mode setting
5. PGM — enter CD program mode
6. DIR — select MP3/WMA directory
7. EQ — select the EQ mode
8. VOLUME — adjust volume level up or down
9. OPEN — open the CD door
10. HOLD — to lock the player keys
11. PHONES JACK — connect a wired remote control and headphones
12. DC JACK — connect to the DC adaptor (4.5V)(Not included)
13. BATTERY COMPARTMENT
WIRED REMOTE CONTROL:
14. PLAY/PAUSE — to playback / to pause / resume CD playback / turn on CD
playback
15. STOP — to stop CD playback
16.
/
— CD searching
17. P-MODE — CD play mode setting
18. PGM — enter CD program mode
19. DIR — select MP3/WMA directory
20. EQ — select the EQ mode
21. VOLUME — adjust volume level up or down
22. HOLD — to lock the wired remote keys
23. PHONES JACK — connect the headphones
24. WIRED REMOTE PLUG — plug to the CD player headphone jack
25. CLIP
26. HEADPHONES
Installation:
1. Connect the headphones to the wired remote control.
2. Connect the wired remote plug to the CD player
16
Using on the batteries
1. Open the battery compartment lid.
2. Insert two AA batteries (not included)by matching the polarity to the diagram
in the battery compartment.
3. Close the lid
NOTE:
Be sure to remove the AC/DC adaptor when using the batteries.
Using on the AC/DC adaptor (not included)
1.Connect the AC/DC adaptor to the DC 4.5V jack and AC outlet.
NOTES:
•
Disconnect the AC/DC adaptor from AC outlet after use.
•
Turn off the power of the CD player before you connect and disconnect the
AC/DC adaptor.
•
Do not mix new batteries with old ones.
•
When the batteries are not to be used for a long time, remove them.
17
LISTENING TO CD / MP3 / WMA – PORTABLE CD PLAYER
LOADING A DISC
1.Open the CD door and press CD onto spindle.
2.Close the CD door to start CD playback.
PLAYBACK CD
1.Press PLAY/PAUSE button to start playback.
2.Adjust the sound level using VOLUME button.
PAUSE / STOP / TURN OFF THE DISC
1. Press PLAY/PAUSE button to pause / resume CD playback.
2. Press STOP button to stop CD playback.
3. Press STOP button again to turn off the unit.
SKIP / SEARCH FUNCTION
1. Press
or
button to skip to desired CD track.
2. Press and hold
or
button for backward or forward search.
3. For MP3/WMA disc only, press DIR button to select the directory.
PLAY MODE
For CD disc:
1. Repeat Playback:
Press P-MODE button once. “
” will appear for repeat playback of one
track.
Press P-MODE button twice, “
” will appear for repeat playback of the
whole disc.
2. Intro Play, playback the 1st 10 seconds of each track of the disc:
Press P-MODE button three times, then “INTRO” is displayed.
Press “PLAY/PAUSE” button then starts INTRO playback mode.
3. Random Play:
Press P-MODE button four times, then “SHUF” is displayed.
Press PLAY/PAUSE button then the track number is selected at random
and starts playback.
18
For MP3 / WMA disc:
1. Repeat Playback:
Press P-MODE button once. “
” will appear for repeat playback of one
track.
Press P-MODE button twice, “
” will appear for repeat playback of
whole directory.
Press P-MODE button three times, “
” will appear for repeat playback of
the whole disc.
2. Intro Play, playback the 1st 10 seconds of each track of the disc:
Press P-MODE button four times, then “INTRO” is displayed.
Press “PLAY/PAUSE” button then starts INTRO playback mode.
3. Random Play:
Press P-MODE button five times, then “SHUF” is displayed.
Press PLAY/PAUSE button then the track number is selected at random and
starts playback.
PROGRAM PLAYBACK
This feature allows you to program tracks that you would like to hear (up to total
30 tracks for each disc).
1. When CD playback stops, press PGM button once. “PGM” and “000”
(track number) indicators on display flash.
2. Press
or
button to select track number (for MP3/WMA disc, press
DIR button to select directory, if necessary).
3. When desired track number displayed, press PGM button to register. Track
number “000” indicator flashes on display again.
4. Repeat step2 & 3 until all desired (or up to 30) tracks have been entered.
5. Press PLAY/PAUSE button. PGM indicator stops flashing and CD starts
program playback.
NOTE: If you press the
and
button during programmed playback, the unit
will skip forward to the next track in the program, not necessary the next track on
the disc.
1.
2.
3.
PGM repeat 1track:
During PGM playback, press P-MODE button once.
Unit will repeatedly playback current PGM tracks, “PGM” & “
” indicators
displayed.
Repeat playback ALL programmed track(s):
During PGM playback, press P-MODE button twice.
Unit will repeatedly playback all programmed tracks, “PGM” & “
”
indicators displayed.
Playback INTRO of programmed track(s):
During PGM playback, press P-MODE button 3 times, “INTRO” indicator
flashes.
Press PLAY/PAUSE button playback the 1st 10 seconds of each
programmed track, “PGM” & “INTRO” indicators displayed.
To cancel Playback / all Repeat modes at any time simply press the STOP
button.
19
CARE AND MAINTENANCE
Compact Disc Care
• To remove a disc from its storage case, press down on the center of the case
and lift the disc out, holding it carefully by the edges.
• Fingerprints and dust should be carefully wiped off the disc’s recorded surface
with a soft cloth.Unlike conventional records, compact discs have no grooves
to collect dust and microscopic debris, so gently wiping with a soft cloth should
remove most particles. Wipe in a straight line from the inside to the outside of
the disc. Small dust particles and light stains will have absolutely no effect on
reproduction quality.
• Clean the disc periodically with a soft, lint-free, dry cloth. Never use detergents
or abrasive cleaners to clean the disc. If necessary, use a CD cleaning kit.
• Never write on or affix labels to the surface of compact discs.
Care Of The Cabinet
If the cabinet becomes dusty wipe it with a soft dry dust cloth. Do not use any wax,
polish sprays, or abrasive cleaners on the cabinet.
Caution
Never allow any water or other liquids to get inside the unit while cleaning.
20
ES398_042505.p65
46
28/4/2005, 16:48
TO FIND THE LOCATION AND PHONE
NUMBER OF YOUR NEAREST SERVICE
CENTER PERMITTED TO PERFORM
WARRANTY...
SERVICE
CALL TOLL FREE: 1-800-695-0098
FOR ADDITIONAL SET-UP OR OPERATING ASSISTANCE
PLEASE CALL:
1-800-898-9020
FOR CUSTOMER SERVICE, PLEASE WRITE TO:
Emerson Radio Corp.
Consumer Affairs Dept.
1901 Diplomat Drive,
Farmers Branch, TX 75234.
The serial number of your system is located on a label on the bottom cabinet.
Please take a moment now to locate the serial number and to write it in the space
provided below for future reference. You may be asked to provide this number if
you call for customer service.
Model Number: ES398
Serial Number:
21
ES398_042505.p65
47
28/4/2005, 16:48
LIMITED WARRANTY
Emerson Radio Corp. warrants manufacturing defects in original material, including
original parts and workmanship, under normal use and conditions, for a period of
ninety (90) days from the date of original purchase in the U.S. With your dated
proof of purchase, we will provide repair service at no charge for labor and parts
at an authorized Depot Repair Facility, or replace the product in our discretion.
For repair or replacement, pack your unit in a padded box, enclose your check or
money order payable to Emerson Radio Corp. in the amount of $9.00 (not required
by California residents) to cover shipping and handling costs, and enclose a copy
of your proof of purchase. Send your unit to:
Emerson Radio Corp.
1901 Diplomat Drive.
Farmers Branch, TX 75234.
This warranty does not cover damage from negligence, misuse, abuse, accident,
failure to follow operating instructions, commercial use, rental, repairs by an
unauthorized facility, or products purchased, used, serviced or damaged outside
of the United States.
THIS WARRANTY GIVES YOU SPECIFIC LEGAL RIGHTS, AND YOU MAY
ALSO HAVE OTHER RIGHTS WHICH VARY FROM STATE TO STATE.
AU898M
22
ES398_042505.p65
48
28/4/2005, 16:46
EMERSON
Part No. 16-2993
504-01
ES398_042505.p65
Printed in China
49
28/4/2005, 16:53