1
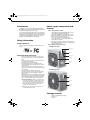
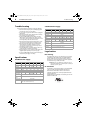
13-0313 DX-400WPS-DX-520WPS_MAN_ENG_V5.book Page 1 Thursday, March 27, 2014 7:47 AM
Dynex ATX 400 and ATX 520 Watt Power Supplies
DX-400WPS/DX-520WPS
USER GUIDE
Before using your new product, please read these instructions to prevent any damage.
13-0313 DX-400WPS-DX-520WPS_MAN_ENG_V5.book Page ii Thursday, March 27, 2014 7:47 AM
ii
Dynex ATX 400 Watt and ATX 520 Watt
Power Supplies
Contents
Introduction . . . . . . . . . . . . . . . . . . . . . . . . . . . . . . . . . . . . . . . . .1
Safety information . . . . . . . . . . . . . . . . . . . . . . . . . . . . . . . . . . .1
Power supply components and features . . . . . . . . . . . . . .1
Package contents . . . . . . . . . . . . . . . . . . . . . . . . . . . . . . . . . . . .1
Installing the power supply . . . . . . . . . . . . . . . . . . . . . . . . . . .2
Connector types . . . . . . . . . . . . . . . . . . . . . . . . . . . . . . . . . . . . .3
Troubleshooting . . . . . . . . . . . . . . . . . . . . . . . . . . . . . . . . . . . . .4
Specifications . . . . . . . . . . . . . . . . . . . . . . . . . . . . . . . . . . . . . . . .4
Legal notices . . . . . . . . . . . . . . . . . . . . . . . . . . . . . . . . . . . . . . . . .4
One-year limited warranty - Dynex . . . . . . . . . . . . . . . . . . . .5
13-0313 DX-400WPS-DX-520WPS_MAN_ENG_V5.book Page 1 Thursday, March 27, 2014 7:47 AM
1
Introduction
Congratulations on your choice of this Dynex DX-400WPS or Dynex
DX-520WPS power supply. Please read this manual carefully and follow
the instructions before installing the power supply.
This is an advanced power supply with excellent acoustic and thermal
performance and intelligent thermal fan control technology that makes
it virtually silent. The power supply provides perfect protection for your
system and comes equipped with two +12V rails that can handle a
maximum load of 18A for additional system reliability.
Safety information
Safety regulations
The power supply meets safety guidelines and regulations for UL, cUL,
and FCC.
Power supply components and
features
Power supply features include:
• Complies with the newest Intel standard ATX 12V version 2.31
and is downward compatible with V2.2 and V2.0
• Supports Intel and AMD dual-core and multi-core processors
• High-performance components designed for better reliability
• Dual +12 V outputs for higher power capacity
• One 4+4 pin +12 V CPU connector for high-end CPUs
• One 6+2 pin PCI Express connector for high-end video cards
• 140 mm low-noise cooling fan
• All DC cables are mesh-sleeved. The length is 15.75 in. (40 cm)
• High reliability, including built-in protection circuit OVP, OLP, SCP,
and line input fuse protection
Power supply components include:
DX-400WPS power supply
Voltage switch
AC power
jack
Important safety instructions
• Do not place your system near a radiator or other heat source.
• Do not place your system close to a source of strong magnetic
fields.
• Do not place your system in a moist or dusty environment, or in
an area subject to strong vibration.
• Do not place your system in direct sunlight.
• Your computer must operate at a stable AC input voltage.
• Your computer should not be situated directly next to a heater or
another heat source.
• Do not open the cover on the power supply case. Dangerous
voltages are present inside the cover. Your warranty is void if the
cover is removed.
• Never operate the device with wet or moist hands.
• Never place items in the openings or fan of the power supply.
• Make sure that the power cord is plugged into a powered
electrical outlet.
• Make sure that the power cord is plugged into the power supply.
• Make sure that you connect your power supply properly. Check
your motherboard and graphic card manuals for compatibility
before connecting the power supply to any of your devices.
ON/OFF switch
Cooling fan
Ventilation
grating
DX-520WPS power supply
AC power
jack
Caution (for DX-400WPS only): Check the red power supply voltage
switch setting before installation. The setting should be the same as
your local power voltage (115 V for North America and 230 V for
Europe and other countries). Change the voltage setting if necessary.
Failure to take this precaution could result in damage to your
equipment and could void your warranty.
Cooling fan
Ventilation
grating
Note: If the power supply does not work correctly, contact our service
center immediately at (800) 305-2204.
Package contents
• 400-Watt or 520-Watt ATX Power Supply
• AC power cord
• User Guide
13-0313 DX-400WPS-DX-520WPS_MAN_ENG_V5.book Page 2 Thursday, March 27, 2014 7:47 AM
2
DX-400WPS/DX-520WPS
Installing the power supply
Preparing your power supply:
Installing the power supply
a. Connect the 20+4-pin main power connector to your
motherboard. If your computer has an older
motherboard with a 20-pin main power socket, connect
only the 20-pin main power connector.
1 Make sure your motherboard, graphics card, and other
components are compatible with this power supply. Refer to the
documentation that came with each component.
2 Check your local AC voltage (115 VAC for USA, Canada, Japan, and
others, and 230 VAC for Europe, Southeast, Asia, and others). The
DX-520WPS is only compatible with 115 VAC.
3 For DX-400WSP only: Make sure that the red voltage switch
(located on the back of the power supply) is set to the correct
voltage setting.
Caution: Using the incorrect voltage can damage the power supply and
connected equipment and may void your warranty.
Are you replacing a power supply?
• Yes, start at “Removing your old power supply” below.
• No, go to “Installing your power supply” on pg 2.
b. Connect the 8-pin (4+4) or 4-pin +12 V power
connector to your motherboard.
Removing your old power supply:
1 Turn off your computer.
2 Unplug the power cord from your computer.
3 Open your computer case. (See the instructions that came with
your computer.)
4 Disconnect your old power supply from all computer
components.
Tip: Make sure to note each component and the connector type for when
you need to connect them to your new power supply.
5 Remove the screws that secure your old power supply to your
computer case, then remove it from the case.
c. Connect all of the following that apply to your computer:
i. The 4-pin peripheral connectors (4) to any
computer components with a 4-pin connector, such
as an IDE drive or a case fan.
Installing your power supply:
1 Position your power supply in the computer case, making sure
that the AC power jack and cooling fan are facing out, then secure
your power supply using the screws included with your computer
case.
2 Connect all power supply cables. Make sure that each connection
is secure.
Tip: If you are replacing an old power supply, reference your notes from
when you removed the old power supply to make sure you are
connecting all of your components correctly.
ii. The floppy drive power connector to the floppy
drive.
13-0313 DX-400WPS-DX-520WPS_MAN_ENG_V5.book Page 3 Thursday, March 27, 2014 7:47 AM
Connector types
iii. The Serial ATA connectors (4) to any computer
components that have a Serial ATA connector, such
as a CD/DVD/Blu-ray or hard drive.
DX-400WPS/DX-520WPS
3
Connector types
Connector
20+4-PIN Main Power
4-PIN+ 12V (400 Watt PS only)
Illustration
Connect to
The motherboard
The motherboard (for CPU
power)
-------------------------------OR----------------------------------iv. The 8-pin PCI-E or 6-pin PCI-E connector to a PCI-E
graphics card.
8-PIN (4+4) + 12V (520 Watt PS only)
The motherboard (for CPU
power)
4-PIN peripheral Total 3 connectors
Internal IDE drives
Serial ATA (SATA) Total 4 connectors
Internal SATA drives
Floppy drive
Caution: Make sure that all connectors are securely connected. Incorrect
connections could prevent your computer from starting and could
damage some components.
3 Close your computer case.
4 Connect the AC power cord to the power supply, then to a surge
protector or wall outlet.
5 Turn on your computer by pressing the power button on the front
of the case.
Note: For more information, refer to your computer’s user guide.
6-PIN PCI-E
(400 Watt PS only)
3.25” floppy drive
PCI Express card (such as a
graphics card) that
requires power
------------------------------OR-------------------------------------8-PIN PCI-E
(520 Watt PS only)
PCI Express card (such as a
graphics card) that
requires power
13-0313 DX-400WPS-DX-520WPS_MAN_ENG_V5.book Page 4 Thursday, March 27, 2014 7:47 AM
4
DX-400WPS/DX-520WPS
Troubleshooting
Troubleshooting
520 Watt Power Supply
If your new power supply is not working correctly, try the following:
• Make sure that the computer power cord is firmly plugged into
the power cord connector on your computer.
• If you are using a surge protector, make sure that it is plugged in
and turned on.
• Make sure that the wall outlet is supplying power. For example,
plug a lamp into the outlet and turn it on.
• If you have the DX-400WPS, make sure that the red voltage
switch (located on the back of the power supply) is set to the
correct voltage setting. The setting for the United States is 115 V.
The setting for Europe and other countries is 230 V.
• Make sure that the system board power supply cable is securely
connected to the system board connector (24 pin or 20 pin).
• Make sure that all power supply cables to peripheral devices,
such as hard drives, optical drives, and fans, are securely
connected. Any loose power cable connections may cause the
power supply to operate incorrectly.
• The power supply may be overloaded. Unplug any unnecessary
components, such as extra drives, then try again.
• If the power supply is very hot, check the case fans and the power
supply fan. Replace any faulty case fans, then try again.
• If you have the DX-400WPS, make sure the power switch (I/O) on
the back of the power supply is set to ON (I).
Output Voltage
+12V1DC +12V2DC +5VDC
+3.3VDC -12VDC
+5Vsb
Max Load
18.0 A
16.0 A
18.0 A
20.0 A
0.3 A
2.0 A
Min Load
1.0 A
1.0 A
0.5 A
0.3 A
0.0 A
0.005 A
±10%
±5%
Max Watt
420 W
Peak Power
520 W
Regulation
±5%
±5%
±5%
±5%
Ripple
120 mV 120 mV 50 mV
Noise
200 mV 200 mV 100 mV 100 mV 200 mV 100 mV
Power Good
Signal
100-500 mS
Power Fail
Signal
1 mS Min.
Hold-up Time
Dimensions
50 mV 120 mV 50 mV
16 mS Min.
5.5 × 3.4 × 5.9 inches (W × H × L)
140 × 86 × 150 mm (W × H × L)
Legal notices
FCC warning
Specifications
400 Watt Power Supply
Output Voltage
+12V1DC +12V2DC +5VDC
+3.3VDC -12VDC
Max Load
8.0 A
14.0 A
20.0 A
20.0 A
0.3 A
Min Load
1.0 A
1.0 A
0.3 A
0.5 A
0.0 A
Max Watt
300 W
Peak Power
400 W
Regulation
±5%
±5%
±5%
±5%
+5Vsb
2.5 A
UL statement
±10%
±5%
120 mV 120 mV 50 mV
50 mV 120 mV 50 mV
Noise
120 mV 120 mV 50 mV
50 mV 120 mV 50 mV
Power Fail
Signal
Hold-up Time
Dimensions
100-500 mS
1 mS Min.
16 mS Min.
5.5 × 3.4 × 5.9 inches (W × H × L)
140 × 86 × 150 mm (W × H × L)
approved by the manufacturer or its authorized parties could void your
authority to operate the equipment.
0.1 A
Ripple
Power Good
Signal
This equipment may generate or use radio frequency energy. Changes
or modifications to this equipment may cause harmful interference
unless the modifications are expressly approved in the instruction
manual.The user could lose the authority to operate this equipment if
an unauthorized change or modification is made.
Caution: Any change or modification to the equipment not expressly
Any information or documentation provided to you involving UL Mark
services is provided on behalf of Underwriters Laboratories, Inc.
Products that bear the UL Mark are identical to those that were
evaluated by UL and found to be technically compliant with the UL’s
applicable requirements.
For further information regarding the use of UL marks, please visit the
UL Website at www.ul.com.
13-0313 DX-400WPS-DX-520WPS_MAN_ENG_V5.book Page 5 Thursday, March 27, 2014 7:47 AM
Legal notices
One-year limited warranty Dynex
Definitions:
Dynex Products (“Dynex”) warrants to you, the original purchaser of this new
Dynex-branded product (“Product”), that the Product shall be free of defects in the
original manufacturer of the material or workmanship for a period of one (1) year from
the date of your purchase of the Product (“Warranty Period”). For this warranty to apply,
your Product must be purchased in the United States or Canada from a Best Buy or
Future Shop authorized dealer of Dynex brand products only that are packaged with this
warranty statement.
How long does the coverage last?
The Warranty Period lasts for 1 year (365 days) from the date you purchased the
Product. Your purchase date is printed on the receipt you received with the Product.
What does this warranty cover?
During the Warranty Period, if the original manufacture of the material or workmanship
of the Product is determined to be defective by an authorized Dynex repair center or
store personnel, Dynex will (at its sole option): (1) repair the Product with new or
rebuilt parts; or (2) replace the Product at no charge with new or rebuilt comparable
products or parts. Products and parts replaced under this warranty become the property
of Dynex and are not returned to you. If service of Products or parts are required after
the Warranty Period expires, you must pay all labor and parts charges. This warranty
lasts as long as you own your Dynex Product during the Warranty Period. Warranty
coverage terminates if you sell or otherwise transfer the Product.
How to obtain warranty service?
If you purchased the Product at a Best Buy or Future Shop retail store location, please
take your original receipt and the Product to any Best Buy or Future Shop store. Make
sure that you place the Product in its original packaging or packaging that provides the
same amount of protection as the original packaging. If you purchased the Product from
a Best Buy or Future Shop online web site, mail your original receipt and the Product to
the address listed on the web site. Make sure that you put the Product in its original
packaging or packaging that provides the same amount of protection as the original
packaging. To obtain warranty service, in the United States call 1-888-BESTBUY, Canada
call 1-866-BESTBUY for Future Shop call 1-800-663-2275. Call agents may diagnose and
correct the issue over the phone.
Where is the warranty valid?
This warranty is valid only in the United States and Canada at Best Buy or Future Shop
branded retail stores or websites to the original purchaser of the product in the county
where the original purchase was made.
What does the warranty not cover?
This warranty does not cover:
• Customer instruction/education
• Installation
• Set up adjustments
• Cosmetic damage
• Damage due to acts of God, such as power surges
• Accident(s)
• Misuse
• Abuse
• Negligence
• Commercial purposes/use, including but not limited to use in a place of business
or in communal areas of a multiple dwelling condominium or apartment
complex, or otherwise used in a place of other than a private home.
• Modification of any part of the Product, including the antenna
• Display panel damaged by static (non-moving) images applied for lengthy
periods (burn-in).
• Damage due to incorrect operation or maintenance
• • Connection to an incorrect voltage or power supply
• • Attempted repair by any person not authorized by Dynex to service the
Product
DX-400WPS/DX-520WPS
•
•
•
•
•
5
Products sold “as is” or “with all faults”
Consumables, including but not limited to batteries (i.e. AA, AAA, C etc.)
Products where the factory applied serial number has been altered or removed
Loss or Theft of this product or any part of the product
Up to three (3) pixel failures (dots that are dark or incorrectly illuminated)
grouped in an area smaller than one tenth (1/10) of the display size or up to five
(5) pixel failures throughout the display. (Pixel based displays may contain a
limited number of pixels that may not function normally.)
• Failures or Damage caused by any contact including but not limited to liquids,
gels or pastes.
REPAIR REPLACEMENT AS PROVIDED UNDER THIS WARRANTY IS YOUR EXCLUSIVE
REMEDY FOR BREACH OF WARRANTY. DYNEX SHALL NOT BE LIABLE FOR ANY INCIDENTAL
OR CONSEQUENTIAL DAMAGES FOR THE BREACH OF ANY EXPRESS OR IMPLIED
WARRANTY ON THIS PRODUCT, INCLUDING, BUT NOT LIMITED TO, LOST DATA, LOSS OF
USE OF YOUR PRODUCT, LOST BUSINESS OR LOST PROFITS. DYNEX PRODUCTS MAKES NO
OTHER EXPRESS WARRANTIES WITH RESPECT TO THE PRODUCT, ALL EXPRESS AND
IMPLIED WARRANTIES FOR THE PRODUCT, INCLUDING, BUT NOT LIMITED TO, ANY
IMPLIED WARRANTIES OF AND CONDITIONS OF MERCHANTABILITY AND FITNESS FOR A
PARTICULAR PURPOSE, ARE LIMITED IN DURATION TO THE WARRANTY PERIOD SET FORTH
ABOVE AND NO WARRANTIES, WHETHER EXPRESS OR IMPLIED, WILL APPLY AFTER THE
WARRANTY PERIOD. SOME STATES, PROVINCES AND JURISDICTIONS DO NOT ALLOW
LIMITATIONS ON HOW LONG AN IMPLIED WARRANTY LASTS, SO THE ABOVE LIMITATION
MAY NOT APPLY TO YOU. THIS WARRANTY GIVES YOU SPECIFIC LEGAL RIGHTS, AND YOU
MAY ALSO HAVE OTHER RIGHTS, WHICH VARY FROM STATE TO STATE OR PROVINCE TO
PROVINCE.
Contact Dynex:
For customer service please call 1-800-305-2204
www.dynexproducts.com
Distributed by Best Buy Purchasing, LLC
7601 Penn Avenue South, Richfield, Minnesota, U.S.A. 55423-3645
© 2014 BBY Solutions, Inc.
All rights reserved. DYNEX is a trademark of BBY Solutions, Inc. Registered in some
countries. All other products and brand names are trademarks of their respective
owners.
13-0313 DX-400WPS-DX-520WPS_MAN_ENG_V5.book Page 1 Thursday, March 27, 2014 7:47 AM
www.dynexproducts.com (800) 305-2204
Distributed by Best Buy Purchasing, LLC
7601 Penn Ave. South, Richfield, MN 55423 U.S.A.
© 2014 BBY Solutions, Inc. All rights reserved.
DYNEX is a trademark of BBY Solutions, Inc. Registered in some countries. All other products and
brand names are trademarks of their respective owners.
V5 ENGLISH
13-0313