1
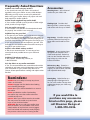
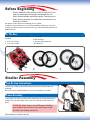
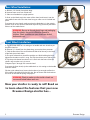
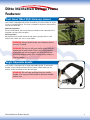
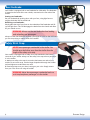
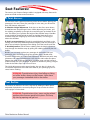
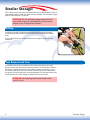
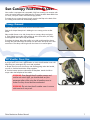
Ditto Manhattan Deluxe User’s Manual Frequently Asked Questions Q. When can I start using my stroller? A. You should wait until your child is 6-8 weeks of age before using your stroller. As every child develops differently you may want to consult your pediatrician before using your stroller. Always use proper neck and body support for smaller children. Q. How much weight will my stroller hold? A. Your stroller will hold up to 85 pounds of child weight plus 8 pounds of cargo weight. Q. Is my stroller rust proof? A. Your stroller is rust resistant if maintained and cared for properly. Your stroller is not rust proof. Q. What if my tire goes flat? A. The tires on your stroller are just like tires on a bicycle or car. They may occasionally go flat if you get a thorn in the tire or something else sharp. To fix this, simply visit a local bike shop and they can change the tire tube for you or you can purchase a tube and replace it yourself. Tires and tubes are not covered under the stroller warranty as they are a wear and tear item. Q. Can I roller blade with my stroller? A. We do not recommend this. It is too easy to lose control and cause possible harm to your child and yourself. Q. What if I break my stroller? A. No problem. Call for help, toll free, at 1-800-278-9626. Q. Is the fabric on my stroller washable? A. Yes. The seat and basket are removable and machine washable in cold water with mild detergent in the gentle cycle. Place back on your stroller to dry. Be sure to remove all seat panels before washing and replace when finished. Reminders: ALWAYS use your safety wrist strap any time a child is in the stroller. ALWAYS engage rear foot brake when loading and unloading passenger. NEVER leave your child unattended in or around the stroller. NEVER overload the stroller. Overloading the stroller may cause the stroller to become unstable and tip over. DO NOT allow your child to stand in the stroller. This may cause the stroller to tip and cause injury to your child and others. WARNING: Do not run with your stroller when the front wheel is in swivel mode. Front swivel wheel strollers of any kind are not true joggers and if not locked into stationary mode properly may overturn when used as a running stroller. Accessories: Shearling Insert soft cushioned comfort for your child’s ride. Flashing Light Provides dual flashing modes, is water resistant, and can be seen for up to 1600 ft. Bug Canopy Versatile canopy that provides protection from bugs or flying debris and shade from the sun. Back Pack A very spacious bag equipped with cell phone and water bottle pockets. Packed up and over the shoulder allows this bag to keep up with even the busiest of families. Deluxe Carry Bag Contains a removable, hard back and bottom support, as well as hand, shoulder, and adjustable back straps. Bunting Bag Styled similar to a sleeping bag but designed to fit for use in the stroller. The zip close padded bag keeps your child snug and warm. If you would like to purchase any accessories listed on this page, please call Dreamer Design at 1-800-278-9626. Before Beginning Correct Assembly of this stroller is vital for safe use by you and your passenger. We strongly recommend that you follow these assembly instructions closely. Choosing not to follow these instructions is outside of the manufacturer’s or distributor’s liability. No tools are required for the assembly of your stroller. Included in your stroller box you will have the below listed items. If you are missing any of the listed items please call us @ 1-800-278-9626 and we will gladly help you. In The Box: 1. Stroller frame with seat and basket installed 2. 2-16”rear wheels 3. 1-12” front wheel 1 4. Tire Pump* 5. Rain Canopy* 6. This Instruction Manual* * Not Pictured. 2 3 Stroller Assembly Step By Step Instructions: Unpack your stroller and carefully verify that you have all listed parts for assembly. Read instructions carefully before you start to assemble your stroller. Frame Assembly: Turn stroller over with the inside of the seat facing up. Grasp stroller by the handle, lift up and pull back at the same time until the stroller locks into place. WARNING: Watch fingers when folding and unfolding your stroller. Failure to do so may cause fingers to get pinched in the folding mechanism. Ditto Manhattan Deluxe Manual Rear Wheel Installation: A. Remove 16” wheels from plastic bags. B. Remove foam cover from wheel axle. C. Place rear footbrake in upright position. D. Push on the black cap in the center of the wheel, and insert it into the rear stroller frame axle. Give the wheel a tug to make sure it is locked into place. To remove the rear wheels, make sure that the footbrake is in the upright position. Push on the center of the black cap that says push and pull wheel axle out of the stroller frame. WARNING: Be sure to discard plastic bags and packaging from the wheels, they are a suffocation hazard to children. Check to make sure your wheels are locked before each use. Front Wheel Installation: A. Tip the stroller back so it is resting on its handle and rear wheels to put the front wheel on. B. Remove 12” wheels from the plastic bag, remove the foam protector. C. Find the flat sides of the round axle and slide all of the way to the back of the fork tips on both sides. D. The quick release lever should be straight out. While holding the lever, tighten the thumbnut until it is snug. The axle should not move side to side. E. Flip the quick release lever down so it is flush with the frame. Give the wheel a tug to make sure it is secure. F. Repeat steps C through E for second wheel. To remove the front wheel, tip the stroller back so it is resting on the handle and rear wheels. Flip the quick release lever, loosen the thumbnut just enough to allow the front wheel to be pulled from the fork tips. Do not loosen the the thumbnut too much or the internal spring will pop out. WARNING: Check to make sure the stroller wheels are secure and locked before each use. Now your stroller is ready to roll! Read on to learn about the features that your new Dreamer Design stroller has... Dreamer Design Ditto Manhattan Deluxe Frame Features: Front Swivel Wheel With Stationary Lockout: Your stroller is equipped with a lever that allows your front wheels to swivel or stay in a locked position. This lever is located on the frame, between the seats on the back side. Stationary position: Lift lever and release, then swivel the front wheels to the underside of the footplate until they locks into place. Swivel position: Squeeze the lever toward the frame and psh the spring button in until locked. Your wheels are now in swivel mode. WARNING: Always double check your stationary lock to assure it is locked. WARNING: Do not run with your stroller when the front wheels are in swivel mode. Front swivel wheel strollers of any kind are not true joggers and if not locked into stationary mode properly may overturn when used as a running stroller. Height Adjustable Handle: Your stroller is equipped with a height adjustable handle. To extend the handle, push the buttons located on the outside. While holding in the buttons, rotate the handle to the desired height. WARNING: Do not hang anything from your stroller handle, as it may cause the stroller to become unstable and tip over. Ditto Manhattan Deluxe Manual Rear Footbrake: Your stroller is equipped with a rear footbrake for child safety. The footbrake is located to the inside of the rear wheels, mounted on the rear axle of the stroller. Setting rear footbrake: Set your footbrake by pushing down with your foot, using light force to engage the brake into the wheel hub. Releasing rear footbrake: Simply place the top of your foot on the underside of the footbrake and lift up with light force. This will disengage the brake from the wheels and allow for your wheels to turn. WARNING: Always use the rear footbrake when loading and unloading your passengers. Always use the rear footbrake anytime a passenger is in the stroller and when you are not pushing or within reach of the stroller. Safety Wrist Strap: NEVER leave passenger unattended in the stroller. You should never be further away from the stroller than the length of the safety wrist strap. Your stroller is equipped with a safety wrist strap attached to the bottom rear axle of your stroller. Always use the safety wrist strap when a passenger is in the stroller. A. Make sure safety wrist strap is secured to the bottom rear axle of your stroller. To secure the strap, lace the larger looped end through the smaller end and tighten around bottom rear axle. B. Place large loop over your hand, resting on your wrist. Simply remove from your wrist when not using the stroller. WARNING: Never leave passenger unattended and use wrist strap anytime a passenger is in the stroller. Dreamer Design Seat Features: The seat on your Dreamer Design stroller is equipped with many features for parent and child comfort and convenience. 5 Point Harness: You will want to do a general positioning of the harness before placing your passenger in the seat. Once your passenger is in the seat, you will want to do a final harness adjustment. A. Shoulder Height Adjustment: Push down on the silver center button located between the passenger's knees. While depressing the button, pull the webbing completely up through the tunnel that goes up the back of the seat. This allows you to position the height of the shoulder straps. Shoulder straps should be placed behind the back at shoulder blade level so the shoulder straps are wrapping up around the shoulders, not resting just above the shoulders. B. Pelvic strap positioning: The pelvic strap slides back and forth on the seating area. This strap should be positioned slightly under the passenger’s pelvic area to keep the passenger from sliding out of the harness and seat. C. Girth Adjustment: Pull the excess webbing from the height adjustment strap through the shoulder straps by pulling the webbing located by the side buckle. D. Now you are ready to place your passenger in the stroller. Seat your passenger, place their arms through the shoulder straps, double check shoulder strap location and make final adjustment. Double check pelvic strap placement and make final adjustment. Now clip the side buckles into place. Depress the center buckle and pull down on center strap until the harness is pulled securely over your passenger. A good fit is reflected in placing 2 fingers under the shoulder straps with no more room. This initial adjustment process seems lengthy, but now that it is done only incremental adjustments will need to be made as your passenger grows or wears heavier clothing. WARNING: To avoid serious injury from falling or sliding out of the stroller, always use the harness. Never leave your passenger unattended while in the stroller. Seat Recline: The amount of recline on the seat is adjusted by holding the black plastic adjustable clip behind the seat and pulling the strap to make the seat sit more upright or further back. WARNING: To avoid serious injury, never use the reclined position unless firmness panels are in place. Child may slip into leg opening and get hurt. Ditto Manhattan Deluxe Manual Stroller Storage: Your stroller comes with many convenient parent and child pockets as well as water bottle holders, inside and under the seat pockets. The combined weight limit for these features is 5 pounds. WARNING: Do not overload storage compartments as your stroller may tip if overloaded. Do not store sharp objects in any of the pockets or basket. Folding: To fold your stroller, pull the latches on both sides of the stroller frame simultaneously and push down on the handle until the forks and handle meet. If you would like for your stroller to fold more compact, simply take the wheels off. Seat Removal and Care: The stroller seat can be removed from the frame and washed with ease. Simply unsnap and unvelcro the seat and remove it from the frame. Remove the firmness support boards from the hidden pockets, the openings are at the bottom back of the seat on the back rest and seat portion. Wash seat in the gentle cycle with cold water and mild detergent. Put the seat back on the stroller frame to dry. Don’t forget to replace the firmness panels. WARNING: Not replacing the firmness boards could result in injury. Dreamer Design Sun Canopy Features & Use: Your stroller is equipped with retractable, fully front rotating sun canopies with many convenient parent and child features. Features include: Retractable front sun visor, view port window and side storage pockets. To rotate the sun canopy forward, simply unvelcro the flap at the back of the sun canopy and rotate it to the desired position. Canopy Removal: Your sun canopies can be removed from the stroller frame. Find the C shaped clamp that is holding the sun canopy on the stroller frame. Place stroller frame on its side, locate the sun canopy clamp and grasp it. Twist slightly to one side while pulling up at the same time, the clamp should pop off. Some force may be needed. To replace the clamp, place the stroller on its side, and thread the clamp through the seat hold. Place the clamp over the frame and push down with some force. The clamp will fit right over the frame in its natural place. All Weather Cover Use: If you get stuck in the rain, cold weather or wind, the all weather cover will help keep your passengers dry, warm and protected. A. Drape the cover over the canopy with the flap going under the handle, not over it. Seal the back Velcro straps together. B. Tuck the bottom portion underneath the footplate. Attach the Velcro straps under the footplate of the stroller. WARNING: Even though the all weather canopy and stroller are not air tight, you should check on your passenger often while using the all weather cover to make sure they do not become overheated. WARNING: Do not store the all weather cover in severe cold areas as it may crack. Ditto Manhattan Deluxe Manual Maintenance: We recommend that you have an experienced dealer perform these maintenance checks at least once a year. Lubrication of the following items is necessary: Front wheel axle Check fabric seams and straps for fraying and tearing. Keep it out of the sun, and in a dry place when not in Quick release lever use, to prevent fading and mildew. Insert in frame for rear wheels Check the frame for loose rivets, cracks, and wear. Wheel hub and ball bearings of rear wheels Check to make sure all nuts and bolts are tight on the Locking bars of folding mechanism frame. Check to make sure all of the bolts are tight, and that springs are secure on footbrake. We recommend that you put a rust preventative type coating on your wheels and other metal parts on your stroller. These parts can also be maintained by cleaning with a damp cloth, and keeping these parts dry and free from debris. Warranty Information Thank you for purchasing a Dreamer Design Stroller. We have created a warranty that will keep your unit in top condition and headache free. The following warranty is on workmanship and materials from date of original consumer purchase. 20 year warranty on the stroller frame 1 year warranty on stroller parts Exclusions include: Parts that require replacement under normal use. Damage or malfunction caused by negligence or abuse. Foam grips, inner tubes, tires, brake pads, and parts damaged by rust are specifically excluded. Dreamer Design will, at its option, repair or replace defective parts upon delivery to our service center accompanied by proof of date of original consumer purchase; such as a copy of a sales receipt. Please refer to the store where you purchased your stroller for refunds. Dreamer Design does not give direct refunds. You must pay any initial shipping charges required to ship the product for warranty service. Purchaser is also responsible for all applicable duties and/ or custom charges. The return charges will be at Dreamer Design’s expense. Please include your name, address, telephone number, email address, and a brief description of the defect or problem. All implied warranties, including warranties of merchantability and fitness for a particular purpose are limited in duration to the length of the warranty. Dreamer Design will not be liable for any incidental, consequential or other damages; including, without limitation, damages resulting from loss of use. Some states do not allow limitations on how long an implied warranty last and/or do not allow the exclusion of limitation of incidental or consequential damages, so the above limitation may not apply to you. This limited warranty gives you specific legal rights, and you may have other rights, which vary from state to state. Your complete satisfaction is our goal. Please let us know if you are dissatisfied with any of our products. We will do our very best to correct the situation and make you happy. Feel free to contact us and send photos. We love to hear from you! [email protected] 800-278-9626 Dreamer Design Warranty Registration Please provide the following information and mail it to: Dreamer Design PO Box 369 Selah, WA 98942 Or complete registration online at www.dreamerdesign.net Name: ___________________________________________________________________ Address: ___________________________________________________________________ City: __________________________ State: ___________ Zip Code: ________________ Phone: __________________________ e-Mail: ___________________________________ Model Purchased: ___________________________________________________________________ Date of Purchase: ___________________________________________________________________ Purchased From: ___________________________________________________________________ Comments:___________________________________________________________________ ___________________________________________________________________ ___________________________________________________________________ ___________________________________________________________________ ___________________________________________________________________ Ditto Manhattan Deluxe Manual Post Office will not deliver without Postage. PO Box 369 Selah WA 98942-8326