1
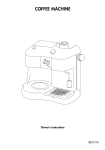
BCO85 Intro
3-07-2002
13:45
Pagina 1
COFFEE MACHINE
INSTRUCTIONS FOR USE
BCO85 Intro
3-07-2002
13:45
Pagina 2
22
21
23
19
24
25
20
18
26
15
27
17
14
28
16
13
10
1
9
8
2
12
6
3
7
5
4
11
ELECTRICAL CONNECTION
A)
If your appliance comes fitted with a plug, it will incorporate a
13 Amp fuse. If it does not fit your socket, the plug should be cut
off from the mains lead, and an appropriate plug fitted, as
below.
WARNING: Very carefully dispose of the cut off plug after removing the fuse: do not insert in a 13 Amp socket elsewhere in the
house as this could cause a shock hazard.
With alternative plugs not incorporating a fuse, the circuit must
be protected by a 15 Amp fuse.
WARNING - THIS APPLIANCE MUST BE EARTHED
IMPORTANT
The wires in the mains lead are coloured in accordance with the following code:
Green and yellow:
Blue:
Brown:
Earth
Neutral
Live
E
L
N
B)
If the plug is a moulded-on type, the fuse cover must be re-fitted
when changing the fuse using a 13 Amp Asta approved fuse to
BS 1362. In the event of losing the fuse cover, the plug must
NOT be used until a replacement fuse cover can be obtained
from your nearest electrical dealer. The colour of the correct
replacement fuse cover is that as marked on the base of the plug.
If your appliance is not fitted with a plug, please follow the
instructions provided below:
As the colours of the wires in the mains lead may not correspond with
the coloured markings identifying the terminals in your plug, proceed
as follows:
The green and yellow wire must be connected to the terminal in the
plug marked with the letter E or the earth symbol
or coloured
green or green and yellow.
The blue wire must be connected to the terminal marked with the letter N or coloured black.
The brown wire must be connected to the terminal marked with the letter L or coloured red.
BCO85 Intro
3-07-2002
13:45
Pagina 3
1
2
3
4
5
6
7
8
9
10
11
12
13
14
15
BCO85 Intro
3-07-2002
13:45
Pagina 4
16
17
18
19
20
21
22
23
24
27
A
C
B
25
4
26
28
BCO85 GB
3-07-2002
13:45
Pagina 5
ENGLISH
Thank you for choosing this De’Longhi coffee
machine. To get the very best out of your new
coffee machine it is advisable to read these
instructions before installing and using the
appliance. This is the only way to ensure optimum results and maximum safety.
DESCRIPTION OF THE APPLIANCE
The following terms are used throughout the
instruction manual.
1. Power supply cable
2. Removable drip tray
3. Anti spray nozzle
4. Boiler outlet
5. Warming plate
6. Steam ready OK light
7. ON/OFF espresso/cappuccino switch
8. ON/OFF drip coffee switch
9. ON drip coffee light
10. ON espresso/cappuccino light
11. Small carafe for espresso/cappuccino
12. Two cup attachment for espresso coffee
13. Measuring spoon
14. Filter holder for espresso coffee
15. Filter for espresso coffee
16. Filter holder for drip coffee
17. Permanent gold tone filter
18. Large carafe for filter coffee
19. “Flavour system” filter strength selector knob
20. Lid for the water reservoir
21. Removable water reservoir
22. “Vario system” espresso coffee strength selector knob
23. Lid for milk tank
24. Emulsifier
25. Milk tank
26. Steam boiler cap
27. Steam boiler
28. Steam release knob
SAFETY WARNINGS
• This machine has been built to “make coffee”
and to “reheat beverages”; please be careful
to avoid burns from the sprays of hot water or
steam and avoid any improper use.
• When the appliance is in use, do not touch any
of the machine’s hot surfaces.
• After unpacking, make sure that the machine is
complete and undamaged. If in doubt, do not
use the appliance and seek the advice of a
qualified service professional.
• This appliance is to be utilised for domestic use
only. Any other use is to be considered
improper and therefore, dangerous.
• The manufacturer takes no responsibility for
damage derived from improper use.
• Never touch the appliance with wet or damp
hands.
• Never allow the appliance to be used by children or unfit persons.
• In case of breakdown or malfunctioning, turn
the appliance off immediately and do not
touch it. For repairs, please contact a Service
Centre authorised by the manufacturer. The
lack of respect for this point may compromise
the safe use of the appliance.
• The user must never replace the power supply
cable of this appliance. If the cable should
become damaged, or in case it needs to be
replaced, please contact a Service Centre
authorised by the manufacturer.
• When the appliance is not in use, turn OFF
and disconnect the plug from the socket.
• As with any electrical appliance, whilst the
instructions aim to cover as many eventualities
as possible, caution and common sense should
be applied when operating your coffee
machine, particulary in the vicinity of young
children.
5
BCO85 GB
3-07-2002
13:45
Pagina 6
INSTALLATION
HOW TO PREPARE FILTER (DRIP) COFFEE
• Place the appliance on a flat work surface at a
safe distance from taps and sinks.
• Raise the lid and remove the water reservoir
(fig. 1).
• Check that the voltage corresponds to that indicated on the appliance rating plate. The appliance must always be connected to a wellearthed socket rated at 10 A minimum. The
manufacturer is not liable for damage caused
by inadequate earthing of the appliance.
• Fill the tank with cold, clean water, up to the
level indicated on the tank corresponding to
the number of cups of coffee that are desired
(fig. 2).
• In the event of incompatibility between the plug
on the appliance and the socket, have the plug
replaced by a qualified professional. If the
cable is damaged or requires replacing, contact a service centre authorised by the manufacturer only.
• Never install the machine in an environment
which can reach a temperature of less than or
equal to 0°C (if the water inside the machine
freezes, the machine might be damaged):
INTRODUCTION TO COFFEE PREPARATION
The coffee machine is designed to make filter coffee, espresso coffee and cappuccino. Filter (drip)
coffee is a “long” relatively mild coffee, which can
be enjoyed throughout the day. Espresso is a
strong dark coffee with a distinctive caramelcoloured froth, known as the “crema”. Espresso
coffee is best served in small “demi-tasse” cups.
Cappuccino is a creamy, smooth coffee which can
be enjoyed at any time. The perfect cappuccino is
1/3 espresso, 1/3 hot milk and 1/3 frothed milk.
USING THE FIRST TIME
Before making coffee for the first time it is necessary to wash all of the accessories and the internal
circuits of the machine as follows:
• for the filter coffee - make at least two carafes
of coffee, without using the ground coffee in
the filter (follow the instructions in the paragraph “How to prepare filter coffee”).
• For the espresso coffee - make at least four
cups of espresso coffee without using ground
coffee in the filter (follow the instructions in the
paragraph “How to prepare espresso coffee).
• Replace the tank into the machine by pressing
down firmly. If desired, the tank can be left in
the machine and the large carafe can be used
to fill it with water. The carafe also has water
level indicators on it.
• Open the filter holder by turning it towards the
left (fig 3) using the plastic tab under”open”.
• Place the permanent filter, into the filter holder
(fig. 4).
• Put the ground coffee into the filter by using the
measuring spoon included with the machine
and level off the grounds evenly (fig. 5). As a
general rule, use one level measuring spoonful
of coffee (about 7 grams) for each cup of coffee (for example, use 10 measures to make 10
cups of coffee). In any case, the quantity of
ground coffee to use can vary according to the
strength desired and personal taste. Use high
quality ground coffee, with a medium grind
produced for filter coffee makers.
• Close the filter holder and place the large
carafe complete with lid onto the warming
plate.
• Select the filter coffee strength by turning the
“Flavour system” knob (fig 7). The coffee can
be programmed for a strong aftertaste
(STRONG position) or a weaker flavour (LIGHT
position).
The “Flavour system” feature
changes the aftertaste of the coffee, while the
true taste of the coffee remains unchanged.
• Press the “ON/OFF” switch for drip coffee (fig.
6). The ON/OFF indicator light for drip coffee
above the switch itself indicates that the filter
machine is functioning properly.
• The brewed coffee will begin to drip out after
a few seconds. It is completely normal that
during the percolation of the coffee, some
steam may escape from the machine.
• If the “ON/OFF” switch for drip coffee is
pressed after the percolation, and the carafe is
6
BCO85 GB
3-07-2002
13:45
Pagina 7
on the warming plate, the coffee will be mantained at an ideal drinking temperature.
HOW TO PREPARE ESPRESSO COFFEE
1. Unscrew the boiler cap by turning it in an anticlockwise direction.
2. Using the water level indicators printed on the
small carafe (fig. 8) fill with water according to
the number of cups of espresso coffee that are
required (see the chart page 10).
3. Pour the water into the steam boiler (fig. 9).
4. Replace the boiler cap by turning firmly in a
clockwise direction.
5. Insert the filter for espresso coffee into the filter
holder (fig. 10).
6. Fill the filter with the ground coffee, using the
measures indicated in the chart page 10 and
pack it evenly in the filter (fig. 11). It is important to use high quality ground coffee with a
medium grind in order to avoid blocking the
filter during the brewing. Remove any excess
coffee from around the edges of the filter (fig.
12).
7. To attach the filter holder to the appliance,
position it under the boiler outlet with the handle towards the left (fig 13). Push upwards,
and at the same time, turn the handle as far
right as possible. It does not matter if the filter
holder is not centrally aligned with the
machine. It is important that the filter holder is
firmly attached to the appliance.
8. Place the small carafe under the filter holder,
the filter will slot inside the carafe lid (14).
9. Position the “Vario System” selector knob
according to the type of espresso coffee
desired: “LIGHT” for a weaker coffee and
“STRONG” for a stronger tasting brew (fig.
15).
10. Make sure that the steam release knob on the
side of the machine is closed. (eg to close turn
in a clockwise direction until tightened)
11. Push the ON/OFF switch for espresso/cappuccino. The ON indicator light for espresso/cappuccino will turn on (fig. 16).
12. After approximately two minutes, the espresso
coffee will begin to flow out (fig. 17).
ATTENTION: to avoid spraying, do not
detach the filter holder while the machine is
brewing coffee.
13. When the coffee no longer flows out from the
filter holder, push the espresso/cappuccino
ON/OFF switch to turn off the steam boiler
(fig. 16). The coffee can then be served into
cups.
14. To remove the used coffee in the filter, detach
the filter holder, from the machine hold the filter in place with the special lever incorporated
on the handle and let the coffee fall out by
turning the filter holder upside down and
knocking gently. (fig. 18).
NOTE:
Before removing the filter holder, it is important to
eliminate all of the residual steam from inside the
steam boiler. Allow the steam to blow out completely by rotating the steam release knob in an
anti-clockwise direction (fig 19).
NOTE:
For safety reasons, when the steam boiler is hot, it
is not possible to remove the steam boiler cap this
is a safety feature. If for any reason it is necessary
to remove it, it is important always to release the
steam in the steam boiler by turning the steam
release knob.
HOW TO USE THE TWO CUP ATTACHMENT
The attachment must be used every time coffee is
dispensed directly into a cup. To mount it, simply
insert the attachment into the lower part of the filter holder (fig 20).
HOW TO PREPARE CAPPUCCINO
• Prepare the espresso coffee as described in the
paragraph “How to prepare espresso coffee”
from points 1 to 12; using, the quantity of
water required to obtain 2 cappuccinos as
indicated in the chart page 10. Note that the
quantity of water required for making cappuccinos is greater that the amount necessary for
making espresso coffee: the extra water is
used for producing steam for frothing the milk.
• Pour cold milk into the milk tank (fig. 21). For
a really good froth try using semi-skimmed
milk at refrigerator temperature. With the tank
filled to the MAX line, there will be enough milk
to make 2 or 3 cappuccinos. Never fill beyond
the MAX line otherwise once the cappuccino
7
BCO85 GB
3-07-2002
13:45
Pagina 8
has been made, the milk may continue to drip
out of the tube.
• Brew the coffee into the small espresso carafe
as paragraph “How to prepare espresso coffee”. When the coffee reaches level 2 on the
side of the small espresso carafe (fig. 22), turn
the Vario System selector to “cappuccino” (fig.
15). If you allow too much coffee to come
through at this point there will not be enough
steam left to make the steam for frothing the
milk.
• Pour the coffee into 2 large cups.
• Place the cup containing the coffee under the
tube of the milk tank, wait for the “ok” light
(fig. 24) to come on, this indicates that the
ideal temperature has been reached for frothing the milk, then turn the steam release knob
in an anti-clockwise direction. The frothed milk
will come out the tube of the milk tank (fig. 19).
To keep the milk from spraying it is necessary
to attach the anti-spray nozzle (fig. 24) onto
the tube of the milk tank. This is also useful
when the cups used for the cappuccino are
quite small.
• Fill the cup with the desired quantity of frothed
milk. To ensure that the milk froths properly,
always wait for the “OK” warning light to
come on before frothing milk for each cappuccino.
• Attention: after the last cappuccino has been
prepared, before turning the coffee maker off,
lift the suction tube of the milk tank above the
level of any remaining milk (as indicated in
Fig. 26) and allow the steam to come out for a
few seconds. With the tube out of the milk close
the steam knob. For hygiene reasons, it is recommended that this operation is carried out
to prevent any milk from going sour in the
internal circuits of the coffee maker.
TIPS
When making a number of cappuccinos, to obtain
a higher temperature you should prepare one cup
at a time and then fill it immediately with the
frothed milk rather than prepare all the cups of coffee at once then fill them with the frothed milk.
CLEANING AND MAINTENANCE
• Before begining any cleaning or maintenance,
turn the machine off, remove the plug from the
electrical socket and allow the machine to cool
down.
CLEANING THE MILK FROTHER (EMULSIFIER)
The cleaning operation for the milk frother must be
done after each use. Proceed as follows:
• Remove the milk tank by pressing lever C and
pulling upwards (fig 27). Wash it in hot, soapy
water.
• Remove the emulsifier by pressing down on lever
A and at the same time, pulling upwards (fig
27). Remove the rubber mixer, rinse it and clean
it thoroughly with hot water. Ensure that the
small holes in the upper part of the emulsifier are
not blocked. If this procedure is not followed the
milk will be poorly frothed or not drawn out of
the tank.
Make sure that the hole marked with the arrow
B has not been clogged (fig 28) (clean with a
needle).
• Once clean, all of the pieces must be reassembled in the correct order. In particular, make
sure that the rubber mixer has been inserted
properly all the way down and that the milk
tank and the emulsifier have been inserted all
the way until a click is heard.
OTHER CLEANING PROCEDURES
• Press the ON/OFF switch for espresso/cappuccino to turn off the appliance.
• To clean the machine, do not use solvents or
abrasive detergents. A soft damp cloth should
be used to clean the surfaces.
• In order to make 4 cappuccinos, it is necessary
to repeat the previous operation, paying attention to the quantity of ground coffee and water,
indicated in the chart on page 10.
• Regularly clean the filter holder, the removable
drip tray, the boiler outlet, and the carafe. Do
not wash the filter holder in the dish washer.
• To make the perfect cappuccino, we recommend the following proportions: 1/3 espresso, 1/3 hot milk and 1/3 frothed milk.
8
• Never immerse the machine in water: it is an
electrical appliance.
• From time to time check that the holes in the fil-
BCO85 GB
3-07-2002
13:45
Pagina 9
ter for espresso coffee are not obstructed. If
necessary, carefully clean the filter with hot
water, scrubbing with an abrasive pad.
• To rinse the appliance, operate the machine
with plain water and without using ground coffee at least 3 times (3 full tanks of water).
DESCALING
If the water in your area is quite hard, the calcium
from this water can accumulate and reduce the
machine’s efficiency.
The espresso coffee machine must be decalcified
every 1-3 months (depending on the hardness of
the water and the frequency of use) using white
wine vinegar. Proceed as follows:
• Fill the carafe for espresso coffee with vinegar
to level 4 of the ‘water level’ side.
• Pour the vinegar into the steam boiler and
replace the cap.
• Attach the filter holder.
• Place the small carafe under the filter holder;
• Turn the machine on and position the Vario
System selector to the “LIGHT” position.
• After a few minutes, the hot vinegar will begin
to flow, through the filter holder, into the
carafe. Release some steam every so often by
turning the steam release knob.
• When all of the solution has gone through the
machine, turn off the appliance and let it cool
down.
• Repeat these operations at least two times
using clean water instead of vinegar to remove
every trace of vinegar left in the circuits.
The filter coffee machine must be decalcified every
40 cycles. Descaling can be done by using special
lime scale solvents made for filter coffee machines.
Alternatively, white wine vinegar can be used, following this procedure:
• Pour two cups of white wine vinegar and three
cups of water into the tank.
• Place the large carafe onto the hot plate but
leave the filter empty.
• Press the ON/OFF drip coffee switch, filter the
equivalent of a cup of the solution and then
turn off the appliance.
• Allow the vinegar to sit in the machine for an
hour.
• Turn the machine back on and allow the rest of
the solution to filter through the circuits.
9
BCO85 GB
3-07-2002
13:45
To make
Pagina 10
Water required for
espresso/cappuccino
(small carafe)
The quantity of ground coffee to put
into the filter
-4
Two espressos
-2
-4
Two cappuccinos
-2
-4
Four espressos
Four cappuccinos
-2
-4
-2
10
BCO85 GB
3-07-2002
13:45
Pagina 11
PROBLEM SOLVING
Problem
Espresso coffee no longer
drips out
The milk froth does not form
properly when making cappuccinos
The filter time of the coffee
is longer than expected
The coffee has an vinegary
aftertaste
Cause
Solution
The coffee has been ground too
finely
Use coffee with a medium grind or the
kind made for espresso coffee
The hole in the spout of the filter
holder is clogged
Clean the hole in the filter holder
The filter is obstructed
Clean the filter with hot water, scrubbing with an abrasive pad
The milk is not cold enough
Always use milk cold from the refrigerator
The steam nozzle is dirty
Carefully clean the holes of the steam
nozzle.
The filter is plugged with limescale
Proceed with the decalcification operation as described in the paragraph
“Descaling”
The machine has not been rinsed
adequately
Thoroughly rinse the appliance as
described in the chapter “Descaling”