1
MANUAL
AW 8 & 10
Magic Moments
www.dali.dk
2
English
anish
udiophile
oudspeaker
ndustries
DALI is renowned among music lovers throughout the world for its
unique speakers and cables, all constructed and build for uncompromising design and sound requirements. Our ultra-modern factory in
Denmark is fully equipped with facilities for development and production of quality speakers.
DALI's principal competence is development and optimisation of
known and new technology in the field of audio and acoustics.
The result is continuous development and optimisation of new and
existing models.
We always keep our goal firmly in view for each and every DALI
speaker: To recreate sound experiences in your home that will carry
you away, making you forget time and place...
It is important to us that your new DALI speakers be set up and connected optimally. This manual contains our recommendations for
setup, connection and maintenance.
Enjoy!
DALI A/S
3
English
Manual
Congratulations on the purchase of your new DALI AW 8/10 subwoofer.
This manual contains information on setup and maintenance of
DALI AW 8/10.
Running-in
Like any other mechanical system, a speaker needs to be "run in", so you
can look forward to a gradual improvement in sound quality over the initial period. Unlike other mechanical systems, regular use will in fact extend
your loudspeakers lifetime.
Positioning
Finding the best possible position for your subwoofer is just as important as
correct connection and adjustment, so please experiment with room placement, just as you would with any loudspeaker.
Unfortunately, there are no shortcuts to find the best placement. You must
experiment and listen for the best position in your room. We offer the following guidelines to assist you in this process.
The subwoofer should be placed on an even floor, either directly on the feet
(included) or on spikes (sold separately). Make sure that spikes do not puncture speaker cables, power cords, interconnects, etc. The subwoofer must
not rock back and forth, as this can cause distortion at high levels. If the floor
is uneven, place objects under the feet/spikes to restore balance, so that the
subwoofer cannot rock back and forth.
Placement on a line roughly halfway between the left and right front
speakers usually works well. Placement along a side wall can in some
rooms yield good results. Note that it is not necessary to angle the subwoofer in towards the listening position.
The subwoofer should normally be placed near a wall. Moving the subwoofer away from the wall will reduce bass output. Placement in a corner
will increase bass output. Note that moving the subwoofer will have the
Congratulations on the purchase of your new DALI AW subwoofer.
4
English
most effect in the midbass region, acting as a kind of tone control. The
rear panel volume control increases or reduces bass output in a more linear
manner.
In the recommended set-up with two subwoofers, each subwoofer should
be placed near the corresponding main speaker, for instance in a corner
behind the speaker.
Connecting AW 8/10
If supplementing your stereo or surround sound system with AW 8/10, the
subwoofers with active crossover network and amplifier, you have various
connection options. You can choose from four options:
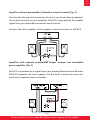
Amplifier with separate subwoofer output terminal (Fig. 1)
If you have an amplifier with a separ-ate subwoofer output terminal, you
can connect this to the line input terminals on AW 8/10. Your front speakers are operated directly by the amplifier and so must not be connected to
AW 8/10. Surround sound amplifiers generally have a separate subwoofer
output terminal.
Fig. 1
Remember that tone controls are only intended for temporary compensation.
5
English
Amplifier without preamplifier/subwoofer output terminal (Fig. 2)
You should only employ the passive solution if you do not have a preamplifier output terminal on your amplifier. AW 8/10 is operated by the speaker
signal from your amplifier/surround sound receiver.
Connect the front speakers to the speaker output terminals on AW 8/10
L
R
Fig. 2
Amplifier with separate preamplifier output terminal and detachable
power amplifier (Fig. 3)
AW 8/10 is operated by a signal from your preamplifier/surround decoder.
AW 8/10 operates the front speakers via the built-in active crossover network and a separate power amplifier.
Fig. 3
Always switch off your amplifier before adjusting any of the cables!
6
English
In many cases one AW 8/10 in one of the listed setups will provide a good
solution, but the absolute perfect solution is two AW 8/10 in stereo setup.
This solution should be connected in exactly the same way, but you only
connect the left channel to one input terminal on the left AW 8/10 and
the right channel to one input terminal on the right AW 8/10. In other
respects, follow the instructions given above - simply with separate channels. If necessary, obtain advice from your dealer.
Tuning AW 8/10
Once you have chosen the connection you wish to use, you must begin the
task of tuning the system. Following the procedure below will help you to
achieve good results. Use a piece of music that you know well, ideally with
rhythmic bass tone content such as bass drums, electric bass or similar.
Begin by setting "Volume" and "Crossover Frequency" to the central position ("12 o'clock"). Set the "Phase" change-over switch to position 180°,
and set both "Auto Shut Off" and "Power" to the "ON" position.
Talk to your authorised DALI dealer about cables - or visit www.dali.dk
7
English
Setting level
Adjust the volume on your AW 8/10 so the bass sound matches the level
from the front speakers. Adjust it so that you can hear the sound contribution from AW 8/10 - but without the bass being too dominant. The bass
should be stable and precise. If you set the volume too high, there is a
risk of the subwoofer being overloaded, which would have a detrimental
effect on the vital playback of mid-range tones from the front speakers.
Choice of crossover frequency
Once the volume level is set you can tackle the equally important adjustment of the crossover between the front speakers and AW 8/10. You do
this by adjusting the "Crossover Frequency" up and down until you can
hear the bass running evenly and with no gaps. You may need to readjust
the volume slightly for this adjustment.
Large solid surfaces close to the speaker may cause intrusive echoes.
8
English
Phase setting
In most cases you will achieve the best results with "Phase" set to 180°.
However, this will depend on the front speakers you are using. Once again,
your ears must be the judge. Use the trial-and-error method for both settings - and you may also want to try readjusting the volume and crossover
frequency. In all cases it is a good idea to listen to the system for several
days and readjust as required. The same setting will not always be ideal for
both surround sound and 2-channel stereo. So it is useful to make a note
of your preferred settings for each type.
The "Power" button is the main switch for the system. It is best to switch
off the system completely when it is not going to be in use for long
periods. When making any changes to connections, always shut down the
system completely.
Overloading
When playing at a loud volume, listen out for possible dissonance and distortion. AW 8/10 is protected against temporary overloading, but if you
often play at a loud volume, you should use a permanent lower setting for
the volume level on AW 8/10. If you position AW 8/10 in a corner, this will
increase the bass level.
Even small changes in the listening room can affect the sound.
9
English
Important cables
There is one area where you can significantly influence the sound quality
- the cables between amplifier and speaker. This is a case where the rule
'any chain is only as strong as its weakest link' definitely applies. The fine
and detailed signal from the amplifier must be conveyed to the speakers
with minimum loss. The table below shows the maximum length your
cables should be.
Cable cross section
AWG
Maximum length
1,0 mm2
18 (17)
15 meter
50 feet
1,5 mm2
16
22 meter
75 feet
2,0 mm2
14
30 meter
100 feet
3,0 mm2
12
45 meter
150 feet
AWG: American Wire Gauge
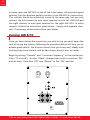
DALI recommends using cables of at least 1.0 mm2 in cross section. However, it is not just the cross section that is crucial to the sound. The actual
structure of the cable and the materials employed can have a great influence on the sound image. We therefore recommend that you only use
cables manufactured for this purpose. You can purchase DALI Wave cables
from your authorised dealer, who will also be able to advise you on the
best type for your requirements. Here is a cross section of the DALI Wave
cables:
DALI White Wave:
DALI Red Wave:
DALI Silver Wave:
1,5 mm2
3,0 mm2
3,0 mm2
WAVE
Remember that the tone controller is only intended for minor adjustments.
10
English
DALI - more than meets the eye
Your DALI speakers have been designed on the basis of a long succession
of technical solutions based on many years' intensive development work.
Most of this is not seen - but it can be heard and experienced, including:
An even frequency response ensures that your DALI speakers reproduce
all tones and kinds of music faithfully and without emphasis.
Sound distribution and correct timing are among DALI's specialities, as
all DALI speakers are designed for optimum performance in a real home
environment and not just in a specially-constructed listening room. The
perfect timing in the sound reproduction ensures that a light beat on a
snare drum, for example, is reproduced as the light, sharp tap that it really
is - without the drums filling and muddying the sound image.
Extremely low loss in movable parts and linear impedance means that the
speakers can reproduce very fine details, even at low sound levels, and
that DALI speakers will load your amplifier very evenly, and the sound will
therefore not be "strained".
Internal cables and crossover networks are an important but frequentlyoverlooked point. The internal cables in your DALI speakers are our own
Cordial cables, and the crossover networks, as with the rest of the speaker,
have been assembled by hand using top-quality components.
The loudspeaker units in your DALI speakers have been developed based
on our ultimate sound requirements. This ensures that the most delicate
details, such as a harp string or a puff of air, will be reproduced just as
convincingly as the powerful sound of a car door slamming etc.
At DALI the cabinet is both a piece of furniture and the speaker's sound
base, and is therefore constructed from acoustically-correct materials. As
with all the other components, the cabinets undergo a rigorous final
inspection, guaranteeing that only perfect speakers leave the DALI factory.
Correct setup is extremely important for your sound experience.
11
English
Safety
CAUTION
RISK OF ELECTRIC SHOCK
DO NOT OPEN
CAUTION:
TO REDUCE THE RISK OF ELRCTRIC SHOCK, DO NOT REMOVE THE BACK PANEL. NO USERSERVICEABLE PARTS INSIDE. REFER SERVICING TO QUALIFIED PERSONNEL.
The lightning flash within an equilateral
triangle is intended to alert you to the presence of uninsulated „dangerous voltage“
within the product’s enclosure that may be
of sufficient magnitude to constitute an
electric shock to persons.
The exclamation point within an equilateral
triangle is intended to alert you to the
presence of important operating and
maintenance (servicing) instructions in the
literature accompanying the appliance.
1. Read Instructions - All the safety and operating instructions should be read before the appliance is operated.
2. Retain Instructions - The safety and operating instructions should be retained for future reference.
3. Heed Warnings - All warnings on the appliance and in the operating instructions should be adhered to.
4. Follow Instructions - All operating and use instructions should be followed.
5. Water and Moisture - The appliance should not be used near water - for example, near a bathtub, washbowl, kitchen sink,
laundry tub, in a wet basement, or near a swimming pool and the like.
6. Carts and Stands - The appliance should be used only with a cart or stand if recommended by the manufacturer.
7. Wall or Ceiling Mounting - The appliance should be mounted to a wall or ceiling only as recommended by the manufacturer.
8. Ventilation - The appliance should be situated so that its location or position does not interfere with proper
ventilation. For example, the appliance should not be situated on a bed, sofa, rug, or similar surface that may block
the ventilation openings; or placed in a built-in installation, such as a bookcase or cabinet, that mayimpede the flow of
air through the ventilation openings.
9. Heat - The appliance should be situated away from heat sources such as radiators, heat registers, stoves, or other
appliances that produce heat.
10. Power Sources - The appliance should be connected to a power supply only of the type described in the operating instructions
or as marked on the appliance.
11. Power Cord Protection - Power-supply cords should be routed so that they are not likely to be walked on or pinched by
items placed on or against them, paying particular attention to cords at plugs, convenience receptacles and the point
where they exit from appliance.
12. Cleaning - Do not use any liquid cleaners. Use only a dry cloth to wipe off dust and grease.
13. Non-use Periods - The power cord of the appliance should be unplugged from the outlet when left unused for a long
period of time.
14. Object and Liguid Entry - Care should be taken so that objects do not fall and liquids are not spilled into the enclosure
through openings.
15. Damage Requiring Service - The appliance should be serviced by qualified personnel when:
a. The power-supply cord or the plug has been damaged; or
b. Objects have fallen, or liquid has been spilled into the appliance; or
c. The appliance has been exposed to rain; or
d. The appliance does not appear to operate normally, or exhibits a marked change in performance; or
e. The appliance has been dropped, or the enclosure damaged.
16. Servicing - The user should not attempt to service the appliance beyond that described in the operating
instructions. All other servicing should be referred to qualified service personnel.
Take your time over tuning the subwoofer - it's well worthwhile!
12
English
Specifications
There are countless methods for evaluating speakers. However, none of
them actually represent how a speaker really sounds. It is up to the individual to decide whether one speaker sounds better than another. So we
only give you the specifications that are of real value to you. The DALI AW
subwoofers has been designed to reproduce music as honestly as possible
- and we know we have succeeded. Enjoy your new speakers!
Model:
DALI AW 8 subwoofer
Design Principle
Bass Driver
Active (Built-in amplifier and crossover), Bass reflex
8" Air dried paper cone
Amplifier
Inputs
Outputs
60 Watt RMS
Stereo speaker level. Input impedance 47 kohm
Stereo line level input RCA phono. Input impedance 47 kohm
Mono line level input RCA phono (unfiltered). Input impedance 47 kohm
Not available
Controls
Volume level, Low-pass crossover frequency (35-150 Hz), Polarity (0˚/180˚)
Frequency Range
40 - 150 Hz
Max. SPL
Power Consumption
Finish/dimensions
Weight ex. packing
108 dB
230 VAC 50-60 Hz, max. 100 Watt
Black ash. 36.4 x 26.5 x 41.4 cm.
11.3 kg / 24.0 lbs.
Model:
DALI AW 10 subwoofer
Design Principle
Bass Driver
Active (Built-in amplifier and crossover), Bass reflex
10" Air dried paper cone
Amplifier
Inputs
60 Watt RMS
Stereo speaker level. Input impedance 47 kohm
Stereo line level input RCA phono. Input impedance 47 kohm
Mono line level input RCA phono (unfiltered). Input impedance 47 kohm
Outputs
Not available
Controls
Volume level, Low-pass crossover frequency (35-150 Hz), Polarity (0˚/180˚)
Frequency Range
38 - 150 Hz
Max. SPL
Power Consumption
Finish/dimensions
Weight ex. packing
109 dB
230 VAC 50-60 Hz, max. 100 Watt
Black ash. 38.0 x 32.6 x 41.4 cm.
15.8 kg / 33.0 lbs.
Enjoy your DALI AW 8/10!