1
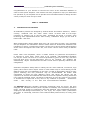
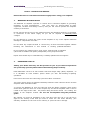
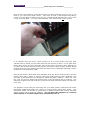
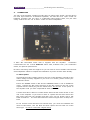
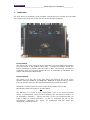
-1- BALDUR 70 _________________________triode _________________________triode tube power monoblocs___________ ::: mono tube triode power amplifier ::: We congratulate you with the purchase of this superb AUDIOVALVE - HiFi component. This handcrafted product has been manufactured according to your wishes, and will allow you many years of musical joy. AUDIO VALVE guarantees that this amplifier has been produced under the strictest manufacturing guidelines, established through decades of tube amplifier design. Your RKV headphone amplifier has been thoroughly tried and tested in all detail. -2- BALDUR 70 _________________________triode _________________________triode tube power monoblocs___________ List of contents Page PART 1 - Overview 1. The BALDUR 70 - silver and black 3 2. Introduction to AudioValve 4 3. Background to the BALDUR 70 5 4. The 6AS7G Valve and ABR circuit 5 5. The PCB 6 PART 2 – Instruction Manual 1. Warnings and precautions 7 2. Unpacking & set-up 7 3. Connection 8 - To mains power 9 - To/From Pre-amp (or other source) 10 - To Loudspeakers 10 4. Operation - Power Switch 11 - Operate Switch 11 - First Start-up 12 - 5. 6. 7. 11 Day-to-day Operation Changing Power Valves 12 12 - IMPORTANT safety warning 12 - Automatic Bias Regulator - function & interpretation 12 Technical Data 14 Warranty 15 -3- BALDUR 70 _________________________triode tube power monoblocs___________ Congratulations on your decision to become the owner of the AudioValve BALDUR 70 class-A triode power amplifier. This manual has been prepared to help you understand the operation of your amplifier and to provide some information about its design and the variety of ways in which it may be used. PART 1 – OVERVIEW 1. Introduction to AudioValve All AudioValve products are designed by Helmut Becker and feature advanced, modern circuitry, combined with the warm sweet sound of valves. Now it is no longer necessary to sacrifice one to get the other. Combining the finest in modern valve technology with sophisticated smart- bias circuitry, AudioValve brings you the best of both worlds - and more. With contemporarily-styled chassis built from 4 & 5 mm laser-cut steel, every amplifier and pre-amplifier we manufacture utilises double sided PC boards and automatic bias regulators to ensure a continuously uniform current flow to and a perfect match between all the valves throughout their entire life, even as the various valves decay at different rates. Unlike other valve amplifiers, where a certain amount of guesswork and experience is required to know when valves need to be replaced, with AudioValve amplifiers not only do valves not have to be removed prematurely (prior to burn out), but when burnt out does occur, only the bad valves need to be replaced. The amplifier will automatically adjust and distribute the total current flow to optimally match the new configuration. AudioValve amplifiers always deliver nothing but the most advanced, economical, high quality valve sound. Power output valves in most models may be varied among several different types with no modifications to the units, so that an appreciable degree of sonic system matching and user preference may be accommodated. No matter what combination of valves one uses (differing valves, new valves, old valves), one will experience at all times the balanced and coherent sound of amplifiers working with brand new, perfectly matched valves. The bonus is that there is never any need to use a meter or screwdriver to adjust bias on any valve in any condition of operation. AudioValve’s smart - bias circuitry is the best and most unobtrusive available! The BALDUR 70 power amplifier represents exceptional value for money. We have designed and manufactured this power amplifier to faithfully and accurately reproduce music. The high quality of components used and advanced valve operational principles employed in this design ensures that you will enjoy the superb audio performance and pride of ownership, inherent in such a hand-crafted product as this, for many years to come. BALDUR 70 _______________________triode _______________________triode tube power monoblocs___________ 2. Background to the BALDUR 70 In 2003 at the CES show in Las Vegas AudioValve’s customers and dealers made it abundantly clear that there was a requirement for a smaller version of the BALDUR 200 plus. Ideally this would offer the same sonic excellence as the 200 plus but in a smaller, less expensive package. AudioValve’s answer was the ‘baby’ BALDUR 70 Class-A triode monoblock power amplifier. The development of a baby BALDUR was rapid with its world premiere being at the ‘HighEnd-Show’ in Frankfurt-Germany later the same year! It achieves within a ‘whisker’ the ideal that the customers and dealers wanted. As you rarely, if ever, get something for nothing, some compromises had to be made, but these were surprisingly few. The BALDUR 70 uses half the complement of 6AS7G valves of the 200 plus which in turn halves power output to 75 watts per channel - still more than enough power to satisfy the vast majority of users and at a significantly lower cost! Damping factor is also reduced from the amazing 100 of the BALDUR 200 plus to 20 for the BALDUR 70. Nevertheless, this is a class leading performance, as the damping factor of competing valve amplifiers is not their strongest feature. This combination of power and damping factor means the BALDUR 70 is happy driving a wide range of loudspeakers whether dynamic, electrostatic or hybrid types. The high damping factor ensures strong, clean, taut and sharply outlined bass accompanied by a broad, deep soundstage and delicate, ‘velvety’ high’s that can only be obtained from pure triodes amplification. There is a clear family resemblance in the appearance of the two BALDURs. The 70 incorporates all of the design and constructional elements of its bigger brother and retains the Audio Valve hallmarks of safety, reliability, durability, low maintenance and ease of use that are familiar to all owners of AudioValve products since the first amplifier, the RKV, was launched over 20 years ago. 3. The 6AS7G Valve and ABR circuit The BALDUR 70 uses four 6AS7G dual triode power output valves. This valve was first used in the BALDUR 100 and is also used in the current BALDUR 200 plus. The 6AS7G is an exceptionally high performance triode when it is working optimally. However there are too many adjustments that need to be carried out for optimum performance to be maintained over time using a conventional biasing circuit. As a consequence the valve is rarely used and is relatively inexpensive. Traditionally, valve biasing is performed with a screwdriver to adjust the bias current to the valve. Any such adjustment can only be optimum for an instant as valves, even selected ones or a matched set, cannot hold a consistency of performance in the long term. Each valve will deteriorate individually and, if in a set, not necessarily in the same way as others in that set. A matched pair or quad will therefore only remain matched for a relatively short period of time! BALDUR 70 _______________________triode _______________________triode tube power monoblocs___________ Helmut Becker of AudioValve has developed a unique valve biasing circuit that automatically monitors, biases and controls each valve independently thereby maintaining any number of valves at their optimum performance level. These valves do not even have to be of the same type or condition. This is AudioValve’s Automatic Bias Regulator (ABR) circuit, a feature that AudioValve considers essential to deliver optimum performance from any multiple power valve amplifier and, in particular, to get the very best from the stunning 6AS7SG. AudioValve’s ABR therefore delivers a long awaited dream - to combine the operational convenience of solid-state amplifiers with the sonic benefits of pure triodes. True 21st century valve-technology! 4. The PCB All electronic components of the BALDUR 70 are mounted on one double sided mil-spec printed circuit board created from a pure copper covered panel using CAD/CAM software to produce a circuit board completely free from solder bridges or point-to-point wiring. All signal and power tracks are separated by grounding tracks to minimise cross-talk and noise and the overall construction is designed to ensure low microphony and excellent conductivity. The advantage of this approach is a consistency and reliability of performance and the certainty that all production examples of any AudioValve model will be exactly like its reference sample! This is in stark contrast to amplifiers that employ “hardwired” components, where the sonic outcome will depend upon the construction technician’s ability to solder all joints to a consistent standard and place the components in the same position and orientation as those of the reference sample to ensure consistency of interaction with other components. AudioValve’s PCB ensures that all components receive the same accuracy of assembly and that electro-dynamic interactions between components are constant in all aspects of the construction. Only the use of a well thought out and calculated printed circuit can achieve this. BALDUR 70 _______________________triode _______________________triode tube power monoblocs___________ PART 2 – INSTRUCTION MANUAL Please take time to read this manual thoroughly before using your amplifier 1. WARNINGS & PRECAUTIONS The BALDUR 70 amplifier operates in class-A and is therefore capable of generating moderate to high temperatures. This may have an adverse effect on other equipment, furniture and fittings close by and you will need to position the amplifier carefully to avoid this. Do not remove the top cover or the metal grille from this amplifier whilst it is in operation or connected to the mains supply as you will be exposed to potentially lethal voltages. Do not attempt to connect any input of this amplifier to any of its outputs otherwise damage to components will result. Do not earth any output terminal or connect any of these terminals together without following the instructions in this manual or seeking qualified assistance. Do not connect any voltage source, short circuit, earth/ground or appliance (other than a suitable Hi-Fi quality loudspeaker) to any output terminal. Repair work should only be undertaken by a suitably qualified service engineer. 2. UNPACKING & SET UP Ideally your dealer will carry out this process for you. If you wish to unpack and set-up the amp yourself please follow the following steps carefully. Each BALDUR70 comes in its own wooden crate and weighs 16kg (36lbs) unpacked, so it is advisable to have another person assist you with the following un-packing operations. First remove the lid to the crate using a pozi-drive No 2 screwdriver. The power output valves are packed individually inside the crate. Remove all four of these and place them somewhere safe! To remove the BALDUR 70 from its crate first undo the plastic wrapping. Each person should then grab the outer rim of the Perspex top and lift the amplifier until it can be rested on the edge of the crate. Any further lifting should be carried out holding the bottom of the amplifier chassis. Do not lift the amplifier using the protective grille! We suggest you leave all packaging in the crate and re-fix the top so you can use it again in the unlikely event that you need to return the unit under warranty (see warranty conditions at the end of the manual) or place the unit in storage. BALDUR 70 _______________________triode _______________________triode tube power monoblocs___________ Next remove the protective grille and Perspex top plate assembly from the top of the amp so you can fit the power valves. This cover is fixed to the Perspex top plate by screws. This top plate is fixed to the amp by 4 round smooth topped bolts, one in each corner of the top plate. To remove the assembly, undo these bolts, not the screws. It is possible that the driver valves already on the circuit board may have been vibrated loose in transit, so first check that they are securely in place - if not, push them firmly home. Once you have done this, remove the power valves from their packing one at a time and fit them into the vacant sockets. Take care to align the pins correctly before pushing them fully into position otherwise the socket may be damaged requiring a return of the unit to the factory for repair. Once all four power valves have been installed, clean any finger marks off them and the driver valves with a tissue or lint-free cloth and replace the top plate assembly. This assembly is decoupled from the amplifier’s chassis by plastic washers. When you re-fit the cover do not over-tighten the knurled nuts or the decoupling will be reduced. It is sufficient to tighten the nuts until they touch the top plate and then tighten one half-turn more only. The amplifier is now ready for connecting into your audio system. Experience has shown that these amplifiers benefit from resting on a solid surface rather than carpet. Your AudioValve dealer will be able to recommend a suitable support that ensures adequate airflow around and through the amplifier. Do not place this amplifier in a position where liquids or any hard objects may accidentally enter it. BALDUR 70 _______________________triode _______________________triode tube power monoblocs___________ 3. CONNECTION The rear of the amplifier contains one IEC 230v AC mains input socket, one RCA phono line level input socket for un-balanced operation, one XLR line level input socket for balanced operation and two pairs of loudspeaker cable binding posts, one pair each clearly marked for the use of either 4 ohm or 8 ohm loudspeakers. A basic IEC terminated mains lead is supplied with the amplifier. AudioValve recommends the use of their BMC Pro mains lead, available from your AudioValve dealer, for optimum performance. No other connecting leads are supplied so you will need to source suitable interconnects and loudspeaker cables to complete the installation if you do not have them already. To mains power Check that the mains voltage printed on the rear of this amplifier is similar to the mains voltage normally supplied to your area. If in doubt, please consult your AudioValve dealer. Ensure the POWER switch is OFF and the OPERATE switch is set to STAND-BY mode. Connect the IEC power lead plug to the IEC socket on the rear of the amplifier and the mains plug into the mains socket. Do not turn on the power to the amplifier until you have completed all other connections. A mains rated fuse is fitted in a small drawer within the IEC mains socket on the rear of the amplifier. If you need to check or replace this fuse first remove the IEC power lead from the amplifier and then lever out the drawer with a flat blade screwdriver. The fuse fitted should be rated no higher than 10 amp slowblow. In the unusual event that this fuse should blow, you must first establish the cause of this failure, cure the fault and then replace the fuse with one of the same type. Do not fit a fuse with a higher rating. BALDUR 70 _______________________triode _______________________triode tube power monoblocs___________ To/From Pre-amp (or other source) Attach either a RCA phono plug terminated interconnect cable from your preamplifier output to the phono socket on the BALDUR 70 OR an XLR terminated interconnect from your pre-amp to the XLR socket on the BALDUR 70 Do not operate the amplifier with both RCA phono and XLR cables connected at the same time. It is possible to connect any line level source directly to the BALDUR 70 using either RCA phono or XLR inputs as long as that source has some means of controlling its output level (volume). Always reduce the volume of such a source to minimum before switching the BALDUR 70 to OPERATE mode (see below). AudioValve recommends balanced operation using XLR terminated interconnects wherever possible for optimum performance. The AudioValve EKLIPSE pre-amp is an ideal partner for the BALDUR 70 in this respect. To Loudspeakers Determine whether your loudspeakers are nominally of a 4 ohm impedance or 8 ohm impedance. If in doubt, you should consult your loudspeaker handbook or manufacturer. Connect the loudspeaker + ive terminal via a suitable loudspeaker cable to the appropriate 4 ohm or 8 ohm + ive terminal on the amplifier. Do the same thing for the – ive terminal of the loudspeaker and amplifier. This ensures that the correct polarity is used at both the loudspeaker and amplifier terminations. If you get this wrong no harm will come to the loudspeaker or amplifier but the sound will be out of phase resulting in poor sound quality with vague imaging and ‘wooly’ sounding bass. If you suspect that you have connected your system in this way, reverse the connections at the terminals of one l oudspeaker only. Alternatively contact your AudioValve dealer to obtain one of the system setup recordings available on LP or CD which will help you to identify and correct this problem. Finally, examine the quality of the connections to ensure optimum performance and reliability of operation. In particular, check that the connections are tight, but do not over tighten with excessive use of spanners etc. If bare wires are used, make sure that no loose strands of wire short across to the other terminals or the amplifier chassis. When using plugs, such as Banana plugs, be sure to use those of good quality with a firm fit. The BALDUR 70 is now ready for operation BALDUR 70 _______________________triode _______________________triode tube power monoblocs___________ 4. OPERATION The front panel of the Baldur power amplifier incorporates two switches and two LEDs. The switches control the day to day function of the amplifier as follows: Power Switch This heavy duty rocker switch is at the right side of the front panel and switches the mains power of the amplifier ON or OFF. The LED immediately beside the switch illuminates to indicate that the power is ON. The BALDUR 70 draws a moderately high current when switched on so it is inadvisable to repeatedly and rapidly switch between ON and OFF. Operate Switch This switch is on the left of the front panel and switches the mode of the amplifier between STAND BY and OPERATE. OPERATE is engaged with the switch in the up position with the LED immediately beside the switch illuminated. STAND-BY is selected with the switch in the down position and the LED immediately beside the switch is not illuminated. The BALDUR 70 is more or less indestructible, even if you short-circuit the output, or inadvertently, leave it running without load. This resilience applies to all AudioValve amplifiers. Having said that, we do not recommend that you make a habit of careless operation! In fact to maximize the life of the components, particularly the valves, we recommend that you follow the operational procedures below. BALDUR 70 _______________________triode _______________________triode tube power monoblocs___________ First start up Ensure that the POWER switch is OFF and the amplifier is in STAND-BY mode. Connect the power lead and switch on at the mains socket. Switch the POWER switch on the face plate to ON. Let the amplifier warm up for about an hour. Now switch the STAND-BY switch to OPERATE. As the valves and circuit components heat up you may notice the smell of hot electrical components (but should not see smoke!). This is normal and can persist for a number of days, getting less in extent as the time passes. Day-to-day operation When you have finished using the amplifier for the day turn the OPERATE switch to STAND-BY mode. If you are planning to not use the amplifier for some days it is advisable to turn the POWER switch to OFF also. When you return, switch the POWER switch to ON. Let the amp warm up for at least 15 minutes before switching from STAND-BY to OPERATE. This method of operation minimizes thermal shock and will maximize the life of your BALDUR 70s. Please note that the OPERATE switch has to be in OPERATE mode before you attempt to listen to music. Some preamplifiers and source components produce large switching pulses when turned on which causes a loud click through the loudspeakers. For this reason, you should turn on all other equipment in your system before switching the BALDUR 70 into OPERATE mode. The BALDUR 70 does not cause this problem itself. For similar reasons, do not disconnect any input or output connection while the amplifier is operating. 5. CHANGING POWER VALVES IMPORTANT before changing a valve you must remove the mains lead from the IEC socket and allow the valves to cool down. Touching a hot valve can cause very serious burns. Standard valve type: 6AS7G dual triode - SOVTEK or SWETLANA The BALDUR 70 will only accept the 6AS7G as power tube. BALDUR 70 _______________________triode _______________________triode tube power monoblocs___________ Automatic Bias Regulator (ABR ) function and interpretation Each power valve is controlled by an ABR for each circuit within the valve. There are two circuits in each 6AS7G valve. There are three LEDs beside each power valve circuit. These LED`s indicate the status of the valve when the amplifier is in OPERATE mode and will light if the valve malfunctions in some way. There are two LEDs for each circuit within the valve (numbers 1 & 2 in the photo below) plus one to indicate stand-by mode (number 3 in the photo below). In total there will be six LEDs surrounding each valve as there are two triode circuits per valve. If a power valve in the BALDUR 70 falls in performance to the point where it needs to be changed, the appropriate ABR circuit will indicate this by lighting LEDs 1 & 2 next to the valve that needs replacing. Exchange the faulty valve for a suitable replacement from the list above. You need only exchange the faulty valve as the ABR automatically adjusts the interrelationship between the valves to give optimum sound. AudioValve will supply individual replacement valves (or complete sets valves) through its distributors at an extremely competitive price. of Once you have changed the faulty power valve the LEDs should go out. If this or any other of the LEDs remains lit, turn the amp off at the POWER switch and contact your AudioValve dealer. Under normal operating conditions none of the LEDs are lit, athough: o if the amplifier is in STAND BY mode, LED number 3 will light up, and o when the amplifier is being driven to very high output levels it is normal for the LEDs 1 & 2 that monitor the valve circuits to simultaneously light dimly. BALDUR 70 _______________________triode _______________________triode tube power monoblocs___________ 6. TECHNICAL DATA Power supply: 100-245 Volt Power consumption /amp: 250 Watt Valves: 4 x 6AS7G, 1 x ECC83, 1 x ECC82, 2 x 6N6P Push-Pull – Concept: class A Max Output / ch: THD 75 Watt (8 ohm load, 1% dist.) at rated output: Power 0.3% ( 50Watt/100Hz - 1KHz – 10KHz) bandwidth: 10Hz – 50KHz (8Ohm load) Damping factor: 20 (output Z= 0.4 Ohm) Input sensitivity: 0 dBm ( 775 mV) Automatic Bias Regulation: Yes, on all power valve-triodes Version Standard - Black. Also Silver edition available Weight: W: 325 mm x D: 385 mm x H: 300 mm Dimensions with packaging: 16 Kg W: 450 mm x D: 525 mm x H: 500 mm: BALDUR 70 _______________________triode _______________________triode tube power monoblocs___________ monoblocs___________ WARRANTY AUDIO VALVE warrants its products for a three-year period on all electronics and a 90day period on the valves from the purchase date. This warranty is restricted to the original purchaser. In the event of a failure of your amplifier, AudioValve will repair or readjust this unit or, should the occasion arise, will replace it provided that all warranty conditions are met. In order to initiate service of any kind it is necessary to obtain distributor or dealer authorisation prior to shipping the unit to AudioValve or one of its distributors. Any of the following conditions shall void the warranty: Operation not in accordance with this manual. Abuse, accidental damage or unauthorized modifications, determined by AudioValve or its agents exclusively. Removal, defacing or falsifying of the serial numbers. Shipping without the original complete factory crates. WARRANTY REGISTRATION Please fill out, detach and return this warranty form to the distributor within fifteen days of the purchase date or register online at our website, www.audi oval ve.info ----------------------------------------------------------------------------------------------------------MODEL : SERIAL NUMBER : PURCHASE DATE : AUTHORIZED AUDIO - VALVE DEALER: PURCHASER`S NAME : STREET ADDRESS : POSTAL CODE : Send to your dealer: BALDUR 70 _______________________triode _______________________triode tube power monoblocs___________ CE – Confirmity Declaration Of Conformity Manufacturer: AudioValve, Germany, 34123 KASSEL, Umbachsweg 70, [email protected] Product Name: CONDUCTOups, das ist heftih Product Type: Audio Amplifier Complies with Standards: LVD: 92/31/EEC, 93/68/EEC, & 73/23/EWG Safety: EN60065 EMC: EN55013, EN55020, EN55022, EN55103, EN61000-3-2, & EN61000-3-3 The official Declaration of Conformity for this product is kept on file at: AudioValve, 34123 Kassel,Umbachsweg 70, Tel. 05617013360 0561 - 701 33 60 0160 910 77 376 0561 – 60 2929 3 [email protected] www.audiovalve.info Fa. Helmut Becker Produktion Marken: AUDIOVALVE & BE-TEC Umbachsweg 70 34 123 KASSEL - Germany U-St.Ident.Nr.: 195 191 420 WEEE-Reg.Nr.: DE81178274 Gerichtsstand: Kassel BALDUR 70 _______________________triode _______________________triode tube power monoblocs___________ :: AUDIOVALVE – ORIGINAL CERTIFICATE of technical and sound testing :: CLIENT: Ser.-Nr. Modell: RKV - MARK II Datum: Mechanische Baugruppen Gehäuseaufbau / Front-Teile fest ?! c lackierte Teile alle ohne Kratzer c gedruckte Blenden fehlerfrei c Pfosten im Winkel c Prüfer: Börger c Markgraf c Technische Baugruppen Optische Leiterplattenprüfung vor Einbau c Sitz aller Kabel, zugfest und isoliert c Prüfer: Börger c Markgraf c Alle Gleichspannungen gemessen c Signale linker & rechter Kanal c Geräusche am Scop gemessen c Balance (nach rechts-rechts mehr) c log. Lautstärke ok ? c Knöpfe einwandfrei und richtig vor Skala ? c Eingänge / Ausgänge, Cinch/XLR/crossfeed c Relais und Empfindlichkeiten c Fernbedienung c Rechteck anschauen unter 100 Ohm Last c Lautsprecherklemmen testen c Prüfer: Börger c Markgraf c Äusserliche Sichtprüfung c lose Teile c fehlende Schrauben c keine Kratzer, Lack & Oberglas c Sitz aller Muttern / Schrauben oben / unten c Federleisten, Blenden, Seiten - fest c Prüfer: Börger c Markgraf c Elektronik Optische Endkontrolle Seriennummer, CE Sticker dran ? Meßtechnischer Teil: Hochspannung Soll Referenzspg 175 VDC Signalspannungen Änderungen 1) 15.11.2012 links rechts c c c c c c c c Alle Eingänge c c Ausgang 1+2 c c alle OP Spg. ok Gleichspg c - 6,3V / +24V keine Bekannt