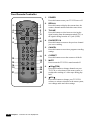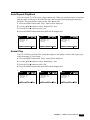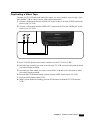
1
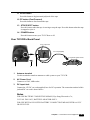
INSTRUCTION MANUAL
TV/VCR COMBINATION
DVQ
9H1FC
CAUTION
RISK OF ELECTRIC SHOCK
DO NOT OPEN
CAUTION : TO REDUCE THE RISK OF ELECTRIC SHOCK,
DO NOT REMOVE COVER (OR BACK)
NO USER-SERVICEABLE PARTS INSIDE.
REFER SERVICING TO QUALIFIED SERVICE PERSONNEL.
The lightning flash with arrowhead symbol, within an equilateral triangle, is intended to alert the user to the presence of uninsulated “dangerous voltage” within the
product’s enclosure that may be of sufficient magnitude to constitute a risk electric
shock.
The exclamation point within an equilateral triangle is intended to alert the user to
the presence of important operating and servicing instructions in the literature
accompanying the appliance.
WARNING
TO PREVENT FIRE OR SHOCK HAZARD, DO NOT EXPOSE THIS APPLIANCE TO RAIN OR
MOISTURE.
CAUTION
CHANGES OR MODIFICATIONS NOT EXPRESSLY APPROVED BY THE MANUFACTURER
COULD VOID THE USER’S AUTHORITY TO OPERATE THE EQUIPMENT.
NOTE TO CATV SYSTEM INSTALLER
THIS REMINDER IS PROVIDED TO CALL THE CATV SYSTEM INSTALLER'S ATTENTION
TO ARTICLE 820-40 OF THE NEC THAT PROVIDES GUIDELINES FOR PROPER GROUNDING AND, IN PARTICULAR, SPECIFIES THAT THE CABLE GROUND SHALL BE CONNECTED TO THE GROUNDING SYSTEM OF THE BUILDING, AS CLOSE TO THE POINT OF
CABLE ENTRY AS PRACTICAL.
CAUTION
The AC power cord provided with this product is polarized (one blade wider than the other).
To prevent electrical shock, match wide blade of plug to wide slot, fully insert the AC plug into a
standard 120V~, 60Hz polarized outlet.
NOTE
Never connect the plug to an electrical source other than one providing 120V~ 60Hz power. Use only
the attached power cord. If the polarized AC cord does not fit into a non-polarized outlet, do not cut or
file the blade. You are responsible for having the obsolete outlet replaced with a polarized outlet.
If you feel a static discharge when touching the unit, and the unit does not function, simply unplug the
unit from the outlet. When you plug the unit back in, it should work normally.
Do not install power cords near any heating element or cooking appliances.
SAFETY PRECAUTIONS
LOCATION
For safe operation and satisfactory performance of your unit,
keep the following in mind when selecting a place for its installation :
• Never leave the TV/VCR in areas exposed to temperature
extremes or strong direct sunlight. Leaving it in closed car, in
direct sunlight, near a heater, etc. can cause deformation of
the case.
• Avoid dusty or humid place.
• Avoid place with insufficient ventilation for proper heat dissipation. Do not block the ventilation holes at the top and bottom of the unit. Do not place the unit on a carpet because this
will block the ventilation holes.
• Install the unit in a horizontal position.
• Avoid locations subject to strong vibration.
• Do not place the unit near strong magnetic fields.
• Do not move the unit from a cold place to a hot place or vice
versa(see the warning below).
HANDLE WITH CARE
• Do not handle the power cord with wet hands.
• Do not pull on the power cord when disconnecting it from an
AC wall outlet. Grasp it by plug.
• If, by accident, water is spilled on your unit, unplug the
power cord immediately and take the unit to an authorized
DAEWOO service center for servicing.
• Do not put your fingers or objects into the TV/VCR cassette
holder.
• Do not place anything directly on the top of the unit.
WARNING
Moisture condensation may occur inside the unit when it is
moved from a cold place to a warm place, after heating in a
cold room, or under conditions of high humidity. If a tape is
played in a TV/VCR that has moisture, it may damage the tape
and TV/VCR. When condensation occurs inside the unit, turn
the power on and allow at least 2 hours for the unit to dry. This
equipment is not operated under conditions of high humidity.
FCC WARNING
This equipment may generate or use radio frequency energy.
Changes or modifications to this equipment may cause harmful
interference unless the modifications are expressly approved in
the instruction manual..
The user could lose the authority to operate this equipment if
an unauthorized change or modification is made.
IMPORTANT COPYRIGHT INFORMATION
Unauthorized recording or use of broadcast television programming, video tape, film, or other copyrighted material may
violate applicable copyright laws. We assume no responsibility
for the unauthorized duplication, use or other acts which
infringe upon the rights of copyright owners.
IMPORTANT NOTES:
• The unit is designed for use with a 12V DC automotive
power supply. Never use it in a truck, bus, or any othe car that
has a 24V power supply.
• Be sure to stop your car in a safe area before watching or
adjusting the TV/VCR.
• Operating the TV/VCR for a long time with the engine of
your car stopped can run down your car’s battery.
• Should the TV/VCR ever begin to emit smoke, abnormal
odor, or a strange noise, immediately turn off power and
unplug the unit from the cigarette lighter socket. Continued
use of the TV/VCR under any of these conditions creates the
danger of fire and electric shock.
• Do not continue to use the TV/VCR if it is malfunctioning
and does not produce a video image or sound. Whenever you
notice such symptoms, immediately turn off power, unplug
the TV/VCR from the cigarette lighter socket. Continued use
of the TV/VCR creates the danger of fire and electric shock.
• When you leave your car unattended for long periods, be sure
to unplug the TV/VCR from the cigarette lighter socket.
Leaving the TV/VCR plugged in can run down the car’s battery.
INSTALL THE TV/VCR IN YOUR CAR
• For a car equipped with air bags, be sure to follow the manufacturer’s instructions whenever performing any electrical
wiring work. Incorrect wiring can cause the air bag system of
a car malfunction.
• Never cut the insulation form the power supply lead in an
attempt to draw power for another device. Doing so can overload the current capacity of the lead, creating the danger of
fire and electric shock.
• For proper installation and wiring, special technical knowledge is required. If you have any doubts about where to position or how to install components, contact the retailer where
you purchased the product, your automobile dealership, or an
automotive service provider. Note that you will be charged
separately for installation work.
• Improper installation creates the danger of fire and accident.
• Avoid installation in areas subject to strong vibration and
areas where secure anchoring cannot be achieved.
Components installed in such areas can work loose, creating
the danger of accident and personal injury.
• Never install the TV/VCR on the dashboard or in any other
location where it obstructs forward vision. Items that obstruct
forward vision in a motor car may be illegal. Improper installation creates the danger of traffic accident and personal
injury.
• Never attach the stand to the roof of your car. Doing so creates the danger of the TV/VCR falling down.
• Never attach the stand to a sharply angled surface or to a surface that causes the TV/VCR to face downloads. Such installation can cause the TV/VCR to fall.
• Be sure to turn the ignition key of the car to the “OFF” position before connecting or disconnecting wires and cables.
Failure to do so creates the danger of electric shock and personal injury.
DRIVING SAFETY
• Never watch the TV/VCR or try to adjust settings while driving. Doing so creates the danger of traffic accident. Before
operating the TV/VCR, be sure to stop the car in a safe area..
• Make sure all cables are bundled together so they do not
interfere with car operation, as described in this manual.
Improperly installed cables create the danger of entanglement
with the steering wheel, shift lever, brake pedal, etc.
S A F E T Y
IMPORTANT SAFEGUARDS
PLEASE READ ALL THESE INSTRUCTIONS REGARDING YOUR TELEVISION EQUIPMENT
AND RETAIN FOR FUTURE REFERENCE. FOLLOW ALL WARNINGS AND INSTRUCTIONS
MARKED ON THE TV RECEIVER.
1 Read all of these instructions.
2 Save these instructions for later use.
3 Unplug this television equipment from the
wall outlet before cleaning. Do not use liquid
cleaners or aerosol cleaners. Use a damp
cloth for cleaning.
4 Do not use attachments not recommended by
the television equipment manufacturer as
they may result in the risk of fire, electric
shock or other personal injury.
5 Do not use this television equipment near
water, for example, near a bathtub, washbowl, kitchen sink, or laundry tub, in a wet
basement, or near a swimming pool, or the
like.
6 Do not place this television equipment on an
unstable cart, stand, or table. The television
equipment may fall, causing serious injury to
a child or adult, and serious damage to the
equipment. Use only with a cart or stand recommended by the manufacturer, or sold with
the television equipment. Wall or shelf
mounting should follow the manufacturer's
instructions, and should use a mounting kit
approved by the manufacturer.
6A An appliance and cart combination should be
moved with care. Quick stops, excessive
force, and uneven surfaces may cause the
appliance and cart combination to overturn.
PORTABLE CART WARNING
S3126A
7 Slots and openings in the cabinet and the
back or bottom are provided for ventilation
and to ensure reliable operation of the television equipment; and to protect it from overheating, these opening, must not be blocked
or covered. The opening should never be
blocked by placing the television equipment
on a bed, sofa, rug, or other similar surface.
(This equipment should never be placed near
or over a radiator or heat register.) This television equipment should not be placed in a
built-in installation such as a bookcase
unless proper ventilation is provided.
8 This television equipment should be operated only from the type of power source indicated on the marking label. If you are not
sure of the type of power supplied to your
home, consult your television dealer or local
power company.
9 This television equipment is equipped with a
polarized alternating current line plug (a plug
having one blade wider than the other). This
plug will fit into the power outlet only one
way. This is a safety feature. If you are
unable to insert the plug fully into the outlet,
try reversing the plug. If the plug should still
fail to fit, contact your electrician to replace
your obsolete outlet. Do not defeat the safety
purpose of the polarized plug.
10 Do not allow anything to rest on the power
cord. Do not locate this television equipment
where the cord will be abused by persons
walking on it.
11 Follow all warnings and instructions marked
on the television equipment.
12 For added protection for this television
equipment during a lightning storm, or when
it is left unattended and unused for long periods of time, unplug it from the wall outlet
and disconnect the antenna or cable system.
This will prevent damage to the equipment
due to lightning and power-line surges.
13 An outside antenna system should not be
located in the vicinity of overhead power
lines or other electric light or power circuits,
or where it can fall into such power lines or
circuits. When installing an outside antenna
system, extreme care should be taken to
keep from touching such power lines or circuits as contact with them might be fatal.
14 Do not overload wall outlets and extension
cords as this can result in fire or electric
shock.
15 Never push objects of any kind into this television equipment through openings as they
may touch dangerous voltage points or
short-out parts that could result in a fire or
electric shock. Never spill liquid of any kind
on the television equipment.
16 Do not attempt to service this television
equipment yourself as opening or removing
covers may expose you to dangerous voltage or other hazards. Refer all servicing to
qualified service personnel.
17 Unplug this television equipment from the
wall outlet and refer servicing to qualified
service personnel under the following conditions:
(a) When the power-supply cord or plug is
damaged or frayed.
(b) If liquid has been spilled, or objects have
fallen into the television equipment.
(c) If the television equipment has been exposed
to rain or water.
(d) If the television equipment does not operate
normally by following the operating instructions. Adjust only those controls that are covered by the operating instructions as an
improper adjustment of other controls may
result in damage and will often require extensive work by a qualified technician to restore
the TV receiver to its normal operation.
(e) If the television equipment has been dropped or
the cabinet has been damaged.
(f) When the television equipment exhibits a
distinct change in performance - this indicates a need for service.
18 When replacement parts are required, be
sure the service technician has used replacement parts specified by the manufacturer
that have the same characteristics as the
original part. Unauthorized substitutions
may result in fire, electric shock or other
hazards.
19 Upon completion of any service or repairs to
this television equipment, ask the service
technician to perform safety checks to determine that the television is in a safe operating
condition.
20 If an outside antenna or cable system is connected to the television receiver, be sure the
antenna or cable system is grounded so as to
provided some protection against voltage
surges and built-up static charges.
Section 810 of the National Electrical Code,
ANSI/NFPA N0.70-1984, provides information with respect to proper grounding of the
mast and supporting structure, grounding of
the lead-in wire to an antenna discharge unit,
size of grounding conductors, location of
antenna-discharge unit, connection to
grounding electrodes, and requirements for
the grounding electrode.
CONTENTS
Table of Contents
Preface : Your New TV/VCR
Features
Unpacking Your TV/VCR
Chapter 1 : Overview of Your Equipment
Your TV/VCR’s Front Panel
Your TV/VCR’s Back Panel
Your Remote Controller
Chapter 2 : Connecting an Antenna or Cable to Your TV/VCR
Connecting an Antenna
Connecting a Cable System
Connecting Other Pieces of Equipment
Safety Notes
Chapter 3 : Operating Your TV
Turning Your TV/VCR On
Programming Your TV/VCR’s Channel Memory
Changing channels
Changing the Volume
Changing the TV/VCR’s Channel Memory
Displaying the TV/VCR’s Status during TV operation
Adjusting Video Settings
Chapter 4 : Operating Your VCR
Video Cassette Tapes
Playing a Tape
Basic Recording
One Touch Recording (OTR)
Displaying the TV/VCR’s Status during VCR Operation
Using the Counter (Zero Stop)
Chapter 5 : Using Timer Functions
Setting the Clock Automatically
Setting the Clock Manually
Setting the On Time
Setting the Off Time
Canceling the On Time or Off Time
Setting the Sleep Timer
Chapter 6 : Additional TV Features
Changing the Language of the On-Screen Menus
Captioning
CC on Mute
Power Restore
Parental Control Settings
Description of Parental Control Settings
Mini Glossary
Chapter 7 : Additional VCR Features
Programming to Record at a Later Time
Setting the Program Recording
Canceling the Program Record Settings
Displaying the Tape Counter
Auto Repeat PlayBack
Rental Play
Index Search (VISS)
Duplicating a Video Tape
Chapter 8 : Troubleshooting
Mainternance and specifications
Warranty
2
2
3
4
4
5
6
9
9
11
12
12
13
13
13
14
14
15
15
16
18
18
19
20
21
22
23
24
24
25
26
26
27
28
29
29
29
30
30
31
32
33
34
34
35
37
38
39
39
40
41
42
43
44
Table of Contents
1
P R E FA C E
Your New TV/VCR
Congratulations on your purchase of a new Daewoo TV/VCR. We hope you find that your
new TV/VCR provides you with years of reliable performance.
Your new TV/VCR is designed and engineered to provide you with the latest in features for
your convenience. Listed below are just a few of the many features of your equipment.
Features
• Auto Power On
This feature automatically turns the TV/VCR on when you insert a cassette.
• On-screen Programming
You can use simple on-screen menus to perform all of the major operating features of your
TV/VCR, including programming to record.
• Tri-lingual Menus
You can choose to display the on-screen menus in English, French or Spanish.
• Auto Clock Setting
Your TV/VCR can automatically set its internal clock based on a signal from local PBS stations.
• 120V AC or 12V DC Operation
This TV/VCR is designed to operate from household AC current or from a 12V DC car cigarette lighter socket.
• 181 Channel Capability
Your TV/VCR has a advanced tuner that can receive up to 181 channels.
• Closed Caption Decoder
Your TV/VCR can decode the hidden text and captions that are broadcast with many shows
and are included on many videotapes.
• Record/Playback Speeds
Your TV/VCR can recording to two speeds(SP, EP), playback to three speeds (SP, LP, EP).
SP(Standard Play), LP(Long Play), EP (Extend Play)
• Automatic Playback Speed Selection
Your TV/VCR will automatically play a pre-recorded tape at the correct speed.
• Still Frame Capability
Your TV/VCR can display a single frame from a video tape.
• Rental Play Mode
This special setting improves the playback quality of worn tapes, especially rental tapes.
• Repeat Playback
You can set your TV/VCR to automatically repeat an entire video tape, or to repeat the
recorded part of a videotape.
2
Preface : Your New TV/VCR
• Video Index Search System (VISS)
This feature allows you to find index marks on your tape quickly. Your TV/VCR places
index marks at the beginning of each new recording.
• One Touch Recording (OTR)
You can quickly begin recording and set the length of time to record using just one button.
• 6 Events / 1 Month Timer Recording
You can program up to six different recording sessions up to a month in advance.
• Daily / Weekly Recording
You can easily set your VCR to record every day at the same time, or to record every week
at the same time.
• Sleep Timer
You can set your TV/VCR to turn off after a certain amount of time passes, from 15 minutes to 120 minutes.
• On Timer
You can set your TV/VCR to turn on at a certain time.
• Parental Control
Parental control is on the 31 page.
Unpacking Your TV/VCR
The following items are included with your TV/VCR. If these items are missing, please contact your Daewoo dealer immediately.
1 A remote control
2 A 300-ohm/75-ohm adaptor
3 A rod antenna (“rabbit ears”)
4 DC Car Cord
2
VO
L
CH
R-39
N0
1
VIS
S
FF
SLOW
0 AT
K
PL
AY
PA
US
E/S
TIL
L
ST
OP
SLEE
D
RE
W
RE
C/O
TR
8
1
4
7
3
VIS
S
5
VO
L
2
9
6
3
E CH
RIT
VO
ET
FA
ES
C-R
ME
NU
RE
CA
LL
TV
CH
/LIN
E
CA
NC
MU
EL
TE
PO
WER
1
4
Preface : Your New TV/VCR
3
CHAPTER
1
Overview of Your Equipment
Your TV/VCR’s comes with a remote control. The section below summarizes the buttons,
controls, and terminals that will use with your TV/VCR’s.
Your TV/VCR's Front Panel
Below you will find short description of the buttons and indicators on the front panel. These
are use following functions.
1 VIDEO in jack
Use this jack to receive a video signal from another A/V component.
2 AUDIO in jack
Use this jack to receive a audio signal from another A/V component.
3 EAR PHONE jack
Use this jack to the earphone (not supplied). The sound from the speaker is turned off.
x buttons (channel)
4 yCHx
Press these buttons to change channels on your TV/VCR. You will also use these buttons
to adjust the tracking.
B buttons (volume)
5 CVOLB
Press these buttons to change your TV/VCR’s volume.
6 Remote control receiver
This receiver receives a signal from your remote control. Do not block it.
7 STAND-BY(red) indicator
This indicator light up when the power is off.
8 REC/T.REC (red/green) indicator
This indicator light up red when recording and light up green when timer program operating.
9 REC button
Press this button to begin recording. Press repeatedly to set a recoding time using
One-Touch Recording (OTR).
10 REW button
Press this button to rewind the tape.
4
Chapter 1 : Overview of Your Equipment
11 PLAY button
Press this button to begin normal palyback of the tape.
12 FF button (Fast Forward)
Press this button to fast forward the tape.
13 STOP/EJECT button
Press this button when the tape is moving to stop the tape. Press this button when the tape
is stopped to eject it.
14 POWER button
Press this button to turn your TV/VCR on or off.
Your TV/VCR’s Back Panel
To DC Input Jack
Car Cord(supplied)
To Cigarette Lighter Socket
1
2
3
1
Antenna terminal
Use this terminal to attach an antenna or cable system to your TV/VCR.
2
AC Power Cord
Connect to a 120V, 60Hz outlet.
3
DC Input Jack
Connect the 12V DC car cord(supplied) here for DC operation. The connection method of this
jack and DC car cord is shown above.
Notes
FOR USE BATTERY CONNECTING MEANS, Hyo Sung Electronics Co.,
CAT. NO. DLP-1033, BATTERY ADAPTOR ONLY.
FOR USE WITH ANY LISTED BATTERY CONNECTING MEANS WITH 8A 125V
OR 250V FUSE.
Chapter 1 : Overview of Your Equipment
5
Your Remote Controller
TV/LINE
FAVORITE CH
4
6
CANCEL
C-RESET
MUTE
CH
MENU
9
POWER
Press this button to turn your TV/VCR on or off.
2.
RECALL
Press this button to display the current time, the
counter, channel number and other status items.
3.
TV/LINE
Press this button to select between viewing the
signal coming from the antenna terminal (TV) or
the signal coming from the A/V jack (LINE).
4.
FAVORITE CH
Press this button to return to the previous channel
you were watching.
5.
CANCEL
Press this button to erase timer program recording
settings.
6.
C-RESET
Press this button to reset the counter to 0:00:00.
14
17
7.
MUTE
Press to turn the TV/VCR’s sound on and off.
18
20
8.
yCHx
x(TRK)
Press these buttons to change channels on your
TV/VCR, or select items in the menu system, or
to adjust the tracking of a video tape during playback.
9.
CVOLB
B
Press these buttons to change your TV/VCR’s
volume, to activate selections in the menu system,
or to change audio and video settings.
POWER
RECALL
2
1.
1
3
5
7
8
9
VOL
VOL
10
8
CH
1
2
3
4
5
6
7
8
9
11
SPEED
0 ATK
C-ØSTOP
REW
PLAY
FF
12
15
16
19
REC/OTR STOP/EJECT PAUSE/STILL
VISS
VISS
21
6
Chapter 1 : Overview of Your Equipment
13
22
10. MENU
Press this button to turn the TV/VCR’s menu system on and off.
11. 0-9
Press these buttons to change channels.
12. SPEED
Press this button to select the SP, EP tape speed when the tape recording.
13. C-OSTOP
Press this button to find the counter zero.
14. 0(ATK)
Press this button to automatically set tracking point when the tape playback.
15. REW
Press this button to rewind the tape.
17. FF button (Fast Forward)
Press this button to fast forward the tape.
18. PAUSE/STILL
Press to temporarily stop the tape during recording or playback.
19. REC/OTR
Press this button to begin recording. Press repeatedly to set a recording time using
One-Touch Recording (OTR)
20. STOP/EJECT
Press this button when the tape is moving to stop the tape. Press this button when the tape
is stopped to eject it.
21. VISS Press this button to find the most recent index mark on tape and begin playing.
22. VISS +
Press this button to find the next index mark on tape and begin playing.
Chapter 1 : Overview of Your Equipment
7
Installing Your Remote Control Batteries
1. Open the battery compartment on the back of the remote control.
2. Install two AAA-size batteries (not included) as shown. Make sure the “+” and “-” terminals
are oriented correctly.
3. Replace the cover.
Notes
Do not mix different types of batteries together or old batteries with fresh ones.
Remove and replace weak batteries. Weak batteries can leak and damage your controller.
Dispose of batteries properly; never throw them into a fire.
Point your remote at the receiver on the center of the front of the TV/VCR. Make sure the
receiver is not blocked.
The remote control can operate up to 30 feet away from the TV/VCR, if you are directly facing the front of the TV/VCR. Operating distance diminishes as you move to the sides of the
TV/VCR.
To use DC power
By using the DC car cord supplied with the TV/VCR, you can operate this TV/VCR from a
cigarette lighter socket in any car that utilizes a negative ground system.
The fused 12V DC car cord has been designed to power the set from the external DC power
(12 volt negative ground) through the TV/VCR DC Input jack.
If the fuse in the car cord plug blows, replace it with a new 8 A fuse (Fast Blow Type) as
shown below. Unscrew the tip of the plug to remove.
Notes
Always turn off TV/VCR first before switch ON or OFF the ignition of car engine.
Make sure that the negative terminal of the battery is grounded.
When the TV/VCR is not in use, always disconnect it from the car cigarette lighter socket to
avoid a battery drain.
Do not operate the TV/VCR if the car battery is weak. Peak current from the car alternator
could blow the DC fuse.
Check the battery's charge level regularly when the TV/VCR is used in a vehicle.
8
Chapter 1 : Overview of Your Equipment
CHAPTER
2
Connecting an Antenna or Cable to Your TV/VCR
Your TV/VCR will provide you with the best performance if you connect it to an external
antenna or cable system. Follow the directions below make this connection. Please note that
you will normally only have to make one of the connections shown below, not all of them.
All connections will be made to the antenna terminal on the back of your TV/VCR. The
antenna terminal is a silver metal post partially surrounded by two plastic tabs. For help in
locating the antenna terminal, see “Your TV/VCR's Back Panel” on page 5.
There is no antenna provided with your TV/VCR.
Connecting an Antenna
If your antenna ends in a single coaxial lead,
simply press or screw the cable onto the antenna
terminal on the back of your TV/VCR.
If your antenna ends in a pair of 300 ohm twin leads, you must use a 300-ohm/75-ohm
adaptor. (An adaptor is included with your TV/VCR.) Place the leads underneath the screws
on the adaptor, tighten the screws, then press the adaptor onto the antenna terminal on the
back of the TV/VCR.
Chapter 2 : Connecting an Antenna or Cable to Your TV/VCR
9
Antennas with two sets of leads
You might have two sets of leads from your antenna system, especially if you have one antenna for VHF signals and one antenna for UHF signals.
If your antenna system has both a coaxial lead and twin 300-ohm leads, you must obtain a combiner (available at your local electronics store). Press or screw the coaxial lead onto the combiner; place the twin leads underneath the screws on the combiner and tighten the screws.
Press the cable from combiner onto the antenna terminal on the back of the TV/VCR.
If your antenna system has two sets of twin 300-ohm leads, you must obtain a combiner
(available at your local electronics store). Place one set of twin leads underneath the screws on
the combiner and tighten the screws. Do the same with the other set of twin leads. Press the
cable from the combiner onto the antenna terminal on the back of your TV/VCR.
10
Chapter 2 : Connecting an Antenna or Cable to Your TV/VCR
Connecting a Cable System
If your cable set-up is not described below, please contact your cable company for more information.
If your cable system does not require the use of a
cable box, simply press or screw the incoming cable
onto the antenna terminal on the back your TV.
If your cable system requires you to use a converter box for all channels, connect the
incoming cable to the IN terminal on the converter box. Connect another cable between the
OUT terminal on the converter box and the antenna terminal on the TV. You will need to
keep your TV tuned to channel 3 or 4 and change channels using the converter box.
Chapter 2 : Connecting an Antenna or Cable to Your TV/VCR
11
If your cable system only requires you to use a converter box for some channels (i. e.
pay-TV channels), follow these steps: Find the primary incoming coaxial cable. Plug this
cable into a splitter (available at your local electronics store). Connect one coaxial cable
between one OUT terminal on the splitter and the IN terminal on the converter box. Connect
another coaxial cable between the other OUT terminal on the splitter and the A-IN terminal on
an A/B switch (available at your local electronics store.) Connect a third coaxial cable
between the OUT terminal on the converter box and the B-IN terminal on the A/B switch.
Finally, connect a coaxial cable between the OUT terminal on the A/B switch and the antenna
terminal on the back of your TV/VCR.
When the A/B switch is in the A position, you can change channels on the TV/VCR; when
the A/B switch is in the B position, you, need to change channels on the converter box (and
your TV should be tuned to channel 3 or 4)
Connecting Other Pieces of Equipment
You may want to connect a VCR, laser disc player, satellite receiver, or another type of equipment to your TV/VCR. We recommend that you follow the instructions included with the
piece of equipment you wish to connect.
If you connect other pieces of equipment to your TV/VCR using the audio/video jacks on the
front panel, you will need to use the TV/LINE button on the remote control to view the signal
coming through these jacks. See page 41 for more information.
Safety Notes
If you plan on being away from your home for an extended period of time, or if a thunderstorm is approaching, you should unplug your television, and you may wish to disconnect
your TV from a rooftop or satellite antenna. You do not need to disconnect your TV from a
cable system.
12
Chapter 2 : Connecting an Antenna or Cable to Your TV/VCR
CHAPTER
3
Operating Your TV
Once you have connected your TV/VCR to an antenna or cable system, plugged the TV in,
and put batteries in the remote, you are ready to use the TV. The first thing you should do is
program your TV/VCR so it memorizes all of available channels.
Turning Your TV/VCR On
POWER
RECALL
TV/LINE
FAVORITE CH
CANCEL
C-RESET
MUTE
CH
MENU
VOL
VOL
1. To turn your TV/VCR on, press the POWER button on the remote
control. You can also use the POWER button on the front panel.
Make sure your TV is plugged in before you try to turn it on.
CH
1
2
3
4
5
6
7
8
9
SLEED
0 ATK
SLOW
REW
PLAY
FF
REC/OTR STOP PAUSE/STILL
VISS
VISS
Programming Your TV/VCR's Channel Memory
y butYour TV/VCR's memory determines the channels that are available using the xCHy
tons. If a channel is not in memory, you can tune to it with the number buttons, but not with
y buttons. Follow these steps to program your TV/VCR's memory:
the xCHy
1. With the TV on, press the MENU button until “Set-Up”menu will be displayed.
y buttons to select “Reception”, then use the VOLB
B button to select ‘Air’
2. Use the xCHy
or ‘Cable’. If you connected an antenna to your TV/VCR, select ‘Air’; If you connected a
cable system, select ‘Cable’.
y buttons to select “Memorize Channels”, then use the VOLB
B button to
3. Use the xCHy
enter the “Memorize Channels” process.
4. Press the MENU button to return to Set-Up menu.
5. Press the MENU button to return to normal TV viewing.
Your TV/VCR's channel memory will not be affected by a power outage. You will not need to
re-program the memory unless you change the type of cable or antenna connected to your
TV/VCR.
1
2
3-1
Set-Up
Set-Up
Set-Up
Language :
English
Reception :
Air
Memorize Channels
Add/Delete Channels
Language :
English
Reception :
Air
Memorize Channels
Add/Delete Channels
Language :
English
Reception :
Air
Memorize Channels
Add/Delete Channels
Select
Adjust
Exit
Select
Adjust
Exit
4
Select
Enter
Exit
5
Set-Up
Language :
English
Reception :
Air
Memorize Channels
Add/Delete Channels
Select
Enter
Exit
Chapter 3 : Operating Your TV
13
Changing Channels
1
You can change channels in three ways:
y buttons will take you through all memorized
1. The xCHy
y buttons will not access chanchannels, one by one. The xCHy
nels that have not been programmed into the TV's memory. For
2
more information about programming channels into memory,
3
see the section “Programming your TV/VCR's Channel
Memory” on the previous page.
POWER
RECALL
TV/LINE
FAVORITE CH
CANCEL
C-RESET
MUTE
CH
MENU
POWER
RECALL
VOL
TV/LINE
VOL
FAVORITE CH
CH
1
2
CANCEL
C-RESET
MUTE
CH
3
5
7
8
POWER
RECALL
MENU
4
6
TV/LINE
FAVORITE CH
VOL
9
CANCEL
VOL
C-RESET
SLEED
0 ATK
REW
PLAY
MUTE
CH
CH
SLOW
1
2
3
4
5
6
MENU
FF
VOL
REC/OTR STOP PAUSE/STILL
VOL
8
9
SLEED
0 ATK
SLOW
1
2
3
REW
PLAY
FF
4
5
6
7
8
9
SLEED
0 ATK
SLOW
REW
PLAY
7
CH
VISS
VISS
REC/OTR STOP PAUSE/STILL
VISS
VISS
FF
REC/OTR STOP PAUSE/STILL
VISS
2. The number buttons (0-9) will take you to any channel, even if it
has not been memorized. To change to a channel, enter its number; the TV/VCR will tune to the new channel when you enter
the second digit of the channel.
VISS
3. The FAVORITE CH button will take you instantly to the last
channel you were watching.
Changing the Volume
1
B but1. To change the volume of the TV/VCR set, use the CVOLB
tons on the remote or on the front panel.
POWER
RECALL
TV/LINE
FAVORITE CH
CANCEL
C-RESET
MUTE
CH
MENU
2
POWER
RECALL
VOL
TV/LINE
VOL
FAVORITE CH
CH
1
2
CANCEL
C-RESET
MUTE
CH
3
MENU
4
5
7
8
9
0 ATK
SLOW
PLAY
FF
SLEED
REW
6
VOL
REC/OTR STOP PAUSE/STILL
VISS
VISS
R-39N01
2
3
4
5
6
7
8
9
SLEED
0 ATK
SLOW
REW
PLAY
FF
REC/OTR STOP PAUSE/STILL
VISS
14
VOL
CH
1
VISS
Chapter 3 : Operating Your TV
2. To quickly turn off the sound, press the MUTE button on the
remote. The ‘MUTE’ will appear on screen, colored red. To
return the volume to its previous level, press MUTE again.
Changing the TV/VCR's Channel Memory
y butYour TV/VCR's memory determines the channels that are available using the xCHy
tons. You can add channels to this memory or remove them from memory. If a channel is
removed from memory, you can tune to it with the number buttons, but you cannot tune to it
with the buttons.
If there are just one channel memorized, then the Add/Delete Channels function will search
the whole channels. But if there are two or more channel memorized, then the Add/Delete
Channels function will search the memorized channels only.
Adding/Deleting a channel to memory
1. Use the number buttons to tune to the channel.
2. Press the MENU button until “Set-Up” menu will be displayed
y buttons to select “Add/Delete Channels”, then use the VOLB
B button to
3. Use the xCHy
enter the “Add/Delete Channels” process.
B buttons to add the channel from
4. If the channel is not in memory, then use the CVOLB
memory.
B buttons to delete the channel from
5. If the channel is in memory, then use the CVOLB
memory.
6. If you are going to delete other channel, then press the xCHy buttons until desired channel is selected. And press the CVOLB buttons to delete the channel.
7. Press MENU to exit.
1
2
3
Set-Up
Set-Up
Language :
English
Reception :
Air
Memorize Channels
Add/Delete Channels
Language :
English
Reception :
Air
Memorize Channels
Add/Delete Channels
Select
4
Adjust
Exit
Air 11
This channel is not in memory.
Press VOL
to add.
Press CH or [0-9]
for other channels.
Press MENU to return
to Set-Up menu.
Enter
Exit
6
5
Add/Delete Channels
Select
Add/Delete Channels
Air 11
This channel is in memory.
Press VOL
to delete.
Press CH or [0-9]
for other channels.
Add/Delete Channels
Air 16
This channel is in memory.
Press VOL
to delete.
Press CH or [0-9]
for other channels.
Press MENU to return
to Set-Up menu.
Press MENU to return
to Set-Up menu.
Displaying the TV/VCR’s Status during TV Operation
POWER
RECALL
TV/LINE
FAVORITE CH
CANCEL
C-RESET
MUTE
CH
MENU
VOL
VOL
1.
To quickly see the current channel number and status, press RECALL button
on the remote control.
The current channel number and status will be displayed.
CH
1
2
3
4
5
6
7
8
9
SLEED
0 ATK
SLOW
REW
PLAY
FF
REC/OTR STOP PAUSE/STILL
VISS
VISS
Chapter 3 : Operating Your TV
15
Adjusting Video Settings
You may wish to adjust the video settings (e. g. contrast or color) to obtain the most pleasing
picture. To do so, follow these directions:
1. With the TV/VCR on, press the MENU button, then “Video” menu will appear.
2. The “Settings” item will be selected. Use the CVOLB buttons to turn Settings to Preset or
Custom.
3. Use the buttons to select the video setting you wish to adjust.
Descriptions of the video settings are on the next page.
4. Use the CVOLB buttons to adjust the video setting to the level you prefer.
5. When you are finished, press the MENU button until menu OSD will be disappeared.
1
2
Settings :
Contrast
Brightness
Sharpness
Color
Tint
Select
Custom
Adjust
Video
Settings :
Contrast
Brightness
Sharpness
Color
Tint
Next
4
Select
5
Contrast
16
3
Video
Video
Chapter 3 : Operating Your TV
Preset
Adjust
Settings :
Contrast
Brightness
Sharpness
Color
Tint
Next
Select
Preset
Adjust
Next
Returning to the factory settings
If you would like to return to the original video settings, as they were calibrated at the factory,
follow these steps :
1. With the TV/VCR on, press the MENU button, then “Video” menu will appear.
2. Press the CVOLB buttons to set the “Settings” to ‘Preset’.
The TV/VCR will remember the ‘Custom’ settings you had previously chosen. When you set
“Settings” to ‘Custom’ again, your previous custom settings will be restored.
3
2
1
Video
Video
Settings :
Contrast
Brightness
Sharpness
Color
Tint
Select
Custom
Adjust
Settings :
Contrast
Brightness
Sharpness
Color
Tint
Next
Select
Preset
Adjust
Next
Descriptions of video settings
The contrast setting controls the relation between the light and black areas of the screen. If the
light areas are too bright and are losing details, press the CVOL button; if the picture is gray
and lacks contrast, press the VOLB button.
The brightness setting controls the overall amount of light in the picture. If the picture is too
bright, press the CVOL button; if the picture is too dark, press the VOLB button.
The sharpness controls how the TV displays edges of objects on-screen. If the TV shows multiple vertical lines at the edges of an object, press the CVOL button; if the vertical edges of
on-screen objects are fuzzy, press the VOLB button.
The color setting controls the intensity of color. If the color is over-saturated, press the CVOL
button; if the color is washed out, press the VOLB button.
The tint setting controls the relationship of red and green in a picture. Tint is especially noticeable in flesh tones. If flesh tones seem too red or purple, press the CVOL button; if flesh tones
are too green, press the VOLB button.
Chapter 3 : Operating Your TV
17
CHAPTER
4
Operating Your VCR
Your TV/VCR has built-in VCR playback and recording capabilities, offering the ultimate in
VCR convenience. This chapter explains the basic of using the VCR features of your unit.
Video Cassette Tapes
Your VCR uses VHS tapes. Only use
tapes that have the official VHS mark:
Tape length/tape speed
VHS tapes come in different lengths, which, along with the tape speed, determine how much
program time you can put on one tape. The following chart shows the maximum recording/
playback time for each type of tape and each tape speed.
Type
SP (standard play)
T-160
2 hours, 40 min.
LP (long play)
(Play only)
5 hours 20 min
EP (Extend play)
8 hours
T-120
2 hours
4 hours
6 hours
T-90
1hour 30 min.
3 hours
4 hours 30 min.
T-60
1 hour
2 hours
3 hours
Protecting your tapes
You can protect your tapes by removing the erasure prevention tab on the back of the tape.
When this tab is removed, VCR cannot record over it. To once again be able to record on a
tape with its tab removed, simply place a piece of tape over the space left by the removed tab.
Inserting a Tape
To insert a tape into your TV/VCR, hold it so that the windows on the tape face up, and the label of the tape faces
away from the TV/VCR. Gently place the tape in the cassette compartment and push it in slowly. Once it is in the
compartment part-way, the TV/VCR will pull the tape the
rest of the way.
You can insert a tape into your TV/VCR even when it is
turned off. If the tape has its erasure prevention tab removed, the TV/VCR will turn on and
begin playing the tape.
Ejecting a tape
To remove a tape from the compartment, press the STOP/EJECT button on the front panel or
on the remote control. The TV/VCR will eject the tape part-way. Grasp the cassette and
remove the tape from the TV/VCR.
18
Chapter 4 : Operating Your VCR
Playing a Tape
1. To begin playing a tape, place it in the TV/VCR’s cassette compartment. If the erasure prevention tab has been removed, the tape will begin playing automatically. If the erasure prevention tab is intact, press the PLAY button on the front panel or on the remote control.
2. To pause the tape and display a still frame, press the PAUSE/STILL button on the remote
control.
3. To stop the tape, press the STOP/EJECT button on the front panel or on the remote control.
POWER
RECALL
1
TV/LINE
FAVORITE CH
CANCEL
C-RESET
2
3
MUTE
CH
Play
MENU
VOL
SP 0:00:00
Still
SP 0:00:00
Stop
SP 0:00:00
VOL
CH
1
2
3
4
5
7
8
9
0 ATK
SLOW
SLEED
REW
PLAY
6
FF
REC/OTR STOP PAUSE/STILL
3
VISS
VISS
1
2
Searching for a scene
If you are looking for a particular scene, you can use the FF and REW buttons to find the
scene faster.
1. Press the FF button during playback to search
quickly in the forward
direction. Press the FF
button a second time to
search at 7X normal(in
SP speed) or 11X normal (in EP).
POWER
RECALL
1
TV/LINE
FAVORITE CH
2
CANCEL
C-RESET
Cue
MUTE
CH
SP 0:00:00
Rev
SP 0:00:00
MENU
VOL
VOL
CH
1
2
3
4
5
7
8
9
SLEED
0 ATK
SLOW
REW
PLAY
6
FF
2
1
REC/OTR STOP PAUSE/STILL
VISS
VISS
2. Press the REW button
during playback to
search quickly in the reverse direction. Press the REW button a second time to search at
7X normal (in SP speed) or 11X normal (in EP.)
If you press FF or REW while the tape is stopped, the TV/VCR will quickly wind your tape in
the selected direction. No picture from the tape will be displayed, but the tape moves at a
much higher speed without the picture.
Chapter 4 : Operating Your VCR
19
Tracking
“Tracking” is a term that describes how the TV/VCR “locks on” to the signal recorded on the
tape. If the TV/VCR is not tracking correctly, the picture during playback will be jumpy and
distorted.
Your TV/VCR is equipped with a sophisticated automatic tracking feature that can perfectly
track a tape’s signal without adjustment from the user.
On some rare occasions, though, manual tracking may be required. To manually track a tape:
1. Begin playing back a tape.
2. Press and hold down the CH buttons on the remote control, one at a time. Adjust the tracking using these buttons until the picture is no longer distorted.
Basic Recording
Your TV/VCR makes it easy to record a program you are watching. To do this :
1. Place the tape on which you want to record in the cassette compartment. Fast forward or
rewind to the point where you want to begin recording.
2. Tune to the channel you want to record.
3. Press the SPEED button repeatedly to select the tape speed at which you want to record :
SP or EP
4. Press the REC/OTR button once. The tape will start recording the channel you are watching, and also add an index mark. The REC light on the front panel will light on red during
recording.
If the tape has its erasure prevention tab removed, the tape will eject when your press
REC/OTR button.
5. Press STOP/EJECT to stop recording.
POWER
RECALL
3
TV/LINE
FAVORITE CH
CANCEL
C-RESET
4
Stop
MENU
VOL
VOL
CH
2
3
4
5
6
7
8
9
SLEED
0 ATK
SLOW
REW
PLAY
1
3
4
20
FF
REC/OTR STOP PAUSE/STILL
VISS
5
MUTE
CH
VISS
5
Chapter 4 : Operating Your VCR
SP 0:00:00
Record
SP 0:00:00
Stop
SP 1:10:00
You cannot change channels while you are recording. To change channels, press
PAUSE/STILL or STOP/EJECT to interrupt your recording.
If the tape reaches its end while recording, it will quit recording and eject the tape.
One Touch Recording (OTR)
One Touch Recording allows you to begin recording a channel, and also set how long how
wish to record. The TV/VCR will automatically stop recording after the time you set has
elapsed. To use OTR:
1. Follow steps 1-3 in “Basic Recording,” on the previous page, to begin recording.
2. Repeatedly press the REC/OTR button. Each time you press the REC/OTR button, 30
minutes is added to the OTR time, up to 4 hours.
3. When you have reached the length of time that you want the TV to record, stop pressing
the OTR button. The TV/VCR will count down the time you set. When the timer reaches
00:00, recording will stop.
4. You can stop recording at any time by pressing STOP button.
POWER
RECALL
TV/LINE
FAVORITE CH
CANCEL
C-RESET
1
MUTE
CH
2
3
MENU
VOL
Record
VOL
CH
2
1
2
3
4
5
6
7
8
9
SLEED
0 ATK
SLOW
REW
PLAY
SP 0:00:00
Record
OTR 0:30
Channel 10
SP 0:00:04
Stop
Channel 10
SP 0:30:00
FF
REC/OTR STOP PAUSE/STILL
VISS
VISS
4
If you press the POWER button during OTR, the picture will turn off, but the tape will still
record for the remainder of the OTR time. To stop recording, press STOP/EJECT.
To return to normal recording and cancel the OTR Time, press the REC/OTR button repeatedly until “4:00” is displayed, then press the REC/OTR button once more to return to normal
recording.
If you program too much time into the OTR timer, continue to press the REC/OTR button.
Once the time reaches “4:00,” press the REC/OTR button twice more to return to “0:30.”
You can not set an OTR time if the TV/VCR is recording a timer program.
Chapter 4 : Operating Your VCR
21
Displaying the TV/VCR’s Status during VCR Operation
If you have a tape in the TV/VCR’s cassette compartment, you can display the following
information.
1. Press the RECALL button. The current time, the current channel, the tape statue (STOP,
PLAY, REC, etc.), the tape speed, and the tape counter will be displayed.
2. Press the button a second time to see the current time, the current channel, the tape status,
the tape speed, and the tape remain will be displayed. If the tape is playing, the current
channel will not be displayed
3. Press the button a third time to return to normal viewing.
1
2
12:08 PM
Stop
22
Chapter 4 : Operating Your VCR
Channel 10
SP 0:15:30
3
12:08 PM
Stop
Channel 10
SP REM 01:20
Using the Counter (Zero Stop)
The VCR counter can be used to keep track of your position on the tape. You can also use it to
quickly return to a particular point on the tape. The counter cannot be displayed unless there is
a cassette tape in the TV/VCR.
1. To display the counter, press the RECALL button until the counter is displayed in the right
hand corner.
2. To reset the counter, press the C-RESET button on the remote control (0:00:00). The
counter is also reset when you put a new cassette in your TV/VCR.
3. Press the MENU button until “Tape” menu will be displayed.
4. After play the tape, use the xCHy buttons to select the “Zero stop”. If the press the
VOLB button, you can quickly return to the 0:00:00.
5. The TV/VCR will rewind until it reaches the 0:00:00 mark on the counter, then it will stop.
You can cancel the search for 0:00:00 by press the STOP button.
6. Press the C-o STOP button on the remote control, you can quickly return to the 0:00:00.
1
2
12:08 PM
Play
Tape Remain : T120
Repeat Play : Off
Rental Tape : Off
Zero Stop
TV/LINE
FAVORITE CH
2
Tape
SP 0:00:00
POWER
RECALL
1
SP 0:15:30
3
12:08 PM
Play
CANCEL
C-RESET
MUTE
CH
MENU
3
VOL
4
VOL
CH
1
2
3
4
5
6
7
Select
8
9
SLEED
0 ATK
SLOW
REW
PLAY
FF
REC/OTR STOP PAUSE/STILL
VISS
VISS
6
4-1
4-2
Tape
REW
Go to zero
Tape Remain : T120
Repeat Play : Off
Rental Tape : Off
Zero Stop
Select
Enter
Adjust
Next
5
SP 0:20:05
12:15 PM
Stop
SP 0:00:00
Next
Chapter 4 : Operating Your VCR
23
CHAPTER
5
Using Timer Functions
Your TV/VCR has a built in-clock, and you can set the TV to turn on and off at times that you
select. You can also set your TV to turn off after counting down a certain amount of time.
Setting the Clock Automatically
Your TV/VCR can automatically set its internal clock using a signal from a local PBS station.
If you complete the following procedure, and your local PBS station is sending a time signal,
then your TV/VCR will always show the correct time.
1. With the TV turned on, press the MENU button until “Time” menu is displayed.
2. The “Set Clock” item will be selected. Press the VOLB button twice, then “Auto” will be
displayed in RED.
3. Press the xCHy buttons to display the “Auto Current Time Set” mode.
4. Use the xCHy buttons to set the PBS channel. If you don’t know the channel of the local
PBS station, to set “Automatic”
5. Use the VOLB button to select “Time Zone”.
6. Press the xCHy buttons to select that corresponds to the time zone where you live. If you
don’t know the time zone where you live, to set ‘Automatic”.
Press the xCHy buttons to change the Time Zone.
Automatic
Atlantic
Eastern
Central
Mountain
Pacific
Alaska
Hawaii
Automatic
7. Use the VOLB button to select ‘DST” (Daylight Savings Time).
8. Press the xCHy buttons to select DST “Automatic” “ON” “OFF”. (See the table blow)
Choose
To
Automatic
Select to set the daylight savings time automatically
ON
Select if your area uses daylight savings time
OFF
Select if your area does not use daylight savings time
9. Press the L MENU button to exit.
10. To activate the Automatic Clock setting, press the POWER button to turn off your TV/VCR.
Leave the TV/VCR off for 4-5 minutes. When you turn the TV/VCR back on, the automatic clock should be set.
1
Set Clock :
On Time :
Off Time :
Sleep Timer :
Select
24
3
2
Auto Current Time Set
Time
Time
Manual/Auto
-- : -- --- : -- -Off
Enter
Next
Chapter 5 : Using Timer Functions
Set Clock :
On Time :
Off Time :
Sleep Timer :
Enter
Manual / Auto
-- : -- --- : -- -Off
Select
Next
Please enter your
PBS Channel : Automatic
Adjust
Select
Exit
4
5
Auto Current Time Set
6
Auto Current Time Set
Please enter your
PBS Channel : 11
Adjust
Auto Current Time Set
Please enter your
Time Zone : Automatic
Select
Exit
7
Adjust
Select
Please enter your
Time Zone : Atlantic
Exit
8
Auto Current Time Set
Select
Exit
9
Auto Current Time Set
Please enter your
DST : Automatic
Adjust
Adjust
Please enter your
DST : On
Select
Exit
Adjust
Select
Exit
Setting the Clock Manually
If you are unable or not interested in using the Auto Clock feature, you can set your
TV/VCR’s clock manually.
1. With the TV turned on, press the MENU button until “Time” menu will be displayed.
2. The “Set Clock” item will be selected. Press the VOLB button once, then “Manual” will
be displayed in RED.
3. Press the xCHy buttons to display the “Current Time Set” mode.
4. Use the xCHy buttons to set the month.
5. Press the VOLB button to select the day, year and time, use the xCHy buttons to setting.
If you hold down either xCH or CHy button, the corresponding numbers will change
more quickly.
6. When the clock is set correctly, press the L MENU button to exit.
1
3
2
Time
Set Clock :
On Time :
Off Time :
Sleep Timer :
Select
Current Time Set
Time
Manual/Auto
-- : -- --- : -- -Off
Enter
Next
4
Set Clock :
On Time :
Off Time :
Sleep Timer :
Enter
Manual / Auto
-- : -- --- : -- -Off
Select
Next
5-1
Current Time Set
Current Time Set
1/ -- ---- --- -- : ---Set the month
Adjust
Select
Exit
5-2
Current Time Set
10/ -- ---- --- -- : ----
10/ 15 ---- --- -- : ----
10/ 15 1999 FRI 07 : 05 AM
Set the month
Set the year
Set the time
Adjust
Select
Exit
Adjust
Select
Exit
Adjust
Select
Exit
Chapter 5 : Using Timer Functions
25
6
Setting the On Time
If you enter a time in the “On Time” setting, your TV/VCR will automatically turn on at that
time.
Follow these instruction to set the “On Time”
1. With the TV turned on, press the MENU button until “Time” menu is displayed.
2. Use the xCHy buttons to select “On Time” item.
3. Press the VOLB button to display “On Time” in RED.
4. Press the CVOLB buttons to select the time and minute, press the xCHy buttons to time
setting.
If you hold down either xCH or CHy button, the corresponding numbers will change
more quickly.
5. When the clock is set correctly, press the CVOLB buttons to select “On Time” and use
the xCHy buttons to select another “Time” function, or press the L MENU button to
exit.
1
3
2
Time
Set Clock :
On Time :
Off Time :
Sleep Timer :
Select
Time
Time
Manual/Auto
-- : -- --- : -- -Off
Enter
Set Clock :
On Time :
Off Time :
Sleep Timer :
Next
4
Select
Manual/Auto
-- : -- --- : -- -Off
Enter
Next
Set Clock :
On Time :
Off Time :
Sleep Timer :
Adjust
Manual/Auto
12 : -- AM
-- : -- -Off
Select
Next
5
Time
Set Clock :
On Time :
Off Time :
Sleep Timer :
Adjust
Time
Manual/Auto
06 : 30 AM
-- : -- -Off
Select
Next
Set Clock :
On Time :
Off Time :
Sleep Timer :
Select
Manual/Auto
06 : 30 AM
-- : -- -Off
Enter
Next
Setting the Off Time
If you enter a time in the “Off Time” setting, your TV/VCR will automatically turn off at that
time.
Follow these instruction to set the “Off Time”
1. With the TV turned on, press the MENU button until “Time” menu will be displayed.
2. Use the xCHy buttons to select “Off Time” item.
3. Press the VOLB button to display “Off Time” in RED.
26
Chapter 5 : Using Timer Functions
4. Press the CVOLB buttons to select the time and minute, press the xCHy buttons to time
setting.
If you hold down either xCH or CHy button, the corresponding numbers will change
more quickly.
5. When the clock is set correctly, press the CVOLB buttons to select “Off Time” and use
the xCHy buttons to select another “Time” function, or press the L MENU button to
exit.
1
3
2
Time
Set Clock :
On Time :
Off Time :
Sleep Timer :
Select
Time
Time
Manual/Auto
06 : 30 AM
--:-- -Off
Enter
Set Clock :
On Time :
Off Time :
Sleep Timer :
Next
4
Select
Manual/Auto
06 : 30 AM
-- : -- -Off
Enter
Next
Set Clock :
On Time :
Off Time :
Sleep Timer :
Adjust
Manual/Auto
06 : 30 AM
12 : -- AM
Off
Select
Next
5
Time
Set Clock :
On Time :
Off Time :
Sleep Timer :
Adjust
Time
Manual/Auto
06 : 30 AM
11 : 30 PM
Off
Select
Next
Set Clock :
On Time :
Off Time :
Sleep Timer :
Select
Manual/Auto
06 : 30 AM
11 : 30 PM
Off
Enter
Next
Canceling the On Time or Off Time
If you would like to cancel the On Time or Off Time, press the CANCEL button on the
remote control. The On Time or Off time will not function correctly unless the clock has been
set.
Chapter 5 : Using Timer Functions
27
Setting the Sleep Timer
The sleep timer allows you to set an amount of time from 15 minutes to 2 hours.
TV/VCR count down the amount of time you set, then turn itself off.
To set the sleep timer:
1. With the TV turned on, press the MENU button until “Time” menu will be displayed.
2. Use the xCHy buttons to select “Sleep Timer” item.
3. Press the CVOLB buttons to set the sleep time. Each time you press the CVOLB buttons,
you step between the available sleep times : 15min, 30min, 45min, 60min, 90min, or
120min.
4. When the clock is set correctly, press the xCHy buttons to select another “Time” function,
or press the L MENU button to exit
To cancel the Sleep Timer, turn the TV/VCR off, or set the sleep time to “off” using one of
the methods described above.
1
2
Time
Set Clock :
On Time :
Off Time :
Sleep Timer :
Select
Manual/Auto
06 : 30 AM
11 : 30 PM
Off
Enter
Select
4-1
Time
Select
28
Set Clock :
On Time :
Off Time :
Sleep Timer :
Next
4
Set Clock :
On Time :
Off Time :
Sleep Timer :
3
Time
Time
Manual/Auto
06 : 30 AM
11 : 30 PM
60
Adjust
Next
Chapter 5 : Using Timer Functions
Manual/Auto
06 : 30 AM
11 : 30 PM
Off
Adjust
Next
Set Clock :
On Time :
Off Time :
Sleep Timer :
Select
Manual/Auto
06 : 30 AM
11 : 30 PM
60
Adjust
Next
CHAPTER
6
Additional TV Features
This section contains descriptions of the more advanced features of your TV.
Changing the Language of the On-Screen Menus
You can choose to display the on-screen menus in English, French, Spanish.
To change the on-screen language:
1. With the TV/VCR on, press the MENU button until “Set-Up” menu will be displayed.
2. The “Language” item will be selected. Press the VOLB button to select the language you
want to use: French, Spanish.
3. To return normal TV viewing, press the MENU button until menu OSD will be disappeared.
Captioning
Many TV shows contains “closed captions”. These captions are hidden words that can be displayed on your TV/VCR screen. There are two types of these words : “captions” usually follow the action on-screen, providing a written version of the dialogue, narration, and sound
effects ; “text” is not usually related to the action on-screen, often providing information such
as news or weather. A TV program might be providing more than one set of captions or one
set of text.
To set your TV/VCR to display captions or text.
1. With the TV/VCR turned on, press the MENU button until “Special” menu will be displayed.
2. The “Closed Caption” item be selected. To turn captioning on, use the VOLB button to
select Captions (CC1 or CC2) or Text (TEXT1, TEXT2)
At the time these instructions were written, only CC1 is normally available, but feel free to
try the other selections.
3. Press the MENU button to return to normal TV viewing.
Your setting will remain intact until you change it.
1
2-1
2-2
Special
Special
Special
Closed Caption : Off
CC on Mute
: Off
Power Restore : Off
Parental Control
Closed Caption : CC1
CC on Mute
: Off
Power Restore : Off
Parental Control
Closed Caption : TEXT1
CC on Mute
: Off
Power Restore : Off
Parental Control
Select
Adjust
Next
Select
Adjust
Next
Select
Adjust
Chapter 6 : Additional TV Features
Next
29
CC on Mute
With this function, user can select the caption display instead of sound mute when using the
Mute button by neccessity. This function is only effective when Closed Caption is set to Off.
1. With the TV turned on, press the MENU button until “Special” menu will be displayed.
2. Use the xCHy buttons to select “CC on Mute” item.
3. Use the VOLB button to select “CC1” or “CC2”.
1
2
3-1
Special
Special
Special
Closed Caption : Off
CC on Mute
: Off
Power Restore : Off
Parental Control
Closed Caption : Off
CC on Mute
: Off
Power Restore : Off
Parental Control
Closed Caption : Off
CC on Mute
: CC1
Power Restore : Off
Parental Control
Select
Adjust
Next
Select
Adjust
Next
Select
Adjust
Next
3-2
Special
Closed Caption : Off
CC on Mute
: CC2
Power Restore : Off
Parental Control
Select
Adjust
Next
Power Restore
User can select the On/Off status when the power cord is put into the wall outlet. If user has a
cable box with AC outlet, then user can connect the TV/VCR power cord to the AC outlet and
control the TV/VCR without TV/VCR remote control. This function is rarely used for home
use, so special care is needed while using.
1. With the TV/VCR turned on, press the MENU button until “Special” menu will be displayed.
2. Use the xCHy buttons select “Power Restore” item.
3. Use the VOLB button to select “On” or “Off”.
1
2
Special
Special
Closed Caption : CC1
CC on Mute
: CC1
Power Restore : Off
Parental Control
Closed Caption : CC1
CC on Mute
: CC1
Power Restore : Off
Parental Control
Closed Caption : CC1
CC on Mute
: CC1
Power Restore : On
Parental Control
Select
30
3
Special
Adjust
Next
Chapter 6 : Additional TV Features
Select
Adjust
Next
Select
Adjust
Next
Parental Control Settings
This item help parents to set the standard for the programs which their children are going to watch.
1. With the TV/VCR turned on, press the MENU button until “Special” menu will be displayed.
2. Use the xCHy buttons to select “Parental Control” item.
3. Use the VOLB button to enter into “Parental Control” settings.
Set a 4-number password using the number keypad.
4. Use the xCHy buttons to select Parental Control settings you wish to adjust.
Descriptions of the Parental Control settings are on the next page.
5. Use the CVOLB buttons to adjust the Parental Control settings.
6. Use the MENU button to return to the preview menu.
1
3
2
Special
Closed Caption :
CC on Mute :
Power Restore :
Parental Control
Select
Parental Control
Special
Closed Caption :
CC on Mute :
Power Restore :
Parental Control
Off
Off
Off
Adjust
Next
Select
Enter
Off
Off
Off
Enter The Password
####
Next
[0-9] : Adjust
Exit
4
Parental Control
Parental Lock :
TV Guidelines
Movie Ratings
No Ratings :
Ext. Source :
Play Source :
Change Password
Select
Adjust
Off
Unblock
Unblock
Unblock
Exit
Chapter 6 : Additional TV Features
31
Description of Parental Control Settings
1. The Movie Ratings set the standard for movie, video, and other media excluding TV programs.
Use the xCHy buttons to select, CVOLB buttons to adjust.
2. The TV Guidelines set the standard for TV programs excluding sports and news.
Use the xCHy buttons to select, CVOLB buttons to adjust. You can set individual settings with CVOLB buttons.
3. The No Ratings item toggles between “Unblock” and “Block”.
This item determines whether to block or not the programs which are not rated by “Movie
Ratings ” and “TV Guidelines”.
4. The Ext. Source item toggles between “Unblock” and “Block”.
5. The Play Source item toggles between “Unblock” and “Block”.
6. The Change Password item let you set or change the password for entering Parental
Control item. Use the VOLB buttons to enter the password input display, and use the number buttons(0-9) to enter new password. After you entered the new password, confirmation
display will appear. Try the password again.
1-1
Parental Control
Parental Lock :
TV Guidelines
Movie Ratings
No Ratings :
Ext. Source :
Play Source :
Change Password
Select
1-2
Movie Ratings
Off
Unblock
Unblock
Unblock
Enter
Exit
2-1
Parental Control
Parental Lock :
TV Guidelines
Movie Ratings
No Ratings :
EXT. Source :
Play Source :
Change Password
Select
32
Enter
X
NC-17
R
PG-13
PG
G
NR
[
Select
: Block]
Adjust
Prev.
2-2
TV Guidelines
ALL
Off
Unblock
Unblock
Unblock
Exit
Chapter 6 : Additional TV Features
FV
V
TV-MA
TV-14
TV-PG
TV-G
TV-Y7
TV-Y
Select
S
[
Adjust
L
D
: Block]
Prev.
No Ratings means
1. When V-chip Data is error.
2. When any ratings are not detected.
3. Received a rating of “None” like news, sports, and emergency broadcast signals.
Mini Glossary
MOVIE RATING SYSTEM
X
Hard Core Films
NC-17
Restrictd viewing
R
Restrictd viewing
PG-13
Parental Guidance
Suggested
Parental Guidance
Not for children under age 17 under any circumstance.
Strong sexual content.
Same as X rating.
Not for children under age 17. Strong element of sex and/or
violence.
Program is inappropriate for preteens, with a greater degree of
offensive material than a PG rated program.
Suggested
Content is such that parents may not want their children to view the
program.
G
General Audience
Content not offensive to most viewers.
NR
Not Rated
A motion picture that did not receive a rating for a variety of possible reasons.
PG
TV PARENTAL GUIDELINE RATING SYSTEM
TV-MA Mature Audience Only
Adults only, may contain Strong Dialog, Bad Language, Sex,
and Violence Scenes.
Parents Strongly
Unsuitable for childern under 14, may contain Strong Dialog, Bad
Cautioned
Language, Sex, and Violence Scenes.
Parental Guidance
Suggested
Unsuitable for younger childern, may contain Suggestive Dialog,
Bad Language, Sex, and Violence Scenes.
TV-G
General Audience
Considered suitable for all audiance; children may watch unattended.
TV-Y
Children
Consider suitable for all children under 7 years old.
TV-Y7
Children 7 and over
Consider suitable for children over 7, may contain Fantasy Violence
Scenes.
TV-14
TV-PG
FV=Fantasy Violence, V=Violence, S=Sex Scenes, L=Bad Language, D=Sexual Suggestive Dialog
Chapter 6 : Additional TV Features
33
CHAPTER
7
Additional VCR Features
Programming to Record at a Later Time
One of the most convenient features of your new TV/VCR is the ability to record programs
when you are not home. Your TV/VCR can be set to record up to six different programs at
any time up to a month from now.
Getting ready
Before programming to record, keep the following things in mind :
• There must be a tape in the cassette compartment with its erasure prevention tab intact. The
tape should be rewound or fast forwared to the point where you want to begin recording.
• The clock must be set correctly.
• You should plan your programming sessions. If you program sessions that overlap, at least
one your sessions will not be recorded correctly.
• The VCR buttons (PLAY, REW, FF) do not work during recording.
34
Chapter 7 : Additional VCR Features
Setting the Program Recording
Here’s an example of how to record a program broadcast on channel 26 from 8:00 PM to 9:00
PM Friday, 6th of February 1999, in EP mode.
1. With the TV/VCR turned on, press the MENU button until “Program” menu will be displayed.
2. Press the VOLB button, then the today’s date(Feb.05) appears in Red.
3. Press the xCHy buttons to set daily and weekly recording.
Press the xCHy buttons to setting changes as follows:
2/5(today)
6 - - 28
1(next month)
2 - - 4(next month)
Every MON - - Every SAT
1
MON~FRI
SUN~SAT
2
Program
Select
3
Program
Enfer
Next
Every SUN
5(today).
Adjust
Program
Select
Exit
Adjust
Select
Exit
4. Press the VOLB button, then set the hour of the recording Start time to “8” with the
xCHy buttons.
5. Press the VOLB button, then set the minute of the recording Start time to “00” with the
xCHy buttons.
6. Press the VOLB button, then set the hour of the recording Stop time to “9” with the
xCHy buttons.
4
5
Program
Adjust
6
Program
Program
Select
Exit
Adjust
Select
Exit
Adjust
Select
Exit
7. Press the VOLB button, then set the minute of the recording Stop time to “00” with the
xCHy buttons.
8. Press the VOLB button, then set the channel to “26” with the xCHy buttons.
9. Press the VOLB button, then set the recording speed to “EP” with the xCHy buttons.
You select the tape speed “AT” mode, default mode is set to “SP”.
If the tape remain not to be enough, change the recording tape speed automatically “EP”.
Chapter 7 : Additional VCR Features
35
7
8
Adjust
9-1
Program
Program
Select
Exit
Select
Exit
Adjust
Program
Select
Exit
Adjust
Select
Exit
9-2
Program
Adjust
10. Press the VOLB button, then the cursor(B) appears at the left margin
11. When you want to set other program, the CHy button to move the cursor(B) to next line,
then repeat step 2 through 10.
12. Press MENU to Exit the “Program” menu.
10
11
Program
Select
12
Program
Enter
Next
Select
Enter
Next
13. Press POWER to turn off the TV/VCR.
The REC lamp on the front of the TV/VCR lights up to Green and the TV/VCR enters
recording stand-by mode.
The TV/VCR turn on automatically and start recording at the preset start time, and the
REC lamp on the front of the TV/VCR changed from Green to Red.
36
Chapter 7 : Additional VCR Features
Canceling the Program Record Settings
1. With the TV/VCR turn on, press the MENU button until “Program” menu will be displayed.
2. Using the xCHy buttons select the Program setting which you want to stop recording
and press the CANCEL button.
3. Press the MENU button to exit the “Program” menu.
1
2
Program
Select
3
Program
Enter
Next
Select
Enter
Next
Chapter 7 : Additional VCR Features
37
Displaying the Tape Counter
Press the RECALL button to display the tape counter. The tape counter shows the tape travel
time in hours, minutes and seconds during recording or playback. Each time you press the
RECALL button, the time counter and the remaining tape time counter appears alternately.
12:08 PM
Stop
Channel 10
SP 0:30:00
12:08 PM
Stop
Time counter
Channel 10
SP REM 01:30
Remaining tape time counter
When you use a tape shorter than 120 minutes, set Tape Remain to T120. When you use a
tape longer than 120 minutes, set Tape Remain to Others.
1. Press the MENU button until “Tape” menu will be displayed.
2. The “Tape Remain” item will be selected.
Press the VOLB button to select “T120” or “Others”.
3. Press the MENU button until menu OSD will be disappeared.
1
2
Tape
Tape Remain : T120
Repeat Play : Off
Rental Tape : Off
Zero Stop
Tape Remain : Others
Repeat Play : Off
Rental Tape : Off
Zero Stop
Select
38
3
Tape
Adjust
Next
Chapter 7 : Additional VCR Features
Select
Adjust
Next
Auto Repeat PlayBack
You can set your TV/VCR to play a tape continuously. When you turn this feature on and start
playing a tape, it will play to the end of the tape, then rewind to the beginning and start playing again. This will continue until you turn Auto Repeat Off.
1. Press the MENU button until “Tape” menu will be displayed.
2. Use the xCHy buttons to select “Repeat Play” item.
3. Press the VOLB button to select “On”.
4. Press the MENU button until menu OSD will be disappeared.
1
2
3
Tape
Tape
Tape
Tape Remain : T120
Repeat Play : Off
Rental Tape : Off
Zero Stop
Tape Remain : T120
Repeat Play : Off
Rental Tape : Off
Zero Stop
Tape Remain : T120
Repeat Play : On
Rental Tape : Off
Zero Stop
Select
Adjust
Next
Select
Adjust
Next
Select
Adjust
Next
Rental Play
Your TV/VCR has a special video setting that improves the quality of worn video tapes, especially rental tapes. To use feature :
1. Press the MENU button until “Tape” menu will be displayed.
2. Use the xCHy buttons to select “Rental play” item.
3. Press the VOLB button to select “On”.
4. Press the MENU button until menu OSD will be disappeared.
1
2
3
Tape
Tape
Tape
Tape Remain : T120
Repeat Play : On
Rental Tape : Off
Zero Stop
Tape Remain : T120
Repeat Play : On
Rental Tape : Off
Zero Stop
Tape Remain : T120
Repeat Play : On
Rental Tape : On
Zero Stop
Select
Adjust
Next
Select
Adjust
Next
Select
Adjust
Next
Chapter 7 : Additional VCR Features
39
Index Search (VISS)
Your TV/VCR is equipped with the VHS Index Search System, or VISS. The VISS allows
“index marks” to be placed on a video tape. These marks are similar to bookmarks - you can
use the search system to quickly find these marks, and thereby find a point on the tape quickly.
Your TV/VCR automatically places an index mark on the tape every time it begins a recording session. Therefore, if you record six programs at six different times on a tape, there will be
six index marks on the tape.
To search for an index mark:
1. Place a tape with index marks in your TV/VCR.
2. If the index mark is ahead on the tape, press the VISS+ button; if the index mark is behind
on the tape, press VISS- button. The tape will fast forward or rewind (without picture) until
it finds the index mark. Then, it will begin playing.
3. You can search further than the next index mark. For example, if you know that the show
you want is three index marks behind, you can press the VISS- button three times. The
TV/VCR will search for the third index mark, then begin playing.
VCRs and TV/VCRs from other manufacturers sometimes use the same VISS system.
Therefore, you may be able to search for index marks on tapes that were recorded on other
VCRs.
Your TV/VCR cannot detect index marks unless they are least one minute apart on the tape.
POWER
RECALL
TV/LINE
FAVORITE CH
CANCEL
C-RESET
MUTE
CH
MENU
VOL
VOL
CH
1
2
3
4
5
7
8
9
SLEED
0 ATK
SLOW
REW
PLAY
6
FF
REC/OTR STOP PAUSE/STILL
VISS
3
40
VISS
2
Chapter 7 : Additional VCR Features
Duplicating a Video Tape
Because your TV/VCR has audio and video inputs, it is easy to make a copy of a tape, if you
have another VCR or Video Camera. Follow these instructions :
1. Connect a audio cable from the AUDIO OUT jack on the VCR to the AUDIO jack on the
front of your TV/VCR.
2. Connect a video cable from the VIDEO OUT jack on the VCR to the VIDEO jack on the
front of your TV/VCR.
3. Press TV/LINE button on the remote control to set the TV/VCR to “LINE”.
4. Insert the tape on which you want to record in the TV/VCR and set it to the point at which
you want to begin recording.
5. Insert the tape from which you want to record in the VCR and set it to the point at which
you want to begin recording.
6. Press the REC/OTR button on the reomote control or REC button on the TV/VCR.
7. Press the PLAY button on the VCR.
8. When you are finished recording, press the STOP button on both the TV/VCR and the
VCR.
Chapter 7 : Additional VCR Features
41
CHAPTER
8
Troubleshooting
Your Daewoo television is designed to give you trouble-free performance for many years.
If you have a problem with your TV, try the solutions listed below.
If the suggestions listed below do not solve your problem, contact your Daewoo dealer or
an authorized Daewoo service center.
There is no picture or sound, or the TV dosen't turn on.
• Make sure the TV is plugged in.
• Make sure the MUTE is not set.
• Make sure the power is on.
• If there is neither picture or sound, unplug the TV for 30 seconds, then plug it in and try
again.
There is no picture or sound on some UHF channels.
• Try another station. If the other stations are OK, it may be a station problem.
• Check that the antenna is connected, is in good working order, has no broken wires, and
is adjusted correctly.
• See if anything is interfering with the antenna signal.
• Make sure the AIR/CABLE setting is correct.
The sound is OK, but the picture is poor.
• Try another station. If the other stations are OK, it may be a station problem.
• Check that the antenna is connected and is in good working order, has no broken wires,
and is adjusted correctly.
The picture is OK, but the sound is poor.
• Try another station. If the other stations are OK, it may be a station problem.
• Check that the antenna is connected, is in good working order, has no broken wires, and
adjusted correctly.
There is poor reception on some channels.
• Try another station. If the other stations are OK, it may be a station problem.
• Check that the antenna is connected, is in good working order, has no broken wires, and
is adjusted correctly.
You cannot tune to a cable channel.
• Make sure the AIR/CABLE setting is correct.
• The channel may not be programmed into memory.
The picture rolls, slants, shows lines, is grainy, has poor color, or has ghosts.
• Try another station. If the other station are OK, it may be a station problem.
• Check that the antenna is connected, is in good working order, has no broken wires, and
is adjusted correctly.
• See of anything is interfering with the antenna signal.
The remote control does not work.
• Make sure the TV is plugged in.
• Make sure there are fresh batteries in the remote control.
• Make sure there is nothing blocking the remote control signal.
42
Chapter 8 : Troubleshooting
MAINTENANCE AND SPECIFICATIONS
Servicing
Should your TV/VCR stop working, do not try to repair it yourself. There are no user-serviceable parts inside the unit. Turn the TV/VCR off, unplug the power cord, and take the unit to an
authorized Daewoo repair center.
Cabinet Cleaning
To clean your TV/VCR, wipe it with a soft cloth that has been dampened with luke-warm
water and wrung dry. Never use a solvent or alcchol. Never spray insecticides near your
TV/VCR; such chemicals can cause damage and discoloration to the exterior of your
TV/VCR.
Video Head Cleaning
If the picture is blurred or interrupted when palying back a tape, it may be caused by dirty
video heads. Video heads can become dirty after long periods of playback, or from repeated
use of rental tepes. To have your video heads cleaned, contact an authorized Daewoo repair
center.
Specifications
Power Supply
Power Consumption
Dimensions (WxHxD)
Weight
Channel Coverage
Video Signal System
Picture Tube
Antenna Inpur
VCR Format
Tape Speed
AC 120V, 60Hz or DC 12V
47W
296.2 x 324 x 324.6mm
7.5Kg
VHF : 2-13, CATV : 1, 14-125 ; UHF : 14-69
NTSC Color
9” diagonal
VHF/UHF 75ohm, one input
VHS Standard
SP : 33.35mm/sec ; LP : 16.67mm/sec ; EP :
11.12mm/sec
Playback Time
SP : 120min ; LP:240min; EP:360min
(T-120 tape)
Speaker Output
8 Ohm, 1W
Video Input
1.0Vpp, 75 Ohm
Audio Input
3.8dBm, over 100K Ohm
Temperature
5˚C to 40˚C
Humidity
Less than 85%
Timer Programming
6 Events / 1 Month
Tuning System
Frequency Synthesized Tuning
Design and specifications are subject to changes without notice or legal obligaiton.
Maintenance and Specifications
43
WARRANTY
Daewoo Electronics Corporation of America warrants each new electronic product
manufactured by it to be free from defective material and workmanship and agrees to
remedy any such defect or to furnish a new part (at the Company’s option) in
exchange for any part of any unit of its manufacture which under normal installation,
use, and service disclosed such defect, provided the unit is delivered by the owner to
us or to our authorized distributor from whom purchased or authorized service station, intact, for our examination with all transportation charges prepaid to our factory. To establish and receive warranty service at our factory or authorized service
facilities, proof of purchase/dated sales invoice is required
Return authorization must be obtained before any merchandise is returned to the factory.
This warranty does not extend to any of our electronic products which have been
subjected to misuse, neglect, accident, incorrect wiring not our own, improper installation, unauthorized modification, or to use in violation of instructions furnished by
us, nor units which have been repaired or altered outside of our factory, nor to cases
where the serial number thereof has been removed, defaced, or changed.
This warranty is in lieu of all warranties expressed or implied and no representative
or person is authorized to assume for us any other liability in connection with the
sake of our electronic products.
Over-the-counter exchange for units that are initially defective
“Initially defective” is described as when the dealer opens the unit and finds that it is
inoperative or a customer opens a new unit and finds that it is inoperable. This unit
may be returned to the factory by the dealer for exchange. Under no circumstances
will the customer be permitted to return the defective unit directly to the factory.
Exchange must be directly with the dealer.
Model
DVQ-9H1FC
44
Warranty
Parts
1 year
Labor
90 days
Picture Tube
2 years
This instrument is listed by Underwriter’s
Laboratories, Inc. It is designed and
manufactured to meet rigid U.L. safety standards
against X-radiation, fire, casualty and electrical
hazards.
Daewoo Electronics Corporation of America
120 Chubb Avenue
Lyndhurst, NJ 07071
For more information about this or other Daewoo products, please call 1-800-DAEWOO8.
P/N:48586083E101-R0