1
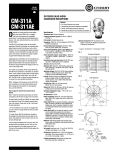
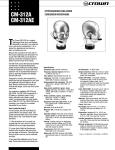
POLAR
PATTERN
DIFFEROID CONDENSER MICROPHONE
FOR USE WITH SONY MDR-7506
AND MDR-V6 HEADPHONES
How to adjust for fit
The CM-311AHS can be adjusted to fit any user.
Please refer to Fig. 1 and follow these steps:
CM-311AHS
1. Loosen the thumbscrew so the boom moves
freely.
2. Put on the Sony headphones with the microphone attached.
esigned for broadcasters, the Crown®
CM-311AHS is a rugged head-worn
microphone that mounts on a Sony MDR7506 or MDR-V6 headphone. The mic rejects
background noise extremely well and is ideal for
use in sporting events. For background noise
that is extremely high, as in traffic-copters and
car races, you may need the extra isolation of a
David Clark headset. Crown makes an adapter for
the boom on the David Clark headset. You can
special-order the adapter from Crown.
D
The CM-311AHS is the latest version of Crown’s
patented Differoid® technology. Its cardioid
pickup pattern rejects noise from behind the
microphone and its noise-canceling ability rejects
ambient noise at a distance.
Lightweight and comfortable, the microphone
adjusts to fit any user. It mounts securely on
either earpiece of the popular Sony MDR-7506
or MDR-V6 headphone. Two included foam pop
filters reduce breath noise, and the windscreen
reduces wind noise.
Supplied with the microphone is a belt pack. It
includes a male 3-pin XLR-type output connector, a battery on/off switch, a programmable
mic on/off switch, and a “Mic On” LED. The belt
clip has been designed extra strong to prevent
breakage and to keep it securely on your belt.
The microphone is an electret condenser type,
powered by phantom power or by the 9V battery
in the belt pack.
How to mount the mic on the Sony headphone
Please see Fig. 1. As supplied from the factory,
the microphone is ready to mount on the right
earpiece of the Sony headphone. To do this, slip
the mount over the yoke above the right earpiece
and tighten the screws. You may want to route
the mic cable along the headband and along the
headphone’s coiled cable.
If you want to mount the microphone on the left
earpiece, please refer to Fig. 6 and follow this
procedure:
1. Remove thumbscrew that holds boom in block.
2. Pull block off pin.
3. Slide block outer half off to the right.
4. Reverse boom direction; place boom in block
inner half.
5. Slide block outer half on from the right.
6. Insert pin into block.
7. Insert thumbscrew and tighten it.
8. Attach mount to left earpiece yoke.
3. You can move the microphone toward and
away from your mouth, and also left, right, up and
down. Position the mic in front of your mouth,
with lips touching the foam windscreen (Fig. 1).
This is necessary because the mic cancels sounds
that are not close to it. To prevent boom bounce,
the foam pop filter should press firmly against the
lips.
Fig. 1
YOKE
MOUNT
Specifications
BLOCK
Transducer type: Electret condenser.
MIC
Frequency response (typical):
50 Hz to 15 kHz (see Fig. 2).
Polar pattern: Cardioid (see Fig.3).
Impedance: 75 ohms balanced.
Open-circuit sensitivity, typical, close-talking:
4 mV/Pa* (–48 dB re 1 V/Pa*).
Power sensitivity, typical, close-talking:
–42.5 dB re 1 mW/Pa.
Equivalent noise level (self-noise): 26 dB SPL typical (0 dB=.0002 dyne/cm2), A-weighted.
S/N ratio: 68 dB at 94 dB SPL.
Maximum SPL: 148 dB SPL produces 3% THD.
Operating voltage: 9V DC internal alkaline battery (not
supplied) or 18-48V phantom power.
Polarity: Positive pressure on diaphragm produces
positive voltage on pin 2 with respect to pin 3 of
output connector.
Current drain: 5 mA.
Battery life: 110 hours.
Output connector: 3-pin pro audio (XLR type).
Cables: 2-conductor shielded, unbalanced cable,
4-feet (1.219-m) from mic capsule to battery pack.
Use 2-conductor shielded mic cable (not included)
between XLR-type connector and mixer mic input.
Materials: High-impact plastic mic housing and
headphone mount, steel mesh grille screen, brass
boom, steel wire headband, high-impact plastic and
steel battery pack.
Finish: Satin black.
Net weight: Headworn mic and mount, 2.3 oz.
(64 g). Belt pack and battery, 6.1 oz. (173 g).
Dimensions: See Figs. 4 and 5.
Included accessories: Microphone carrying case,
WS-6 foam pop filter, WS-13 two-stage pop filter
and WS-14 windscreen.
Optional accessories: PH-1A phantom power supply
(1 channel, battery or AC/DC adapter powered).
Replacement parts: WS-6 foam pop filter, WS-13
two-stage pop filter, and WS-14 windscreen.
*1 pascal = 10 dynes/cm2 = 10 microbars = 94 dB SPL.
BOOM
THUMBSCREW
Operation
1. Access the battery by sliding open the battery
cover.
2. Insert a fresh 9V alkaline battery (Mallory Duracell MN9100 or equivalent) into the battery clip.
The battery cover shows the correct polarity.
3. Replace the battery cover.
Connect the belt pack to the mixer using a 2-conductor shielded mic cable with XLR-type connectors. If your mixer lacks phantom power, either
turn on the battery switch on the belt pack, or use
a separate phantom-power supply (such as the
Crown PH-1A).
If you’re using phantom power and the battery
switch is on, the battery will automatically take
over if phantom power fails. Turn off the battery
switch when not in use to prolong battery life.
After 110 hours of use, or if the sound is distorted,
it’s time to replace the battery.
The Sony headphones might invert the polarity of
your voice signal, making it sound weak or colored
through the headphones. If this happens, you
might want to invert the polarity of your mixer mic
channel.
After several hours of use, the foam pop filter can
become clogged with moisture, giving a muffled
sound. You might want to remove the pop filter
periodically and let it dry. It can be washed in mild
detergent and water. Additional WS-6 and WS-13
filters for yourself or different users can be ordered
from Crown’s Parts Department.
How to program the mic on/off switch
Fig. 5
The mic on/off switch can be programmed to work
in three ways:
* Push-on/push-off (as supplied).
CM-311AHS
* Momentary on (push to talk).
* Momentary off (cough button).
To change the switch operation, open the belt-pack
case by removing the three screws. Set the switch
as shown below.
The microphone shall have an adjustable boom
with a locking thumbscrew, a battery belt pack, a
foam pop filter, a 2-stage pop filter, and a windscreen. The microphone shall mount to either earpiece of a Sony MDR-7506 or MDR-V6 headphone.
The LED lights when the mic is on.
TO XLR
PUSH ON/
PUSH OFF
MOM OFF
(COUGH)
MOM. ON
(P.T.T.)
A 4-foot, (1.219-m) permanently attached,
two-conductor shielded cable shall connect the
microphone to the belt pack. The belt pack shall
include a 3-pin pro audio (XLR type) connector,
battery on/off switch, programmable mic on/off
switch, and “Mic On” LED. The microphone shall
be powered by a 9V battery in the belt pack, or by
18 to 48V phantom power.
Fig. 6
PIN
BLOCK
INNER HALF
Fig. 2
Frequency Response
THUMBSCREW
BLOCK
OUTER HALF
How to assemble the WS-14 windscreen
1. REMOVE POP FILTER FROM MIC.
POP FILTER
Frequency in Hz
Warranty
Crown professional microphones are guaranteed
against malfunction for a period of three years
from date of original purchase. See enclosed warranty sheet for additional information.
MIC
2. SLIP FOAM TUBE OVER MIC.
Fig. 3
Polar Response
330
0
Nominal open-circuit sensitivity shall be 4 mV/Pa.
Maximum SPL shall be 148 dB SPL for 3% THD.
Equivalent noise shall be 26 dBA nominal. Frequency response shall be 50 Hz to 15,000 Hz with
a uniform off-axis response, over 20 dB down at
the rear null. The Crown model CM-311AHS is
specified.
FOAM TUBE
Service
30
FRONT
If the microphone does not function properly,
check that it is aimed correctly and is connected
as described in this datasheet. If the microphone
is defective, return it in the original packaging to:
Crown Factory Service, 1718 West Mishawaka
Road, Elkhart, IN 46517-9439. For further assistance or technical support call 800-342-6939.
MIC
-0
300
60
-5
3. ORIENT WINDSCREEN SO FLAT AREA WILL BE OVER
FRONT OF MIC. SLIP WINDSCREEN OVER FOAM TUBE
AND VELCRO STRAP.
-10
-15
-20
270
90
WINDSCREEN
4. GRAB THE WINDSCREEN’S OPEN END, AND
PINCH IT AROUND THE BOOM.
240
200 Hz
300 Hz-3 kHz
10 kHz
VELCRO STRAP
120
BOOM
REAR
210
180
150
5. WRAP VELCRO STRAP TIGHTLY AROUND END OF
WINDSCREEN.
Fig. 4
Crown International, Inc.
1718 W. Mishawaka Rd.
Elkhart, IN 46517-9439
TEL: 574-294-8000
FAX: 574-294-8FAX
www.crownaudio.com
BOOM
VELCRO STRAP
3 in.
(7.62 cm)
Architects’ and Engineers’ Specifications
3 in.
(7.62 cm)
7 in.
(17.78 cm)
The microphone shall be the Crown Model
CM-311AHS or equivalent. The microphone shall
be a head-worn noise-cancelling, cardioid type of
electret-condenser design. The microphone shall
exhibit excellent off-axis response and gain-beforefeedback.
©2005 Crown Audio®, Inc. Specifications subject to
change without prior notice. Latest information available at www.crownaudio.com. Crown, Crown Audio
and Differoid are registered trademarks of Crown
International.
7/05
102548-3A