1
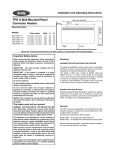
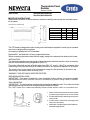
NEWera
Thermostatic Panel
Radiator
Owners Guide
a heating revolution from Creda
85301, 85302, 85303, 85304, 85305
85311, 85312, 85313, 85314, 85315
Model Numbers:
IMPORTANT INSTRUCTIONS
Retain these instructions for future reference, read them carefully and note also the information given
on the heater.
Dimensions (millimetres)
150
min
rnin
150
min
Model
85301
85302
85303
85304
85305
420
/
/
/
/
/
85311
85312
85313
85314
85315
Watt
750
1000
1250
1500
2000
A
444
614
614
682
852
B
93
93
93
93
93
150
150
min
The TPR Heater is designed for wall mounting on the wall brackets supplied. It should only be operated
when in the upright position as shown.
All models are splashproof to IP24 standard.
Models 8530.. are fitted with a 24 hour programmable timer.
Before connecting the heater check that the supply voltage is the same as that stated on the heater,
INSTALLATION:
The electrical installation must be carried out by a competent electrician and be in strict accordance
with the current National Wiring Regulations (BS7671).
The heater is fitted with a length of flexible cable type H05V V-F, size 3 x 1.0mm2 for connection to the
fixed wiring of the premises through a suitable connection box positioned adjacent to the heater.
The supply circuit to the heater must incorporate a means for disconnection in all poles in the
fixed wiring in accordance with the wiring rules.
WARNING -THIS APPLIANCE MUST BE EARTHED
BATHROOM INSTALLATION:
IMPORTANT - If the heater is installed in a room containing a bath or shower, it must be so installed
that switches and other controls cannot be touched by a person using a bath or shower.
WALL MOUNTING:
IMPORTANT - The wall brackets supplied with the appliance must be used. The heater should be
positioned observing the minimum clearances stated around the heater.
DO NOT locate the heater immediately below a fixed socket outlet or connection box.
1.
Remove wall mounting bracket from back of heater
by depressing spring latch at top of each bracket.
2. Fix wall bracket securely to wall through the four screw
holes provided.
200
Min.
3. Present heater to wall bracket, and engage lower
slots in back with bracket,
4. Raise heater to upright position and push heater onto
brackets to engage top latch.
THERMOSTAT MODELS 85311 / 85312 / 85313 / 85314 / 85315
The Panel - How it Works
Heating elements within the metal casing warm its front face for direct radiation into the room and a gentle circulation
of warm air around the room. A built-in thermostat with its adjustment knob towards the bottom of the right hand edge
of the panel, controls the room temperature by detecting this from the air passing upwards through the panel.
NOTE - Should your heater fail to come on when the thermostat knob is at a low setting, this may be due to the room
temperature being higher than the thermostat setting.
THERMOSTAT AND PROGRAMME TIMER MODELS
85301 / 85302 / 85303 / 85304 / 85305
An electric timer by which the heating panel can be switched on and off
automatically at predetermined times, is built into the top right hand corner of the
panel. If you are making use of this feature, you must, of course, leave the power
supply connected to the panel from the wall power point otherwise the timer will not
run. To select the automatic periods of heating, make sure that the timer dial is set to
read the correct time of day against its index mark (WARNING: TIME DIAL IS
CAPABLE ONLY OF BEING ROTATED CLOCKWISE). Push the segments
around the timer dial inwards at the appropriate times that you wish the panel to be
'ON'. This reveals an orange background. Each segment represents a
twenty minute ( 1 / 3 of an hour) period.
At the bottom of the control cover is a screwdriver operated lock. Other than actually
adjusting the controls, this lock should be kept in the locked position. Adjacent to the
timer dial is a switch with three settings:
Select this setting for the timer to give automatic control of the panel.
The panel is permanently switched off, although the power is still connected to it.
Provided the wall power point is switched on, at this setting the panel provides
continuous heating.
Quartz Electronic
Splashproof
SAFETY:
A thermal cut-out is fitted to all models, which will switch off the heater if, for any reason, it overheats. Should the cut-out
operate, determine the reason for over-heating before resetting the cut-out. To re-set the cut-out, switch off and
disconnect the electricity supply to the heater for a few minutes, after which time normal operation may be resumed.
DO NOT SPILL LIQUIDS ONTO THE APPLIANCE. IF YOU DO, SWITCH THE HEATER OFF AND GET A QUALIFIED
ELECTRICIAN TO CHECK IT.
DO NOT POKE OBJECTS THROUGH THE GRILL OR VENTILATION SLOTS.
THE SURFACES OF THIS HEATER WILL GET HOT THEREFORE WHEN YOUNG CHILDREN, ELDERLY OR INFIRM
PEOPLE ARE PRESENT THE APPLIANCE MUST BE ADEQUATELY GUARDED.
DO NOT USE POLISHES ON THE HEATER OR ON FURNITURE NEAR IT. The hot interior of the heater can produce
paraffin smells from the polish vapours which may last for a number of hours. To clean the heater switch off the mains
supply and wipe over with a damp cloth.
DO NOT DRAPE CLOTHING OR CURTAINS OVER THE HEATER OR STAND ANYTHING ON OR NEAR TO IT.
ENSURE THAT NOTHING IS PLACED AGAINST OR IN CONTACT WITH THE HEATER CASING. An air space of at
least 50mm (2") must be maintained around the heater. Any shelf or curtain installed above the heater must have a
minimum gap of 150mm (6") between the heater and the shelf or curtain.
WARNING: IF THE HEATER IS COVERED THERE IS A RISK OF FIRE. DO NOT SIT OR STAND ON THE HEATER.
DO NOT ATTEMPT TO REMOVE THE HEATER FROM ITS WALL BRACKET. DOING SO COULD CAUSE PERSONAL
INJURY OR STRESS TO THE ELECTRICAL CABLE AND ITS CONNECTIONS.
DO NOT ATTEMPT TO REPAIR THE HEATER YOURSELF. In case of breakdown or other failure, switch off the heater at
the wall switch and consult your supplier or Creda Service Centre. Always ensure that the heater is switched off at the wall
switch and the fuse removed before any repair is carried out.
DO NOT USE THIS HEATER FOR ANY PURPOSE OTHER THAN AS A ROOM HEATER.
This appliance is not intended for use by young children or infirm persons
without supervision.
Young children should be supervised to ensure that they do not play with
the appliance.
Applied Energy Products Ltd., Morley Way, Peterborough PE2 9JJ
Tel. +44(0)8709-000430
Fax. +44(0)8709-000530
For details of spares, service and guarantee see separate leaflet.
INCPUKRNGE/1