1
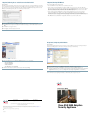
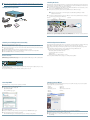
Note
Read the safety warnings in the Regulatory Compliance and Safety Information (RCSI), and follow proper safety procedures
when performing the steps in this guide. See http://www.cisco.com/go/asadocs for links to the RCSI and other documents.
1. Verifying the Package Contents
2. Installing the Chassis
The ASA ships with a default configuration that includes two preconfigured networks (the Inside network and the Outside network)
and an Inside interface configured for a DHCP server. Clients on the Inside network obtain a dynamic IP address from the ASA so that
they can communicate with each other as well as with devices on the Internet.
Step 1 Connect one end of a yellow Ethernet cable to Ethernet 0 on the ASA. (By default, Ethernet 0 is the Outside interface.) Connect
the other end to a cable/DSL/ISDN modem (the Outside network).
Step 2 Connect your devices (such as PCs, printers, and servers) with Ethernet cables to Ethernet 1 through 7.
Connect a PC to the ASA so that you can run the Adaptive Security Device Manager (ASDM). See “4. Initial
Configuration Considerations.”
Note
Securit
y
Services
Card Slo
t
POWER
48
VDC
CONSOL
E
7 POWER
over ETH
ERNET
6
5
4
3
Step 3 Connect Power over Ethernet (PoE) devices (such as Cisco IP Phones or network cameras) with Ethernet cables to switch ports
6 or 7 (the only ports providing power to PoE devices).
1
2
1
Cisco ASA 5505
2
0
RESET
Inside Network
Outside Network
Ports 1 − 7
Inside Network Interfaces
Port 0
Outside Network Interface
Blue console cable
Security
Services
Card Slot
Console
Power supply adapter
2
05
55
A rt
S ta
A S
co ck de
i s ui i
C Q Gu
POWER
48VDC
RESET
1
7 POWER over ETHERNET 6
5
4
3
1
0
Internet
3
Power cable
(US shown)
2
2
1
ISP Connection
Documentation
Cisco IP Phone
Web Server
PC
If you connect a server (such as a web server) to the ASA, you can use ASDM to make services on that server accessible by internal and
external users. See “7. (Optional) Allowing Access to Public Servers Behind the ASA.”
3. Powering on and Verifying Interface Connectivity
4. Initial Configuration Considerations
Step 1 Connect the power supply adaptor to the power cable.
The ASA ships with a default configuration that, in most cases, is sufficient for your basic deployment. You configure the ASA by using
ASDM. ASDM is a graphical interface that allows you to manage the ASA from any location by using a web browser.
Step 2 Connect the rectangular connector of the power supply adaptor to the power connector on the rear panel of the ASA.
Step 3 Connect the AC power connector of the power cable to an electrical outlet. (The ASA does not have a power switch. Completing
this step powers on the device.)
Step 4 Check the Power LED on the front of the ASA; if it is solid green, the device is powered on.
Step 5 Check your management PC to make sure it received an IP address on the 192.168.1.0/24 network using DHCP.
Step 6 Check the LINK/ACT indicators to verify interface connectivity.
Interface Connectivity
However, changing certain settings is recommended or required. For example, you should change the following settings from their
defaults:
• The privileged mode (enable) password that is required to administer the ASA through ASDM and the CLI
• When using the ASA as a VPN endpoint (using the SSL VPN features):
–
The hostname, domain name, and DNS server names
–
Outside interface IP address to a static address
–
Identity certificate
–
WINS names when access to Windows file shares is required
Use the Start up Wizard in ASDM to make these changes. See “6. Running the Startup Wizard.”
Each Ethernet interface has an LED to indicate a physical link is established. When the LED is solid green, a link is established. When
the LED is flashing green, there is network activity.
LINK/ACT Indicator
Power Indicator
LINK/ACT
Power
Status
Active
VPN
SSC
100 MBPS
0
0
0
0
0
0
0
0
Cisco ASA 5505 series
Adaptive Security Appliance
0
If a LINK/ACT LED is not lit, the link could be down due to a duplex mismatch. If auto-negotiation is disabled, verify you are using
a straight-through Ethernet cable.
For a description of all chassis components, see the hardware installation guide on Cisco.com.
5. Launching ASDM
6. Running the Startup Wizard
See the ASDM release notes on Cisco.com for the requirements to run ASDM.
Run the Startup Wizard to modify the default configuration so that you can customize the security policy to suit your deployment.
Using the startup wizard, you can set the following:
Step 1 On the PC connected to the ASA, launch a web browser.
• Hostname
• Static routes
Step 2 In the Address field, enter the following URL:
• Domain name
• DHCP server
https://192.168.1.1/admin
• Administrative passwords
• Network address translation rules
The Cisco ASDM web page appears.
• Interfaces
• and more...
• IP addresses
Step 3 Click Run Startup Wizard.
Step 4 Accept any certificates according to the dialog boxes that appear. The Cisco ASDM-IDM Launcher appears.
Step 1 If the wizard is not already running, in the main ASDM window, choose Wizards > Startup Wizard.
Step 5 Leave the username and password fields empty and click OK.
Step 2 Follow the instructions in the Startup Wizard to configure your ASA.
The main ASDM window appears and the Startup Wizard opens. See “6. Running the Startup Wizard.”
Step 3 While running the wizard, you can accept the default settings or change them as required. (For information about any wizard
field, click Help.)
7. (Optional) Allowing Access to Public Servers Behind the ASA
8. (Optional) Running VPN Wizards
ASA 8.2 and Later
You can configure VPN using the following wizards:
The Public Server pane automatically configures the security policy to make an inside server accessible from the Internet. As a business
owner, you might have internal network services, such as a web and FTP server, that need to be available to an outside user. You can
place these services on a separate network behind the ASA, called a demilitarized zone (DMZ). By placing the public servers on the
DMZ, any attacks launched against the public servers do not affect your inside networks.
• Site-to-Site VPN Wizard—Creates an IPsec site-to-site tunnel between two ASAs.
• (ASA 8.0 and later) AnyConnect VPN Wizard—Configures SSL VPN remote access for the Cisco AnyConnect VPN client.
AnyConnect provides secure SSL connections to the ASA for remote users with full VPN tunneling to corporate resources. The ASA
policy can be configured to download the AnyConnect Client to remote users when they initially connect via a browser. With
AnyConnect 3.0 and later, the client can run either the SSL or IPSec IKEv2 VPN protocol.
• (ASA 8.0 and later) Clientless SSL VPN Wizard—Configures clientless SSL VPN remote access for a browser. Clientless,
browser-based SSL VPN lets users establish a secure, remote-access VPN tunnel to the ASA using a web browser. After
authentication, users access a portal page and can access specific, supported internal resources. The network administrator provides
access to resources by users on a group basis. ACLs can be applied to restrict or allow access to specific corporate resources.
• IPsec (IKEv1) Remote Access VPN Wizard—Configures IPsec VPN remote access for the Cisco IPsec client.
Step 1 In the main ASDM window, choose Configuration > Firewall > Public Servers. The Public Server pane appears.
Step 2 Click Add, then enter the public server settings in the Add Public Server dialog box. (For information about any field, click
Help.)
Step 3 Click OK. The server appears in the list.
Step 4 Click Apply to submit the configuration to the ASA.
10. (Optional) Configuring the IPS Module
ASA 8.2 and Later
If your ASA came installed with a Security Services Card (SSC), you can use ASDM to set up the SSC and configure the Intrusion
Prevention System (IPS) application to run on the SSC. An SSC does not have any external interfaces.
Step 1 In the main ASDM window, choose Wizards > VPN Wizards, then choose one of the following:
• Site-to-Site VPN Wizard
• AnyConnect VPN Wizard
• Clientless VPN Wizard
Step 1 In the main ASDM window, choose Configuration > Device Setup > SSC Setup. The SSC pane appears.
• IPsec (IKEv1) Remote Access VPN Wizard
Step 2 Complete the SSC setup fields and click Apply. (For information about any field, click Help in the dialog box.)
Step 2 Follow the wizard instructions. (For information about any wizard field, click Help.)
Step 3 To configure the IPS module on the SSC, click the Configure the IPS SSC module link. The Startup Wizard appears. Click Launch
Startup Wizard. (Alternatively, you can choose Configure > IPS > Sensor Setup > Startup Wizard to access the wizard.)
For more information about configuring the IPS module, see the IPS module quick start guide on Cisco.com.
Q UICK S TART G UIDE
Americas Headquarters
Cisco Systems, Inc.
San Jose, CA
Asia Pacific Headquarters
Cisco Systems (USA) Pte. Ltd.
Singapore
Europe Headquarters
Cisco Systems International BV
Amsterdam, The Netherlands
Cisco has more than 200 offices worldwide. Addresses, phone numbers, and fax numbers are listed on the
Cisco Website at www.cisco.com/go/offices.
Cisco and the Cisco logo are trademarks or registered trademarks of Cisco and/or its affiliates in the U.S. and other countries. To view a list of Cisco trademarks, go to this URL: www.cisco.com/go/trademarks.
Third-party trademarks mentioned are the property of their respective owners. The use of the word partner does not imply a partnership relationship between Cisco and any other company. (1110R)
© 2011-2014 Cisco Systems, Inc. All rights reserved.
Printed in the USA on recycled paper containing 10% postconsumer waste.
78-19752-01
Cisco ASA 5505 Adaptive
Security Appliance