1
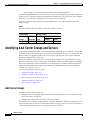
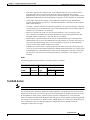
C H A P T E R
12
Configuring AAA Servers and User Accounts
This chapter describes support for AAA (pronounced “triple A”) and how to configure AAA servers and
the local database.
This chapter contains the following sections:
•
AAA Overview, page 12-1
•
AAA Server and Local Database Support, page 12-2
•
Configuring the Local Database, page 12-7
•
Identifying AAA Server Groups and Servers, page 12-12
•
Configuring an Authentication Prompt, page 12-20
•
Configuring an LDAP Attribute Map, page 12-21
AAA Overview
AAA enables the security appliance to determine who the user is (authentication), what the user can do
(authorization), and what the user did (accounting).
AAA provides an extra level of protection and control for user access than using access lists alone. For
example, you can create an access list allowing all outside users to access Telnet on a server on the DMZ
network. If you want only some users to access the server and you might not always know IP addresses
of these users, you can enable AAA to allow only authenticated and/or authorized users to make it
through the security appliance. (The Telnet server enforces authentication, too; the security appliance
prevents unauthorized users from attempting to access the server.)
You can use authentication alone or with authorization and accounting. Authorization always requires a
user to be authenticated first. You can use accounting alone, or with authentication and authorization.
This section includes the following topics:
•
About Authentication, page 12-1
•
About Authorization, page 12-2
•
About Accounting, page 12-2
About Authentication
Authentication controls access by requiring valid user credentials, which are typically a username and
password. You can configure the security appliance to authenticate the following items:
ASDM User Guide
OL-12180-01
12-1
Chapter 12
Configuring AAA Servers and User Accounts
AAA Server and Local Database Support
•
All administrative connections to the security appliance including the following sessions:
– Telnet
– SSH
– Serial console
– ASDM (using HTTPS)
– VPN management access
•
The enable command
•
Network access
•
VPN access
About Authorization
Authorization controls access per user after users authenticate. You can configure the security appliance
to authorize the following items:
•
Management commands
•
Network access
•
VPN access
Authorization controls the services and commands available to each authenticated user. Were you not to
enable authorization, authentication alone would provide the same access to services for all
authenticated users.
If you need the control that authorization provides, you can configure a broad authentication rule, and
then have a detailed authorization configuration. For example, you authenticate inside users who attempt
to access any server on the outside network and then limit the outside servers that a particular user can
access using authorization.
The security appliance caches the first 16 authorization requests per user, so if the user accesses the same
services during the current authentication session, the security appliance does not resend the request to
the authorization server.
About Accounting
Accounting tracks traffic that passes through the security appliance, enabling you to have a record of
user activity. If you enable authentication for that traffic, you can account for traffic per user. If you do
not authenticate the traffic, you can account for traffic per IP address. Accounting information includes
when sessions start and stop, username, the number of bytes that pass through the security appliance for
the session, the service used, and the duration of each session.
AAA Server and Local Database Support
The security appliance supports a variety of AAA server types and a local database that is stored on the
security appliance. This section describes support for each AAA server type and the local database.
This section contains the following topics:
•
Summary of Support, page 12-3
ASDM User Guide
12-2
OL-12180-01
Chapter 12
Configuring AAA Servers and User Accounts
AAA Server and Local Database Support
•
RADIUS Server Support, page 12-3
•
TACACS+ Server Support, page 12-4
•
SDI Server Support, page 12-4
•
NT Server Support, page 12-5
•
Kerberos Server Support, page 12-5
•
LDAP Server Support, page 12-5
•
SSO Support for Clientless SSL VPN with HTTP Forms, page 12-6
•
Local Database Support, page 12-6
Summary of Support
Table 12-1 summarizes the support for each AAA service by each AAA server type, including the local
database. For more information about support for a specific AAA server type, refer to the topics
following the table.
Table 12-1
Summary of AAA Support
Database Type
Local
RADIUS
TACACS+
SDI
NT
Kerberos
LDAP
HTTP
Form
VPN users
Yes
Yes
Yes
Yes
Yes
Yes
Yes
Yes1
Firewall sessions
Yes
Yes
Yes
Yes
Yes
Yes
Yes
No
Yes
Yes
Yes
No
AAA Service
Authentication of...
Administrators
Yes
Yes
Yes
Yes
2
Yes
Yes
No
No
No
No
Yes
No
Yes
No
No
No
No
No
No
Yes
No
No
No
No
No
Authorization of...
VPN users
Firewall sessions
Administrators
No
Yes
Yes
4
3
Accounting of...
VPN connections
No
Yes
Yes
No
No
No
No
No
Firewall sessions
No
Yes
Yes
No
No
No
No
No
Administrators
No
Yes5
Yes
No
No
No
No
No
1. HTTP Form protocol supports single sign-on authentication for Clientless SSL VPN connections only.
2. SDI is not supported for HTTP administrative access.
3. For firewall sessions, RADIUS authorization is supported with user-specific access lists only, which are received or
specified in a RADIUS authentication response.
4. Local command authorization is supported by privilege level only.
5. Command accounting is available for TACACS+ only.
RADIUS Server Support
The security appliance supports RADIUS servers.
ASDM User Guide
OL-12180-01
12-3
Chapter 12
Configuring AAA Servers and User Accounts
AAA Server and Local Database Support
This section contains the following topics:
•
Authentication Methods, page 12-4
•
Attribute Support, page 12-4
•
RADIUS Authorization Functions, page 12-4
Authentication Methods
The security appliance supports the following authentication methods with RADIUS:
•
PAP—For all connection types.
•
CHAP—For L2TP-over-IPSec.
•
MS-CHAPv1—For L2TP-over-IPSec.
•
MS-CHAPv2—For L2TP-over-IPSec, and for regular IPSec remote access connections when the
password management feature is enabled.
Attribute Support
The security appliance supports the following sets of RADIUS attributes:
•
Authentication attributes defined in RFC 2138.
•
Accounting attributes defined in RFC 2139.
•
RADIUS attributes for tunneled protocol support, defined in RFC 2868.
•
Cisco IOS VSAs, identified by RADIUS vendor ID 9.
•
Cisco VPN-related VSAs, identified by RADIUS vendor ID 3076.
•
Microsoft VSAs, defined in RFC 2548.
RADIUS Authorization Functions
The security appliance can use RADIUS servers for user authorization for network access using dynamic
access lists or access list names per user. To implement dynamic access lists, you must configure the
RADIUS server to support it. When the user authenticates, the RADIUS server sends a downloadable
access list or access list name to the security appliance. Access to a given service is either permitted or
denied by the access list. The security appliance deletes the access list when the authentication session
expires.
TACACS+ Server Support
The security appliance supports TACACS+ authentication with ASCII, PAP, CHAP, and MS-CHAPv1.
SDI Server Support
The RSA SecureID servers are also known as SDI servers.
This section contains the following topics:
•
SDI Version Support, page 12-5
ASDM User Guide
12-4
OL-12180-01
Chapter 12
Configuring AAA Servers and User Accounts
AAA Server and Local Database Support
•
Two-step Authentication Process, page 12-5
•
SDI Primary and Replica Servers, page 12-5
SDI Version Support
The security appliance supports SDI Version 5.0 and 6.0. SDI uses the concepts of an SDI primary and
SDI replica servers. Each primary and its replicas share a single node secret file. The node secret file has
its name based on the hexadecimal value of the ACE/Server IP address with .sdi appended.
A version 5.0 or 6.0 SDI server that you configure on the security appliance can be either the primary or
any one of the replicas. See the “SDI Primary and Replica Servers” section for information about how
the SDI agent selects servers to authenticate users.
Two-step Authentication Process
SDI version 5.0 and 6.0 uses a two-step process to prevent an intruder from capturing information from
an RSA SecurID authentication request and using it to authenticate to another server. The Agent first
sends a lock request to the SecurID server before sending the user authentication request. The server
locks the username, preventing another (replica) server from accepting it. This means that the same user
cannot authenticate to two security appliances using the same authentication servers simultaneously.
After a successful username lock, the security appliance sends the passcode.
SDI Primary and Replica Servers
The security appliance obtains the server list when the first user authenticates to the configured server,
which can be either a primary or a replica. The security appliance then assigns priorities to each of the
servers on the list, and subsequent server selection derives at random from those assigned priorities. The
highest priority servers have a higher likelihood of being selected.
NT Server Support
The security appliance supports Microsoft Windows server operating systems that support NTLM
version 1, collectively referred to as NT servers.
Note
NT servers have a maximum length of 14 characters for user passwords. Longer passwords are truncated.
This is a limitation of NTLM version 1.
Kerberos Server Support
The security appliance supports 3DES, DES, and RC4 encryption types.
Note
The security appliance does not support changing user passwords during tunnel negotiation. To avoid
this situation happening inadvertently, disable password expiration on the Kerberos/Active Directory
server for users connecting to the security appliance.
ASDM User Guide
OL-12180-01
12-5
Chapter 12
Configuring AAA Servers and User Accounts
AAA Server and Local Database Support
LDAP Server Support
This section describes using an LDAP directory with the security appliance for user authentication and
VPN authorization.
During authentication, the security appliance acts as a client proxy to the LDAP server for the user, and
authenticates to the LDAP server in either plain text or using the Simple Authentication and Security
Layer (SASL) protocol. By default, the security appliance passes authentication parameters, usually a
username and password, to the LDAP server in plain text. Whether using SASL or plain text, you can
secure the communications between the security appliance and the LDAP server with SSL.
Note
If you do not configure SASL, we strongly recommend that you secure LDAP communications with
SSL.
When user LDAP authentication has succeeded, the LDAP server returns the attributes for the
authenticated user. For VPN authentication, these attributes generally include authorization data which
is applied to the VPN session. Thus, using LDAP accomplishes authentication and authorization in a
single step.
For example configuration procedures used to set up LDAP authentication or authorization, see
Appendix B, “Configuring an External Server for Authorization and Authentication”.
SSO Support for Clientless SSL VPN with HTTP Forms
The security appliance can use the HTTP Form protocol for single sign-on (SSO) authentication of
Clientless SSL VPN only. Single sign-on support lets users enter a username and password only once to
access multiple protected services and Web servers. The Clientless SSL VPN server running on the
security appliance acts as a proxy for the user to the authenticating server. When a user logs in, the
Clientless SSL VPN server sends an SSO authentication request, including username and password, to
the authenticating server using HTTPS. If the server approves the authentication request, it returns an
SSO authentication cookie to the Clientless SSL VPN server. The security appliance keeps this cookie
on behalf of the user and uses it to authenticate the user to secure websites within the domain protected
by the SSO server.
In addition to the HTTP Form protocol, administrators can choose to configure SSO with the HTTP
Basic and NTLM authentication protocols (the auto-signon command), or with Computer Associates
eTrust SiteMinder SSO server (formerly Netegrity SiteMinder) as well. For an in-depth discussion of
configuring SSO with either HTTP Forms, auto-signon or SiteMinder, see the Clientless SSL VPN
chapter.
Local Database Support
The security appliance maintains a local database that you can populate with user profiles.
This section contains the following topics:
•
User Profiles, page 12-6
•
Fallback Support, page 12-7
ASDM User Guide
12-6
OL-12180-01
Chapter 12
Configuring AAA Servers and User Accounts
Configuring the Local Database
User Profiles
User profiles contain, at a minimum, a username. Typically, a password is assigned to each username,
although passwords are optional. You can add other information to a specific user profile. The
information you can add includes VPN-related attributes, such as a VPN session timeout value.
Fallback Support
The local database can act as a fallback method for several functions. This behavior is designed to help
you prevent accidental lockout from the security appliance.
For users who need fallback support, we recommend that their usernames and passwords in the local
database match their usernames and passwords in the AAA servers. This provides transparent fallback
support. Because the user cannot determine whether a AAA server or the local database is providing the
service, using usernames and passwords on AAA servers that are different than the usernames and
passwords in the local database means that the user cannot be certain which username and password
should be given.
The local database supports the following fallback functions:
•
Console and enable password authentication—If the servers in the group all are unavailable, the
security appliance uses the local database to authenticate administrative access. This can include
enable password authentication, too.
•
Command authorization—If the TACACS+ servers in the group all are unavailable, the local
database is used to authorize commands based on privilege levels.
•
VPN authentication and authorization—VPN authentication and authorization are supported to
enable remote access to the security appliance if AAA servers that normally support these VPN
services are unavailable. When VPN client of an administrator specifies a tunnel group configured
to fallback to the local database, the VPN tunnel can be established even if the AAA server group
is unavailable, provided that the local database is configured with the necessary attributes.
Configuring the Local Database
This section describes how to manage users in the local database. You can use the local database for
CLI access authentication, privileged mode authentication, command authorization, network access
authentication, and VPN authentication and authorization. You cannot use the local database for network
access authorization. The local database does not support accounting.
For multiple context mode, you can configure usernames in the system execution space to provide
individual logins using the login command; however, you cannot configure any aaa commands in the
system execution space.
This section includes the following topics:
•
User Accounts, page 12-7
•
Add/Edit User Account > Identity, page 12-9
•
Add/Edit User Account > VPN Policy, page 12-10
•
Identifying AAA Server Groups and Servers, page 12-12
ASDM User Guide
OL-12180-01
12-7
Chapter 12
Configuring AAA Servers and User Accounts
Configuring the Local Database
User Accounts
The User Accounts pane lets you manage the local user database. The local database is used for the
following features:
•
ASDM per-user access
By default, you can log into ASDM with a blank username and the enable password (see Device
Name/Password, page 10-12). However, if you enter a username and password at the login screen
(instead of leaving the username blank), ASDM checks the local database for a match.
Although you can configure HTTP authentication using the local database, that functionality is
always enabled by default. You should only configure HTTP authentication if you want to use a
RADIUS or TACACS+ server for authentication.
Note
•
Console authentication
•
Telnet and SSH authentication
•
enable command authentication
This setting is for CLI-access only and does not affect the ASDM login.
•
Command authorization
If you turn on command authorization using the local database, then the security appliance refers to
the user privilege level to determine what commands are available. Otherwise, the privilege level is
not generally used. By default, all commands are either privilege level 0 or level 15. ASDM allows
you to enable three predefined privilege levels, with commands assigned to level 15 (Admin), level
5 (Read Only), and level 3 (Monitor Only). If you use the predefined levels, then assign users to one
of these three privilege levels.
•
Network access authentication
•
VPN client authentication
You cannot use the local database for network access authorization.
For multiple context mode, you can configure usernames in the system execution space to provide
individual logins at the CLI using the login command; however, you cannot configure any aaa
commands that use the local database in the system execution space.
Note
VPN functions are not supported in multiple context mode.
To configure the enable password from this pane (instead of in Device Name/Password, page 10-12),
change the password for the enable_15 user. The enable_15 user is always present in this pane, and
represents the default username. This method of configuring the enable password is the only method
available in ASDM for the system configuration. If you configured other enable level passwords at the
CLI (enable password 10, for example), then those users are listed as enable_10, etc.
Fields
•
User Name—Specifies the user name to which these parameters apply.
•
Privilege (Level)—Specifies the privilege level assigned to that user. The privilege level is used with
local command authorization.
•
VPN Group Policy—Specifies the name of the VPN group policy for this user. Not available in
multimode.
ASDM User Guide
12-8
OL-12180-01
Chapter 12
Configuring AAA Servers and User Accounts
Configuring the Local Database
•
VPN Group Lock—Specifies what, if any, group lock policy is in effect for this user. Not available
in multimode.
•
Add—Displays the Add User Account dialog box.
•
Edit—Displays the Edit User Account dialog box.
•
Delete—Removes the selected row from the table. There is no confirmation or undo.
Modes
The following table shows the modes in which this feature is available:
Firewall Mode
Security Context
Multiple
Routed
•
Transparent Single
•
•
Context
•
System
—
Add/Edit User Account > Identity
Use this pane to specify parameters that identify the user account you want to add or change. The
changes appear in the User Accounts table as soon as you click OK.
Fields
•
Username—Specifies the username for this account.
•
Change user password—When editing an existing user, check this box to change the password.
– Password—Specifies the unique password for this user. The minimum password length is 4
characters. The maximum is 32 characters. Entries are case-sensitive. The field displays only
asterisks.
To protect security, we recommend a password length of at least 8 characters.
– Confirm Password—Asks you to re-enter the user password to verify it. The field displays only
asterisks.
•
User authenticated using MSCHAP—Specifies that the password will be converted to unicode and
hashed using MD4 after you enter it. Use this option if users are authenticated using MSCHAPv1
or MSCHAPv2
•
Member-of—Specifies the VPN groups that the user belongs to.
– Member-of—Enter the name of a VPN group.
– Add—Adds the VPN group to the list.
– Delete—Deletes a VPN group from the list.
•
Access Restriction—This section sets the management access level for a user. You must first enable
management authorization using the Perform authorization for exec shell access option on the
Configuration > Device Management > Users/AAA > AAA Access > Authorization tab.
– Full Access (ASDM, Telnet, SSH and console)—If you configure authentication for
management access using the local database (see the “Configuring Authentication for CLI,
ASDM, and enable command Access” section on page 13-27), then this option lets the user use
ASDM, SSH, Telnet, and the console port. If you also configure enable authentication, then the
user can access global configuration mode.
ASDM User Guide
OL-12180-01
12-9
Chapter 12
Configuring AAA Servers and User Accounts
Configuring the Local Database
Privilege Level—Selects the privilege level for this user to use with local command
authorization. The range is 0 (lowest) to 15 (highest). See the “Configuring Local Command
Authorization” section on page 13-31 for more information.
– CLI login prompt for SSH, Telnet and console (no ASDM access)—If you configure
authentication for management access using the local database (see the “Configuring
Authentication for CLI, ASDM, and enable command Access” section on page 13-27), then this
option lets the user use SSH, Telnet, and the console port. The user cannot use ASDM for
configuration (if you configure HTTP authentication). ASDM monitoring is allowed. If you also
configure enable authentication, then the user cannot access global configuration mode.
– No ASDM, SSH, Telnet, or console access—If you configure authentication for management
access using the local database (see the “Configuring Authentication for CLI, ASDM, and
enable command Access” section on page 13-27), then this option disallows the user from
accessing any management access method for which you configured authentication (excluding
the Serial option; serial access is allowed).
Modes
The following table shows the modes in which this feature is available:
Firewall Mode
Security Context
Multiple
Routed
•
Transparent Single
•
•
Context
•
System
—
Add/Edit User Account > VPN Policy
Use this pane to specify VPN policies for this user. Check an Inherit check box to let the corresponding
setting take its value from the group policy.
Fields
•
Group Policy—Lists the available group policies.
•
Tunneling Protocols—Specifies what tunneling protocols that this user can use, or whether to inherit
the value from the group policy. Check the desired Tunneling Protocols check boxes to select the
VPN tunneling protocols that this user can use. Users can use only the selected protocols. The
choices are as follows:
IPSec—IP Security Protocol. IPSec provides the most complete architecture for VPN tunnels, and
it is perceived as the most secure protocol. Both LAN-to-LAN (peer-to-peer) connections and
client-to-LAN connections can use IPSec.
Clientless SSL VPN—VPN via SSL/TLS. Uses a web browser to establish a secure remote-access
tunnel to a VPN Concentrator; requires neither a software nor hardware client. Clientless SSL VPN
can provide easy access to a broad range of enterprise resources, including corporate websites,
web-enabled applications, NT/AD file share (web-enabled), e-mail, and other TCP-based
applications from almost any computer that can reach HTTPS Internet sites.
SSL VPN Client—Lets users connect after downloading the Cisco AnyConnect Client application.
Users use a clientless SSL VPN connection to download this application the first time. Client
updates then occur automatically as needed whenever the user connects.
ASDM User Guide
12-10
OL-12180-01
Chapter 12
Configuring AAA Servers and User Accounts
Configuring the Local Database
L2TP over IPSec—Allows remote users with VPN clients provided with several common PC and
mobile PC operating systems to establish secure connections over the public IP network to the
security appliance and private corporate networks.
Note
If no protocol is selected, an error message appears.
•
Filter—Specifies what filter to use, or whether to inherit the value from the group policy. Filters
consist of rules that determine whether to allow or reject tunneled data packets coming through the
security appliance, based on criteria such as source address, destination address, and protocol. To
configure filters and rules, see the Configuration > VPN > VPN General > Group Policy pane.
•
Manage—Displays the ACL Manager pane, on which you can add, edit, and delete Access Control
Lists (ACLs) and Extended Access Control Lists (ACEs).
•
Tunnel Group Lock—Specifies whether to inherit the tunnel group lock or to use the selected tunnel
group lock, if any. Selecting a specific lock restricts users to remote access through this group only.
Tunnel Group Lock restricts users by checking if the group configured in the VPN client is the same
as the user’s assigned group. If it is not, the security appliance prevents the user from connecting. If
the Inherit check box is not selected, the default value is --None--.
•
Store Password on Client System—Specifies whether to inherit this setting from the group.
Deselecting the Inherit check box activates the Yes and No radio buttons. Selecting Yes stores the
login password on the client system (potentially a less-secure option). Selecting No (the default)
requires the user to enter the password with each connection. For maximum security, we recommend
that you not do allow password storage. This parameter has no bearing on interactive hardware client
authentication or individual user authentication for a VPN 3002.
•
Connection Settings—Specifies the connection settings parameters.
– Access Hours—If the Inherit check box is not selected, you can select the name of an existing
access hours policy, if any, applied to this user or create a new access hours policy. The default
value is Inherit, or, if the Inherit check box is not selected, the default value is --Unrestricted--.
– New—Opens the Add Time Range dialog box, on which you can specify a new set of access
hours.
– Simultaneous Logins—If the Inherit check box is not selected, this parameter specifies the
maximum number of simultaneous logins allowed for this user. The default value is 3. The
minimum value is 0, which disables login and prevents user access.
Note
While there is no maximum limit, allowing several simultaneous connections could
compromise security and affect performance.
– Maximum Connect Time—If the Inherit check box is not selected, this parameter specifies the
maximum user connection time in minutes. At the end of this time, the system terminates the
connection. The minimum is 1 minute, and the maximum is 2147483647 minutes (over 4000
years). To allow unlimited connection time, select the Unlimited check box (the default).
– Idle Timeout—If the Inherit check box is not selected, this parameter specifies this user’s idle
timeout period in minutes. If there is no communication activity on the user’s connection in this
period, the system terminates the connection. The minimum time is 1 minute, and the maximum
time is 10080 minutes. This value does not apply to users of clientless SSL VPN connections.
•
Dedicated IP Address (Optional)—
– IP Address box—Specifies the optional Dedicated IP address.
ASDM User Guide
OL-12180-01
12-11
Chapter 12
Configuring AAA Servers and User Accounts
Identifying AAA Server Groups and Servers
– Subnet Mask list—Specifies the subnet mask for the Dedicated IP address.
Check the Group Lock check box to restrict users to remote access through this group only. Group Lock
restricts users by checking if the group configured in the VPN client is the same as the user’s assigned
group. If it is not, the VPN Concentrator prevents the user from connecting.
If this box is unchecked (the default), the system authenticates a user without regard to the user’s
assigned group.
Modes
The following table shows the modes in which this feature is available:
Firewall Mode
Security Context
Multiple
Routed
•
Transparent Single
•
Context
•
•
System
—
Identifying AAA Server Groups and Servers
If you want to use an external AAA server for authentication, authorization, or accounting, you must first
create at least one AAA server group per AAA protocol and add one or more servers to each group. You
identify AAA server groups by name. Each server group is specific to one type of server: Kerberos,
LDAP, NT, RADIUS, SDI, or TACACS+.
The security appliance contacts the first server in the group. If that server is unavailable, the security
appliance contacts the next server in the group, if configured. If all servers in the group are unavailable,
the security appliance tries the local database if you configured it as a fallback method (management
authentication and authorization only). If you do not have a fallback method, the security appliance
continues to try the AAA servers.
This section includes the following topics:
•
AAA Server Groups, page 12-12
•
Add/Edit AAA Server Group, page 12-14
•
Edit AAA Local Server Group, page 12-15
•
Add/Edit AAA Server, page 12-15
•
Test AAA Server, page 12-19
AAA Server Groups
The AAA Server Groups pane lets you:
•
Configure AAA server groups and the protocols the security appliance uses to communicate with
the servers listed in each group.
•
Configure and add individual servers to AAA server groups.
You can have up to 15 groups in single-mode or 4 groups in multi-mode. Each group can have up to 16
servers in single mode or 4 servers in multi-mode. When a user logs in, the servers are accessed one at
a time, starting with the first server you specify, until a server responds.
ASDM User Guide
12-12
OL-12180-01
Chapter 12
Configuring AAA Servers and User Accounts
Identifying AAA Server Groups and Servers
If AAA accounting is in effect, the accounting information goes only to the active server, unless you have
configured simultaneous accounting.
For an overview of AAA services, see the “AAA Overview” section on page 12-1.
Fields
The fields in the AAA Server Groups pane are grouped into two main areas: the AAA Server Groups
area and the Servers In The Selected Group area. The AAA Server Groups area lets you configure AAA
server groups and the protocols the security appliance uses to communicate with the servers listed in
each group.
Note
Double-clicking any of the rows in the AAA Server Groups table opens the Edit AAA Server Group
dialog box, in which you can modify the AAA Server Group parameters. These changes are immediately
reflected in the table, but you must click Apply to save them to the configuration.
Clicking a column head sorts the table rows in alphanumeric order according to the contents of that
column.
•
Server Group—Display only. Shows the symbolic name of the selected server group.
•
Protocol—Display only. Lists the AAA protocol that servers in the group support.
•
Accounting Mode—Display only. Shows either simultaneous or single mode accounting. In single
mode, the security appliance sends accounting data to only one server. In simultaneous mode, the
security appliance sends accounting data to all servers in the group.
•
Reactivation Mode—Display only. Shows the method by which failed servers are reactivated:
Depletion or Timed reactivation mode. In Depletion mode, failed servers are reactivated only after
all of the servers in the group are inactive. In Timed mode, failed servers are reactivated after 30
seconds of down time.
•
Dead Time—Display only. Shows the number of minutes that will elapse between the disabling of
the last server in the group and the subsequent reenabling of all servers. This parameter applies only
in depletion mode.
•
Max Failed Attempts—Display only. Shows the number of failed connection attempts allowed
before declaring a nonresponsive server inactive.
•
Add—Displays the Add AAA Server Group dialog box.
•
Edit—Displays the Edit AAA Server Group dialog box, or, if you have selected LOCAL as the
server group, displays the Edit AAA Local Server Group dialog box.
•
Delete—Removes the currently selected server group entry from the server group table. There is no
confirmation or undo.
The Servers In Selected Group area, the second area of the AAA Server Groups pane, lets you add and
configure AAA servers for existing AAA server groups. The servers can be RADIUS, TACACS+, NT,
SDI, Kerberos, LDAP, or HTTP-form servers.
•
Server Name or IP Address—Display only. Shows the name or IP address of the AAA server.
•
Interface—Display only. Shows the network interface where the authentication server resides.
•
Timeout—Display only. Shows the timeout interval, in seconds. This is the time after which the
security appliance gives up on the request to the primary AAA server. If there is a standby AAA
server, the security appliance sends the request to the backup server.
•
Add/Edit—Displays the Add/Edit AAA Server dialog box.
ASDM User Guide
OL-12180-01
12-13
Chapter 12
Configuring AAA Servers and User Accounts
Identifying AAA Server Groups and Servers
•
Delete—Removes the selected AAA server from the list.
•
Move up—Moves the selected AAA server up in the AAA sequence.
•
Move down—Moves the selected AAA server back in the AAA sequence.
•
Test—Displays the Test AAA Server dialog box.
Modes
The following table shows the modes in which this feature is available:
Firewall Mode
Security Context
Multiple
Routed
Transparent Single
•
•
1
•
Context
•
System
—
1. HTTP Form and Clientless SSL VPN are supported only in single routed mode.
Add/Edit AAA Server Group
The Add/Edit AAA Server Group dialog box lets you add or modify AAA server groups. The results
appear in the AAA Server table.
Fields
•
Server Group—Display only. Shows the name of the selected server group.
•
Protocol drop-down list—Specifies the protocols supported by servers in the group. They include
RADIUS, TACACS+, NT Domain, SDI, Kerberos, LDAP, and HTTP Form for single sign-on (users
of Clientless SSL VPN only).
The following fields are not available after selecting the HTTP Form protocol.
Note
•
Accounting Mode—Specifies the accounting mode used with the server group.
– Simultaneous—Configures the security appliance to send accounting data to all servers in the
group.
– Single—Configures the security appliance to send accounting data to only one server of the
group.
•
Reactivation Mode—Specifies the method by which failed servers are reactivated.
– Depletion—Configures the security appliance to reactivate failed servers only after all of the
servers in the group are inactive.
– Timed—Configures the security appliance to reactive failed servers after 30 seconds of down
time.
•
Dead Time—Specifies the number of minutes that will elapse between the disabling of the last
server in the group and the subsequent reenabling of all servers. This field is not available for timed
mode.
•
Max Failed Attempts—Specifies the number of failed connection attempts (1 through 5) allowed
before declaring a nonresponsive server inactive.
ASDM User Guide
12-14
OL-12180-01
Chapter 12
Configuring AAA Servers and User Accounts
Identifying AAA Server Groups and Servers
Modes
The following table shows the modes in which this feature is available:
Firewall Mode
Security Context
Multiple
Routed
Transparent Single
•
•
1
•
Context
•
System
—
1. HTTP Form and Clientless SSL VPN are supported only in single routed mode.
Edit AAA Local Server Group
The Edit AAA Local Server Group dialog box lets you specify whether to enable local user lockout and
the maximum number of failed login attempts to allow before locking out the user. If a user is locked
out, and administrator must clear the lockout condition before the user can successfully log in.
Fields
•
Enable Local User Lockout —Enables locking out and denying access to a user who has exceeded
the configured maximum number of failed authentication attempts.
•
Maximum Attempts—Specifies the maximum number of failed login attempts allowed before
locking out and denying access to a user. This limit applies only when the LOCAL database is used
for authentication.
Modes
The following table shows the modes in which this feature is available:
Firewall Mode
Security Context
Multiple
Routed
•
Transparent Single
•
1
•
Context
•
System
—
1. HTTP Form and Clientless SSL VPN are supported only in single routed mode.
Add/Edit AAA Server
The Add/Edit AAA Server dialog box lets you modify the parameters of an existing AAA server or add
a new AAA server to an existing group selected in the AAA server groups table.
Fields
Note
The first four fields are the same for all types of servers. The area contents area is specific to each server
type.
•
Server Group—Display only. Shows the name of the server group.
•
Interface Name—Specifies the network interface where the server resides.
ASDM User Guide
OL-12180-01
12-15
Chapter 12
Configuring AAA Servers and User Accounts
Identifying AAA Server Groups and Servers
•
Server Name or IP Address—Specifies the name or IP address of the AAA server.
•
Timeout—Specifies the timeout interval, in seconds. This is the time after which the security
appliance gives up on the request to the primary AAA server. If there is a standby AAA server, the
security appliance sends the request to the backup server.
•
RADIUS Parameters area—Specifies the parameters needed for using a RADIUS server. This area
appears only when the selected server group uses RADIUS.
– Retry Interval—Specifies the number of seconds to wait after sending a query to the server and
receiving no response, before reattempting the connection. The minimum time is 1 second. The
default time is 10 seconds. The maximum time is 10 seconds.
– Server Authentication Port—Specifies the server port to use for user authentication. The default
port is 1645.
Note
The latest RFC states that RADIUS should be on UDP port number 1812, so you might need to
change this default value to 1812.
– Server Accounting Port—Specifies the server port to use for user accounting. The default port
is 1646.
– Server Secret Key—Specifies the server secret key (also called the shared secret) to use for
encryption; for example: C8z077f. The secret is case-sensitive. The security appliance uses the
server secret to authenticate to the RADIUS server. The server secret you configure here should
match the one configured on the RADIUS server. If you do not know the server secret for the
RADIUS server, ask the administrator of the RADIUS server. The maximum field length is 64
characters.
– Common Password—Specifies the common password for the group. The password is
case-sensitive. If you are defining a RADIUS server to be used for authentication rather than
authorization, do not provide a common password.
A RADIUS authorization server requires a password and username for each connecting user.
You enter the password here. The RADIUS authorization server administrator must configure
the RADIUS server to associate this password with each user authorizing to the server via this
security appliance. Be sure to provide this information to your RADIUS server administrator.
Enter a common password for all users who are accessing this RADIUS authorization server
through this security appliance.
If you leave this field blank, each user password will be his or her own username. For example,
a user with the username “jsmith” would enter “jsmith”. As a security precaution never use a
RADIUS authorization server for authentication. Use of a common password or usernames as
passwords is much less secure than strong passwords per user.
Note
The password field is required by the RADIUS protocol and the RADIUS server requires it;
however, users do not need to know it.
– ACL Netmask Convert—Specifies how the security appliance handles netmasks received in
downloadable access lists. The security appliance expects downloadable access lists to contain
standard netmask expressions whereas Cisco Secure VPN 3000 series concentrators expect
downloadable access lists to contain wildcard netmask expressions, which are the reverse of a
standard netmask expression. A wildcard mask has ones in bit positions to ignore, zeros in bit
positions to match. The ACL Netmask Convert list helps minimize the effects of these
differences upon how you configure downloadable access lists on your RADIUS servers.
ASDM User Guide
12-16
OL-12180-01
Chapter 12
Configuring AAA Servers and User Accounts
Identifying AAA Server Groups and Servers
If you choose Detect Automatically, the security appliance attempts to determine the type of
netmask expression used. If it detects a wildcard netmask expression, it converts it to a standard
netmask expression; however, because some wildcard expressions are difficult to detect
unambiguously, this setting may occasionally misinterpret a wildcard netmask expression as a
standard netmask expression.
If you choose Standard, the security appliance assumes downloadable access lists received from
the RADIUS server contain only standard netmask expressions. No translation from wildcard
netmask expressions is performed.
If you choose Wildcard, the security appliance assumes downloadable access lists received from
the RADIUS server contain only wildcard netmask expressions and it converts them all to
standard netmask expressions when the access lists are downloaded.
•
TACACS+ Parameters—Specifies the parameters needed for using a TACACS+ server. This area
appears only when the selected server group uses TACACS+.
– Server Port—Specifies the server port to use.
– Server Secret Key—Specifies the server secret key to use for encryption. The secret is
case-sensitive. The field displays only asterisks.
•
SDI Parameters—Specifies the parameters needed for using an SDI server. This area appears only
when the selected server group uses SDI.
– Server Port—Specifies the server port to use.
– Retry Interval—Specifies the number of seconds to wait before reattempting the connection.
•
Kerberos Parameters—Specifies the parameters needed for using a Kerberos server. This area
appears only when the selected server group uses Kerberos.
– Server Port—Specifies the server port that the Kerberos server listens to.
– Retry Interval—Retry Interval value is the amount of time between retry attempts and its range
is 1 to 10 seconds.
– Kerberos Realm—Specifies the name of the Kerberos realm to use, for example:
USDOMAIN.ACME.COM. The maximum length is 64 characters. The following types of
servers require that you enter the realm name in all uppercase letters: Windows 2000, Windows
XP, and Windows.NET. You must enter this name, and it must be the correct realm name for the
server whose IP address you entered in the Server IP Address field.
•
LDAP Parameters—Specifies the parameters needed for using an LDAP server. This area appears
only when the selected server group uses LDAP.
– Enable LDAP Over SSL—Specifies that SSL secures communications between the security
appliance and the LDAP server. Also called secure LDAP.
– Server Port—Specifies the server port to use. Enter the TCP port number by which you access
the server.
– Server Type—Lets you manually set the LDAP server type, or lets you specify auto-detection
for server type determination.
– Base DN—Specifies the Base DN. Enter the location in the LDAP hierarchy where the server
should begin searching when it receives an authorization request. For example, OU=people,
dc=cisco, dc=com.
– Scope—Specifies the extent of the search in the LDAP hierarchy that the server should make
when it receives an authorization request—One Level (Search only one level beneath the Base
DN. This option is quicker.) All Levels (Search all levels beneath the Base DN; in other words,
search the entire subtree hierarchy. This option takes more time.)
ASDM User Guide
OL-12180-01
12-17
Chapter 12
Configuring AAA Servers and User Accounts
Identifying AAA Server Groups and Servers
– Naming Attribute(s)—Specifies the Relative Distinguished Name attribute (or attributes) that
uniquely identifies an entry on the LDAP server. Common naming attributes are Common Name
(cn) and User ID (uid).
– Login DN—Specifies the login DN. Some LDAP servers (including the Microsoft Active
Directory server) require the security appliance to establish a handshake via authenticated
binding before they will accept requests for any other LDAP operations. The security appliance
identifies itself for authenticated binding by attaching a Login DN field to the user
authentication request. The Login DN field defines the security appliance’s authentication
characteristics; these characteristics should correspond to those of a user with administration
privileges. Enter the name of the directory object for security appliance authenticated binding,
for example: cn=Administrator, cn=users, ou=people, dc=Example Corporation, dc=com. For
anonymous access, leave this field blank.
– Login Password—Specifies the login password. The characters you type are replaced with
asterisks.
– LDAP Attribute Map—Lists the LDAP attribute maps that you can apply to LDAP server. The
LDAP attribute map translates Cisco attribute names into user-defined attribute names and
values.
– SASL MD5 authentication—Specifies that the MD5 mechanism of the Simple Authentication
and Security Layer secures authentication communications between the security appliance and
the LDAP server.
– SASL Kerberos authentication—Specifies that Kerberos mechanism of the Simple
Authentication and Security Layer secures authentication communications between the security
appliance and the LDAP server.
– Kerberos Server Group—Specifies the Kerberos server or server group used for authentication.
The Kerberos Server group option is disabled by default and is enabled only when SASL
Kerberos authentication is chosen.
•
NT Domain Parameters—Specifies the parameters needed for using an NT server and includes the
following fields:
– Server Port—Specifies the TCP port number by which you access the server. The default port
number is 139.
– NT Domain Controller— Specifies the NT Primary Domain Controller host name for this
server, for example: PDC01. The maximum host name length is 15 characters. You must enter
this name, and it must be the correct host name for the server for which you entered the IP
Address in Authentication Server Address; if the name is incorrect, authentication fails.
•
HTTP Form Parameters—Specifies the parameters for the HTTP Form protocol for single sign-on
authentication, available only to users of Clientless SSL VPN. This area appears only when the
selected server group uses HTTP Form, and only the Server Group name and the protocol are visible.
Other fields are not available when using HTTP Form.
To configure SSO with the HTTP protocol correctly, you must have a thorough working
knowledge of authentication and HTTP protocol exchanges.
Note
If you do not know what the following parameters are, use an HTTP header analyzer to extract the
data from the HTTP GET and POST exchanges when logging into the authenticating web server
directly, not through the security appliance. See the Clientless SSL VPN chapter in the Cisco
Security Appliance Command Line Configuration Guide for more detail on extracting these
parameters from the HTTP exchanges.
ASDM User Guide
12-18
OL-12180-01
Chapter 12
Configuring AAA Servers and User Accounts
Identifying AAA Server Groups and Servers
– Start URL—Specifies the complete URL of the authenticating web server location where a
pre-login cookie can be retrieved. This parameter must be configured only when the
authenticating web server loads a pre-login cookie with the login page. A drop-down list offers
both HTTP and HTTPS. The maximum number of characters is 1024, and there is no minimum.
– Action URI—Specifies the complete Uniform Resource Identifier for the authentication
program on the authorizing web server. The maximum number of characters for the complete
URI is 2048 characters.
– Username—Specifies the name of a username parameter—not a specific username—that must
be submitted as part of the HTTP form used for SSO authentication. The maximum number of
characters is 128, and there is no minimum.
– Password—Specifies the name of a user password parameter—not a specific password
value—that must be submitted as part of the HTTP form used for SSO authentication. The
maximum number of characters is 128, and there is no minimum.
– Hidden Values—Specifies hidden parameters for the HTTP POST request submitted to the
authenticating web server for SSO authentication. This parameter is necessary only when it is
expected by the authenticating web server as indicated by its presence in the HTTP POST
request. The maximum number of characters is 2048.
– Authentication Cookie Name—(Optional) Specifies the name of the cookie that is set by the
server on successful login and that contains the authentication information. It is used to assign
a meaningful name to the authentication cookie to help distinguish it from other cookies that
the web server may pass back. The maximum number of characters is 128, and there is no
minimum.
Modes
The following table shows the modes in which this feature is available:
Firewall Mode
Security Context
Multiple
Routed
•
Transparent Single
•
1
•
Context
•
1.
System
—
1. HTTP Form and Clientless SSL VPN are supported only in single routed mode.
Test AAA Server
Note
Test AAA Server is not available for HTTP Form authentication servers.
Use the Test button to determine whether the security appliance can contact the selected AAA server.
Failure to reach the AAA server may be due to incorrect configuration in ASDM or the AAA server may
be unreachable for other reasons, such as restrictive network configurations or server downtime.
After you complete the fields in this dialog box and click OK, the security appliance sends the applicable
test message to the selected server. If the test fails, ASDM displays an error message about the type of
error encountered. If the error message suggests a configuration error in ASDM, correct the
configuration and try the test again.
ASDM User Guide
OL-12180-01
12-19
Chapter 12
Configuring AAA Servers and User Accounts
Configuring an Authentication Prompt
Tip
Checking for basic network connectivity to the AAA server may save you time in troubleshooting. To
test basic connectivity, click Tools > Ping.
Fields
•
AAA Server Group—Display only. Shows the AAA server group that the selected AAA server
belongs to.
•
Host —Display only. Shows the hostname of the AAA server you selected.
•
Authorization—Specifies that ASDM tests authorizing a user with the selected AAA server. If the
server type selected does not support authorization, this radio button is not available. For example,
the security appliance cannot support authorization with Kerberos servers.
•
Authentication—Specifies that ASDM tests authenticating a user with the selected AAA server. If
the server type selected does not support authentication, this radio button is not available. For
example, the security appliance cannot support authentication with LDAP servers.
•
Username—Specifies the username you want to use to test the AAA server. Make sure the username
exists on the AAA server; otherwise, the test will fail.
•
Password—Specifies the password for the username you entered in the Username field. The
Password field is available only for authentication tests. Make sure the password is correct for the
username entered; otherwise, the authentication test will fail.
Modes
The following table shows the modes in which this feature is available:
Firewall Mode
Security Context
Multiple
Routed
•
Transparent Single
•
1
•
Context
•
System
—
1. HTTP Form and Clientless SSL VPN are supported only in single routed mode.
Configuring an Authentication Prompt
The Authentication Prompt pane (Configuration > Device Management > Users/AAA) lets you specify
text to display to the user during the AAA authentication challenge process.You can specify the AAA
challenge text for HTTP, FTP, and Telnet access through the security appliance when requiring user
authentication from TACACS+ or RADIUS servers. This text is primarily for cosmetic purposes and
displays above the username and password prompts that users view when logging in.
If the user authentication occurs from Telnet, you can use the User accepted message and User rejected
message options to display different status prompts to indicate that the authentication attempt is accepted
or rejected by the AAA server.
If the AAA server authenticates the user, the security appliance displays the User accepted message text,
if specified, to the user; otherwise it displays the User rejected message text, if specified. Authentication
of HTTP and FTP sessions displays only the challenge text at the prompt. The User accepted message
and User rejected message text are not displayed.
ASDM User Guide
12-20
OL-12180-01
Chapter 12
Configuring AAA Servers and User Accounts
Configuring an LDAP Attribute Map
Note
Microsoft Internet Explorer displays up to 37 characters in an authentication prompt. Netscape
Navigator displays up to 120 characters, and Telnet and FTP display up to 235 characters in an
authentication prompt.
Fields
Note
•
Prompt—(Optional) Enables the display of AAA challenge text, specified in the field below the
check box, for through-the-security appliance user sessions.
•
Text—(Optional) Specify a string of up to 235 alphanumeric characters or 31 words, limited by
whichever maximum is first reached. Do not use special characters; however, spaces and punctuation
characters are permitted. Entering a question mark or pressing the Enter key ends the string. (The
question mark appears in the string.)
•
User accepted message—(Optional) Enables the display of text, specified in the field below the
check box, confirming that the user has been authenticated.
•
User rejected message—(Optional) Enables the display of text, specified in the field below the check
box, indicating that authentication failed.
All of the fields in this pane are optional. If you do not specify an authentication prompt, FTP users see
FTP authentication, HTTP users see HTTP Authentication Telnet users see no challenge text.
Modes
The following table shows the modes in which this feature is available:
Firewall Mode
Security Context
Multiple
Routed
•
Transparent Single
•
•
Context
•
System
—
Configuring an LDAP Attribute Map
The LDAP Attribute Map pane (Configuration > Remote Access VPN > AAA Setup) lets you create and
name an attribute map for mapping customer (user-defined) attribute names to Cisco LDAP attribute
names. If you are introducing a security appliance to an existing LDAP directory, your existing customer
LDAP attribute names and values are probably different from the Cisco attribute names and values.
Rather than renaming your existing attributes, you can create LDAP attribute maps that map your
customer attribute names and values to Cisco attribute names and values. By using simple string
substitution, the security appliance then presents you with only your own customer names and values.
You can then bind these attribute maps to LDAP servers or remove them as needed. You can also delete
entire attribute maps or remove individual name and value entries.
Note
To use the attribute mapping features correctly, you need to understand the Cisco LDAP attribute names
and values as well as the user-defined attribute names and values.
ASDM User Guide
OL-12180-01
12-21
Chapter 12
Configuring AAA Servers and User Accounts
Configuring an LDAP Attribute Map
Fields
•
Name—Displays the names of the LDAP attribute maps available for editing.
•
Attribute Map Name—Displays the mappings of customer attribute names to Cisco attribute names
within each attribute map.
•
Add—Displays the Add LDAP Attribute Map dialog box.
•
Edit—Displays the Edit LDAP Attribute Map dialog box.
•
Delete—Deletes the selected LDAP Attribute Map.
Add/Edit LDAP Attribute Map
The Add/Edit LDAP Attribute Map dialog box lets you modify or delete an existing LDAP attribute map,
add a new LDAP attribute map, and populate attribute maps with attribute name and value mappings.
Your typical steps to add a new attribute map using the LDAP Attribute Map dialog box would be as
follows:
1.
Create a new, unpopulated attribute map.
2.
Populate the attribute map with name mappings that translate Cisco attribute names to customer,
user-defined attribute names.
3.
Populate the attribute map with value mappings that apply customer, user-defined attribute values
to the customer attribute name and to the matching Cisco attribute name and value.
You would then bind the attribute map to an LDAP server when adding or editing the LDAP server using
the Add/Edit AAA Server dialog box.
Fields
•
Name—Specifies the name of the LDAP attribute map you are adding or editing. If you are adding
a new map, you enter the name of the map in this field. If you are editing a map that was selected in
the LDAP Attribute Map pane, the name of the selected map displays as read-only text in this field.
To change the map, you must return to the LDAP Attribute Map pane and choose the desired map.
•
Name Map—Displays the fields necessary for mapping customer attribute names to Cisco attribute
names.
•
Value Map—Displays the fields necessary for mapping customer attribute values to customer
attribute names and to the matching Cisco attribute name and value.
Add/Edit LDAP Attribute Map > Map Name Tab
The Add/Edit LDAP Attribute Map dialog box lets you modify or delete an existing LDAP attribute map,
add a new LDAP attribute map, and populate attribute maps with attribute name and value mappings.
See also Add/Edit LDAP Attribute Map.
Some fields vary depending upon whether you have selected the Map Name tab or the Map Value tab.
When you click the Map Name tab, the following fields display.
ASDM User Guide
12-22
OL-12180-01
Chapter 12
Configuring AAA Servers and User Accounts
Configuring an LDAP Attribute Map
Fields
•
Name—Specifies the name of the LDAP attribute map you are adding or editing. If you are adding
a new map, you enter the name of the map in this field. If you are editing a map that was selected in
the LDAP Attribute Map pane, the name of the selected map displays as read-only text in this field.
To change the map, you must return to the LDAP Attribute Map pane and choose the desired map.
•
Customer Name—Specifies the customer, user-defined attribute name that maps to an attribute name
selected from the Cisco Name drop-down list.
•
Cisco Name—Specifies the Cisco attribute name you want to map to the user-defined name in the
Customer Name field.
•
Add—Inserts the name mapping into the attribute map.
•
Remove—Removes the selected name mapping from the attribute map.
•
Customer Name—Displays the customer attribute names of mappings in the attribute map.
•
Cisco Name—Displays the Cisco attribute names of mappings in the attribute map.
Add/Edit LDAP Attribute Map > Map Value Tab
The Add/Edit LDAP Attribute Map dialog box lets you modify or delete an existing LDAP attribute map,
add a new LDAP attribute map, and populate attribute maps with attribute name and value mappings.
See also Add/Edit LDAP Attribute Map.
Some fields vary depending upon whether you have selected the Map Name tab or the Map Value tab.
When you click the Map Value tab, the following fields appear.
Fields
•
Name—Specifies the name of the LDAP attribute map you are adding or editing. If you are adding
a new map, you enter the name of the map in this field. If you are editing a map that was selected in
the LDAP Attribute Map pane, the name of the selected map displays as read-only text in this field.
To change the map, you must return to the LDAP Attribute Map pane and choose the desired map.
•
Customer Name—Displays the customer attribute names of mappings in the attribute map.
•
Customer to Cisco Map Value—Displays the mapping of a customer value to a Cisco value for a
customer attribute.
•
Add—Displays the Add LDAP Attributes Map Value dialog box.
•
Edit—Displays the Edit LDAP Attributes Map Value dialog box.
•
Delete—Deletes the selected attribute value mapping from the LDAP attribute map.
Add/Edit LDAP Attributes Value Map
The Add/Edit LDAP Attribute Map Value dialog box lets you map a customer attribute value for a
customer attribute name to the Cisco value of the associated Cisco attribute name.
Fields
•
Customer Name—If adding a new attribute value mapping, this is a drop-down list that lets you
choose a customer attribute name from a list of attributes which do not yet have a customer value
mapped to a Cisco attribute value. If editing an existing attribute value mapping, this is a read-only
field which displays the name of the customer attribute selected on the Map Value tab of the
Add/Edit LDAP Attribute Map dialog box.
ASDM User Guide
OL-12180-01
12-23
Chapter 12
Configuring AAA Servers and User Accounts
Configuring an LDAP Attribute Map
•
Customer Value—Specifies a customer value for the selected customer attribute.
•
Cisco Value—Specifies the Cisco value for the selected customer attribute.
•
Add—Adds the value mapping to the customer attribute value map.
•
Remove—Removes the value mapping from the customer attribute value map.
•
Customer Name—Displays the customer value for the customer attribute name.
•
Cisco Name—Displays the Cisco value for the Cisco attribute name.
ASDM User Guide
12-24
OL-12180-01