1
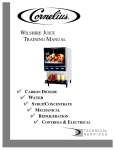
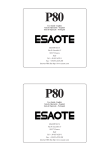
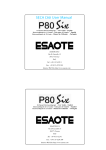
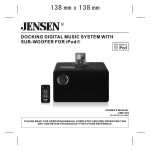
User Guide
CD Clock Radio
NS-CL02
Insignia NS-CL02
CD Clock Radio
Contents
Welcome . . . . . . . . . . . . . . . . . . . . . . . . . . . . . . . . . . . . . . . . . . 3
Safety information . . . . . . . . . . . . . . . . . . . . . . . . . . . . . . . . . . . 3
Important safeguards . . . . . . . . . . . . . . . . . . . . . . . . . . . . . . . . 4
Features . . . . . . . . . . . . . . . . . . . . . . . . . . . . . . . . . . . . . . . . . . 6
Setting up your clock radio . . . . . . . . . . . . . . . . . . . . . . . . . . . 11
Using your clock radio. . . . . . . . . . . . . . . . . . . . . . . . . . . . . . . 13
Troubleshooting. . . . . . . . . . . . . . . . . . . . . . . . . . . . . . . . . . . . 18
Legal notices. . . . . . . . . . . . . . . . . . . . . . . . . . . . . . . . . . . . . . 19
90-Day Limited Warranty. . . . . . . . . . . . . . . . . . . . . . . . . . . . . 21
Welcome
Congratulations on your purchase of a high-quality Insignia product.
Your NS-CL02 represents the state of the art in clock radios and is
designed for reliable and trouble-free performance.
Safety information
To prevent fire or shock hazard, do not plug the power adapter into an
extension cord, receptacle, or other outlet unless the blades can be
fully inserted to prevent blade exposure. To prevent fire or shock
hazard, do not expose this appliance to rain or moisture.
CAUTION: To reduce the risk of electric
shock, do not remove cover (or back). No
user-serviceable parts inside. Refer
servicing to qualified service personnel.
The lightning flash with arrowhead symbol within a
triangle is intended to alert you to the presence of
uninsulated dangerous voltage within your clock radio’s
enclosure that may be of sufficient magnitude to
constitute risk of electric shock to persons.
www.insignia-products.com
3
Insignia NS-CL02 CD Clock Radio
The exclamation point within a triangle is intended to
alert you to the presence of important operating and
maintenance (servicing) instructions in the literature
accompanying your clock radio.
Danger - Invisible and hazardous laser radiation when
the CD compartment is open and the interlock fails or is
defeated. Avoid direct exposure to beam.
Caution
Any change or modification to your clock radio not expressly
approved by Insignia or its authorized parties could void
your authority to operate your shelf system.
Caution
Your clock radio should not be exposed to water (dripping or
splashing) and no objects filled with liquids, such as vases,
should be placed on it.
Important safeguards
•
•
•
•
•
•
•
•
4
Read instructions—Read all the safety and operating
instructions before operating your clock radio.
Retain instructions—Retain the safety and operating
instructions for future reference.
Follow warnings—Follow all warnings on your clock radio and
in the operating instructions.
Follow instructions—Follow all operating and use
instructions.
Cleaning—Unplug your clock radio’s AC power adapter from
the power outlet before cleaning. Do not use liquid cleaners or
aerosol cleaners. Use a damp cloth for cleaning.
Attachments—Do not use attachments not recommended by
Insignia because they may cause hazards.
Water and moisture—Do not use your clock radio near water.
Such as near a bath tub, in a wet basement, or near a
swimming pool.
Ventilation—To ensure reliable operation of your clock radio
and to protect it from overheating, ventilation slots and
openings are provided in the cabinet back. Do not block these
openings. Your clock radio should never be placed near or over
a radiator or heat register. Do not place your clock radio in a
built-in installation such as a bookcase or rack unless correct
ventilation is provided or the manufacturer’s instructions have
been adhered to.
www.insignia-products.com
Insignia NS-CL02 CD Clock Radio
•
•
•
•
•
•
•
•
•
Power sources—Use only the type of power source indicated
on the label. If you are not sure of the type of power supply to
your home, consult Insignia Technical Support or your local
power company. For clock radios intended to operate from
battery power or other sources, refer to the operating
instructions.
Grounding or polarization—Your clock radio’s AC power
adapter may be equipped with a polarized alternating-current
line plug (a plug having one blade wider than the other). This
plug will fit into the power outlet only one way. This is a safety
feature. If you are unable to insert the plug fully into the outlet,
try reversing the plug. If the plug should still fail to fit, contact
your electrician to replace your obsolete outlet. Do not defeat
the safety purpose of the polarized plug.
Power cord protection—Route power supply cords so that
they are not likely to be walked on or pinched by items placed
upon or against them, paying particular attention to cords at
plugs, convenience receptacles, and the point where they exit
from your clock radio.
Surge protector—We recommend the use of a surge
protector for the AC power adapter connection. Lightning and
power surges ARE NOT covered under warranty for this
product.
Lightning—For added protection for your clock radio during a
lightning storm, or when it is left unattended and unused for
long periods of time, unplug the AC power adapter from the
power outlet. This will prevent damage to your clock radio due
to lightning and power line surges.
Overloading—Do not overload power outlets and extension
cords, because this can result in a risk of fire or electric shock.
Object and liquid entry—Never insert objects of any kind into
your clock radio through openings, because they may touch
dangerous voltage points or short out parts that could result in
a fire or electric shock. Never spill liquid of any kind on your
clock radio.
Servicing—Do not attempt to service your clock radio yourself,
because opening or removing covers may expose you to
dangerous voltage or other hazards. Refer all servicing to
qualified service personnel.
Damage requiring service—Unplug your clock radio’s AC
power adapter from the power outlet and refer servicing to
qualified service personnel under the following conditions:
• When the power supply cord or plug is damaged or frayed.
• If liquid has been spilled, or objects have fallen into your
clock radio.
• If your clock radio has been exposed to rain or water.
www.insignia-products.com
5
Insignia NS-CL02 CD Clock Radio
•
If your clock radio does not operate normally by following
the operating instructions. Adjust only those controls that
are covered by the operating instructions, because incorrect
adjustment of other controls may result in damage and
often requires extensive work by a qualified technician to
restore your clock radio to its normal operation.
• If your clock radio has been dropped or damaged in any
way.
• When your clock radio exhibits a distinct change in
performance.
Replacement parts—When replacement parts are required,
make sure that the service technician uses replacement parts
specified by the manufacturer that have the same
characteristics as the original part. Unauthorized substitutions
may result in fire, electric shock, injury to persons, or other
hazards.
Safety check—Upon completion of any service or repairs to
your clock radio, ask the service technician to perform routine
safety checks to determine that your clock radio is in correct
operating condition.
Heat—Place your clock radio away from heat sources such as
radiators, heat registers, stoves, or other products (including
amplifiers) that produce heat.
•
•
•
Caution
To prevent electric shock, match the wide blade of the AC
power adapter plug to the wide slot in the power outlet and
fully insert the plug.
The AC power adapter plug is used as the disconnect device. It
should remain readily accessible and should not be obstructed during
use. To completely disconnect the clock radio from electric power, the
AC power adapter plug should be disconnected from the AC power
outlet completely.
The marking plate of the AC power adapter is located on the bottom
of the adapter.
Features
Package contents:
• Clock radio
• AC power adapter
• Line-in cable
• AAA batteries (2)
• User Guide
6
www.insignia-products.com
Insignia NS-CL02 CD Clock Radio
Top panel
DISPLAY
STANDBY / ON
FUNCTION
M ODE
EQ
ALAR M 1
MEMORY/
ALBUM
ALAR M 2
P US H
OP EN CLOS E
PRESET
TUNE
TIM E S ET /
B AND
VOLUM E
S N OOZ E / S L E E P
#
Description
Function
1
DISPLAY button
Press to show the current function, such as CD, radio,
or line-in mode.
2
FUNCTION button
Press to select AM, FM, Line-in, or CD.
3
EQ button
Press to select a preset equalization setting.
Selections include Flat, Jazz, Pop, Classic, and
Rock.
4
MEMORY/ALBUM
button
In radio mode, press to set radio presets and press to
recall radio presets.
In CD (MP3) mode, press to skip forward to the next
album.
www.insignia-products.com
7
Insignia NS-CL02 CD Clock Radio
#
Description
Function
5
PLAY/PAUSE/PRESET
button
In CD mode, press to begin CD playback. Press again
to pause playback.
In radio mode, press repeatedly to cycle through
preset stations.
6
SKIP+/FF/TUNE UP
button
In CD mode, press to skip forward a track. Press and
hold to search forward through a track.
In radio mode, press to tune or scan the radio to a
higher frequency.
In alarm mode, press to select Buzzer, Radio, or CD.
7
SKIP– /FR/TUNE
DOWN button
In CD mode, press to skip backward a track. Press and
hold to search backward through a track.
In radio mode, press to tune or scan the radio to a
lower frequency.
8
SNOOZE/SLEEP button Press to temporarily turn off the alarm or to set the
sleep timer when playing the radio or CD.
In alarm mode, press to select Buzzer, Radio, or CD.
9
Standby/ON button
Press to turn on the clock radio. Press again to return
the clock radio to standby mode.
10
MODE button
In FM radio mode, press to choose between FM
MONO and FM STEREO.
In CD mode, press to select One Repeat Play, Repeat
Album, All Repeat Play, Intro Play, or Random Play
mode.
11
ALARM 1 button
Press to select and change settings for Alarm mode 1.
12
ALARM 2 button
Press to select and change settings for Alarm mode 2.
13
STOP/BAND/TIME SET
button
In CD mode, press to stop playback.
In radio mode, press to select the radio frequency
band to listen to (AM or FM).
In standby mode, press and hold to enter time set
mode.
14
OPEN/CLOSE button
Press to open the CD compartment. Press again to
close the CD compartment.
15
LCD display
Displays the current time, as well as information about
the radio or CD.
16
VOL + button
Press to increase the volume of the radio or CD.
17
VOL – button
Press to decrease the volume of the radio or CD.
8
www.insignia-products.com
Insignia NS-CL02 CD Clock Radio
Side panel
#
Description
Function
1
Dimmer
Move this switch to set the LCD backlight level
to High, Mid, or Low.
2
Headphone jack
Connect a headphone plug to this jack to listen
to the radio or a CD through headphones.
Note: Plugging in a headphone automatically
mutes the speaker.
3
Line in jack
Connect a cable from an external audio source
to this input jack to hear the sound through your
clock radio.
4
DC IN jack
Insert the small connector from the AC power
adapter here.
5
Speaker
Provides audible sound from the radio or CD
player.
www.insignia-products.com
9
Insignia NS-CL02 CD Clock Radio
Bottom
#
Description
Function
1
Battery compartment door
Open this door to install backup batteries for
your clock radio.
10
www.insignia-products.com
Insignia NS-CL02 CD Clock Radio
LCD Display
Setting up your clock radio
Using the AC power adapter
To use the AC power adapter:
1 Insert the small connector at the end of the AC power adapter
cable into the DC IN jack on the back of your clock radio.
2 Plug the AC power adapter into a wall power outlet.
Note
Only use the supplied AC power adapter, which has the
following specifications: DC=9.0 V _
+
Unplug both the DC plug and the adapter when not in use.
Installing backup batteries
To install backup batteries:
1 Turn your clock radio over, then open the door to the battery
compartment (1).
www.insignia-products.com
11
Insignia NS-CL02 CD Clock Radio
2 Insert two (2) AAA batteries into the battery compartment. Make
sure that you match the + and – symbols on the batteries with the
+ and – symbols in the battery compartment.
Insert batteries as shown
1. 5 V X 2
AAA/UM- 4
3 Reinstall and close the battery compartment and return your clock
radio to the upright position.
Caution
Follow these precautions when using batteries in this
device:
1. Use only the size and type of batteries specified.
2. Make sure that you follow the correct polarity as indicated
in the battery compartment when installing batteries.
Reversed batteries may cause damage to the clock radio.
3. Do not mix different types of batteries together (for
example, alkaline, rechargeable, and carbon zinc), or
semi-used batteries with fresh ones.
4. If your clock radio is not to be used for a long period of
time, remove the batteries to prevent damage or injury from
possible battery leakage.
5. Do not try to recharge batteries not intended to be
recharged, because they can overheat and rupture. (Follow
battery manufacturer’s directions.)
6. Do not throw batteries into a fire. Dispose of used
batteries as hazardous waste.
Note
The batteries are used to provide backup for your clock
when AC power adapter is disconnected or there is a power
failure.
appears in the display, you
When the battery indicator
need to replace the batteries.
Connecting the power cord
To prepare your clock radio for use:
1 Make sure that your local AC power source matches the voltage
shown on the plate located on the AC power adapter. If it does not,
consult your dealer or service center.
12
www.insignia-products.com
Insignia NS-CL02 CD Clock Radio
2 Plug the small connector on the power cable into the DC IN jack
on the back of the clock radio and the AC power adapter itself into
an AC power outlet.
Caution
To protect your clock radio during thunderstorms, unplug the
AC power adapter from the AC power outlet.
Using your clock radio
Dimmer Setting
To set the backlight level:
1 Make sure the AC adapter is connected and the clock radio is
turned on.
2 Slide the dimmer switch to set the display backlight to a
comfortable level. Your choices include High, Mid, or Low.
Playing the radio
To play the radio:
1 Press
(Standby/on) to turn on the clock radio.
• To select the radio band you want to listen to, press STOP/
BAND/TIME SET repeatedly.
• To tune the radio up or down and select the station you
want, press SKIP +/FF/TUNE UP or SKIP–/FR/TUNE
DOWN.
• To adjust the volume to a comfortable level, press either the
VOLUME UP or VOLUME DOWN button.
• To scan to a higher or lower frequency, press and hold SKIP
+/FF/TUNE UP or SKIP–/FR/TUNE DOWN for more than
two seconds, then release the button to search for the next
strong station.
• To select FM MONO or FM STEREO, press MODE .
2 Press
(Standby/on) to turn off the clock radio.
To use presets:
1 Press
(Standby/on) to turn on the clock radio.
2 Press STOP/BAND/TIME SET repeatedly to select the radio band
you want to listen to.
3 Press SKIP +/FF/TUNE UP or SKIP–/FR/TUNE DOWN to tune
the radio up or down and select the station you want.
www.insignia-products.com
13
Insignia NS-CL02 CD Clock Radio
4 To save the station as a preset, press the MEMORY/ALBUM
button. “PRESET” and the preset number blinks on the display.
5 Press SKIP +/FF/TUNE UP or SKIP–/FR/TUNE DOWN to select
the preset number you want to designate for that station.
6 Press MEMORY/ALBUM to confirm the setting. The station is
stored in memory.
7 Repeat Steps 3 to 6 to store as many as 10 AM presets and 10
FM presets.
8 To select a preset station, briefly press PLAY/PAUSE/PRESET
repeatedly until you reach the station you want. “PRESET”
appears on the LCD display, along with the preset number
selected.
To recall presets to make changes:
1 Press MEMORY/ALBUM in radio mode. The preset frequency
appears on the LCD display, the radio is tuned to the preset
frequency, and “PRESET” blinks for five seconds.
2 Press SKIP +/FF/TUNE UP or SKIP–/FR/TUNE DOWN while
“PRESET” is blinking to change the preset station.
To listen to another audio device:
1 Make sure the clock radio is turned off.
2 Plug one end of the auxiliary line-in cable into the LINE-IN jack on
the side of the radio.
3 Plug the other end of the cord into the LINE-OUT jack on the
audio device.
4 Turn on the radio.
5 Press FUNCTION one or more times until “LINE-IN” appears on
the display.
6 Use the controls on the audio device to control playback.
14
www.insignia-products.com
Insignia NS-CL02 CD Clock Radio
Playing a CD
This clock radio plays music CDs, MP3 CDs, and WMA CDs.
To play a CD:
1 Press
(Standby/on) to turn on the clock radio.
2 Press CD OPEN/CLOSE to open the CD compartment door.
3 Insert a CD disc with the label side up, then close the CD
compartment door.
4 Press FUNCTION repeatedly to select CD mode.
5 Press VOL + or VOL – to set the volume to a comfortable level.
6 Press EQ to cycle through the available equalization presets.
Choices include FLAT, JAZZ, POP, CLASSIC, or ROCK. A bar
appears under your choice on the display.
7 If you are playing a CD in MP3 format, press MEMORY/ALBUM to
skip to the next album and play the first track. Press and hold
MEMORY/ALBUM to skip forward tracks one-by-one within an
album.
8 Press STOP/BAND/TIME SET to stop playback.
To select the playback mode:
1 While in CD mode, press MODE repeatedly to cycle through the
available playback modes. Choices include the following:
One Repeat Play:
Repeats the current track
Repeat Album:
Repeats all tracks within the current album (MP3/
WMA only)
All Repeat Play:
Repeats all tracks
Intro Play:
Plays a 10 second intro for each track
Random Play:
Plays all tracks in random order
Setting the clock and the alarm
To set the clock:
1 Hold STOP/BAND/TIME SET two seconds or more. The hour
blinks on the display.
2 Within 10 seconds, press SKIP+/FF/TUNE UP or SKIP–/FR/
TUNE DOWN to set the hour and select the correct AM/PM
setting.
3 Press STOP/BAND/TIME SET again. The minute blinks on the
display.
www.insignia-products.com
15
Insignia NS-CL02 CD Clock Radio
4 Press SKIP +/FF/TUNE UP or SKIP–/FR/TUNE DOWN to set the
minute. Make sure that you set the correct AM/PM setting.
5 Press STOP/BAND/TIME SET again. The clock is set.
To set the alarm:
1 Press and hold ALARM 1 or ALARM 2 (depending on the alarm
mode you want) until the hour blinks.
2 While the hour is blinking, press SKIP+/FF/TUNE UP or SKIP-/
FR/TUNE DOWN to set hour (AM/PM) you want to wake up.
3 Press ALARM 1 or ALARM 2 again. The minutes begin to blink.
4 While the minutes are blinking, press SKIP+/FF/TUNE UP or
SKIP-/FR/TUNE DOWN to set the minute you want to wake up.
Make sure that you set the correct AM/PM setting.
5 Within 10 seconds, press SKIP+/FF/TUNE UP or SKIP-/FR/TUNE
DOWN repeatedly to select CD, RADIO, or BUZZER as the alarm
source. Make sure that the corresponding indicator appears on
the display. If you select RADIO, the frequency of last setting will
display on display
6 Press ALARM 1 or ALARM 2 again to confirm the setting.
7 To turn on the alarm, press ALARM 1 or ALARM 2 in standby
mode.
8 To cancel the alarm, press ALARM 1 or ALARM 2 until the alarm
indicator disappears from the display. The alarm will not come on
until it is reset.
Notes
In Standby mode, press ALARM 1 or ALARM 2 to activate
the alarm. ALARM 1 (or ALARM 2) and BUZZER appear
on the display. Press SKIP+/FF/TUNE UP or SKIP-/FR/
TUNE DOWN to cycle through the alarm options (BUZZER,
CD, RADIO, or OFF).
The alarm automatically changes to BUZZER if the CD
cannot play.
The alarm automatically switches off after 60 minutes if no
key is pressed during the alarm set.
16
www.insignia-products.com
Insignia NS-CL02 CD Clock Radio
To turn the alarm off:
1 Press ALARM 1, ALARM 2, STANDBY ON (except SNOOZE/
SLEEP) to turn off the alarm. The alarm will be set for the next
day.
2 If you do not want to set the alarm for the next day, press
ALARM 1 or ALARM 2 until “ALARM 1” or “ALARM 2” disappears
from the display.
To use the snooze:
1 While the alarm is sounding, press SNOOZE/SLEEP. The
SNOOZE indicator appears on the display and “10” appears in the
display for five seconds, then it reverts back to the real time. The
alarm turns back on automatically 10 minutes later.
2 If you press SNOOZE/SLEEP within those five seconds, each
time you press the SNOOZE/SLEEP button, the snooze time
increases by ten minutes up to 60 minutes.
After you set snooze, the real time will display. Press SNOOZE/
SLEEP again to view the remaining snooze time for five seconds.
3 To cancel snooze (the alarm will not turn back on), press
ALARM 1 or ALARM 2 or standby on (depending on the alarm
that was set). The SNOOZE indicator disappears from the display.
To set the sleep timer:
1 Make sure the clock radio is turned on.
2 Press SNOOZE/SLEEP once. The “SLEEP” indicator appears in
the display, and “90” appears (blinking) on the display (indicating
that the clock radio will turn off after 90 minutes).
3 Repeatedly press SNOOZE/SLEEP to decrease the sleep timer in
10 minute increments.
4 After you set the sleep timer, the real time displays. Press
SNOOZE/SLEEP again to view the remaining sleep time for five
seconds.
5 To cancel the sleep function, repeatedly press SNOOZE/SLEEP
until “0” shows on the display.
www.insignia-products.com
17
Insignia NS-CL02 CD Clock Radio
Troubleshooting
Caution
Do not try to repair the clock radio yourself. Doing so will
invalidate your warranty.
Problem
Possible cause
Solution
The CD does
not play
The disc may be inserted
incorrectly.
Check the disc and insert it
correctly.
The disc may be dirty or
defective.
Check the disc and make sure that
is clean and not bent or scratched.
The pickup lens may be dirty.
Clean the pickup lens.
There is moisture or
condensation in the player.
Let the player warm up to room
temperature for 60 minutes, then
try again.
The source is not set to CD.
Set the source to CD.
The disc may be dirty or
defective.
Check the disc and make sure that
is clean and not bent or scratched.
The pickup lens may be dirty.
Clean the pickup lens.
Intermittent
sound
Place the player on a stable
The player is being subjected
to excessive vibration or shock. surface.
Poor headphone connection.
Make sure that the headphones are
firmly plugged in.
Noise or sound FM—The antenna wire is not
distorted on AM extended.
or FM radio
AM—The radio is not
broadcasts
positioned correctly.
Extend the FM antenna.
No sound
The volume control is turned
down.
Increase the volume.
The AC power adapter is
unplugged.
Plug in the AC power adapter and
press
(Standby/on) to turn on
the radio.
No sound from
headphones
The headphone plug is not
inserted fully into the
headphone jack.
Plug in the headphone connector
firmly.
No sound in
Line-in mode
The external device is not
connected correctly.
Make sure that the connection is
correct.
The alarm does
not turn on
The alarm is not activated or
set correctly.
Set and activate the alarm as
described in “Setting the clock and
the alarm” on page 15.
The clock is not set.
Set the clock.
18
Rotate the radio until the best
reception is obtained.
www.insignia-products.com
Insignia NS-CL02 CD Clock Radio
Legal notices
FCC Part 15
This device complies with Part 15 of the FCC Rules. Operation of this product is
subject to the following two conditions: (1) this device may not cause harmful
interference, and (2) this device must accept any interference received, including
interference that may cause undesired operation.
This equipment has been tested and found to comply within the limits for a class B
digital device, pursuant to Part 15 of the FCC Rules. These limits are designed to
provide reasonable protection against harmful interference in a residential installation.
This equipment generates, uses, and can radiate radio frequency energy and, if not
installed and used in accordance with the instructions, may cause harmful interference
to radio communications. However, there is no guarantee that interference will not
occur in a particular installation. If this equipment does cause harmful interference to
radio or television reception, which can be determined by turning the equipment off and
on, the user is encouraged to try to correct the interference by one or more of the
following measures:
• Reorient or relocate the receiving antenna.
• Increase the separation between the equipment and receiver.
• Connect the equipment into an outlet on a circuit different from that to which the
receiver is connected.
• Consult the dealer or an experienced technician for help.
www.insignia-products.com
19
Insignia NS-CL02 CD Clock Radio
20
www.insignia-products.com
Insignia NS-CL02 CD Clock Radio
90-Day Limited Warranty
Insignia Products (“Insignia”) warrants to you, the original purchaser of this new
NS-CLO2 (“Product”), that the Product shall be free of defects in the original
manufacture of the material or workmanship for a period of 90 days from the date of
your purchase of the Product (“Warranty Period”). This Product must be purchased
from an authorized dealer of Insignia brand products and packaged with this warranty
statement. This warranty does not cover refurbished Product. If you notify Insignia
during the Warranty Period of a defect covered by this warranty that requires service,
terms of this warranty apply.
How long does the coverage last?
The Warranty Period lasts for 90 days from the date you purchased the Product. The
purchase date is printed on the receipt you received with the Product.
What does this warranty cover?
During the Warranty Period, if the original manufacture of the material or workmanship
of the Product is determined to be defective by an authorized Insignia repair center or
store personnel, Insignia will (at its sole option): (1) repair the Product with new or
rebuilt parts; or (2) replace the Product at no charge with new or rebuilt comparable
products or parts. Products and parts replaced under this warranty become the
property of Insignia and are not returned to you. If service of Products or parts are
required after the Warranty Period expires, you must pay all labor and parts charges.
This warranty lasts as long as you own your Insignia Product during the Warranty
Period. Warranty coverage terminates if you sell or otherwise transfer the Product.
How to obtain warranty service?
If you purchased the Product at a retail store location, take your original receipt and the
Product to the store you purchased it from. Make sure that you place the Product in its
original packaging or packaging that provides the same amount of protection as the
original packaging. If you purchased the Product from an online web site, mail your
original receipt and the Product to the address listed on the web site. Make sure that
you put the Product in its original packaging or packaging that provides the same
amount of protection as the original packaging.
To obtain in-home warranty service for a television with a screen 25 inches or larger,
call 1-888-BESTBUY. Call agents will diagnose and correct the issue over the phone or
will have an Insignia-approved repair person dispatched to your home.
Where is the warranty valid?
This warranty is valid only to the original purchaser of the product in the United States,
Canada, and Mexico.
What does the warranty not cover?
This warranty does not cover:
• Customer instruction
• Installation
• Set up adjustments
• Cosmetic damage
• Damage due to acts of God, such as lightning strikes
• Accident
• Misuse
• Abuse
• Negligence
• Commercial use
www.insignia-products.com
21
Insignia NS-CL02 CD Clock Radio
•
•
Modification of any part of the Product, including the antenna
Plasma display panel damaged by static (non-moving) images applied for lengthy
periods (burn-in).
This warranty also does not cover:
• Damage due to incorrect operation or maintenance
• Connection to an incorrect voltage supply
• Attempted repair by anyone other than a facility authorized by Insignia to service
the Product
• Products sold as is or with all faults
• Consumables, such as fuses or batteries
• Products where the factory applied serial number has been altered or removed
REPAIR REPLACEMENT AS PROVIDED UNDER THIS WARRANTY IS YOUR
EXCLUSIVE REMEDY. INSIGNIA SHALL NOT BE LIABLE FOR ANY INCIDENTAL
OR CONSEQUENTIAL DAMAGES FOR THE BREACH OF ANY EXPRESS OR
IMPLIED WARRANTY ON THIS PRODUCT, INCLUDING, BUT NOT LIMITED TO,
LOST DATA, LOSS OF USE OF YOUR PRODUCT, LOST BUSINESS OR LOST
PROFITS. INSIGNIA PRODUCTS MAKES NO OTHER EXPRESS WARRANTIES
WITH RESPECT TO THE PRODUCT, ALL EXPRESS AND IMPLIED WARRANTIES
FOR THE PRODUCT, INCLUDING, BUT NOT LIMITED TO, ANY IMPLIED
WARRANTIES OF AND CONDITIONS OF MERCHANTABILITY AND FITNESS FOR
A PARTICULAR PURPOSE, ARE LIMITED IN DURATION TO THE WARRANTY
PERIOD SET FORTH ABOVE AND NO WARRANTIES, WHETHER EXPRESS OR
IMPLIED, WILL APPLY AFTER THE WARRANTY PERIOD. SOME STATES,
PROVINCES AND JURISDICTIONS DO NOT ALLOW LIMITATIONS ON HOW LONG
AN IMPLIED WARRANTY LASTS, SO THE ABOVE LIMITATION MAY NOT APPLY TO
YOU. THIS WARRANTY GIVES YOU SPECIFIC LEGAL RIGHTS, AND YOU MAY
ALSO HAVE OTHER RIGHTS, WHICH VARY FROM STATE TO STATE OR
PROVINCE TO PROVINCE.
Contact Insignia:
For customer service please call 1-877-467-4289
www.insignia-products.com
Distributed by Best Buy Purchasing, LLC
7601 Penn Avenue South, Richfield, Minnesota, U.S.A. 55423-3645
© 2008 Best Buy Enterprise Services, Inc.
All rights reserved. INSIGNIA is a trademark of Best Buy Enterprise Services, Inc.
Registered in some countries. All other products and brand names are trademarks of
their respective owners.
22
www.insignia-products.com
Insignia NS-CL02 CD Clock Radio
www.insignia-products.com
23
www.insignia-products.com
(877) 467-4289
Distributed by Best Buy Purchasing, LLC
7601 Penn Avenue South, Richfield, MN USA 55423-3645
© 2008 Best Buy Enterprise Services, Inc.
All rights reserved. INSIGNIA is a trademark of Best Buy Enterprise Services, Inc. Registered in some countries.
All other products and brand names are trademarks of their respective owners.
iPod® is a trademark of Apple Computer, Inc., registered in the U.S. and other countries.
ENGLISH
08-1466