1
Welcome
Welcome to the world of Motorola digital wireless communications!
We are pleased that you have chosen the Motorola E365 wireless
phone.
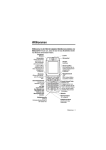
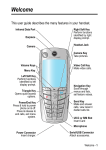
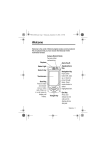
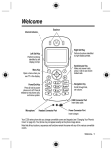
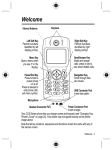
Internal Antenna
Lanyard Loop
Camera Key
Open camera and
press to view or
capture image.
Earpiece
Left Soft Key
Perform functions
identified by left
display prompt.
Right Soft Key
Perform functions
identified by right
display prompt.
Headset
Connector
Navigation Key
Menu Key
Open a menu when
G displays.
Power/End Key
Press & hold to turn
phone
on & off.
Press & release to
end phone calls, exit
menu system.
S
Scroll through lists, set
volume.
Send/Answer Key
Make and answer calls;
press in idle to list
recently dialled calls.
Microphone
Light Sensor
Sets backlight for keypad.
Power Connector
Insert charger.
Accessory Connector
Insert data cable.
Welcome - 1
www.motorola.com
MOTOROLA and the Stylised M Logo are registered in the US
Patent & Trademark Office. TrueSync, Sidekick, Starfish and the
Stylised Starfish Logo are registered trademarks of Starfish
Software, Inc., a wholly owned independent subsidiary of Motorola,
Inc. All other product or service names are the property of their
respective owners.
© Motorola, Inc. 2003
Software Copyright Notice
The Motorola products described in this manual may include
copyrighted Motorola and third party software stored in
semiconductor memories or other media. Laws in the United States
and other countries preserve for Motorola and third party software
providers certain exclusive rights for copyrighted software, such as
the exclusive rights to distribute or reproduce the copyrighted
software. Accordingly, any copyrighted software contained in the
Motorola products may not be modified, reverse-engineered,
distributed, or reproduced in any manner to the extent allowed by
law. Furthermore, the purchase of the Motorola products shall not
be deemed to grant either directly or by implication, estoppel, or
otherwise, any licence under the copyrights, patents, or patent
applications of Motorola or any third party software provider, except
for the normal, non-exclusive, royalty-free licence to use that arises
by operation of law in the sale of a product.
2 - Welcome
Menu Map
Main Menu
U Messages *
•
•
•
•
•
•
•
> More
r Phone Book
z Recent Calls
Create
Inbox
Templates
Outbox
Draft
Voicemail
Message Settings
• Voicemail Number
• Inbox Setup
• Info Alert Setup
• Cleanup Settings
Magic II
Bowling King
Bubble Tea
Big 2 Garden
Pacific Storm
Sound Setting
Vibration Setting
• Start Chat
• History
• Clear History
: Shortcuts
& Profile Setting
Normal
Meeting
Outdoor
Headset
Pager
Tools
• Datebook
• Calculator
• Fixed Dial
(
/ Settings
• (see next page)
•
•
•
•
•
•
•
•
Media Centre
New Picture
Photo Album
Picture
Animation
Melody
VoiceMemo
Download
View Free Space
w Ring Style
) Camera
è Browser *
' Voice Memo
ê Web Shortcut
* Alarm
o Chat *
•
•
•
•
•
Received Calls
Dialled Calls
Missed Calls
NotePad
Call Times
Call Cost
v
- Games
•
•
•
•
•
•
•
•
•
•
•
•
•
Note: Select More when it appears in the menu to
see additional menu items.
This is the standard phone menu layout. Menu
organisation and feature names may vary on your
phone. Not all features may be available for all
users.
*
optional network, SIM card, or subscriptiondependent features
Menu Map - 3
Settings Menu
• Personalise
• Caller Groups
• Banner
• Wallpaper
• Screen Saver
• WAP Profile
• Set Profile
• Set GPRS
• Shortcuts Setup
• Call Divert
• Voice Calls
• Cancel All
• Phone Status
• My Tel. Numbers
• Credit Available
• Active Line
• In Call Setup
• In Call Timer
• Call Cost Setup
• My Caller ID
• Call Waiting
• Security
• Phone Lock
• Lock Now
• Auto Lock
• Unlock Code
• Lock Keypad
• Auto Key Lock
• Fixed Dial
• Call Barring
• Outgoing Calls
• Incoming Calls
• Cancel All
• SIM PIN
• Passwords
• Unlock Code
• Security Code
• SIM PIN
• SIM PIN2
• Bar Password
• Initial Setup
• Time and Date
• Power on/off
• Manual Redial
• Backlight
• Language
• Battery Save
• Master Reset
• Master Clear
• Network
• Avail. Networks
• Network Setup
Shortcuts
View idle menu:
Press S in idle
View dialled calls list:
Press N in idle
Open Voice Tag list
Press and hold - in idle
Lock keypad:
Press M *
Exit menu system:
Press O in a menu
*
4 - Menu Map
optional network, SIM card, or
subscription-dependent features
Contents
Menu Map . . . . . . . . . . . . . . . . . . . . . . . . . . . . . . . . . . . . . . . . . 3
Safety and General Information . . . . . . . . . . . . . . . . . . . . . . . 9
Getting Started. . . . . . . . . . . . . . . . . . . . . . . . . . . . . . . . . . . . 16
What’s in the Box?. . . . . . . . . . . . . . . . . . . . . . . . . . . . . . . . 16
About This Guide . . . . . . . . . . . . . . . . . . . . . . . . . . . . . . . . . 16
Changing Your SIM Card. . . . . . . . . . . . . . . . . . . . . . . . . . . 16
Installing Your Battery . . . . . . . . . . . . . . . . . . . . . . . . . . . . . 18
Charging Your Battery . . . . . . . . . . . . . . . . . . . . . . . . . . . . . 19
Battery Use . . . . . . . . . . . . . . . . . . . . . . . . . . . . . . . . . . . . . 20
Turning Your Phone On . . . . . . . . . . . . . . . . . . . . . . . . . . . . 21
Adjusting Volume . . . . . . . . . . . . . . . . . . . . . . . . . . . . . . . . . 21
Making a Call . . . . . . . . . . . . . . . . . . . . . . . . . . . . . . . . . . . . 22
Answering a Call . . . . . . . . . . . . . . . . . . . . . . . . . . . . . . . . . 23
Learning to Use Your Phone. . . . . . . . . . . . . . . . . . . . . . . . . 24
Using the Display. . . . . . . . . . . . . . . . . . . . . . . . . . . . . . . . . 24
Using the 4-Way Navigation Keys . . . . . . . . . . . . . . . . . . . . 26
Using Menus . . . . . . . . . . . . . . . . . . . . . . . . . . . . . . . . . . . . 27
Entering Text . . . . . . . . . . . . . . . . . . . . . . . . . . . . . . . . . . . . 29
Locking and Unlocking Your Phone. . . . . . . . . . . . . . . . . . . 35
Changing a Code or Password . . . . . . . . . . . . . . . . . . . . . . 37
If You Forget a Code or Password. . . . . . . . . . . . . . . . . . . . 37
Locking and Unlocking the Keypad . . . . . . . . . . . . . . . . . . . 38
Taking Photos and Sending Picture Messages . . . . . . . . . . 38
Setting Up Your Phone . . . . . . . . . . . . . . . . . . . . . . . . . . . . . 42
Storing Your Name and Phone Number . . . . . . . . . . . . . . . 42
Setting the Time and Date . . . . . . . . . . . . . . . . . . . . . . . . . . 42
Setting a Ring Style . . . . . . . . . . . . . . . . . . . . . . . . . . . . . . . 42
Contents - 5
Setting Answer Mode. . . . . . . . . . . . . . . . . . . . . . . . . . . . . . 43
Setting a Wallpaper Image . . . . . . . . . . . . . . . . . . . . . . . . . 44
Selecting a Screen Saver . . . . . . . . . . . . . . . . . . . . . . . . . . 44
Setting Display Colour . . . . . . . . . . . . . . . . . . . . . . . . . . . . . 44
Adjusting the Backlight . . . . . . . . . . . . . . . . . . . . . . . . . . . . 45
Conserving Battery Power . . . . . . . . . . . . . . . . . . . . . . . . . . 45
Calling Features. . . . . . . . . . . . . . . . . . . . . . . . . . . . . . . . . . . 46
Changing the Active Line. . . . . . . . . . . . . . . . . . . . . . . . . . . 46
Redialling a Number . . . . . . . . . . . . . . . . . . . . . . . . . . . . . . 46
Using Caller ID. . . . . . . . . . . . . . . . . . . . . . . . . . . . . . . . . . . 46
Cancelling an Incoming Call . . . . . . . . . . . . . . . . . . . . . . . . 47
Calling an Emergency Number . . . . . . . . . . . . . . . . . . . . . . 47
Dialling International Numbers. . . . . . . . . . . . . . . . . . . . . . . 48
Viewing the Received Calls or Dialled Calls List . . . . . . . . . 48
Returning an Unanswered Call . . . . . . . . . . . . . . . . . . . . . . 50
Using the Notepad. . . . . . . . . . . . . . . . . . . . . . . . . . . . . . . . 50
Calling With Speed Dial. . . . . . . . . . . . . . . . . . . . . . . . . . . . 50
Calling With TurboDial . . . . . . . . . . . . . . . . . . . . . . . . . . . . . 51
Using Voicemail . . . . . . . . . . . . . . . . . . . . . . . . . . . . . . . . . . 51
Using Call Waiting . . . . . . . . . . . . . . . . . . . . . . . . . . . . . . . . 52
Putting a Call on Hold . . . . . . . . . . . . . . . . . . . . . . . . . . . . . 53
Transferring a Call . . . . . . . . . . . . . . . . . . . . . . . . . . . . . . . . 53
Messages . . . . . . . . . . . . . . . . . . . . . . . . . . . . . . . . . . . . . . . . 55
Setting Up the Message Inbox. . . . . . . . . . . . . . . . . . . . . . . 55
Sending Messages, Pictures, and Sounds . . . . . . . . . . . . . 55
Sending a Quick Note Text Message. . . . . . . . . . . . . . . . . . 57
Viewing the Status of Sent Text Messages . . . . . . . . . . . . . 57
Receiving a Message . . . . . . . . . . . . . . . . . . . . . . . . . . . . . 57
Reading or Deleting a Text Message. . . . . . . . . . . . . . . . . . 58
Reading Information Service Messages . . . . . . . . . . . . . . . 59
Using Chat. . . . . . . . . . . . . . . . . . . . . . . . . . . . . . . . . . . . . . 60
6 - Contents
Setting Up Your Phonebook . . . . . . . . . . . . . . . . . . . . . . . . . 64
Viewing Entry Details. . . . . . . . . . . . . . . . . . . . . . . . . . . . . . 64
Creating a Phonebook Entry . . . . . . . . . . . . . . . . . . . . . . . . 64
Storing a PIN Code With a Phone Number . . . . . . . . . . . . . 66
Recording a Voice Name For a Phonebook Entry . . . . . . . . 67
Dialling a Phonebook Entry . . . . . . . . . . . . . . . . . . . . . . . . . 68
Editing a Phonebook Entry . . . . . . . . . . . . . . . . . . . . . . . . . 69
Deleting a Phonebook Entry . . . . . . . . . . . . . . . . . . . . . . . . 70
Using Caller Groups . . . . . . . . . . . . . . . . . . . . . . . . . . . . . . 70
Sorting Phonebook Entries . . . . . . . . . . . . . . . . . . . . . . . . . 71
Copying Phonebook Entries . . . . . . . . . . . . . . . . . . . . . . . . 71
Checking Phonebook Capacity . . . . . . . . . . . . . . . . . . . . . . 73
Personalising Your Phone . . . . . . . . . . . . . . . . . . . . . . . . . . 74
Selecting or Editing a Profile . . . . . . . . . . . . . . . . . . . . . . . . 74
Creating and Editing Alert Tones . . . . . . . . . . . . . . . . . . . . . 75
Setting the Menu Language. . . . . . . . . . . . . . . . . . . . . . . . . 79
Resetting All Options . . . . . . . . . . . . . . . . . . . . . . . . . . . . . . 79
Clearing All Information . . . . . . . . . . . . . . . . . . . . . . . . . . . . 79
Using the Shortcuts Menu . . . . . . . . . . . . . . . . . . . . . . . . . . 80
Getting More Out of Your Phone . . . . . . . . . . . . . . . . . . . . . 81
Making a Conference Call . . . . . . . . . . . . . . . . . . . . . . . . . . 81
Diverting a Call . . . . . . . . . . . . . . . . . . . . . . . . . . . . . . . . . . 81
Barring Calls . . . . . . . . . . . . . . . . . . . . . . . . . . . . . . . . . . . . 83
Using Fixed Dialling . . . . . . . . . . . . . . . . . . . . . . . . . . . . . . . 83
Monitoring Phone Use . . . . . . . . . . . . . . . . . . . . . . . . . . . . . 84
Adjusting Network Settings . . . . . . . . . . . . . . . . . . . . . . . . . 87
Personal Organiser Features . . . . . . . . . . . . . . . . . . . . . . . . 88
Using the Datebook . . . . . . . . . . . . . . . . . . . . . . . . . . . . . . . 88
Using the Alarm Clock . . . . . . . . . . . . . . . . . . . . . . . . . . . . . 93
Using the Calculator . . . . . . . . . . . . . . . . . . . . . . . . . . . . . . 94
Contents - 7
Security . . . . . . . . . . . . . . . . . . . . . . . . . . . . . . . . . . . . . . . . . 97
Locking the SIM Card . . . . . . . . . . . . . . . . . . . . . . . . . . . . . 97
News and Entertainment. . . . . . . . . . . . . . . . . . . . . . . . . . . . 99
Using the Micro-Browser . . . . . . . . . . . . . . . . . . . . . . . . . . . 99
Picture and Animation Viewers . . . . . . . . . . . . . . . . . . . . . 103
Playing Games . . . . . . . . . . . . . . . . . . . . . . . . . . . . . . . . . 104
Troubleshooting . . . . . . . . . . . . . . . . . . . . . . . . . . . . . . . . . 106
Specific Absorption Rate Data . . . . . . . . . . . . . . . . . . . . . . 113
Warranty Information . . . . . . . . . . . . . . . . . . . . . . . . . . . . . 115
Index . . . . . . . . . . . . . . . . . . . . . . . . . . . . . . . . . . . . . . . . . . . 120
8 - Contents
Safety and General Information
IMPORTANT INFORMATION ON SAFE AND EFFICIENT
OPERATION. READ THIS INFORMATION BEFORE USING
YOUR PHONE.
The information provided in this document supersedes the general
safety information in user guides published prior to
December 1, 2002.
Exposure To Radio Frequency (RF) Energy
Your phone contains a transmitter and a receiver. When it is ON, it
receives and transmits RF energy. When you communicate with
your phone, the system handling your call controls the power level
at which your phone transmits.
Your Motorola phone is designed to comply with local regulatory
requirements in your country concerning exposure of human
beings to RF energy.
Operational Precautions
To assure optimal phone performance and make sure human
exposure to RF energy is within the guidelines set forth in the
relevant standards, always adhere to the following procedures.
External Antenna Care
Use only the supplied or Motorola-approved replacement antenna.
Unauthorised antennas, modifications, or attachments could
damage the phone.
Do NOT hold the external antenna when the phone is IN USE.
Holding the external antenna affects call quality and may cause the
phone to operate at a higher power level than needed. In addition,
use of unauthorised antennas may result in non-compliance with
the local regulatory requirements in your country.
Safety and General Information - 9
Phone Operation
When placing or receiving a phone call, hold your phone as you
would a wireline telephone.
Body-Worn Operation
To maintain compliance with RF energy exposure guidelines, if you
wear a phone on your body when transmitting, always place the
phone in a Motorola-supplied or approved clip, holder, holster,
case, or body harness for this phone, if available. Use of
accessories not approved by Motorola may exceed RF energy
exposure guidelines. If you do not use one of the body-worn
accessories approved or supplied by Motorola, and are not using
the phone held in the normal use position, ensure the phone and its
antenna are at least 1 inch (2.5 centimetres) from your body when
transmitting.
Data Operation
When using any data feature of the phone, with or without an
accessory cable, position the phone and its antenna at least 1 inch
(2.5 centimetres) from your body.
Approved Accessories
Use of accessories not approved by Motorola, including but not
limited to batteries and antenna, may cause your phone to exceed
RF energy exposure guidelines. For a list of approved Motorola
accessories, visit our website at www.Motorola.com.
RF Energy Interference/Compatibility
Note: Nearly every electronic device is susceptible to RF energy
interference from external sources if inadequately shielded,
designed, or otherwise configured for RF energy compatibility. In
some circumstances your phone may cause interference.
Facilities
Turn off your phone in any facility where posted notices instruct you
to do so. These facilities may include hospitals or health care
10 - Safety and General Information
facilities that may be using equipment that is sensitive to external
RF energy.
Aircraft
When instructed to do so, turn off your phone when on board an
aircraft. Any use of a phone must be in accordance with applicable
regulations per airline crew instructions.
Medical Devices
Pacemakers
Pacemaker manufacturers recommend that a minimum separation
of 6 inches (15 centimetres) be maintained between a handheld
wireless phone and a pacemaker.
Persons with pacemakers should:
• ALWAYS keep the phone more than 6 inches (15 centimetres)
from your pacemaker when the phone is turned ON.
• NOT carry the phone in the breast pocket.
• Use the ear opposite the pacemaker to minimise the potential
for interference.
• Turn OFF the phone immediately if you have any reason to
suspect that interference is taking place.
Hearing Aids
Some digital wireless phones may interfere with some hearing aids.
In the event of such interference, you may want to consult your
hearing aid manufacturer to discuss alternatives.
Other Medical Devices
If you use any other personal medical device, consult the
manufacturer of your device to determine if it is adequately
shielded from RF energy. Your GP may be able to assist you in
obtaining this information.
Safety and General Information - 11
Use While Driving
Check the laws and regulations on the use of phones in the area
where you drive. Always obey them.
When using your phone while driving, please:
• Give full attention to driving and to the road.
• Use hands-free operation, if available.
• Pull off the road and park before making or answering a call if
driving conditions so require.
Operational Warnings
For Vehicles With an Air Bag
Do not place a phone in the area over an air bag or in the air bag
deployment area. Air bags inflate with great force. If a phone is
placed in the air bag deployment area and the air bag inflates, the
phone may be propelled with great force and cause serious injury
to occupants of the vehicle.
Potentially Explosive Atmospheres
Turn off your phone prior to entering any area with a potentially
explosive atmosphere, unless it is a phone type especially qualified
for use in such areas and certified as “Intrinsically Safe.” Do not
remove, install, or charge batteries in such areas. Sparks in a
potentially explosive atmosphere can cause an explosion or fire
resulting in bodily injury or even death.
Note: The areas with potentially explosive atmospheres referred to
above include fuelling areas such as below decks on boats, fuel or
chemical transfer or storage facilities, areas where the air contains
chemicals or particles, such as grain, dust, or metal powders.
Areas with potentially explosive atmospheres are often but not
always posted.
12 - Safety and General Information
Blasting Caps and Areas
To avoid possible interference with blasting operations, turn OFF
your phone when you are near electrical blasting caps, in a blasting
area, or in areas posted “Turn off electronic devices.” Obey all
signs and instructions.
Batteries
Batteries can cause property damage and/or bodily injury such as
burns if a conductive material such as jewellery, keys, or beaded
chains touch exposed terminals. The conductive material may
complete an electrical circuit (short circuit) and become quite hot.
Exercise care in handling any charged battery, particularly when
placing it inside a pocket, bag, or other container with metal
objects. Use only Motorola original batteries and chargers.
Your battery or phone may contain symbols, defined as follows:
Symbol
Definition
Important safety information will follow.
Your battery or phone should not be disposed of in
a fire.
Your battery or phone may require recycling in
accordance with local laws. Contact your local
regulatory authorities for more information.
Your battery or phone should not be thrown in the
trash.
LiIon BATT
Your phone contains an internal lithium ion
battery.
Seizures/Blackouts
Some people may be susceptible to epileptic seizures or blackouts
when exposed to blinking lights, such as when watching television
Safety and General Information - 13
or playing video games. These seizures or blackouts may occur
even if a person never had a previous seizure or blackout.
If you have experienced seizures or blackouts, or if you have a
family history of such occurrences, please consult with your doctor
before playing video games on your phone or enabling a blinkinglights feature on your phone. (The blinking-light feature is not
available on all products.)
Parents should monitor their children's use of video game or other
features that incorporate blinking lights on the phones. All persons
should discontinue use and consult a doctor if any of the following
symptoms occur: convulsion, eye or muscle twitching, loss of
awareness, involuntary movements, or disorientation.
To limit the likelihood of such symptoms, please take the following
safety precautions:
• Do not play or use a blinking-lights feature if you are tired or
need sleep.
• Take a minimum of a 15-minute break hourly.
• Play in a room in which all lights are on.
• Play at the farthest distance possible from the screen.
Repetitive Motion Injuries
When you play games on your phone, you may experience
occasional discomfort in your hands, arms, shoulders, neck, or
other parts of your body. Follow these instructions to avoid
problems such as tendonitis, carpal tunnel syndrome, or other
musculoskeletal disorders:
• Take a minimum 15-minute break every hour of game playing.
• If your hands, wrists, or arms become tired or sore while
playing, stop and rest for several hours before playing again.
• If you continue to have sore hands, wrists, or arms during or
after play, stop playing and see a doctor.
14 - Safety and General Information
European Union Directives Conformance Statement
Hereby, Motorola declares that this product is in
compliance with
• The essential requirements and other relevant
provisions of Directive 1999/5/EC
• All other relevant EU Directives
IMEI: 350034/40/394721/9
0168
Type: MC2-41H14
Product
Approval
Number
The above gives an example of a typical Product Approval Number.
You can view your product's Declaration of Conformity (DoC) to
Directive 1999/5/EC (the R&TTE Directive) at www.motorola.com/
rtte - to find your DoC, enter the product Approval Number from
your product's label in the "Search" bar on the Web site
Safety and General Information - 15
Getting Started
What’s in the Box?
Your digital wireless phone typically comes equipped with a battery
and a charger. You can purchase other accessory items to
customise your phone for maximum performance and portability.
About This Guide
This guide introduces you to your Motorola wireless
phone.Optional Features
This label identifies an optional network, SIM card, or
subscription-dependent feature that may not be offered
by all service providers in all geographical areas.
Contact your service provider for more information.
Optional Accessories
This label identifies a feature that requires an optional
Motorola Original™ accessory.
Changing Your SIM Card
Your SIM (Subscriber Identity Module) card contains your phone
number, service details, and phonebook/message memory.
Caution: Do not bend or scratch your SIM card. Avoid exposing
your SIM card to static electricity, water, or dirt
Action
1 Switch off your phone by pressing the Power key
O.
16 - Getting Started
Action
2 Pinch the battery
cover and slide it
back to remove it.
pinch here
3 Remove the
battery.
4 To remove a SIM
card, slide the
card carefully
downward until it
comes out.
5 Slide the new SIM
card carefully into
the slot as
indicated on the
phone. Make sure
that the notch of
the SIM card is in
the bottom right
corner.
Getting Started - 17
Action
6 Replace the
battery and
battery cover.
Installing Your Battery
You must install and charge the battery to use your phone.
Your phone is designed to be used only with Motorola
Original batteries and accessories. We recommend that
you store batteries in their protective cases when not in
use.
Action
1 Remove the battery from its protective clear plastic
case, if necessary.
If you are replacing an existing battery, make sure
your phone is turned off.
2 Pinch the battery
pinch here
cover and slide it
back to remove it.
3 Remove the old
battery if
necessary.
18 - Getting Started
Action
4 Align the
connections on
the new battery
with the
connections on
the phone.
5 Press the battery toward the connections and push
downward until it clicks into place.
6 Replace the battery cover.
Charging Your Battery
New batteries are shipped partially charged. Before you can use
your phone, you need to install and charge the battery as described
below. Some batteries perform best after several full charge/
discharge cycles.
Action
1 Connect the travel
charger to the phone.
Note: The connector
is keyed and can
only be inserted one
way.
2 Plug the other end of the travel charger into the
appropriate electrical outlet.
3 When your phone indicates Charge Complete, remove
the travel charger.
Getting Started - 19
When you charge the battery, the battery level indicator in the
upper right corner of the display shows how much of the charging
process is complete.
Battery Use
Battery performance depends on many factors, including your
wireless carrier’s network configuration; signal strength; the
temperature at which you operate your phone; the features and/or
settings you select and use; items attached to the phone’s
accessory connector port; and your voice, data, and other
application usage patterns.
Tip: Prolonged gaming or heavy use of the camera and WAP
browser may reduce battery life. To conserve battery life, set your
Backlight to Off (page 45) and set Battery Save to On (page 45).
Caution: To prevent injuries or burns, do not allow metal objects to
contact or short-circuit the battery terminals.
To maximise your battery’s performance:
• Always use Motorola Original™ batteries and battery
chargers. The phone warranty does not cover damage caused
from using non-Motorola batteries and/or battery chargers.
• New batteries or batteries that have been stored for long
periods of time may require a longer charge time.
• Maintain the battery at or near room temperature when
charging.
• Do not expose batteries to temperatures below -10°C (14°F)
or above 45°C (113°F). Always take your phone with you
when you leave your vehicle.
• When you do not intend to use a battery for a while, store it
uncharged in a cool, dark, dry place, such as a refrigerator.
• Over extended periods of time, batteries gradually wear down
and require longer charging times. This is normal. If you
charge your battery regularly and notice a decrease in talk
20 - Getting Started
time or an increase in charging time, then it is probably time to
purchase a new battery.
The rechargeable batteries that power this product must
be disposed of properly and may need to be recycled.
Refer to your battery’s label for battery type. Contact
your local recycling centre for proper disposal methods.
Never dispose of batteries in a fire because they may explode.
Turning Your Phone On
Action
1 Press and hold O
(the End/Power key).
End/
Power
Key
2 If necessary, enter your SIM card PIN code and press
OK (+) to unlock your SIM card.
Caution: If you enter an incorrect PIN code 3 times in
a row, your SIM card is disabled and your phone
displays SIM Blocked. (For more information, see
page 97.)
3 If necessary, enter your four-digit unlock code and
press OK (+) to unlock your phone.
Note: The unlock code is originally set to 1234. (For
more information, see page 37.)
Adjusting Volume
When you are in a call, press S left and right to adjust the
earpiece speaker volume.
Getting Started - 21
To adjust keypad or ring tone volume:
Find the Feature
M > Profile Settings > active
profile > Edit
A \ indicates the active profile. You can set
Profile Setting
Ring Volume
Keypad Tone
Description
the volume of the incoming call
alert sound
the sound for key presses
For other profile settings, see page 74.
Making a Call
Built-in antenna
Do not block the built-in antenna in the top of
your phone while you are on a call.
Press
1 keypad keys
2 N
3 O
22 - Getting Started
To
dial the phone number
Tip: If you make a mistake,
press DELETE (-) to delete the
last digit, or press and hold
DELETE (-) to delete all digits.
make the call
end the call and “hang up” the
phone
Answering a Call
When you receive a call, your phone rings and/or vibrates and
displays an incoming call message.
Action
1 Press N or ANSWER (+)
2 Press O (end key) when the call is done.
Note: If the phone is locked, unlock it to answer the call.
Getting Started - 23
Learning to Use Your Phone
See page 1 for a basic phone diagram.
Using the Display
The idle display (shown below) is the standard display you see
when you are not on a call or using the menu. You must be in the
idle display to dial a phone number.
Press S in idle to
display the icon
menu.
Messages
5
J Y9
Service Provider
Normal Mode
Phonebook
U
r
g
v
Clock and Date
Alert Profile (see
page 42)
12:00 pm 01/01
G MESSAG
PH.BO0
Menu Indicator
Datebook
Media Centre
Note: Your phone
might list different
features in the idle
display.
Soft Key Labels
The G (menu) indicator at the bottom centre of the display indicates
you can press the menu key (M) to display the main menu to see
more features.
Labels at the bottom corners of the display show the current soft
key functions. Press the left soft key (-) or right soft key (+) to
perform the function indicated by the left or right soft key label.
24 - Learning to Use Your Phone
The following status indicators can appear:
➌ GPRS
➍ Roam
➏ Message
➎ Active
Line
➐ Alert Type
➋ In Use
➊ Signal
Strength
5 UD;JÄY9
Service Provider
Normal Mode
➑ Battery Level
U
r
g
v
12:00 pm 01/01
G MESSAG
PH.BO0
➊ Signal Strength Indicator Indicates the strength of your
phone’s connection with the network.
Strong
5
4
3
2
1
0
No signal
You cannot make or answer calls when the “no signal” indicator
appears.
➋ In Use Indicator Indicates when a call is in progress (U).
➌ GPRS Indicator Indicates that your phone is using
a high-speed GPRS network connection (D). GPRS
allows faster data transfer speeds. The indicator does
not mean that you are in a call; only that you are
registered on the network with a GPRS connection.
➍ Roam Indicator Appears when your phone uses
another network system outside your home network
(;). When you leave your home network area, your
phone roams or seeks another network.
➎ Active Line Indicator Shows the current active phone line. To
change the active line, see page 46.
Learning to Use Your Phone - 25
➏ Message Indicator Indicates when you have a new
voice ( ) or text (Ä) message waiting. The symbol
flashes when message memory is full.
➐ Alert Type Indicator Shows the currently selected alert type for
incoming calls and messages.
Y Ring
a Flash
W Vibrate
Off
Z Vibrate Then Ring
➑ Battery Level Indicator Shows the amount of charge left in
your battery. The more bars visible, the greater the charge.
High
9
8
7
6
Low
Recharge your battery as soon as possible when you see the
Low Battery warning message and hear the low battery alert.
Using the 4-Way Navigation Keys
Use the 4-way navigation key like a
joystick to navigate the menu system,
change feature settings, and play
games.
Navigation
key
Tip: Down and up are the primary
movements within menus. Move left
and right to change feature settings, navigate the datebook, and
edit text.
26 - Learning to Use Your Phone
Using Menus
From the idle display, press M to display the main menu.
Left Soft Key
Perform functions
identified by left
display prompt.
Right Soft Key
Perform functions
identified by right
display prompt.
Menu Key
Enter menu
system or open a
sub-menu.
Power/End Key
Press and hold to
turn phone
on and off.
Press and release
to end phone
calls, exit menus.
Navigation Key
S
Scroll through
menus & lists, set
feature values.
Selecting a Menu Feature
From the idle display, select a menu feature as follows:
Find the Feature
M > Settings
> Initial Setup
> Time and Date
This example shows that from the idle display, you must press M,
scroll to and select Settings, then scroll to and select Initial Setup, then
scroll to and select Time and Date to display the time and date. Use
S to scroll, and the left/right soft keys to perform the functions in
the bottom left and right corners of the display.
Learning to Use Your Phone - 27
Selecting a Feature Option
Some features require you to select an item from a list:
Press M to
open the
sub-menu.
Press
BACK (-) to
display the
previous
screen.
5
J Y9
Dialled Calls
d 10.John Smith
9.Mary Smith
8.Carlos E..
7.Adda Tho..
e 6.Jack Bra..
G VIEW
BACK
Highlighted item
Press VIEW (+)
to display details
for the highlighted
item.
• Press S to scroll up or down to highlight an item.
• In a numbered list, press a number key to highlight the item.
• In an alphabetised list, press a key repeatedly to cycle through
the letters on the key and highlight the closest matching list
item.
• When an item has a list of possible values, press S to the
left or right to scroll and select a value.
• When an item has a list of possible numeric values, press a
number key to set the value.
28 - Learning to Use Your Phone
Entering Text
Some features require you to enter information:
Press S to
scroll to
additional items.
5
J Y9
Entry Details
d Name:
No.:
Memory:Phone
Voice Name:0
e Email:
CANCEL
CHANGE
Press CANCEL (-) to exit without
making changes.
DONE (-) displays when you
enter or edit information.
Highlighted
item
Press CHANGE (+) or
number keys to edit the
information.
The message centre lets you compose and send text messages. A
flashing cursor shows where text will appear:
Flashing
cursor
indicates
insertion
point.
5
Y9
Press SEND (+)
when you finish
your message.
CANCEL
G
Press CANCEL (-) to exit
without making changes.
SEND
Press M to open the
sub-menu.
When you enter text using the standard tap method (see page 30),
the soft key functions change.
Learning to Use Your Phone - 29
Choosing a Text Entry Method
Multiple text entry methods make it easy for you to enter names,
numbers, and messages.
Press M > Entry Method from any text entry screen to select a text
entry method:
iTAP
TAP
Number
Let the phone predict each word as you
enter it, then choose the word from a list
(see page 32).
Enter characters one at a time by pressing
the key for the letter, number, or symbol
(see page 30). This is the standard
method for entering text.
Enter numbers only.
Note: The text entry method you select remains active until you
change it by selecting another method.
Using the Tap Method
This is the standard entry method for entering text on your phone.
Press M > TAP from a text entry screen..
Press
1 A number key one
or more times
2 Number keys
3 SEND (+)
30 - Learning to Use Your Phone
To
select a letter, number, or
symbol shown in the chart on
page 31.
enter the remaining characters
accept the text and open the
address display
Tap Method Text Entry Rules
• Press a number key repeatedly to cycle through its characters.
See the chart on page 31.
• Press S left or right to move the flashing cursor to the left or
right in a text message.
• Press S up or down to change a character case.
• Your phone may support multiple languages. The current
language setting determines whether a new message begins
on the left or right side of the display.
• If you enter or edit information and do not want to save your
changes, press O to exit without saving.
Character Chart
Use this chart as a guide for entering characters with the tap
method.
1
space . 1 ? ! , @ _ & ~ : ; "
- ( ) ' ¿ ¡ % £ $ ¥ ¢ £
2
a b c 2 ä å á à â ã α β ç
3
d e f 3 δ ë é è ê φ
4
g h i 4 ï í î γ
5
j k l 5 λ
6
m n o 6 ñ ö ø ó ò ô õ ω
7
p q r s 7 π ß σ
8
t u v 8 θ ü ú ù û
9
w x y z 9 ξ ψ
+ - 0 x * / \ [ ] = > < # §
0
Learning to Use Your Phone - 31
Note: This chart may not reflect the exact character set available
on your phone.
Using the iTAP™ Method
iTAP™ software provides a predictive text entry method that lets
you enter a word using one keypress per letter.
Press M > iTAP from a text entry screen.
Entering Words
Press
1 A number key one
time
To
enter the first letter of the word
The letters associated with the
key are shown at the bottom of
the display.
2 Number keys (one enter the rest of the word
per letter)
Alternative words and letter
3
S right or left
4 SELECT (+)
combinations are shown at the
bottom of the display. The word
choices are updated with each
keypress.
highlight the word you want
enter the word at the flashing
cursor
A space is automatically
inserted after the word.
32 - Learning to Use Your Phone
For example, to spell “art,” press 2 7 8. The display
shows:
Flashing cursor
indicates
insertion point.
5
Y9
Press S to scroll
and see additional
choices.
Art Apt Cpu c
G SELECT
DELETE
Press DELETE (-) to clear the Press SELECT (+) to insert the
last letter entered. highlighted letters.
Entering Novel Words
If iTAP does not display the word you want:
Press
1 DELETE (-) one or
more times
To
delete letters until you see
a letter combination that
matches the start of the
word
highlight
the letter or letter
2 S left or right
combination
3 SELECT (+), then press shift the text entry cursor to
the left and “lock” the
S to the left
selected letters
4 Number keys and S enter letters and highlight
letter combinations to spell
the word
Learning to Use Your Phone - 33
Your phone stores the unrecognised word, and includes
it in the list of alternative word choices the next time you
enter it. When you fill memory space for storing
unrecognised words, your phone deletes the oldest
words as you add new words.
Entering Punctuation
Press
0 or 1
To
enter punctuation or other
characters (see the chart on
page 31)
Using Capitalisation
The first word of a sentence is automatically capitalised, with the
words that follow in lowercase.
Press
S up
S down
34 - Learning to Use Your Phone
To
display complete words that
begin with the characters you
entered
change the words to initial
character capitalised, all
uppercase characters, or all
lowercase characters
Entering Numbers
Action
1 Enter the first digit
and then highlight
it
2 Press number
keys
3 Press SELECT (+)
To
put the iTAP software in number
entry method
add digits to the number
enter the number
Deleting Letters and Words
Place the cursor to the right of the text you want to delete, and then:
Action
Press DELETE (-)
Hold DELETE (-)
To
delete 1 letter at a time
delete the entire message
Locking and Unlocking Your Phone
You can lock your phone manually or set your phone to lock
automatically whenever you turn it off.
A locked phone still rings or vibrates for incoming calls or
messages, but you must unlock it to answer. To use a locked
phone, enter the unlock code.
You can make emergency calls on your phone even when it is
locked. See page 47.
Learning to Use Your Phone - 35
Locking Your Phone Manually
Find the Feature
M > Settings > Security
> Phone Lock
> Lock Now
Press
4 ENTER (+)
5 keypad keys
6 OK (+)
To
open the unlock code display
enter your 4-digit unlock code
lock the phone
Unlocking Your Phone
At the Enter Unlock Code prompt:
Press
1 ENTER (+)
2 keypad keys
To
open the unlock code display
enter your 4-digit unlock code
3 OK (+)
The unlock code is originally set
to 1234. If necessary, see “If You
Forget a Code or Password” on
page 37.
unlock your phone
Setting Your Phone to Lock Automatically
You can set your phone to lock every time you turn it off:
Find the Feature
36 - Learning to Use Your Phone
M > Settings > Security
> Phone Lock
> Auto Lock > On
Press
1 ENTER (+)
2 keypad keys
3 OK (+)
To
open the unlock code display
enter your 4-digit unlock code
set the phone to lock
automatically
Note: To automatically lock your keypad, see page 38.
Changing a Code or Password
Your phone’s 4-digit unlock code is originally set to 1234, and the
6-digit security code is originally set to 000000. Your service
provider may reset these numbers before you receive your phone.
If your service provider has not reset these numbers, we
recommend that you change them to prevent others from
accessing your personal information or modifying your phone
settings. The unlock code must contain 4 digits, and the security
code must contain 6 digits.
To change a code or password:
Find the Feature
M > Settings > Security
> Passwords
If You Forget a Code or Password
If you forget your security code (originally set to 000000), SIM PIN,
SIM PIN2, or call barring password, contact your service provider.
If you forget your unlock code, try entering 1234 or the last 4 digits
of your phone number. If that does not work, do the following when
you see the Enter Unlock Code message:
Press
1 ENTER (+)
To
open the unlock code display
Learning to Use Your Phone - 37
Press
2 M
3 keypad keys
4 OK (+)
To
go to the unlock code bypass
screen
enter your security code
submit your security code
Locking and Unlocking the Keypad
You can lock the keypad to prevent accidental keypresses (for
example, when carrying your phone in a purse or pocket).
Press
M*
To
lock or unlock your keypad
Note: Incoming calls unlock the keypad.
To make the keypad lock automatically if it is inactive:
Find the Feature
M > Settings > Security
> Auto Key Lock > On
Taking Photos and Sending Picture Messages
You can take photos to view and send as Multimedia Messaging
Service (MMS) picture messages.
38 - Learning to Use Your Phone
Take Photos
Note: The viewfinder image
and captured images are
scaled to fit your phone’s
display. The image will have
greater resolution when
viewed on a PC.
Camera Key
Open camera and
press to view or
capture image.
Open the camera lens on the
back of your phone and point
the viewfinder at the photo
subject:
Press
1 M > Camera
or
the camera key
2 TAKE (+)
To
The image in the camera’s
viewfinder appears on your
phone’s display.
freeze the image in the display
or
the camera key
3 STORE (+)
save the photo as a JPG file on
your phone (see step 4)
or
DELETE (-)
delete the photo and return to
viewfinder mode.
Learning to Use Your Phone - 39
Press
4 S SELECT (+)
To
scroll to Send MMS, Set As,
Rename, or Details
open a new MMS picture
message with the photo
attached
or
BACK (-)
Option
Send MMS
Set As...
Rename
Details
return to viewfinder mode
Description
Open a new MMS picture message
with the photo attached.
Save the photo as your wallpaper, or
a caller group icon.
Name the photo.
Display the photo name, type, size,
date, and time.
View, Send, Delete, or Rename Photos
Find the Feature
Press
1 S
2 VIEW (+)
40 - Learning to Use Your Phone
M > Media Centre
> Photo Album > album
To
scroll to the photo you want
view the photo
Press
3 SEND (+)
To
open a new MMS picture
message with the photo
attached
or
M
open the Photo Album menu for the
following options.
The Photo Album menu can include the following options:
Option
Set as ...
Delete
Rename
Details
View Free Space
Delete All
Send
Move
Description
Set the picture as your
wallpaper or a caller
groupimage.
Delete the picture.
Rename the picture.
View picture information.
Check the space available for
more pictures and animations
Delete all pictures in the
album.
Open a text message with the
picture attached (see
page 55).
Move the picture to another
location
Learning to Use Your Phone - 41
Setting Up Your Phone
Storing Your Name and Phone Number
To store or edit your name and phone number information on your
SIM card:
M > Settings
> Phone Status
> My Tel. Numbers
Find the Feature
If you do not know your phone number, contact your service
provider.
Setting the Time and Date
To use the datebook, you must set the time and date.
Find the Feature
M > Settings
> Initial Setup
> Time and Date
Setting a Ring Style
Your phone rings or vibrates to notify you of an incoming call,
message, or other event. This ring or vibration is called an alert.
Find the Feature
M > Ring Style
You can change these ring style settings:
Setting
Ring Volume
42 - Setting Up Your Phone
Description
volume for all alerts
Setting
In-Call Alert
Description
ring or vibrate alert types
Ring Type
Note: The alert indicator in your
display shows this alert type (see
indicators on page 24).
Continuous or Once
sound for incoming call alerts
sound for incoming message alerts
sound for alarms
Ring Tones
Text Msgs
Alarms
Tip: You can choose a profile that sets all of your alert, colour,
answer mode settings at once. To choose a profile, see page 74.
Setting Answer Mode
You can answer calls by pressing any key, or tell your phone to
answer calls automatically after a delay. To set these options:
Find the Feature
Setting
Auto Answer
Anykey Answer
Sendkey Answer
M > Profile Settings
> profile > Edit
> Answer Mode
Description
answer automatically, after a delay
answer by pressing any key
answer by pressing N
Tip: You can choose a profile that sets all of your alert, colour,
answer mode settings at once. To choose a profile, see page 74.
Setting Up Your Phone - 43
Setting a Wallpaper Image
You can set a picture or photo as a wallpaper (background) image
in your phone’s idle display.
M > Settings
> Personalise
> Wallpaper
Find the Feature
Select a wallpaper image, or press M and select:
Setting
Photo Album
Picture
Description
photos stored on your phone
pictures stored on your phone
Selecting a Screen Saver
When you display an animation or picture, you can set it as your
screen saver image. The screen saver image displays when the
phone detects no activity for a specified time.
Find the Feature
M > Media Centre
> Animation
> the animation
M > Apply as screen saver
The screen saver image shrinks to fit the display, if necessary.
Setting Display Colour
You can select the colour palette that your phone uses to display
indicators, highlights, and soft key labels.
Find the Feature
M > Profile Settings
> profile > Edit
> Colour Setting
Tip: You can choose a profile that sets all of your alert, colour,
answer mode settings at once. To choose a profile, see page 74.
44 - Setting Up Your Phone
Adjusting the Backlight
You can set the amount of time that the display backlight remains
on, or turn off the backlight to conserve battery power.
Find the Feature
M > Settings
> Initial Setup
> Backlight
Conserving Battery Power
Some networks and phones include a battery save
setting to conserve battery power.
Find the Feature
M > Settings
> Initial Setup
> Battery Save
Setting Up Your Phone - 45
Calling Features
For basic instructions on how to make and answer calls, see page
22.
Changing the Active Line
Change the active phone line to make and receive calls
from your other phone number.
Find the Feature
M > Settings
> Phone Status
> Active Line
The active line indicator in the display shows the current active
phone line (see page 25).
Redialling a Number
From the idle display:
Press
1 N
2
S
3 N
To
view the dialled calls list
scroll to the entry you want
redial the number
Using Caller ID
Calling line identification (caller ID) displays the phone
number for incoming calls.
46 - Calling Features
For Incoming Calls: The phone displays the caller’s name when
the name is stored in your phonebook, or Incoming Call when caller ID
information is not available.
For Outgoing Calls: Other phones can display your phone number
when you call them or send a message. To hide your number for
the next call, or for all your calls:
Find the Feature
M > Settings
> In-Call Setup
> My Caller ID
> Next Call Only or
All Calls
Cancelling an Incoming Call
While the phone is ringing or vibrating:
Press
CANCEL (-)
To
cancel the incoming call
Depending on your phone settings and the type of
subscription you have, the call may be forwarded to
another number, or the caller may hear a busy signal.
Calling an Emergency Number
Your service provider may program one or more emergency phone
numbers, such as 999, that you can call under any circumstances,
even when your phone is locked or the SIM card is not inserted.
Note: Emergency numbers vary by country. Your phone’s
emergency number(s) may not work in all locations, and sometimes
Calling Features - 47
an emergency call cannot be placed due to network,
environmental, or interference issues.
Press
1 keypad keys
2 N
To
dial the emergency number
call the emergency number
Dialling International Numbers
To dial the local international access code:
Action
Press 0 for 2
seconds
To
insert the international access
code (+) for the country from
which you are dialling
Viewing the Received Calls or Dialled Calls List
Your phone keeps lists of the calls you recently received and
dialled, even if the calls did not connect. The lists are sorted from
newest to oldest, and contain up to 10 entries. The oldest entries
are deleted as new ones are added.
Shortcut: From the idle display, press N to display the dialled
calls list.
Find the Feature
M > Recent Calls
Press
1 S
To
scroll to Received Calls or Dialled Calls
2 SELECT (+)
select the list
scroll to an entry
3
S
48 - Calling Features
Press
4 N
To
call the entry’s number
Note: Press and hold N for 2
seconds to send the number as
DTMF tones during a call.
or
+
if View appears above the +
key—view the entry’s details
if Store appears above the +
key—store the entry’s details in
the phonebook
or
M
Option
Store
Delete
Delete All
Add Digits
open the Last Calls Menu to
perform other procedures in the
following list
Description
Create a phonebook entry with the
selected number in the No. field. (This
option does not appear if STORE
appears above the + key, or if the
number is already stored as a
phonebook entry.)
Delete the entry. (This option does
not appear if DELETE appears above the
+ key.)
Delete all entries in the current list.
Add digits to the end of the selected
number.
Calling Features - 49
Returning an Unanswered Call
When you do not answer calls, your phone displays X Missed Calls,
where X is the total number of missed calls
Press
1 VIEW (+)
2
To
see the missed calls list,
beginning with the most recent
call
scroll through the list and select
a call that you want to return
make the call
S
3 N
Using the Notepad
Your phone stores the most recent string of digits entered on the
keypad in a temporary memory location called the notepad. This
can be a phone number that you called, or a number that you
entered but did not call. To retrieve the number stored in the
notepad:
Find the Feature
Press
N
or
STORE (+)
M > Recent Calls
> Notepad
To
call the number
create a new phonebook entry, with the
notepad number copied into the No. field
(see page 64).
Calling With Speed Dial
Each entry in your phonebook is assigned a unique speed dial
number that identifies where the entry is stored in phone memory
50 - Calling Features
or on the SIM card. To speed dial a phonebook entry, in the idle
display:
Press
1 keypad keys
2 #
3 N
To
enter the speed dial number for
the entry you want to dial
submit the number
call the entry
Calling With TurboDial
To call phonebook entries 1 to 9 from the idle display, press and
hold the 1-digit speed dial number for 1 second.
Using Voicemail
You can listen to your voicemail messages by calling
your network voicemail phone number. Voicemail
messages are stored on the network—not on your
phone.
Storing Your Voicemail Number
Storing your voicemail number in your phone makes it easy for you
to listen to new voicemail messages. Your voicemail number is
provided by your service provider.
Find the Feature
Press
1 keypad keys
2 OK (+)
M > Messages
> Message Settings
> Voicemail No.
To
enter the phone number for your
voicemail
store the number
Calling Features - 51
Note: You cannot store pause (p), wait (w), or number (n)
characters in this number. If you want to store a voicemail number
with these characters, create a phonebook entry for it. Then, you
can use the entry to call your voicemail. For more about these
characters, see page 66.
Receiving a New Voicemail Message
When you receive a voicemail message, your phone displays f
(voice message waiting) and New Voicemail. Some networks only
indicate when you have messages, whether they are new or not.
Press
CALL (+)
To
call the voicemail phone number
you stored and listen to the
message
Listening to a Voicemail Message
Find the Feature
M > Messages > Voicemail
Your phone calls your voicemail number. If no voicemail number is
stored, the phone prompts you to store one.
Using Call Waiting
When you are on a call, an alert tone sounds to indicate
that you have received a second call.
Press
1 N
52 - Calling Features
To
answer the new call
Press
2 SWITCH (+)
To
switch back to the first call
Note: You can press
or
LINK (-)
SWITCH (+) at any time to
switch between calls.
connect the two calls
You must turn on call waiting to use this feature. To turn call waiting
on or off:
Find the Feature
M > Settings
> In-Call Setup
> Call Waiting
Putting a Call on Hold
Press
HOLD (+) (if
available)
To
put a call on hold
or
M > Hold
Transferring a Call
While you are on a call, you can transfer the call to another phone
Find the Feature
Press
1 keypad keys
M > Hold
To
enter the phone number where
you are transferring the call
Calling Features - 53
Press
2 N
3 M
4
S
5 SELECT (+)
54 - Calling Features
To
dial the phone number
Speak to the person who
answers the target phone.
open the menu
scroll to Call Transfer
confirm the transfer
Messages
Text messages are brief messages that you can send
and receive.
Quick notes are prewritten text messages that you can
insert into a message and send quickly.
Setting Up the Message Inbox
Your message inbox must be set up before you can send and
receive messages.
Note: Your service provider may have already set up the message
inbox for you.
Find the Feature
Setting
Short Msg Setup
Multimedia Msg Setup
M > Messages
> Message Settings
> Inbox Setup
Description
Enter your service centre
number, expiry period, and
reply type for SMS messages.
Enter the network settings,
filters, and limits for MMS
messages.
Sending Messages, Pictures, and Sounds
Note: Your message inbox must be set up before you can send and
receive messages (see page 55).
Messages - 55
You can send two types of text messages:
Find the Feature
SMS/EMS
Multimedia
Multimedia
Templates
M > Messages > Create
> message type
Contains text, simple icons, and ring
tones.
Contains text, photos, and complex
sounds.
Contains pre-selected text, photos, or
complex sounds.
Press
1 keypad keys
To
enter the text message (see
page 29)
To insert a picture, animation, or
sound file in the message,
press:
2 SEND (+)
3 SELECT (+)
4 keypad keys
or
M > Phonebook
56 - Messages
M > Insert Media > object type
> object
Note: Some files may not be
compatible with some brands of
phones.
store the message contents and
open the address editor
select [New Entry]
enter a phone number where
you want to send the message
select one or more phone
numbers from the phonebook
Press
5 SEND (+)
or
M > Save to Drafts
6 OK (-)
To
send the message
save the message as a draft
confirm the send
Sending a Quick Note Text Message
Quick notes are prewritten text messages that you can insert into a
message and send quickly (for example, Meet me at ...). You can also
create new quick notes.
M > Messages > Templates
> Quick Notes
Find the Feature
Press
1 S
To
scroll to the quick note
2 SEND (+)
send the quick note
or
M
view the note text or
create a new quick note
Viewing the Status of Sent Text Messages
Text messages that you send are stored in the outbox.
Find the Feature
M > Messages > Outbox
Messages are sorted from oldest to newest.
Receiving a Message
Note: Your message inbox must be set up before you can send and
receive messages. See page 55.
Messages - 57
When you receive a new message, your phone displays the g
(message waiting indicator) and New Message, and sounds an alert.
Press
1 VIEW (+)
To
open the message (or your text
message inbox if there are
multiple messages)
If reminders are turned on, your phone sends a reminder at regular
intervals until you close the new message notification, read the
message, or turn off your phone.
When your phone displays Memory is Full!, you must delete some
existing messages from your inbox, outbox, or drafts folder to
receive new messages.
Reading or Deleting a Text Message
Messages in the text message inbox are sorted from newest to
oldest.
Find the Feature
M > Messages > Inbox
Press
1 S
To
scroll to the message
2 READ (+)
3 BACK (-)
or
REPLY (+)
or
M
open the message
close the message
58 - Messages
compose and send a reply
open the Text Msg Menu for the
following options
Option
Reply
Delete
Call Back
Chat
Forward
Cleanup Message
Extract Address
Description
Open a new text message, with the
sender’s Reply To number or email
address in the To field.
Delete the message.
Call the number in the message
header or embedded in the
message.
Open a chat session with the
message sender.
Open a copy of the text message,
with an empty To field.
Delete any messages past the
expiry in your Inbox Setup (see
page 55)
Create a phonebook entry for the
Reply To number
Reading Information Service Messages
Information service messages are broadcast messages
that you can receive, such as stock updates or news
headlines.
Your information services message inbox must be set up before
you can receive information services messages. The number of
messages the inbox can hold depends on the length of the
messages, and the number of other messages and drafts stored on
your phone.
Messages - 59
Note: Your service provider may have already set up the
information services inbox for you.
Find the Feature
M > Messages
> Message Settings
> Info Alert Setup
To set up the information services inbox, you must configure the
following settings. Contact your service provider to obtain this
information, if necessary. Actual field names and values may vary
depending on the technologies available to your service provider.
Some settings may not be available for all phone models.
Setting
Service
Active Channels
Language
Description
select Yes or No to turn
broadcasts on or off
set the subscription channels
select the language(s) in
which you want to accept
broadcasts
Using Chat
You can exchange text messages in real time with
another wireless phone user in a chat session. The
messages you send appear immediately on your chat
partner’s phone.
Starting a Chat Session
Find the Feature
Press
1 keypad keys
60 - Messages
M > Chat > Start Chat
To
enter your Nickname
Press
2 OK (+)
3 keypad keys
To
save your Nickname
enter your first chat message
or
M > Quick Notes
4 OK (+)
5 SELECT (+)
select a quick note
save the chat message
enter your chat partner’s phone
number
or
S > PB Lookup
6 OK (+)
select a number from the
phonebook or recent call lists
send the message
7 CHAT (+)
8 OK (+)
Your phone displays the chat
log. When your chat partner
replies, the reply appears below
your text.
enter a reply to your partner
send your reply
Notes:
• If you send a chat message to a phone that only has text
messaging, the chat text appears as a text message on the
other phone. The reply appears as chat text on your phone.
• You can start a chat session from a text message. Press M
and select Chat to start a new session with the sender’s Reply To
number in the To field.
• When your phone displays Memory is Full!, you must delete
some existing messages from your inbox, outbox, or drafts
folder to receive new chat messages.
Messages - 61
Using the Chat Log
The chat log displays the messages exchanged in a chat session.
Nickname
Press S to
scroll and see
more text.
Exit chat
5
Y9
Chat
d Katy>10 AM
Carlo>What
time does it
start?
e Katy>Are you
PAUSE
CHAT
Newest
messages
display at
top.
Chat text
Enter reply
Responding to Chat
When you receive a chat message, your phone displays Chat from
chat name, and sounds an alert.
Press
ACCEPT (+)
To
accept the chat session
or
REJECT (-)
refuse the chat session
If reminders are turned on, your phone reminds you at regular
intervals until you respond to the chat notification or turn off your
phone.
If you receive another chat request during a chat session, the new
message appears as an incoming text message, with the
requestor’s chat name at the beginning of the message.
62 - Messages
Ending a Chat Session
Press
1 PAUSE (-)
2 M
3
S
4 SELECT (+)
To
suspend the session
open the Chat Menu
scroll to End Chat
select End Chat
A chat session also ends when you turn off your phone, answer an
incoming call, or start a new chat session.
Your chat partner is not notified when you end a chat session. If
your partner sends more chat text, your phone treats it as an
incoming text message, with your chat partner’s chat name at the
beginning of the message.
If you exit the chat log without selecting End Chat, and your chat
partner sends another message, your phone notifies you and adds
it to the chat log. You can re-enter the session by returning to the
chat log.
Messages - 63
Setting Up Your Phonebook
You can store a list of names and phone numbers or email
addresses in your phone’s electronic phonebook.
To see the names in your phonebook:
M > Phonebook
Find the Feature
Scroll to a name and press VIEW (+) to view details of the
phonebook entry as shown in the following display.
Viewing Entry Details
Press S to
scroll to items.
Scroll down for
entry’s Location
(TurboDial)
number
Return to list
5
Y9
d Carlo Emrys
2125551212
Memory:Phone
Email:carlo@
e mot.com
G EDIT
BACK
Entry’s Name
Entry’s phone
number
SIM or Phone
entry location
Entry’s email
address
Edit entry
Press M to open the
Phonebook Menu
Creating a Phonebook Entry
You can store a phonebook entry on your phone or on the
SIM card.
64 - Setting Up Your Phonebook
Entering Information
To create or edit a phonebook entry:
Find the Feature
M > Phonebook
M > New
> Phone Number
Shortcut: Enter a phone number in the idle display, then press
STORE (+) to create a phonebook entry with the number in the No.
field.
A phone number is required for a phonebook entry. All other
information is optional. You can enter the following information for a
phonebook entry:
Phonebook item
Name
No.
Memory
Voice Name
Email
Group
Photo CLI
TurboDial
Description
a name for the entry
the phone number
select whether to store the entry
on your Phone or SIM
record a name to voice dial the
entry
the email address
the group that classifies the
entry (see page 70)
select a photo to appear when
you receive calls from the entry
the number you use to TurboDial
the entry (for entries 1 to 9). To
TurboDial an entry, press and
hold its TurboDial number in
idle.
Setting Up Your Phonebook - 65
Completing a Phonebook Entry
When you are finished entering information for a phonebook entry:
Press
DONE (-)
To
store the entry and return to the
phonebook list
Storing a PIN Code With a Phone Number
You can store a PIN code with the phone number for calls that
require additional digits (for example, to make a calling card call, or
to retrieve voicemail or answering machine messages). Insert one
or more of the following characters in the dialling sequence to
ensure that the number dials and connects properly:
Press
M > Insert Pause
To
inserts a p (pause) character
Your phone dials the preceding
digits, waits for the call to
connect, then sends the
remaining digit(s).
M > Insert Wait
Note: If your network does not
recognise the first pause
character, try two (pp).
inserts a w (wait) character
Your phone dials the preceding
digits, waits for the call to
connect, then prompts you for
confirmation before it sends the
remaining digit(s).
66 - Setting Up Your Phonebook
Press
M > Insert 'n'
To
inserts an n (number) character
Your phone prompts you for a
number before dialling the call.
The number you enter is
inserted into the dialling
sequence in place of the n
character.
Notes:
• You can store a maximum of 40 digits per number for a
phonebook entry on your phone. The maximum number may
vary for entries stored on the SIM card. Each character counts
as one digit.
• You cannot store numbers that contain a w or n character on
the SIM card.
Recording a Voice Name For a Phonebook Entry
A voice name lets you call the phonebook entry using voice dial.
You can record a voice name for a new or existing phonebook
entry.
Note: You cannot record a voice name for an entry stored on a SIM
card.
Record your voice name in a quiet location. Hold the phone about 4
inches (10 centimetres) from your mouth, and speak directly into
the phone’s microphone in a normal tone.
Find the Feature
M > Phonebook
Press
1 S
To
scroll to the entry
2 VIEW (+)
view entry details
Setting Up Your Phonebook - 67
Press
3 EDIT (+)
4
S
5 RECORD (+)
6 RECORD (+) and
release, then say
the entry’s name
(within 2 seconds)
7 RECORD (+) and
release, then
repeat the name
8 DONE (-)
To
edit the entry
scroll to Voice Name
begin recording
record the voice name
confirm the voice name
store the voice name
Dialling a Phonebook Entry
Use one of the following procedures to call a number (or send a
text message to an email address) stored in your phonebook.
Note: You can also use TurboDial (see page 51).
Using the Phonebook List
Find the Feature
M > Phonebook
Press
To
1 keypad key letters jump to entries that begin with
that letter (optional)
scroll to the entry you want
2 S
3 N
68 - Setting Up Your Phonebook
call the entry
Using Voice Dial
To call a phonebook entry that you
Left
stored with a voice name, press and
Softkey
hold the left soft key until your phone
says Say Name Now. Say the entry’s name
(in two seconds).
To store a voice name for a phonebook entry, see page 67.
Editing a Phonebook Entry
Find the Feature
Press
1 S
2 VIEW (+)
3 EDIT (+)
M > Phonebook
To
scroll to the entry you want to
edit
display the entry’s detailed view
edit the phonebook entry
Edit the entry as described on page 64.
Tip: Press M to open the Phonebook Menu to perform various
operations on the selected entry.
Setting Up Your Phonebook - 69
Deleting a Phonebook Entry
M > Phonebook
Find the Feature
Press
1 S
To
scroll to the entry
2 M
open the Phonebook Menu
scroll to Delete
3
S
4 SELECT (+)
delete the entry
Using Caller Groups
You can put phonebook entries into groups. When you
get a call or message from someone in a group, your
phone uses the group’s special ring.
Setting Up a Group
Find the Feature
M > Settings
> Personalise
> Caller Groups
> group name
You can edit the following settings:
Setting
Name
Ring
Icon
70 - Setting Up Your Phonebook
Description
name of the group
ring alert your phone uses for
calls from group members
icon your phone displays for
calls from group members
Setting
Use Defaults
Description
reset all of the settings to the
phone defaults
Viewing Only One Group in Your Phonebook
To make your phonebook display only the entries in one group:
M > Phonebook
M > Caller Groups
> the group to view
Find the Feature
Your phone hides all phonebook entries except for the members of
the group you selected.
Sorting Phonebook Entries
You can sort your phonebook list by speed dial number Alpha
Sorting, Bopomofo Sorting, Pinyin Sorting, and Stroke Sorting.
M > Phonebook
M > PB Sorting
> sort order
Find the Feature
Copying Phonebook Entries
Note: These procedures do not delete the original entries.
Copying a Single Entry
Find the Feature
M > Phonebook
Press
1 S
To
scroll to the entry
2 M
open the Phonebook Menu
Setting Up Your Phonebook - 71
Press
3 S
4
SELECT (+)
5 YES (-)
To
scroll to Copy Entry
select Copy Entry
The phone asks for a
confirmation.
copy the entry to the new
location
Tip: The SIM card cannot store Type and Voice Name data for entries.
When you try to copy an entry with a type or voice name to the SIM
card, the phone asks you for confirmation before dropping this
information and copying the entry.
Copying All Entries
Find the Feature
Press
1 M
2
S
3 SELECT (+)
4 YES (-)
72 - Setting Up Your Phonebook
M > Phonebook
M > Copy Entries
To
open the Phonebook Menu
scroll to SIM to Phone, Phone to SIM,
SIM to Caller Group, or
CallerGroup to SIM
select the copy option
confirm the copy
Checking Phonebook Capacity
You can see how much memory space remains for storing
phonebook and datebook entries on the phone, and how many
more phonebook entries you can store on the SIM.
Find the Feature
Press
1 M
2
S
3 SELECT (+)
M > Phonebook
To
open the Phonebook Menu
scroll to Phone Capacity or
SIM Capacity
select Phone Capacity or SIM Capacity
Your phone displays the phone
memory meter, or the number of
SIM card phonebook entries
available.
Setting Up Your Phonebook - 73
Personalising Your Phone
Selecting or Editing a Profile
A profile stores your settings for alerts, colour style, and answer
options. To select a profile:
M > Profile Settings
> profile > Activate
Find the Feature
Note: profile represents the profile you want.
You can also customise any profile
Find the Feature
Setting
Colour Setting
Ring Style
Keypad Tone
Warning Tone
Call Time Reminder
Connected Alert
74 - Personalising Your Phone
M > Profile Settings
> profile > Edit
Description
the colour palette for your
display indicators, highlights,
and soft key labels
ring or vibration settings for
calls, messages, and alarms
Note: You can also change
these settings under
M > Ring Styles (see page 42).
the sound for key presses
turn warning tones On or Off
select a Single or Multiple call time
reminder
select the alert for connected
calls
Setting
Answer Mode
Description
select a method for answering
incoming calls
Creating and Editing Alert Tones
You can create and store custom alert tones on your phone. The
tones appear in the list of available alerts.
Creating a Tone
Find the Feature
Press
1 CHANGE (+)
2
S
or
M > Media Centre
> Melody
M > New
To
select Notes
enter notes for the tone (see the
following section)
keypad keys
3
4
5
6
7
OK (+)
CHANGE (+)
keypad keys
OK (+)
DONE (-)
store the notes
select Name
enter the name for the tone
store the name
store the tone
Entering Notes
Press S up or down to select a note in octaves 0-8.
Basic notes: c d e f g a b Sharp Notes: #c #d #f #g #a
Personalising Your Phone - 75
You can also enter note details and rests. For example, *2#g0r
plays a second-octave G sharp whole note followed by a rest.
Press number keys repeatedly to cycle cycle through the options in
the following table.
Note Table
Key
1
Display
1
2
3
2
A
B
C
2
3
D
E
F
3
4
G
R
7
#
0
q
b
h
w
76 - Personalising Your Phone
Description
First octave, as in 1G
Second octave, as in 2G
Third octave, as in 3G
A note
B note
C note
Second octave, as in 2G
D note
E note
F note
Third octave, as in 3G
G note
inserts a rest (you can add
length modifiers, such as Rh)
sharp note, as in F#
flat note, as in Gb
1/4 note, as in Gq
1/2 note, as in Gh
whole note, as in Gw
Example
To create a simple tone, you can enter notes by pressing S up
and down, and enter rests by pressing 4.
For example:
Press
1 S
S
3 S
4 S
2
5 4
6 OK (+)
To
scroll up to C, then
wait for the highlight
to disappear
scroll up to E
Display
C
CE
scroll down to 1A
CE1A
scroll down to C
CE1AC
select R for a rest
store the tone
CE1ACR
Playing a Tone
Find the Feature
M > Media Centre
> Melody
> the tone name
Editing a Tone
You cannot edit the standard alert tones included with your phone.
To edit a custom tone that you created:
Find the Feature
M > Media Centre
> Melody
Press
1 S
To
scroll to the tone
2 M > Edit
open the tone details
Personalising Your Phone - 77
Press
3 S
To
scroll to Name or Notes
4 CHANGE (+)
select the details to edit
enter new text or notes
5
S
or
keypad keys
6 OK (+)
7 DONE (-)
store the details
store the tone
Deleting a Tone
You cannot delete the standard alert tones included with your
phone. To delete a custom tone that you created:
Find the Feature
M > Media Centre
> Melody
Press
1 S
To
scroll to the tone
2 M > Delete
3 YES (-)
select Delete
confirm the deletion
Downloading a Tone
You can download custom ring tones from the micro-browser
application, or from a text message. To download tones from the
micro-browser, see page 100. To download tones from a text
message, see page 57.
78 - Personalising Your Phone
Send Tones
You can send ring tones to other wireless phone users. To insert a
tone in a text message, see page 55.
Setting the Menu Language
You can set the language in which menu features and options are
displayed.
Find the Feature
M > Settings
> Initial Setup
> Language
Resetting All Options
You can reset all options back to their factory settings except for the
unlock code, security code, and lifetime timer.
Find the Feature
M > Settings
> Initial Setup
> Master Reset
Clearing All Information
You can reset all options back to their factory settings except for the
unlock code, security code, and lifetime timer and clear all user
entries (such as Phonebook entries and downloaded wallpapers,
screen savers, and sounds).
Caution: Master clear erases all user-downloaded content and
user-entered information stored in your phone’s memory, including
phonebook and datebook entries. Once you erase the information,
it cannot be recovered. Master clear does not delete any
information stored on the SIM card.
Find the Feature
M > Settings
> Initial Setup
> Master Clear
Personalising Your Phone - 79
Using the Shortcuts Menu
Your phone includes several standard shortcuts. You can create
additional custom shortcuts to frequently used menu items.
Standard Shortcuts
The following shortcuts are pre-programmed in your phone. You
cannot edit or delete these shortcuts.
Action
Press M * in idle
Press N in idle
Press O
Press S up or down
To
lock/unlock your keypad
go to the dialled calls list
exit the menu system and
return to the idle display
open the idle menu
Editing the Shortcuts List
To edit the Shortcuts Menu list:
Find the Feature
M > Settings > Shortcuts Setup
This opens the list of Shortcuts options. The current Shortcuts
options are numbered in the list (1-9).
• To replace a Shortcuts option with an unnumbered option,
select the unnumbered option and press
OPTION (+) > Assign Key
• To assign a voice tag to an option, select the option and press
OPTION (+) > Add or Modify Voice Tag
Using a Shortcuts Shortcut
To select a feature from the Shortcuts Menu list:
Find the Feature
80 - Personalising Your Phone
M > Shortcuts > the feature
Getting More Out of Your Phone
Making a Conference Call
Link an active call and a call on hold together so that all
parties can speak to each other.
Press
1 keypad keys
2 N
3 HOLD (+)
(if available)
To
dial the first person’s number
call the number
put the first call on hold
or
4
5
6
7
M > Hold
keypad keys
N
LINK (-)
O
dial the next person’s number
call the number
connect the two calls
end the entire call
Tip: Repeat steps 3-6 to add additional parties to the conference
call.
Diverting a Call
You can divert your phone’s incoming voice, fax, and/or
data calls directly to another phone number.
Getting More Out of Your Phone - 81
Setting
If Unreachable
If No Answer
If Busy
Unconditional
If Unavailable
Description
diverts if your phone is turned off or
not on a network
diverts if you do not answer
diverts if your phone is busy
diverts all calls
diverts if your phone is turned off, not
on a network, busy, or if you do not
answer
Setting Up or Cancelling Call Diverting
Find the Feature
Press
1 S
2 SELECT (+)
3
S
4 SELECT (+)
5
S
6 SELECT (+)
7 keypad keys
82 - Getting More Out of Your Phone
M > Settings > Call Divert
To
scroll to the type of calls you
want to stop or start diverting
view call diverting settings
scroll to a diverting setting (such
as If Busy)
select the setting
scroll to On or Off
Note: Query confirms this setting
on the network.
select the option
enter the diverting phone
number
Press
8 OK (+)
To
send the divert setting to the
network
Note: Repeat this procedure to enter diverting information for other
call types.
Barring Calls
Call barring lets you restrict outgoing or incoming calls.
You can restrict all calls, calls to international numbers,
or calls while roaming, or all calls but home.
M > Settings > Security
> Call Barring
Find the Feature
Press
1 S
2 CHANGE (+)
3
S
4 SELECT (+)
5 keypad keys
6 OK (+)
To
scroll to Outgoing Calls or
Incoming Calls
select the option
scroll to a restriction setting
select the restriction setting
enter your call barring password
submit your password
Using Fixed Dialling
When you turn on fixed dialling, users can only call
numbers stored in the fixed dial list. Use this feature to
limit outgoing calls to a predefined list of numbers,
country codes, area codes, or other prefixes.
Getting More Out of Your Phone - 83
Turning Fixed Dial On or Off
M > Settings > Security
> Fixed Dial > On or Off
Find the Feature
Using the Fixed Dial List
You must turn on fixed dialling to open the fixed dial list (see above)
M > Tools > Fixed Dial
Find the Feature
You create and edit fixed dial entries just like phonebook entries.
Fixed dial entries are stored on your SIM card, and do not have
Type, Voice Name, or Ringer ID information.
Monitoring Phone Use
Viewing and Resetting Call Timers
Network connection time is the elapsed time from the
moment you connect to your service provider’s network
to the moment you end the call by pressing O. This
time includes busy signals and ringing.
The amount of network connection time you track on your
resettable timer may not equal the amount of time for which
you are billed by your service provider. For billing information,
please contact your service provider directly.
To view a call timer:
M > Recent Calls > Call Times
Find the Feature
Select one of the following options:
Setting
Last Call
Description
Time spent on the last call dialled or
received. You cannot reset this timer.
84 - Getting More Out of Your Phone
Setting
All Calls
Lifetime
Description
Total time spent on dialled and
received calls since the last time you
reset this timer.
Total time spent on all calls on this
phone. You cannot reset this timer.
To reset the call timer:
Press
1 RESET (+)
2 YES (-)
To
reset the time (if available)
confirm the reset
Using Timers During a Call
You can set a timer to beep at selected intervals during a call, and
display information during a call.
Find the Feature
M > Settings
> In-Call Setup
> In-Call Timer
> Display
Select one of the following options:
Setting
Call Times
Off
Description
Display the approximate elapsed
time for the current call.
No in-call timer display.
Getting More Out of Your Phone - 85
Viewing Call Cost Trackers
M > Recent Calls > Call Cost
Find the Feature
Select one of the following options:
Setting
Credit Available
All Call Cost
Last Call Cost
Description
Amount of credit available.
For GSM advice-of-charge,
this is only available if you
set a credit limit.
Amount spent on all dialled and
received calls since the last time you
reset this cost tracker.
You can reset this value separate
from Dialled Calls and Received Calls, so
Dialled Calls plus Received Calls may not
equal All Calls.
Amount spent on the last call you
dialled or received. You cannot reset
this cost tracker.
Viewing Credit Information
Viewing Advice of Charge Option
If you subscribe to an advice of charge option, you can
view the amount of credit available.
Find the Feature
86 - Getting More Out of Your Phone
M > Settings
> Phone Status
> Credit Available
Adjusting and Resetting Call Cost Settings
You can set a credit limit so that the phone displays
your remaining credit during calls. The phone notifies
you when you near your limit, and ends the call when
you reach it.
Find the Feature
M > Settings
> In-Call Setup
> Call Cost Setup
You can choose Reset All Costs, Credit Limit, or Currency Setup.
Adjusting Network Settings
Your service provider registers your phone to a network.
You can view information about the current network,
change how your phone searches for a network, specify
your preferred networks, and activate alerts that indicate
when a call is dropped or network registration changes.
Find the Feature
M > Settings > Network
Getting More Out of Your Phone - 87
Personal Organiser Features
Using the Datebook
The datebook is a calendar that lets you schedule and organise
events such as appointments and meetings. You can set the
datebook to play a reminder alarm for specific events.
Note: You must set the correct time and date on your phone to use
the datebook (see page 42).
To schedule or review events in the datebook:
M > Tools > Datebook
Find the Feature
Viewing by the Week
The datebook initially displays a calendar for the week. Lines or
filled boxes indicate scheduled events.
Press M to
open the
sub-menu.
5
Press
EXIT (-) to
display the
previous
screen.
07:00
10:00
13:00
16:00
J
Y9
JAN 1 - JAN 7
S M T W T F S
88 - Personal Organiser Features
EXIT
Press S to
select day (bc) or
week (:)
Highlighted day
Press VIEW (+)
to display events
for the highlighted
day.
G
VIEW
Viewing by the Day
Select a day and press VIEW (+) to see the day’s events.
Press M to
open the
sub-menu.
Press
BACK (-) to
display the
previous
screen.
5
J Y9
THU 01-Jan
d Joes B-day
Marie, mtg..
Conference..
Call about..
e Follow up ..
G VIEW
BACK
Highlighted item
Press VIEW (+)
to display details
for the highlighted
event.
Viewing by the Event
Select an event and press VIEW (+) to see event details.
Press M to
open the
sub-menu.
Press
BACK (-) to
display the
previous
screen.
5
J Y9
THU 09:00 am
Marie, mtg
(1hrs)
5 min before
Daily
BACK
G
Highlighted item
Press EDIT (+)
to edit the
highlighted details.
EDIT
Adding a Datebook Event
A title is required for a datebook event. All other information is
optional.
Notes:
• You must create an event to use the reminder alarm.
Personal Organiser Features - 89
• Your phone must be turned on for the reminder alarm to
sound.
M > Tools > Datebook
> day
M > New
Find the Feature
Press
1 CHANGE (+)
2 keypad keys
3 OK (+)
4
S
5 DONE (-)
To
select Title
enter a title for the event
store the event title
scroll to other fields and enter
information as necessary
You can enter start time,
duration, date, repeating events,
and reminder alarm.
store the event
Changing Event Information
Find the Feature
M > Tools > Datebook
Press
1 S
To
scroll to the day
2 VIEW (+)
display the day view
scroll to the event
3
S
4 VIEW (+)
5 EDIT (+)
6
S
90 - Personal Organiser Features
display the event view
edit the event
scroll to the information you
want to change
Press
7 CHANGE (+)
8 keypad keys
9 DONE (-)
To
edit the information
enter the new information
store the information
Copying an Event
Find the Feature
M > Tools > Datebook
Press
1 S
To
scroll to the day
2 VIEW (+)
display the day view
scroll to the event to copy
3
S
4 M
5
S
6 SELECT (+)
7 YES (-)
8 keypad keys
9
S
10 OK (+)
11 DONE (-)
open the Datebook Menu
scroll to Copy
copy the event
confirm the copy
Your phone assumes that you
want to change the date, and
displays the Date field.
enter the date information
move to day, month, and year
save the copy of the event
store the information
Personal Organiser Features - 91
Deleting an Event
Find the Feature
M > Tools > Datebook
Press
1 S
To
scroll to the day
2 VIEW (+)
display the day view
scroll to the event to delete
3
S
4 M
5
S
6 SELECT (+)
7 YES (-)
open the Datebook Menu
scroll to Delete
select Delete
confirm the Delete
Viewing and Dismissing an Event Reminder
When you set a reminder alarm for an event, the phone displays an
event reminder and sounds a reminder alarm.
To view or dismiss an event reminder:
Press
VIEW (+)
To
view the event
Press S to scroll through the
event details.
or
OK (-)
dismiss the reminder
If you have more than one event set up for the same time, the
phone displays each event in sequence. As you view and dismiss
each event reminder, the next one is displayed.
92 - Personal Organiser Features
Changing the Datebook Setup
You can change the datebook’s daily start time, and set the length
of time that events are stored
Find the Feature
M > Tools > Datebook
M > Setup
Using the Alarm Clock
Note: The alarm clock setting does not appear in the datebook day
view, and is not synchronised with datebook settings.
Setting the Alarm
Find the Feature
Press
1 CHANGE (+)
2 keypad keys
3 OK (-)
4
S
5 DONE (-)
M > Alarm > On
To
select Start
enter the alarm time
store the time
scroll to other fields and enter
information as necessary
You can set the name and
repeat duration.
store the alarm setting
Personal Organiser Features - 93
Responding To an Alarm
When the alarm is activated, your phone rings or vibrates
(depending on the alarm ring alert setting for the current ring style),
and displays the time and alarm title.
Press
OK (-) or O
To
turn off the alarm
Using the Calculator
You can use your phone as a convenient calculator and currency
converter.
Calculating Numbers
Find the Feature
M > Tools > Calculator
Press
1 number keys
To
enter a number
highlight a calculator function
2
S left or right
3 SELECT (+)
94 - Personal Organiser Features
perform the function
Selected
function
5
J
Calculator
+
Y9
0
Press S to
highlight a
function
.
c = + - * ÷c
CANCEL
Exit the
calculator
Entered
number
Press S to
scroll to other
functions
G SELECT
Press M to open the
Calculator Menu
Perform the
highlighted
function
The calculator can perform the following functions:
Function
.
c
CE
+
*
÷
%
$
±
MR
MS
MC
Description
Insert a decimal point
Clear the calculation
Clear entry (replaces the C function when
you enter more values in a calculation)
Add
Subtract
Multiply
Divide
Divide the displayed value by 100
Calculate the exchange rate
Change the entry’s sign (positive/negative)
Recall the value stored in memory
Store the displayed number in memory
Clear memory
Personal Organiser Features - 95
Converting Currency
The currency converter works just like the calculator, but uses the €
(currency) function:
Find the Feature
M > Tools > Calculator
M > Exchange Rate
Press
1 number keys
2 OK (+)
3 number keys
To
enter the exchange rate
store the exchange rate
enter the amount to convert
(amount to multiply by the
exchange rate)
highlight the € function
perform the conversion
4 S (left or right)
5 SELECT (+)
96 - Personal Organiser Features
Security
Locking the SIM Card
Your PIN (Personal Identication Number) code protects the
information stored on your SIM card. When the SIM PIN feature is
activated, you must enter your SIM card PIN code to unlock the
SIM card each time you turn on the phone or insert the SIM card in
the phone.
Find the Feature
M > Settings > Security
> SIM PIN > On or Off
Unblocking the SIM Card PIN Code
If you enter an incorrect SIM card PIN code three times in a row,
your SIM card is disabled and your phone displays SIM Blocked. You
must enter a PIN unblocking key (PUK) code, which you can obtain
from your service provider.
Caution: In the following key sequence, each key press must occur
within two seconds of the previous keypress. If the unblocking
attempt is tried unsuccessfully 10 times, the SIM card is
permanently disabled and your phone displays SIM Disabled.
Press
1 UNBLOCK (+)
2 keypad keys
3 OK (+)
4 keypad keys
To
open the PIN unblocking editor
enter the PUK code
submit the PUK code
enter a new SIM card PIN
5 OK (+)
Note: The SIM PIN must be
between four and eight digits.
assign the new SIM PIN
Security - 97
Press
6 keypad keys
7 OK (+)
98 - Security
To
re-enter the new SIM PIN
confirm the new SIM PIN and
unblock the SIM card
News and Entertainment
Using the Micro-Browser
The micro-browser lets you access Web pages and
Web-based applications on your phone. Contact your
service provider to set up access, if necessary.
Note: Your phone may use a high-speed GPRS (General Packet
Radio Service) network connection. This type of connection can be
identified by a D GPRS indicator in the idle display that disappears
when you start a micro-browser session. If a U (connected call)
indicator displays when you start a micro-browser session, your
phone is using a standard voice channel connection. Your network
connection charges may vary depending on the type of connection
used. To change GPRS settings:
Find the Feature
M > Settings
> WAP Profile
> Set GPRS
You can select GPRS Always (connects GPRS when the phone is on),
GPRS When Needed (connects GPRS when the browser opens a
connection), or GPRS Off.
Starting a Micro-Browser Session
Find the Feature
Press
1 S
2 SELECT (+)
M > Browser
To
scroll to a bookmark or service,
or application
select the item
News and Entertainment - 99
Shortcuts:
• If you open a text message with a Web address (URL) in it,
you can press M > Go To URL to launch the micro-browser and
go directly to the URL.
• To open the browser to a page you saved as a Bookmark, select
M > Web Shortcuts.
If you are unable to establish a network connection with the
micro-browser, contact your service provider.
Interacting With Web Pages
S up or down
Press
To
scroll through a page
M
open the Browser Menu
Select Exit to close the browser.
Downloading Pictures, Games, and Sounds
You can download a picture, animation, sound, or game upgrade
from a Web page by selecting its link. A picture or animation
displays when downloading is complete.
You can store these object files on your phone, and use them as
screen saver images, wallpaper images, and ring tones.
To download files:
Find the Feature
M > Media Centre > Download
Downloading a File Using a Web Browser
1 In the browser, go to the Web site and find the file you
want.
100 - News and Entertainment
Downloading a File Using a Web Browser
2 Follow the directions on the site to purchase the file
(payment details vary). The site sends a text
message to your phone, containing the attached file
or a URL link to the file.
3 Open the message and store the file (see page 57).
Notes:
• Call charges apply during download sessions.
• When your phone runs out of memory for downloaded files,
new files overwrite the old ones. Downloaded files share your
phone’s memory, so you can make room for a picture, for
example, by deleting ring tones.
• Some games might make your phone vibrate, or light up the
display and keys. To change game vibrations, see page 105.
• Some ring tones might have vibrations programmed into them,
so your phone rings and vibrates when the ring tone is active.
Editing a Web Session
You can select or edit a Web session, or network connection
profile. You can use different Web sessions to connect to the
Internet in different ways.
Find the Feature
Setting
Set default
Edit
M > Settings
> WAP Profile
> Set Profile
> profile
Description
Set the session as your default
Edit session settings (see the
following table)
News and Entertainment - 101
Setting
Rename
Description
Rename the session
WAP Session Settings
• Bearer Type
• GPRS
• User Name
• Password
• APN
• CSD
• User Name
• Password
• Phone Number
• Line Type
• Transfer Rate
• WAP Setting
• Primary IP
• Primary Port
• Secondary IP
• Secondary Port
• Timer
• Homepage
To create a Web session, you must configure the following settings.
Contact your service provider to obtain the following information, if
necessary. Actual field names and values may vary depending on
the technologies available to your service provider. Some settings
may not be available for all phone models.
Setting
User Name
Password
APN
Phone Number
Line Type
Transfer Rate
Primary IP
Primary Port
Secondary IP
102 - News and Entertainment
Description
user name for connection
password for connection
GPRS access point name (the name
of the WAP service provider)
phone number to use to set up a CSD
connection
CSD line type (analogue or ISDN)
CSD connection speed
primary WAP gateway IP address
primary WAP port number
secondary WAP gateway IP address
Setting
Secondary Port
Timer
Homepage
Description
secondary WAP port number
time at which the phone exits the
micro-browser application when no
keypress activity is detected
default home page
Picture and Animation Viewers
Your phone contains pictures and animations that you can insert
into text messages, and use as wallpaper and screen saver
images.
To download pictures or animations, see page 100. Your phone
may also include predefined images. You cannot rename, delete, or
view details about predefined images.
Find the Feature
Press
1 S
2 VIEW (+)
M > Media Centre
> Picture or
Animation
To
scroll to the picture or animation
name
view the picture or animation
or
M
open the menu for the following
options.
News and Entertainment - 103
The Picture and Animation menus can include:
Option
Set as Wallpaper
Set as Screen Saver
Details
View Free Space
Description
Set a picture as your
wallpaper image.
Set an animation as your
screen saver image
(animation only).
View item information.
Check the space available for
more pictures and animations
Playing Games
Your phone comes with 5 games. If you get an incoming call,
message, alarm, or alert while playing a game, the game pauses.
Selecting and Starting a New Game
Find the Feature
M > Games > the game
When the game is over, you can play again or return to the games
menu. Depending on the game:
Press
BACK (-)
To
return to the games menu
or
NO (-)
NEW (+)
or
YES (+)
104 - News and Entertainment
start another session of the
game you just played
Ending a Game
You can end a game at any time.
Press
BACK (-)
or
To
end the game session and
return to the games menu
O
Changing Game Vibrations
Some games might make your phone vibrate. To change the
vibration setting:
Find the Feature
M > Games
> Vibration Setting
News and Entertainment - 105
Troubleshooting
Check these questions first if you have problems with your phone.
Question
Is your battery
charged? Do you
see 6 in the
display?
Do you have a valid
3 volt SIM card
inserted in your
phone?
Does the handset
have a signal? Do
you see 0 in the
display?
Answer
The battery level indicator should
have at least one segment showing
(7). If it does not, recharge your
battery. See page 19.
If necessary, turn off your phone and
make sure that you have inserted a
valid SIM card. See page 16.
Is the earpiece
volume too low?
While on a call, press up on the S
key.
Your phone may be muted.
The signal strength indicator should
have at least one segment showing
(1). If it does not, move to an area
with a stronger signal to use your
phone.
Is the other party
unable to hear you? Also, make sure that your phone’s
microphone is not blocked by its
carrying case or a sticker.
Has the phone been Dropping your phone, getting it wet,
damaged, dropped, or using a non-Motorola battery
or got wet?
charger can damage the phone. The
Was a non-Motorola phone’s limited warranty does not
cover liquid damage or damage
battery charger
caused from using non-Motorola
used?
accessories.
106 - Troubleshooting
The following refer to specific problems:
Problem
My phone was
stolen. To whom
should I report
this?
I forgot my
password.
I pressed the End/
Power key, but
nothing happened.
The display says:
Insert SIM Card or
Check SIM Card even
though I have
inserted my SIM
card in the phone.
The display says:
SIM Blocked. How do I
unblock my SIM
card?
Solution
Report a stolen phone to the police
and to your service provider (the
company that sends you your
monthly wireless service bill).
See page 37 for information about
what to do if you forget a code or
password. .
Be sure to press and hold O (the
End/Power key) until the display
appears and you hear an audible
alert (this could take a couple of
seconds). If nothing happens, check
that the battery is charged and
correctly installed. See page 19.
The SIM card may be incorrectly
inserted. Check the SIM card to make
sure that it is inserted properly as
described on page 16. Make sure
that you have a valid 3 volt SIM card.
Note: Be sure to turn your phone off
and then back on after you re-insert
the SIM card.
Call your service provider (the
company that sends you your
monthly wireless service bill) to
obtain the PIN unblocking key (PUK)
code. See page 97.
Troubleshooting - 107
Problem
The display says:
Enter Unlock Code. How
do I unlock my
phone?
My phone says
Terminal Blocked.
My phone does not
ring.
My phone rings
even though I
selected the Silent
(or Vibrate) alert
style.
I tried to place a call
and heard an
alternating high/low
tone.
108 - Troubleshooting
Solution
Enter the factory-preset unlock code
(1234), or the last four digits of your
phone number. See page 35.) If this
fails, call your service provider (the
company that sends you your
monthly wireless service bill).
Your phone does not accept the SIM
card inserted. Contact your service
provider.
If you see W or a in the display,
then the ring tone is turned off. To
turn a ring tone on, see page 42.
Also, the ring tone may be set to Silent
even though your phone is set to a
ringing alert style. Be sure to listen to
your ring tone before setting it to
make sure it is effective in the
environment where you use your
phone.
The ring tone may be set to play a
tone even though your phone is set to
a silent alert style. See page 74.
Your call did not reach the wireless
system. You may have dialled the
number too soon after turning the
phone on. Wait until the display
shows the name of your service
provider before making a call.
Problem
I cannot make/
answer calls.
Solution
Make sure that you have a phone
signal (see the “Signal Strength
Indicator” item on page 25). Avoid
electrical or radio interference, and
obstructions such as bridges, car
parks, or tall buildings.
Your phone also may have the
Call Barring feature turned on. If you
My phone has poor
reception and
drops calls.
I cannot hear
others on my
phone.
I cannot open my
inbox.
know the unlock code, you can
change this setting in the security
menu
(M > Settings > Security). Also, check to
be sure your SIM card is installed and
working.
Make sure you have a phone signal
(see the “Signal Strength Indicator”
item on 25). Stay clear of any
obstructions such as bridges, car
parks, or tall buildings.
While on a call, press S. Your
phone display should show the
volume increasing.
Also, make sure that your phone’s
earpiece is not blocked by its carrying
case.
Before you can use text or
information services messages, you
must set up the appropriate inbox.
See page 55.
Troubleshooting - 109
Problem
How do I see the
calls I sent or
received?
Solution
To see the most recent calls you
dialled or received, open the “Recent
Calls” lists:
M > Recent Calls
> Received Calls or
Dialled Calls
What can I do to
Your battery’s performance is
extend battery life? affected by charge time, feature use,
temperature changes, and other
factors. For tips on extending your
battery life, see page 20.
I can’t find a file I
When your phone memory is full, it
downloaded.
writes new downloaded files over the
old ones. See page 100.
The beep indicates that you are set
I plugged the data
up correctly. If you did not hear a
cable into my
beep, make sure that both ends of
phone but my
phone did not beep. the data cable are connected—the
smaller end to your phone and the
How do I know if
larger end to your computer.
the data cable is
ready to go?
Finally, your computer may have
deactivated the port to save power.
Try opening an application that uses
the port, like a fax or dial-up
application, and your computer will
automatically activate the port.
110 - Troubleshooting
Problem
My phone beeped
when I attached the
data cable, but my
fax and data
applications don’t
work.
When sending data
with the data cable,
why does the
computer show a
connection rate of
19200 Kbps?
Solution
Some wireless networks may not
support data or fax transmission. If
you are roaming on an unfamiliar
network, this may be the case.
Also, remember that data and fax
transmission usually requires a
subscription. Call your service
provider for more information.
19200 Kbps is the data transfer rate
of the connection between your
computer and the phone in a
standard CSD (Circuit Switch Data)
connection. The rate of the
connection between your phone and
the network is displayed on your
phone, and will be either 14400 or
9600 Kbps.
A GPRS connection may have a
higher data transfer rate.
I can’t end my data Try pressing O on your phone. Also
call by closing the try disconnecting the cable or turning
application on my
off the phone. If possible, always
computer. What can close the connection through your
I do?
computer. These alternative methods
may disrupt the application on your
computer.
I launched the
You may be in an area without
micro-browser but service, or you may be connected to
the display says:
a network that does not support
Internet access.
Service Not Available.
Troubleshooting - 111
Problem
I launched the
micro-browser but
the display says:
Data Server Unavailable.
112 - Troubleshooting
Solution
Try again in a few minutes. The
servers may be temporarily busy.
Specific Absorption Rate Data
This model handset meets international standards for
exposure to radio waves
Your mobile handset is a radio transmitter and receiver. It is
designed and manufactured not to exceed limits for exposure to
radio frequency (RF) energy. These limits are part of
comprehensive guidelines and establish permitted levels of RF
energy for the general population. The guidelines are based on
standards that were developed by independent scientific
organisations through periodic and thorough evaluation of scientific
studies. The guidelines include a substantial safety margin
designed to assure the safety of all persons, regardless of age and
health.
The exposure standard for mobile handsets employs a unit of
measurement known as the Specific Absorption Rate, or SAR.
Under the guidelines for your handset model, the SAR limit is
2.0 W/kg.* Tests for SAR are conducted in accordance with
CENELEC** testing procedures using standard operating positions
with the handset transmitting at its highest certified power level in
all tested frequency bands. Although the SAR is determined at the
highest certified power level, the actual SAR of the handset while
operating can be well below the maximum value. This is because
the handset is designed to operate at multiple power levels so as to
use only the power required to reach the network. In general, the
closer you are to a base station, the lower the power output of the
handset.
Before a handset model is available for sale to the public, it is
tested to confirm compliance with the guidelines. The tests are
performed in positions and locations (e.g., at the ear and worn on
the body) that conform to a uniform testing methodology
determined by an expert standards body. The highest SAR value
for this model handset when tested for use at the ear is:
0.88 W/kg.***
Specific Absorption Rate Data - 113
While there may be differences between the SAR levels of various
handsets and at various positions, they all meet the governmental
requirements for safe exposure. Please note that modifications to
this product model could cause differences in the SAR value for
later products; in all cases, products are designed to be within the
guidelines.
*
The SAR limit recommended by international guidelines (ICNIRP) for mobile
handsets used by the public is 2.0 watts/kilogram (W/kg) averaged over ten grams
of tissue. The limit incorporates a substantial margin for safety to give additional
protection for the public and to account for any variations in measurements.
** CENELEC is a European Union standards body.
*** Additional related information includes the Motorola testing protocol, assessment
procedure, and measurement uncertainty range for this product.
114 - Specific Absorption Rate Data
Warranty Information
Motorola guarantees you, the original purchaser, the Personal
handset and accessories which you have purchased from an
authorised Motorola dealer (the “Products”), to be in conformance
with the applicable Motorola specifications current at the time of
manufacture for a term of [1] year from date of purchase of the
Product(s) (Warranty Term).
You must inform Motorola of the lack of conformity to the applicable
specifications of any of the Products within a period of two (2)
months from the date on which you detect a defect in material,
workmanship or lack of conformity and in any event within a term
not to exceed the Warranty Term, by submitting the Product for
service to Motorola. Motorola shall not be bound by Product related
statements not directly made by Motorola nor any warranty
obligations applicable to the seller.
A list of the Motorola Call Centre numbers is enclosed with this
Product.
During the Warranty term, Motorola will, at its discretion and without
extra charge, as your exclusive remedy, repair or replace your
Product which does not comply with this warranty; or failing this, to
reimburse the price of the Product but reduced to take into account
the use you have had of the Product since it was delivered. This
warranty will expire at the end of the Warranty Term.
This is the complete and exclusive warranty for a Motorola
Personal handset and accessories and in lieu of all other
warranties, terms and conditions, whether express or implied.
Where you purchase the product other than as a consumer,
Motorola disclaims all other warranties, terms and conditions
express or implied, such as fitness for purpose and satisfactory
quality.
Warranty Information - 115
In no event shall Motorola be liable for damages nor loss of data in
excess of the purchase price nor for any incidental special or
consequential damages* arising out of the use or inability to use
the Product, to the full extent such may be disclaimed by law.
This Warranty does not affect any statutory rights that you may
have if you are a consumer, such as a warranty of satisfactory
quality and fit for the purpose for which products of the same type
are normally used under normal use and service, nor any rights
against the seller of the Products arising from your purchase and
sales contract.
(*)including without limitation loss of use, loss of time, loss of data,
inconvenience, commercial loss, lost profits or savings.
How to get warranty service?
In most cases the authorised Motorola dealer which sold and/or
installed your Motorola Personal handset and original accessories
will honour a warranty claim and/or provide warranty service.
Alternatively, for further information on how to get warranty service
please contact either the customer service department of your
service provider or Motorola’s call centre at the telephone numbers
below for your country.
In order to claim the warranty service you must return the Personal
handset and/or accessories in question to Motorola. Please avoid
leaving any supplementary items like USIM cards. The Product
should also be accompanied by a label with your name, address,
and telephone number; name of operator and a description of the
problem. In the case of vehicular installation, the vehicle in which
the Personal handset is installed should be driven to the Authorised
Repair Centre, as analysis of any problem may require inspection
of the entire vehicular installation.
In order to be eligible to receive warranty service, you must present
your receipt of purchase or a comparable substitute proof of
purchase bearing the date of purchase. The handset should also
clearly display the original compatible electronic serial number
(IMEI) and mechanic serial number [MSN]. Such information is
contained with the Product.
116 - Warranty Information
Conditions
This warranty will not apply if the type or serial numbers on the
Product has been altered, deleted, duplicated, removed, or made
illegible. Motorola reserves the right to refuse free-of-charge
warranty service if the requested documentation can not be
presented or if the information is incomplete, illegible or
incompatible with the factory records.
Repair, at Motorola's option, may include reflashing of software, the
replacement of parts or boards with functionally equivalent,
reconditioned or new parts or boards. Replaced parts, accessories,
batteries, or boards are warranted for the balance of the original
warranty time period. The Warranty Term will not be extended. All
original accessories, batteries, parts, and Personal handset
equipment that have been replaced shall become the property of
Motorola. Motorola does not warrant the installation, maintenance
or service of the products, accessories, batteries or parts.
Motorola will not be responsible in any way for problems or damage
caused by any ancillary equipment not furnished by Motorola which
is attached to or used in connection with the Products, or for
operation of Motorola equipment with any ancillary equipment and
all such equipment is expressly excluded from this warranty.
When the Product is used in conjunction with ancillary or peripheral
equipment not supplied by Motorola, Motorola does not warrant the
operation of the Product/peripheral combination and Motorola will
not honour any warranty claim where the Product is used in such a
combination and it is determined by Motorola that there is no fault
with the Product. Motorola specifically disclaims any responsibility
for any damage, whether or not to Motorola equipment, caused in
any way by the use of the Personal handset, accessories, software
applications and peripherals (specific examples include, but are not
limited to: batteries, chargers, adapters, and power supplies) when
such accessories, software applications and peripherals are not
manufactured and supplied by Motorola.
Warranty Information - 117
What is not covered by the warranty
This warranty is not valid if the defects are due to damage, misuse,
tampering, neglect or lack of care and in case of alterations or
repair carried out by unauthorised persons.
1 Defects or damage resulting from use of the Product in other
than its normal and customary manner.
2 Defects or damage from misuse, access to incompatible
sources, accident or neglect.
3 Defects or damage from improper testing, operation,
maintenance, installation, adjustment, unauthorised software
applications or any alteration or modification of any kind.
4 Breakage or damage to antennas unless caused directly by
defects in material or workmanship.
5 Products disassembled or repaired in such a manner as to
adversely affect performance or prevent adequate inspection
and testing to verify any warranty claim.
6 Defects or damage due to range, coverage, availability, grade
of service, or operation of the cellular system by the cellular
operator.
7 Defects or damage due to moisture, liquid or spills of food.
8 Control unit coil cords in the Product that are stretched or have
the modular tab broken.
9 All plastic surfaces and all other externally exposed parts that
are scratched or damaged due to customer normal use.
10 Leather cases (which are covered under separate
manufacturer's warranties).
11 Products rented on a temporary basis.
12 Periodic maintenance and repair or replacement of parts due to
normal wear and tear.
118 - Warranty Information
Note: The talk-time, stand-by time and total life cycle of a Motorola
rechargeable battery for your Personal handset will depend on
usage conditions and network configurations. As a consumable
product, the specifications indicate that you should be able to
obtain optimum performance for your Motorola Personal handset
within the first six months from date of purchase and up-to (200)
charges.
The warranty for Motorola rechargeable batteries becomes void if
(i) the batteries are charged other than by Motorola approved
battery chargers specified for the charging of the battery, (ii) any of
the seals on the battery are broken or show evidence of tampering,
(iii) the battery is used in equipment or service other than the
cellular telephone equipment for which it is specified.
Warranty Information - 119
Index
A
accessories 16
connector ports 1
active line 25, 46
Add Digits feature 49
alarm clock 93
alert
creating 75
defined 42
indicators 26, 43
profile 42, 74
alert indicator 25
animation 100
managing 103
screen saver 104
wallpaper 41, 44, 104
appointments. See datebook
B
backlight 45
barring calls 83
battery 45
Battery Save feature 45
charging 19
extending battery life 20, 45,
110
installing 18
120 - Index
level indicator 25, 26
browser. See micro-browser
C
calculator 94
calendar. See datebook
call
adding digits after phone
number 49
alert profile 42
alert type, selecting 74
alert, creating 75
answer mode 43
answering 23
automatic answer 43
barring 83
call waiting 52
calling card 66
cancelling 47
costs 85, 86, 87
deleting 48
dialled calls list 48
dialling 22
dialling a recent call 48
emergency number 47
ending 22, 23
hold 53
ignoring 47
making 22
placing 22
received calls list 48
receiving 23
recent calls 48
storing 48
terminating 47
timing 84, 85
transferring 53
unanswered call 50
call barring 83
call cost information 85, 86, 87
call diverting 81
call timers 84, 85
call waiting 52
caller ID
incoming calls 46
calling card call 66
calling line identification. See
caller ID
camera
taking photos 38
charging battery 19
chat 60
clock
illustration 24
codes. See passwords
colour, display 44
conference call 81
cost trackers 86
credit information 86, 87
currency converter 96
cursor 29
D
date, setting 42
datebook
adding an event 89
alarm 90
calendar 88
changing event information
90
copying an event 91
day view 89
deleting an event 92
event view 89
menu feature icon 24
reminders 89, 90, 92
week view 88
default passwords 37
deleting a call 48
dialled calls list 48
dialling a number 22
display
backlight 45
colour 44
description 24
idle display, defined 24
language 79
diverting calls 81
DTMF tones 49
Index - 121
E
H
earpiece 1
email address, storing in
phonebook 65
emergency number 47
end key 1, 27
functions 22, 23
ending a call 22, 23
Enter Unlock Code message 36, 37
event alert 74
exchange rate, calculating 96
hold a call 53
F
factory settings, resetting 79
fixed dial
defined 83
dialling numbers 83
editing an entry 69, 83
storing an entry 64, 66
flashing cursor, defined 29
4-way navigation key 26
frequency, changing 87
G
games 104
GPRS indicator 25
displayed 99
GPRS, defined 99
groups, phonebook 70
122 - Index
I
idle display 24
ignoring a call 47
in use indicator 25
inbox, text message 55
incoming call
cancelling 47
ignoring 47
terminating 47
Incoming Call message 47
indicators
active line 25
alert 25, 26
alert setting 43
battery level 25, 26
GPRS 25, 99
in use 25
menu 24
message 26
message waiting 25
roam 25
signal strength 25
transmit 25
information services 59
iTAP software
activating 32
entering novel words 33
entering words 32
K
key
end 1, 22, 23, 27
4-way navigation 26
left soft key 1, 27, 39
menu 1, 27
navigation 1, 26
right soft key 1, 27
send 1, 22, 23, 48
keypad
answering calls 43
L
language, setting 79
Last Calls Menu
opening 49
options 49
left soft key 1, 39
functions 27
lights
incoming call 70
line, active 46
lock
phone 35
SIM card 97
M
making a call 22
master clear 79
master reset 79
Melody 75
Memory is Full! message 61
menu
Browser Menu 100
entering text 29
features 81
key 1
language, setting 79
Last Calls Menu 49
lists 28
navigating 27
Phonebook Menu 64
Shortcuts Menu 80
using features 29
menu indicator 24
defined 24
menu key 27
message
chat 60
deleting 58
inbox setup 55
information services 59
menu feature icon 24
outbox 57
picture 38
quick note 57
reading 58
receiving 57
reminders, text message 58
sending 55
status 57
Index - 123
voicemail 51
message indicator 26
message waiting indicator 25
messages menu feature icon
24
micro-browser
animation 100
Browser Menu 100
defined 99
functions 100
picture 100
sound 100
starting 99, 100
microphone 1
Mindblaster 105
Missed Calls message 50
MMS, defined 38
N
n character, storing in number
67
navigation key 1, 26
network settings 87
notepad
defined 50
entering digits 50
numeric text mode 30
O
optional accessory, defined 16
optional feature, defined 16
124 - Index
outbox 57
P
passwords
changing 37
default 37
if you forget a password 37
pause, storing in number 66
phone
answer mode 43
automatic answer 43
credit available 86
credit information 87
date, setting 42
erase user-entered
information 79
frequency, changing 87
keypad, answering calls 43
language, setting 79
line 46
locking 35
network settings 87
passwords 37
reset all options 79
security code 37
speed dial, using 50
time, setting 42
TurboDial 51
unlock code 37
unlocking 21, 35
phone number
adding digits after 49
line 46
redialling 46
storing in phonebook 64, 66
phonebook
capacity, checking 73
copying entries 71
deleting an entry 70
dialling a number 68
editing an entry 69
email address 64
entry name 64
fields 64
groups 70
menu feature icon 24
phone number 64
sorting entries 71
speed dial number 50
speed dial, using 50
storing an entry 64, 66
TurboDial 51
TurboDial number 65
voice name entry 67
Phonebook Menu 64
photo 38
picture
managing 103
screen saver 104
storing 100
wallpaper 41, 44, 104
picture message 38
PIN code
activating/deactivating 97
defined 97
protecting the SIM card 97
unblocking 97
PIN code, inserting in number
66
predictive text entry
activating 32
entering novel words 33
entering words 32
profile
customising 74
setting 42
prompt, storing in number 67
PUK code 97
Q
quick note 57
R
received calls list 48
receiving a call 23
recent calls 48
redial
busy number 46
reminders
chat message 62
datebook 89, 90, 92
text message 58
right soft key 1
Index - 125
functions 27
roam indicator 25
defined 25
S
screen saver 104
security code 37
send key 1, 22, 23, 48
sending a call. See making a
call
short message service. See
text message
Shortcuts Menu
creating 80
using 80
signal strength indicator 25
defined 25
SIM Blocked message 21, 97
SIM card
defined 16
installing 16
precautions 16
protecting 97
SIM Blocked message 21, 97
SIM Disabled message 97
unblocking 97
SIM Disabled message 97
SIM PIN code
activating/deactivating 97
protecting the SIM card 97
unblocking 97
126 - Index
SMS. See text message
soft keys 1, 39
illustration 27
labels 24
sound
storing 100
special characters 66
speed dial
number, defined 50
using 50
storing a call 48
T
tap method text entry 30
text
character chart 31
entering from keypad 29
entry mode, changing 30
flashing cursor 29
iTAP software predictive text
entry 32
numeric mode 30
tap method 30
text message
deleting 58
inbox setup 55
reading 58
receiving 57
reminders 58
sending 55
status 57
Text Msg Menu
options 59
time, setting 42
timers 84, 85
transfer a call 53
transmit indicator 25
travel charger 19
TurboDial 51
changing number 65
U
unblocking the SIM card 97
unlock code 35, 37
V
vibration
alert 74
games 105
voice dial
dialling a number 69
recording voice name 67
voice name
defined 67
recording 67
voicemail 51
W
wait, storing in number 66
wallpaper 41, 44, 104
Web pages 99, 100
6809468A43
Index - 127