1
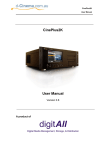
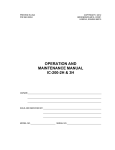
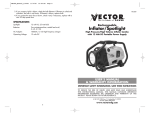
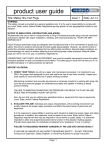
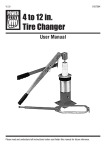
12V PORTABLE
AIR COMPRESSOR
92310
ASSEMBLY & OPERATING INSTRUCTIONS
®
3491 Mission Oaks Blvd., Camarillo, CA 93011
Visit our Web Site at www.harborfreight.com
Copyright© 2004 by Harbor Freight Tools®. All rights reserved. No portion of this manual or
any artwork contained herein may be reproduced in any shape or form without the express
written consent of Harbor Freight Tools.
For technical questions and replacement parts please call 1-800-444-3353.
THANK YOU for choosing a HARBOR FREIGHT TOOLS product. For future reference, please
complete the owner’s record below:
Model______________
Serial No._____________
Purchase Date_______________
SAVE THE RECEIPT, WARRANTY AND THESE INSTRUCTIONS. It is important that you read the
entire manual to become familiar with the unit BEFORE you begin assembly.
The 300 PSI output easily inflates tires, rafts and sports equipment. The Air Compressor comes
with a bright light for nighttime use, and a red warning flasher for emergency signaling.
Technical Specifications
Materials:
Molded ABS Thermoplastic
Power Source:
12 Volts DC Motor
Plug Type:
Automotive Cigarette Lighter type (not fused)
Power Cord:
18 AWG x 2C, 9’-4” long with plug in socket
Pressure Gauge:
300 PSI Maximum
Air Hose Length:
26” Length with one end valve adapter
Safety Warnings and Precautions
WARNING: When using product, basic safety precautions should always be followed to
reduce the risk of personal injury and damage to equipment.
Read all instructions before using this product!
1.
Store idle equipment. When not in use, the 12V Portable Air Compressor must be stored in a
dry location to inhibit damage from moisture and salt air.
2.
Check for damaged parts. Before using any appliance, any part that appears damaged
should be carefully checked to determine that it will operate properly and perform its intended
function. Check for any broken or damaged parts and any other conditions that may affect its
operation. Replace or repair damaged or worn parts immediately.
3.
Replacement parts and accessories. When servicing, use only identical replacement parts.
Use of any other parts will void the warranty.
4.
5.
Do not let children play with or use the 12V Portable Air Compressor.
Keep your work area clean and well lit. Cluttered benches and dark areas invite
accidents.
Do not operate the Portable Air Compressor in explosive atmospheres, such as in the
presence of flammable liquids, gases, or dust. Electrical products create sparks which may
ignite the dust or fumes.
Keep bystanders, children, and visitors away while operating the Air Compressor.
Distractions can cause you to lose control.
Do not abuse the Power Cord. Never use the Power Cord to carry the Air Compressor. Keep
the Power Cord away from heat, oil, sharp edges, or moving parts. Replace damaged Power
Cords immediately. Damaged Power Cords increase the risk of electric shock.
6.
7.
8.
SKU 92310
For technical questions please call 1-800-444-3353.
Page 2
9.
Stay alert. Watch what you are doing, and use common sense when operating the
Air Compressor. Do not operate the Air Compressor while tired or under the
influence of drugs, alcohol, or medication. A moment of inattention while operating the
Compressor may result in serious personal injury.
10.
Dress properly. Do not wear loose clothing or jewelry. Contain long hair. Keep your
hair, clothing, and gloves away from moving parts. Loose clothes, jewelry, or long hair
can be caught in moving parts.
11.
Avoid accidental starting. Be sure the Power Switch is off before plugging in.
Carrying appliances with your finger on the Power Switch, or plugging in appliances with
the Power Switch on, invites accidents.
12.
Use safety equipment. Always wear ANSI approved eye protection. ANSI approved
equipment such as a dust mask, non-skid safety shoes, hard hat, or hearing protection must
be used for appropriate conditions.
13.
Check for damaged parts. Before using the Air Compressor, carefully check that it will
operate properly and perform its intended function. Check for damaged parts and any
other conditions that may affect its operation. Replace or repair damaged or worn parts
immediately.
14.
Replacement parts and accessories. When servicing, use only identical replacement
parts. Only use accessories intended for use with this product. Approved accessories are
available from Harbor Freight Tools.
15.
Maintain product with care. Keep this product clean and dry for better performance.
16.
Maintenance: Service and maintenance should be performed regularly by a qualified
technician.
17.
Use the right product for the right job. There are certain applications for which the Air
Compressor was designed. Do not use the Air Compressor for a purpose for which it
was not intended.
SPECIFIC PRECAUTIONS FOR THIS PRODUCT
1.
Do not use this product with the car/truck/motorcycle engine running.
2.
Do not use this product on high pressure tires (large trucks, trailors, tractors, etc.).
3.
Do not exceed the tire air pressure recommended by the tire manufacturer.
4.
Do not leave this product unattended while the unit is running.
5.
Do not use this product continuously for more than 15 minutes. Allow this product to
cool approximately 5 minutes after inflating a tire or other inflatable.
6.
Be careful to make sure you do not overinflate. Inflatable items constructed of soft
materials (balls, beach toys, air mattresses, rubber rafts, etc.) will usually not show
manufacturer recommended air pressure.
Explosion Danger: overinflating can result in serious personal injury.
SKU 92310
For technical questions please call 1-800-444-3353.
Page 3
7.
To avoid dangerous oncoming traffic, always use this product as far away from the
road side as possible.
8.
Always use a tire pressure gauge to check the actual pressure in tires.
9.
When using the Blow Gun Nozzle accessory, always point the Nozzle away from
your body and away from others.
10.
Do not operate the Emergency Light continuously for periods of one hour or more.
Doing so will cause the unit to overheat, and may damage the unit and/or cause
personal injury. It is recommended that the Emergency Light only be operated
continuously for up to 45 minutes. Then, turn off the Emergency Light and allow
the unit to cool for a minimum of 10 minutes before re-use.
Warning:
The warnings, cautions, and instructions discussed in this instruction manual cannot
cover all possible conditions and situations that may occur. It must be understood by
the operator that common sense and caution are factors which cannot be built into
this product, but must be supplied by the operator.
Unpacking
When unpacking your 12V Portable Air Compressor, check to make sure the following parts are
included. If any parts are missing or broken, please call HARBOR FREIGHT TOOLS
at 1-800-444-3353.
Assembly/ Operation
Your 12V Portable Air Compressor comes completely assembled. It is important that you read the
entire manual to become familiar with the product BEFORE you assemble and use the Air
Compressor. Before assembling and operating the Air Compressor be sure that you have all parts
described in the Parts List and Assembly Diagram located on the last pages of this manual.
Inflating Tires
1.
Remove the valve cap from the valve stem of the tire.
2.
Remove the Cover (43) from the rear of the Portable Air Compressor and extend the
Universal Hose Adapter (25) and the DC Power Cord (11).
3.
Attach the Universal Hose Adapter (25) to the tire valve stem with the locking lever in
the up position. Check to make sure the Universal Hose Adapter is pressed down
completely over the threads of the valve stem-see Figure 1.
Figure 1
locking lever
Universal Hose
Adapter (25)
SKU 92310
For technical questions please call 1-800-444-3353.
Page 4
4.
When the Universal Hose Adapter (25) is firmly in place, press the locking lever
down to lock onto the valve stem-see Figure 1.
5.
To inflate, plug the DC Power Cord into the cigarette lighter socket-see Figure 2. Then press
the DC Power Cord “ON”/”OFF” Switch (2) down to the “ON” position-see Figure 3. When
the Air Pressure Gauge (36) reaches the appropriate PSI, turn “OFF” the “On/Off” Switch.
Figure 2
Figure 3
Air Pressure
Gauge (36)
Lens (4)/Light (7)
“On/Off Switch (2)
Light Switch (1)
6.
The Portable Air Compressor is now ready for operating.
7.
NOTE: In the event the tire is totally deflated it may have separated from the
tire rim. In this case, you may need to jack up the vehicle prior to inflating the tire. If
this occurs, make certain to follow all safety instructions for the jack and for the
motor vehicle.
The Air Pressure Gauge
1.
The Air Pressure Gauge (36) is located on the top of the Portable Air Compressor-(see
Figure 3) and is calibrated in P.S.I. (Pounds Per Square Inch).
2.
The maximum air pressure this unit will produce is 300 P.S.I.
3.
Explosion Danger! Do not inflate the air pressure beyond the pressure recommended by
the manufacturer of the item you are inflating. Over inflating a tire or inflatable may result in
serious personal injury and property damage.
4.
To obtain an accurate air pressure reading, turn off the Portable Air Compressor
when reading the gauge.
The Emergency Light
1.
The Emergency Light is located at the front of the Portable Air Compressor-see Figure 3.
2.
To use the Emergency Light, plug the DC Power Cord (11) into the cigarette lighter socket.
Then turn the DC Power Cord “ON”/”OFF” Switch (2) to the “ON” position.
3.
For continuous lighting, press the Light Switch (1) to the “LIGHT” position-see Figure 3.
4.
For a blinking light, press the Light Switch to the “FLASH” position-see Figure 3.
5.
Caution: Do not operate the Emergency Light continuously for periods longer than 45
minutes. Doing so will cause the unit to overheat, and may damage the unit and/or cause
personal injury. It is recommended that the Emergency Light only be operated continuously
for up to 45 minutes. Then, turn off the Emergency Light and allow the unit to cool for a
minimum of 10 minutes before re-use.
SKU 92310
For technical questions please call 1-800-444-3353.
Page 5
Inflating Balls, Beach Toys, Air Mattresses, Rubber Rafts, etc.
1.
To inflate, insert the threaded end of the Inflation Nozzle (part #50) into the Universal
Hose Adapter. Lock the Inflation Nozzle in place and insert its tip into the item to be
inflated.
Using the Blow Gun Nozzle
1.
Insert the threaded end of the Blow Gun Nozzle (part #51) into the Universal
Hose Adapter and lock the Blow Gun Nozzle in place.
PLEASE READ THE FOLLOWING CAREFULLY
THE MANUFACTURER AND/OR DISTRIBUTOR HAS PROVIDED THE PARTS DIAGRAM IN THIS MANUAL AS A
REFERENCE TOOL ONLY. NEITHER THE MANUFACTURER NOR DISTRIBUTOR MAKES ANY REPRESENTATION OR
WARRANTY OF ANY KIND TO THE BUYER THAT HE OR SHE IS QUALIFIED TO MAKE ANY REPAIRS TO THE PRODUCT
OR THAT HE OR SHE IS QUALIFIED TO REPLACE ANY PARTS OF THE PRODUCT. IN FACT, THE MANUFACTURER
AND/OR DISTRIBUTOR EXPRESSLY STATES THAT ALL REPAIRS AND PARTS REPLACEMENTS SHOULD BE
UNDERTAKEN BY CERTIFIED AND LICENSED TECHNICIANS AND NOT BY THE BUYER. THE BUYER ASSUMES ALL
RISK AND LIABILITY ARISING OUT OF HIS OR HER REPAIRS TO THE ORIGINAL PRODUCT OR REPLACEMENT
PARTS THERETO, OR ARISING OUT OF HIS OR HER INSTALLATION OF REPLACEMENT PARTS THERETO.
Part #
1
2
3
4
5
6
7
8
9
10
11
12
13
14
15
16
17
18
19
20
21
22
23
24
25
26
Description
Light Switch
On/Off Switch
Body
Lens
Reflector
Light Holder
Light
Light Contacter
Terminal
Screw
DC Power Cord
Gear Housing Support
Pump Gear
Cam Rod
Cam
Piston Arm Pin
Gear Housing-Brass
Gear Housing
Motor Mount Screw
Lock Washer
Motor Gear
Motor
Terminal
Flasher
Hose-Universal Adapter
Hose Ferrule
Quantity
1
1
1
1
1
1
1
1
2
1
1
1
1
1
1
1
1
1
2
2
1
1
1
1
1
1
Part #
27
28
29
30
31
32
33
34
35
36
37
38
39
40
41
42
43
44
45
46
47
48
49
50
51
Description
Hose
Valve Ferrule
Valve
Piston Head
Piston Head Pin
Piston Arm
Cylinder
O-Ring
Check Valve
Gauge
Cylinder Head
Cylinder Screw
Check Valve
Spring
O-Ring
Cylinder Head Gap
Cover
Hose Gauge
Hose Ferrule
Body
Gear Housing Support
Lens
Screw-Housing
Inflation Nozzle
Blow Gun Nozzle
Quantity
1
1
1
1
1
1
1
1
1
1
1
2
1
1
1
1
1
1
1
1
1
1
5
1
2
NOTE: Some parts are listed and shown for illustration purposes only, and are not available
individually as replacement parts.
SKU 92310
For technical questions please call 1-800-444-3353.
Page 6
SKU 92310
For technical questions please call 1-800-444-3353.
51
50
Assembly and Parts Diagram
Page 7