1
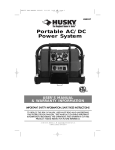
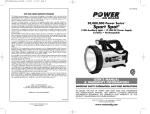
VEC270SB_Manual_062105.qxd
6/23/05
5:24 PM
Page 8
VEC270SB
ONE YEAR LIMITED WARRANTY PROGRAM
This limited warranty program is the only one that applies to this product, and it sets forth all the
responsibilities of Vector Manufacturing, regarding this product. There is no other warranty, other than those
described herein.
This Vector Manufacturing product is warranted, to the original purchaser only, to be free of defects in
materials and workmanship for one year from the date of purchase without additional charge. The
warranty does not extend to subsequent purchasers or users. Manufacturer will not be responsible for any
amount of damage in excess of the retail purchase price of the product under any circumstances. Incidental
and consequential damages are specifically excluded from coverage under this warranty.
This product is not intended for commercial use. This warranty does not apply to accessories or damage to
units from misuse or incorrect installation/connection. Misuse includes wiring or connecting to improper
polarity power sources.
RETURN/REPAIR POLICY: Defective products, other than accessories, may be returned to manufacturer. Any
defective product, other than accessories, that is returned to manufacturer within 30 days of the date of
purchase will be replaced free of charge. If such a product is returned more than 30 days but less than one
year from the purchase date, manufacturer will repair the unit or, at its option, replace it free of charge.
If the unit is repaired, new or reconditioned replacement parts may be used, at manufacturer’s option. A
unit may be replaced with a new or reconditioned unit of the same or comparable design. The repaired or
replaced unit will then be warranted under the terms of the remainder of the warranty period. The customer
is responsible for the shipping charges on all returned items after 30 days. During the warranty period,
manufacturer will be responsible for the return shipping charges.
LIMITATIONS: This warranty does not cover accessories, bulbs, fuses and batteries, defects resulting from
normal wear and tear (including chips, scratches, abrasions, discoloration or fading due to usage or
exposure to sunlight), accidents, damage during shipping to our service facility, alterations, unauthorized
use or repair, neglect, misuse, abuse, failure to follow instructions for care and maintenance, fire, flood and
Acts of God.
If your problem is not covered by this warranty, call our Technical Support Department at (954) 584-4446
or toll free at (866) 584-5504 for general repair information and charges if applicable. You may also
contact us through our website at www.vectormfg.com.
STATE LAW RIGHTS: This warranty gives you specific legal rights. Some states do not allow limitations on
how long an implied warranty lasts or the exclusion or limitation of incidental or consequential damages,
so the exclusions or limitations stated herein may not apply. This warranty gives the purchaser specific legal
rights; other rights, which vary from state to state, may apply.
TO REQUEST WARRANTY SERVICE FOR THIS PRODUCT: Contact Technical Support by telephone, fax or
mail (see below). We suggest that you keep the original packaging in case you need to ship the unit. When
returning a product, include your name, address, phone number, dated sales receipt (or copy) and a
description of the reason for return and product serial number. After repairing or replacing the unit, we will
make every effort to return it to you within four weeks.
WARRANTY ACTIVATION: Please complete Warranty Activation Card and mail to Vector Manufacturing.
Enter “VEC270SB” as Model and “Inflator/1,000,000 Power Series™ Spotlight” as Product Type. All Vector
products must be registered within 30 days of purchase to activate this warranty. Mail the completed
registration form, along with a copy of the original sales receipt to:
12 Volt DC Power Supply
Cordless • Rechargeable
IMPORTANT SAFETY INFORMATION, SAVE THESE INSTRUCTIONS
TO REDUCE THE RISK OF INJURY, USER MUST READ AND UNDERSTAND
THIS INSTRUCTIONAL MANUAL. THIS MANUAL CONTAINS IMPORTANT
INFORMATION REGARDING THE OPERATION AND WARRANTY OF THIS
PRODUCT. PLEASE RETAIN FOR FUTURE REFERENCE.
WARRANTY IS NON-TRANSFERABLE AND NON-REFUNDABLE
BD062105
8
1,000,000 Power Series™
USER’S MANUAL
& WARRANTY INFORMATION
ATTN.: CUSTOMER SERVICE
4140 SW 30th Ave., Ft. Lauderdale, FL 33312
• TOLL FREE: (866 ) 584-5504 • FAX: (954) 584-5556 •
© 2005 VECTOR MANUFACTURING
MADE IN CHINA
Inflator/Spotlight
4140 S.W. 30th Ave., Ft. Lauderdale, FL 33312
Toll Free: (866) 584-5504
VEC270SB_Manual_062105.qxd
6/23/05
5:24 PM
Page ii
IMPORTANT SAFETY INSTRUCTIONS
WARNINGS
1. There is a risk of explosive gases being released when lead acid batteries are
being charged or discharged. Failure to follow instructions may cause property
damage, explosive hazard, and/or personal injury.
2. Never look into or point the inflator/air compressor nozzle or the spotlight toward
anyone’s eyes.
3. Do not use the inflator/air compressor continuously for longer than 15 minutes.
Extended use will cause it to overheat and can damage the unit. After 15 minutes
of continuous inflator/air compressor use, turn the unit OFF and wait 15 minutes
before resuming operation of the compressor.
4. DO NOT overinflate objects or exceed manufacturers’ recommendations for
pressure on objects to be inflated. Always monitor pressure using the pressure
gauge. Bursting articles can cause serious injury. It is recommended to wear
protective eyewear when inflating tires/inflatable items.
5. NEVER submerge this unit in water. When charging the unit near water, do not
allow electrical cords to become moist, damp or wet — electrical shock could
result.
6. Never cover unit at any time.
7. Never leave this unit unattended while operating.
CAUTIONS
1. When using an extension cord (not supplied) for AC charging/recharging, make sure it has the
same configuration as the plug of the unit and that the cord is properly wired and in good
condition. The cord must be suitable for 120 volts AC and have a minimum 2 amp rating. It is
recommended to use an outlet complete with a Ground Fault Interrupt (GFI) Switch.
2. Do not recharge for more than 5-6 hours maximum using the 12 volt DC method or more than 14-16
hours using the 120 volt AC method. Recharge unit after each use (using the recommended 120 volt
AC method). Avoid charging the battery at temperatures below 40°F, (5°C) or above 105°F (40°C).
3. All ON/OFF switches should be in the OFF position when the unit is charging or not in use. Make
sure all switches are in the OFF position before connection to a power source.
4. Never operate the inflator with the 120 Volt AC Recharging Adapter connected to the unit as the
charger could become damaged.
5. Do not use any accessory that is not recommended or provided by the manufacturer. Never insert
anything other than the supplied or recommended accessories into this unit’s 12 Volt DC
Recharging/Power Port.
6. Never operate the inflator after the battery indicator light comes on.
7. Although this unit contains a non-spillable battery, it is recommended that unit be kept upright
during storage, use and recharging. To avoid possible damage that may shorten the unit’s working
life, protect it from direct sunlight, direct heat and/or moisture.
8. Check unit periodically for wear and tear. Contact the Customer Service Department at
(866) 584-5504 to replace worn or defective parts.
9. Do not drop this unit as it may damage the product. If unit is dropped or damaged, please
discontinue using it.
10. Never disassemble; take unit to a qualified service technician or call Vector Customer Service when
service or repair is required. Incorrect reassembly may result in a risk of electric shock or fire and
will void the warranty.
11. Always replace the fuse with the same type and amp rating. Never use a higher amperage fuse
rating.
12. To reduce risk of damage to unit, pull by plug and not the cord when disconnecting.
13. Disconnect all charging cords and turn all ON/OFF switches to the OFF position before cleaning
this unit.
THIS UNIT IS NOT FOR USE BY CHILDREN AND SHOULD ONLY BE OPERATED BY ADULTS.
Read This User’s Manual Before Using This Unit.
SAVE THESE INSTRUCTIONS
ii
iii
VEC270SB_Manual_062105.qxd
6/23/05
5:24 PM
Page iv
TABLE OF CONTENTS
Introduction . . . . . . . . . . . . . . . . . . . . . . . . . . . . . .
Features . . . . . . . . . . . . . . . . . . . . . . . . . . . . . . . .
AC and DC Charging/Recharging . . . . . . . . . . . . . .
Viewing Battery Charge Status . . . . . . . . . . . . . . .
120 Volt AC Charging . . . . . . . . . . . . . . . . . . . .
12 Volt DC Charging . . . . . . . . . . . . . . . . . . . . .
Using the Spotlight . . . . . . . . . . . . . . . . . . . . . . . . .
Using the Auxiliary LED Area Light . . . . . . . . . . . . . .
Using the Unit as a 12 volt DC Portable Power Supply
Estimated 12 Volt DC Operation Time . . . . . . . . .
Using the Inflator/Air Compressor . . . . . . . . . . . . . .
Inflating Products With a Valve Stem . . . . . . . . . .
Inflating Products Without a Valve Stem . . . . . . . .
Care and Maintenance . . . . . . . . . . . . . . . . . . . . . .
Replacement Parts . . . . . . . . . . . . . . . . . . . . . . .
Bulb Replacement . . . . . . . . . . . . . . . . . . . . . . . .
Battery Replacement/Disposal . . . . . . . . . . . . . . .
Fuse Replacement (DC Accessory Adapter) . . . . . .
Specifications . . . . . . . . . . . . . . . . . . . . . . . . . . . . .
.
.
.
.
.
.
.
.
.
.
.
.
.
.
.
.
.
.
.
.
.
.
.
.
.
.
.
.
.
.
.
.
.
.
.
.
.
.
.
.
.
.
.
.
.
.
.
.
.
.
.
.
.
.
.
.
.
.
.
.
.
.
.
.
.
.
.
.
.
.
.
.
.
.
.
.
.
.
.
.
.
.
.
.
.
.
.
.
.
.
.
.
.
.
.
.
.
.
.
.
.
.
.
.
.
.
.
.
.
.
.
.
.
.
.
.
.
.
.
.
.
.
.
.
.
.
.
.
.
.
.
.
.
.
.
.
.
.
.
.
.
.
.
.
.
.
.
.
.
.
.
.
.
.
.
.
.
.
.
.
.
.
.
.
.
.
.
.
.
.
.
.
.
.
.
.
.
.
.
.
.
.
.
.
.
.
.
.
.
.
.
.
.
.
.
.
.
.
.
.
.
.
.
.
.
.
.
.
.
.
.
.
.
.
.
.
.
.
.
.
.
.
.
.
.
.
.
.
.
.
.
.
.
.
.
.
.
.
.
.
.
.
.
.
.
.
.
.
.
.
.
.
.
.
.
.
.
.
.
.
.
.
.
.
.
.
.
.
.
.
.
.
.
.
.
.
.
.
.
.
.
.
.
.
.
.
.
.
.
.
.
.
.
.
.
.
.
.
.
.
.
.
.
.
.
.
.
.
.
.
.
.
.
.
.
.
.
.
.
.
.
.
.
.
.
.
.
.
.
.
.
.
.
.
.
.
.
.
.
.
.
.
.
.
.
.
.
.
.
.
.
.
.
.
.
.
.
.
.
.
.
.
.
.
.
.
.
.
.
.
.
.
.
.
.
.
.
.
.
.
.
.
.
.
.
.
.
.
.
.
.
.
.
.
.
.
.
.
.
1
1
3
3
3
3
4
4
4
4
5
5
5
6
6
6
7
7
7
INTRODUCTION
Thank you for purchasing the VEC270SB Inflator/1,000,000 Power Series™
Spotlight. This system is an advanced high-pressure (up to 260 PSI) multi-use air
inflator system, 1,000,000 power spotlight and 12 volt DC power source that will
provide years of reliable service if maintained properly. Please read this guide
carefully before use to ensure optimum performance and avoid damage to the unit.
FEATURES
•
•
•
•
•
•
•
•
•
•
•
iv
Built-in inflator/air compressor with pressure gauge, hose and adapters
Built-in ultra bright 12 volt halogen spotlight
Long-life auxiliary LED area light
12 volt DC accessory outlet
Includes 120 volt AC and 12 volt DC adapters
LED battery charge level indicators
Includes a non-spillable, maintenance-free, heavy-duty, sealed battery
Requires no maintenance (other than recharging) for optimum operation
Rubberized base and easy-grip handle
Protective rubber safety guard (bezel) around lens
Tough, durable, molded, high-impact housing
1
VEC270SB_Manual_062105.qxd
2
3
6/23/05
5:24 PM
Page 2
AC AND DC CHARGING/RECHARGING
4
5
FULLY CHARGE THE UNIT USING THE 120 VOLT AC CHARGING METHOD
FOR A FULL 14 TO 16 HOURS BEFORE FIRST USE.
For maximum battery life, we recommend the unit be kept fully charged at all times.
If the battery is allowed to remain in a discharged state, battery life will be shortened.
• MAKE SURE ALL SWITCHES ARE TURNED OFF DURING RECHARGING.
• Recharge the unit fully after each use; and recharge the unit every two months when
it has not been used regularly.
• If the unit is used for an extended period after the red LED indicator lights,
recharging could take up to 20 hours and battery life may be shortened.
6
1
Notes: Recharging the battery after each use prolongs battery life; frequent
10
9
8
discharges between recharges reduces battery life.
If unit is fully discharged, it is recommended that the vehicle being used for
recharging be left running while the unit is charged via the 12 volt DC
method.
7
Viewing Battery Charge Level Status
1. 12 Volt Halogen 1,000,000 Power Series™ Spotlight
2. Auxiliary LED Area Light
3. Auxiliary LED Area Light Power Switch
4. Rubberized Easy-grip Handle
5. Battery Charge Level LED Indicators
6. Battery Charge Level Pushbutton
7. 12 Volt DC Accessory Outlet/Recharge Port
8. 120 Volt AC Recharge Adapter Barrel Connector Port
9. Spotlight Power Pushbutton
10. Inflator/Air Compressor Power Switch
11. Inflator Hose/Accessory Storage Compartment
12. Analog Dial Pressure Gauge
13. 20" Air Hose with Standard Tire Connector (Chuck)
Press the Battery Charge Level Pushbutton to display charge level status. The Battery
Charge Level Indicator LEDs will light.
LEDs (from left to right):
• One Red LED indicates a low battery charge
• Two Red LEDs indicate a medium level or partially charged battery
• Two Red and one Green LEDs indicates a full or high level battery charge.
120 Volt AC Charging
1. Insert the supplied 120 Volt AC Recharging Adapter into the
120 Volt AC Recharge Adapter Barrel Connector Port located
next to the Battery Charge Level LED Indicators.
2. Plug the adapter into a standard North American120 volt AC
electrical outlet.
3. Charge until two Red and one Green LEDs light.
4. Once fully charged, disconnect the adapter.
Note: The unit cannot be overcharged using this method.
12
12 Volt DC Charging
1. Insert the 12 Volt DC Recharging Adapter into the unit’s 12
Volt DC Accessory/Recharge Port.
2. Insert the other end into the vehicle accessory outlet (or other
12 volt DC power source).
3. To check the charge level status of the battery during DC
charging, disconnect the DC adapter from the accessory
outlet and push the Battery Charge Level pushbutton. Observe
the battery charge indicator.
4. When charging is complete, disconnect the adapter.
11
13
2
WARNING
Do not recharge for more than 5-6 hours maximum using the 12 volt
DC method.
3
VEC270SB_Manual_062105.qxd
6/23/05
5:24 PM
Page 4
USING THE SPOTLIGHT
USING THE INFLATOR/AIR COMPRESSOR
The quartz halogen Spotlight is controlled by the Spotlight Power Pushbutton located
on the side of the unit. Make sure the Spotlight is turned OFF when the unit is being
recharged or stored.
The built-in 12 volt DC Inflator/Air Compressor is the ultimate inflator for all vehicle
tires, trailer tires and sports inflatables. The attached hose with standard tire valve
connector (chuck) and three different sized nozzles are located in the compartment in
the rear of the unit.
Each nozzle clips on the end of the standard tire valve connector attached to the free
end of the inflator/air compressor hose.
USING THE AUXILIARY LED AREA LIGHT
The Auxiliary LED Area Light is controlled by the Auxiliary LED Area Light Power
Switch located directly under the Area Light above the Spotlight. Make sure the Area
Light is turned OFF when the unit is being recharged or stored.
USING THE UNIT AS A 12 VOLT DC
PORTABLE POWER SUPPLY
This portable power source is also for use with all 12 volt DC accessories equipped
with a male accessory outlet plug and are rated up to 15 amps.
1. Insert the 12 volt DC plug from the appliance into the unit’s 12 Volt DC
Accessory Outlet/Recharge Port. DO NOT EXCEED A 15 AMP LOAD.
2. Switch on the appliance and operate as usual.
3. Periodically press the battery charge level pushbutton to check battery status.
WARNING
Do not attempt to connect items exceeding the 15 amp, 12 volt rating.
Using the Inflator and a 12 volt DC item may exceed 15 amps and
cause damage to the unit, item, and/or accessories, and will void
warranty. Therefore, it is strongly recommended not to use both the
12 Volt DC Accessory/Recharge Port and the Inflator at the same time.
Estimated Power Usage
(Watts)
Cell phone
Fluorescent light
Radio, fan, depth finder
Camcorder, VCR, spotlight
Power tools, bilge pump
Electric cooler
Car vacuum
1
4
9
15
24
48
80
Operating Time
(hours)
20-120 (talk time)
10-30
1-14
1-8
1-5
1-3
0.5-1
Note: All times are approximate and based upon a fully charged unit.
4
CAUTION
Do not operate the Inflator/Air Compressor continuously for extended
periods of time (approx. 15 minutes, depending on the ambient
temperature), as it may overheat. In such event, the Inflator/Air
Compressor will shut down and can be restarted after a cooling period
of approximately 15 minutes.
Inflating Products With a Valve Stem
1. Place the standard connector (chuck) of the hose on the valve stem.
2. Push connector toward the valve stem and close thumb latch.
Note: Make sure connector is pushed onto valve stem as far as possible
before closing thumb latch.
Estimated 12 Volt DC Operation Time
Appliance
WARNING
The Inflator/Air Compressor is capable of inflating up to 260 pounds
per square inch (PSI). To avoid overinflating, carefully follow
instructions on articles to be inflated. Never exceed recommended
pressures. Always check pressure with the pressure gauge. Never
leave the Inflator/Air Compressor unattended while in use. Bursting
articles can cause serious injury.
3. Slide the Inflator/Air Compressor Power Switch to ON.
4. Monitor the pressure gauge. When desired pressure is reached, slide the
Inflator/Air Compressor Power Switch to OFF; open thumb latch and remove
connector from valve stem.
5. Store the hose in the Inflator Hose/Accessory Storage Compartment when not
in use.
Inflating Products Without a Valve Stem
Inflation of other items requires use of one of the adapters (nozzles).
1. Insert appropriate adapter (e.g. needle) into the connector (chuck) on the Air hose
and close thumb latch.
2. Insert adapter (e.g. needle) into item to inflate.
3. Slide Inflator/Air Compressor Switch to COMPRESSOR.
4. Refer to the following table for approximate filling pressure and time. Small items
such as volleyballs, footballs, etc. inflate very rapidly.
5. Monitor the pressure gauge. When desired pressure is reached, slide the
Inflator/Air Compressor Power Switch to OFF; open thumb latch and remove
connector from valve stem.
6. Remove adapter from item and store along with the hose in the Inflator
Hose/Accessory Storage Compartment.
5
VEC270SB_Manual_062105.qxd
6/23/05
5:24 PM
Page 6
Typical Inflation Times
Inflation pressure (psi)
Vehicle and trailer tires
155/80R 13"
185/70R 14"
235/75R 16"
235/70R 17"
Bicycle tires
27" X 1" (racing)
Sports Equipment
Football
Basketball
Volleyball
Approx. Filling time
26
30
30
42
2.5
4.5
6.5
16
min.
min.
min.
min.
70
2.3 min.
13
10
5
24 sec.
20 sec.
6 sec.
WARNING
Always follow manufacturer’s recommendations for pressure on item
to be inflated.
CARE AND MAINTENANCE
Replacement Parts
Contact Vector’s Technical Support Department toll free at (866) 584-5504 or visit our
website (www.vectormfg.com) for replacement parts (including replacement adapters
and cords) and any additional information that you may need.
WARNING
To reduce the risk of shocks or burns and avoid damage to the unit,
make sure all power switches are in the OFF position, all adapters are
unplugged and the unit has been allowed to cool down before
performing any maintenance/parts replacement.
Bulb Replacement
The quartz halogen bulb assembly is available through Vector (see contact
information above). A comparable (12 volt H3 25 watt) bulb may be substituted.
These can also be purchased from popular automotive parts suppliers nationwide.
You will need a Phillips screwdriver to replace the bulb.
HAIRPIN RETAINING
WIRES
Open
Closed
4. Gently lift the reflector and bulb assembly from the housing; note that the wires
are still attached to assembly.
5. Unsnap the retaining wire from the reflector’s flange by pinching the two ends
together and lifting.
6. Loosen the Phillips-head retaining screw (no need to completely remove) to free
the bulb assembly from the reflector.
7. Slightly turn and lift out the bulb assembly from the back of the reflector.
8. Disconnect the bulb assembly’s white wire from the red power wire by separating
the male spade terminal from the female terminal.
9. Insert the replacement bulb assembly into the reflector flange.
10. Reverse the proceeding procedure to reassemble the Spotlight.
11. Press the Spotlight’s Power Pushbutton ON to test proper operation of spotlight.
Battery Replacement/Disposal
It is recommended that the unit be returned to Vector Customer Service for battery
replacement.
Contains a maintenance-free, sealed, non-spillable, lead acid battery,
which must be disposed of properly. Recycling is required, contact your
local authority for information. Failure to comply with local, state and
federal regulations can result in fines, or imprisonment. For more
information on recycling this battery, call toll-free (877) 288-7722.
Fuse Replacement
The VEC270SB contains a 15 amp blade fuse located in the Inflator Hose/
Accessory Storage Compartment. You will need small needle nose pliers to replace
the fuse.
1. Open the Inflator Hose/Accessory Storage Compartment cover.
2. Grasp the blade fuse with the needle-nose pliers and pull straight out.
3. Replace the fuse with the same size and type.
SPECIFICATIONS
Battery Type(s):
Sealed, high density, AGM, lead-acid, rechargeable,
maintenance-free, 6 volt DC, 4.5 Amp-hour
Spotlight:
H3 25 watt bulb
Accessory Outlet:
Protected by a 15 Amp Fuse
DC Charger/Adapter:
12 volt DC/DC
AC Charger/Adapter:
120 volt AC (500mA 12 volt DC Output)
SCREW
1. Remove the rubber bezel from the lens cover.
2. Unscrew (counterclockwise) and remove the two Phillips screws located on either
side of the lens.
3. Carefully separate the lens guard, lens glass and rubber gasket from the reflector.
6
7