1
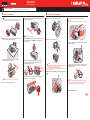
Start Here
Easy Setup Instructions
Unpack the Machine
Photo All-in-One
• Please confirm the included items against the illustration printed on the lid of the packing box.
• A USB cable is necessary to connect the machine with your computer.
1 Prepare the Machine
Note
When moving the machine, carry the machine at both ends as shown below. Do not lift
the machine by grasping the Paper Support Extension or the Operation Panel.
2 Install the FINE Cartridges
dPlug the Power Cord in the back of the machine and connect the
other end to the wall outlet.
aRemove the Black FINE Cartridge from its box.
dPush up the FINE Cartridge until it clicks into place.
Important
For correct machine operation, make sure the FINE Cartridge is secure in slots.
Power Cord
aPlace the machine on a flat and horizontal surface, and do not
place any objects in front of the machine.
Note
Do not connect the USB cable at this stage.
ePress the ON/OFF button to turn on the machine. The machine
will initialize. Wait until the POWER lamp stops flashing and
remains lit green.
bRemove the Protective Tape gently.
Protective Tape
eRepeat the procedure for the Color FINE Cartridge, inserting it
into the right slot C .
C
Electrical Contacts
bLift the Scanning Unit (Printer Cover), then remove the
Protective Material on the right side.
fLift the Scanning Unit (Printer Cover) and pull the Scanning
Unit Support down into place. The FINE Cartridge Holder
automatically moves to the left.
The FINE
Cartridge Holder
moves to the left.
Install the FINE
Cartridges here.
Print Head Nozzles
Important
• Do not touch the Electrical Contacts or Print Head Nozzles on a FINE Cartridge.
The machine may not print out properly if you touch it.
• Do not reattach the Protective Tape once you have removed it.
• Be careful not to stain your hands or surrounding work area with ink on the
removed Protective Tape.
fLift the Scanning Unit (Printer Cover) to put the Scanning Unit
Support back to its original position, then close the Scanning
Unit (Printer Cover).
cInsert the Black FINE Cartridge slightly slanted into the left slot
B.
Protective Material
Caution
Before turning on the machine, remove all of the shipping tapes.
gWrite down the Serial Number located inside the machine. You
B
will need this to register your product.
Important
Once you have installed the FINE Cartridges, the LED will flash green. Wait for
about one to two minutes, until the LED stops flashing and displays 1 and the
machine has stopped making operating noises, before proceeding.
cClose the Scanning Unit (Printer Cover).
Hardware setup is complete.
Serial Number
Macintosh® MP Drivers Installation
M
ac
W
in
in
do
to
w
s
sh
Windows® MP Drivers Installation
Note
• The screens below refer to Windows XP Service Pack 2 installation.
Screens may vary depending on the operating system you are using.
• For Windows XP or Windows 2000, log on to Windows as a member of the
Administrators group before continuing.
• Before installing the driver, disable all anti-virus programs and automatically loading
programs.
Important
Since Mac® OS 9, Mac OS X Classic environments, or Mac OS X v.10.2.7 or earlier are not supported, do not connect the machine to these.
Note
• Use Mac OS X v.10.2.8 to 10.4.x.
• The screens below refer to Mac OS X v.10.4.x installation. Screens may vary
depending on the operating system you are using.
• Log on as an Administrator before continuing.
• Before installing the driver, disable all anti-virus programs and automatically loading
programs.
a Be sure to TURN THE MACHINE OFF before continuing.
(1) Press the ON/OFF button.
(2) Make sure that the POWERlampstopsflashing.
a Connect one end of the USB cable to the computer, the other
b Turn the computer on and start Windows.
Important
If you see the Found New Hardware Wizard, remove the USB cable. Click Cancel
to quit the screen. Next, turn off the machine. Then proceed from step c to
install the MP Drivers.
to the machine.
h When the User Registration screen appears, click Register.
Note
Follow on-screen instructions to register your product. You will need your product
serial number, which is located on the inside of the machine. See Step 1- g on the
front page.
i When the Installation completed successfully screen
appears, click Restart.
h When the Print Head Alignment Recommended screen
appears, click Next.
The system is restarted automatically.
c Insert the Setup CD-ROM. The setup program should run
automatically.
Note
The setup program should run automatically. If the installer in the CD-ROM does not
run automatically, click Start and select My Computer, then double-click the CD-ROM
icon
.
i When the User Registration screen appears, click Register.
b Turn on your Mac and your machine and insert the Setup CDROM.
Note
If the CD-ROM folder does not open automatically, double-click the CD-ROM icon
on the desktop.
d When the main menu appears, click Easy Install.
c Double-click the Setup icon.
d When the Authenticate screen appears, enter your
Note
• Select Easy Install in order to install the MP Drivers, on-screen manuals, and
application software. Select Custom Install in order to choose the options you would
like to install.
• To install Adobe® RGB (1998), click Custom Install and follow the on-screen
instructions.
eWhenthelistofapplicationstoinstallappears,confirmthe
contents, click Install.
Note
Move the cursor over items to display explanations of each application.
f Read the License Agreement carefully and click Yes. Follow
the on-screen instructions to install the software. If a message
askingforyourconfirmationtorestartyourcomputerappears,
click OK.
g When the Printer Connection screen appears, connect
one end of the USB cable to the computer, the other to the
machine, then TURN THE MACHINE ON. The software will
begin identifying the printer port being used.
Important
If you cannot go to the next procedure after two minutes, refer to “Troubleshooting” instructions in the User’s Guide on-screen manual.
Note
• Follow on-screen instructions to register your product. You will need your product
serial number, which is located on the inside of the machine. See Step 1- g on the
front page.
• We would appreciate it if you would take part in the PIXMA Extended Survey
Program regarding the use of Canon machine. For details, refer to the on-screen
instructions.
administrator name and password. Click OK.
If you do not know your administrator name or password, click
, then follow the on-screen instructions.
e When the main menu appears, click Easy Install.
When using Mac OS X v.10.2.8 to v.10.3.3:
Restarting the computer while connected to the machine may cause the
machine not to be detected. To resolve this, either unplug the USB cable
then plug it back in again, or turn the machine off then back on again.
j After restarting the computer, start Printer Setup Utility
(start Print Center if you are using Mac OS X v.10.2.8) and
then check that the printer name you want to use is shown in
Printer List. If the printer name is not displayed, click Add to
add the machine.
For more detailed instructions, refer to the Mac on-screen Help.
Note
If the straight line is misaligned or print quality is not satisfactory after installing the MP
Drivers, you may need to align the Print Head. Refer to “Aligning the Print Head” in
the Quick Start Guide.
Software installation is now complete.
j When the Installation completed successfully screen
appears, click Exit.
Register your Canon PIXMA today, and you
will be entitled to the following benefits:
If Restart is displayed, make sure that the Restart the system now
(recommended) check box is selected, then click Restart.
Note
If the straight line is misaligned or print quality is not satisfactory after installing the MP
Drivers, you may need to align the Print Head. Refer to “Aligning the Print Head” in
the Quick Start Guide.
Software installation is now complete.
Note
Select Easy Install in order to install the MP Drivers, on-screen manuals, and
application software. Select Custom Install in order to choose the options you would
like to install.
fWhenthelistofapplicationstoinstallappears,confirmthe
contents, then click Install.
Note
Move the cursor over items to display explanations of each application.
g Read the License Agreement carefully and click Yes. Follow
the on-screen instructions to install the software.
Canon Sweepstakes!!!
Register your PIXMA product and you will be automatically
enteredtowingreatCanonprizes!
Visit http://www.usa.canon.com/sweepstakes01 for details.
Receive information on new products, tips and promotions
Receive our monthly Printer Newsletter with Canon savings, fun Creative
Park projects, and helpful tips.
Receive software upgrades
Canon USA often updates the software for its printers. You will be among
thefirsttoreceivenotifications.
Protect your product
We will keep the model number and date of purchase of your new Canon
PIXMAprinteronfiletohelpyourefertothisinformationandexpedite
your call in the event of an insurance claim such as loss or theft.
Part no. QT5-0973-V01 © 2007 Canon Inc. “Windows” is a trademark of Microsoft Corporation, registered in the United States and other countries. Windows Vista is either a registered trademark or trademark of Microsoft Corporation in the United States and/or other countries. “Macintosh” and “Mac” are trademarks of Apple Computer, Inc., registered in the U.S. and other countries. “Adobe” and
“AdobeRGB(1998)”areeitherregisteredtrademarksortrademarksofAdobeSystemsIncorporatedintheUnitedStatesand/orothercountries.Allotherproductandbrandnamesaretrademarksoftheirrespectiveowners.Specificationssubjecttochangewithoutnotice.
XXXXXXXX
PRINTEDINVIETNAM