1
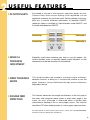
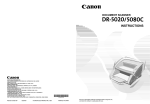
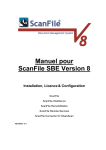
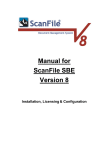
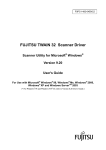
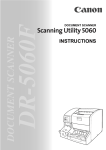
QUICK REFERENCE
SCANNING BASICS
USEFUL FEATURES
TROUBLESHOOTING
DOCUMENT SCANNER
PRECAUTIONS
The Canon DR-5020/5080C are versatile document scanners that feature reliable paper
feeding capabilities. To ensure an optimal level of scanner performance on each job,
please follow the recommendations listed below.
Does your stack include...
❘❘❘❘❘❘❘❘❘❘❘❘❘❘❘❘❘❘❘❘❘❘❘❘❘❘❘❘❘❘❘❘❘❘❘❘❘❘❘❘❘❘❘❘❘❘❘❘❘❘
❘❘❘❘❘❘❘❘❘❘❘❘❘❘❘❘❘❘❘❘❘❘❘❘❘❘❘❘❘❘❘❘❘❘❘❘❘❘❘❘❘❘❘❘❘❘❘❘❘❘
❘❘❘❘❘❘❘❘❘❘❘❘❘❘❘❘❘❘❘❘❘❘❘❘❘❘❘❘❘❘❘❘❘❘❘❘❘❘❘❘❘❘❘❘❘❘❘❘❘❘
❘❘❘❘❘❘❘❘❘❘❘❘❘❘❘❘❘❘❘❘❘❘❘❘❘❘❘❘❘❘❘❘❘❘❘❘❘❘❘❘❘❘❘❘❘❘❘❘❘❘
❘❘❘❘❘❘❘❘❘❘❘❘❘❘❘❘❘❘❘❘❘❘❘❘❘❘❘❘❘❘❘❘❘❘❘❘❘❘❘❘❘❘❘❘❘❘❘❘❘❘
❘❘❘❘❘❘❘❘❘❘❘❘❘❘❘❘❘❘❘❘❘❘❘❘❘❘❘❘❘❘❘❘❘❘❘❘❘❘❘❘❘❘❘❘❘❘❘❘❘❘
❘❘❘❘❘❘❘❘❘❘❘❘❘❘❘❘❘❘❘❘❘❘❘❘❘❘❘❘❘❘❘❘❘❘❘❘❘❘❘❘❘❘❘❘❘❘❘❘❘❘
❘❘❘❘❘❘❘❘❘❘❘❘❘❘❘❘❘❘❘❘❘❘❘❘❘❘❘❘❘❘❘❘❘❘❘❘❘❘❘❘❘❘❘❘❘❘❘❘❘❘
❘❘❘❘❘❘❘❘❘❘❘❘❘❘❘❘❘❘❘❘❘❘❘❘❘❘❘❘❘❘❘❘❘❘❘❘❘❘❘❘❘❘❘❘❘❘❘❘❘❘
❘❘❘❘❘❘❘❘❘❘❘❘❘❘❘❘❘❘❘❘❘❘❘❘❘❘❘❘❘❘❘❘❘❘❘❘❘❘❘❘❘❘❘❘❘❘❘❘❘❘
❘❘❘❘❘❘❘❘❘❘❘❘❘❘❘❘❘❘❘❘❘❘❘❘❘❘❘❘❘❘❘❘❘❘❘❘❘❘❘❘❘❘❘❘❘❘❘❘❘❘
❘❘❘❘❘❘❘❘❘❘❘❘❘❘❘❘❘❘❘❘❘❘❘❘❘❘❘❘❘❘❘❘❘❘❘❘❘❘❘❘❘❘❘❘❘❘❘❘❘❘
❘❘❘❘❘❘❘❘❘❘❘❘❘❘❘❘❘❘❘❘❘❘❘❘❘❘❘❘❘❘❘❘❘❘❘❘❘❘❘❘❘❘❘❘❘❘❘❘❘❘
❘❘❘❘❘❘❘❘❘❘❘❘❘❘❘❘❘❘❘❘❘❘❘❘❘❘❘❘❘❘❘❘❘❘❘❘❘❘❘❘❘❘❘❘❘❘❘❘❘❘
❘❘❘❘❘❘❘❘❘❘❘❘❘❘❘❘❘❘❘❘❘❘❘❘❘❘❘❘❘❘❘❘❘❘❘❘❘❘❘❘❘❘❘❘❘❘❘❘❘❘
❘❘❘❘❘❘❘❘❘❘❘❘❘❘❘❘❘❘❘❘❘❘❘❘❘❘❘❘❘❘❘❘❘❘❘❘❘❘❘❘❘❘❘❘❘❘❘❘❘❘
❘❘❘❘❘❘❘❘❘❘❘❘❘❘❘❘❘❘❘❘❘❘❘❘❘❘❘❘❘❘❘❘❘❘❘❘❘❘❘❘❘❘❘❘❘❘❘❘❘❘
❘❘❘❘❘❘❘❘❘❘❘❘❘❘❘❘❘❘❘❘❘❘❘❘❘❘❘❘❘❘❘❘❘❘❘❘❘❘❘❘❘❘❘❘❘❘❘❘❘❘
If so, then make these adjustments:
❘❘❘❘❘❘❘❘❘❘❘❘❘❘❘❘❘❘❘❘❘❘❘❘❘❘❘❘❘❘❘❘❘❘❘
❘❘❘❘❘❘❘❘❘❘❘❘❘❘❘❘❘❘❘❘❘❘❘❘❘❘❘❘❘❘❘❘❘❘❘
❘❘❘❘❘❘❘❘❘❘❘❘❘❘❘❘❘❘❘❘❘❘❘❘❘❘❘❘❘❘❘❘❘❘❘
❘❘❘❘❘❘❘❘❘❘❘❘❘❘❘❘❘❘❘❘❘❘❘❘❘❘❘❘❘❘❘❘❘❘❘
❘❘❘❘❘❘❘❘❘❘❘❘❘❘❘❘❘❘❘❘❘❘❘❘❘❘❘❘❘❘❘❘❘❘❘
❘❘❘❘❘❘❘❘❘❘❘❘❘❘❘❘❘❘❘❘❘❘❘❘❘❘❘❘❘❘❘❘❘❘❘
❘❘❘❘❘❘❘❘❘❘❘❘❘❘❘❘❘❘❘❘❘❘❘❘❘❘❘❘❘❘❘❘❘❘❘
Papers of different types and sizes?
❘❘❘❘❘❘❘❘❘❘❘❘❘❘❘❘❘❘❘❘❘❘❘❘❘❘❘❘❘❘❘❘❘❘❘❘❘❘❘❘❘❘❘❘❘❘❘❘❘❘
❘❘❘❘❘❘❘❘❘❘❘❘❘❘❘❘❘❘❘❘❘❘❘❘❘❘❘❘❘❘❘❘❘❘❘❘❘❘❘❘❘❘❘❘❘❘❘❘❘❘
❘❘❘❘❘❘❘❘❘❘❘❘❘❘❘❘❘❘❘❘❘❘❘❘❘❘❘❘❘❘❘❘❘❘❘❘❘❘❘❘❘❘❘❘❘❘❘❘❘❘
❘❘❘❘❘❘❘❘❘❘❘❘❘❘❘❘❘❘❘❘❘❘❘❘❘❘❘❘❘❘❘❘❘❘❘❘❘❘❘❘❘❘❘❘❘❘❘❘❘❘
❘❘❘❘❘❘❘❘❘❘❘❘❘❘❘❘❘❘❘❘❘❘❘❘❘❘❘❘❘❘❘❘❘❘❘❘❘❘❘❘❘❘❘❘❘❘❘❘❘❘
❘❘❘❘❘❘❘❘❘❘❘❘❘❘❘❘❘❘❘❘❘❘❘❘❘❘❘❘❘❘❘❘❘❘❘❘❘❘❘❘❘❘❘❘❘❘❘❘❘❘
❘❘❘❘❘❘❘❘❘❘❘❘❘❘❘❘❘❘❘❘❘❘❘❘❘❘❘❘❘❘❘❘❘❘❘❘❘❘❘❘❘❘❘❘❘❘❘❘❘❘
❘❘❘❘❘❘❘❘❘❘❘❘❘❘❘❘❘❘❘❘❘❘❘❘❘❘❘❘❘❘❘❘❘❘❘❘❘❘❘❘❘❘❘❘❘❘❘❘❘❘
❘❘❘❘❘❘❘❘❘❘❘❘❘❘❘❘❘❘❘❘❘❘❘❘❘❘❘❘❘❘❘❘❘❘❘❘❘❘❘❘❘❘❘❘❘❘❘❘❘❘
❘❘❘❘❘❘❘❘❘❘❘❘❘❘❘❘❘❘❘❘❘❘❘❘❘❘❘❘❘❘❘❘❘❘❘❘❘❘❘❘❘❘❘❘❘❘❘❘❘❘
❘❘❘❘❘❘❘❘❘❘❘❘❘❘❘❘❘❘❘❘❘❘❘❘❘❘❘❘❘❘❘❘❘❘❘❘❘❘❘❘❘❘❘❘❘❘❘❘❘❘
❘❘❘❘❘❘❘❘❘❘❘❘❘❘❘❘❘❘❘❘❘❘❘❘❘❘❘❘❘❘❘❘❘❘❘❘❘❘❘❘❘❘❘❘❘❘❘❘❘❘
❘❘❘❘❘❘❘❘❘❘❘❘❘❘❘❘❘❘❘❘❘❘❘❘❘❘❘❘❘❘❘❘❘❘❘❘❘❘❘❘❘❘❘❘❘❘❘❘❘❘
❘❘❘❘❘❘❘❘❘❘❘❘❘❘❘❘❘❘❘❘❘❘❘❘❘❘❘❘❘❘❘❘❘❘❘❘❘❘❘❘❘❘❘❘❘❘❘❘❘❘
❘❘❘❘❘❘❘❘❘❘❘❘❘❘❘❘❘❘❘❘❘❘❘❘❘❘❘❘❘❘❘❘❘❘❘❘❘❘❘❘❘❘❘❘❘❘❘❘❘❘
❘❘❘❘❘❘❘❘❘❘❘❘❘❘❘❘❘❘❘❘❘❘❘❘❘❘❘❘❘❘❘❘❘❘❘❘❘❘❘❘❘❘❘❘❘❘❘❘❘❘
❘❘❘❘❘❘❘❘❘❘❘❘❘❘❘❘❘❘❘❘❘❘❘❘❘❘❘❘❘❘❘❘❘❘❘❘❘❘❘❘❘❘❘❘❘❘❘❘❘❘
❘❘❘❘❘❘❘❘❘❘❘❘❘❘❘❘❘❘❘❘❘❘❘❘❘❘❘❘❘❘❘❘❘❘❘❘❘❘❘❘❘❘❘❘❘❘❘❘❘❘
❘❘❘❘❘❘❘❘❘❘❘❘❘❘❘❘❘❘❘❘❘❘❘❘❘❘❘❘❘❘❘❘❘❘❘❘❘❘❘❘❘❘❘❘❘❘❘❘❘❘
❘❘❘❘❘❘❘❘❘❘❘❘❘❘❘❘❘❘❘❘❘❘❘❘❘❘❘❘❘❘❘❘❘❘❘❘❘❘❘❘❘❘❘❘❘❘❘❘❘❘
❘❘❘❘❘❘❘❘❘❘❘❘❘❘❘❘❘❘❘❘❘❘❘❘❘❘❘❘❘❘❘❘❘❘❘❘❘❘❘❘❘❘❘❘❘❘❘❘❘❘
❘❘❘❘❘❘❘❘❘❘❘❘❘❘❘❘❘❘❘❘❘❘❘❘❘❘❘❘❘❘❘❘❘❘❘❘❘❘❘❘❘❘❘❘❘❘❘❘❘❘
❘❘❘❘❘❘❘❘❘❘❘❘❘❘❘❘❘❘❘❘❘❘❘❘❘❘❘❘❘❘❘❘❘❘❘❘❘❘❘❘❘❘❘❘❘❘❘❘❘❘
❘❘❘❘❘❘❘❘❘❘❘❘❘❘❘❘❘❘❘❘❘❘❘❘❘❘❘❘❘❘❘❘❘❘❘❘❘❘❘❘❘❘❘❘❘❘❘❘❘❘
❘❘❘❘❘❘❘❘❘❘❘❘❘❘❘❘❘❘❘❘❘❘❘❘❘❘❘❘❘❘❘❘❘❘❘❘❘❘❘❘❘❘❘❘❘❘❘❘❘❘
❘❘❘❘❘❘❘❘❘❘❘❘❘❘❘❘❘❘❘❘❘❘❘❘❘❘❘❘❘❘❘❘❘❘❘❘❘❘❘❘❘❘❘❘❘❘❘❘❘❘
❘❘❘❘❘❘❘❘❘❘❘❘❘❘❘❘❘❘❘❘❘❘❘❘❘❘❘❘❘❘❘❘❘❘❘❘❘❘❘❘❘❘❘❘❘❘❘❘❘❘
❘❘❘❘❘❘❘❘❘❘❘❘❘❘❘❘❘❘❘❘❘❘❘❘❘❘❘❘❘❘❘❘❘❘❘❘❘❘❘❘❘❘❘❘❘❘❘❘❘❘
❘❘❘❘❘❘❘❘❘❘❘❘❘❘❘❘❘❘❘❘❘❘❘❘❘❘❘❘❘❘❘❘❘❘❘❘❘❘❘❘❘❘❘❘❘❘❘❘❘❘
❘❘❘❘❘❘❘❘❘❘❘❘❘❘❘❘❘❘❘❘❘❘❘❘❘❘❘❘❘❘❘❘❘❘❘❘❘❘❘❘❘❘❘❘❘❘❘❘❘❘
❘❘❘❘❘❘❘❘❘❘❘❘❘❘❘❘❘❘❘❘❘❘❘❘❘❘❘❘❘❘❘❘❘❘❘❘❘❘❘❘❘❘❘❘❘❘❘❘❘❘
❘❘❘❘❘❘❘❘❘❘❘❘❘❘❘❘❘❘❘❘❘❘❘❘❘❘❘❘❘❘❘❘❘❘❘❘❘❘❘❘❘❘❘❘❘❘❘❘❘❘
❘❘❘❘❘❘❘❘❘❘❘❘❘❘❘❘❘❘❘❘❘❘❘❘❘❘❘❘❘❘❘❘❘❘❘❘❘❘❘❘❘❘❘❘❘❘❘❘❘❘
❘❘❘❘❘❘❘❘❘❘❘❘❘❘❘❘❘❘❘❘❘❘❘❘❘❘❘❘❘❘❘❘❘❘❘❘❘❘❘❘❘❘❘❘❘❘❘❘❘❘
❘❘❘❘❘❘❘❘❘❘❘❘❘❘❘❘❘❘❘❘❘❘❘❘❘❘❘❘❘❘❘❘❘❘❘❘❘❘❘❘❘❘❘❘❘❘❘❘❘❘
❘❘❘❘❘❘❘❘❘❘❘❘❘❘❘❘❘❘❘❘❘❘❘❘❘❘❘❘❘❘❘❘❘❘❘❘❘❘❘❘❘❘❘❘❘❘❘❘❘❘
❘❘❘❘❘❘❘❘❘❘❘❘❘❘❘❘❘❘❘❘❘❘❘❘❘❘❘❘❘❘❘❘❘❘❘❘❘❘❘❘❘❘❘❘❘❘❘❘❘❘
❘❘❘❘❘❘❘❘❘❘❘❘❘❘❘❘❘❘❘❘❘❘❘❘❘❘❘❘❘❘❘❘❘❘❘❘❘❘❘❘❘❘❘❘❘❘❘❘❘❘
❘❘❘❘❘❘❘❘❘❘❘❘❘❘❘❘❘❘❘❘❘❘❘❘❘❘❘❘❘❘❘❘❘❘❘❘❘❘❘❘❘❘❘❘❘❘❘❘❘❘
❘❘❘❘❘❘❘❘❘❘❘❘❘❘❘❘❘❘❘❘❘❘❘❘❘❘❘❘❘❘❘❘❘❘❘❘❘❘❘❘❘❘❘❘❘❘❘❘❘❘
❘❘❘❘❘❘❘❘❘❘❘❘❘❘❘❘❘❘❘❘❘❘❘❘❘❘❘❘❘❘❘❘❘❘❘❘❘❘❘❘❘❘❘❘❘❘❘❘❘❘
❘❘❘❘❘❘❘❘❘❘❘❘❘❘❘❘❘❘❘❘❘❘❘❘❘❘❘❘❘❘❘❘❘❘❘❘❘❘❘❘❘❘❘❘❘❘❘❘❘❘
❘❘❘❘❘❘❘❘❘❘❘❘❘❘❘❘❘❘❘❘❘❘❘❘❘❘❘❘❘❘❘❘❘❘❘❘❘❘❘❘❘❘❘❘❘❘❘❘❘❘
❘❘❘❘❘❘❘❘❘❘❘❘❘❘❘❘❘❘❘❘❘❘❘❘❘❘❘❘❘❘❘❘❘❘❘❘❘❘❘❘❘❘❘❘❘❘❘❘❘❘
● Set the double feed detection function to OFF (P.6).
● Center small documents in the feeder.
When scanning documents with a width of 130mm or less, turn double feed
detection OFF.
● Set the double feed detection function to OFF (P.6).
Double feed detection by document length can be set using the driver or
application software.
Papers of uniform size but varying thickness?
For example, a document with an extra page or pages attached.
❘❘❘❘❘❘❘❘❘❘❘❘❘❘❘❘❘❘❘❘❘❘❘❘❘❘❘❘❘❘❘❘❘❘❘❘❘❘❘❘❘❘❘❘❘❘❘❘❘❘
❘❘❘❘❘❘❘❘❘❘❘❘❘❘❘❘❘❘❘❘❘❘❘❘❘❘❘❘❘❘❘❘❘❘❘❘❘❘❘❘❘❘❘❘❘❘❘❘❘❘
❘❘❘❘❘❘❘❘❘❘❘❘❘❘❘❘❘❘❘❘❘❘❘❘❘❘❘❘❘❘❘❘❘❘❘❘❘❘❘❘❘❘❘❘❘❘❘❘❘❘
❘❘❘❘❘❘❘❘❘❘❘❘❘❘❘❘❘❘❘❘❘❘❘❘❘❘❘❘❘❘❘❘❘❘❘❘❘❘❘❘❘❘❘❘❘❘❘❘❘❘
❘❘❘❘❘❘❘❘❘❘❘❘❘❘❘❘❘❘❘❘❘❘❘❘❘❘❘❘❘❘❘❘❘❘❘❘❘❘❘❘❘❘❘❘❘❘❘❘❘❘
❘❘❘❘❘❘❘❘❘❘❘❘❘❘❘❘❘❘❘❘❘❘❘❘❘❘❘❘❘❘❘❘❘❘❘❘❘❘❘❘❘❘❘❘❘❘❘❘❘❘
❘❘❘❘❘❘❘❘❘❘❘❘❘❘❘❘❘❘❘❘❘❘❘❘❘❘❘❘❘❘❘❘❘❘❘❘❘❘❘❘❘❘❘❘❘❘❘❘❘❘
❘❘❘❘❘❘❘❘❘❘❘❘❘❘❘❘❘❘❘❘❘❘❘❘❘❘❘❘❘❘❘❘❘❘❘❘❘❘❘❘❘❘❘❘❘❘❘❘❘❘
❘❘❘❘❘❘❘❘❘❘❘❘❘❘❘❘❘❘❘❘❘❘❘❘❘❘❘❘❘❘❘❘❘❘❘❘❘❘❘❘❘❘❘❘❘❘❘❘❘❘
❘❘❘❘❘❘❘❘❘❘❘❘❘❘❘❘❘❘❘❘❘❘❘❘❘❘❘❘❘❘❘❘❘❘❘❘❘❘❘❘❘❘❘❘❘❘❘❘❘❘
❘❘❘❘❘❘❘❘❘❘❘❘❘❘❘❘❘❘❘❘❘❘❘❘❘❘❘❘❘❘❘❘❘❘❘❘❘❘❘❘❘❘❘❘❘❘❘❘❘❘
❘❘❘❘❘❘❘❘❘❘❘❘❘❘❘❘❘❘❘❘❘❘❘❘❘❘❘❘❘❘❘❘❘❘❘❘❘❘❘❘❘❘❘❘❘❘❘❘❘❘
❘❘❘❘❘❘❘❘❘❘❘❘❘❘❘❘❘❘❘❘❘❘❘❘❘❘❘❘❘❘❘❘❘❘❘❘❘❘❘❘❘❘❘❘❘❘❘❘❘❘
❘❘❘❘❘❘❘❘❘❘❘❘❘❘❘❘❘❘❘❘❘❘❘❘❘❘❘❘❘❘❘❘❘❘❘❘❘❘❘❘❘❘❘❘❘❘❘❘❘❘
❘❘❘❘❘❘❘❘❘❘❘❘❘❘❘❘❘❘❘❘❘❘❘❘❘❘❘❘❘❘❘❘❘❘❘❘❘❘❘❘❘❘❘❘❘❘❘❘❘❘
❘❘❘❘❘❘❘❘❘❘❘❘❘❘❘❘❘❘❘❘❘❘❘❘❘❘❘❘❘❘❘❘❘❘❘❘❘❘❘❘❘❘❘❘❘❘❘❘❘❘
❘❘❘❘❘❘❘❘❘❘❘❘❘❘❘❘❘❘❘❘❘❘❘❘❘❘❘❘❘❘❘❘❘❘❘❘❘❘❘❘❘❘❘❘❘❘❘❘❘❘
❘❘❘❘❘❘❘❘❘❘❘❘❘❘❘❘❘❘❘❘❘❘❘❘❘❘❘❘❘❘❘❘❘❘❘❘❘❘❘❘❘❘❘❘❘❘❘❘❘❘
❘❘❘❘❘❘❘❘❘❘❘❘❘❘❘❘❘❘❘❘❘❘❘❘❘❘❘❘❘❘❘❘❘❘❘❘❘❘❘❘❘❘❘❘❘❘❘❘❘❘
❘❘❘❘❘❘❘❘❘❘❘❘❘❘❘❘❘❘❘❘❘❘❘❘❘❘❘❘❘❘❘❘❘❘❘❘❘❘❘❘❘❘❘❘❘❘❘❘❘❘
❘❘❘❘❘❘❘❘❘❘❘❘❘❘❘❘❘❘❘❘❘❘❘❘❘❘❘❘❘❘❘❘❘❘❘❘❘❘❘❘❘❘❘❘❘❘❘❘❘❘
❘❘❘❘❘❘❘❘❘❘❘❘❘❘❘❘❘❘❘❘❘❘❘❘❘❘❘❘❘❘❘❘❘❘❘❘❘❘❘❘❘❘❘❘❘❘❘❘❘❘
● Switch to Manual mode (P.3) if automatic feeding is not
working properly.
Very thin or very thick paper types?
❘❘❘❘❘❘❘❘❘❘❘❘❘❘❘❘❘❘❘❘❘❘❘❘❘❘❘❘❘❘❘❘❘❘❘❘❘❘❘❘❘❘❘❘❘❘❘❘❘❘
❘❘❘❘❘❘❘❘❘❘❘❘❘❘❘❘❘❘❘❘❘❘❘❘❘❘❘❘❘❘❘❘❘❘❘❘❘❘❘❘❘❘❘❘❘❘❘❘❘❘
❘❘❘❘❘❘❘❘❘❘❘❘❘❘❘❘❘❘❘❘❘❘❘❘❘❘❘❘❘❘❘❘❘❘❘❘❘❘❘❘❘❘❘❘❘❘❘❘❘❘
❘❘❘❘❘❘❘❘❘❘❘❘❘❘❘❘❘❘❘❘❘❘❘❘❘❘❘❘❘❘❘❘❘❘❘❘❘❘❘❘❘❘❘❘❘❘❘❘❘❘
❘❘❘❘❘❘❘❘❘❘❘❘❘❘❘❘❘❘❘❘❘❘❘❘❘❘❘❘❘❘❘❘❘❘❘❘❘❘❘❘❘❘❘❘❘❘❘❘❘❘
❘❘❘❘❘❘❘❘❘❘❘❘❘❘❘❘❘❘❘❘❘❘❘❘❘❘❘❘❘❘❘❘❘❘❘❘❘❘❘❘❘❘❘❘❘❘❘❘❘❘
❘❘❘❘❘❘❘❘❘❘❘❘❘❘❘❘❘❘❘❘❘❘❘❘❘❘❘❘❘❘❘❘❘❘❘❘❘❘❘❘❘❘❘❘❘❘❘❘❘❘
❘❘❘❘❘❘❘❘❘❘❘❘❘❘❘❘❘❘❘❘❘❘❘❘❘❘❘❘❘❘❘❘❘❘❘❘❘❘❘❘❘❘❘❘❘❘❘❘❘❘
❘❘❘❘❘❘❘❘❘❘❘❘❘❘❘❘❘❘❘❘❘❘❘❘❘❘❘❘❘❘❘❘❘❘❘❘❘❘❘❘❘❘❘❘❘❘❘❘❘❘
❘❘❘❘❘❘❘❘❘❘❘❘❘❘❘❘❘❘❘❘❘❘❘❘❘❘❘❘❘❘❘❘❘❘❘❘❘❘❘❘❘❘❘❘❘❘❘❘❘❘
● Set the fixed thickness mode to ON.
Papers with an uneven top edge?
❘❘❘❘❘❘❘❘❘❘❘❘❘❘❘❘❘❘❘❘❘❘❘❘❘❘❘❘❘❘❘❘❘❘❘❘❘❘❘❘❘❘❘❘❘❘❘❘❘❘
❘❘❘❘❘❘❘❘❘❘❘❘❘❘❘❘❘❘❘❘❘❘❘❘❘❘❘❘❘❘❘❘❘❘❘❘❘❘❘❘❘❘❘❘❘❘❘❘❘❘
❘❘❘❘❘❘❘❘❘❘❘❘❘❘❘❘❘❘❘❘❘❘❘❘❘❘❘❘❘❘❘❘❘❘❘❘❘❘❘❘❘❘❘❘❘❘❘❘❘❘
❘❘❘❘❘❘❘❘❘❘❘❘❘❘❘❘❘❘❘❘❘❘❘❘❘❘❘❘❘❘❘❘❘❘❘❘❘❘❘❘❘❘❘❘❘❘❘❘❘❘
❘❘❘❘❘❘❘❘❘❘❘❘❘❘❘❘❘❘❘❘❘❘❘❘❘❘❘❘❘❘❘❘❘❘❘❘❘❘❘❘❘❘❘❘❘❘❘❘❘❘
❘❘❘❘❘❘❘❘❘❘❘❘❘❘❘❘❘❘❘❘❘❘❘❘❘❘❘❘❘❘❘❘❘❘❘❘❘❘❘❘❘❘❘❘❘❘❘❘❘❘
❘❘❘❘❘❘❘❘❘❘❘❘❘❘❘❘❘❘❘❘❘❘❘❘❘❘❘❘❘❘❘❘❘❘❘❘❘❘❘❘❘❘❘❘❘❘❘❘❘❘
❘❘❘❘❘❘❘❘❘❘❘❘❘❘❘❘❘❘❘❘❘❘❘❘❘❘❘❘❘❘❘❘❘❘❘❘❘❘❘❘❘❘❘❘❘❘❘❘❘❘
❘❘❘❘❘❘❘❘❘❘❘❘❘❘❘❘❘❘❘❘❘❘❘❘❘❘❘❘❘❘❘❘❘❘❘❘❘❘❘❘❘❘❘❘❘❘❘❘❘❘
❘❘❘❘❘❘❘❘❘❘❘❘❘❘❘❘❘❘❘❘❘❘❘❘❘❘❘❘❘❘❘❘❘❘❘❘❘❘❘❘❘❘❘❘❘❘❘❘❘❘
❘❘❘❘❘❘❘❘❘❘❘❘❘❘❘❘❘❘❘❘❘❘❘❘❘❘❘❘❘❘❘❘❘❘❘❘❘❘❘❘❘❘❘❘❘❘❘❘❘❘
● Adjust the paper feed adjustment lever (P.2) to either
position II or III.
Difficult-to-feed paper types?
■ DOCUMENT TYPES TO AVOID
1
Wrinkled or
creased paper
Paper with clips
or staples
Onion skin or
other thin paper
Curled paper
Carbon-backed paper
Paper with binding
holes
Torn paper
Coated paper or fax
recording paper
More detailed information on acceptable
document types can be found in Section 3.1 of
the DR-5020/5080C Instructions manual
(“About Documents”).
1
SCANNING BASICS
The purpose of this Quick Reference is to provide a
concise overview of the DR-5020/5080C. It is designed
to supplement – not replace – the Instructions manual
included with the scanner. Please review the DR5020/5080C Instructions manual for key information
on safety precautions, installation procedures, and
maintenance guidelines.
▲
GETTING STARTED
▲
STEP
1
This section explains the basic steps involved in scanning a
document. It assumes that the stack to be scanned contains papers
all of the same size and thickness. When working with the DR5020/5080C, you should always make sure that the scanner has been
turned ON before turning the computer ON.
To prepare the DR-5020/5080C for document scanning, first pull out
the document tray extension from the scanner’s lower section and
the document eject tray from the scanner’s upper unit. A paper
feed adjustment lever is located underneath the scanner’s upper
unit; when working with standard paper, this lever should be set to the
left position (I).
Document eject tray
Document tray extension
Paper feed adjustment lever
2
▲
1
SCANNING BASICS
STEP
2
The scanner is equipped with four different feed modes to match
different types of document scanning jobs.
■ Remote mode (default):
Use this mode when you wish to scan only one document stack.
■ Semi-Auto:
Use this mode when you wish to continuously scan separate, differently-sized
stacks of documents.
■ Auto:
Use this mode to scan multiple stacks of papers all of the same size.
■ Manual:
This mode is most suited for documents which cannot be smoothly fed into the
scanner; when using this mode, documents are fed into the scanner one page
at a time.
To set the feed mode, press the Feeding Option key on the scanner’s
operation panel until the desired mode is indicated. If none of the
indicator lights are on, this means that the scanner is in Remote mode.
Feeding Option key
▲
STEP
3
Use the operation panel (or application software) to make the
following settings as needed. The Text/Picture modes enables you
to set the scanner mode to match your document type, and the
Simplex/Duplex key sets the unit to scan either one side or both
sides of the document. Brightness can be manually adjusted in 13
steps or set to adjust automatically (A).
Text/Picture
Simplex/Duplex
Brightness keys
3
SCANNING BASICS
1
REMOTE • SEMI-AUTO • MANUAL
▲
4
If you are scanning a stack of documents with the DR-5020/5080C
set to Remote or Semi-Auto, first prepare the papers so that the
stack’s edges are even. Then load the stack onto the document tray
with the documents face up, their top edge inserted first into the
scanner. (If you are using Manual mode, set the single sheet onto the
document tray in the same manner.)
▲
5
Set the paper guides on the document tray to match the width of the
documents to be scanned.
▲
6
Use the application software to instruct the scanner to start scanning.
(If you are using Semi-Auto mode, at this point you will have to take
the extra step of pressing the Start button to begin.)
STEP
STEP
STEP
Semi-Auto mode, Manual mode: To scan more pages, reload the document tray and
press the Start button. To end scanning, press the Stop key.
4
1
SCANNING BASICS
WHEN USING AUTO MODE
▲
4
Place one page of the stack on the document tray, and set the paper
guides to match the width of the document.
▲
5
Use the application software to instruct the scanner to start scanning.
At this point, the Start key on the operation panel will change colors
from red to green. This means that the scanner is ready to accept
your document.
▲
6
Prepare the stack of papers so that the stack’s edges are even. Then
load the stack onto the document tray with the documents face up,
their top edge inserted first into the scanner. A sensor located on the
document tray will detect the documents and start scanning.
STEP
STEP
STEP
To scan more pages, reload the document tray and the scanner will start scanning
automatically. To end scanning, press the Stop key.
5
▲
2
U S E F U L F E AT U R E S
FUNCTION KEYS
Positioned at the top of the scanner’s operation panel, the four
Function Keys allow various settings to be registered (via the
application software) for one-touch recall. Default settings for the four
keys are: 1) manual thickness adjustment; 2) Imprinter ON/OFF
(when this option is installed); 3) fixed thickness mode ON/OFF; and
4) double feed detection ON/OFF.
Function Key 1
Function Key 2
Function Key 3
Function Key 4
▲
Especially useful when scanning very thick or very thin papers, this
function enables users to manually specify paper thickness so that
documents may be fed smoothly into the scanner.
▲
This mode disables the scanner’s automatic paper thickness
detection function; in doing so, it instructs the scanner to use the
paper thickness value established through manual thickness
adjustment (above).
▲
This function memorizes the length and thickness of the first page in
the stack, and compares these values to every other page in the
stack. An error message is displayed when a double feed
(simultaneous feeding of two or more pages) occurs. This function
should be OFF when feeding stacks of various paper types and sizes.
MANUAL
THICKNESS
ADJUSTMENT
FIXED THICKNESS
MODE
DOUBLE FEED
DETECTION
For further details on these features, please refer to section 3.3 of the DR-5020/5080C
Instructions manual (“Setting Scan Conditions”).
6
▲
Function Sheets are a convenient way of changing scan settings.
Place it in the stack where you wish the change in scan mode to take
effect; the scanner will then “read” the instructions printed on the
Function Sheet and configure itself accordingly. Five types of
Function Sheets are provided, each with a different setting: Duplex
mode, Simplex mode, Photo mode, Text mode, and Job Separation
(to automatically divide a stack into separate image data files).
▲
2
U S E F U L F E AT U R E S
By using the Count Only mode, you can find out how many pages are
in your document stack without having to scan the material. The easy
two-step procedure begins by pressing the Count Only key on the
operation panel (to set the mode), and then simply loading the
documents. When counting ends, the number of pages in the stack is
indicated in the counter display.
FUNCTION
SHEETS
COUNT-ONLY
MODE
Count Only key
7
U S E F U L F E AT U R E S
▲
ADDITIONAL
FUNCTIONS
2
A collection of other available features makes the DR-5020/5080C
useful for an even wider range of document scanning needs. Many of
these features can be set using the application software provided with
the scanner.
■ Automatic paper size detection
This function enables the scanner to detect the size of your document.
■ Image processing filters
The image data produced by the document scanner can be polished in a
number of ways by the application software. The various parameters
include edge emphasis, erase black dot, erase white dot, erase notch,
complement thin line, user gamma, and negative image.
■ Color or grayscale output (DR-5080C only)
In addition to binary (black-and-white) images, the DR-5080C is designed
to produce grayscale and color images. Grayscale output comes in 4, 16,
or 256 gradations, and color processing covers 3-, 6-, 12-, or 24-bit
scanning.
■ Dropout color settings (DR-5080C only)
A standard feature with the DR-5080C, this function produces scans with
a specific color eliminated from the image data. (Red color dropout is
possible with the DR-5020 by changing the LED unit.)
■ Imprinter (option)
The Imprinter option prints serial numbers and user-designated
messages on the front of each scanned document.
■ Endorser (option)
The Endorser option prints dates and other information on the back of
checks and other types of documents (up to A4/LTR-size).
■ Barcode Decoder (option)
Convenient for record keeping tasks, this feature reads the barcode on
scanned documents and generates an indexed list from these codes.
Users can then refer to this list to retrieve individual image files.
8
3
TROUBLESHOOTING
CLEARING PAPER JAMS
Paper may be jammed if scanning stops midway or “PXX” appears on
the counter display. Please follow the procedure below to clear the
paper jam; when finished, confirm the final scanned document on the
PC monitor before continuing to scan.
▲
1
Remove documents from the scanner’s upper and lower trays, and
remove any extra parts attached to the upper (eject) tray. Close the
document eject tray guide if it is open.
▲
2
Press the open/close button to open the upper unit. If it appears that
paper is jammed inside the scanner,* raise the upper unit until it stops
and holds position.
▲
3
Remove the jammed paper from inside the scanner or from the exit
section.
▲
4
Close the upper unit by pushing it up as far as it allows, and then letting
go. The unit will begin to descend slowly. Do not push the unit down
during its descent. When the upper unit has fallen as far as it can go,
press down firmly on both sides until you hear it click into place.
STEP
STEP
STEP
STEP
* If a document is jammed in the scanner’s exit section, the upper unit only needs to be
lifted up slightly for jammed paper to be removed. To close the upper unit, simply press
down firmly on both sides until it clicks into place.
9
TROUBLESHOOTING
3
ERROR CODES
Error codes appear on the operation panel’s counter display when a
scanner malfunction occurs.
Error Code
Cause and Solution
d01, d02, d03
Two or more document pages were scanned.
Press the Stop key to reset the counter display. Check the
document with the scanned image, and scan the document again.
• Feeding a stack of mixed size or thickness with double feed
detection ON will cause this error message to appear, regardless
of whether a double feed has actually occurred. Set double feed
detection OFF when working with these types of stacks.
P00, P01, P02, P03,
P04, P06, P08, P10,
P20
Scanned paper jam.
P80
Paper feed error.
Remove the jammed paper and scan the document again.
• If this error continues to occur, use the fixed thickness mode or
the paper feed adjustment lever to establish the appropriate
setting.
Open and close the upper unit.
• If this error continues to occur, use the fixed thickness mode or
the paper feed adjustment lever to establish the appropriate
setting.
J18
Skew error occurs even though paper is not being fed at
an angle.
The scanner erroneously judges that a skew is occurring. Remove
the jammed paper and scan the document again.
• This error occurs when the area 5 mm (0.2 in.) from the top edge
of the original contains text or pictures, when the original has a
dark background, or when the edges of the original are damaged.
If this error occurs, turn skew detection OFF and scan the
document again. Or, make a copy of the document on different
paper, provide a wider margin around the document (or lighten the
background), and scan the document again.
A complete list of error codes and solutions to other types of
scanner trouble can be found in Chapter 4 of the Instructions
manual (“Troubleshooting”).
10
CANON Customer Service Centers
PUB.CE-CE-957
0500AB3
© CANON ELECTRONICS INC. 2000
PRINTED IN JAPAN