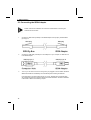
1
Copyright
®
®
MS DOS is a registered trademark of the Microsoft Corporation; MS Windows is a
®
registered trademark of the Microsoft Corporation; MS Windows NT is a registered
®
trademark of the Microsoft Corporation; MS Windows 95 is a registered trademark
®
of the Microsoft Corporation; MS Windows 98 is a registered trademark of the
®
Microsoft Corporation; MS Remote Access Service is a registered trademark of the
Microsoft Corporation; Netware is a registered trademark of the Novell Corporation.
Right of Ownership
No part of this software may be copied, changed, transferred in any shape or form,
into other languages without the express prior written consent of Siemens AG.
Note regarding the copyright
RVS-COM Lite is a software program developed by RVS Datentechnik GmbH and
protected by copyright. This program may only be used in accordance with the
regulations of the attached licence agreement.
You may not use, copy or transfer this documentation, in whole or part, except as
expressly provided for in the licence agreement. Violations to this agreement will
lead to civil action and prosecution.
RVS, RVS-COM and Softmodem are registered trademarks of RVS Datentechnik
GmbH in Germany and/or other countries. Microsoft, Windows, Windows NT,
Outlook, NetMeeting, the Windows logo and the Internet Explorer logo are
registered trademarks or trademarks of the Microsoft Corporation in the US and/or
other countries. All other products mentioned are registered trademarks or
trademarks of their respective holders.
RVS-COM Lite
Copyright © 1988-1999 by RVS Datentechnik GmbH, Munich
RVS Datentechnik GmbH
Hainbuchenstrasse 2
D-80935 Munich / Germany
Phone:
Fax:
Internet (WWW):
E-Mail (Vertrieb):
Mailbox (Modem):
Mailbox (ISDN X.75 T.70NL):
Mailbox (ISDN Eurofiletransfer):
+49 (89) 3 54 98 - 0
+49 (89) 3 54 98 - 499
http://www.rvs.com
[email protected]
+49 (89) 3 51 62 94
+49 (89) 35 71 60 55
+49 (89) 35 71 60 56
Please direct your support queries for RVS-COM Lite solely to the manufacturer of
the communications device with which RVS-COM Lite was shipped.
RVS Datentechnik cannot answer any support or hotline calls for RVS-COM Lite.
Note regarding the manual
The software and manual are made with the greatest possible care. Siemens AG
accepts no liability for errors that may be contained in the manual or may result from
using the manual.
Siemens AG reserves the right to make alternations to this manual without prior
notice.
Siemens AG accepts no responsibility for loss or damages caused as a result of
use of the software.
Contens
Contents
Safety Instructions
Instructions regarding the location of the device
Approval
1
1
2
1. About This Documentation
3
1.1 Introduction
1.2 Where to find information in this documentation
1.3 Typographic Conventions
3
3
4
2. Introduction
5
2.1 Preface
2.2 Product Description
2.3 Deliverables
2.4 Instructions for care
2.5 Giving I-SURF USB away or getting rid of it
2.6 Warranty
2.7 Siemens Service
2.8 Internet-Support
5
5
6
6
6
7
7
8
3. Basics of ISDN
9
3.1 What is ISDN ?
3.2 What Does ISDN Have to Offer?
3.3 ISDN Access
3.4 Features
3.5 PABX or Multiple Device Access?
3.6 Access Type: PABX
3.7 Access Type: Multiple Device
9
9
10
10
10
10
10
4. Drivers and Applications
11
4.1 Overview
4.2 NDIS WAN Miniport
4.3 CAPI
11
11
12
5. USB Installation
15
5.1 Installation Requirements
5.2 USB Hardware Interface
5.3 Connecting the ISDN Adapter
6. Installation and Configuration under Windows 98
6.1 Automatic Installation
6.2 Uninstalling
6.3 Uninstalling Version 1.0
6.4 Device Driver Update
7. Installation and Configuration under Windows 2000
7.1 Automatic Installation
7.2 Deactivation (Hot Plug) and Configuration
7.3 Uninstalling
15
15
16
17
17
22
22
22
23
23
30
33
I
Contens
8. I-Surf USB Utilities
8.1 ISDN Configuration Wizard
8.2 CAPI Monitor
8.3 Loopback Test Program
8.3.1 Prerequisites of the Test
8.3.2 Testing Criteria and Testing Procedure
8.3.3 Test Execution and Test Result
9. RVS COM Lite
9.1 Welcome to RVS-COM Lite
9.2 Operating Requirements
9.3 Setup
9.4 Registration
9.5 Tips
9.6 Other Applications
10. Internet access
10.1 Microsoft Dial-Up Network
10.2 Regular ISP With Multilink PPP
10.3 Online Services
11. Troubleshooting
11.1 Hardware Installation
11.2 Device Driver Installation/Operating System
11.3 Dial-Up Network
11.4 CAPI Applications
11.5 Check Liste
Appendix
A1: Technical Specifications
A2: CAPI 2.0 Error Messages
A3: ISDN S0 Interface Pin Assignment
A4: Terminal Resistor for ISDN S0 Interface
A5: USB Interface Pin Assignment
II
35
36
37
39
39
39
40
43
43
43
44
44
44
44
45
45
48
51
53
53
53
54
54
55
61
61
62
63
63
64
Safety Instructions
Safety Instructions
Please read the installation instructions carefully, before you connect and
initially start up the I-SURF USB box.
The I-SURF USB box may be given to a third person only if accompanied
by the installation instructions as well.
The I-SURF USB box is a complex electronic unit that may be repaired only
be authorised, qualified personnel. DO NOT try to open or repair the USB
box yourself.
Please be careful not to pull out the data cable or to plug it in during a
thunderstorm.
The I-SURF USB box can be used only with an S0 basic rate interface.
Small children and babies are in danger of choking or suffocating if they put
small objects in their mouths. In the case of the I-SURF-USB, the clip
binding the cable could pose such a danger. Please keep this out of reach
of children.
Instructions regarding the location of the device
The device is designed for operation in a sheltered space and within a
temperature range of +5 °C to +40 °C.
Normally the device leaves no traces on the surfaces on which it is placed;
however, in view of the great variety of materials, lacquers and polishes
used for furniture these days, it is not impossible that this could happen in
the course of time. Place the device on a level, non-slip surface.
Make sure that the I-SURF USB box is not subjected to direct sunlight or
other heat sources. The electronic components and/or the housing may be
damaged as a result.
Do not place the device in a damp place such as a bathroom.
The mains plug of the NTBA is to be plugged in.
1
Approval
Approval
Federal Communication Commission approval from the Federal Office for
Telecommunication Approvals has been granted for this ISDN product. It can be
connected to, and operated from, any ISDN multi-device connection or PBX. It has
been approved in accordance with the EU guideline 91/263/EWG for
Telecommunication Terminal Equipment.
This equipment complies with the requirements of the EU
guidelines and the national supplements applicable in Germany.
The CE label confirms that the equipment complies with the above mentioned
guidelines.
2
1. About This Documentation
1. About This Documentation
1.1 Introduction
This documentation describes the installation and operation of the Siemens ISDN
Adapter and contains a lot of other interesting information on ISDN and on using
your ISDN Adapter in conjunction with application programs.
If the information in the README.TXT file on the installations diskettes (or CD)
differs from the content of this documentation, please follow the instructions in
README.TXT.
1.2 Where to find information in this documentation
Read the following chapters to get further information on the following topics:
Basics of ISDN
Chapter 2-4
Hardware installation
Chapter 5
Software installation
Chapter 6-8
Application software installation
Chapter 9-10
Installation problems
Chapter 11
3
1. About This Documentation
1.3 Typographic Conventions
The following tables explain symbols and typographic conventions used in this
documentation.
Symbol
4
Type of notice
Description
Information
Important functions and notes
Warning
Information about hazards to
important components
Konvention
Description
Screen view
Used to distinguish text shown on the
screen or entered by the user.
Boldface type
Used for emphasis.
2. Introduction
2. Introduction
2.1 Preface
Congratulations!
Thank you for purchasing a Siemens ISDN Adapter. For many decades now,
Siemens has been one of the leading manufacturers and developers in data
communications in Europe. Siemens’ advanced technology as implemented in your
new ISDN Adapter opens up new horizons in data communications. As an innovator
in the data communications field, Siemens has been supplying the market with
cutting-edge technology at reasonable prices for a long time. Additional information
about Siemens is available on Siemens’ web site at:
http://www.siemens.de
2.2 Product Description
The ISDN Adapter gives you access to the ISDN network via your PC. It uses a S0 –
interface that connected to your ISDN basic access through the enclosed cable.
The Siemens ISDN Adapter offers the following functions:
ISDN and analog data communications via:
Microsoft’s Dial-Up Network (WAN Miniport)
CAPI 2.0
ISDN application package RVS-COM Lite with fax, voicemail, phone,
modem and file transfer functions
In addition, you can of course utilize your ISDN Adapter with other suitable
application programs..
5
2. Introduction
2.3 Deliverables
The following components are supplied with your I-SURF USB:
1 I-SURF USB box
1 ISDN S0 connection cable with RJ45/IAE plugs (not illustrated)
1 USB cable for connecting to the PC
1 CD ROM with drivers for Windows 98 and Windows 2000, RVS-COM Lite
and online documentation (not illustrated)
1 set of operating instructions (not illustrated)
USB box
USB cable
2.4 Instructions for care
Wipe the device with a damp cloth or with an antistatic cloth. Do not use cleaning
agents.
Do not use a dry cloth, because then you run the risk of destroying the
electronics by producing static.
2.5 Giving I-SURF USB away or getting rid of it
Your I-SURF USB should be given away only with the operating instructions. After
you have finished with it, please get rid of the device in accordance with the laws on
conservation of the environment.
6
2. Introduction
2.6 Warranty
Siemens AG offers a warranty on this device for a period of 12 months from the
date of purchase from the dealer. Your purchase receipt serves as proof of date of
purchase, so keep it in a safe place.
Siemens AG will repair any manufacturing or material defects that arise during the
period of guarantee. Siemens AG will decide whether it will fulfil the warranty by
repairing, replacing or exchanging the defective device.
The guarantee does not cover damages due to tampering, wear and tear or
intervention by a third party. The guarantee does not cover expendable materials,
nor does it cover those defects which do not significantly affect the value of the
usability of the device.
The Siemens product that you have bought corresponds to the technical
requirements for plugging into the German public telephone network.
You can make warranty claims at the Siemens Service.
2.7 Siemens Service
If you have any questions about your device malfunctioning, contact our Hotline
team on these numbers:
National
International
Germany:
01805 333 220
+49 / 1805 333 220
Austria:
0 1 1707 5004
+43 / 1 1707 5004
Switzerland:
0 1 495 4487
+41 / 1 495 4487
Please have the following information ready when you call:
Exact description of the problem
Description and version of your I-SURF USB
Information about your PC configuration:
The easiest way to get this information is to call up the Device Manager
with Start −> Settings −> Control Panel −> System and then print out the
Combined Device and System Overview with the Print key.
The Hotline can best help you if you are sitting beside your PC with the problematic
situation on the screen when you call.
7
2. Introduction
2.8 Internet-Support
Up-to-date information, device drivers, and tips related to PC communications
products are available on the Internet.
Establish an Internet connection as described in Chapter 10, „ Internet Access.“
Start your browser and point it to the following URL:
http://www.siemens.de/pc-communication-support
8
3. Basics of ISDN
3. Basics of ISDN
3.1 What is ISDN ?
ISDN is an abbreviation for Integrated Services Digital Network, a modern
communications network. ISDN lets you enjoy all the many facets of electronic
communications. You can surf the Internet, balance your accounts using home
banking services, or remotely connect to your company's computer network.
3.2 What Does ISDN Have to Offer?
The ISDN telecommunications network offers subscribers digital payload channels
(B channels) with a maximum transfer speed of 64 kbps. The most important
improvement of ISDN over conventional analog public communications networks is
that ISDN supports a variety of different types of telecommunications services.
ISDN connections are not limited to data, as is the case with some other network
types, but are equally suitable for carrying speech, text, or images.
This constitutes a tremendous economic advantage, since the same lines can be
used for speech, fax, or data communications as needed. Standard ISDN access to
Euro features 2 B channels and 1 D channel (for service and control purposes).
ISDN is unrivaled when it comes to dial-up connections:
Connections are established quickly (in approx. 1.8 seconds)
No handshaking process, unlike standard analog modems
Optimized use of resources
High transfer rate of 64 kbps per B channel
In addition to the B payload channels ISDN features a parallel service channel
called D channel. This channel is used to carry information on establishing and
terminating connections as well as data relevant to in-call control.
The subscriber line that the ISDN user is provided with is called basic access. Each
basic access offers two B channels with a bandwidth of 64 kbps each and a D
channel with a bandwidth 16 kbps.
B channels can either be used separately or combined for greater data transmission
bandwidth. The present ISDN terminal adapter thus offers its users flexible
bandwidth , provided that this channel combination feature (trunking) is supported
by the software used.
9
3. Basics of ISDN
3.3 ISDN Access
Converting a standard analog phone line to ISDN has become very simple these
days. The existing phone line can simply be changed over to ISDN at a specified
point in time. Since ISDN uses existing telephone cables, the telephone company
does not need to run any new lines to your house or office.
At the end of the phone line you need an NTBA (network terminator/bus adapter) to
convert the two-wire signals for the four-wire ISDN S0 bus.
3.4 Features
ISDN offers a great variety of features, especially for voice communications. The
basic functions, however – establishing and terminating connections – are usually
quite sufficient for data communications. Consult your ISDN service provider for
available features.
3.5 PABX or Multiple Device Access?
Depending on how you wish to use ISDN, there are two types of ISDN basic access
PABX access
Multiple device access
3.6 Access Type: PABX
PABX access always requires a PABX to be connected. All subsequent terminal
devices are connected to the PABX as extensions. PABX can also handle analog
terminal devices. You will receive a block of subscriber numbers with several direct
extension numbers, allowing individual terminal devices to be addressed (dialed)
directly.
To connect an ISDN terminal adapter to ISDN via PABX access, you need a PABX
with an internal S0 bus.
3.7 Access Type: Multiple Device
Up to 8 terminal devices can be connected to the S0 bus of each multiple device
access. Two of them can establish a connection at the same time, each using one B
channel.
You will be assigned several Multiple Subscriber Numbers (MSNs) for your multiple
device access. By assigning different MSNs to different devices on the S0 bus, you
can address these directly.
10
4. Drivers and Applications
4. Drivers and Applications
4.1 Overview
You can use your ISDN Adapter for a wide variety of applications. The most
important applications are:
Online services - Internet access via PPP (direct dial-up to an Internet
provider), AOL, CompuServe, and others.
Direct data interchange between two PCs.
Telecommunications services - e.g. fax (analog/G3 or digital/G4),
voicemail, Euro File Transfer.
BBS access using terminal emulator programs.
Since, historically, these applications evolved independently of each other, different
types of driver concepts are required for ISDN integration. NDIS WAN Miniport,
CAPI, and VCOMM are the most important of these drivers and are of course
supported by your ISDN Adapter. Each driver offers at least two basic functions:
Opening and closing a connection (D channel)
Transferring payload data (B channel).
4.2 NDIS WAN Miniport
The NDIS WAN Miniport driver was specified by Microsoft and is a part of Windows
95/98 and Windows NT. The connection is controlled by the RAS (Remote Access
Service, Dial-Up Network). Special drivers, namely Microsoft’s NDIS WAN Miniport
and ISDN Accelerator Pack constitute the connection to the ISDN Adapter. When
the RAS has established the connection, the ISDN Adapter is seen by Windows as
a network interface card similar to those used for local area networks (LANs). This
means that all programs that can exchange data over a LAN can use this pathway
for communicating via ISDN.
11
4. Drivers and Applications
The NDIS WAN Miniport driver is therefore optimally suited for the following
applications:
Internet access - The Dial-Up Network establishes an ISDN connection
with your Internet provider. The Web browser (Netscape, Internet
Explorer) or the E-mail client subsequently use this connection like a
TCP/IP LAN connection to the Internet.
Direct connection of two PCs - The Dial-Up Network establishes a
connection to a second PC via ISDN. Windows Explorer then creates a
Windows network connection between the PCs using the NetBEUI
protocol. Once this is done, each PC can access the other PC’s hard disk
just like a disk on a LAN server; data can be copied or moved, and
applications can be run.
Connection between a remote PC and a LAN - The Dial-Up Network
establishes a connection to a router or server connected to a LAN, e.g. a
company server. Subsequently, Windows Explorer establishes a Windows
network connection using the NetBEUI, TCP/IP, or IPX protocol. Once this
is done, each PC can access the other PC’s hard disk via ISDN as if it
were connected directly to the LAN. In this manner, it is possible to
duplicate your in-company working environment at your home office.
Thanks to the high speed of the ISDN connection, remote access is
convenient and fast.
The Siemens ISDN Adapter in conjunction with the NDIS WAN Miniport driver is
integrated into Windows as a network interface card during installation. To this end,
the system environment consisting of the ISDN Accelerator Pack, Dial-Up Network,
and LAN protocol (NetBEUI, TCP/IP, IPX) is examined and completed as needed.
Subsequently, the requisite internal connections to these components are
established.
The NDIS WAN Miniport hardware driver is also used by the other ISDN interfaces
(CAPI, VCOMM). It is entered as a network adapter in the Windows registry.
4.3 CAPI
The CAPI (Common Application Program Interface) was defined to be able to
develop ISDN applications independently of the proprietary characteristics of ISDN
adapters. One of the most remarkable CAPI features is platform independence. In
addition to Windows, the CAPI has been defined for Unix, OS/2, and other
operating systems. The older CAPI Version 1.1 should no longer be used; the
current CAPI version is 2.0.
12
4. Drivers and Applications
Some standard CAPI applications are:
Online services
Online services should be configured to use the CAPI wherever possible,
as this offers you the fastest and safest service access.
Fax (analog and digital)
ISDN application program suites usually use the CAPI for all services,
including analog (Group 3) and digital (Group 4) fax. Analog faxing
requires a softfax module, which is a component of the ISDN driver. This
driver should be used instead of any softfax module offered by the
application, since it uses the PC’s resources more economically.
Euro File Transfer
Euro File Transfer (EFT) was developed for the simple exchange of files
via ISDN. It replaces the X/Y/Zmodem protocols. You can call any EFT
server the way you call a BBS and upload or download files.
Voicemail
CAPI programs are able to preserve B channel data without any
modification. These data may include digital speech from a telephone call.
It is immaterial whether the call originates from within the analog phone
network or from an ISDN line. Voicemail programs play back
announcements to callers and record messages.
The CAPI interface is able to handle ISDN Adapter with different properties. If you
wish to use a specific application, you need to make sure that the ISDN Adapter
meets the application’s requirements. Some applications may need special B
channel protocols, hardware phone connections, or similar.
The technical specifications for your ISDN Adapter are found in the Appendix.
Only one CAPI can be installed at any time, because the
CAPI2032.DLL file must be located in a specific directory and each
directory can only contain one file by the same name. This means
that if you previously installed a CAPI device on your PC, you will
have to deinstall it first before you can install the CAPI of the new
ISDN adapter. If you fail to do so, the old files will be overwritten,
which may result in system crashes and misconfigurations in certain
cases.
Make sure to remove all previous CAPI installations before
installing this device.
13
4. Drivers and Applications
14
5. USB Installation
5. USB Installation
5.1 Installation Requirements
Your PC must meet the following requirements if you want to install the ISDN
Adapter:
IBM AT or -compatible
Pentium II with 200 MHz or better
Windows 98 min. Pentium 166 MHz,
Windows 2000 min. Pentium II 200 MHz.
RAM Memory: Windows 98 min. 32MB, Windows 2000 min. 64 MB
ca. 4 MB of hard disk space (for the drivers alone)
An unoccupied USB socket on your PC or on another device connected
up to the PC (e.g. to the keyboard or the monitor)
CD ROM drive and harddisk
If you are using a different operating system or your PC does not meet one of the
above requirements, please contact your dealer.
5.2 USB Hardware Interface
The USB (Universal Serial Bus) interface is a modern computer interface allowing
you to connect up to 127 different peripheral devices (such as printers, cameras,
speakers) to your computer.
The devices can be connected or disconnected while the system is up and running
(hot-pluggable devices). Low-power USB devices do not need their own power
supply.
Your ISDN Adapter is a low-power USB device requiring its own USB Port. If all the
USB ports of your computer are already in use, you need to use a USB hub to
increase the number of available USB ports.
15
5. USB Installation
5.3 Connecting the ISDN Adapter
Please note that the installation CD should be inserted before connecting the
hardware for the first time.
1.
Connect the ISDN cable (included) to the ISDN Adapter and a properly installed ISDN
(S0 bus) jack.
2.
Connect the USB cable (included) to a free USB port on your computer or USB hub and
to the ISDN Adapter.
3.
Turn on your PC now if it was not running when you plugged in the two cables. Windows
98/Windows 2000 will immediately and automatically start installing the software.
If the USB cable is connected while the PC is running, Windows 98 or Windows 2000
will automatically start the Hardware Wizard and initiate installation. Software installation
is discussed in detail in the following chapter.
16
6. Installation and Configuration under Windows 98
6. Installation and Configuration under Windows 98
6.1 Automatic Installation
Keep the Windows 98 installation CD handy, as it will be needed during
installation.
1.
If a device driver or application software are already installed for an ISDN
Adapter, this driver or software (such as RVS-COM) should be uninstalled as
per its manufacturer’s instructions in order to ensure proper installation of the
new software.
In case you have installed the Windows 98 device driver for Version 1.0 of I-Surf
USB, you must first uninstall this driver using the Uninstall program
(rem_drv_old.exe) in the installation menu of the new CD-ROM. Start this
program and then follow the screen prompts (see Chapter 6.3).
2.
After connecting the ISDN Adapter to a USB port, the hardware recognition
facility of Windows 98 will recognize the presence of a new hardware component
and start the Hardware Wizard.
Click 'Next' .
17
6. Installation and Configuration under Windows 98
3.
Accept the default setting to have the computer search for the device driver, and
click 'Next' .
4.
Enter the pathname of your CD-ROM drive as the location of the driver database.
Make sure the ISDN Adapter installation CD is inserted. Then click 'Next' .
18
6. Installation and Configuration under Windows 98
5.
Confirm the location of the driver by clicking 'Next' again.
The Hardware Wizard will now start updating the driver database, copying the
ISDN Adapter driver to your hard disk. This process will take a bit of time; watch
the progress indicator on your screen.
6.
The last installation step requires that the Windows 98 installations CD be
inserted. Wait for your CD-ROM drive to recognize the new CD. Enter or select the
correct source path, and click OK .
Die Windows 98 Komponenten für den WAN Miniport Treiber werden nun This will
install the Windows 98 components for the WAN Miniport device driver, concluding
the installation process.
19
6. Installation and Configuration under Windows 98
7.
Click 'Finish' to continue.
8.
The Computer has to be restarted for the new installation to take effect.
Click 'Yes' to confirm.
20
6. Installation and Configuration under Windows 98
After the system has been restarted, your ISDN Adapter is ready to use. The
installation program will have installed the following components on your system:
NDIS WAN Miniport Treiber
CAPI driver
ISDN Utilities program group
ISDN configuration wizard
CAPI tray (B channel usage indicator)
Loopback test program
Uninstall
Your PC’s Device Manager will show two new devices:
USB ISDN Adapter WAN-Miniport + Capi 2.0
USB ISDN Adapter
This is where you find the Device Manager:
My Computer / Control Panel / System / Device Manager
21
6. Installation and Configuration under Windows 98
6.2 Uninstalling
To remove the device driver software and the ISDN utilities from your computer, you
need to start the Uninstall program:
Program Files/I-Surf USB Utilities/Uninstall
You need to reboot your computer after uninstalling.
6.3 Uninstalling Version 1.0
If you have installed the Windows 98 device driver for Version 1.0 of I-Surf USB,
you must first uninstall this version. You may start the required Uninstall program
(rem_drv_old.exe) from the installation menu of the new CD-ROM.
The program will first check if Version 1.0 of I-Surf USB is present, and uninstall this
device driver if found. The PC is then rebooted, and installation of the current
version continues.
The Uninstall program rem_drv_old.exe can only be used for Version
1.0 of the I-Surf USB driver. Different drivers will be ignored.
6.4 Device Driver Update
The device driver is updated by uninstalling the current installation. Once the PC
has been rebooted, the ISDN Adapter hardware is again detected, and the device
driver installation process is activated.
22
7. Installation and Configuration under Windows 2000
7. Installation and Configuration under Windows 2000
7.1 Automatic Installation
1.
If a device driver or application software are already installed for an ISDN
Adapter, this driver or software (such as RVS-COM) should be uninstalled as
per its manufacturer’s instructions in order to ensure proper installation of the
new software.
If you want to update a Windows 98 installation that has ISDN software installed
to Windows 2000, you should first uninstall the ISDN drivers and/or ISDN
application software in Windows 98 as per their manufacturer’s instructions.
Windows 98 ISDN-Software will usually not work after the Windows 2000
update, but will interfere with the installation of the Windows 2000 ISDN
software.
If Windows 2000 is installed over an existing Windows 98 installation with I-Surf
USB, the hardware has to be reinstalled. The Hardware Wizard of the
System/Hardware applet of the Control Panel will show I-Surf USB to be
incorrectly installed. Install the device drivers (as if you were to install them for
the first time). Then uninstall RVS-COM by first closing the RVS-COM center
from the system tray icon, then selecting the System/Software applet from the
Control Panel. Select RVS-COM from the list and remove it, then restart the PC.
Finally, reinstall RVS-COM.
2.
After connecting the ISDN Adapter to a USB port, the hardware recognition
facility of Windows 2000 will recognize the presence of a new hardware
component and automatically start the Found New Hardware Wizard.
Click 'Next'.
23
7. Installation and Configuration under Windows 2000
3.
Accept the default setting to have the computer search for a suitable driver for
your device, and click 'Next'.
4.
Check CD-ROM drives as an optional search location for suitable drivers. Make
sure the ISDN Adapter installation CD is inserted in the CD-ROM drive. Then click
'Next'.
24
7. Installation and Configuration under Windows 2000
5.
Confirm the location found for the driver database by clicking 'Next' again.
The Hardware Wizard will now start updating the driver database, copying the
ISDN Adapter driver to your hard disk. This process will take a bit of time; watch
the progress indicator for the various installation steps on your screen.
6.
As the installation progresses, you will see a question concerning a digital
signature that was not found. Simply continue the installation by clicking Yes.
25
7. Installation and Configuration under Windows 2000
7.
Select the language and click ‘OK‘ .
8.
Once the software installation is completed, the installation of the I-Surf ISDN
Utilities (ISDN Tools) is started automatically. Click 'Next'.
26
7. Installation and Configuration under Windows 2000
9.
Enter or select a destination folder for the I-Surf ISDN Utilities (ISDN Tools).
Click 'Next'.
10.
Select an existing program folder where the I-Surf ISDN Utilities icons are to be
installed. To install the I-Surf ISDN Utilities icons in a new program folder, enter
the name for the new folder instead. Click Next.
27
7. Installation and Configuration under Windows 2000
11.
This concludes the installation of the I-Surf ISDN Utilities.
Click ‘Finish‘ .
The installation program will have installed the following components on your
system:
NDIS WAN Miniport driver
CAPI driver
I-Surf USB Utilities program folder
ISDN configuration wizard
CAPI tray (B channel usage indicator)
Loopback test program
Uninstall
28
7. Installation and Configuration under Windows 2000
Your PC’s Device Manager will show a new device:
NDIS 3.0 WAN-Miniport Driver for Windows
This is where you find the Device Manager:
My Computer / Control Panel / System / Device Manager
29
7. Installation and Configuration under Windows 2000
7.2 Deactivation (Hot Plug) and Configuration
nder Windows 2000, you may deactivate your ISDN Adapter without uninstalling
the device driver software. This allows you, for example, to use your ISDN Adapter
on a different computer temporarily.
1.
The system task bar contains the following icon:
Left-click this icon.
2.
The Unplug or Eject Hardware dialog box is displayed:
Select the I-Surf USB entry and click the 'Stop' button to deactivate your ISDN
Adapter.
30
7. Installation and Configuration under Windows 2000
3.
Click the Properties button to display the configuration parameters for your ISDN
Adapter:
Here you can select the D channel protocol required for your ISDN access.
31
7. Installation and Configuration under Windows 2000
4.
You can change the MSNs for your ISDN Adapter using the Configure button:
To add a MSN to the Multi-Subscriber Numbers list, enter it in the entry field in the
middle and click Add. To delete a MSN from the Multi-Subscriber Numbers list,
select it, and click Remove.
32
7. Installation and Configuration under Windows 2000
7.3 Uninstalling
Windows 2000 offers two ways for removing the device driver software and ISDN
utilities from your PC:
1.
Uninstalling using the Uninstall program:
Start the Uninstall program by double-clicking on the Uninstall icon in the I-Surf
USB Utilities folder.
2.
Alternatively, you may uninstall the software from the system task bar.
To do so, right-click the following icon:
Select Uninstall from the popup menu. You may uninstall the installed components
separately. Select the components you wish to uninstall, and click OK.
33
7. Installation and Configuration under Windows 2000
34
8. I-Surf USB Utilities
8. I-Surf USB Utilities
When you have installed your software and restarted your computer, you will find a
new icon for the I-Surf ISDN Utilities program folder on your Windows desktop.
(It is possible that this icon is covered by another window.) Open the program folder
by clicking/double-clicking it. It contains software components described separately
in the following sections.
35
8. I-Surf USB Utilities
8.1 ISDN Configuration Wizard
The ISDN Configuration Wizard lets you change the basic ISDN settings entered
during software installation:
ISDN D channel protocol
The ISDN D channel protocol does not usually have to be changed. It
is supplied by your telephone company and has to be configured
accordingly. For a European ISDN access this will almost always be
DSS1 (Euro ISDN). If you do not know which D channel protocol you
are using, please contact your telephone company.
MSNs for the two B channels
Each MSN is one of your ISDN multiple subscriber numbers that can
be used to call you on ISDN. These numbers are assigned by the
telephone company and can be configured separately for each ISDN
B channel.
Note that these MSN settings are used only for the loopback test
program and for the Dial-Up Network.
Under Windows 98 changes on these settings take only effect if you
restart your computer.
36
8. I-Surf USB Utilities
8.2 CAPI Monitor
This program shows you the operating status and the connection status of your
ISDN Adapter. The display is effected via the system task bar using a set of
different icons.
Icon
Status
USB is ready.
USB is not connected.
An error has occurred. Double-clicking this icon displays an
error message and troubleshooting suggestions.
If a connection has been established via the ISDN Adapter, additional icons appear
on the system task bar that indicate the status of the connection.
Icon
Status
A connection exists; no data are currently transferred.
A connection exists; outgoing data are transmitted.
A connection exists; incoming data are received.
A connection exists; data are transmitted and received.
37
8. I-Surf USB Utilities
Single-clicking one of these icons opens a popup menu with the following
selections:
Command
Description
Log
Opens the connection log, which contains logged data for all
connections.
Info
Opens a dialog box containing information on the current
connection.
Exit
Terminates the CAPI Monitor
To automatically load the CAPI Monitor each time Windows is started, copy the
CAPI Monitor program icon to the Windows Startup folder.
38
8. I-Surf USB Utilities
8.3 Loopback Test Program
The loopback test program is a simple program for checking your ISDN Adapter
installation and your ISDN access.
The program establishes a connection "with itself", sending data and receiving
them. The data received are compared to the data sent.
This program is found in I-Surf ISDN Utilties program folder. It can be started by
clicking the Loopback Test icon.
8.3.1 Prerequisites of the Test
The following conditions must be met for the loopback test to be run:
The ISDN Adapter must be installed.
The ISDN (S0 bus) cable must be connected.
The second B channel of the S0 bus must be free, that is, no other
connection may be active on the same ISDN line. Any analog device
connected to the ISDN Adapter (phone, fax, modem) must be onhook.
8.3.2 Testing Criteria and Testing Procedure
The loopback test will test the following components:
ISDN access wiring
D channel protocol setting
Hardware component function
NDIS WAN Miniport driver installation
CAPI2032.DLL installation
39
8. I-Surf USB Utilities
The loopback test follows this pattern:
1.
The ISDN Adapter is addressed (initialized).
2.
An ISDN data connection is established to the multi-subscriber
number (MSN) given. If the MSN is correct, a connection is
established in order to be able to transmit data.
3.
Test data are sent on one B channel of the S0 bus and received on the
second B channel.Testdaten werden auf einem B-Kanal des S0-Bus
gesendet und über den zweiten B-Kanal wieder empfangen.
4.
The test data are checked for transmission errors.
5.
The test result is displayed.
8.3.3 Test Execution and Test Result
40
1.
Start the loopback test program, if you have not already done so.
2.
Enter the subscriber number (MSN) to be user for testing. If this
number was given during configuration, it is automatically obtained
from the Windows registry. If no number was given during
configuration, enter the MSN for your ISDN Adapter.
3.
Click Start Test.
8. I-Surf USB Utilities
4.
Watch the messages in the status window showing the current status
of the test connection and the test result. Status messages are given
in text form and as CAPI or ISDN error numbers.
5.
If the test was successful, the following message appears:
If the loopback test was passed, you can assume that your ISDN Adapter hardware
and software are operating properly.
If the loopback test was not passed, this could be due to one or more of the
following errors:
Error in ISDN access wiring (inverted wires)
Incorrect plug connections
Loose connections within jacks
Terminal resistor pack missing
Incorrect D channel protocol settings
Incompatible ISDN provider D channel protocol
Incorrectly configured MSN
MSN incorrectly configured by the ISDN provider
For additional information please consult the loopback testing program error
messages and the CAPI or ISDN error numbers.
41
8. I-Surf USB Utilities
42
9. RVS COM Lite
9. RVS COM Lite
9.1 Welcome to RVS-COM Lite
It's simple and easy to use RVS-COM Lite to manage all your important
communications tasks without fuss or bother. RVS-COM is fully compatible with
most popular communications devices and services and lets you start as soon as
you have installed the program.
RVS-COM Lite may only be distributed in conjunction with a communications
device. Please inform us if you purchased RVS-COM Lite without any hardware, as
this software may not work properly with the hardware you are using.
RVS-COM Lite provides you with the most important functions of RVS-COM
Standard. Some functions, however, are not included or are limited. If you need
these functions then use the opportunity to upgrade for a low price.
9.2 Operating Requirements
Operating system: Microsoft Windows 95, Windows 98 or
Windows NT 4.0
PC/CPU: IBM AT-type PC with Intel-compatible CPU 486 DX 66
(Pentium recommended).
SoftwareFax reception at 14,400 bps and RVS Softmodem require a
Pentium-type CPU (Pentium 133 recommended).
RAM: 8 MB minimum for Windows 95 (16 MB recommended), 16 MB
minimum for Windows 98 and NT (24 MB recommended)
Hard disk space: 25 MB before installation. There should be at least
16 MB available on the hard disk for virtual memory when running the
program.
Graphics card: At least 640*480, 16 colour VGA display
CD-ROM drive is required for the installation of RVS-COM Lite.
You will need a full-duplex-capable audio device (sound card) for
telephony.
RVS-COM Lite is designed for your communications device. To install this, please
see the manufacturer's instructions for the device. Some communications devices
require special driver programs supplied by the manufacturer. If this applies to your
device, then please install these driver programs according to the manufacturer's
instructions.
If you are using an ISDN router with RVS ISDN DCP, the CAPI is installed with
RVS-COM Lite. Please refer to the README.RTF file in the root directory of your ISurf USB CD.
43
9. RVS COM Lite
9.3 Setup
So richten Sie RVS-COM Lite mit Hilfe des Setup-Programms auf Ihrem PC ein:
1.
Insert the I-Surf USB CD into your CD drive.
2.
If the setup program doesn't start automatically, click on Start in the Taskbar and
then Run. Type in D:\SETUP (substitute the drive letter of your CD-ROM drive)
and click on OK. Select "RVS-COM lite" from the menu. You will be asked to type
in the KEY for RVS-COM. Depending on the version, you will find the KEY either
on the back of the CD cover or on a separate card.
3.
The setup program will now start. Please follow the on-screen instructions.
4.
Restart the computer if the program prompts you to do so.
5.
The Configuration Wizard will then start and take you through the steps required to
configure the program.
The installed programs will be located in the list of programs named RVS-COM.
You reach this by clicking on Start in the Taskbar and then selecting Programs.
9.4 Registration
Be sure to fill out the registration form and send it to RVS Datentechnik. You will
find this form in the RVS-COM program group.
The registration will entitle you to:
Upgrade: As a registered user you have the opportunity to purchase
RVS-COM Standard at a special price. To order, please use the order
form that you will find in the program group setup by RVS-COM.
New product information: You will receive the latest information
about other RVS communications software.
9.5 Tips
Use the following checklist if you have problems installing or using RVS-COM. Use
the online documentation if you need more information.
9.6 Other Applications
There is a wealth of other applications you can use with your ISDN Adapter. Please
consult the respective documentation for information about installing and using this
software.
For the application to interact properly with the ISDN Adapter, note the following:
Make sure the version of the application you are using supports the driver versions
offered by your ISDN Adapter (NDIS WAN Miniport, CAPI...). You can determine
this by the application software installation routine or by the existence of files with
names like ISDN... or CAPI.... When in doubt, contact the software vendor for
information about the type of driver required.
44
10. Internet access
10. Internet access
10.1 Microsoft Dial-Up Network
When the driver software has been successfully installed, you can use the Dial-Up
Network to connect your computer to other computers or networks.
To do so, you will first need to have your server or provider provide you with the
access parameters for the dial-up connection. The following example will show you
how to establish a connection with a server using the Microsoft Dial-Up Network (or
the Microsoft Remote Access Service, RAS).
Depending on your user privileges, you will be able to access the resources on the
server (hard disk, printer, etc.). You can also use this connection to transfer data
from one PC to another (PC-PC connection, file transfer).
Have the following information handy before setting up the Dial-Up Network
connection:
- Access number des Servers/Providers
- User name on the server
- Password for this user name
- Information on the protocols and IP addresses used
1.
When you have received your ISDN access number, user name, and password,
create a new connection for the Windows Dial-Up Network.
Make a new connection using My Computer | Dial-Up Network. Select one of the
modems ISDN Line 0 or ISDN Line 1, and give the new connection a name of your
choice (here: MyGroup).
45
10. Internet access
2.
Enter the server’s area code and subscriber number (here: 01111)
This concludes the definition of the connection. You will now have to select the
correct network protocols.
3.
46
To activate the required network protocols for this newly created connection, you
will have to change the server type. Right-click the new connection icon, and
select Properties.
10. Internet access
4.
Select the appropriate settings for the protocols supported by the server (here:
TCP/IP):
Limiting the number of protocol will speed up the connection process. Now you
can connect to the server by double-clicking on the connection icon.
47
10. Internet access
5.
Enter your user name and password.
If your server access is valid and your user data were correctly entered, you
should now be connected to the server via the network.
10.2 Regular ISP With Multilink PPP
If you want to use a multilink connection (i.e. a connection with which you can
transfer data via both B channels at a total of 128 kbps) through the Dial-Up
Network, proceed as follows after creating the connection:
1.
48
Select My Computer | Dial-Up Network.
Right-click the new connection icon, and select Properties.
10. Internet access
2.
Click Settings under Set additional devices, then click Add to add a device.
49
10. Internet access
For example, if the connection uses ("Using:") ISDN Line 0, you may add ISDN
Line 1 to Set additional devices to activate the multilink function for this
connection. This will make 128 kbps bandwidth available to you.
You may add another connection by clicking Add. You need to enter the channel
not yet used for this connection.
Any multilink connection, however, requires that your dial-up server supports this
feature and that your account has the necessary access privileges. Multilink
connections, for instance, do not work for CompuServe.
50
10. Internet access
10.3 Online Services
You can use your ISDN Adapter to access a variety of online services. Online
services offer a broad spectrum of information services that is continuously being
updated. Online services offer up-to-date information, the way newspapers and
magazines have done, but by an electronic route. Learn all you can about what the
different services have to offer before signing up with the service most suitable for
your needs.
Major online services usually offer their own software packages you can use to
access thse services.
The software packages of most major online services include CAPI support. You
may therefore select the CAPI as access mode instead of a modem when installing
this type of software.
The major online services also offer Internet access as part of their software, so you
can use the Internet as well if the respective gateway is activated for you.
More detailed installation instructions are found within the respective software
packages.
51
10. Internet access
52
11. Troubleshooting
11. Troubleshooting
11.1 Hardware Installation
The PC cannot be booted.
Check to see if all cables were connected properly.
11.2 Device Driver Installation/Operating System
“Fax operation not possible.”
Fax operation is only possible with software using the CAPI interface. Check
software installation if needed.
“Dial-up connection not possible.”
Check to see if the device is connected to the S0 bus. It will usually be necessary to
activate the Ignore dial tone setting of the software used if the device is connected
to a PBX. If a connection still cannot be established, check the PABX hookup, and if
necessary contact our support hotline.
“No calls can be accepted.”
Check the settings of your software to see whether it is set to automatic or manual
answer. Furthermore, ensure that the correct MSN has been assigned to the
device.
“Internet connection cannot be established.”
Check to see if the TCP/IP is activated in the Network applet of the Control Panel.
Check the Dial-Up Network Windows online help topic to see which other protocols
must be activated.
“Device not recognized.”
Start the PC with only indispensable boards installed, plus the ISDN Adapter. If the
device still is not recognized, please exchange or check for system compatibility
with the ISDN Adapter.
53
11. Troubleshooting
11.3 Dial-Up Network
If you wish to use the ISDN Adapter with the Windows Dial-Up Network, you will first
have to configure a connection. Once a connection is configured, click the
connection icon to establish the connection. The current connection status will be
displayed in the status window. Error messages indicating possible causes of the
error will be displayed in case a connection cannot be established.
Connection broken before “Verifying user name and password” is shown
If the connection is broken before the message "Verifying user name and password"
appears, no ISDN connection could be established with the server. Use the
loopback test to check whether the ISDN Adapter and ISDN access work properly.
Also, check that you are using the correct access number for your server. If using a
PABX, it may be necessary to dial "0" or "9" before the number. Try calling a
different server (test server) known to be fully functional.
Connection broken after “Verifying user name and password” is shown
If the connection is broken before the message "Verifying user name and password"
appears, an ISDN connection was established with the server. If problems occur
after this point, they may be related to the network configuration or the server
configuration. Contact the server's PC or LAN administrator.
11.4 CAPI Applications
If you experience problems with CAPI applications, you should first perform the
loopback test. If the test was passed, all CAPI applications should operate properly.
However, the following exceptions might apply to your case:
The CAPI application may use a B channel protocol not supported by
the ISDN Adapter. A list of supported protocols is found in the
Appendix.
The CAPI application may use the CAPI.VxD or CAPI.SYS kernel
mode drivers instead of the CAPI3220.DLL user mode driver. The
kernel mode drivers are not tested by the loopback test. Contact your
application manufacturer’s customer support.
54
11. Troubleshooting
11.5 Check Liste
Effect
Cause
Check
Action
Incorrect
operating system
Are you using
Windows 98 or
Windows 2000?
Install Windows
98 or Windows
2000.
Connecting I-Surf
USB
Operating system
does not
recognize I-Surf
USB when it is
plugged in
USB controller
deactivated in the
BIOS
Activate the USB
controller in the
BIOS.
USB controller
not correctly
installed within
the operating
system.
Has the USB
Controller been
properly installed
in the Device
Manager of the
operating
system?
Use the
properties button
of the Device
Manager to look
for and eliminate
potential sources
of error.
I-Surf USB is
“ known” to the
operating
system, but no
device drivers
have been
installed
Has I-Surf USB
been entered in
the Device
Manager as an
"Other
Component” ?
Delete I-Surf
USB in the
Device Manager
and restart the
operating
system.
USB cable
Has the USB
cable been
properly
connected to ISurf USB and the
PC, or USB hub.
Connect cables
properly and turn
on the USB hub if
required.
55
11. Troubleshooting
Installation
Installation does
not start
automatically
No new hardware
detected
Is the ISDN
Adapter
connected to the
PC?
Previous
installation was
interrupted
Adapter already
installed
Installation does
not complete
56
Properly connect
the USB cable to
the ISDN Adapter
and reboot.
Remove previous
installation and
reboot.
Does the ISDN
Adapter appear
in the network
adapter list of the
Device Manager?
Wrong
installation
source specified
No action
required. Do not
install twice.
Specify the drive
containing the
installation CD as
source.
ISDN Adapter not
found
Is the ISDN
Adapter
connected to the
PC?
Properly connect
the USB
connector to the
to the ISDN
Adapter using the
USB cable and
reboot.
Incompatible
USB interface
Does the ISDN
Adapter work
with another PC?
Use another PC.
USB interface
influenced by
another USB
peripheral device
Does the ISDN
Adapter work
with the USB
device detached
from the USB?
Remove the
other USB device
from the USB
bus.
11. Troubleshooting
Loopback Test
An error
message
appears after the
test
USB connection
error
Has the PC been
correctly
connected to ISurf USB?
Establish correct
USB connection.
ISDN S0 cable
error
Has I-Surf USB
been correctly
connected to the
ISDN outlet?
Establish correct
ISDN connection.
ISDN S0 bus
error
Is the S0 cable
between the S0
outlet and the
ISDN NTBA
correctly wired?
Are the terminal
resistors in
place? Does a
standard ISDN
phone work when
connected to this
S0 outlet?
Establish correct
S0 bus
connection.
Different types of
S0 cables used
Disconnect other
devices
connected to the
S0 bus and
repeat the test. Is
it passed now?
Replace the
cable of the other
ISDN device.
ISDN error
0x3492
Second B
channel busy
Is a connection
may be active on
the second B
channel?
Terminate all
other
connections.
ISDN error
0x3492
Incorrect phone
number
Is the phone
number dialed
the adapter’s
MSN?
Enter the correct
number.
57
11. Troubleshooting
ISDN Software
No ISDN
connection
possible either
incoming and
outgoing
D channel
protocol
incompatible
Is the D channel
protocol DSS1?
Ask ISDN carrier
for D channel
protocol.
ISDN connection
to a specific
target not
possible
Incompatible B
channel protocols
Are the B
channel protocols
(X.75, ML/PPP)
identical on both
sides ?
Ask remote ISDN
site for B channel
protocol.
Incompatible
ISDN services
Are the ISDN
services (data,
speech) identical
on both sides?
Ask remote ISDN
site for ISDN
service setting.
Incompatible
application
protocols
Are the
applications
(EFT, TCP/IP,
Fax) identical on
both sides?
Ask remote ISDN
site for
application to be
used
Instable USB
interface
Does the ISDN
Adapter work
with another PC?
Use another PC.
USB influenced
by another USB
peripheral device
Does the ISDN
Adapter work
with the USB
device detached
from the USB?
Remove the
other USB device
from the USB
bus.
CAPI not
installed
Does the CAPI
appear in the
network protocol
list of the
Network Control
Panel?
Install CAPI, run
Setup manually
from CD root
directory
Interrupted data
transfers
PC Software
“No CAPI found”
58
11. Troubleshooting
Dial-up Network
Dial-up Network
shows “ verifying
user name and
password” but
then stops
User account not
valid
Connection has
been established.
Are the , user ID
and password
valid?
Consult dial-up
server
administrator for
help.
Dial-up Network
does not show
“ verifying user
name and
password” and
stops
Wrong phone
number
Is the phone
number of dial-up
server correct?
Consult dial-up
server
administrator for
help.
Dial-up Network
shows “ logging
onto the network”
but then stops
Incorrect network
protocol
Connection has
been established,
user ID and
password are
valid. Are the
networking
settings correct
(IPX, TCP/IP
etc.)?
Consult dial-up
server
administrator for
help.
Dial-up Network
does not show
the ISDN Adapter
in the modem list
ISDN Adapter not
installed
Does the ISDN
Adapter appear
in the network
adapter list of the
Device Manager?
Install ISDN
Adapter.
Dial-up Network
cannot find the
ISDN Adapter
while dialing
Driver not started
Does the ISDN
Adapter appear
in the network
adapter list of the
Device Manager?
Uninstall the
ISDN Adapter
and reinstall.
Driver hangs
Do other ISDN
applications
work?
Reboot.
Second B
channel not free
Do other devices
on the ISDN line
use the second B
channel while
ML-PPP is in
use?
Terminate all
connections with
other ISDN
devices.
Server does not
support ML-PPP
Does single PPP
work? Check
connectivity.
Consult dial-up
server
administrator.
Dial-up Network
does not work
with ML-PPP
59
11. Troubleshooting
Software
Fax transmission
does not succeed
Voicemail has
bad sound
60
PC performance
too low
Are other PC
programs active?
Close other
applications.
Does the PC
meet minimum
hardware
requirements?
Update PC
hardware.
Incompatible Fax
device
Does fax
transmission
work with other
fax machines?
Check if an
update for the
ISDN Adapter is
available.
PC performance
too low
Are other PC
programs active?
Close other
applications.
Does the PC
meet minimum
hardware
requirements?
Update PC
hardware.
Appendix
Appendix
A1: Technical Specifications
Hardware
Energy consumption
Energy supply from PC via USB interface
Approved ambient environment
for operation
+5°C bis + 45°C
Dimensions (L x W x H)
127 x 119 x 31 mm
Weight of the USB-Box:
185 g
Length of cable:
ISDN connecting cord approx. 6 m
USB cable approx. 1 m
Basic software
D-Kanal Protokolle
DSS1 (Euro ISDN)
B-Kanal Protokolle
L1: HDLC transparent, 64k transparent
L2: transparent / X.75SLP with V.42bis / V.120 async
L3: transparent / X.25 /ISO8208 / T70NL /T90NL
L2: transparent, X.75, LAP-B, LAP-D, V.120, V.110
L3: transparent, T.70NL, X.25, ISO 8208, T.90NL
NDIS WAN Miniport drivers
Operating system
Windows 98 / Windows 2000
B channel protocol
HDLC transparent
CAPI-Interface
Interface file
CAPI2032.DLL
Applications
EFT, Fax, Answering machine
digital and analog modems for Internet, Dial-up
Networking and mailbox access
Online software
Acrobat Reader
oline documentation
61
Appendix
A2: CAPI 2.0 Error Messages
Number (hex)
Description
0x1001
0x1002
0x1003
0x1004
0x1005
0x1006
0x1007
0x1008
0x2001
0x2002
0x2003
0x2004
0x3101
0x3102
0x3103
0x3104
0x3105
0x3106
0x3107
0x3108
0x3109
0x3201
0x3202
0x3203
0x3204
0x3205
0x3206
0x3207
0x3208
0x3209
0x320a
0x320b
0x320c
0x320d
0x3301
0x3302
0x3303
0x3304
0x3305
0x3306
0x3307
0x3308
0x3309
0x330a
0x330b
0x330c
0x34xx
Error in API_REGISTER
Invalid application ID
Invalid message
Invalid command or subcommand
Queue full
Queue empty
Queue overflow
Deinstallation error
Invalid controller
Invalid PLCI
Invalid NCCI
Invalid type
Error in B channel
Error in info mask
Error in MSN service mask
Error in SI service mask
Invalid protocol layer 2
Invalid DLPD
Invalid protocol layer 2
Invalid NCPD
Invalid NCPIs
General controller error
LISTEN_REQs not unique
Unsupported function
PLCI not active
NCCI not active
Protocol l2 not supported
Cannot select protocol I2 now
Protocol l3 not supported
Cannot select protocol I3 now
Invalid DLPD parameter
Invalid NCPD parameter
Invalid NCPI parameter
Data length not supported
Setup error D channel, layer 1
Setup error D channel, layer 2
Setup error B channel, layer 1
Setup error B channel, layer 2
Turned off D channel, layer 1
Turned off D channel, layer 2
Turned off D channel, layer 3
Turned off B channel, layer 1
Turned off B channel, layer 2
Turned off B channel, layer 3
Restored B channel, layer 2
Restored B channel, layer 3
Connection ended/terminated
62
Appendix
A3: ISDN S0 Interface Pin Assignment
ISDN S0 interface pin assignment (RJ45 plug/jack)
(CCITT I.430/ISO 8877)
Pin
Signal
1
Not used
2
Not used
3
STA (Sending A)
4
SRA (Receiving A)
5
SRB (Receiving B)
6
STB (Sending B)
7
Not used
8
Not used
A4: Terminal Resistor for ISDN S0 Interface
The last jack on your ISDN S0 bus must be terminated with two 100 ohm terminal
resistors.
63
Appendix
A5: USB Interface Pin Assignment
USB interface pin assignment:
Ordernumber: A30853-X501-B101-1-19
64