1
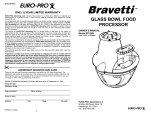
EP585H
ONE (1) YEAR LIMITED WARRANTY
EURO-PRO OPERATING LLC warrants this product to be free from defects in material
and workmanship for a period of one (1) year from the date of purchase when utilized for
normal household use.
If your appliance fails to operate properly while in use under normal household
conditions within the warranty period, return the complete appliance and accessories,
freight prepaid to EURO-PRO Operating LLC, 94 Main Mill Street, Door 16, Plattsburgh,
N.Y. 12901. If the appliance is found to be defective in material or workmanship, EUROPRO Operating LLC will repair or replace it free of charge. Proof of purchase date and
$12.95 to cover the cost of return shipping and handling must be included.*
The liability of EURO-PRO Operating LLC is limited solely to the cost of the repair or
replacement of the unit at our option. This warranty does not cover normal wear of parts
and does not apply to any unit that has been tampered with or used for commercial
purposes. This limited warranty does not cover damage caused by misuse, abuse,
negligent handling or damage due to faulty packaging or mishandling in transit.
This warranty is extended to the original purchaser of the unit and excludes all other
legal and/or conventional warranties. The responsibility of EURO-PRO Operating LLC if
any, is limited to the specific obligations expressly assumed by it under the terms of the
limited warranty. In no event is EURO-PRO Operating LLC liable for incidental or
consequential damages of any nature whatsoever. Some states do not permit the
exclusion or limitation of incidental or consequential damages, so the above may not
apply to you.
This warranty gives you specific legal rights, and you may also have other rights which
vary from state to state.
*Important: Carefully pack item to avoid damage in shipping. Be sure to include
proof of purchase date and to attach tag to item before packing with your name,
complete address and phone number with a note giving purchase information,
model number and what you believe is the problem with item. We recommend you
insure the package (as damage in shipping is not covered by your warranty). Mark
the outside of your package “ATTENTION CUSTOMER SERVICE”. We are
constantly striving to improve our products, therefore the specifications contained
herein are subject to change without notice.
CONVERTIBLE
HAND/STAND MIXER
OWNER’S MANUAL
Model EP585H
127V., 60Hz., 325 Watts
-----------------------------------------------------------------------------------------------------------------------------
OWNERSHIP REGISTRATION CARD
Please fill out and mail the product registration card within ten (10) days of purchase.
The registration will enable us to contact you in the unlikely event of a product safety
notification. By returning this card you acknowledge to have read and understood the
instructions for use, and warnings set forth in the accompanying instructions.
RETURN TO EURO-PRO OPERATING LLC, 94 Main Mill Street, Door 16, Plattsburgh, N.Y. 12901
EP585H
______________________________________________________________________
Appliance model
______________________________________________________________________
Date purchased
Name of store
______________________________________________________________________
Owner’s name
______________________________________________________________________
Address
City
State
7
Printed in China
Zip Code
For information or assistance:
EURO-PRO Operating LLC
94 Main Mill Street, Door 16
Plattsburgh, NY 12901
Tel.: 1 (800) 798-7398
IMPORTANT SAFETY INSTRUCTIONS
When using electrical appliances, basic safety precautions should always be
followed, including the following:
10. Extreme caution must be used when
1. Read all instructions for use carefully
moving any appliance containing hot
and look at the illustrations before you
liquids.
start using the appliance.
11. Do not leave appliance unattended
2. To protect against risk of electrical
while in use.
shock, do not immerse power cord,
12. Do not use outdoors.
plug or mixer in water or any other
13. Do not let cord hang over the edge
liquid.
of the table, counter or touch hot
3. Close supervision is necessary when
surfaces.
any appliance is used by or near
14. Do not place on or near a hot gas or
children.
electric burner, or in a heated oven.
4. Unplug from outlet when not in use,
15. Do not use appliance for other than
before putting on or taking off parts and
intended household use.
before cleaning the appliance.
16. To avoid injury by accidentally
5. Do not operate any appliance with a
switching on the appliance when
damaged cord or plug, or after the
inserting the beaters or dough
appliance malfunctions, has been
hooks, always set the switch to the
dropped or damaged in any manner.
"OFF" position and unplug the
Return the appliance to EURO-PRO
appliance before assembling or
Operating LLC for examination, repair
disassembling.
or adjustment. See warranty.
An extension cord may be used if
Note:
6. Avoid contact with moving parts at all
you are careful in its use:
times. Keep hands, hair, clothing, as
well as spatulas and other utensils away
from beaters during operation to prevent 1. The electrical rating of the extension
cord should be at least as great as
personal injury and/or damage to the
the electrical rating of the appliance.
mixer.
2. An extension cord with the power
7. The use of accessory attachments
cord must be arranged so that it will
not recommended by the appliance
not drape over the countertop or
manufacturer may cause injuries.
tabletop where they can be pulled on
8. Remove beaters and dough hooks
by children or tripped over
from mixer before cleaning.
accidentally.
9. NEVER place the unit close to the
edge of a counter or table. Make
sure that the power cord is
positioned safely so that nobody
trips or gets tangled in it.
This appliance has a polarized plug (one blade is wider than the other). To reduce
the risk of electric shock, this plug is intended to fit into a polarized outlet only one
way. If the plug does not fit fully into the outlet, reverse the plug. If it still does not fit,
contact a qualified electrician. Do not attempt to modify the plug in any way.
SAVE THESE INSTRUCTIONS
CARE & CLEANING
Warning: Before cleaning your
Hand/Stand Mixer, ensure that the
power is turned off and that the power
cord is not plugged into the electrical
outlet. Always switch off and unplug
before cleaning.
1. Wipe the outside area of the
Hand/Stand Mixer with a damp cloth
and polish with a soft, dry cloth. NEVER
immerse the hand mixer, stand, plug or
power cord into water or any other
liquid.
2. Wipe any excess food particles from
the power cord.
3. To make cleaning easier, remove
beaters/dough hooks and wash right
away after use. Wash the mixing
bowl, beaters and dough hooks in
warm, soapy water. The stainless
steel mixing bowl, beaters and dough
hooks are dishwasher safe. The plastic
bowl, bowl lid and spatula are top rack
dishwasher safe ONLY. Do NOT use
scouring pads, harsh detergents or
abrasive cleaners to clean the bowls,
beaters or dough hooks. Dry with a soft,
clean cloth.
Storing Your Hand/Stand Mixer
You can keep your Hand/Stand Mixer in
a convenient place on your kitchen
counter ready for use. Place the beaters
and dough hooks into the bowl. Storing
the beaters or dough hooks in a drawer
with other kitchen utensils may cause
damage.
Never wind the power cord around the
motor after use as the warmth of the
motor may cause damage to the power
cord.
IMPORTANT INSTRUCTIONS
ALWAYS
NEVER
ALWAYS make sure that your hands are dry
before handling the plug or switching on the
appliance.
NEVER place your hand in the bowl while it is in
operation.
ALWAYS use the mixer on a dry, level surface.
NEVER use this appliance outdoors.
ALWAYS unplug unit from the electrical outlet
when not in use or when removing attachments
and before cleaning.
NEVER use this appliance for other than for
intended use. This appliance is for household use
only.
ALWAYS remove the beaters or dough hooks
from the mixer before washing.
NEVER mix dry, thick or heavy mixture for more
than 60 seconds without turning off the hand
mixer and stirring the ingredients before
continuing.
ALWAYS avoid contact with moving parts while
unit is in operation. Keep hands, hair, clothing as
well as other utensils away from beaters/dough
hooks during operation.
NEVER use harsh, abrasive or caustic cleansers
to clean this appliance.
NEVER allow children to use this appliance
unsupervised.
FOR HOUSEHOLD USE ONLY
NEVER leave this appliance unattended while in
use.
NEVER let the power cord to hang over the edge
of a table or counter, touch hot surface or
become knotted.
1
NEVER eject attachments with the unit operating.
Rev. 02/04A
6
GETTING TO KNOW YOUR CONVERTIBLE
HAND/STAND MIXER
OPERATING INSTRUCTIONS
Fitting the Bowl onto the
Turntable of the Stand
Warning: To avoid injury when
Using the Convertible Hand/Stand
Mixer
Warning: To avoid injury when
assembling the hand mixer to the
stand, always set the speed selector on
“0” and unplug the appliance.
1. Before plugging the hand/stand mixer
into the electrical outlet, assemble the
unit with the desired accessories.
2. Set the speed selector switch to the
“HI” or “LO” position.
3. Select the speed that you desire.
assembling the hand mixer to the
stand, always set the speed selector on
“0” and unplug the appliance.
1. Place the base of the mixing bowl
onto the turntable of the stand. To
fully lock the mixing bowl in place,
press down and turn the mixing bowl
in a clockwise direction until you hear
it click into place. (Fig. 9)
MIXING GUIDE
Fig. 9
2. To remove the mixing bowl from the
stand, press down and turn the mixing
bowl counter clockwise. The mixing
bowl can now be detached from the
turntable and lifted away. (Fig. 10)
MIXING
TASK
RECOMMENDED
SPEED(S)
Folding &
Blending
“LO” 1 & 2
Light Mixing
“LO” 3 & 4
Creaming &
Beating
“HI” 6 - 8 or “LO” 5
Whipping &
Aerating
“HI” 9 & 10 or
BURST
4. Select the bowl speed – “LO” or “HI”
depending on how fast you want the
bowl to turn. Use the “LO” bowl
speed for mixing speed 1-5. Use the
“HI” bowl speed for mixing speed
6-10. If you do not wish the bowl to
turn, leave the bowl speed in the
“OFF” position.
Note:
• Always select the speed setting
before the mixing bowl speed to
prevent ingredients from being flicked
out of the mixing bowl.
• Always start mixing at slow speeds
and increase the speed gradually to
prevent the ingredients splashing out
of the bowl.
Fig. 10
Note: It is easier to fit the mixing bowl to
the turntable when the hand mixer is not
attached to the pivot support.
12
14
13
15
1.
2.
3.
4.
5.
6.
7.
8.
Hi-Lo Speed Selector
Speed Control
Burst of Speed Button
Beater Eject Button
Beaters
Stainless Steel Bowl
Tilt Button
Hand Mixer Release Button
9.
10.
11.
12.
13.
14.
15.
Technical Specifications
Voltage:
Power:
Bowl Capacity:
5
127V., 60Hz.
325Watts
3.5 Qts.
2
Bowl Speed Control Dial
Hand Mixer
Base Stand
Dough Hooks
Plastic Bowl
Bowl Lid
Spatula
Read all the sections of this booklet and follow all the instructions carefully.
OPERATING INSTRUCTIONS
Attaching the Dough Hooks to
the Hand Mixer
Warning: To avoid injury when
inserting or removing beaters or
dough hooks, always set the speed
selector on “0” and unplug the appliance.
1. Before using your Bravetti
Convertible Hand/Stand Mixer for
the first time, wash the beaters,
dough hooks, bowls and spatula in
warm, sudsy water. Rinse and dry
thoroughly. Use a damp cloth to wash
over the mixer base and the hand
mixer. Dry with a soft cloth.
NEVER immerse the base stand or
the hand mixer in water or any other
liquids.
2. Before assembling your Convertible
Hand/Stand Mixer, make sure that the
power cord is unplugged from the
electrical outlet and that both the
speed control and the base speed
control dial are in the “OFF” position.
1. Ensure that the hand mixer is not
plugged in to an electrical outlet
and that the speed control switch
is on the “0” (off) position.
2. The dough hooks have a set
method of fitting into the hand
mixer because they are not
identical. One has a grommet and
the other does not. (Fig. 2)
OPERATING INSTRUCTIONS
Assembling the Hand Mixer to
the Stand
Warning: To avoid injury when
3. While the hand mixer is still in the
raised position, insert either the
beaters or the dough hooks.
4. To lower the hand mixer, press and
hold the tilt button with one hand
while holding the hand mixer with the
other hand and slowly lower the hand
mixer down. (Fig. 6)
assembling the hand mixer to the
stand, always set the speed selector on
“0” and unplug the appliance.
1. Press the tilt button, located on the
top of the support pivot . While the
button is depressed, ease the support
pivot back. (Fig. 4)
Press the
tilt button
and tilt the
hand
mixer
down
Tilt Button
Support
Pivot
Grommet
Fig. 6
Fig. 2
Fig. 4
3. Looking at the under side of the
hand mixer, you will see that one
of the sockets has a red dot over
it. (Fig. 3) Insert the dough hook
with the grommet into this socket.
Attaching the Beaters to the
Hand Mixer
1. Ensure that the hand mixer is not
plugged in to an electrical outlet
and that the speed control switch
is on the “0” (off) position.
2. Insert the beaters into the sockets
on the under side of the hand
mixer and twist counter clockwise
until the beater is firmly fitted into
the socket.
3. To release the beaters from the
unit, press on the beater eject
button on the front of the unit and
they will pop out. (Fig. 1)
Grommet
The support pivot will lock into this
raised position until it is released by
pressing the tilt button again.
2. To connect the hand mixer to the
support pivot, locate the two retaining
prongs on the support pivot into the
two rectangular holes in the heel of
the hand mixer. (Fig. 5) When the
hand mixer is seated on the support
pivot, press down on the hand mixer
to click it into place and lock the hand
mixer and the support pivot together.
5. To remove the hand mixer from the
pivot support, first raise the mixer by
pressing the tilt button and raise the
mixer up. (Fig. 7) the mixer will lock
into the raised position.
6. Then press the mixer release button
which is located on the under side of
the pivot support with one hand and
with the other lift the hand mixer by
the handle upwards and away from
the support pivot. (Fig. 8)
Press the
tilt button
and tilt the
hand
mixer up
Fig. 3
Press
eject
button
4. Then insert the other dough hook
into the other socket. Push both
dough hooks in until you hear a
click confirming that they are
securely in place.
5. To release the dough hooks from
the unit, press on the beater eject
button on the front of the unit and
they will pop out. (Fig. 1)
Note: Ensure that the beaters or
dough hooks are fully inserted into
the correct sockets or your mixing
results may be affected.
Fig. 1
Rectangular
holes
Retaining
prongs
Fig. 7
Support
pivot
Fig. 5
Note: Ensure that the two retaining
prongs on the support pivot are fully
connected into the hand mixer.
Hand
mixer
release
button
Fig. 8
3
4