1
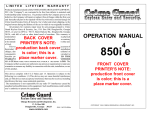
EXP-52
OPERATION INSTRUCTIONS
THIS PRODUCT IS DESIGNED FOR PROFESSIONAL
INSTALLATION ONLY!!
Congratulations on your purchase of the EXP-52 vehicle security
system.
Please take the time to read over this operation manual to thoroughly
familiarize yourself with the many features and options.
THIS PRODUCT IS DESIGNED FOR PROFESSIONAL
INSTALLATION ONLY!!
!!NOTICE!!
THIS DEVICE COMPLIES WITH PART 15 OF THE FCC RULES. OPERATION IS
SUBJECT TO THE FOLLOWING TWO CONDITIONS:
(1) THIS DEVICE MAY NOT CAUSE HARMFUL INTERFERENCE, AND
(2) THIS DEVICE MUST ACCEPT ANY INTERFERENCE RECEIVED, INCLUDING
INTERFERENCE THAT MAY CAUSE UNDESIRED OPERATION.
FEDERAL COMMUNICATION COMMISSION RULES AND REGULATIONS
PROHIBIT THE ADJUSTMENT OF THE TRANSMITTER PORTION OF THIS SYSTEM
BY UNLICENSED PERSONNEL.
EXP-52
EXP-52 OPERATION INSTRUCTIONS
A.
REMOTE CONTROL TRANSMITTER OPERATION
The new remote control transmitter (XT-54) included with the EXP-52
offers the code rolling feature which will prevent illegal use of a codegrabber with an attempt to record the code of your transmitter.
1. ARM/DISARM
ON/OFF
TO ARM THE EXP-52
AUX
Press the ON/OFF button once to
arm. The siren will chirp one (1)
time, the lights will flash, and all
doors will lock. (*)
TO DISARM THE EXP-52
Press the ON/OFF button once to
disarm. The siren will chirp two (2) times, the lights will flash, and all
doors will unlock.(*)
NOTE(*): Your vehicle must be equipped with power door locks and
optional relays may be required. Additionally, all doors will lock
automatically each time the ignition key is turned on, and unlock each
time the ignition key is turned off. Please see Section (H).
2. TEMPORARY CHIRP DELETE FROM REMOTE
Upon approaching the vehicle (whether armed or disarmed) push the
AUX button on the remote control transmitter for half (0.5) second, then
very quickly push the ON/OFF button on the transmitter to arm or disarm
in the usual manner. The chirp sound will be silenced only for this
particular operation. The sequence must be repeated each time if it is
desired to cancel the arm/disarm chirp sound.
1
EXP-52
3. PANIC FUNCTION
The EXP-52 remote control may be used as a remote panic switch to
trigger the siren in cases of emergency. To activate the PANIC
FUNCTION press and hold the ON/OFF button on the remote transmitter
for a minimum of 3 seconds. The siren will sound. To stop the PANIC
FUNCTION press the ON/OFF button on the transmitter.
4. DELETING THE PRE-WARNING SENSOR CIRCUIT (If installed)
The EXP-52 offers the dual stage SIS-5 impact sensor to pre-warn a
light impact on the vehicle with a siren chirp before triggering the alarm.
The alarm will trigger with the third violation within 15 seconds. The
EXP-52 also provides a pre-warning sensor input for an additional
sensor like a radar sensor to pre-warn approach to the vehicle.
To delete the pre-warning sensor, press the ON/OFF button again within
5 seconds after arming. The siren will confirm deletion with a low chirp.
NOTE: Deleted sensor(s) will return to normal operation upon
disarming the EXP-52. Sensor(s) deletion procedure must be followed
each time the EXP-52 is armed. This operation deletes only the prewarning sensor of the alarm.
NOTE: This pre-warning feature is set inactive by the factory, and must
be activated at the time of installation if this feature is desired.
5. TRUNK/HATCH RELEASE
To remotely release the electric trunk or hatch on the vehicle you must
first disarm the EXP-52. After disarming, push the AUX button on the
transmitter for THREE (3) seconds. Trunk or hatch will release and
open. NOTE: The alarm will not control mechanical/latch trunk release
mechanisms.
2
EXP-52
6. OPTIONAL ACCESSORY OPERATION
Simultaneously pressing both the ON/OFF and AUX buttons will allow
third channel operation. A negative pulse begins and will continue until
buttons are released. It is not recommended to press the buttons
longer than 3 seconds.
7. SECOND CAR OPERATION
Refer to SECTION “(K)” of this operation manual. Arming and disarming
will be determined by how the transmitters have been programmed for
multiple vehicle operation.
8. CHANGING THE REMOTE TRANSMITTER BATTERY
The EXP-52 remote transmitter uses one (1) 12 volt miniature battery,
#EL12, #VR22, or Radio Shack #23-144. It will provide approximately
one year of operation before replacement is necessary.
-
3
+
To replace the battery, carefully remove
the case screw located at the end of the
remote where the key ring attaches to the
case. Use a small blade Phillips
screwdriver. Before removing the battery
note the direction of its terminals. Install
the new battery exactly the same, using
caution so as not to bend, or otherwise
damage the battery contacts. Replace the
case cover and carefully tighten the screw.
Do not over-tighten the screw! Test the
transmitter to insure it arms and disarms
the alarm.
EXP-52
B.
1.
2.
3.
4.
5.
LED STATUS INDICATOR OPERATION
LED OFF= The EXP-52 is disarmed.
LED CONSTANT ON= Indicates open trigger circuit.
LED FAST FLASHING= Passive arming timer is counting down.
LED FLASHING= The EXP-52 is armed.
LED FLASHING IN A 2 FLASH/HOLD SEQUENCE= Alarm breach.
NOTE: Unless a door is opened after disarming, the EXP -52 will
automatically rearm in 60 seconds, and the LED will continue to flash.
See Section (G) AUTOMATIC RE-ARMING for details.
C.
AUDIBLE AND VISUAL ALARM STATUS INDICATOR
1. 1 CHIRP WITH LIGHT FLASH= Alarm is armed.
2. 2 CHIRPS WITH LIGHT FLASH= Alarm is disarmed.
3. 4 CHIRPS WITH LIGHT FLASH & LED FLASHING IN A 2
FLASH/HOLD SEQUENCE= Alarm is disarmed and has been
breached in your absence.
D.
BREACH WARNING
The EXP-52 is equipped with BREACH WARNING to tell you, upon
disarming, if the alarm has been triggered in your absence. Press the
ON/OFF button on the remote transmitter. If a breach has occurred, the
siren will signal with 4 chirps, the lights will flash four times, and the
LED will be flashing in a 2 second flash/hold sequence.
E.
VALET/OVERRIDE SWITCH
NOTE: Both VALET and OVERRIDE functions are performed from the
same switch.
1. OVERRIDE FUNCTION
The OVERRIDE FUNCTION may be used if the EXP-52 remote is lost or
inoperative. To operate the OVERRIDE FUNCTION, enter the vehicle
4
EXP-52
(siren will sound); switch the vehicle ignition to ON. Move the
VALET/OVERRIDE switch to ON; then OFF; the siren will stop. The EXP52 will be disarmed. Quickly replace or service the remote transmitter to
insure continued vehicle protection.
2. VALET FUNCTION
The EXP-52 may be placed into the VALET (stand-by) mode to allow for
vehicle service, car washing, or attendant parking without self arming
after the ignition is switched off, and without leaving the EXP-52 remote
control with unauthorized individuals.
To operate the VALET FUNCTION turn the vehicle ignition to ON and
move the VALET/OVERRIDE SWITCH to ON.
To return to normal operation turn the vehicle ignition to ON and move
the VALET/OVERRIDE SWITCH to OFF.
3. KEYLESS ENTRY MODE
In the valet mode, the vehicle doors can be locked and unlocked using
the remote. However, there will be no chirp confirmation; it is strongly
recommended that the driver visually confirm that the doors are locked.
F.
PASSIVE/MANUAL ARMING OPERATION
(Optional at installation)
Passive/Manual operations can be selectable if an optional toggle
switch is installed. Consult your installing dealer.
1. PASSIVE ARMING
If you choose the PASSIVE (automatic) mode, the system must be
operated as below.
1. Switch OFF vehicle ignition, exit vehicle, and be sure all protected
openings are closed.
5
EXP-52
2. The LED STATUS INDICATOR will begin fast flashing and the
passive arming timer will begin counting down.
3. If you re-open the exit, the LED will stop flashing.
4. Close the exit, and the LED will start flashing again.
5. The EXP-52 will count down for 30 seconds. After 30 seconds,
the siren will chirp 1 time indicating the EXP-52 has armed.
NOTE: If the optional remote power door locks feature is installed, the
doors will automatically lock 10 seconds after the PASSIVE arming cycle
is completed.
2. MANUAL ARMING
If you choose the MANUAL (active) arming mode, follow the steps below.
1. Switch off ignition, leave vehicle, and close all protected openings.
2. Press the ON/OFF button on the remote transmitter.
3. The siren will chirp 1 time. 5 seconds later the EXP-52 will be fully
armed.
G.
AUTOMATIC RE-ARMING
The EXP-52 is equipped with an automatic re-arming circuit that will
return the alarm to a fully armed state if a door is not opened within 60
seconds after disarming. This automatic re-arming circuit can be
eliminated at the time of installation.
H.
IGNITION CONTROL POWER DOOR LOCK SYSTEM
When installed with remote power door locks, the vehicle's doors will
automatically lock when the ignition is switched on. The doors will
automatically unlock when the ignition is switched off. In order to avoid
any undesirable lock-out, the doors will not lock if any door is left open.
6
EXP-52
This feature is optional at time of installation.
I.
TRIGGER TEST
After arming the EXP-52 in either the PASSIVE or MANUAL mode, test
the system in the following manner.
1. Open any door or other protected opening. The siren will sound
instantly, and the lights will flash.
2. If the pre-warning feature is activated, the EXP-52’s SIS-5 impact
sensor will respond to a light shock with a chirp sound, and trigger
the alarm when a heavier shock is detected. (Please refer to A-4 for
details).
3. If optional sensors have been installed, arm the EXP-52 and test
according to the directions of the particular sensor installed.
If triggered in the armed condition, the EXP-52 will sound its siren and
flash the lights for 60 seconds; then it will stop and automatically reset
and rearm. If the violation continues, the alarm will sound and lights will
flash for two 60 second cycles.
J.
PROGRAMMING THE REMOTE TRANSMITTERS
NOTE: Each time the programming mode is entered, all programmed
transmitter codes will be automatically deleted and must be reprogrammed. This is an important security feature. If any transmitter is
lost or stolen, enter the programming mode and re-program existing
transmitters. Transmitters can only be programmed by entering the
programming mode. Existing codes will remain in memory even if
power to the EXP-52 is disconnected.
To program the EXP-52 transmitters, follow the directions as written
below, in their exact order!
7
EXP-52
1.
Flip the VALET/OVERRIDE switch to "ON" position.
2.
Turn the ignition switch to "ON", then "OFF", then immediately
3.
Flip the VALET/OVERRIDE switch "OFF", "ON/OFF", "ON/OFF". The
siren will chirp one (1) time.
4.
Turn the ignition switch "ON/OFF", "ON/OFF". The siren will chirp two
(2) times. You are now in the programming mode.
5.
Press the ON/OFF button on one of the remote transmitters until the
alarm siren responds with a confirm ing chirp. The first transmitter is
now programmed.
Within five (5) seconds, press the ON/OFF button on the second
transmitter until the alarm siren responds with a confirming chirp.
The second transmitter is now programmed.
NOTE: If the EXP-52 does not receive a second code to learn within
five (5) seconds, it will automatically close the programming mode
and resume normal alarm functions. If this happens, it will be
necessary to repeat steps 1 through 6 and re-program all
transmitters. If three or four transmitters are programmed, continue
pressing the ON/OFF button of the third and/or fourth transmitters.
6.
The EXP-52 can learn up to four remote transmitter codes. If later
optional third and forth transmitters are to be programmed, follow
sequence 1 through 6 and re-program all existing transmitters.
K.
PROGRAMMING REMOTE FOR A SECOND VEHICLE
The EXP-52 transmitters are capable of controlling separately installed
EXP-52 or RF-302 alarm systems in two or three vehicles.
8
EXP-52
To code the EXP-52 transmitters for two or three vehicles follow the
diagrams as shown below. Before multiple vehicle programming can be
achieved, it is necessary to enter the programming mode as described
in SECTION K.
1. TWO VEHICLE OPERATION
VEHICLE #1
Enter the programming mode on vehicle #1 and push the ON/OFF
button on the transmitter for Vehicle #1. The alarm siren will respond
with a confirming chirp. Within five (5) seconds, push the AUX button on
the transmitter for Vehicle #2. The alarm siren will respond with a
confirming chirp. Both transmitters are now programmed to Vehicle #1.
VEHICLE #2
Enter the programming mode on Vehicle #2 and push the AUX button on
the first transmitter used for Vehicle #1. The alarm siren will respond
with a confirming chirp. Within five (5) seconds, push the ON/OFF button
on the second transmitter that had been previously programmed on
Vehicle #1. The alarm siren will respond with a confirming chirp. Both
transmitters are now programmed to Vehicle #2.
NOTE: Here, the first transmitter is assumed to be the primary
transmitter of Vehicle #1, and the second transmitter is assumed to be
the primary transmitter of Vehicle #2.
VEHICLE #1
VEHICLE #2
TRANSMITTER #1
ON/OFF BUTTON
AUX BUTTON
TRANSMITTER #2
AUX BUTTON
ON/OFF BUTTON
9
A.P.I.