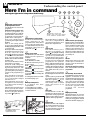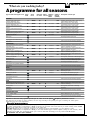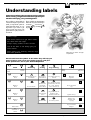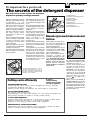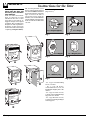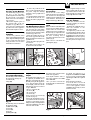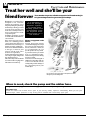
1
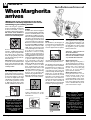
M ARGHERITA The secrets of fabrics CDE 12 X Instructions for installation and use GB How to get better results A wash performance The first washer-dryer to give a perfect wash at only 40°C Cashmere Gold The first washer-dryer to have The Woolmark Company recognition Margherita Washingmachine Assistance, Spare parts and Accessories? Call your nearest Customer Service Centre or dial 0870 607 0805 M ARGHERITA Quick guide to Margherita Here are the 13 topics explained in this manual. Read, learn and have fun: you will discover many secret ways to get a better wash, more easily and making your washer-dryer last longer......and especially keeping an eye on safety. 1. Installation and removal (p. 11) Installation, after delivery or transport, is the most important operation for the correct functioning of your Margherita washer-dryer. Always check: 1. That the electric system complies with the law; 2. That the inlet and draining pipes are connected correctly. Never use hoses that have already been used, always use the new ones provided with your machine. 3. That the washer-dryer is levelled properly; something worth checking for the life of your washer-dryer and the quality of your wash; 4. That the drum's fixing screws have been removed from the back of the washer-dryer. 2. What goes in your washer-dryer and how to start it (p. 2) A correct distribution of your laundry is vital to both the successful outcome of the wash and the life of the washer-dryer. Learn all the tips and secrets to dividing your linen: colour, type of fabric and tendency of creating fuzz are the most important criteria. 3. Guide to understanding labels (p. 6) The symbols on the labels of your garments are easy to understand and equally important for the success of your wash. The guide includes simple instructions to help you choose the right temperature, wash cycles and ironing methods. 4. Useful tips to avoid mistakes (p. 7) Yeras back, our grandmothers were the ones who gave us good advice - and in those days synthetic fibres did not exist: washing was easy. Today, Margherita offers you helpful advice allowing you to wash cashmere and wool even better than an expert laundress would by hand. 5. The detergent dispenser (p. 8) How to use the detergent dispenser and the bleach compartment. 6. Understanding the control panel (p. 3) Margheritas control panel is very simple. It has only a few essential buttons to help you choose any type of wash cycle, ranging from the most energetic, capable of cleaning a mechanics overalls, to the most delicate for cashmere. Familiarising with it will help you get the best out of your wash while helping your washer-dryer last longer. Its easy. 1 Margherita - Instructions for installation and use 7. Guide to Margheritas programmes (p. 4) Herein is an easy table to help you choose the right programme, temperature, detergents and possible additives. Choose the right programme and you will get better results with your wash while saving time, water and energy, day after day. 8. How to dry (p. 5) A few handy tips to get the best drying cycle from your appliance. 9. Care and maintenance (p. 15) Margherita is a true friend. With just a bit of care, it will repay you with loyalty and devotion. With the necessary upkeep, it will wash for years and years to come. 10. Problems and solutions (p. 9 and 10) Before calling a technician, read these pages: immediate solutions may be found for a number of problems. If the problem persists, call Ariston customer services and any failure will be repaired, as soon as possible. 11. Technical characteristics (p. 10) Herein are the technical features of your washer-dryer: model type number, electric and water specifications, size, capacity, speed of the spin cycle and compliance with Italian and European rules and regulations. 12. Safety for you and your children (p. 16) Here you will find the necessary guidelines for the safety of your entire household, because safety is very important indeed. 13. Ariston stays with you after your purchase (p. 17) Ariston supports its products after their purchase by offering you a range of special services, professional assistance, spare parts and quality accessories. What goes in your washer-dryer? Before washing, you can do a great deal for better results. Divide your garments according to fabric and colour. Read the labels, follow their indications and alternate small items with large ones. Before washing. Divide your washing according to the type of fabric and colour resistance: sturdy fabrics should be separated from delicate ones. Light colours should be separated from dark ones. Empty all pockets (coins, paper, money and small obejects) and check the buttons. Mend immediately or remove loose buttons as they could fall off during the wash cycle. The labels say it all. Always look at the labels: they tell you everything about your garment and how to wash it in the best way possible. The table on page 6 shows you all the secrets of the symbols found on labels. Their indications are a valuable guide to a better wash and to longer lasting clothes. M ARGHERITA Dividing your garments according to fabric and colour, is very important for good results Big and small happily together. This washer-dryer has a special electronic control device for distributing the wash load evenly: before the spin cycle starts, this device allows the washing to position itself as uniformly as possible in the drum, according to the type of washing and initial positioning. For this reason, even at top spin, the washer-dryer does not vibrate or make any noise. Remember that, if you want to use it, the "programmed start" should be set before the wash cycle. having removed the freshly cleaned washing, leave the door open or ajar so that the humidity left inside can evaporate. Always close the water tap. Remember that, in the event of a power failure, or should the washer-dryer switch itself off, the programme chosen will be memorised. Starting Margherita After installing your new washer-dryer, start a wash cycle by setting programme "1" at 90 degrees. Starting Margherita in the right way is important for the quality of your wash, for preventing problems and for lengthening the life of your appliance. After loading your washing and pouring in the detergent together with any additives, always check that: For more delicate garments: protect underwear, tights and stockings and delicate items by placing them in a canvas pouch 1. The door is correctly shut. 2. The plug is inserted in the socket. 3. The water tap is open. 4. Selector knob A is positioned on one of the symbols (Stop/ Reset). Choose the desired programme The programme is selected according to the type of garments that need to be washed. To choose a programme, refer to the table on page 4. Turn knob A until the selected programme is aligned with the mark on the control panel, set the temperature using knob B, make sure knob C is in the required position and, if necessary, use buttons E, F, G and H and then press on/off button I (position I). At the end of the wash cycle... Lamp L will flash quickly for a few seconds, then it will begin flashing more slowly. Then turn Margherita off by pressing on-off button I (O position). You can now open the washer-dryer door safely. After How to eliminate the most common stains Ink and biro Dab with a wad of cotton soaked in methyl alcohol or alcohol at 90°. Tar Dab with fresh butter, rub in turpentine then wash immediately. Wax Scrape away, then run a hot iron between two sheets of absorbent paper. Then rub in cotton with turpentine or methyl alcohol. Chewing gum Rub in nail polish remover and wipe with a clean rag. Mold Cotton and white linen should be placed in a solution of 5 parts water, one bleach and a spoon of vinegar, then washed immediately. For other white fabrics, use hydrogen peroxide at 10 volumes and wash immediately. Lipstick Dab with ether on wool or cotton. Use tricloroetilene for silk. Nail polish Place a sheet of absorbent paper on the side of the stain, wet it with nail polish remover, shifting the garment as the sheet gradually changes colour. Grass Dab with a wad of cotton soaked in methyl alcohol. Margherita - Iinstructions for installation and use 2 M ARGHERITA Understanding the control panel Here Im in command Making the right choice is important. And its easy. E F A H G Programme selector knob and programmed start Use this knob to select the wash programme. Turn this knob clockwise only. To select a programme, you should turn the knob so that the symbol/number of the desired programme is in line with the pointer on the control panel. Now press on/off button I (position I), pilot lamp L will start flashing. After 5", the setting will be accepted, pilot lamp L will stop flashing (staying lit) and the wash cycle will begin. Should you wish to interrupt the programme in progress or set a new one, select one of the symbols (Stop/Reset) and wait 5" : when the cancellation has been accepted, pilot lamp L flashes, and you can then turn the appliance off. You can use this knob to delay the appliance's operation. Select one of the 3 delay time positions, press the on/off button I (position I) and wait 5". The setting has now been accepted (pilot lamp L stays lit) and you can select the programme you desire. Pilot lamp L has a particular flashing motion (2" on and 4" off) to indicate that a delayed start has been set. During this phase, you can open the appliance door and change the washing load, should you wish to do so. After the wash cycle has been set and accepted by the washerdryer, turning the knob will have no effect (except for when it is on position Stop/Reset). D Margheritas knobs are hidden. Just press them lightly in the middle to extract them. Temperature control knob It is used to set the wash temperature indicated in the programme table. It also allows you to reduce the temperature recommended for the selected programme, and even to set a cold wash cycle ( ). Drying cycle knob Use this knob to select the desired drying cycle. Two options are available: A - Based on time: From 40 minutes to 150. B - Based on the damp level of the dry clothes: Iron : slightly damp clothes, easy to iron. Wardrobe : dry clothes to put away. Extra dry : very dry clothes, recommended for towelling and bathrobes. A cooling stage is foreseen at the end of the drying cycle. Detergent dispenser It is divided into three compartments: 1. Detergent for pre-washing; 2. Detergent for the wash cycle; 3. Fabric softeners. MAX 4 2 3 The detergent dispenser with the additional bleach compartment is here. Margherita - Instructions for installation and use B M L I The washer-dryer is equipped with extra compartment 4 Stain removal (see page 8) (provided) for the bleach, to be Thanks to this command, Margherita will carry out a more ininserted in compartment 1. tensive wash that optimises the effectiveness of the liquid Anti-crease additives, thus allowing more This button allows you to resistant stains to be removed. interrupt a programme (on When you press the stain removal symbol ) keeping the washing button, you cannot activate the soaking in water before the spin pre-wash cycle. cycle. It is a very useful button in particular because it can be used for delicates and synthetics. On-off It is only to be used with wash When button I is pressed, the program-mes for synthetic washer-dryer is switched on, fabrics, silk and curtains when it when it is not the machine is is impossible for you to take the switched off. washing out immediately. Before Turning the appliance off does opening the washing machine not cancel the selected door, finish the wash cycle as programme. follows: Silk and curtains: press button E and Margherita will drain the On-off lamp / door locked Lamp L flashes slowly when the water. Synthetic fabrics: press button E appliance is switched on and if you want a spin cycle, or turn awaiting instructions and at the knob A to symbol if you end of a cycle, indicating that the door can be opened. It flashes want the water to be drained. With "Daily wash" or "Hand quickly when the door should wash", this function is not not be opened. A steady light means the appliance has performed. accepted the selected programme. Slow spin Use this button to reduce the spinning speed from 1200 to 600 rpm for the cotton programmes and from 850 to 600 rpm for the synthetic fabrics programmes. Rapid wash 1 3 C This button reduces the length of the wash programme by about 30%. It cannot be used with special programmes (see page 4) or those for wool and silk. Drying cycle lamp When this lamp is on, it means that knob C has been set on a drying cycle and at the end of the wash cycle, the appliance will run the selected tumble drying cycle. ARGHERITA M What are you washing today? A programme for all seasons Type of fabric and degree of soil Progr. knob Temp. knob Detergent Fabric Stain rem. for wash softener button/ Bleach Length of the cycle (minutes) Description of wash cycle COTTONS 165 Prewash, wash cycle at 90°C, rinse cycles, intermediate and final spin cycles Del./Trad. 145 Wash cycle at 90°C, rinse cycles, intermediate and final spin cycles Del./Trad. 130 Wash cycle at 60°C, rinse cycles, intermediate and final spin cycles 150 Wash cycle at 40°C, rinse cycles, intermediate and final spin cycles 95 Wash cycle at 40°C, rinse cycles, intermediate and final spin cycles Exceptionally soiled whites (sheets, tablecloths, etc.) 1 90°C ◆ ◆ Exceptionally soiled whites (sheets, tablecloths, etc.) 2 90°C ◆ ◆ Heavily soiled whites and fast colours 3 60°C ◆ ◆ Heavily soiled whites and fast colours 4 40°C ◆ ◆ Slightly soiled whites and delicate colours (shirts, jumpers, etc.) 5 40°C ◆ ◆ Del./Trad. ◆ Del./Trad. Rinse cycles/Bleach Rinse cycles, intermediate and final spin cycles Spin cycle Draining and final spin cycle Drying cycle for cotton fabrics Stop/Reset Interrupts/Cancels the selected programme SYNTHETICS Heavily soiled fast colour synthetics (baby linen, etc.) 6 60°C ◆ ◆ Delicate 100 Wash cycle at 60°C, rinse cycles, anticrease or delicate spin cycle Heavily soiled fast colour synthetics (baby linen, etc.) 7 50°C ◆ ◆ Delicate 95 Wash cycle at 50°C, rinse cycles, anticrease or delicate spin cycle Delicate colour synthetics (all types of slightly soiled garments) 8 40°C ◆ ◆ Delicate 70 Wash cycle at 40°C, rinse cycles, anticrease or delicate spin cycle Delicate colour synthetics (all types of slightly soiled garments) 9 30°C ◆ ◆ 30 Wash cycle at 30°C, rinse cycles and delicate spin cycle Rinse cycles/Bleach ◆ Fabric softener Rinse cycles, anti-crease or delicate spin cycel Delicate Rinse cycles with automatic introduction of softener, anti-crease or delicate spin cycle ◆ Spin cycle Draining and delicate spin cycle Drying cycle for synthetic fabrics Stop/Reset Interrupts/Cancels the selected programme WOOL Hand wash 10 40°C ◆ Rinse cycles/Bleach ◆ Delicate ◆ Delicate 45 Wash cycle at 40°C, rinse cycles and delicate spin cycle Rinse cycles and delicate spin cycle Spin cycle Draining and delicate spin cycle Drying cycle for wool Stop/Reset Interrupts/Cancels the selected programme SILK Particularly delicate garments and fabrics (curtains, silk, viscose, etc.) 11 Rinse cycles 30°C ◆ ◆ ◆ 50 Wash cycle at 30°C, rinse cycles, anticrease or draining Rinse cyclesi, anti-crease or draining Draining Draining Stop/Reset Interrupts/Cancels the selected programme PROGRAMMED START 12 - 9 - 3 hour delay Start is delayed by 12 - 9 - 3 hours Stop/Reset Interrupts/Cancels the selected programme Important: to cancel the wash programme you have just set, select one of the symbols (Stop/Reset) and wait for at least 5. The data found in the table is purely indicative, and can vary according to the quantity and type of washing, the water system temperature and the room temperature. Special programmes A wash performance Margherita has a special programme to allow you to obtain optimum results even at low temperatures. By setting programme 4 at a temperature of 40° C, the results you will obtain will be the same as you would normally obtain at 60°C thanks to the washer-dryers action and the length of the wash cycle. Daily wash Margherita has a programme studied for the washing of lightly soiled garments in a short amount of time. By setting programme 9 at a temperature of 30°C, you can wash different types of fabrics together (except for wool and silk), with a maximum load of 3 kg. This programmes allows you to save on both time and energy as it only lasts around 30 minutes. WE RECOMMEND THE USE LIQUID DETERGENT. Margherita - Iinstructions for installation and use 4 M ARGHERITA How to dry A combined Washing and Drying Programme Look at table A to the side and follow the instructions provided for MAX load to have an automatic washing and drying cycle. Follow the instructions for wash only (see page 2, the paragraph entitled "Starting Margherita") and use knob C to set the type of drying cycle desired, then press button I (I position). If the laundry load to be washed and dried exceeds the maximum load foreseen (see table A), then follow the instructions provided for wash only (see page 2, the paragraph entitled "Starting Margherita"). When the wash cycle has finished, remove your washing, divide it up and replace part of it inside the drum. Now follow the instructions provided for a dry only cycle. Repeat this procedure for the remainder of the load. Dry only Once you have loaded the washing that needs drying (4 kg max. for cottons, see table for other fabrics ), make sure that: - the door is shut correctly; - the plug is inserted in the socket; - the water tap is turned on; - button I has not been pressed (O position). And now set the wash cycle knob Set knob A on the appropriate drying setting depending on the type of fabric, select the type of drying cycle required using knob C and then press on-off button I (I position). At the end of the drying cycle... Wait for lamp L to flash slowly, then turn the washer-dryer off by pressing on-off button I (O position). Now you can open the appliance door. Once you have removed the washing from the appliance, leave the door open or ajar to avoid the formation of bad odours and turn off the water tap. WOOL DRYING CYCLE The woollen garments drying cycle should only and exclusively be run together with the selection of a specific cycle time (150 - 100 - 60 - 40 minutes). We recommend a 60 minute drying cycle for a 1 kg load. If one of the three levels (Extra dry , Wardrobe , Iron ) is selected by mistake, the appliance will run a drying cycle lasting the MAX time foreseen (150 minutes). A. Fabric type Load type Cotton, Linen Clothing of different sizes Cotton Max. load (kg) Drying time (Min.) Extra dry Wardrobe Iron 4 155 140 130 Terry towels 4 155 140 130 Terital, Cotton Sheets, Shirts 2,5 110 100 90 Acrylics Pyjamas, socks, etc. 1 65 60 60 1 65 60 60 Nylon Slips, tights, stockings, etc. The data contained in the table are purely indicative. For cotton loads of less than 1 Kg, use the drying programme designed for synthetic fabrics. IMPORTANT A spin cycle is carried out during the drying if you have set a cotton programme and a level of dryness (Extra dry , Wardrobe , Iron ). WARNING - During the drying phase, the door tends to get quite hot. - Do not use the appliance to dry clothes that have been washed with flammable solvents (e.g. trichlorethylene). - Do not use the appliance to dry foam rubber or similar elastomers. - Make sure that the water tap is turned on during the drying cycles. - This washer-dryer can only be used to dry clothes which have been pre-washed in water. 5 Margherita - Instructions for installation and use M ARGHERITA Understanding labels Learn the meaning of these symbols and you will get better results, your garments will last longer and your machine will repay you by washing better. All over Europe, garment labels contain messages expressed in small yet important symbols. Understanding them is very important if you want to get better results and treat your garments the way they deserve to be treated. These symbols are divided in five different categories and shapes: washing , bleaching , ironing , dry cleaning and drying . Useful tips Turn shirts inside out to get better results and make them last longer. Always empty pockets of their contents. Look at the label: it will always give you useful advice. When loading your washing, alternate large and small garments. Make sure you select the right temperature! Consult and learn the symbols in this table: they will help you obtain a better wash, treat your clothes properly, and get a better performance out of your Ariston Margherita. Wash Strong action Bleaching Ironing Dry cleaning Delicate action High Temp. Bleaching only in cold water Low Temperat. A cl Wash at 95°C Drying Hot iron at max 200°C Dry clean with any solvent Machine dryable Medium hot ironing at max 150°C Dry clean only with perchloride, benzine av., pure alcohol, R111 and R113 Iron at max 110°C Dry clean with av. benzine, pure alcohol and R113 Spread to dry Do not dry clean Hang to dry without spin drying P Wash at 60°C Do not bleach Do not machine dry F Wash at 40°C Wash at 30°C Hand wash Not ironable Dry on clothes hanger Not washable in water Margherita - Iinstructions for installation and use 6 M ARGHERITA Useful tips to avoid mistakes Never use your washerdryer to wash... torn, fraying or non-hemmed linen. If it is absolutely neccessary, place it in a bag for protection. Brightly coloured linen with whites. How much does it weigh? 1 sheet 400-500 gr. 1 pillow case 150-200 gr. 1 tablecloth 400-500 gr. 1 bathrobe 900-1,200 gr. 1 towel 150-250 gr. Watch the weight! For best results, do not exceed the weight limits stated below (figures show weight when dry): Coloured T-shirts, printed ones and shirts last longer if turned inside out before washing. Printed T-shirts and sweatshirts should always be ironed inside out. - Resistant fabrics: 5,5 kg maximum - Synthetic fabrics: 2.5 kg maximum - Delicate fabrics: 2 kg maximum - Pure new wool: 1 kg maximum Salopette alert. Very popular salopette type overalls have straps with hooks that can damage the drum of your washer-dryer or other garments during the wash. By placing the hooks in the bib pocket and fastening them with safety pins, all risks are avoided. Holidays: unplug the appliance. When you go on holiday, we recommend that you unplug your washer-dryer, shutting off the water inlet tap and leaving the door opened or ajar. In this way, both the drum and the gasket will remain nice and dry and unpleasant odours will not develop inside the washer-dryer. WOOL CYCLE For best results, we recommend you use a specific detergent, taking care not to wash more than 1 kg of laundry. How to wash almost anything Curtains. Curtains tend to crease a great deal. Here is a tip to reduce creasing: fold the curtains and place them in a pillow case or mesh bag. Do not load anything else, so that the overall weight does not exceed the half load. Remember to use the specific programme 11 which automatically excludes the spin cycle. Quilted coats and windcheaters. You can wash quilted coats and wind-cheaters, too, if they are padded with goose or duck down. Do not load more than 2-3 kg and never load 5,5 kg. Repeat rinse once or twice using the gentle spin. Trainers. Once you have removed mud and dirt from trainers, you can wash them with jeans and other tough garments. Do not wash trainers with whites. EXCLUSIVE Cashmere Gold: As gentle as a hand wash The first Washer-dryer to have "The Woolmark Company" recognition. The Cashmere Gold wash programme has been studied for machine washing even the most delicate and valuable wool and Cashmere garments. The Merloni Elettrodomestici wool wash cycle has been tested and approved by The Woolmark Company for 7 washing Woolmark garments labelled as hand wash. This is the first gentle action hand wash cycle approved by The Woolmark Company. M.00221 This has been made possible thanks to the speed of the drum at 90 rpm, even during the rinse cycle, thus Margherita - Instructions for installation and use preventing the fibres from rubbing. Always use programme 10 with garments bearing the hand wash symbol: the washbasin and hand. To take care of your woollen items, we recommend you use special detergents. M ARGHERITA Its important for a good wash The secrets of the detergent dispenser The first secret is the easiest: the detergent dispenser is opened by rotating it outwards. You must add detergent and any additives following the dosage recommended by the manufacturers: generally, all the indications you need are on the box. Doses vary according to wash load, the water hardness and how soiled the washing is. Experience will help you select the right dosage almost automatically: it will become your secret. Before pouring in the detergent for pre-washing in compartment 1, make sure that the extra compartment for bleach 4 has not been inserted. When pouring in the softener in compartment 3, avoid making it overflow from the grate. The washer-dryer automatically adds the softener to the wash in each programme. 1 2 Liquid detergent is to be poured into compartment 2 only a few seconds before starting the wash cycle. Remember that liquid detergent is only designed for wash cycles of up to 60 degrees on non prewash items. Liquid or powder detergents are sold together with special containers that are to be placed directly inside the washer-dryer drum, according to the instructions found on the detergent box. Never use hand wash detergent, because it may form too much foam, which could damage the washer-dryer. Detergents that are specifically indicated for both hand and machine wash are an exception. One last secret: when washing with cold water, always reduce the amount of detergent you use: it dissolves less easily in cold water than in hot water, so part of it would be wasted. In compartment 1: Detergent for pre-washing (powder) MAX 4 In compartment 2: Detergent for washing (powder or liquid) In compartment 3: Additives (softeners, perfumes, etc.) 1 2 3 In compartment 4: Bleach and delicate bleach. Bleach cycle and stain removal button If bleaching is necessary, the extra case 4 (provided) must be inserted into compartment 1 of the detergent dispenser. When pouring in the bleach, be careful not to exceed the "max" level indicated on the central pivot (see illustration). The use of the additional bleach container excludes the possibility of using the pre-wash cycle. Traditional bleach can only be used on sturdy white fabrics, whereas delicate bleach can be used for coloured fabrics, synthetics and for wool. The detergent dispenser can be removed and cleaned: just lift it up and pull it outwards ,as indicated in the figure. Then leave it under running water for a few minutes. Cutting costs efficiently A guide to environmentally friendly and economic use of your appliance. MAXIMISE THE LOAD SIZE Achieve the best use of energy, water, detergent and time by using the recommended maximum load size. SAVE up to 50% energy by washing a full load instead of 2 half loads. MAX MAX You cannot bleach with the Silk programme and with the special programmes (see page 4). Use the stain removal button every time you want to bleach. Should you want to do it separately you must pour the bleach into the additional container 4, press button H (stain removal), start the washerdryer, then select one of the according to the symbols type of fabric. When you bleach during a normal wash cycle, pour the detergent and any additives in the special compartments, press button H (stain removal), set the programme you desire and turn the washer-dryer on. DO YOU NEED TO PRE-WASH? For heavily soiled laundry only! SAVE detergent, time, water and between 5 to 15% energy consumption by NOT selecting Prewash for slight to normally soiled laundry. IS A HOT WASH REQUIRED? Pretreat stains with stain remover or soak dried in stains in water before washing to reduce the necessity of a hot wash programme. SAVE up to 50% energy by using a 60°C wash programme. BEFORE USING A DRYING PROGRAMME ... SAVE energy and time by selecting a high spin speed to reduce the water content in laundry before using a drying programme. Margherita - Iinstructions for installation and use 8 M ARGHERITA Troubleshooting Before calling, read the following Your washer-dryer could fail to work. In most cases, the problems arising can be easily solved without having to call for a technician. Before calling for assistance, always check these points. The washer-dryer fails to start. Is the plug correctly inserted into the socket? It could have been moved whilst cleaning. Is there electricity in the house? A circuit breaker could have gone off, perhaps because too many appliances are on at the same time. Or perhaps because of a general power failure in your entire area. Is the washer-dryer door closed properly? For safety reasons, the washer- dryer cannot work if the door is open or not shut properly. Is the On/Off button pressed? If it is, then a programmed start has been set. But where did all the water go? Simple: with the new Ariston technology, you need less than half of it, to get good results on twice as much! This is why you cannot see the water through the door: because there is little, very little of it, to respect the environment yet without renouncing maximum cleanliness. And, on top of that, you are also saving electricity. Is the programmed start knob, on those models concerned, in the correct position? Is the water tap open? For safety reasons, if the washerdryer does not load water, it cannot start a wash cycle. The programme selector knob keeps turning? The washer-dryer fails to load water. RIGHT Close the tap after every wash cycle. Limit the use of the washer-dryers hydraulic system and eliminate leakage risks when no-one is at home. Always leave the appliance door ajar to avoid bad odours. Clean the appliances exteriors delicately. To clean the exteriors and the rubber parts of the appliance, always use a rag dipped in lukewarm water and soap. 9 Leave the washerdryer plugged in while cleaning. Even during maintenance, the appliance should always be unplugged. Is the tap correctly attached to the pipe ? Is there a water shortage ? There could be work in progress in your building or street. Is there enough pressure? The autoclave may be malfunctioning. Use solvents and aggressive abrasives. Never use solvents or abrasives to clean the external and rubber parts of the washerdryer. Is the tap filter clean? If the water is very calcareous, or if work has recently been carried out on the water piping, the tap filter could be clogged with particles and debris. Neglect the detergent dispenser. It is removable and can easily be cleaned by leaving it under running water. Is the rubber hose bent? The tract of the rubber hose bringing water to the washerdryer must be as straight as possible. Make sure it is not squashed or bent. WRONG Go on holiday without thinking about her. Before leaving, always make sure that the washer-dryer is unplugged and that the water tap is closed. Margherita - Instructions for installation and use Wait a few minutes for the drain pump to empty the tub, switch Margherita off, select one of the symbols stop/reset , then switch it back on. If the knob continues to turn, call for assistance because it is reporting an anomaly. The washer-dryer continuously loads and unloads water. Is the drain hose positioned too low? It must be installed at a height ranging from 60 to 100 cm. Is the hoses mouth immersed in water? Does the wall drainage system have a breather pipe? If the problem persists even after these checks, close the water tap, switch the appliance off and call for assistance. If you live on an upper floor of your building, there may be a problem with your drain trap. To solve this problem, a special valve must be installed. M ARGHERITA Is the washer-dryers drain duct clogged? Is there an extension of the drain hose? If so, is it positioned incorrectly, blocking the water flow? The washer-dryer does not drain or spin. Does the selected programme foresee water draining? Some wash cycles require enabling the draining manually. Is the Anti-crease" function -where provided enabled? This function require enabling the draining manually. Is the drain hose bent? The tract of the drain hose must be as straight as possible. Make sure it is not squashed or bent. Is the appliance closed in between furniture and a wall? If it is not a built-in model, the washer-dryer needs to oscillate a bit during the spin cycle. A few cm of space should therefore be left around it. The washer-dryer vibrates too much during the spin cycle. Has the internal floating unit been correctly unblocked during installation? See the following page on installation procedures. Has the washer-dryer been levelled correctly? The levelling of the appliance should be checked periodically. In time, the machine could move imperceptibly. Adjust the feet and check them with a level. Always get assistance from authorised technicians and always insist on original spare parts. The washer-dryer leaks. Is the metal ring of the inlet hose properly attached? Close the tap, unplug the appliance and try tightening its attachment without forcing it. Is the detergent dispenser obstructed? Try extracting it and washing it under tap water. Is the drain hose well attached? Close the tap, unplug the appliance and try tightening its attachment. CDE 12 X Dimensions width 59,5 cm height 81,5 cm depth 54 cm Capacity from 1 to 5,5 kg for the wash programme; from 1 to 4 kg for the drying programme Electrical connections voltage 230/240 Volt 50 Hz maximum absorbed power 2050 W Water connections maximum pressure 1 MPa (10 bar) minimum pressure 0,05 MPa (0,5 bar) drum capacity 46 litre Spinning speed up to 1200 rpm Control programs in compliance with IEC regulation 456 wash: programme 3; temperature 60°C; carried out with 5 kg load. drying: run with a load of 2.5 kg and knob C set to position . Is the detergent appropriate for machine washing? Check whether its label reads the definition for machine wash or hand and machine wash, or other similar indications. Is the correct amount being used? An excessive amount of detergent, besides producing too much foam, does not guarantee a more effective wash, and causes scaling in the internal parts of the appliance. The washer-dryer does not dry. Check whether: the plug has been correctly inserted into the socket; there is electricity in your home; the appliance door has been shut properly; a delayed start (if available) has not been selected; programme knob A has been set to position (Stop/Reset); the drying cycle knob C has been set to position 0. The washer-dryer doesn't dry properly. Check whether: the end of the drain hose is underwater; the drain pump is obstructed; the advice given on the maximum loads has been taken; the water tap has been turned on. Technical characteristics Model Too much foam. If, despite all checks, the washerdryer fails to function and the problem persists, call your nearest authorised Customer Service Centre, providing the following information: - the type of malfunctioning - the model type no. (Mod. ....) - the serial number (S/N ....) These indications can be found on the data plate situated on the back of the washer-dryer. This appliance conforms with the following E.E.C. directives: - 73/23/EEC of 19/02/73 (Low Voltage) and subsequent modifications - 89/336/EEC of 03/05/89 (Electromagnetic Compatibility) and subsequent modifications Margherita - Iinstructions for installation and use 10 M ARGHERITA When Margherita arrives Installation and removal Whether new or just transported to a new house, installation is extremely important for the correct functioning of your washing machine. After removing the appliance from its packaging, check that it is intact. If in doubt, contact a qualified technician immediately. The inside of the machine is supported, for transportation, by four screws on the back panel. Before using the washing machine, remove the screws, remove the spacers together with the rubber tubes attached to them (keeping all the parts) and use the plastic plugs provided to fill in the holes. Important: Use the cap (provided) to close the 3 holes which housed the stop pin, situated in the righthand part of the lower back of the washing machine. Levelling The washing machine must be levelled appropriatey in order to guarantee its correct functioning. To level the appliance, the front feet must be adjusted; the angle of inclination, measured according to the worktop, must not exceed 2°. When placed on carpet, make sure the ventilation is not reduced. Connection to the water mains Both hot and cold water supplies are preferable and they should be between 34.5kN/m²(5lb/in²) and 1034.2kN/m² (150lb/in²) pressure. The hose having the red end fitting should be encountered between the hot supply and the threaded connection adjacent to the letter H on the rear of the machine. The hose having the white end fittings should be connected between the cold supply and the threaded connection adjacent to the letter C on the rear of the machine. Remember to insert a sealing washer at each connection to ensure watertight joints. Do not overtighten the connections by using tools -hand tight is sufficient to prevent leaks. It is generally more convenient to have these supplies away from the sink taps. Where no suitable hot water supply is available or it does not meet these requirements, both inlet hoses may be connected to a cold supply by using two taps etc., or a «T» junction on the plumbing however, use of cold water only will increase programme times. Note: the maximum temperature should not exceed 70°C (158°F). Connecting the drain hose The drain hose (hooked pipe) is secured to the rear of the machine by support clips and may be routed to right or left as required. Electric connection Your appliance is now supplied with a 13 amp fused plug it can be plugged into a 13 amp socket for immediate use. Before using the appliance please read the instructions below. WARNING - THIS APPLIANCE MUST BE EARTHED. THE FOLLOWING OPERATIONS SHOULD BE CARRIED OUT BY A QUALIFIED ELECTRICIAN. The hook to be used in case the drain hose ends at a height below 60 cm. The drain hose should be placed in a stand pipe with a minimum internal diameter of 38 mm (1½ inches) or it can be positioned over a sink or it can be connected as shown in Fig. A. The height of stand pipe or sink should be between 60 and 100 cm (24 and 40 inches). Care must be taken that the hose is not obstructed, twisted, submerged or kinked. If the hose is connected with an airtight joining, provision should be made to prevent syphoning. Replacing the fuse: When replacing a faulty fuse, a 13 amp ASTA approved fuse to BS 1362 should always be used, and the fuse cover re-fitted. If the fuse cover is lost, the plug must not be used until a replacement is obtained. Replacement fuse covers: If a replacement fuse cover is fitted, it must be of the correct colour as indicated by the coloured marking or the colour that is embossed in words on the base of the plug. Replacements can be obtained directly from your nearest Service Depot. The rubber gasket. The front feet are adjustable. Retain the transit screws, spacers and washers. Should you move house then these should be replaced to support the inside of the machine to prevent damage when transporting the machine. Connect the inlet hose to the threaded connector on the machine rear. The guide for draining into tubs and sinks. Water pipe inlet at the top right. 11 Margherita - Instructions for installation and use Fig. A Warning! The company denies all liability if and when these norms are not respected. Plastic bags, expanded styrofoam, nails and other packaging parts are not childrens toys, and are potentially dangerous. M ARGHERITA Removing the plug: If your appliance has a nonrewireable moulded plug and you should wish to re-route the mains cable through partitions, units etc., please ensure that either: the plug is replaced by a fused 13 ampere re-wearable plug bearing the BSI mark of approval. or: the mains cable is wired directly into a 13 amp cable outlet, controlled by a switch, (in compliance with BS 5733) which is accessible without moving the appliance. Disposing of the appliance: When disposing of the appliance please remove the plug by cutting the mains cable as close as possible to the plug body and dispose of it as described above. GREEN & YELLOW BROWN BLUE 13 ampere fuse CROSS-BAR CORD GRIP Disposing of the plug: Ensure that before disposing of the plug itself, you make the pins unusable so that it cannot be accidentally inserted into a socket. Instructions for connecting cable to an alternative plug: Important: the wires in the mains lead are coloured in accordance with the following code: Green & Yellow Earth Blue Neutral Brown Live As the colours of the wires in the lead may not correspond with the coloured markings identifyng the terminals in your plug, proceed as follows: Connect Green & Yellow wire to terminal marked E or or coloured Green or Green & Yellow. Connect Brown wire to terminal marked L or coloured Red. Connect Blue wire to terminal marked N or coloured Black. If a 13 amp plug (BS 1363) is used it must be fitted with a 13 amp fuse, either in the plug or adaptor or at the distribution board. If you are in any doubt the electrical supply to your machine, consult a qualified electrician before use. How to connect an alternative plug: The wires in this mains lead are coloured in accordance with the following code: BLUE NEUTRAL (N) BROWN LIVE (L) GREEN&YELLOW EARTH (E) Margherita - Iinstructions for installation and use 12 M ARGHERITA Mounting the wooden panel onto the door and inserting the machine into cabinets: In the case where the machine must be shipped for final installation after the wooden panel has been mounted, we suggest leaving it in its original packaging. The packaging was designed to make it possible to mount the wooden panel onto the machine without removing it completely (see figures below). Instructions for the fitter The wooden panel that covers the face of the machine must not be less than 18 mm in thickness and can be hinged on either the right or left. For the sake of practicality when using the machine, we recommend that the panel be hinged on the same side as the door for the machine itself - the left. Door Mounting Accessories (Fig. 1-2-3-4-5) N° 2 Hinges N° 2 Hinge Supports Fig. 1 cheria lavabian machine washing laver ne machi aschine waschm Fig. 2 N° 1 Magnet 6 5 4 3 2 1 Fig. 3 N° 1 Magnet plate Fig. 4 ta Lato por Door side te Cote por te Tur sei B A N° 1 Rubber plug Fig. 5 D C cheria lavabian machine washing laver ne hi mac aschine waschm 6 5 4 3 2 1 ta Lato por Door side te Cote pore Tur seit E 13 Margherita - Instructions for installation and use - No. 6 type A self-threading screws, l =13 mm. - No. 2 type B metric, countersunk screws, l =25; for fastening the magnet plate to the cabinet. - No. 4 type C metric screws, l =15 mm; for mounting the hinge supports to the cabinet. - No. 4 type D metric screws, l =7 mm; for mounting the hinges on the supports. N° 1 Spacer Fig. 4/B M ARGHERITA Mounting the Parts onto the Face of the Machine - Mount the hinge supports onto the face of the machine, positioning the hole indicated by the arrow in fig. 1 towards the inside of the face and using the type C screws. - Mount the magnetic plate on the opposite side, at the top, using the two type B screws. - Place the spacer illustrated in fig. 4/B between the appliance front and the magnet receiver. Using the Drilling Template - To trace the positions of the holes on the left-hand side of the panel, align the drilling template to the top left side of the panel using the lines traced on the extremities as a reference. - To trace the positions of the holes on the right-hand side of the panel, align the drilling template to the top right side of the panel. - Use an appropriately sized router to mill the holes for the two hinges, the rubber plug and the magnet. Mounding the Parts onto the Wooden Panel (Door) - Insert the hinges into the holes (the movable part of the hinge must be positioned facing away from the panel) and fasten them with the 4 type A screws. - Insert the magnet into the top hole on the opposite side of the hinges and fasten it with the two type B screws. - Insert the rubber plug into the bottom hole. The panel is now ready to be mounted onto the machine. 820 ÷ 900 595 Inserting the machine into the Cabinet - Push the machine into the opening, aligning it with the cabinets (fig. 6). - Regulate the adjustable feet to raise the machine to the appropriate height. - To adjust the position of the wooden panel in both the vertical and horizontal directions, use the C and D screws, as shown in fig. 7. Important: close the lower part of the appliance front by ensuring that the plinth rests against the floor. D 57 min0 815 Fastening the plinth guide If the machine is installed at the end of a set of modular cabinets, mount either one or both of the guides for the base molding (as shown in fig. 8). Adjust them for depth based on the position of the base molding, and, if necessary, fasten the base to the guides (fig. 9). This is how to assemble the plinth guide (fig.8): Fasten angle P using screw R, insert plinth guide Q into the special slot and once it is in the desired position, lock it in place using angle P and screw R. C 600 min 540 Mounting the Panel into the machine Insert the nib of the hinge (indicated by the arrow in fig. 2) into the hole for the hinge and push the panel towards the front of the machine. Fasten the two hinges with the type D screws. C Fig. 6 Fig. 7 Fig. 8 Fig. 9 Accessories provided for the height adjustment The following can be found inside the polystyrene lid (fig. 10): 2 crossbars (G), 1 strip (M) Adjusting the appliance height The height of the appliance can be adjusted (from 815 mm to 835 mm), by turning the 4 feet. Should you require the appliance to be placed higher than the above height, you need to use the following accessories to raise it to up to 870 mm: - the two crossbars (G) - the 4 feet (H) - the 4 screws (I) - the 4 nuts (L) then perform the following operations (fig. 11): remove the 4 original feet, place a crossbar G at the front of the appliance, fastening it in place using screws I (screwing them in where the original feet were) then insert the new feet H. Repeat the same operation at the back of the appliance. Now adjust feet H to raise or lower the appliance from 835 mm to 870 mm. Once you have reached the desired height, lock nuts L onto crossbar G. To adjust the appliance to a height between 870 mm and 900 mm, you need to mount strip M, adjusting feet H to the required height. Insert the strip as follows: loosen the three screws N situated at the front of the Top cover of the appliance, insert strip M as shown in fig. 12, then fasten screws N. Fig. 10 the following can be found inside the appliance drum: 4 additional feet (H), 4 screws (I), 4 screws (R), 4 nuts (L), 2 plinth guides (Q) M G L H Fig. 11 I Fig. 12 Margherita - Iinstructions for installation and use 14 M ARGHERITA Easy Care and Maintenance Treat her well and shell be your friend forever Your washer-dryer is a reliable companion in life and on the job. It is just as important for you to keep it in shape. Margherita is a washer-dryer designed to last a lifetime without any problems. A few simple steps help keep it in shape and last longer. Firstly, you must close the water tap after each wash: the constant pressure of water could warp a few of the component parts. In addition, by doing so, you will avoid the risk of leaks when noone is at home. If the water in your area is too hard, use a deliming product (water is hard if it often leaves whitish stains around taps or drains, especially of bath tubs. For more accurate information as to the type of water in your system, call the local water works or a local plumber). Pockets must always be emptied removing even pins, badges and any other hard object. The washer-dryer exterior should be cleaned with a rag dipped in lukewarm water and soap. It is important to wash the detergent dispenser regularly. To prevent dried washing powder from accumulating, place the dispenser under running water for a few minutes. Never exaggerate with doses. Normal detergents already contain deliming agents. Only if the water is particularly hard, that is, rich in lime content, do we recommend the use of a specific product at every wash. A periodical wash cycle with a dose of a deliming product, without detergents or washing, may prove useful. Never use too much detergent or additives because this could cause an excess amount of foam, scaling and possible damage to the component parts of your washer-dryer. Do not forget to empty all pockets: small objects can cause damage to your friend Margherita. When in need, check the pump and the rubber hose. Margherita comes equipped with a self-cleaning pump that does not require any cleaning or maintenance. The rubber hose Check the rubber hose at least once a year. If you see any cracks, replace it immediately. When you use your washer-dryer, water pressure is very strong and a cracked tube could easily split open. 15 Margherita - Instructions for installation and use M ARGHERITA More and more important Your safety and that of your children Margherita has been built in compliance with the strictest international safety regulations. To protect you and all your family. Read these indications and all the information in this manual carefully: they are an important source, not only of numerous useful tips, but also of vital information on safety, use and maintenance. 1. Margherita should not be installed in an outdoor environment, not even when a roof shelters the area, because it may be very dangerous to leave it exposed to rain and thunderstorms. 2. It must only be used by adults and exclusively for washig clothes following the instructions provided in this manual. 3. Should it have to be moved, proceed with the help of two or three people and handle it with the utmost care. Never try to do this alone, because the appliance is very heavy. 4. Before loading the washerdryer, make sure the drum is empty. 5. Never touch the washerdryer when barefoot or with wet or damp hands or feet. 6. Never use extensions or multiple plugs, which are particularly dangerous in humid environments. The power supply cable must never be bent or dangerously compressed. 7. Never open the detergent dispenser while the appliance is functioning; do not use hand wash detergent because the abundance of foam could damage its internal parts. I only want an authorised specialised technician with original Ariston spare parts! 8. Never pull on the plug or the washer-dryer to disconnect it from the wall socket: it is extremely dangerous. 9. While the appliance is functioning, do not touch the drain water as it could reach very high temperatures. The appliance door, during wash cycles, tends to become heated; keep it out of childrens reach. Never force the washerdryer door because this could damage the safety block on the opening, which serves to protect from accidental openings. 10. In case of malfunctioning, first close the water tap and unplug the appliance from the wall socket; do not under any circumstances touch internal parts in order to attempt repairs. How to change the power supply cable The Margherita power supply cable is special and can be purchased exclusively from authorised Technical Service Centres. To replace the cable: 1. Make sure that Margherita is switched off and unplugged. 2. Remove the cover by unscrewing screws I [fig 13]. 3. Disconnect the wires from the radio interference suppressor F [fig. 14] noting as to their position (Blue=N wire; Brown=L wire) leaving the earth wire until last . N.B.: letters L, N and the symbol are indicated on the radio interference suppressor. 4. Remove the screw and washer V [fig. 15], which act as a stop for the cable passageway. 5. Remove the upper part of the cable slightly from the back panel of the appliance, pull the power supply cable upwards and take it out [fig. 16]. To connect the new power supply cable, reverse the procedure. It is important for your safety that you reassemble all parts and screws used. N L F Fig. 13 Fig. 14 Fig. 15 Fig. 16 Margherita - Iinstructions for installation and use 16 M ARGHERITA Stay in touch THANK YOU for choosing an Ariston appliance. We are confident you have made a good choice and that your new appliance will give many years of excellent service. And we're there when you need us. Register your purchase now This will confirm your entitlement to free spare parts for five years, and you could also be lucky enough to recover the cost of your purchase in our quarterly prize draw. Simply complete and return the Registration Form supplied with the appliance documents, using the FREEPOST envelope supplied. Or call the Registration Hotline on 0870 010 4305. Enjoy complete peace of mind. By registering now, you automatically qualify for a full year's guarantee on parts and labour PLUS free functional parts cover for a further 4 years, provided they are genuine Ariston spare parts fitted by an Ariston Service Engineer. We're as close to you as your telephone For direct access to Genuine Ariston Spare Parts and Accessories, call 0870 558 5850 and speak to our skilled staff who can help you to identify and purchase the item you require. For a Rapid Response to a problem with your appliance, call 0870 607 0805. We're open from Monday to Saturday (8am - 5.30pm weekdays, 9am - 5pm Saturday). We have our own department of highly trained Ariston service staff. For most calls, our Service Engineer can fix the problem on the first visit. Please have the following details to hand when you ring us: The nature of the problem, the Model Number and the Serial Number. These numbers can be found on the appliance and on the portion of the Registration Card which you retain. 17 Margherita - Instructions for installation and use M ARGHERITA Margherita - Iinstructions for installation and use 18 01/2002 - 195033058.00 - XEROX BUSINESS SERVICES - DOCUTECH Via Aristide Merloni, 47 - 60044 Fabriano - tel. (0732) 6611 - Italy