1
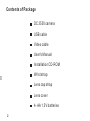
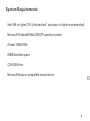
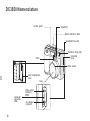
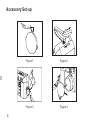
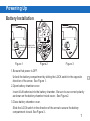
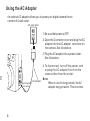
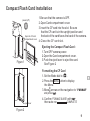
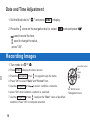
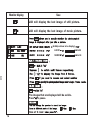
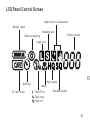
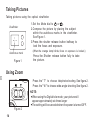
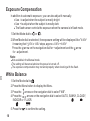
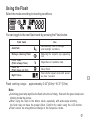
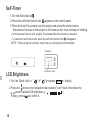
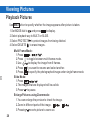
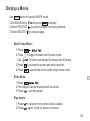
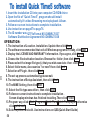
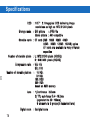
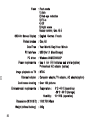
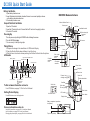
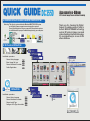
5
8
9
6
DC 3550 User's Manual
Digital Camera
Table of Contents
Getting Started
Welcome
Contents of Package
System Requirements
Dc3550 Nomenclature
Accessory Set-up
Powering Up
Battery Installation
Using the AC adapter
Compact Flash Card Installation
Ejecting the Compact Flash Card
Formatting Compact Flash Card
Date and Time Adjustment
Recording Images
Using the Navigation Dial
Recording Mode Screen
LCD Panel Control Screen
Taking Pictures
Using Zoom
Macro Mode
Exposure Compensation
White Balance
Using the Flash
Self-Timer
LCD Brightness
Beep Sound
Taking a Movie
1
1
2
3
4
6
7
7
8
9
9
9
10
10
10
11
13
14
14
15
16
16
17
18
18
19
20
Viewing Pictures
Playback Pictures
Display a Movie
Deleting Pictures
Managing Pictures
Connecting External Equipmen
Television Display Output
PC Display Output
Installing Software
How to install driver for Windows98( other OS without)
How to install MGI PhotoSuite8.21SE software
How to install QuickTime5 software
20
20
21
22
22
23
23
24
27
32
43
61
Accessories
FAQ(Frequently Asked Questions)
Specifications
QSG(Quick Start Guide)
76
78
81
Getting Started
Welcome to the Exciting World of Argus Camera
Thank you for choosing Argus Camera to pursue your video adventures. Whether you are
creating memories of your friends and family or exploring the great outdoors, since 1936
Argus Camera has been there, sharpening your images with leading edge technology. To
get the utmost satisfaction from your DC3550 digital camera please take a moment to read
through this manual. Its contents will send you on an educational journey into your
camera's multiple capabilities.
Thank you again for choosing Argus!
This camera is not resistant to water and should not be used outdoors in snow or
rain. If accidentally dropped in water, please quickly pour out the water. Dry it with
sunlight or an air-blower.
Protect it from excessive humidity. It will wet the lens and the pictures taken will be
blurred.
Do not attempt to disassemble the camera yourself. Always take it to an authorized
service facility for repair.
To store the camera, wrap it in a piece of clean, soft cloth and place it in a cool, dry,
dust-free place.
Performance may be limited using 1.5V batteries in low temperatures. Do not use
Manganese batteries as they may overheat and destroy the camera.
1
Contents of Package
DC 3550 camera
USB cable
Video cable
User's Manual
Installation CD-ROM
Wrist strap
Lens cap strap
Lens cover
4- AA 1.5V batteries
2
System Requirements
Intel 486 or higher CPU (intel pentium® processor or higher recommended)
Microsoft Windows98/Me /2000 /XP operation system
At least 16MB RAM
80MB harddisk space
CD-ROM driver
Microsoft Mouse or compatible mouse device
3
DC3550 Nomenclature
Control panel
Viewfinder
Macro / self-timer / flash
Viewfinder focus dial
Flash
Self-timer lamp (red)
Connector
cover
Flash sensor
card compartment
cover
Lens
Computer
connector
USB
4
Video output
connector
NTSC
AC adapter
connector
Viewfinder
Power button
Navigation Dial
Zoom lever
Process lamp
shooting ready (green)
Autofocus mark
Viewfinder
Online lamp
AF ready (orange)
LCD monitor
Mode dial
Shutter release
button
"ok" mark
Enter button
Menu button
Display button
Battery compartment open/close lever
Tripod mount
(bottom view)
5
Accessory Set-up
D
CAR
Figure 1
Figure 2
CARD
Figure 3
6
Figure 4
Powering Up
Battery Installation
sliding the LOCK switch in the
opposite direction of the arrow
to unlock
Figure 1
Figure 2
Figure 3
1.Be sure that power is OFF.
Unlock the battery compartment by sliding the LOCK switch in the opposite
direction of the arrow. See Figure 1.
2.Open battery chamber cover.
Insert 4 AA batteries into the battery chamber. Be sure to use correct polarity
as shown on the battery chamber inside cover. See Figure 2.
3.Close battery chamber cover.
Slide the LOCK switch in the direction of the arrow to secure the battery
compartment closed. See Figure 3..
7
Using the AC Adapter
An optional AC adapter allows you to power your digital camera from a
common AC wall outlet.
AC wall outlet
1.Be sure that power is OFF.
2.Open the Connector cover and plug the AC
adapter into the AC adapter connector on
the camera. See illustration.
3.Plug the AC adapter into a power outlet.
See illustration.
AC adapter
connector
8
AC adapter
4 . To d i s c o n n e c t , t u r n o ff t h e p o w e r, a n d
unplug the AC adapter first from the
camera then from the outlet.
Note:
When in use for long periods, the AC
adapter may get warm. This is normal.
Compact Flash Card Installation
1.Be sure that the camera is OFF.
2.Open Card compartment cover.
3.Insert the CF card into the slot. Be sure
that the CF card is in the upright position and
the back of the card faces the back of the camera.
4.Close the CF card slot.
power(off)
Open the CF card
compartment cover
Figure 1
the
b
fac ack o
f
c a me s t h e t h e c
era bac ard
k of
.
th
e
Ejecting the Compact Flash Card:
1.Turn OFF camera power.
2.Open the Card compartment cover.
3.Push the eject lever to eject the card.
See Figure 2
Formatting the CF Card
1.Set the Mode dial to
.
2.Press the Menu button to display
the Menu.
3.Move arrows on the navigation to " FORMAT "
and press "ok" .
eject lever
4.Confirm "FORMAT/SURE? with "ok"
then auto run
COMPLETE
Figure 2
9
Date and Time Adjustment
1.Set the Mode dial to "
2.Press the
" and press MENU to display.
arrow on the navigation dial to select
mode,and press "OK"
used to move the item,
used to change the value ,
press "OK" .
Recording Images
1.Turn mode to
or
2.Press MENU to display the menu screen
3.Press the navigation arrow
to toggle through the items.
4.Press "OK" to select "Date" and "Format" item.
5.Use the navigation arrow
to select condition elements.
6.press "OK" when condition element is selected.
7.Use the navigation arrows
to adjust the "Date" value of specified
condition .Press "OK" to complete selection.
10
OK
move the cursor
up,
down,
left,
right.
"OK" ENTER button
Navigation tools
Recording Mode Screen
When the Mode dial is set to
or
.
Monitor display
MOVIE
MODE
Use
MENU
STILL MODE MENU
ITEM
SIZE
CONDITION
ELEMENT
L
"ok"
S
QUAL
"ok"
LCD
"ok"
W B
sunny
LANG
EN GR FR
DATE
2002.09.20 15:45
FORMAT
SURE?
LANGUAGE
ENGLISH
"ok"
2002
first "ok"
cloudy fluorescent
lamp
GERMAN
09
then
20
"ok"
indoor
FRENCH
15
45
"ok"
"ok"
"ok"
COMPLETE
each value of condition element
11
Monitor display
Use
S
LCD will display the last image of still picture.
M
LCD will display the last image of movie picture.
MULT1
SLIDE (continue to be display)
LOCK?
"ok"
COMPLETE
"ok"
SURE?
"ok"
COMPLETE
"ok"
"ok"
"ok"
The images that are displayed will be a slide.
Press "ok" to pause.
"ok"
12
"ok"
"ok"
LCD Panel Control Screen
Night scene & shake avoid
Battery check
Red-eye reducing
Standard size
Frame number
Large size
Selftimer
CF card check
Macro
Flash Fill-in
Flash auto
Flash off
High quality
Standard quality
13
Taking Pictures
Taking pictures using the optical viewfinder.
Viewfinder
Autofocus mark
Figure 1
1.Set the Mode dial to
or
.
2.Compose the picture by placing the subject
within the autofocus marks in the viewfinder.
See Figure 1.
3.Press the shutter release button halfway to
lock the focus and exposure.
(When the orange lamp blinks, focus or exposure is locked.)
Press the Shutter release button fully to take
the picture.
Using Zoom
Press the " T" to choose telephoto shooting. See figure 2.
Press the " W " to choose wide-angle shooting.See figure 2.
Figure 2
14
NOTE:
When using the Digital tele mode, your picture will
appear approximately six times larger
The setting will be canceled when the power is turned OFF.
Macro Mode
You can take photographs in macro mode as close as 0 .2 meters. A subject that is
approximately 6 X 8cm can be photographed fully within the frame.
1.Set the Mode dial to
or
2.Press the Macro button until
.
appears on the control panel.
To cancel the Macro mode, press the Macro button again until the
3.Take a picture.
disappears.
Control panel
Shooting Range: approximately 0.66 (0.2m)~1.64 (0.5m)
Note:
When using the flash in the Macro mode, the flash may not have the proper
effect. Confirm the result using the LCD monitor.
Using the LCD monitor as a viewfinder makes it easy to take the close-up
pictures.
The setting will be canceled when the power is turned to OFF.
When using movie record mode in Macro mode, the camera has an effect similar to Digital
TEL mode.
15
Exposure Compensation
In addition to automatic exposure, you can also adjust it manually.
Use - to adjust when the subject is mostly bright
Use + to adjust when the subject is mostly dark
The flash sensor controls the exposure when the camera is in flash mode.
1.Set the Mode dial to
or
.
2.When Mode dial is selected, the exposure setting will be displayed.like:" 0/3EV"
it meaning that "+2EV in 1/3EV steps ,approx .-6/3EV~+6/3EV"
Press the arrow on the navigation dial for + adjustment and the arrow
for - adjustment.
Note:
Not available in the Manual mode.
The setting will be canceled when the power is turned off.
The exposure compensation may not work properly when shooting with the flash.
White Balance
1.Set the Mode dial to
.
2.Press the Menu button to display the Menu.
3.Press the
arrows on the navigation dial to select" WB".
4.Press the
arrows on the navigation dial to select AUTO, SUNNY, CLOUDY,
INDOOR or FLUOR.
5.Press the "ok" to confirm the setting.
16
Using the Flash
Select the mode according to shooting conditions.
You can toggle to the next flash mode by pressing the Flash button.
Flash mode
Use
Auto-Flash
Automatically flash in low-light
and backlight conditions.
Red-eye reducing Flash
Reducing the subject's eye appearing
red.
Fill-in Flash
(Flash always fires)
Regardless of available flash.
Flash Off
(Flash dose not fire)
Never flash.
Night Scene
Flash working range:
Slow shutter speed mode with speed
as slow 1 second.
approximately 2.62 (0.8m)~18.37 (5.6m)
Note:
A blinking green lamp signifies the flash is the time of charg, Wait until the green lamp is not
blinking to take the picture.
When using the flash in the Macro mode, especially with wide-angle shooting,
the flash may not have the proper effect. Confirm the result using the LCD monitor.
Flash cannot be enough time to charge in the Sequence mode.
17
Self-Timer
1.Set the Mode dial to
.
2.Press the self-timer button until
appears on the control panel.
3.Place the Auto Focus mark over the subject and press the shutter button.
The camera focuses on the subject in the frame as the front red lamp is blinking.
In this mode a timer runs for roughly 10 seconds before the shutter is released.
To cancel the self-timer mode, press the self-timer button until
disappears.
NOTE: When using the self-timer mode, the use of a tripod is recommended.
Viewfinder
Autofocus mark
LCD Brightness
1.Set the Mode dial to "
"or"
"and press
MENU
to display.
2.Press the arrow on the navigation dial to select " LCD " mode, then press the
arrow to adjust LCD brightness .(
)
Finally, press "ok" to confirm it.
18
Beep Sound
1.Set the Mode dial to
and press
MENU
to display.
2.Press the
arrow on the navigation dial to select " BEEP"mode, then press the
arrow to adjust the setting "OFF LOW HIGH" and press "ok" botton to
conform.
Note:
The setting will remain until it is readjusted.
Taking a Movie
1.Press MENU to set /exit.
2.Use W T to select wide angle or telephoto.
3.Press the shutter halfway to lock focus and exposure. See Figure 1.
4.Press the shutter fully, to record movie until the gauge is full. This usually
happens within approximately 12 seconds. See Figure 2.
Figure 1
Figure 2
19
Viewing Pictures
Playback Pictures
Use MENU button to specify whether the image appears after picture is taken.
1.Set MODE dial to
and press
to display.
2.Select playback way to MULTI or SLIDE.
3.Select PROTECT
to protect images from being deleted.
4.Select DELETE
to erase images.
Multi Frame Mode:
"ok" .
1.Press
2.Press
to toggle between multi frames mode.
"ok" to display the image from 6 frames.
3.Use
4.Press
if you want to resume and select another.
5.Press
to specify the photographed image under single frame mode.
Slide Mode:
"ok" .
1.Press
2.The images that are displayed will be a slide.
3.Press "ok" to pause.
Enlarge Pictures using Zoom mode:
1.You can enlarge the preview to check the image.
2.Zoom in different parts of the image.
3.Pressing "ok" reverts picture to zoom out.
20
Display a Movie
Use
MENU
button to specify MOVIE mode.
1.Set MODE dial to
2.Select PROTECT
3.Select DELETE
and press
to display.
to protect images from being deleted.
to erase images.
Multi Frame Mode:
1.Press
2.Press
Use
3.Press
4.Press
"ok" .
to toggle between multi frames mode.
"ok" to select and display the image from 6 frames.
if you want to resume and select another.
to specify the movie under single frame mode.
Slide Mode:
"ok" .
1.Press
2.The images that are displayed will be a slide.
3.Press "ok" could be pause.
Play movie:
1.Press "ok" to play the movie when data is loaded.
2.Press "ok" again, could be pause or resume.
21
Deleting Pictures
1.Set the Mode dial to
or
to select the picture you
press the MENU
M U LT I , a n d
"ok"
want to delete.
2.Press the MENU and use navigation dial to select
Use arrows to choose ONE/ALL,
3.Press "ok" to select Delete one or Delete all.
! Important
Never open the card cover, eject the card, remove the batteries, or pull the plug while
erasing pictures. It may destroy the data in the card.
When the picture is protected or the write-protect adhesive seal "
"MARK is placed
on the picture the camera does not erase it.
Cancel the protection or remove the seal use " "to switch "LOCK? /UNLOCK?"under
"
protect" mode.
Managing Pictures
1.Set the Mode dial to
or
"ok" t o s e l e c t t h e p i c t u r e y o u
M U LT I , a n d
Press the MENU
want to protect.
2.Press the MENU and navigation dial to select
,Use arrow to choose ONE/ALL.
3.Press "ok" to select Protect one or protect all.
The protected picture will not be deleted with all-Frame erase. When using card
format, it will erase all protected and unprotected pictures.
22
Note:
The protected picture will not be deleted with All-Frame erase, but will be deleted with Card
format.but "card format" will erase all the picture , can't choice or selection.
Delete is not available when the write-protect adhesive seal is placed like "
MARK".
The setting will remain until it is readjusted.
Connecting External Equipment
Television Display Output
Recorded images can be viewed on TV
1.Be sure the TV is OFF and the camera is OFF prior to connecting.
2.Connect the cable by inserting video connector between camera
and television . See Figure 1.
3.Turn on the TV. See Figure 2.
4.Set the camera Mode dial to
or
.
1
5.Select a picture. Use instructions on page 20
Playback Picture to choose a picture.
2
4
5
Video cable
3
Video output connector
Figure 1
Figure 2
23
PC Display Output
Use the appropriate connector according to computer's platform.
USB
serial port
card reader
USB socket
serial cable
IBM PC/AT compatible
Connect the provided USB Socket serial
cable to the USB port on your computer.
24
DC3550
How to install driver for Windows98( other OS without)
How to install MGI PhotoSuite8.21SE software
How to install QuickTime5 software
STI Protocol Image Process & Video Streaming
25
Installing Software
1.Insert the installation CD into the CD driver.The installation CD includes : MGI
PhotoSuite8.21SE, QuickTime 5, USB driver for Windows 98 ( other OS without
driver installation ).
2.Find appropriate file and click to open it , If you are using Windows Me/2000/XP.
installation will auto run.
3.Click the setup. exe file to execute file set-up.
4.Follow on screen instructions to complete installation.
26
To install USB Driver for Windows 98
1.Insert the installation CD into your computer CD-ROM driver.
2.Open the file of "windows 98 USB Driver ", It requires a manual install.
3.select the item of "Add New Hardware" from "control panel" to install
USB Driver to your computer.
4.Use instructions on page28 to page37 to install the driver.
Warning: This driver is not needed under Windows ME/NT/2000/XP
system as the Digital Camera supports mass storage driver
system. Do not install this driver into your computer if the
operation system is not Windows98. Improper installation
may destory your computer.
Operation:
1.Install way:Follow on-screen of your computer,click:
START/SETTING/CONTROL PANEL/Add New Hardware
2.Screen display the driver file name automatically.Then click Next
3.Select the driver Search .Then click Next
4.Select locations of data source.Then click Next
5.Screen display to confir m the driver location .Then click Next
6.Follow on-screen instructions to complete installation .
Screen display windows has finished installing.Then click Finish
7.Screen display a removable Disk appear .Then click it.
8.A new file appear.
9.Click the file.
10.Click the file to playback picture.
27
Install way:Follow on-screen of your computer,click:
START/SETTING/CONTROL PANEL/add New Hardware
28
Note: Screen display the driver file name automatically.
Then click Next
29
Note: Select the driver Search .
Then click Next
30
Note: Select locations of data source.
Then click Next
31
Digital Camera Zoom
F
Note: Screen display to confir m the driver location .
Then click Next
32
7
Digital Camera Zoom
Note: Follow on-screen instructions to complete installation .
Screen display windows has finished installing.
Then click Finish
33
Note: Screen display a removable Disk appear .
Then click it.
34
Note: A new file appear.
35
Note: Click the file.
36
Note: Click the file to playback picture.
37
To install MGI Photo Suite8.21SE software
1.Insert the installation CD into your computer CD-ROM driver.
2.Open the file of "MGI Photo Suite8.21SE, program should install
automatically.It's still picture edit Album.
3.Follow on-screen instuctions to complete installation.
4.Use instuction on page39 to page55.
Operation:
1.Follow on-screen of your computer,first,select language :Then click OK
2.The set up process automatically,please wait.
3.The software recommended that exit all Windows programs If ready, click Next
4.Display the LICENSE AND WARRANTY infor mation.If you agree, click Yes
5.Please select the image file type(s) that you wish associate then click Next
6.Choose the file destination location.Browse the folder ,then click Next
7.Select folder name, Accessories ? or new? then click Next
8.Display Cur rent setting automatically. then click Next
9.Display Online Registration automatically. then click Continue
10.Follow on-screen instructions to complete installation .
Screen display windows has finished installing.Then click Finish
11.Program way:click: Star t /Programs/MGI PhotoSuite8.21SE
/MGI PhotoSuite8.21SE.exe otherwise click quick mark.
12.Select a picture and edit .Use instructions on QSG(Quick Star t Guide)
38
39
Note: The set up process automatically,please wait.
40
Note: The software recommended that you exit all Windows programs
If you ready, click Next
41
Note: Display the LICENSE AND WARRANTY infor mation.
If you agree, click Yes
42
Note: Please select the image file type(s) that you wish associate
then click Next
43
Note: Choose the file destination location.
Browse the destination folder ,then click Next
44
Note: select folder name, Accessories ? or new?
then click Next
45
8.21
8.21
Note: display Cur rent setting automatically..
then click Next
46
Note: display Online Registration automatically.
then click Continue
47
48
Note:Follow on-screen instructions to complete installation .
Screen display windows has finished installing.Then click Finish
49
50
Note:.Program way:click: Star t /Programs/
MGI PhotoSuite8.21SE/MGI PhotoSuite8.21SE.exe
or click quick mark.
51
52
53
54
21SE
55
To install Quick Time5 software
1.Insert the installation CD into your computer CD-ROM driver.
2.Open the file of "Quick Time5", program should install
automatically.It's video Streaming movie playback Album.
3.Follow on-screen instuctions to complete installation.
4.Use instuction on page57 to page76.
5.The ID number was: QTFileFormat NO.ID#SWL70337
Software Distribution Agreement NO.ID#SWL70338
OPERATION:
1.The instruction of Location .Installation. Update then click Next
2.The software recommended that exit all Windows programs If ready, click Next
3.Display the LICENSE AND WARRANTY information. If you agree, click Agree
4.Choose the file destination location. Browse the folder ,then click Next
5.Please select the image file type(s) that you wish associate .then click Next
6.Select folder name, Accessories ? or new? then click Next
7.Selection of Plugin . then click Next.
8.The set up process automatically,please wait.
9.The instruction of Setup Assistant, then click Next
10.The MIME Setting ,then click Next
11.Select the file type assocition , then click Next
12.Follow on-screen instructions to complete installation .
Screen display windows has finished installing.Then click Finish
13.Program way:click: Start /Programs/Quick Time/Quick Time player. otherwise
click quick mark.
14.Select a picture and edit .Use instructions on QSG(Quick Start Guide)
56
57
58
Note:The instruction of Location .Installation. Update
then click Next
59
Note:The software recommended that exit all Windows programs
If ready, click Next
60
Note:Display the LICENSE AND WARRANTY infor mation.
If you agree, click Agree
61
Note:Choose the file destination location.
Browse the folder ,then click Next
62
Note:Please select the image file type(s) that you wish associate
then click Next
63
Note:Select folder name, Accessories ? or new? then click Next
64
Note:Selection of Plugin . then click Next.
65
Note:The set up process automatically,please wait.
66
Note:The instruction of Setup Assistant, then click Next
67
Note:The MIME Setting ,then click Next
68
Note:Select the file type assocition , then click Next
69
Note:Follow on-screen instructions to complete installation .
Screen display windows has finished installing.Then click Finish
70
71
72
73
74
75
FAQ (FREQUENTLY ASKED QUESTIONS)
The software will display the following messages after performing system detection with DSC in various operation modes
NO. On-screen Message
1
SRAM ERROR
2
TIMER NOT TICK
3
EEPROM ERROR
4
MEDIA NOT SUPPORT
FORMAT REQUIRE GO TO
SETTING MODE
5
Description of On-screen Time Point of Software
Message
detection
TIMER does not work
Media is not supported
Action Response after
detection
Shut down in a few
Detect when starting up seconds
ERROR Warning displays
Detect when starting up when it is set up
Shut down in a few
Detect when starting up seconds
Possible Reasons
SRAM fails to read data
REAL TIME system failure
Detect when starting up Key failure
EEPROM read/write failure
CF CARD over 256M is
not supported
CF CARD over 32M is
required to FORMAT
Detect when deleting
Protected files can not be
deleted; You must set up
Release PROTECT firstly
Detect when starting up Key failure
WRITE PROTECT
Write function is
protected
7
LENS INIT ERROR
The initial value of Lens
is not set up correctly
Detect when starting up Key failure
The initial value of lens
had not been defined in
the software
8
COMPRESS REEOR
Data is not compressed
correctly
Detect when fetching
data
Compress data failure;
Please reset it.
9
NO CARD
CF card is not inserted
Compress action failure
Key failure when reading
Detect when starting up data
Media failure
Detect when starting up Key failure
6
10 MEDIA ERROR
76
Delete action failure
CF CARD is not inserted
CF CARD Failure
FAQ (FREQUENTLY ASKED QUESTIONS)
The software will display the following messages after performing system detection with DSC in various operation modes
17 FORMAT ERROR
Description of On-screen Time Point of Software
Message
detection
Detect when reading
Decompress failure
data
Detect when reading
No file
data
Detect when deleting
File can not be deleted data
Initial file is not handled Detect when reading
correctly
data
Detect when reading
Media fails to read data data
Detect when reading
Fails to read animation data
Memory card fails to
format
Detect when formating
18 SYSTEM ERROR
System failure
19 STROBE ERROR
Strobe light failure
20 MEMORY FULL
Memory full
NO. On-screen Message
11 DECOMPRESS ERROR
12 NO FILE
13 FILE DELETE ERROR
14 HEADER ERROR
15 MEDIA READ ERROR
16 AVI READ ERROR
Memory self-test
Action Response after
detection
Decompress data failure
Possible Reasons
Key failure
Decompress failure
No picture file is in the
memory
Failure when deleting
picture file
Fails to unfold files
File unfold failure
Key failure
File unfold failure
Files in a AVI mode fails to
read
Format memory card
failure
Key failure
Fails to extract data
Format failure
Shut down in a few
seconds automatically
Detect when strobe light No flash or flash is out of
is charging
control
Detect when storing
data
Fails to store data
Memory address error
Strobe light charge failure
Short of memory space or
space is full
77
Specifications
CCD
Storage mode
Storable cards
Number of storable pixels
Compression ratio
Number of storable pictures
Lens
Digital zoom
78
: 1/2.7" 2.11megapixel CCD delivering image
resolutions as high as 1672 X 1248 pixels
: Still picture
: JPEG file
Movie picture : AVI compatible
: CF card (8MB 16MB 32MB 48MB
64MB 96MB 128MB 192MB) option
CF cards are available in many different
capacities
: L: 1672 X 1248 pixels (HQ\SQ)
S: 640 X 480 pixels (HQ\SQ)
: HQ : 1/8
SQ : 1/16
: 16: HQL
32: SQL
100 : HQS
200 : SQS
based on 8MB memory
: 1) Continuous 3xZoom
2) TTL auto-focus f5.4 ~ 16.2mm
(equivalent to 35 ~ 105mm)
8 elements in 3 groups (2 Aspherical lens)
: 2x digital zoom
Shooting distance
Exposure metering
Optical viewfinder
LCD monitor
Storage file
Shooting modes
Movie display mode
Shutter
Exposure control
: 0.66 (0.2m) ~ 1.64 (0.5m) in Macro mode
1.64 (0.5m) ~ Q
in standard mode
: Multi-metering (64-segment Matrix)
: real-image zoom viewfinder
diopter adjustment -2.0~+1DP (visual range unit)
: 1.8" TFD brightness adjustment approx. 60000 pixels
: DCF standard
: Auto
: 12sec for QVGA, 320 X 240 pixels at 15fps
: 1) 1/2~1/500 sec, mechanical and electronic shutter
2) Aperture Wide F2.8, F8/Tele F4.6, F13.6
: Programmed auto and manual compensation
2EV in 1/3EV steps (approx. -6/3EV~+6/3EV)
White balance
: 1) Auto
2) Manual in
Self-timer
Power on time
: 10sec duration
: Approx. 5sec
LED
Sunny
Cloudy
Indoor
Fluor
: 1) Self-timer LED (red)
2) Shooting ready (green)
3) AF ready (orange)
79
Flash
OSD-On Screen Display
Protect modes
Date/Time
PC interface
PC driver
Power requirements
Image playback on TV
External adapter
Continuous shooting
Environmental requirements
: Flash mode
1) Auto
2) Red- eye reduction
3) Fill-in
4) Off
5) Night scene
Sensor control, Gno. 10.5
: English German French
: One, All
: Year / Month / Day / Hour / Minute
: USB (Ver1.1 MassStorage)
: Windows: 98/ME/2000/XP
: Use 4 AA 1.5V batteries and similar (option)
Professional AC adapter (option)
: NTSC
: Computer adapter, TV adapter, AC adapter(option)
: Over 100 pictures
: Temperature :
Humidity :
Dimensions (W X H X D)
Weight (without battery)
80
: 110 X 70 X 45mm
: 245g
0 C ~ 40 C (operation)
-20 C ~ 60 C (storage)
10 ~ 90% (operation)
DC 3550 Quick Start Guide
Battery Installation
1. Open battery chamber cover.
2. Insert 4 batteries into the battery chamber. Be sure to use correct polarity as shown
on the battery chamber inside cover.
3. Close battery chamber cover.
DC3550 Nomenclature
Macro / self-timer / flash
Compact Flash Card Installation
Control panel
1.Open the CF card slot.
2. Insert the CF card into the slot. Be sure that the CF card is in the upright position.
3. Close the CF card slot.
Powering Up
Flash
1.Turn the power on by sliding the POWER button following the arrows.
2.Turn the MODE dial to
.
3.You are ready to take photographs.
Viewfinder focus dial
Self-timer lamp (red)
Connector
cover
Flash sensor
Taking Photos
card compartment
cover
Lens
1.Compose the image in the viewfinder or LCD Monitor Display.
2.Press the Shutter Button down halfway to lock the focus.
3.After the focus is locked continue pressing the Shutter Button to take the picture.
LCD modes
Night scene & shake avoid
Battery check
Standard size
Red-eye reducing
Large size
Frame number
Viewfinder
Computer
connector
USB
Video output
connector
NTSC
AC adapter
connector
Power button
Navigation
Zoom lever
High quality
Macro
Standard quality
Self-timer
Flash Fill-in
CF card check
Flash auto
Flash off
To find out more information on how to:
Process lamp
shooting ready (green)
Viewfinder
Use LCD Modes, see page 11-12 in the User's Manual.
Setting Picture Display
Press MENU button to set the display mode.
Online lamp
AF ready (orange)
LCD monitor
Display button
Battery compartment open/close
lever(bottom)
Use Multi Frames Mode, see page 20-21 in the User's Manual
Use Slide Modes, see page 20-21 in the User's Manual
Enlarging the picture display, see page 20 in the User's Manual
Tripod mount (bottom)
Shutter release button
Viewfinder
Autofocus mark
For more information on how to:
Mode dial
Enter button
Menu button
QUICK GUIDE DC3550
Accessories- Album
STI Protocol Image Process & Video Streaming
A. USB DRIVER INSTALLATION UNDER WINDOWS98 OPERATION SYSTEM
Warning: This driver is not needed under Windows ME/NT/2000/XP system
as the Digital Camera supports mass storage driver system.
Do not install this driver into your computer if the operation system
is not Windows98. Improper installation may destory your computer.
Find hardware
from CD-ROM driver
& specify a location:
C:\WIN98
Next
And bump to CD-ROM
G:\
.INF
Thank you for choosing the Digital
Camera. It combines some of today's
hottest MASS STORAGE technology
such as STI protocol image process&
video streaming interface technology.
It's so simple & easy to access to the
album database.
Finish
B. MGI PhotoSuite INSTALLATION
Installation procedure:
Choose Setup language
Select image file type
Choose Destination Location
Online Registration
21SE
C.
INSTALLATION:
Installation procedure:
Choose Setup Language
Choose Destination Location
Choose Install Type
Configure & File Type Association
MGI PHOTO SUITE 8.21SE MENU QUICK GUIDE
Paste
Copy
Cut
Preview
Save
Open
New file
Select by Ellipse
Select by Freehand
Filled Ellipse
filled Rectangle
Filled rounded Rectangle
Filled Polygon
Straight Line
Flood Fill
Erase White
Select color sample
Select pen size
Fore ground color
Zoom
Zoom in
Zoom out
Actual size
Mirror
Rotate
Brightness
Color
Select by Rectangle
Select by Magic Wand
Picture frame
Lense effect
Special effect
Return to Main menu
Start slide show
Screen capture
Hollow Ellipse
Hollow Rectangle
Hollow rounded Rectangle
Hollow Polygon
Free Hand
Air Brush
Text
Clone
Increase
Decrease
Back ground color
Color palette
QUICKTIME5 MENU QUICK GUIDE
Volume
TV Switch
Mute
Last Frame
Play Forward
Backward
First Frame