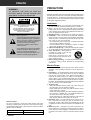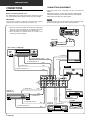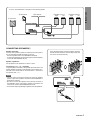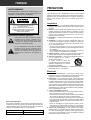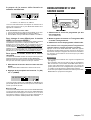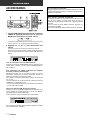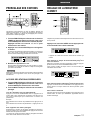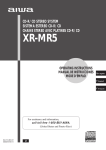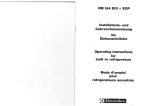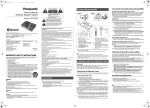
1
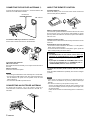
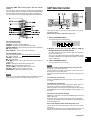
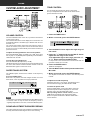
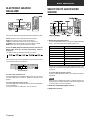
STEREO RECEIVER
RECEPTOR ESTEREO
AMPLI-TUNER STEREO
AV-S17
OPERATING INSTRUCTIONS
MANUAL DE INSTRUCCIONES
MODE D’EMPLOI
En (English)
E (Español)
F (Français)
For assistance and information
call toll free 1-800-BUY-AIWA
(United States and Puerto Rico)
8A-AR5-903-01
000620CCK-Y-M
U
NOTE
This equipment has been tested and found to comply with the
limits for a Class B digital device, pursuant to Part 15 of the FCC
Rules. These limits are designed to provide reasonable protection
against harmful interference in a residential installation.
This equipment generates, uses, and can radiate radio frequency
energy and, if not installed and used in accordance with the
instructions, may cause harmful interference to radio
communications. However, there is no guarantee that interference
will not occur in a particular installation. If this equipment does
cause harmful interference to radio or television reception, which
can be determined by turning the equipment off and on, the user
is encouraged to try to correct the interference by one or more
of the following measures:
- Reorient or relocate the receiving antenna.
- Increase the separation between the equipment and
receiver.
- Connect the equipment into an outlet on circuit different from
that to which the receiver is connected.
- Consult the dealer or an experienced radio/TV technician
for help.
CAUTION
Modifications or adjustments to this product, which are not
expressly approved by the manufacturer, may void the user’s
right or authority to operate this product.
For assistance and information
Printed in Malaysia
call toll free 1-800-BUY-AIWA
(United States and Puerto Rico)
ENGLISH
PRECAUTIONS
WARNING
TO REDUCE THE RISK OF FIRE OR
ELECTRIC SHOCK, DO NOT EXPOSE THIS
APPLIANCE TO RAIN OR MOISTURE.
Read the Operating Instructions carefully and completely before
operating the unit. Be sure to keep the Operating Instructions
for future reference. All warnings and cautions in the Operating
Instructions and on the unit should be strictly followed, as well
as the safety suggestions below.
RISK OF ELECTRIC SHOCK
DO NOT OPEN
“CAUTION: TO REDUCE THE RISK OF
ELECTRIC SHOCK,
DO NOT REMOVE COVER (OR BACK).
NO USER-SERVICEABLE PARTS INSIDE.
REFER SERVICING TO QUALIFIED
SERVICE PERSONNEL.”
Explanation of Graphical Symbols:
The lightning flash with arrowhead symbol,
within an equilateral triangle, is intended to
alert the user to the presence of uninsulated
“dangerous voltage” within the product’s
enclosure that may be of sufficient
magnitude to constitute a risk of electric
shock to persons.
The exclamation point within an equilateral
triangle is intended to alert the user to the
presence of important operating and
maintenance (servicing) instructions in the
literature accompanying the appliance.
Installation
1 Water and moisture — Do not use this unit near water, such
as near a bathtub, washbowl, swimming pool, or the like.
2 Heat — Do not use this unit near heat sources, including
heating vents, stoves, or other appliances that generate heat.
It also should not be placed in temperatures less than 5°C
(41°F) or higher than 35°C (95°F).
3 Mounting surface — Place the unit on a flat, even surface.
4 Ventilation — The unit should be situated with adequate
space around it so that proper heat ventilation is assured.
Allow 10 cm (4 in.) clearance from the rear and the top of the
unit, and 5 cm (2 in.) from each side.
- Do not place the unit on a bed, rug, or similar surface that
may block the ventilation openings.
- Do not install the unit in a bookcase, cabinet, or airtight
rack where ventilation may be impeded.
5 Objects and liquid entry — Take care that objects or liquids
do not get inside the unit through the ventilation openings.
6 Carts and stands — When placed or
mounted on a stand or cart, the unit
should be moved with care.
Quick stops, excessive force, and
uneven surfaces may cause the unit or
cart to overturn or fall.
7 Wall or ceiling mounting — The unit should not be mounted
on a wall or ceiling, unless specified in the Operating
Instructions.
Electric Power
Owner’s record
For your convenience, record the model number and serial
number (you will find them on the rear of your unit) in the space
provided below. Please refer to them when you contact your Aiwa
dealer in case of difficulty.
Model No.
AV-S17
1
ENGLISH
Serial No. (Lot No.)
1 Power sources — Connect this unit only to power sources
specified in the Operating Instructions, and as marked on
the unit.
2 Polarization — As a safety feature, some units are equipped
with polarized AC power plugs which can only be inserted
one way into a power outlet. If it is difficult or impossible to
insert the AC power plug into an outlet, turn the plug over
and try again. If it is not still inserted easily into the outlet,
please call a qualified service technician to service or replace
the outlet. To avoid defeating the safety feature of the polarized
plug, do not force it into a power outlet.
3 AC power cord
- When disconnecting the AC power cord, pull it out by the
AC power plug. Do not pull the cord itself.
- Never handle the AC power plug with wet hands, as this
could result in fire or shock.
- Power cords should be firmly secured to avoid being severely
bent, pinched, or walked upon. Pay particular attention to
the cord from the unit to the power socket.
- Avoid overloading AC outlets and extension cords beyond
their capacity, as this could result in fire or shock.
4 Extension cord — To help prevent electric shock, do not
use a polarized AC power plug with an extension cord,
receptacle, or other outlet unless the polarized plug can be
completely inserted to prevent exposure of the blades of the
plug.
5 When not in use — Unplug the AC power cord from the AC
power outlet if the unit will not be used for several months or
more. When the cord is plugged in, a small amount of current
continues to flow to the unit, even when the power is turned
off.
Outdoor Antenna
1 Power lines — When connecting an outdoor antenna, make
sure it is located away from power lines.
2 Outdoor antenna grounding — Be sure the antenna system
is properly grounded to provide protection against unexpected
voltage surges or static electricity build-up. Article 810 of the
National Electrical Code, ANSI/NFPA70, provides information
on proper grounding of the mast, supporting structure, and
the lead-in wire to the antenna discharge unit, as well as the
size of the grounding unit, connection to grounding terminals,
and requirements for grounding terminals themselves.
Antenna Grounding According to the National Electrical Code
TABLE OF CONTENTS
PRECAUTIONS ................................................................... 1
PREPARATIONS
CONNECTIONS .................................................................. 3
SETTING THE CLOCK ........................................................ 6
BEFORE OPERATION ........................................................ 7
SOUND
CUSTOM AUDIO ADJUSTMENT ....................................... 8
ELECTRONIC GRAPHIC EQUALIZER .............................. 9
ANTENNA LEAD IN WIRE
ANTENNA DISCHARGE
UNIT
(NEC SECTION 810-20)
GROUND CLAMP
GROUNDING
CONDUCTORS
(NEC SECTION 810-21)
ELECTRIC
SERVICE
EQUIPMENT
GROUND CLAMPS
POWER SERVICE GROUNDING
ELECTRODE SYSTEM
(NEC ART 250 PART H)
BASIC OPERATIONS
SELECTION OF AUDIO/VIDEO SOURCE ......................... 9
RECORDING AN AUDIO SOURCE ................................. 10
RADIO RECEPTION
MANUAL TUNING ............................................................. 11
PRESETTING STATIONS ................................................. 12
TIMER
SETTING THE SLEEP TIMER .......................................... 12
NEC-NATIONAL ELECTRICAL CODE
GENERAL
Maintenance
Clean the unit only as recommended in the Operating
Instructions.
Damage Requiring Service
SPECIFICATIONS ............................................................. 13
CARE AND MAINTENANCE ............................................ 14
TROUBLESHOOTING GUIDE .......................................... 14
PARTS INDEX ................................................................... 14
Have the unit serviced by a qualified service technician if:
- The AC power cord or plug has been damaged
- Foreign objects or liquid have gotten inside the unit
- The unit has been exposed to rain or water
- The unit does not seem to operate normally
- The unit exhibits a marked change in performance
- The unit has been dropped, or the cabinet has been damaged
DO NOT ATTEMPT TO SERVICE THE UNIT YOURSELF.
E (Españo
F (França
Check your accessories
Remote control
FM antenna
En
AM antenna
Operating Instructions, etc.
ENGLISH
2
PREPARATIONS
CONNECTIONS
CONNECTING EQUIPMENT
Before connecting the AC cord
The rated voltage of your unit shown on the rear panel is 120 V
AC. Check that the rated voltage matches your local voltage.
IMPORTANT
Connect the speakers, antennas, and all other external
equipment first. Then connect the AC cord at the end.
Jacks and plugs of the connecting cord are color-coded as
follows:
Red jacks and plugs : For the right channel of audio signals
White jacks and plugs: For the left channel of audio signals
Yellow jacks and plugs: For video signals
NOTE
Insert the plugs fully into the jacks. Loose connections may
produce a humming sound or other noise interference.
FRONT
*1 Be sure to connect the VIDEO OUT terminal of a DVD player
directly to a TV set, not through this unit. Otherwise, the picture
noise may appear when playing copy protected DVDs.
*2 When connecting a monaural video, use a stereo-mono
connecting cord (not supplied).
Camcorder
to VIDEO OUT
to AUDIO OUT
DVD or Video 1*2 /MD player
TV
to VIDEO IN
to AUDIO IN(Video 1/MD)
o
to AUDIO OUTPUT
o
to VIDEO IN(Video 1)
o
to AUDIO OUT
REAR
o
to VIDEO OUT(Video 1)*
o
o
1
o
o
to AUDIO OUT
CD player
2
Video 2* or
LD/Cable TV
o
o
o
o
to VIDEO OUT
to OUTPUT
Turntable
to AUDIO IN (Video 2)
to VIDEO IN (Video 2)
3
ENGLISH
o
o
to LINE IN
Tape deck
to LINE OUT
2AM antenna
2FM antenna
1Speaker system A
Right
Left
PREPARATIONS
1 and 2 in the illustration correspond to the following details.
1Speaker system B
Right
Left
1Sub woofer
CONNECTING SPEAKERS1
Speaker terminals
Connect front speakers (system A and/or B) and sub woofer to
the corresponding speaker terminals on the unit:
- the front speaker cords to the SPEAKERS terminals
- for more powerful bass, the sub woofer (with a built-in amplifier)
cord to the SUB WOOFER 3 jack
Lift up the terminal flap, insert the speaker cord lead
into the terminal slot, then close the flap. Check that
the cord is connected securely.
En
Speaker impedance
For all speakers, use speakers of 8 ohms or more.
E (Españo
Connecting + to +, – to – terminals
To get the proper sound effect, the speaker terminals on the unit
and the speaker should be connected with proper polarity; the +
terminal on the unit should be connected to the + terminal on
the speaker (and – to –).
F (França
NOTE
• The sub woofer sound will be output only when the speaker
system A (the front speakers connected to the SPEAKERS A
terminals) is selected.
• Be sure to connect the speaker cords correctly as shown in
the illustration on the right column. Improper connections can
cause short circuits in the SPEAKERS terminals.
• Do not leave objects generating magnetism near the speakers.
ENGLISH
4
CONNECTING THE SUPPLIED ANTENNAS 2
ABOUT THE REMOTE CONTROL
Connect the FM antenna to the FM 75 Ω terminals and the AM
antenna to the AM LOOP terminals.
Inserting batteries
FM antenna
Detach the battery cover on the rear of the remote control and
insert two R6 (size AA) batteries.
AM antenna
When to replace the batteries
The maximum operational distance between the remote control
and the sensor on the unit should be approximately 5 meters
(16 feet). When this distance decreases, replace the batteries
with new ones.
To stand the AM loop antenna on a surface
Fix the claw to the slot as shown in the illustration.
Using the remote control
The instructions in this manual refer mainly to the buttons on the
main unit.
Some buttons have two functions.
• To use the function indicated on the button, or on the plate in
black, simply press the button.
• To use the function indicated on the plate in green, press the
button while pressing the SHIFT button.
Important
To position the antennas
FM feeder antenna:
Extend this antenna horizontally in a T shape and fix its ends to
the wall.
AM loop antenna:
Position for the best reception.
NOTE
• Do not bring the FM antenna near metal objects or curtain rails.
• Do not bring the AM antenna near other external equipment,
the unit itself, the AC power cord or speaker cords, as noise
will be picked up.
• Do not unwind the AM loop antenna wire.
CONNECTING AN OUTDOOR ANTENNA
For better FM reception, use of an outdoor antenna is
recommended. Connect the outdoor antenna to the FM 75 Ω
terminals.
5
ENGLISH
• The ENTER button on the remote control does not
substitute for the ENTER button on the main unit. This
button is for operating the DVD player only (see the next
page.)
• In principal, the TUNING UP and DOWN buttons on the
remote control substitute for N (TUNING UP) and M
(TUNING DOWN) buttons on the main unit.
To select the function (audio source) with the remote
control
Press the FUNCTION button repeatedly. The function changes
cyclically.
NOTE
• If the unit is not going to be used for an extended period of
time, remove the batteries to prevent possible electrolyte
leakage.
• The remote control may not operate correctly when:
- The line of sight between the remote control and the remote
sensor in the display window is exposed to intense light, such
as direct sunlight.
- Other remote controls are used nearby (those of a television,
etc.)
Operating AIWA CD or DVD players with the remote
control
SETTING THE CLOCK
PREPARATIONS
You can control the basic functions of AIWA CD or DVD players
with the remote control. In principle, the buttons described below
have the same function as those on the DVD or CD players.
For more details, refer to the operating instructions of the player.
When the AC cord is connected for the first time, the clock on
the display flashes.
Set the time as follows while the power is off.
1 Press the ENTER button.
The display becomes a little brighter.
Operating CD players
Press the following button.
c/a(CD) - Starts or pauses playback.
f,g - Searches a track. Hold the button down.
r(CD),t(CD) - Skips a track. Press the button repeatedly.
s - Stops playback.
DISC SKIP(CD) - Skips a disc in the CD changer.
Operating DVD players
Press the following button while pressing the SHIFT button.
c - Starts playback.
f,g - Searches a track.
s - Stops playback.
i,k,j,l (up, down, left or right) - Moves the cursor to select a
program etc.
AUDIO - Changes an audio track (language etc.)
ENTER - Enters the selected program etc.
TITLE or MENU - Enters the title or menu screen.
RETURN - Returns to the previous mode etc.
DVD PAUSE - Pauses the playback of a DVD.
NOTE
There are some AIWA COMPACT DISC PLAYERs for which
some of the functions of the remote control do not work.
2 Within 4 seconds, turn the MULTI JOG to
designate the hour and the minute.
The time advances by turning it to the right, and decreases
by turning it to the left.
The N or M button on the main unit is also available. Press
the button repeatedly. To change the time rapidly in 10-minute
steps, hold it down.
En
3 Press the ENTER button.
The clock starts from 00 seconds.
E (Españo
NOTE
When the clock is set for the first time after purchase
Everything on the display will clear.
This is because the power economizing mode of the unit is
activated, and is not a malfunction.
The power economizing mode can be canceled. See page 7 for
details.
To correct the current time
Press the POWER button to turn the unit off. Carry out steps 1
to 3 above.
To display the current time
Press the CLOCK button while pressing the SHIFT button on
the remote control. The clock is displayed for 4 seconds.
When the power is off in the power economizing mode, pressing
the ENTER button on the unit also display the current time for 4
seconds.
To switch to the 24-hour standard
Display the current time, and press the BAND button on the unit
within 4 seconds.
Repeat the same procedure to restore the 12-hour standard.
In the 12-hour standard, “AM 12:00” indicates midnight and “PM
12:00” indicates noon.
If the clock display flashes while the power is off
This is caused by a power interruption. The current time needs
to be reset.
If power is interrupted for more than approximately 24 hours, all
settings stored in memory after purchase need to be reset.
ENGLISH
6
F (França
BEFORE OPERATION
To select the front speaker system
To use speaker system A: Set the FRONT SPEAKERS A button
to HON.
To use speaker system B: Set the FRONT SPEAKERS B button
to HON.
To use both speaker systems: Set both the buttons to HON.
Set the button(s) to hOFF to turn off the speaker system(s).
NOTE
• As the front speaker systems A and B are connected in series:
- The sound will decrease slightly when using both speaker
systems
- No sound can be heard if the FRONT SPEAKERS A and B
buttons are set to HON when only one speaker system is
connected
• The sub woofer sound will be output only when the speaker
system A (the front speakers connected to the SPEAKERS A
terminals) is selected.
To turn the unit on
Press the POWER button.
Operation is possible after four seconds. The VOL (volume) level
or function name is displayed one after the other for the first four
seconds.
The selected function indicator lights up in red.
To turn the unit off, press the POWER button.
POWER ECONOMIZING (ECO) MODE
To change the brightness level of the display
1 Press the ECO button repeatedly until “DIM MODE” is
displayed.
2 Within 4 seconds, press the ENTER button.
3 Within 4 seconds, turn the MULTI JOG to select the dimmer
mode as below.
The mode will be automatically set after 4 seconds. It will
also be set if the ENTER button is pressed within 4 seconds
after step 3.
DIM-OFF: The normal display.
DIMMER 1: The illumination of the display is dimmer than
usual.
DIMMER 2: The illumination of the display is dimmer than
DIMMER 1. The function indicator turns off.
Setting this unit to the ECO mode reduces power consumption
as below.
Initial setting of the ECO mode is ON.
• When the current time is set, the clock display disappears
immediately.
• While the power is off, all the display lights turn off, and only
the ECO indicator lights in red.
Using the headphones
To cancel the ECO mode
Connect headphones to the PHONES jack with a standard stereo
plug (ø6.3 mm, 1/4 inch). Be sure to set the FRONT SPEAKERS
A and B buttons to hOFF. Otherwise sound is output from the
speakers.
1 Press the ECO button to display ECO MODE while the unit is
turned on.
2 Within 4 seconds, press the ENTER button.
3 Within 4 seconds, turn the MULTI JOG to select ECO OFF.
The mode will be automatically set after 4 seconds. It will
also be set if the ENTER button is pressed within 4 seconds
after step 3.
7
ENGLISH
SOUND
CUSTOM AUDIO ADJUSTMENT
TONE CONTROL
SOUND
You can adjust the high and low range of the sound,
and up to 5 adjusted sound modes can be stored as the
preset numbers M1 to M5.
VOLUME CONTROL
Turn the VOLUME control on the unit, or press the VOL buttons
on the remote control.
The volume level is shown on the display for four seconds. It can
be adjusted between 0 and MAX (50). It flashes when set over
the level of 44.
The volume level remains memorized even after the power is
turned off. However, if the power is turned off when the volume
is set to 21 or more, it is automatically set to 20 the next time the
power is turned on.
To adjust the left/right balance of the front speakers
Press the BALANCE button to display “L/R 0dB”. Then press
the N(UP) or M(DOWN) button repeatedly or turn the MULTI
JOG within four seconds.
To mute the sound temporarily
Press the MUTING (MUTE) button (–20 dB).
“MUTE ON” appears on the display for four seconds. While muting
the sound, the selected function indicator flashes. Press the
MUTING button again to restore the sound.
SUPER T-BASS SYSTEM
The T-BASS system enhances the realism of low-frequency
sound.
Press the T-BASS button.
Each time it is pressed, the level changes. Select one of the
three levels, or the off position to suit your preference.
1 Press the TONE button.
2 Within 7 seconds, press the ENTER button.
3 Turn the MULTI JOG to adjust the high range of
the sound.
4 Press the M button and turn the MULTI JOG to
adjust the low range of the sound.
To re-adjust the high or low range, press the N
or M button and turn the MULTI JOG.
In steps 3 and 4, the unit returns to normal mode when no
operation is made for 4 seconds.
E (Españo
5 Press the ENTER button.
TONE M1 is displayed.
6 Turn the MULTI JOG to select preset number from
M1 to M5.
7 Within 4 seconds, press the ENTER button.
The adjusted sound mode is stored in the selected preset
number.
To adjust the sound temporarily
Follow the steps from 1 to 4 above. The adjusted sound
remains before changing the FUNCTION or TONE.
To select the preset mode
NOTE
Low-frequency sound may be distorted when the T-BASS system
is used for a disc or tape in which low-frequency sound is
originally emphasized. In this case, cancel the T-BASS system.
En
Press the TONE button, and turn the MULTI JOG until
the desired preset number is displayed. To cancel the
selected mode, press the TONE button twice.
When operating with the remote control, press the
TONE button repeatedly while pressing the SHIFT
button. The preset modes M1 to M5 and "TONE OFF"
can be selected.
SOUND ADJUSTMENT DURING RECORDING
The output volume and tone of the speakers or headphones may
be freely varied without affecting the level of the recording.
ENGLISH
8
F (França
BASIC OPERATIONS
ELECTRONIC GRAPHIC
EQUALIZER
SELECTION OF AUDIO/VIDEO
SOURCE
This unit provides the following five different equalization modes.
ROCK: Powerful sound emphasizing treble and bass
POP: More presence in the vocals and midrange
JAZZ: Accented lower frequencies for jazz-type music
CLASSIC: Enriched sound with heavy bass and fine treble
BGM: Calm tone with suppressed bass and treble
Press the GEQ (Graphic Equalizer) button, and turn the
MULTI JOG until the desired equalization mode is
displayed.
The GEQ modes are displayed cyclically as follows.
The selected mode name is displayed for four seconds, and the
selected GEQ indicator is enclosed.
Selected mode
1 Select the program source.
Turn the FUNCTION selector or press the TAPE MONITOR
button. The selected function indicator lights in red.
To listen to or watch
The indicator in red
Tape
TAPE MONITOR
Radio
TUNER
Record
PHONO
Compact disc
CD
Television, etc.
AUX
Video
VIDEO 1/DVD/MD,
VIDEO 2/LD/TV, VIDEO 3
LD or Cable TV
VIDEO 2/LD/TV
MD or DVD
VIDEO 1/DVD/MD
The function to be selected (except PHONO) depends on the
equipment connected to the input terminals on the rear panel
of the unit.
To select with the remote control
To cancel the selected mode
Press the GEQ button to display the GEQ mode name, and press
the button again within 4 seconds. “GEQ OFF” appears on the
display.
To select with the remote control
Press the GEQ button repeatedly until the desired equalization
mode is displayed.
Five preset modes and “GEQ OFF” can be selected.
Press the TAPE MONITOR button or the FUNCTION button
repeatedly.
NOTE
When using a turntable with a built-in equalizer amplifier, set
the switch of the equalizer amplifier to off. See the instructions
of the turntable for further information.
2 Start the selected program source.
3 Adjust the sound.
9
ENGLISH
RECORDING AN AUDIO SOURCE
SOUND
BASIC OPERATIONS
About the video source to the monitor or TV
Selected Video source
V1: VIDEO 1, V2: VIDEO 2, V3: VIDEO 3
The selected video source is indicated on the display and the
video signal through the MONITOR VIDEO OUT jack is output
on the TV.
To select the video source
1 Turn the FUNCTION to select PHONO, CD or AUX.
2 Press the ENTER button to display VIDEO 1.
3 Turn the MULTI JOG to select VIDEO 2 or VIDEO 3.
1 Select the program source to be recorded.
Turn the FUNCTION.
2 Set the tape deck or MD recorder to the recording
mode.
To change a displayed name for the VIDEO 1
and VIDEO 2
3 Start the selected program source.
When the VIDEO 1 function is selected, VIDEO 1 is displayed
initially. It can be changed to DVD or MD.
Press the BAND button while pressing the ENTER button, then
release the ENTER button first.
The displayed name for the VIDEO 2 function can be changed
to VIDEO 2, LD or TV; while the VIDEO 2 function is selected,
press the BAND button while pressing the ENTER button, then
release the ENTER button first.
To monitor recorded sound during recording (when the
connected tape deck is a three-head system)
To adjust the sound level of the connected
source
The input sensitivity level of each function can be adjusted (except
the TUNER and TAPE MONITOR).
When the sound level of the connected source is higher or lower
than that of the TUNER, adjust it as follows.
1 Select the function to be adjusted.
Press the TAPE MONITOR button. “TAPE ON” appears on the
display for four seconds, and then the source name selected in
step 1 comes back on. To cancel the tape monitor, press it again
so that “TAPE OFF” appears.
NOTE
• Any sound control system has no effect on recording (see
page 8).
• When recording audio sources by the MD recorder connected
to the VIDEO 1/DVD/MD AUDIO OUT terminals, the selected
video source (see left column) should be V2 or V3. Recording
cannot be done while the V1 (VIDEO 1) is selected and
displayed on the window.
• Input sound from the tape deck connected to the TAPE
MONITOR IN terminals cannot be recorded.
En
E (Españo
Turn the FUNCTION and play the source.
2 Press the N (UP) or M (DOWN) button
repeatedly.
F (França
The level can be adjusted between -6dB (MIN) and +8dB
(MAX) in 2dB steps. Adjust the level so that the sound is output
at the same level as the TUNER.
NOTE
The input sensitivity level of the TAPE MONITOR cannot
be adjusted. Even if TAPE MONITOR is selected,
pressing the N orM button will change the level of the
selected function (except TUNER) displayed on the
window.
ENGLISH
10
RADIO RECEPTION
MANUAL TUNING
When the reception contains noise interference
Move the unit away from other electrical appliances, especially
digital audio devices, or turn off the appliances that generate
noise signals.
To change the AM tuning interval
The default setting of the AM tuning interval is 10 kHz/step. If
you use this unit in an area where the frequency allocation
system is 9 kHz/step, change the tuning interval.
Hold down the BAND button and press the POWER button.
To reset the interval, repeat this procedure.
1 Turn the FUNCTION to select the TUNER function,
and press the BAND button repeatedly to select
the desired band.
The display changes to frequency indications after indicating
band and video source (V1, V2 or V3) for two seconds.
2 Press the N or M button to select a station.
Each time the button is pressed, the frequency changes.
When a station is received, “TUNE” is displayed for two
seconds. During FM stereo reception, 1 is displayed.
When operating with the remote control
Press the TUNER/BAND button while pressing the SHIFT button
in step 1, and the TUNING DOWN or UP button in step 2.
To search for a station quickly (Auto Search)
Keep the N or M button pressed until the tuner starts
searching for a station. After tuning in to a station, the search
stops.
To stop the Auto Search manually, press the N or M button.
When operating with the remote control, keep the TUNING UP
or DOWN button pressed.
• The Auto Search may not stop at stations with very weak
signals.
When an FM stereo broadcast contains noise
Press the MONO TUNER button while pressing the SHIFT button
on the remote control so that “MONO” appears on the display.
Noise is reduced, although reception is monaural.
To restore stereo reception, repeat the above so that “STEREO”
appears.
11
ENGLISH
TIMER
SETTING THE SLEEP TIMER
The unit can store a total of 32 preset stations. When a station is
stored, a preset number is assigned to the station. Use the preset
number to tune in to a preset station directly.
The receiver can be automatically turned off at a specified time.
1 Turn the FUNCTION to select the TUNER function,
and press the BAND button repeatedly to select
the desired band. Then press the N or M
button to select a station.
RADIO RECEPTION / TIMER
PRESETTING STATIONS
Press the SLEEP button while pressing the SHIFT button
on the remote control.
2 Press the ENTER button to store the station.
A preset number assigned to the station, beginning from 1 in
consecutive order for each band, appears in the display for
two seconds.
The unit will be turned off after about 60 minutes.
To specify the time until the power is turned off
3 Repeat steps 1 and 2.
Within 4 seconds after the above, press the TUNING DOWN or
UP button repeatedly.
You can change the time between 5 and 240 minutes in 5-minute
steps.
No more stations will be stored and “FULL” appears if a total
of 32 stations have already been stored for all the bands.
E (Españo
NOTE
When the AM tuning interval is changed, all preset stations are
cleared. The preset stations have to be set again.
PRESET NUMBER TUNING
1 Turn the FUNCTION to select the TUNER function,
and press the BAND button repeatedly to select
a band.
2 Turn the MULTI JOG to select a preset number.
En
Specified time
F (França
To check the time remaining until the power is turned off
Press the SLEEP button once while pressing the SHIFT button.
The remaining time is displayed for four seconds.
To cancel the sleep timer
Press the SLEEP button twice while pressing the SHIFT button
so that “SLEEPoFF” appears on the display.
When operating with the remote control
Press the TUNER/BAND button while pressing the SHIFT button
to select a band, then press the numbered buttons to select a
preset number.
Example:
To select preset number 25, press 2 and 5.
To select preset number 7 press 0 and 7.
To clear a preset station
Select the preset number of the station to be cleared. Then, press
the ENTER button, and press it again within four seconds.
The preset numbers of all other stations in the band with higher
numbers are decreased by one.
ENGLISH
12
GENERAL
SPECIFICATIONS
Outputs
FM tuner section
Tuning range
Usable sensitivity
(IHF)
Antenna terminals
87.5 MHz to 108 MHz
13.2 dBf
75 ohms (unbalanced)
AM tuner section
Tuning range
Usable sensitivity
Antenna
530 kHz to 1710 kHz (10 kHz step),
531 kHz to 1602 kHz (9 kHz step)
350 µV/m
Loop antenna
Amplifier section
Power output
Total harmonic
distortion
Inputs
13
ENGLISH
100 watts per channel, Min. RMS at 8
ohms, from 40 Hz to 20 kHz, with no
more than 0.9% Total Harmonic
Distortion
0.08 % (50 W, 1 kHz, 8 ohms, Front)
AUDIO IN
PHONO: 1.5 mV, adjustable (47
kohms)
VIDEO 1/DVD/MD, VIDEO 2/LD/
TV, VIDEO 3, CD, AUX: 200 mV,
adjustable (47 kohms)
TAPE MONITOR: 250 mV,
(47 kohms)
VIDEO IN: 1 Vp-p (75 ohms)
Muting
AUDIO OUT (REC OUT): 200 mV (1
kohm)
VIDEO OUT (MONITOR): 1 Vp-p (75
ohms)
SUB WOOFER: 2 V (47 kohms)
SPEAKERS IMP: 8Ω (front speakers
A and B): accepts speakers of 8 ohms
or more.
PHONES (stereo jack): accepts
headphones of 32 ohms or more
–20 dB
General
Power requirements
Power consumption
Power consumption in
standby mode
Dimensions
(W × H × D)
Weight
120 V AC, 60 Hz
75 W
ECO OFF: 17 W
ECO ON: 1 W
430 × 155 × 392.5 mm
(17 × 61/8 × 151/2 in.)
9.1 kg (20 lb 1 oz.)
Specifications and external appearance are subject to change
without notice.
PARTS INDEX
Occasional care and maintenance of the unit is needed to
optimize the performance of your unit.
Instructions about each part on the unit or remote control are
indicated on the pages listed below.
To clean the cabinet
(in alphabetical order)
AUDIO
BALANCE
CLOCK
BAND (TUNER/BAND)
DISC SKIP (CD)
DVD PAUSE
ECO
ENTER
FRONT SPEAKER A, B
FUNCTION
GEQ
MENU
MONO TUNER
MULTI JOG
MUTING (MUTE)
PHONES
POWER
RETURN
SHIFT
SLEEP
TAPE MONITOR
T-BASS
TITLE
TONE
TUNING M (DOWN)
TUNING N (UP)
VOLUME (VOL)
Use a soft dry cloth.
If the surfaces are extremely dirty, use a soft cloth lightly
moistened with mild detergent solution. Do not use strong
solvents, such as alcohol, benzine or thinner as these could
damage the finish of the unit.
TROUBLESHOOTING GUIDE
If the unit fails to perform as described in these Operating
Instructions, check the following guide.
GENERAL
There is no sound.
• Is the AC cord connected properly?
• Is there an incorrect connection? (➞ page 3, 4)
• There may be a short circuit in the speaker terminals.
➞ Disconnect the AC cord, then correct the speaker
connections.
• Was an incorrect function button pressed?
• Was the TAPE MONITOR button pressed?
• Are the FRONT SPEAKERS A and B buttons set correctly?
(➞ page 7)
Sound is emitted from one speaker only.
• Is the BALANCE set appropriately?
• Is the other speaker disconnected?
Sound is heard at a very low volume.
• Has the MUTING button been pressed?
An erroneous display or a malfunction occurs.
➞ Reset the unit as stated below.
6
8
6
6, 10-12
6
6
7
5-8, 10, 12, 14
7
5, 9-12
9
6
11
6-10, 12
8
7
7, 11, 14
6
6, 8, 11, 12
12
9, 10
8
6
8
5, 6, 8, 10-12
5, 6, 8, 10-12
8
GENERAL
CARE AND MAINTENANCE
En
E (Españo
F (França
TUNER SECTION
There is constant, wave-like static.
• Is the antenna connected properly? (➞ page 5)
• Is the FM signal weak?
➞ Connect an outdoor antenna.
The reception contains noise interference or the sound is
distorted.
• Is the system picking up external noise or multipath distortion?
➞ Change the orientation of the antenna.
➞ Move the unit away from other electrical appliances.
To reset
If an unusual condition in the display window or malfunction
occurs, reset the unit as follows.
1 Press the POWER button to turn off the power.
2 Press the POWER button while pressing the ENTER button.
Everything stored in memory after purchase is canceled.
If the power cannot be turned off in step 1 because of a
malfunction, reset by disconnecting the AC cord and carry out
step 2.
ENGLISH
14
FRANÇAIS
PRECAUTIONS
AVERTISSEMENT
POUR REDUIRE LE RISQUE DE COURT-CIRCUIT OU
DE CHOC ELECTRIQUE, NE PAS EXPOSER CET
APPAREIL A LA PLUIE OU A L'HUMIDITE.
Lisez attentivement et complètement le mode d’emploi avant
d’utiliser l’ampli-tuner et conservez-le pour toute référence future.
Respectez tous les avertissements et consignes mentionnés
dans le mode d’emploi, ainsi que les conseils concernant la
sécurité.
RISK OF ELECTRIC SHOCK
DO NOT OPEN
“CAUTION: TO REDUCE THE RISK OF
ELECTRIC SHOCK,
DO NOT REMOVE COVER (OR BACK).
NO USER-SERVICEABLE PARTS INSIDE.
REFER SERVICING TO QUALIFIED
SERVICE PERSONNEL.”
Signification des symboles graphiques:
L’éclair portant une flèche, situé dans un triangle
équilatéral, sert à prévenir l’utilisateur de la
présence d’une “tension dangereuse” non isolée
à l’intérieur de l’appareil, assez élevée pour
constituer un risque d’électrocution.
Le point d’exclamation situé dans un triangle
équilatéral, sert à prévenir l’utilisateur de la
présence d’instructions importantes concernant
l’utilisation et l’entretien (ou la réparation) de
l’appareil dans le manuel qui accompagne ce
dernier.
Installation
1 Eau et humidité — Ne pas utiliser l’ampli-tuner près d’une
baignoire, d’un lavabo, d’une piscine ou de tout autre endroit
similaire.
2 Chaleur — Ne pas utiliser l’ampli-tuner près d’une source de
chaleur, comme une sortie d’air chaud, un chauffage, ou autre
appareil produisant de la chaleur. Il ne doit pas non plus être
exposé à des températures inférieures à 5°C (41°F) ou
supérieures à 35°C (95°F).
3 Installation — Installez l’ampli-tuner sur une surface plane,
de niveau.
4 Ventilation — Laissez un espace suffisant tout autour de
l’ampli-tuner pour garantir une bonne ventilation, soit environ
10 cm (4 po.) à l’arrière et au-dessus de l’ampli-tuner et 5 cm
(2 po.) sur les deux côtés.
- Ne pas poser l’ampli-tuner sur un lit, une couverture ou
toute autre surface similaire qui pourrait bloquer les orifices
de ventilation.
- Ne pas installer l’ampli-tuner dans une étagère, un placard
ou un meuble où la ventilation est insuffisante.
5 Objets et liquide — Veillez à ce qu’aucun objet ni liquide ne
pénètre dans les orifices de ventilation de l’ampli-tuner.
6 Chariots et supports — Quand vous installez l’ampli-tuner
sur un suppor t ou un chariot,
déplacez-les lentement.
A cause d’arrêts subits, de
mouvements brusques et de surfaces
inégales, l’ampli-tuner ou le chariot
peuvent être renversés.
7 Fixation au mur ou au plafond — L'ampli-tuner ne doit pas
être installé au mur ou au plafond.
Electricité
Relevé du propriétaire
Pour plus de commodité, noter le numéro de modèle et le numéro
de série (cas numéros se trouvent au dos de l'appareil) dans les
cases ci-dessous. Prière de mentionner ces numéros quand on
contacte un distributeur Aiwa en cas de difficulté.
N° de modèle
AV-S17
1
FRANÇAIS
N° de série (N° de lot)
1 Sources d’alimentation — Raccordez l’ampli-tuner
seulement à la source d’alimentation spécifiée dans le mode
d’emploi et indiquée sur l’ampli-tuner proprement dit.
2 Polarisation — Par mesure de sécurité, certains appareils
sont équipés d’une fiche secteur polarisée qui ne rentre dans
la prise murale que dans un seul sens. S’il n’est pas possible
d’insérer la fiche dans la prise, essayez dans l’autre sens.
S’il n’est toujours pas possible d’insérer la fiche dans la prise,
faites appel à un électricien pour remplacer la prise qui est
probablement trop vieille. Ne pas modifier la fiche polarisée,
elle ne remplirait plus son but.
3 Cordon d’alimentation secteur
- Quand vous débranchez le cordon d’alimentation secteur,
tirez sur la fiche et non pas sur le cordon.
- Ne jamais toucher la fiche secteur avec des mains humides
afin d’éviter les risques d’incendie ou d’électrocution.
- Les cordons d’alimentation doivent être fixés correctement
pour éviter qu’ils ne soient pliés, coincés ou piétinés. Faites
particulièrement attention au cordon reliant l’ampli-tuner à
la prise secteur.
- Evitez de surcharger les prises murales (secteur) et les
prolongateurs au-delà de leur capacité, car vous risquez
sinon de provoquer un incendie ou une décharge électrique.
4 Cordon de prolongation — Afin d’éviter tout risque
d’électrocution, ne pas utiliser de fiche secteur polarisée avec
un cordon de prolongation, douille ou autre type de prise à
moins que la fiche polarisée ne soit complètement insérée
sans laisser les lames à découvert.
5 Quand l’ampli-tuner n’est pas utilisé — Débranchez l’amplituner de la prise murale si vous prévoyez de ne pas l’utiliser
pendant plusieurs mois. Quand le cordon est branché, une petite
quantité d’électricité s’écoule vers même s’il est hors tension.
TABLE DES MATIERES
PRECAUTIONS ................................................................... 1
Antenne extérieure
1 Lignes électriques — Quand vous raccordez une antenne
extérieure, assurez-vous qu’elle est suffisamment éloignée
des lignes électriques.
2 Prise de terre de l’antenne extérieure — Assurez-vous que
l’antenne est raccordée correctement à la terre par mesure
de protection contre les pointes de tension et l’accumulation
de charges statiques. L’article 810 du Code Electrique National,
ANSI/NFPA70, fournit des informations pour une mise à la
terre correcte des mâts et supports, la mise à la terre du fil de
connexion à un appareil de décharge, la dimension de
l’appareil de décharge, la connexion des électrodes de terre
et les exigences que doivent remplir les électrodes de terre.
Mise à la terre d'une antenne selon le code national
d'électrlclté(NEC)
FIL DE DESCENTE D'ANTENNE
UNITE DE DECHARGE
D'ANTENNE
(NEC SECTION 810-20)
COLLIER DE MISE
A LA TERRE
PREPARATIFS
RACCORDEMENTS ............................................................ 3
REGLAGE DE L’HORLOGE ............................................... 6
AVANT DE COMMENCER .................................................. 7
SON
REGLAGE PERSONNEL DU SON ..................................... 8
EGALISEUR GRAPHIQUE ELECTRONIQUE ................... 9
OPERATIONS DE BASE
SELECTION D’UNE SOURCE AUDIO OU VIDEO ............ 9
ENREGISTREMENT D’UNE SOURCE AUDIO ................ 10
RECEPTION RADIO
ACCORD MANUEL ........................................................... 11
PREREGLAGE DES STATIONS ....................................... 12
MINUTERIE
APPAREILLAGE
D'AMENEE DE
COURANT
CONDUCTEURS DE
MISE A LA TERRE
(NEC SECTION 810-21)
COLLIERS DE MISE A LA TERRE
ELECTRODE DE MISE A LA TERRE DE
LA LIGNE D'AMENEE DE COURANT
(NEC ARTICLE 250 PARTIE H)
NEC: CODE NATIONAL D'ELECTRICITE
Entretien
REGLAGE DE LA MINUTERIE D’ARRET ....................... 12
GENERALITES
SPECIFICATIONS ............................................................. 13
SOIN ET ENTRETIEN ....................................................... 14
EN CAS DE PANNE .......................................................... 14
NOMENCLATURE ............................................................. 14
En
Nettoyez l’ampli-tuner comme indiqué dans le mode d’emploi.
E
Réparations exigeant l’intervention d’un
professionnel
Faites réparer l’ampli-tuner par un professionnel dans les cas
suivants:
- Le cordon ou la prise secteur a été endommagé
- Des objets ou liquides sont tombés dans l’ampli-tuner
- L’ampli-tuner a été exposé à la pluie ou à l’eau
- L’ampli-tuner ne semble pas fonctionner correctement
- Les performances de l’ampli-tuner ne sont plus les mêmes
- L’ampli-tuner est tombé ou le coffret a été endommagé
NE PAS ESSAYER DE REPARER SOI-MEME LE RECEPTEUR.
F
Vérifiez vos accessoires
Télécommande
Antenne FM
Antenne AM
Mode d’emploi, etc.
FRANÇAIS
2
PREPARATIFS
RACCORDEMENTS
RACCORDEMENT DE TOUT
L’EQUIPEMENT
Avant de raccorder le cordon secteur
La tension nominale de l’ampli-tuner indiquée sur le panneau
arrière est de 120 V. Vérifiez si elle correspond à la tension locale.
IMPORTANT
Raccordez les enceintes, les antennes et les autres appareils
en premier. Raccordez le cordon secteur en dernier.
∗1
∗2
Les prises et les fiches des cordons de liaison sont codées
couleur de la façon suivante:
Prises et fiches rouges: Canal droit des signaux audio
Prises et fiches blanches: Canal gauche des signaux audio
Prises et fiches jaunes: Signaux vidéo
REMARQUE
Insérez les fiches à fond dans les prises. Des connexions relâchées
peuvent produire un bourdonnement ou d’autres interférences.
Veillez à raccorder la prise VIDEO OUT d’un lecteur DVD
directement à un téléviseur, et non pas à cet appareil, sinon
l’image présentera de la distorsion à la lecture de DVD de copie
protégée.
Pour le raccordement d’un appareil vidéo monophonique,
utilisez un cordon de liaison stéréo-mono (non fourni).
FRONT
AVANT
Camescope
Camcorder
à VIDEO OUT
to
toàAUDIO
VIDEOOUT
OUT
2
DVD
or DVD
Video
/MD player 1∗2/Lecteur MD
Lecteur
ou1*
magnétoscope
TV
Téléviseur
VIDEO IN
toàVIDEO
IN
à AUDIO IN
1/Lecteur
MD)
to(Magnétoscope
AUDIO IN(Video
1/MD)
à to
VIDEO
IN (Magnétoscope
VIDEO
IN(Video 1) 1)
à AUDIOOUTPUT
OUTPUT
to AUDIO
o
o
àtoAUDIO
OUT
AUDIO
OUT
o
REAR
ARRIERE
o
à
toAUDIO
AUDIOOUT
OUT
o
o
àtoVIDEO
OUT
(Magnétoscope1)
VIDEO
OUT(Video
1)*1 ∗1
Magnétoscope 2∗2
Video
2*2 or
ou lecteur
LD/
Télévision TV
câblée
LD/Cable
o
o
Lecteur
CD
CD
player
o
o
o
o
àtoVIDEO
OUT
VIDEO
OUT
à OUT
PUT
to
OUTPUT
Tourne-disque
Turntable
AUDIO
IN (Video 2) 2)
à to
VIDEO
IN (Magnétoscope
AUDIO IN
2)
toà VIDEO
IN(Magnétoscope
(Video 2)
3
FRANÇAIS
o
o
à LINE IN
toPlatina
LINE IN
Tape
deck
cassette
à
toLINE
LINEOUT
OUT
2AM antenne
antenna
2AM
2FM antenne
antenna
2FM
1
Speaker
system A A
1Paire
d’enceintes
Right
Droite
Left
Gauche
PREPARATIFS
1 et 2 sur l’illustration correspondent aux détails suivants.
1
Speaker
system B B
1Paire
d’enceintes
Right
Droite
Left
Gauche
1Sub woofer
1Caisson
de grave
RACCORDEMENT DES ENCEINTES 1
Bornes d’enceinte
Raccordez les enceintes avant (systèmes A et/ou B) et un
caisson de grave aux prises correspondantes de l’ampli-tuner:
- les cordons d’enceintes avant aux bornes SPEAKERS
- le cordon du caisson de grave (amplifié) à la prise SUB
WOOFER 3 pour obtenir un son grave omniprésent.
Relevez le poussoir de la borne, inserez le cordon
d’enceinte dans l’orifice, puis refermez le poussoir.
Vérifiez si le cordon est bien bloqué.
En
Impédance des enceintes
Quel que soit le type d’enceinte, utilisez des enceintes d’au moins
8 ohms.
E
Raccordement des bornes + à + et – à –
Pour obtenir l’effet sonore adéquat, les bornes d’enceintes de
l’ampli-tuner et des enceintes doivent àtre raccordées
correctement: les bornes + de l’ampli-tuner doivent àtre reliées
aux bornes + des enceintes (et – à –).
F
REMARQUE
• Le son du caisson de grave sera émis uniquement lorsque la
paire d’enceintes A (les enceintes avant raccordées aux bornes
SPEAKERS A) est sélectionnée.
• Veillez à raccorder correctement les cordons comme indiqué
sur l’illustration de droite. Des connexions inadéquates peuvent
causer des courts-circuits au niveau des bornes SPEAKERS.
• Ne pas laisser de sources de magnétisme près des enceintes.
FRANÇAIS
4
RACCORDEMENT DES ANTENNES
FOURNIES 2
A PROPOS DE LA TELECOMMANDE
Raccordez l’antenne FM aux bornes FM 75 Ω et l’antenne AM
aux bornes AM LOOP.
Antenne FM
Enlevez le couvercle du logement des piles au dos de la
télécommande et insérez deux piles R6 (format AA).
Mise en place des piles
Antenne AM
Remplacement des piles
La portée maximale de la télécommande, c’est-à-dire la distance
entre la télécommande et le capteur de l’ampli-tuner, devrait être
de 5 mètres (16 pieds). Quand la portée est réduite, remplacez
les piles par des neuves.
Utilisation de la télécommande
Pour poser l’antenne cadre AM sur une surface
Les instructions de ce mode d’emploi indiquent la plupart du
temps les touches de l’appareil.
Insérez la saillie dans la rainure comme indiqué sur l’ilustration.
Quelques touches ont deux fonctions.
• Pour utiliser la fonction indiquée sur la touche, ou sur la plaque
en noir, appuyez simplement sur la touche.
• Pour utiliser la fonction indiquée sur la plaque en vert, appuyez
sur la touche tout en appuyant sur la touche SHIFT.
Important
Pour positionner les antennes
Antenne fil FM:
Etendez-la à l’horizontale de manière à former un T et fixez ses
extrémités au mur.
Antenne cadre AM:
Faites-la pivoter pour trouver la meilleure direction.
REMARQUE
• Ne pas approcher l’antenne FM d’objets métalliques ou de
tringles de rideaux.
• Ne pas approcher l’antenne AM d’autres appareils, de l’amplituner, du cordon secteur ou des cordons d’enceintes, car elle
pourrait capter du bruit.
• Ne pas dérouler le fil de l’antenne cadre AM.
RACCORDEMENT D’UN ANTENNE
EXTERIEURE
Pour garantir une réception FM de qualité, il est conseillé d’utiliser
une antenne extérieure. Raccordez l’antenne extérieure aux
bornes FM 75 Ω.
5
FRANÇAIS
• La touche ENTER de la télécommande ne se substitue
pas à la touche ENTER de l’appareil principal. Cette
touche est destinée à exploiter le lecteur DVD uniquement
(voir page suivante.)
• En principe, les touches TUNING UP et DOWN de la
télécommande se substituent aux touches N (TUNING
UP) et M (TUNING DOWN) de l’appareil principal.
Pour sélectionner la fonction (source audio) au moyen
de la télécommande
Appuyez plusieurs fois sur la touche FUNCTION. La fonction
change cycliquement.
REMARQUE
• Si vous prévoyez de ne pas utiliser l’ampli-tuner pendant une
certaine période, enlevez les piles de la télécommande pour
éviter toute fuite de l’électrolyte des piles.
• La télécommande risque de ne pas fonctionner correctement
quand:
- La ligne de vue entre la télécommande et le capteur de
télécommande dans l’afficheur est exposée à une lumière
intense, par exemple la lumière directe du soleil.
- D’autres télécommandes sont utilisées à proximité
(télécommande de téléviseur, par ex.).
Utilisation des lecteurs CD ou DVD AIWA à l’aide de la
télécommande
REGLAGE DE L’HORLOGE
PREPARATIFS
Vous pouvez contrôler les fonctions de base des lecteurs CD ou
DVD AIWA à l’aide de la télécommande. En principe, les touches
décrites ci-dessous ont la même fonction que celles des lecteurs
DVD ou CD.
Pour plus de détails, reportez-vous au mode d’emploi du lecteur.
Quand le cordon secteur est raccordé au secteur pour la première
fois, l’horloge clignote sur l’afficheur.
Réglez-la de la façon suivante quand l’ampli-tuner est éteint.
1 Appuyez sur la touche ENTER.
L’afficheur devient légèrement plus lumineux.
Utilisation des lecteurs DVD et CD
Appuyez sur la touche suivante.
c/a - Lance la lecture. La touche introduit également une pause
de lecture CD.
f,g - Recherche une plage. Maintenez la touche enfoncée.
r,t - Ignore une plage du CD. Appuyez plusieurs fois sur
la touche.
s - Arrête la lecture.
Utilisation des lecteurs DVD
Appuyez sur la touche suivante tout en appuyant sur la touche
SHIFT.
i,k,j,l (haut, bas, gauche ou droite) - Déplace le curseur
pour sélectionner un programme, etc.
AUDIO - Change une piste audio (langue etc.)
ENTER - Entre le programme sélectionné, etc.
TITLE ou MENU - Entre le titre ou l’écran de menu.
RETURN - Retourne au mode précédent, etc.
DVD PAUSE - Introduit une pause de lecture d’un DVD.
Utilisaiton des lecteurs CD
Appuyez sur la touche suivante.
DISC SKIP (CD) - Ignore un disque dans le changeur CD.
2 Dans les 4 secondes, tournez MULTI JOG pour
désigner l’heure et la minute.
L’heure avance lorsque vous tournez vers la droite et diminue
lorsque vous tournez vers la gauche.
La touche N ou M de l’appareil principal est également
disponible. Appuyez plusieurs fois de suite sur la touche.
Maintenez-la enfoncée pour changer l’heure rapidement par
incréments de 10 minutes.
En
3 Appuyez sur la touche ENTER.
L’horloge démarre à partir de 00 seconde.
E
REMARQUE
Lors du premier réglage de l’horloge après l’achat
Toutes les indications de la fenêtre d’affichage disparaissent.
La raison en est que le mode d’économie d’énergie de l’appareil
est activé; il ne s’agit pas d’un dysfonctionnement.
Le mode d’économie d’énergie peut être annulé. Pour plus de
détails, voir page 7.
Pour remettre l’horloge à l’heure
Appuyez sur l’interrupteur POWER pour mettre l’ampli-tuner hors
tension. Exécutez les étapes 1 à 3 ci-dessus.
Pour afficher l’heure actuelle
Appuyez sur la touche CLOCK tout en appuyant sur la touche
SHIFT de la télécommande. L’horloge s’affiche pendant 4
secondes.
Lorsque l’alimentation est coupée en mode d’économie
d’énergie, le fait d’appuyer sur la touche ENTER sur l’appareil
permet d’afficher l’heure pendant quatre secondes.
Pour passer au standard de 24 heures
Affichez l’heure actuelle et appuyez sur la touche BAND de
l’appareil dans les 4 secondes.
Répétez la même opération pour rétablir le standard de 12 heures.
Dans le standard 12 heures, “AM 12:00” indique minuit et
“PM12:00” indique midi.
Si l’affichage de l’heure clignote quand l’ampli-tuner est
hors tension
Il y a eu une interruption de courant. L’horloge doit être remise à
l’heure.
Si l’alimentation est interrompue pendant plus de 24 heures,
tous les réglages mémorisés après l’achat doivent être de
nouveau effectués.
FRANÇAIS
6
F
AVANT DE COMMENCER
Indicateurs de fonction
Pour mettre l’ampli-tuner sous tension
Appuyez sur la touche POWER.
Le fonctionnement est possible après quatre secondes. Le niveau
de VOL (volume) et le nom de la fonction s’affichent l’un après
l’autre pendant les quatre premières secondes.
L’indicateur de fonction sélectionné s’allume en rouge.
Pour changer la luminosité de l’affichage
Sélection de la paire d’enceintes avant
Pour utiliser la paire d’enceintes A: Réglez la touche FRONT
SPEAKERS A sur HON (marche).
Pour utiliser la paire d’enceintes B: Réglez la touche FRONT
SPEAKERS B sur HON (marche).
Pour utiliser les deux paires d’enceintes: Réglez les deux touches
sur HON (marche).
Réglez ces touches sur hOFF (arrêt) pour mettre une paire
d’enceintes, ou les deux, hors service.
REMARQUE
• Comme les paires d’enceintes avant A et B sont raccordées
en série:
- le son est légèrement réduit quand vous utilisez les deux
paires d’enceintes
- aucun son n’est audible si les touches FRONT SPEAKERS
A et B sont enclenchées (HON/marche) mais qu’une seule
paire d’enceintes est raccordée
• Le son du caisson de grave sera émis uniquement lorsque la
paire d’enceintes A (les enceintes avant raccordées aux bornes
SPEAKERS A) est sélectionnée.
Pour éteindre l’ampli-tuner, appuyez sur l’interrupteur POWER.
MODE D’ECONOMIE D’ENERGIE (ECO)
1 Appuyez plusieurs fois sur ECO jusqu’à ce que “DIM MODE”
s’affiche.
2 En l’espace de 4 secondes, appuyez sur la touche ENTER.
3 En l’espace de 4 secondes, tournez MULTI JOG pour
sélectionner le mode d’atténuation comme ci-dessous.
Le mode se règle automatiquement après 4 secondes. Il se
règle également si vous appuyez sur la touche ENTER dans
un délai de 4 secondes après l’étape 3.
DIM-OFF:
Afficheur normal
DIMMER 1: Eclairage de l’afficheur atténué.
DIMMER 2: Eclairage de l’afficheur plus atténué qu’avec
DIMMER 1. L’indicateur de fonction s’éteint.
Utilisation d’un casque d’écoute
Raccordez un casque d’écoute à fiche standard stéréo (ø6,3
mm, 1/4 pouce) à la prise PHONES. N’oubliez pas de désactiver
les touches FRONT SPEAKERS A et B (hOFF/arrêt), sinon le
son sera fourni par les enceintes.
Indicateur ECO
Activez l’ampli-tuner en mode ECO pour réduire la consommation
d’électricité comme indiqué ci-dessous.
Le réglage par défaut du mode ECO est ON.
• Lorsque l’heure a été réglée, l’affichage de l’horloge disparaît
immédiatement.
• Lorsque l’appareil est hors tension, tous les voyants de l’appareil
s’éteignent et seul le voyant ECO est allumé en rouge.
Pour désactiver le mode ECO
1 Appuyez sur la touche ECO pour afficher ECO MODE alors
que l’appareil est sous tension.
2 En l’espace de 4 secondes, appuyez sur la touche ENTER.
3 En l’espace de 4 secondes, tournez MULTI JOG pour
sélectionner ECO OFF.
Le mode se règle automatiquement au bout de 4 secondes.
Il se règle également si vous appuyez sur la touche ENTER
dans un délai de 4 secondes après l’étape 3.
7
FRANÇAIS
SON
REGLAGE DE LA TONALITE
Il vous est possible de régler le niveau des basses et des aigus
et un maximum de 5 modes de son peuvent être stockés
à l’aide des numéros de présélection M1 à M5.
PREPARATIFS/
SON
REGLAGE PERSONNEL DU SON
REGLAGE DE VOLUME
Tournez la commande de VOLUME sur l’ampli-tuner ou appuyez
sur les touches VOL de la télécommande.
Le niveau sonore est indiqué sur l’afficheur pendant quatre
secondes. Il peut être réglé de 0 à 50 (MAX) mais il clignote s’il
est réglé au-dessus du niveau 44.
Le niveau de volume reste mémorisé même après que l’appareil
est hors tension. Toutefois, si l’appareil est mis hors tension
lorsque le volume est réglé sur 20 ou plus, il est automatiquement
ramené à 21 la prochaine fois que l’appareil est mis sous tension.
Pour ajuster la balance gauche/droite des enceintes avant
Appuyez sur la touche BALANCE pour afficher “L/R 0dB”, puis
appuyez de façon répétée sur la touche N (UP) ou M (DOWN)
ou tournez MULTI JOG en l’espace de quatre secondes.
Pour couper provisoirement le son
Appuyez sur la touche MUTING (MUTE) (–20 dB).
“MUTE ON” apparaît sur l’afficheur pendant quatre secondes.
Quand le son est coupé, l’indicateur de fonction sélectionné
clignote. Appuyez une nouvelle fois sur la touche MUTING pour
rétablir le son.
1 Appuyez sur la touche TONE.
2 Dans les 7 secondes qui suivent, appuyez sur la
touche ENTER.
3 Tournez MULTI JOG pour ajuster les aigus.
4 Appuyez sur la touche M et tournez MULTI JOG
pour régler les basses.
Pour régler de nouveau les aigus ou les basses,
appuyez sur les touches N ou M et tournez
MULTI JOG.
Dans les étapes 3 et 4, l’appareil revient en mode normal
lorsqu’aucune action n’est effectuée pendant 4 secondes.
SYSTEME SUPER T-BASS
5 Appuyez sur la touche ENTER.
Le système T-BASS sert à renforcer le réalisme des basses
fréquences.
Appuyez sur la touche T-BASS.
A chaque pression, le niveau change. Sélectionnez un des trois
niveaux, ou la position d'annulation si vous préférez.
6 Tournez MULTI JOG pour sélectionner un numéro
de présélection allant de M1 à M5.
Le mode sonore réglé est stocké dans le numéro de
présélection correspondant.
Pour régler temporairement le son
Suivez les étapes 1 à 4 ci-dessus. Le son ainsi réglé
reste inchangé jusqu’à une modification FUNCTION ou TONE.
Le son des basses fréquences peut présenter des distorsions
quand le système T-BASS est utilisé avec un disque ou une
cassette sur lesquels les graves sont amplifiés d’origine. Dans
ce cas, mettez le système T-BASS hors service.
REGLAGE DU SON PENDANT
L’ENREGISTREMENT
Vous pouvez varier à volonté le volume de sortie et le timbre
des enceintes ou du casque sans changer le niveau
d’enregistrement.
E
F
TONE M1 est affiché.
7 Dans les 4 secondes qui suivent, appuyez sur la
touche ENTER.
(annulation)
En
Pour sélectionner un mode présélectionné
Appuyez sur la touche TONE et tournez MULTI JOG jusqu’à ce
que le numéro correspondant au mode présélectionné souhaité
soit affiché. Pour annuler le mode sélectionné, appuyez deux
fois sur la touche TONE.
Si vous utilisez la télecommande, appuyez plusieurs fois
sur la touche TONE tout en maintenant la touche SHIFT
enfoncée. Les modes M1 à M5 et “TONE OFF” peuvent être
sélectionnés.
FRANÇAIS
8
OPERATIONS DE BASE
EGALISEUR GRAPHIQUE
ELECTRONIQUE
SELECTION D'UNE SOURCE
AUDIO OU VIDEO
Indicateurs de fonction
L’ampli-tuner présente les cinq modes d’égalisation suivants.
1 Sélectionnez la source de programme.
ROCK: Son puissant avec accentuation des aigus et des graves
POP: Présence améliorée des voix et des médiums
JAZZ: Accentuation des basses fréquences pour la musique de
type jazz
CLASSIC: Son plus riche avec des graves lourds et des aigus
fins
BGM: Son calme avec graves et aigus supprimés
Appuyez sur la touche GEQ (égaliseur graphique) et
tournez MULTI JOG jusqu’à ce que le mode d’égalisation
voulu s’affiche.
Les modes GEQ s’affichent de manière cyclique comme ci-après.
Le nom du mode sélectionné est affiché pendant quatre
secondes puis l’indicateur GEQ correspondant est entouré.
Tournez le sélecteur FUNCTION ou appuyez sur la touche
TAPE MONITOR. L’indicateur de la fonction sélectionnée
clignote en rouge.
Pour écouter ou regarder
L’indicateur en rouge
une cassette
TAPE MONITOR
la radio
TUNER
un disque analogique
PHONO
la télévision, etc.
CD
un disque compact
AUX
une cassette vidéo
VIDEO 1/DVD/MD,
VIDEO 2/LD/TV, VIDEO 3
un LD ou la télévision câble
VIDEO 2/LD/TV
un MD ou DVD
VIDEO 1/DVD/MD
Les fonctions à sélectionner (excepté PHONO) dépendent
de l’appareil raccordé aux bornes d’entrée du panneau arrière
de l’appareil.
A sélectionner avec la télécommande
Appuyez plusieurs fois de suite sur la touche TAPE MONITOR
ou FUNCTION.
Mode sélectionné
Pour annuler le mode sélectionné
Appuyez sur la touche GEQ pour afficher le nom de mode GEQ
et appuyez ensuite à nouveau sur cette touche dans les 4
secondes. “GEQ OFF” apparaît sur l’afficheur.
Pour sélectionner le mode avec la télécommande
Appuyez plusieurs fois sur la touche GEQ jusqu’à ce que le mode
d’égalisation souhaité soit affiché.
Cinq modes de présélection et “GEQ OFF” peuvent être
sélectionnés.
9
FRANÇAIS
Quand vous utilisez un tourne-disque avec amplificateur
égaliseur intégré, réglez l’interrupteur de l’amplificateur
égaliseur sur arràt. Reportez-vous au mode d’emploi de la
platine tourne-disque pour les détails.
2 Démarrez la source de programme sélectionnée.
3 Réglez le son.
ENREGISTREMENT D’UNE
SOURCE AUDIO
SON/
OPERATIONS DE BASE
A propos de la source vidéo fournie au
moniteur ou téléviseur
Source vidéo sélectionné
V1: VIDEO 1, V2: VIDEO 2, V3: VIDEO 3
La source vidéo sélectionnée est indiquée sur l’afficheur et le
signal vidéo transmis par la prise MONITOR VIDEO OUT
apparaît sur le téléviseur.
Pour sélectionner la source vidéo
1 Tournez FUNCTION pour sélectionner PHONO, CD ou AUX.
2 Appuyez sur la touche ENTER pour afficher VIDEO 1.
3 Tournez MULTI JOG pour sélectionner VIDEO 2 ou VIDEO 3.
1 Sélectionnez la source de programme qui doit
être enregistrée.
Pour changer le nom affiché pour la touche
VIDEO 1 et la touche VIDEO 2
2 Mettez la platine à cassette ou l’enregistreur MD
en mode d’enregistrement.
Lorsque la fonction VIDEO 1 est sélectionnée, VIDEO 1 apparaît
normalement. Vous pouvez le changer par DVD ou MD.
Appuyez sur la touche BAND tout en maintenant la touche
ENTER enfoncée, et relâchez la touche ENTER en premier.
Le nom affiché pour la function VIDEO 2 peut être changé en
VIDEO 2, LD ou TV; lorsque la fonction VIDEO 2 est sélectionnée,
appuyez sur la touche BAND tout en maintenant la touche
ENTER enfoncée, et relâchez la touche ENTER en premier.
Pour ajuster le niveau sonore de la source
raccordée
Le niveau de sensibilité d’entrée de chaque fonction peut être
ajusté (excepté les fonctions TUNER et TAPE MONITOR).
Quand le niveau de la source sonore raccordée est plus haut ou
bas que celui de la radio, ajustez-le de la façon suivante.
1 Sélectionnez la fonction dont le niveau doit être
ajusté.
Tournez FUNCTION et démarrez la lecture de la source.
2 Appuyez de façon répétée sur la touche N (UP)
ou M (DOWN).
Tournez FUNCTION.
3 Démarrez la source de programme sélectionnée.
Pour contrôler le son enregistré pendant l’enregistrement
(quand la platine à cassette raccordée a trois têtes)
Appuyez sur la touche TAPE MONITOR. “TAPE ON” apparaît
sur l’afficheur pendant quatre secondes, puis le nom de la source
sélectionnée à l’étape 1 réapparaît. Pour cesser de contrôler le
son, appuyez une nouvelle fois sur la touche pour que “TAPE
OFF” apparaisse.
REMARQUE
• Aucun système de contrôle du son n’agit sur l’enregistrement
(voir page 8).
• Pour enregistrer des sources audio à l’aide de l’enregistreur
MD raccordé aux bornes VIDEO 1/DVD/MD AUDIO OUT, la
source vidéo sélectionnée (reportez-vous à la colonne de
gauche) doit être V2 ou V3. L’enregistrement ne peut se faire si
V1 (VIDEO 1) est sélectionné et affiché dans la fenêtre.
• Le son fourni par la platine à cassette raccordé aux prises TAPE
MONITOR IN ne peut pas être enregistré.
Le niveau peut être ajusté entre –6dB (MIN) et +8dB (MAX) par
pas de 2dB. Ajustez le niveau de sorte que le son soit au même
niveau que celui de la radio.
REMARQUE
Le niveau de sensibilité d’entrée de la fonction TAPE MONITOR
ne peut pas être ajusté. Même si la fonction TAPE MONITOR
est sélectionnée, le fait d’appuyer sur la touche N ou M aura
pour effet de changer le niveau de la fonction sélectionnée (à
l’exception de la fonction TUNER) affiché dans la fenêtre.
FRANÇAIS
10
En
E
F
RECEPTION RADIO
ACCORD MANUEL
Si la réception est parasitée
Eloignez l’appareil des autres appareils électriques, surtout
des appareils audionumériques, ou éteignez les appareils qui
génèrent des parasites.
Pour changer l’intervalle d’accord AM
Le réglage par défaut de l’intervalle d’accord AM est de 10
kHz. Si vous utilisez cet ampli-tuner dans un pays où
l’attribution des fréquences est de 9 kHz, changez l’intervalle
d’accord.
Tout en tenant la touche BAND enfoncée, appuyez sur
l’interrupteur POWER.
Pour revenir à l’intervalle initial, refaites les mêmes opérations.
1 Tournez FUNCTION pour sélectionner la fonction
TUNER et appuyez plusieurs fois de suite sur
BAND pour sélectionner la bande voulue.
La fréquence est indiquée après le nom de la gamme et de la
source vidéo (V1, V2 ou V3) pendant deux secondes.
2 Appuyez sur N ou M pour sélectionner une
station.
A chaque pression sur la touche, la fréquence change.
Quand vous recevez une station, “TUNE” est affiché pendant
deux secondes. Pendant la réception stéréo FM, 1 est
affiché.
Lors de l’utilisation avec une télécommande
Appuyez sur la touche TUNER/BAND tout en appuyant sur la
touche SHIFT à l’étape 1, et sur la touche TUNING DOWN ou
UP à l’étape 2.
Pour rechercher une station rapidement sur l’appareil
principal (recherche automatique)
Maintenez la touche N ou M enfoncée jusqu’à ce que le
syntoniseur commence à rechercher une station. Quand une
station est accordée, la recherche s’arrête.
Pour arrêter la recherche automatique, appuyez sur la touche
N ou M.
Lors de l’utilisation de la télécommande, maintenez la touche
TUNING UP ou DOWN enfoncée.
• La recherche automatique peut ne pas s’arrêter sur les stations
dont le signal est trop faible.
Quand une émission FM stéréo est parasitée
Appuyez sur la touche MONO TUNER tout en appuyant sur la
touche SHIFT de la télécommande de sorte que “MONO”
apparaisse dans la fenêtre d’affichage.
Le bruit est réduit, mais la réception est monophonique.
Pour restaurer la réception stéréo, répétez l’opération ci-dessus
pour faire apparaître “STEREO”.
11
FRANÇAIS
MINUTERIE
REGLAGE DE LA MINUTERIE
D’ARRET
RECEPTION RADIO/
MINUTERIE
PREREGLAGE DES STATIONS
L’ampli-tuner peut mémoriser en tout 32 stations. Quand une
station est mémorisée, un numéro de préréglage est affecté à
cette station. Utilisez le numéro de préréglage pour accorder
directement la station préréglée.
1 Tournez FUNCTION pour sélectionner la fonction
TUNER et appuyez plusieurs fois de suite sur la
touche BAND pour sélectionner la bande désirée.
Appuyez ensuite sur la touche N ou M pour
sélectionner une station.
L’ampli-tuner peut être automatiquement mis hors tension à une
heure précise.
Appuyez sur la touche SLEEP tout en appuyant sur
la touche SHIFT de la télécommande.
2 Appuyez sur la touche ENTER pour sauvegarder
la station.
Un numéro de présélection assigné à la station, à commencer
par 1 dans l’ordre consécutif pour chaque bande, apparaît
dans la fenêtre d’affichage pendant deux secondes.
L’appareil se mettra hors tension dans les 60 minutes qui
suivent.
En
Pour désigner le temps de fonctionnement jusqu’à la
mise hors tension
3 Refaites les opérations 1 et 2.
Aucune station supplémentaire ne sera stockées et “FULL”
apparaîtra si un total de 32 stations a déjà été sauvegardé
pour toutes les bandes.
Dans les 4 secondes qui suivent l’opération ci-dessus, appuyez
plusieurs fois sur la touche TUNING DOWN ou UP.
Vous pouvez modifier le temps entre 5 et 240 minutes par
intervalles de 5 minutes.
E
F
Quand vous changez l’intervalle d’accord AM, toutes les stations
préréglées sont supprimées. Vous devez les prérégler une
nouvelle fois.
Temps désigné
ACCORD DES STATIONS PREREGLEES
1 Tournez FUNCTION pour sélectionner la fonction
TUNER et appuyez plusieurs fois de suite sur la
touche BAND pour sélectionner une bande.
2 Tournez MULTI JOG pour sélectionner un numéro
préréglé.
Lors de l’utilisation avec une télécommande
Appuyez sur la touche TUNER/BAND tout en appuyant sur la
touche SHIFT pour sélectionner une bande, puis appuyez sur
les touches numériques pour sélectionner un numéro de
présélection.
Pour vérifier le temps restant jusqu’à la mise hors tension
Appuyez une seule sur la touche SLEEP tout en appuyant sur la
touche SHIFT. Le temps restant est affiché pendant quatre
secondes.
Pour arrêter la minuterie
Appuyez deux fois sur la touche SLEEP tout en appuyant sur la
touche SHIFT de sorte que “SLEEPoFF” apparaisse dans la
fenêtre d’affichage.
Exemple:
Pour sélectionner le numéro de présélection 25, appuyez sur 2
et 5.
Pour sélectionner le numéro de présélection 7, appuyez sur 0 et
7.
Pour supprimer une station préréglée
Sélectionnez le numéro de la station préréglée à supprimer.
Appuyez ensuite sur la touche ENTER et appuyez de nouveau
dessus dans les quatre secondes.
Le numéro de toutes les autres stations préréglées suivantes
dans cette bande diminuent d’une unité.
FRANÇAIS
12
GENERALITES
SPECIFICATIONS
Sorties
Section Tuner FM
Plage d’accord
Sensibilité utilisable
(IHF)
Bornes d’antenne
87,5 MHz à 108 MHz
13,2 dBf
75 ohms (asymétrique)
Section Tuner AM
Plage d’accord
Sensibilité utilisable
Antenne
530 kHz à 1710 kHz (intervalle de 10
kHz), 531 kHz à 1602 kHz (intervalle
de 9 kHz)
350 µV/m
Antenne cadre
Section Amplificateur
Puissance de sortie
100 watts par canal, minimum RMS à
8 ohms, de 40 Hz à 20 kHz, avec
moins de 0,9 % de distorsion
harmonique totale
Distorsion harmonique 0,08 % (50 W, 1 kHz, 8 ohms,
totale
Enceintes avant)
Entrées
AUDIO IN
PHONO: 1,5 mV, réglable
(47 kohms)
VIDEO 1/DVD/MD, VIDEO 2/LD/
TV, VIDEO 3, CD, AUX: 200 mV,
réglable (47 kohms)
TAPE MONITOR: 250 mV
(47 kohms)
VIDEO IN: 1 Vc-c (75 ohms)
13
FRANÇAIS
Coupure du son
AUDIO OUT (REC OUT): 200 mV
(1 kohm)
VIDEO OUT (MONITOR): 1 Vc-c
(75 ohms)
SUB WOOFER: 2 V (47 kohms)
SPEAKERS IMP: 8Ω (enceintes avant
A et B): accepte des enceintes de 8
ohms ou plus.
PHONES (jack stéréo): accepte un
casque de 32 ohms ou plus
–20 dB
Généralités
Alimentation
5Consommation
Consommation en
mode de veille
Dimensions (l/h/p)
Poids
Secteur 120 V, 60 Hz
75 W
ECO OFF : 17 W
ECO ON : 1 W
430 × 155 × 392,5 mm
(17 × 61/8 × 151/2 po.)
9,1 kg (20 li. 1 on.)
La conception et les spécifications peuvent être modifiées sans
préavis.
NOMENCLATURE
Un entretien occasionnel de l’ampli-tuner est indispensable pour
garantir des performances optimales.
Les instructions concernant chaque touche de l’ampli-tuner ou
la télécommande se trouvent aux pages indiquées ci-dessous.
Pour nettoyer le coffret
(ordre alphabétique)
AUDIO
BALANCE
CLOCK
BAND (TUNER/BAND)
DISC SKIP (CD)
DVD PAUSE
ECO
ENTER
FRONT SPEAKER A, B
FUNCTION
GEQ
MENU
MONO TUNER
MULTI JOG
MUTING (MUTE)
PHONES
POWER
RETURN
SHIFT
SLEEP
TAPE MONITOR
T-BASS
TITLE
TONE
TUNING M (DOWN)
TUNING N (UP)
VOLUME (VOL)
Utilisez un chiffon doux et sec.
Si la surface est extrêmement sale, utilisez un chiffon légèrement
imprégné d’une solution détergente neutre. Ne pas utiliser de
solvants puissants, tels que l’alcool, la benzine et du diluant, car
ils pourraient abîmer la finition.
EN CAS DE PANNE
Si l’ampli-tuner ne fonctionne pas comme décrit dans le mode
d’emploi, vérifiez les points suivants.
GENERAL
Aucun son.
• Est-ce que le cordon secteur est raccordé correctement?
• Est-ce qu’un raccordement n’est pas exact? (➞ pages 3 et 4)
• Est-ce qu’il y a un court-circuit au niveau des bornes
d’enceintes?
➞ Débranchez le cordon secteur, puis raccordez correctement
l’enceinte.
• Est-ce que vous avez appuyé sur une mauvaise touche?
• Avez-vous appuyé sur la touche TAPE MONITOR?
• Est-ce que les touches FRONT SPEAKERS A et B sont réglées
correctement? (➞ page 7)
6
8
6
6, 10-12
6
6
7
5-8, 10, 12, 14
7
5, 9-12
9
6
11
6-10, 12
8
7
7, 11, 14
6
6, 8, 11, 12
12
9, 10
8
6
8
5, 6, 10-12
5, 6, 10-12
8
GENERALITES
SOIN ET ENTRETIEN
En
Son émis par une enceinte seulement.
• Est-ce que la balance BALANCE est réglée correctement ?
• Est-ce que l’autre enceinte est débranchée ?
E
Le volume sonore est considérablement réduit.
• Est-ce que vous avez appuyé sur la touche MUTING?
Affichage erroné ou dysfonctionnement.
F
➞ Réinitialisez l’ampli-tuner comme indiqué ci-dessous.
SECTION TUNER
Parasites électrostatiques constants.
• Est-ce que l’antenne est correctement raccordée? (➞ page 5)
• Est-ce que le signal FM est faible?
➞ Raccordez une antenne extérieure.
La réception contient des interférences ou le son
présente de la distorsion.
• Est-ce que la chaîne capte du bruit ou est-ce qu’il y a des
interférences par trajets multiples?
➞ Changez l’orientation de l’antenne.
➞ Eloignez l’ampli-tuner des autres appareils électriques.
Pour réinitialiser l’ampli-tuner
Si l’affichage ou le fonctionnement n’est pas normal, réinitialisez
l’ampli-tuner de la manière suivante.
1 Appuyez sur l’interrupteur POWER pour mettre l’ampli-tuner
hors tension.
2 Appuyez sur l’interrupteur POWER tout en tenant la touche
ENTER enfoncée. Tous les préréglages sont effacés.
Si vous ne pouvez pas mettre l’ampli-tuner hors tension à l’étape
1 parce qu’il ne fonctionne pas normalement, réinitialisez-le en
débranchant le cordon secteur et refaites l’opération 2.
FRANÇAIS
14