1
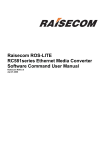
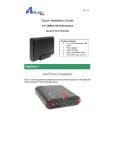
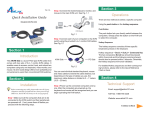
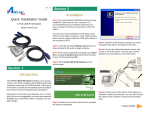
Ver. 1.0
Step 2 Pull out the front panel.
Quick Installation Guide
Office NAS
3.5” IDE/SATA Network Attached Storage
Model # ANAS350
Package Contents:
• Office NAS
• Vertical Stand
• Power adapter
• Ethernet Cable
• Utility CD
• Quick Installation Guide
• Screws (4)
• Rubber feet (4)
Section 1
Hard Drive Installation
WARNING:
This Network Attached Storage device is not hot-swappable. Please make sure that
it is turned off and not connected to the power outlet when performing the following
assembly procedure.
Step 1 Unfasten the two screws at the rear side of the device, and pull out the
back cover.
Step 3 Put the 3.5-inch IDE or SATA hard disk into the slot, and connect the
proper data cable for your hard drive. (The red cable is used for SATA and the gray
one is for IDE).
Step 3a IDE
Step 3b SATA
Step 6 Re-attach the back panel to the device and secure it with the two screws
removed in step 1.
Step 7 Connect Office NAS to your router or your computer with the provided Ethernet
cable, and connect the supplied power adapter. Plug the power cord into a power
outlet.
(Note: connecting this device to your computer directly is not recommended since
many features will not be able to function.)
Step 4 Secure the drive to the metal plate on the sides with the provided four
screws.
Step 8 Turn it on by pressing the On switch in the back of the device. Verify the
Power and LAN LEDs are lit.
Step5 Re-attach the front panel to the device.
Congratulations! The hard drive installation is complete. For more information about this product, please refer to the User's Manual in the provided
CD.
Continue on Back
Section 2
Step 2 When prompted for a username and password, type in admin for the
username and admin for the password in lowercase letters.
Connecting to Office NAS
Step 1 To access Office NAS, double-click on My Computer or open Windows Explorer and then type in “\\airnas” into the Address bar and press
Enter.
Step 2 Click on the Storage folder to begin accessing your files and using Office
NAS to store/backup your data.
Section 3 (optional)
Configuring Office NAS
You can configure Office NAS using either your web browser (Internet Explorer or
Firefox) or using the Utility provided on the installation CD.
Step 1 To use your web browser, open up the browser and in the Address bar
type in http://airnas and press Enter or hit the Go button.
Step 3 Please consult the User’s Manual located on the installation CD for
more informtion on how to conifigure your new Airlink101 Office NAS.
For more information on how to use the Utility (optional), please consult
Section 3 in the User’s Manual.
Section 4
Section 2 Technical Support
E-mail: [email protected]
Toll Free: 1-888-746-3238
Web Site: www.airlink101.com
* Actual data throughput will vary. Network conditions and environmental factors lower actual data throughput rate. Specifications are subject to
change without notice.
Continue on back...
Copyright ©2006 AirLink101™ All rights reserved. AirLink101, the stylized AirLink101 logo, specific product designations, and all other words
and logos that are identified as trademarks and/or service marks are, unless noted otherwise, the trademarks and service marks of AirLink101.
All other product or service names are the property of their respective holders. AirLink101 products are protected under numerous U.S. and
foreign patents and pending applications, mask work rights, and copyrights.