1
HT-SB300
4
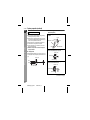
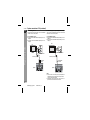
Installing the speaker
Screw the wall mount angle to the wall as shown in the
illustration. (Total screw is 8 pieces)
Wall mount angle
Wall surface
ENGLISH
1
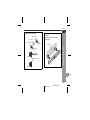
Align the wall mount slot at the speaker to the wall
mount angle.
2
3
Slot the speaker into the wall mount angle.
DE (1)
FR (2)
Fix them securely.
Wall mount angle
ES (3)
Wall surface
Preparation for Use
(screws x 4)
(screws x 4)
Wall surface
Wall mount angle
SV (4)
IT (5)
NL (6)
PT (7)
Wall surface
Note:
Make sure all screws are fully tighten. (screws are not supplied)
ZH (8)
EN (9)
AR (10)
E-8
2009 February 10
HT-SB300_A6_EN_UK.fm