1
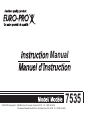
Manual
7535
EURO-PRO Operating LLC, 4400 Bois Franc, St. Laurent, Quebec H4S 1A7 Tel. 1 (800) 361-4639
21 Lawrence Paquette Industrial Drive, Champlain, New York 12919 Tel. 1 (800) 361-4639
IMPORTANT SAFETY INSTRUCTIONS
When using an electrical appliance, basic safety precautions
should always be followed, including the following:
5. Keep fingers away from all moving parts. Special care is
required around the sewing machine needle.
Read all instructions before using this sewing machine.
6. Always use the proper needle plate. The wrong plate can
cause the needle to break.
DANGER - To reduce the risk of electric shock:
1. An appliance should never be left unattended when plugged in.
2. Always unplug this appliance from the electric outlet
immediately after using and before cleaning.
3. Always unplug before relamping. Replace bulb with same
type rated 10 watts (110-120V area) or 15 watts (220-240V
area).
WARNING
- To reduce the risk of burns, fire,
electric shock, or injury to persons:
1. Do not allow to be used as a toy. Close attention is necessary
when this appliance is used by or near children.
2. Use this appliance only for its intended use as described in
this manual. Use only attachments recommended by the
manufacturer as contained in this manual.
3. Never operate this appliance if it has a damaged cord or plug,
if it is not working properly, if it has been dropped or
damaged, or dropped into water. Return the appliance to the
nearest authorized dealer or service center for examination,
repair, electrical or mechanical adjustment.
4. Never operate the appliance with any air openings block.
Keep ventilation openings of the sewing machine and foot
controller free from accumulation of lint, dust, and loose cloth.
7. Do not use bent needles.
8. Do not pull or push fabric while stitching. It may deflect the
needle causing it to break.
9. Switch the sewing machine off ("O") when making any
adjustments in the needle area, such as threading needle,
changing needle, threading bobbin, or changing presser foot,
and the like.
10.Always unplug sewing machine from the electrical outlet when
removing covers, lubricating, or when making any other user
servicing adjustments mentioned in the instruction manual.
11.Never drop or insert any object into any opening.
12.Do not use outdoors.
13.Do not operate where aerosol spray products are being used
or where oxygen is being administered.
14.To disconnect, turn all controls to the off ("O") position, then
remove plug from outlet.
15.Do not unplug by pulling on cord. To unplug, grasp the plug,
not the cord.
SAVE THESE INSTRUCTIONS
This sewing machine is intended for household use only.
IMPORTANTES MESURES DE SÉCURITÉ
Lire toutes les directives avant usage.
4. Ne jamais utiliser la machine à coudre lorsque les trous
d'aération sont bloqués. Garder les trous d'aération de la
machine à coudre et de la commande de vitesse libres de toute
accumulation de charpie, poussières et tissus.
DANGER - Pour éviter les risques de secousses
6. Ne pas utiliser à l'extérieur.
Lorsqu'on utilise une machine à coudre, il faut toujours
respecter certaines règles fondamentales de sécurité,
notamment les suivantes:
électriques:
1. Ne pas laisser sans surveillance lorsque branchée. Toujours
débrancher la machine immédiatement après usage et avant
de la nettoyer.
2. Toujours débrancher avant de changer l'ampoule.
Remplacer l'ampoule par une ampoule de même calibre 10
watts (110-120V area) ou 15 watts (220-240V area).
AVIS
- Afin de réduire les risques de brûlures, feu,
risques de secousses électriques, ou blessures:
1. Ne pas permettre l'utilisation comme jouet. Exercer une
étroite surveillance lorsque la machine est utilisée à
proximité d'un enfant ou lorsqu'elle est utilisée par ce
dernier.
2. N'utilisez cette machine à coudre que pour l'utilisation
décrite dans ce manuel. N'utiliser que les accessoires
recommandés par le manufacturier décrits dans ce manuel.
3. Ne pas utiliser cette machine à coudre si le cordon ou la
prise sont en mauvais état, si elle ne fonctionne pas
normalement, si elle est tombée et endommagée, ou
plongée dans l'eau. Retourner la machine à coudre chez le
dépositaire autorisé le plus près pour examen, réparations,
réglages électriques ou mécanique.
5. Ne jamais échapper ou insérer tout objet dans les ouvertures.
7. Ne pas utiliser dans un endroit où des produits aérosol sont
utilisés on dans un endroit où on administre de l'oxygène.
8. Mettre la machine hors tension avant de la brancher ou de la
débrancher.
9. Ne pas tirer sur le cordon pour débrancher la machine à coudre.
Pour débrancher, saisir la fiche et tirer.
10. Tenir les doigts éloignés des pièces mobiles. Tout
spécialement de l'aiguille.
11. Toujours utiliser la plaque à aiguille appropriée.
12. Ne pas utiliser d'aiguille croche.
13. Ne pas tirer ou pousser sur le tissu en cousant, afin d'éviter de
briser l'aiguille.
14. Mettre la machine hors tension pour effectuer tout réglage, tel
enfiler l'aiguille, changer l'aiguille ou plaque aiguille.
15. Toujours débrancher la machine à coudre pour effectuer
l'entretien ou tout autre réglage mentionnés dans ce manuel.
CONSERVER CES
INSTRUCTIONS
Congratulations:
Félicitations:
As the owner of a new EURO-PRO sewing machine, you will
enjoy precision quality stitching on all types of fabrics, from
multiple layers of denim to delicate silks.
Your EURO-PRO sewing machine offers the ultimate in
simplicity and ease of operation. For your safety and to fully
enjoy the many advantages and ease of operation of your
sewing machine, we recommend that you read all the
important safeguards and use and care instructions in this
instruction book.
A titre de nouveau propriétaire d'une machine à coudre
EURO-PRO, vous pourrez apprécier une couture de qualité
sur tous les genres de tissus, que ce soit plusieurs
épaisseurs de denim ou de la soie délicate.
May we suggest that before you start to use your sewing
machine, you discover the many features and advantages by
going through this instruction book, step by step, while seated
at your sewing machine.
Votre machine à coudre EURO-PRO offre ce qu'il y a de
mieux en fait de simplicité et de facilité d'usage. Pour votre
sécurité et afin de pleinement apprécier les nombreux
avantages de votre machine à coudre, nous recommandons
que vous lisiez toutes les mesures de sécurité et les
instructions qui sont contenues dans le présent manuel.
Permettez-nous de vous suggérer, avant d'utiliser votre
machine à coudre, de découvrir les nombreuses
caractéristiques et avantages en feuilletant ce manuel, étape
par étape, assise face à votre machine à coudre.
List of contents
Principal parts...............................................................................................2/3
Accessories .....................................................................................................4
Fitting the snap-in sewing table.......................................................................5
Connecting machine to power source .............................................................6
Changing the bulb ...........................................................................................8
Two-step presser foot lever/ Adjusting the presser foot pressure ...................9
Attaching the presser foot holder ..................................................................10
Winding the bobbin........................................................................................12
Inserting bobbin.............................................................................................13
Changing the needle (System 130/705H) .....................................................14
Threading the upper thread...........................................................................15
Thread tension ..............................................................................................16
Bringing up the lower thread .........................................................................17
Reverse sewing/ Changing sewing directions...............................................18
Removing the work/ Cutting the thread .........................................................19
Matching needle / fabric / thread ...................................................................20
How to choose your pattern ..........................................................................22
Straight stitching and needle position............................................................23
Zig zag sewing ..............................................................................................24
Blind hem/ lingerie stitch ...............................................................................25
Overlock stitches ...........................................................................................26
Sewing on buttons.........................................................................................27
How to sew buttonholes ................................................................................28
Zippers and piping.........................................................................................30
Sewing with the hemmer foot ........................................................................31
3-step zig-zag................................................................................................32
Stitch selection ..............................................................................................34
Smocking stitch .............................................................................................35
Sewing with the cording foot .........................................................................36
Free motion darning ......................................................................................37
Practical stitches ...........................................................................................38
Darning..........................................................................................................40
Attaching lace................................................................................................41
Applique ........................................................................................................42
Twin needle ...................................................................................................43
Monogramming and embroidering with embroidery hoop*............................44
Monogramming and embroidering (continued) .............................................45
Quilting ..........................................................................................................46
Gathering.......................................................................................................47
Scallop stitching ............................................................................................48
Patch work.....................................................................................................49
Maintenance..................................................................................................50
Trouble shooting guide..................................................................................52
Sommaire
Pièces principales de la machine .................................................................2/3
Accessoires .....................................................................................................4
Mise en place de la table-rallonge...................................................................5
Branchement de la machine à coudre.............................................................7
Changement de l'ampoule...............................................................................8
Levier du pied-de-biche à deux positions/
Ajustement de la pression du pied-de-biche ..............................................9
Montage du support du pied-de-biche...........................................................11
Remplir la canette .........................................................................................12
Mise en place de la canette...........................................................................13
Mise en place de l'aiguille (Système 130/705H)............................................14
Enfilage du fil supérieur.................................................................................15
Tension du fil .................................................................................................16
Remonter le fil inférieur .................................................................................17
Marche arrière/ Pour modifier le sens de la couture .....................................18
Retrait de l'ouvrage/ Couper les fils...............................................................19
Tableau des aiguilles et fils ...........................................................................21
Sélection des points ......................................................................................22
Couture au point droit et position d'aiguille....................................................23
Couture au point zig-zag ...............................................................................24
Ourlet au point invisible .................................................................................25
Point overlock................................................................................................26
Pose des boutons..........................................................................................27
Faire les boutonnières...................................................................................29
Pose d'une fermeture à glissière ...................................................................30
Coudre avec le pied ourleur ..........................................................................31
Point zig-zag cousu .......................................................................................33
Sélection des points ......................................................................................34
Point nid d'abeille ..........................................................................................35
Coudre avec le pied pour cordonnet .............................................................36
Reprise à main libre ......................................................................................37
Points utilitaires .............................................................................................39
Reprisage ......................................................................................................40
Pose de la dentelle........................................................................................41
Appliqué ........................................................................................................42
Couture à deux aiguilles................................................................................43
Monogramme et broderie à main libre* .........................................................44
Monogramme et broderie à main libre (suite) ...............................................45
Coudre avec le guide ....................................................................................46
Le fronçage ...................................................................................................47
Point feston ...................................................................................................48
Patchwork......................................................................................................49
Entretien de la machine.................................................................................51
Comment remédier soi-même aux petits problèmes....................................53
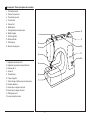
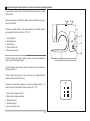
Principal parts/ Pièces principales de la machine
1.
2.
3.
4.
5.
6.
7.
8.
9.
10.
11.
12.
Thread tension dial
Presser foot pressure
Thread take-up lever
Thread cutter
Presser foot
Needle plate
Sewing table and accessory box
Bobbin stopper
Stitch length dial
Stitch width dial
Stitch display
Reverse sewing lever
8
1
9
2
10
3
11
4
12
1. Régulateur de tension du fil
2. Régulateur de pression du pied-de-biche
3. Releveur de fil
4. Coupe-fil
5. Pied-de-biche
6. Plaque à aiguille
7. Table-rallonge et boîtier pour les accessoires
8. Butée du bobineur
9. Bouton pour la longueur du point
10. Bouton pour la largeur du point
11. Affichage du point
12. Levier de marche arrière
5
6
7
2
Principal parts/ Pièces principales de la machine
13.
14.
15.
16.
17.
18.
19.
20.
21.
22.
Handle
Bobbin winder
Spool pin
Handwheel
Pattern selector dial
Power switch
Main plug socket
Bobbin thread guide
Upper thread guide
Presser foot lever
13
20
14
21
15
16
22
17
13.
14.
15.
16.
17.
18.
19.
20.
21.
22.
Poignée
Bobineur
Broche porte-bobine
Volant
Sélecteur de point
Interrupteur principal
Prise
Guide-fil du bobineur
Guide-fil supérieur
Levier du pied-de-biche
18
19
3
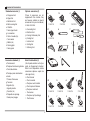
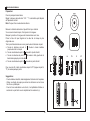
Accessories/ Accessoires
Standard accessories (1)
a. All purpose foot
b. Zipper foot
c. Buttonhole foot
d. Button sewing foot
e. Oil bottle
f. Seam ripper/ brush
g. L-screwdriver
h. Pack of needles (3x)
i. Twin needle
j. Bobbin (3x)
k. Darning plate
l. Seam guide
Optional accessories (2)
(These 8 accessories are not
supplied with this machine; they
are however available as special
accessories from your local dealer.)
m. Satin stitch foot
n. Overcasting foot
o. Blind hem foot
p. Darning/ Embroidery foot
q. Cording foot
r. Hemmer foot
s. Quilting foot
t. Gathering foot
Accessoires standard (1)
a. Pied universel
b. Pied pour fermetures à glissière
c. Pied à boutonnière
d. Pied pour poser des boutons
e. Huilier
f. Pinceau/ Découseur
g. Tournevis
h. Aiguilles (3x)
i. Aiguille jumelée
j. Canettes (3x)
k. Plaquette de reprisage
l. Guide pour piquage
Extra Pieds-de-biche (2)
(Ces 8 pieds-de-biche ne font pas
partie de l'équipement standard.
Mais ils sont disponibles comme
accessoires spéciaux auprés de
votre agent local.)
m. Pied à broder
n. Pied à overlock
o. Pied pour ourlet invisible
p. Pied à repriser/ Broderie
q. Pied pour cordonnet
r. Pied ourleur
s. Pied pour quilt (ouatinage)
t. Pied fronceur
1
a
b
006806008
c
006905008
d
006909008
e
f
006914008
g
h
j
i
l
k
2
m
006803008
006804008
q
006810008
4
o
n
p
s
r
006800008
006016008
006812008
t
006916008
006917008
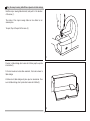
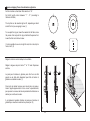
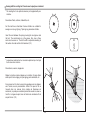
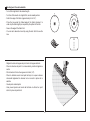
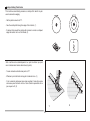
Fitting the snap-in sewing table/ Mise en place de la table-rallonge
Hold the snap-in sewing table horizontal, and push it in the direction
of the arrow. (1)
The inside of the snap-in sewing table can be utilized as an
accessory box.
To open, lift up at the point of the arrow. (2)
1
Pousser la table-rallonge dans le sens de la flèche jusqu'à ce qu'elle
s'enclenche (1).
Si l'on doit coudre sur le bras libre seulement, il faut alors enlever la
table-rallonge.
L'intérieur de la table-rallonge est prévu pour les accessoires. Pour
ouvrir la table-rallonge, tirer la porte dans le sens de la flèche (2).
2
5
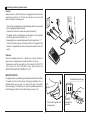
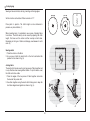
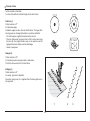
Connecting machine to power source
Caution:
Always make sure that the machine is unplugged from power source
and the main switch is on "O" when the machine is not in use and
before inserting or removing parts.
- This machine is equipped with a polarized plug which must be used
with an appropriate electrical outlet.
- Connect the machine to a power source as illustrated (1).
- The power switch is located above the terminal box. Your machine
will not operate unless this switch is on " I ". (1)
- Sewing light turns on automatically when the main switch is on " I ".
- To start the machine, press on the foot control (2). The speed of the
machine is regulated by the amount of pressure exerted on the foot
control.
Attention:
Consult a qualified electrician if in doubt as to connect machine to
power source. Unplug power cord when machine is not in use.
The appliance must be used with the foot controller 4C-316B (110120V area)/ 4C-316C (220-240V area) manufactured by
MATSUSHITA ELECTRIC (TAIWAN) CO., LTD.
1
IMPORTANT NOTICE
For appliance with a polarized plug (one blade is wider than the other).
To reduce the risk of electric shock, this plug is intended to fit in a
polarized outlet only one way. If it does not fit fully in the outlet,
reverse the plug. If it still does not fit, contact a qualified electrician to
install the proper outlet. Do not modify the plug in any way. (3)
Polarized attachment plug
Foot control regulates the
sewing speed.
2
6
Conductor
intended to be
grounded
3
Branchement de la machine à coudre
Mise en garde:
La machine doit toujours être débranchée et l'interrupteur principal à
"O" lorsque la machine n'est pas utilisée, pour changer des pièces et/
ou accessoires.
- Cette machine à coudre est munie d'une fiche polarisée et ne doit
être branchée que dans une prise murale appropriée.
- Brancher la machine dans une prise murale selon l'illustration. (1)
- Enfoncer la fiche (A) dans la machine. (1)
- L'interrupteur principal se trouve juste au dessus du branchement
du réseau.
- La lumière d'éclairage est automatiquement allumée lorsque
l'interrupteur principal est à " I ".
- Pour mettre la machine en marche, appuyer sur la pédale de
commande. (2)
- La vitesse de la machine est réglée par la pression du pied sur la
pédale de commande.
Attention:
Consulter un électricien qualifié en cas de doute pour brancher la
machine. Débrancher la machine quand celle-ci c'est pas en service.
Le pied de contrôle doit être obligatoirement utilisé avec les apareils
4C-316B (110-120V area) / 4C-316C (220-240V area) fabriqués par
MATSUSHITA ELECTRIC (TAIWAN) CO., LTD.
1
Fiche polarisée
AVIS IMPORTATNT
Cette machine a une fiche polarisée (une lame plus large que l'autre).
Pour réduire le risque de secousse électrique, cette fiche est conçue
pour être branchée d'une seule façon dans une prise de courant
polarisée. Si la fiche ne se branche pas pleinement dans la prise,
inverser la fiche et si elle ne se branche pas pleinement, contacter un
électricien pour installer la prise de courant appropriée. Ne pas
modifier la prise de courant de quelque façon que ce soit. (3)
Conducteur
pour mise à la masse
2
7
3
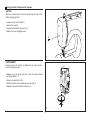
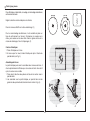
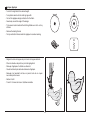
Changing the bulb/ Changement de l'ampoule
CAUTION:
Mack sure to disconnect the electrical supply plug from wall outlet
before changing light bulb.
- Loosen screw (A) as illustrated.(1)
- Remove the cover (B).
- Unscrew the bulb and fit new one (C).(2)
- Replace the cover and tighten screw.
B
A
1
AVERTISSEMENT:
Assurez-vous que la machine est débranchée de la prise murale
avant de changer la lampe.
- Desserrer la vis (A) qui se trouve sur le côté du couvercle frontal
(sur laface latérale). (1)
- Enlever le couvercle frontal (B).
- Dévisser l'ampoule et la remplacer par une neuve(C).(2)
- Replacer le couvercle frontal et resserrer la vis.
C
2
8
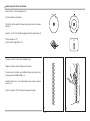
Two-step presser foot lever/ Levier du pied-de-biche à deux positions
When sewing several layers or thick fabrics, the presser foot can be
raised a second stage for easy positioning of the work. (A)
Pour faciliter l'insertion de tissus très épais sous le pied-de-biche,on
peut augmenter l'espace entre le pied-de-biche et la plaque à aiguille,
en relevant le levier du pied-de-biche d'un cran.
A
Adjusting the presser foot pressure/ Ajustement de la pression
du pied-de-biche
The presser foot pressure of the machine has ben pre-set and
requires no particular readjustment according to the type of fabric
(light-or-heavy weight).
However, if you need to adjust the presser foot pressure, turn the
presser adjusting screw with a coln.
For sewing very thin fabric, loosen the pressure by turning the screw
counter clockwise, and for heavy fabric, tighten by turning it clockwise.
Loosen/
Desserrer
Le régulateur de pression du pied-de-biche a été ajusté et
devraitconvenir à tous les types de tissus (du plus fin au tissu épais).
Cependant, si un ajustement s'avère nécessaire, tournez la vis
d'ajustement en vous servant d'une pièce de monnaie.
Pour les tissus très fins, desserrer le régulateur de pression en
tournant dans le sens contraire des aiguilles d'une montre, et pour les
tissus épais, augmenter la pression en tournant la vis dans le sens
des aiguilles d'une montre.
9
Tighten pressure adjusting screw
/ Serrer la vis d'ajustement de la
pression
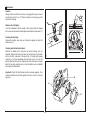
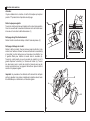
Attaching the presser foot holder
Attention:
Turn power switch to "O" before carrying out any of the operations
below.
a
a
Raise the needle to its highest position and raise the presser foot
lever. Attach the presser foot holder (b) to the presser foot bar (a). (1)
e
Attaching the presser foot:
Lower the presser foot holder (b) until the cut-out (c) is directly above
the pin (d). (2)
Raise the lever (e).
Lower the presser foot holder (b) and the presser foot (f) will engage
automatically.
e
b
d
c
f
b
Removing the presser foot:
Raise the presser foot.
Release the pressure foot by raising lever (e) located at the back of
the foot holder. (3)
2
1
Attaching the seam guide:
Attach the seam guide (g) in the slot as illustrated. Adjust the
distance as required for hems, pleats, etc.... (4)
e
3
10
g
4
Montage du support du pied-de-biche
Attention:
Placer l'interrupteur principal à "O" avant de procéder.
a
a
Relever la barre du pied-de-biche (a) en vous servant du levier à
l'arrière de la machine. Installer le support de pied-de-biche tel
qu'indiqué sur le schéma (1).
e
Mise en place de pied-de-biche
Abaisser le support du pied-de-biche (b) jusqu'à ce que la rainure (c)
se trouve positionnée au-dessus de la broche (d). Pousser
légèrement le levier (e) vers l'avant. Abaisser la barre du pied-debiche (a) et le pied-de-biche (f) s'enclenchera. Schéma (2).
e
b
d
Retrait du pied-de-biche
Relever le pied-de-biche en vous servant du levier à l'arrière de la
machine à coudre. Pousser légèrement le levier (e) vers l'avant, de
manière à dégager le pied-de-biche. Schéma (3).
c
f
b
2
1
Mise en place du guide de piquage
Insérer le guide (g) à l'arrière du support du pied-de-biche et régler à
la distance désirée. Le guide s'utilise pour le piquage, les ourlets les
plis etc. Schéma (4).
e
3
11
g
4
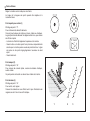
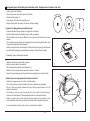
Winding the bobbin/ Remplir la canette
Place an empty bobbin on the bobbin winder spindle.
Spool cap/ étrier
Take the thread from the spool through the bobbin winder tension
disc. (1)
Winder spindle/ dévidoir
Wind the thread a few times by hand around the empty bobbin in a
clockwise direction. Push the bobbin to the right towards the bobbin
winding position. (2)
Press the foot control gently. The bobbin will stop winding when it is
full. Push the bobbin to the left to "sewing position" and remove it.
Sewing/ couture
Please Note:
When the bobbin winder spindle is in "bobbin winding" position, the
machine will not sew-the hand wheel will not turn. To start sewing,
push the bobbin winder spindle to the left (sewing position).
Bobbin winding/ bobinage
1
1. Placer une bobine de fil sur la broche porte-bobine et la retenir
avec l'étrier. (1)
2. Amener le fil vers la gauche et le passer à travers le guide et la
tension du bobineur. Ramener le fil vers la droite. (1)
3. Passer le fil dans un trou du dessus de la canette par l'intérieur et
enrouler à la main le fil de quelques tours sur la canette. (2)
4. Placer la canette vide sur la broche du bobineur. (2)
5. Pousser la canette, vers la droite, contre l'arrêt du bobineur. La
couture s'interrompt automatiquement. (2)
6. Retenir l'extrémité du fil et appuyer sur la commande au pied pour
bobiner. Après quelques tours de bobinage, arrêter la machine et
couper le fil près du trou.
7. Remettre la machine en marche. Dès que la canette est pleine,
le processus de bobinage est automatiquement interrompu.
8. Retirer la canette et couper le fil.
2
12
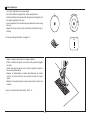
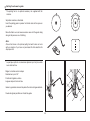
Inserting bobbin/ Mise en place de la canette
Attention:
Turn power switch to "O" before inserting or removing the bobbin.
When inserting or removing the bobbin, the needle must be fully raised.
- Open the hinged cover. (1)
- Hold the bobbin case with one hand. Insert the bobbin so that the thread
runs in a clockwise direction (arrow). (2)
- Pull the thread through the slot, down and to the left until it enters the
delivery eyelet (rectangular opening) under the tension spring. (3)
- Hold the bobbin case by the hinged latch. (4)
- Insert the bobbin case fully into the shuttle race and release the latch.
Make sure that the metal finger fits into the notch at the top of the race
cover. (5)
Attention:
Assurez-vous de placer l'interrupteur principal en position "O" avant
d'insérer ou de retirer la canette.
Lors de la mise en place et du retrait de la canette, veiller à ce que
l'aiguille se trouve à sa plus haute position.
- Ouvrir le couvercle à charnière du bras libre. (1)
- Tenir le boîtier à canette d'une main. Introduire la canette de façon à
que le fil s'enroule dans le sens des aiguilles d'une montre (flèche) (2).
- Engager le fil dans la fente et tirer vers la gauche et sous le ressort
jusqu'à ce que le fil apparaisse dans l'ouverture rectangulaire (3).
Laisser dépasser le fil environ 15cm (6").
- Maintenir le loquet du boîtier à canette entre le pouce et l'index.
- Glisser le boîtier à canette dans la coursière du crochet, en vous
assurant que le doigt du boîtier s'insère complètement dans la fente de
la coursière.
13
1
2
3
4
5
Changing the needle (System 130/ 705H)/ Mise en place de l'aiguille(Système 130/ 705H)
Caution:
Turn power switch to "O" before inserting or removing the needle.
Replace the needle at the first sign of thread breakage or skipped stitches.
Select the correct type and size of needle for the fabric to be sewn. Turn the
balance wheel towards you until the needle is at highest position. Loosen the
needle clamp screw (A) and tighten again after inserting the new needle. (1)
D
A
The flat side of the needle shaft should be facing away from you (B).
Push the needle up (C) into the needle clamp as far as it will go (D).
Tighten the needle clamp screw firmly.
The sewing needle must always be straight and sharp for smooth sewing.
Replace the needle (2) if it is bent (A), blunt (B) or the point is damaged (C).
B
C
Attention:
Assurez-vous de placer l'interrupteur principal en position "O" avant de changer
l'aiguille.
1
Remplacer l'aiguille dès que les premiers signes d'usure se manifestent: la
machine saute des points, le fil s'effiloche et brise etc.
Remplacer l'aiguille si la grosseur ne convient pas pour le tissu à coudre.
Sélectionner une aiguille de grosseur et de type appropriés au tissu à coudre.
B
1. Tourner le volant vers vous jusqu'à ce que l'aiguille soit à son point le plus haut.
2. Desserrer la vis du pince-aiguille (A) et enlever l'aiguille existante. (1)
3. Mettre en place la nouvelle aiguille (C) en vous assurant que le côté plat du
talon de l'aiguille soit vers l'arrière de la machine à coudre. (1)
4. Introduire l'aiguille (C) jusqu'à la butée au fond du pince-aiguille. Serrer la vis
du pince-aiguille. (1)
L'aiguille doit toujours être en parfait état pour une couture sans problèmes.
Remplacer l'aiguille si elle est tordue (A), émoussée (B) ou crochue (C). (2)
2
14
A
C
Threading the upper thread/ Enfilage du fil supérieur
Caution: Before threading, turn power switch to "O".
Raise the needle bar to its highest position. Follow exactly the numbered threading
sequence illustrated below. If you skip a step or fail to properly engage the thread in any
of the thread guides, the machine will not sew properly. (1-5)
Continue to draw the thread down and into the needle bar thread guide. Insert the thread
through the eye of the needle from front to back. Leave about 10 cm (4") of thread loose
behind the needle. (6)
Attention: Placer l'interrupteur principal à "O".
Relever l'aiguille à sa plus haute position. Relever le pied-de-biche. Placer une bobine sur
la broche porte-bobine et la retenir avec l'étrier.
Tirer le fil vers la gauche et le passer à travers les deux guide-fil sur le dessus de la
machine.
Ramener le fil vers l'avant dans la rainure de haut en bas, à droite de la plaque de
séparation. Tirer sur le fil pour vous assurer qu'il pénètre bien dans les disques de
tension.
En passant sous la plaque de séparation, remonter le fil à gauche de la plaque de
séparation et le passer de droite à gauche dans le releveur de fil. Continuer de guider le
fil vers le bas.
Passer le fil dans le guide-fil inférieur et le guide-fil du pince-aiguille.
Enfiler l'aiguille de l'avant vers l'arrière. Laisser environ 10cm (4") de fil derrière l'aiguille.
1
Cutter
/ Coupe-fils
2
3
5
4
15
6
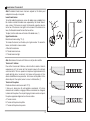
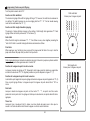
Thread tension/ Tension du fil
Note:The bobbin thread tension has been adjusted at the factory and
readjustment is usually not required.
Lower thread tension
To test the bobbin thread tension, remove the bobbin case and bobbin from
the machine and hold the bobbin case suspended by the thread. Shake it
once or twice. If the tension is correct, the thread will unwind by about an
inch or two. If the tension is too tight, it will not unwind. If the tension is too
loose, the thread will unwind for more than two inches.
To adjust, turn the small screw on the side of the bobbin case. (1)
Upper thread tension
Basic thread tension setting: "4". (2)
To increase the tension, turn the dial up to a higher number. To reduce the
tension, turn the dial to a lower number.
A. Normal thread tension.
B. Thread tension too loose.
C. Thread tension too tight.
Note: Normalement la tension du fil inférieur ne doit pas être modifiée.
Tension du fil inférieur
Pour vérifier la tension du fil inférieur, retirer le boîtier à canette et tenez-la
suspendue par le fil. La tension du fil est correcte lorsque le fil se déroule
vers le bas de 5 à 10cm env. quand on lui imprime un léger balancement (la
canette doit être pleine lors du test). Si la tension est trop serrée, le fil se
déroule très difficilement ou pas du tout. Si la tension est trop faible, le fil se
déroule trop vite. Pour ajuster, tourner la vis sur le côté du boîtier. (1)
Tension du fil supérieur
Position de référence de la tension du fil: "4" (2)
Il faut que la tension des fils soit équilibrée correctement. S'il s'avère
nécessaire de la modifier, ce réglage s'effectue normalement en changeant
la tension du fil supérieur. Pour le point zigzag, la tension correcte est que le
fil supérieur apparaisse légèrement sur l'envers du tissu.
A. Tension normale
B. Tension du fil supérieur trop lâche
C. Tension du fil supérieur trop serrée
16
1
2
A
B
C
3
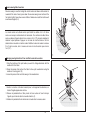
Bringing up the lower thread/ Remonter le fil inférieur
Hold the upper thread with the left hand. Turn the
handwheel towards you with your right hand until the
needle goes down and comes up again to its highest
position. (1)
- Lightly draw the needle thread forming a loop with the
bobbin thread. The upper thread should have caught the
lower thread in a loop.
- Pull the needle thread toward you and the lower thread
will come up from the bobbin in a large loop. (2)
Pull about 15 cm. (6") of both thread away from you
under the presser foot.
Lever la barre du pied presseur. Tenir le fil supérieur de la
main gauche et avec la main droite, tourner le volant vers
vous jusqu'à ce que l'aiguille descende et remonte à son
plus haut point. (1)
1
- Tirer légèrement le fil supérieur pour que la boucle
formée par le fil inférieur apparaisse à la surface de la
plaque à aiguille. Sortir la boucle de la plaque à aiguille à
la main.
- Passer les deux fils sous le pied-de-biche et les faire
dépasser de 10cm (3") environ vers l'arrière.
2
17
Reverse sewing/ Marche arrière
Reverse sewing is used for locking the end of seams and where reinforcement is
needed. At the end of seam, press down the reverse sewing lever and touch the
foot control lightly. Sew a few reverse stitches. Release lever and the machine will
sew forwards again (A/1).
A
La marche arrière est utilisée comme point d'arrêt au début et à la fin d'une
couture ou lorsqu'un renforcement est nécessaire. Pour renforcer le début d'une
couture, abaisser l'aiguille dans le tissu à environ 1cm (1/2") du point de départ et
abaisser le pied presseur. Appuyer sur le levier de marche arrière et le tenir
abaissé tout en cousant en marche arrière. Relâcher le levier et coudre la couture.
À la fin de la couture, tenir à nouveau le levier en marche arrière pour environ
1cm (1/2").
1
Changing sewing directions/ Pour modifier le sens de la couture
1. Stop the machine at the point where you wish to change directions with the
needle still in the fabric.
2. Raise the presser foot and turn the fabric to line up its new direction using the
needle as a turning point. (2)
3. Lower the presser foot and start sewing in the new direction.
1. Arrêter la machine à l'endroit souhaité pour le changement de direction, en
laissant l'aiguille piquée dans le tissu.
2. Relever le pied-de-biche et faire pivoter le tissu autour de l'axe formé par
l'aiguille, pour l'orienter dans la nouvelle direction. (2)
3. Abaisser le pied-de-biche et commencer à coudre dans le nouveau sens.
2
18
Removing the work/ Retrait de l'ouvrage
Turn the handwheel towards you to bring the thread take up lever to its highest
position. Raise the presser foot and draw the fabric away from you. (1)
Amener le levier releveur de fil à sa position la plus haute en tournant le volant
vers vous. Soulever le pied-de-biche. Tirer la partie de l'ouvrage se trouvant sous
le pied-de-biche vers l'arrière, puis couper les fils. (1)
1
Cutting the thread/ Couper les fils
Hold the threads behind the presser foot with both hands, guide them to the slit (A)
and press down. (2)
A
Pour couper les fils, tenir des deux mains les fils derrière le pied-de-biche, les
glisser dans la fente (A) et les tirer vers le bas.
Vous pouvez également utiliser le coupe-fil situé sur le côté gauche de la
machine. (2)
2
19
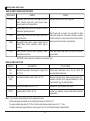
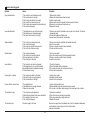
Matching needle/ fabric/ thread
NEEDLE, FABRIC, THREAD SELECTION GUIDE
NEEDLE SIZE
FABRICS
THREAD
9-11(65-75)
Lightweight fabrics-thin cottons, voile, serge, silk , muslin,
Qiana, interlocks, cotton knits, tricots, jerseys, crepes,
woven polyester, shirt & blouse fabrics.
12(80)
Medium weight fabrics-cotton, satin, kettleclote, sailcloth,
double knits, lightweight woollens.
14(90)
Medium weight fabrics-cotton duck, woolen, heavier knits,
terrycloth, denims.
16(100)
Heavyweight fabrics-canvas, woolens, outdoor tent and
quilted fabrics, denims, upholstery material (light to
medium).
18(110)
Heavy woollens, overcoat fabrics, upholstery fabrics,
some leathers and vinyls.
Light-duty thread in cotton, nylon or polyester.
Most threads sold are medium size and suitable for these
fabrics and needle sizes. Use polyester threads on synthetic
materials and cotton on natural woven fabrics for best results.
Always use the same thread on top and bottom.
Heavy duty thread, carpet thread. (Use heavy foot pressurelarge numbers.)
IMPORTANT: Match needle size to thread size and weight of fabric
NEEDLE, FABRIC SELECTION
NEEDLES
EXPLANATION
Ha×1
15×1
Standard sharp needles. Sizes range thin to large. 9 (65)
to 18 (110)
Natural woven fabrics-wool, cotton, silk, etc. Qiana. Not
recommended for double knits.
Semi-ball point needle, scarfed. 9 (65) to 18 (110)
Natural and synthetic woven fabrics, polyester blends. Knitspolyesters, interlocks, tricot, single and double knits. Can be
used instead of 15 1 for sewing all fabrics.
Full ball point needle 9 (65) to 18 (110)
Sweater knits, Lycra, swimsuit fabric, elastic.
Leather needles. 12 (80) to 18 (110)
Leather, vinyl, upholstery. (Leaves smaller hole than standard
large needle.)
15×1/705H
(SUK)
15×1/705HS (SUK)
130 PCL
TYPE OF FABRIC
Note: 1. Twin needles, can be purchased for utility and decorative work.
2. When sewing with twin needles, the stitch width dial should be set at less than "3".
3. European needles show sizes 65, 70, 80 etc. American and Japanese needles show size 9, 11, 12 etc.
4. Replace needle often (approximately every other garment ) and / or at first thread breakage or skipped stitches.
20
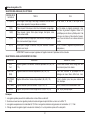
Tableau des aiguilles et fils
SÉLECTION DES AIGUILLES, FILS ET TISSUS
GROSSEUR DE
LAIGUILLE
TISSUS
FILS
9-11(65-75)
Tissus Légers: Coton léger, voile, serge, mousseline, tricot de coton,
jersey, crêpes, polyester, tissu pour blouse ou chemise.
Fil de coton, fil de soie, fil de nylon ou fil
12(80)
Tissus moyens: Coton moyen, satin, toile, tricot double , lainage léger.
14(90)
Tissus moyens à épais: Coton épais, lainages, tricot épais, ratine,
denim, velours côtelé.
16(100)
Tissus épais: canevas, lainage épais, toile de tente, tissu piqué, denim,
tissu à recouvrement (léger à moyen).
Les fils vendus en magasin conviennent à tous
ces tissus et grosseurs d'aiguilles. Utiliser le fil
synthétique pour les tissus synthétique et le fil de
coton pour les tissus en fibre naturelle. Assurezvous d' avoir le même fil sur le dessus et dans la
canette.
18(110)
Tissus épais: Lainages à manteau, tissu pour vêtements d'extéieur,
certains cuir et vinyle.
Fil fort, fil à denim. ( Augmenter la pression sur le
pied presseur).
IMPORTANT: Assurez-vous que la grosseur de l'aiguille convienne à l'épaisseur du tissu à coudre
SÉLECTION DE L'AIGUILLE PAR RAPPORT AU TISSU
AIGUILLES
HA×1
15×1
AIGUILLES
GENRE DE TISSUS
Aiguilles régulières et universelles. Grosseurs disponibles de 9 (65) à 18
(110).
Tissu en fibre naturelle: coton, lainage, soie. Non
recommand é pour tricot- double.
Aiguilles à demi-bille. Grosseurs disponibles 9 (65) à 18 (110).
Pour fibre naturelle et synthétique ou un
mélange des deux fibres: étoffe tissé, tricot,
15×1/705HS
(SUK)
Aiguilles à bille entière. Grosseurs disponibles 9 (65) à 18 (110).
Trico à chandail, lycra, tissu pour costume de
bain, élastique.
15×1/705HJ
Aiguilles robustes à pointe universelle, 14 (90) à 18 (110).
Denim, canevas, tissu à recouvrement, toile.
Aiguilles avec pointe en forme d'angle acéré, 12 (80) à 18 (110).
Cuir, vinyle, plastique souple.
15×1/705H
(SUK)
130 PCL
Remarque:
1. Les aiguilles jumelles peuvent être achetées dans un but utilitaire ou décoratif.
2. Quand vous cousez avec les aiguilles jumelles, le bouton de largeur de point doit être au moins sur le chiffre "3".
3. Les aiguilles européennes sont numérotées 65, 70, 80 etc. Les aiguilles américaines et japonaises sont numérotées 9, 11, 12 etc.
4. Changer souvent les aiguilles (après le couture d'un vêtement) et / ou à la première rupture du fil ou des points.
21
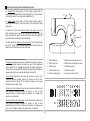
How to choose your pattern/ Sélection des points
For straight stitch select pattern "A" with pattern selector dial (4).
Adjust the stitch length with the stitch length dial (2). You may choose
any needle position, by turning the stitch width dial (1).
1
2
For zigzag stitch, select pattern "B" with pattern selector dial (4).
Adjust the stitch length (2) and stitch width (1) according to the fabric
being used.
3
To obtain any of the other patterns shown in the upper row on the
stitch selection panel, select the letter above the stitch with the
pattern selector dial. Adjust the stitch length and the stitch width with
the control dials according to the result desired.
4
To obtain any of the patterns on the second row, turn the stitch length
dial to "S1", select the pattern desired with pattern selector dial, and
adjust the stitch width with the stitch width dial.
5
1. Stitch width dial
2. Stitch length dial
3. Stitch display
4. Pattern selector dial
5. Reverse sewing lever
Points droits sélectionnez le bouton de sélection de point (4) et tournezle jusqu'au symbole souhaité ou jusqu'à ce que la lettre apparaisse
dans la fenêtre "A" (3). Réglage de la position de l'aiguille à gauche ou
à droite en tournant le bouton de sélection de largeur de point. Régler la
longueur des points avec le bouton de sélection de point (2).
Points zigzag sélectionnez le bouton de sélection de point (4) et
tournez-le jusqu'au symbole souhaité ou jusqu'à ce que la lettre
apparaisse dans la fenêtre "B" (3). Régler la longueur et la largeur
des points selon le tissu utilisé.
Autres points de la première ligne tournez le bouton de sélection de
point jusqu'au symbole souhaité ou jusqu'à ce que la lettre
apparaisse dans la fenêtre. Régler la longueur et la largeur des
points selon vos besoins.
Autres points de la deuxième ligne tournez le bouton de sélection de
point jusqu'au symbole souhaité ou jusqu'à ce que la lettre
apparaisse dans la fenêtre. Positionnez le bouton de longueur de
point sur "S1". Régler la largeur des points selon vos besoins.
S1
22
1. Bouton pour la largeur du point
2. Bouton pour la longueur du point
3. Affichage du point
4. Sélecteur de point
5. Levier de marche arrière
Straight stitching and needle position/ Couture au point droit et position d'aiguille
Turn the pattern selector dial so that the stitch display shows the straight
stitch position.
Generally speaking, the thicker the fabric, thread and needle, the longer
the stitch should be.
1
2
Choose your needle position, from center position to left needle position
by changing the stitch width dial from "0" to "5".
3
1. Stitch width dial
2. Stitch length dial
3. Stitch display
4. Pattern selector dial
5. Reverse sewing lever
4
5
Tourner le bouton de sélection jusqu'à ce que le point droit apparaisse
dans la fenêtre d'affichage du point.
Ajuster la longueur du point selon le tissu à coudre, en tournant le bouton
de longueur de point.
Suivre la règle suivante: plus le tissu est lourd, plus l'aiguille doit être
grosse et plus le point doit être long.
Choisissez votre position d'aiguille, de la position d'aiguille centre, à la
position de gauche en réglant la largeur du point du "0" à "5".
1. Bouton pour la largeur du point
2. Bouton pour la longueur du point
3. Affichage du point
4. Sélecteur de point
5. Levier de marche arrière
23
A
Zig zag sewing/ Couture au point Zig-zag
Turn the pattern selector dial to "B".
Stitch width dial/
Bouton pour la largeur du point
Function of stitch width dial
The maximum zigzag stitch width for zigzag stitching is "5"; however, the width can be reduced on
any pattern. The width increases as you move zigzag dial from "0" - "5". For twin needle sewing,
never set the width wider than "3". (1)
Function of stitch length dial while zigzaging
The density of zigzag stitches increase as the setting of stitch length dial approaches "0". Neat
zigzag stitches are usually achieved at "2.5" or below. (2)
5
4
5
4
2
1
0
3 2 1
0
Satin stitch
When the stitch length is set between "0" - "1", the stitches are very close together producing the
"satin stitch" which is used for making buttonholes and decorative stitches.
3
Fine fabric
When sewing on very fine fabric, place a piece of thin paper under the fabric. It is easy to tear the
paper and remove the paper after you have finish your seam.
1
Points zigzag sélectionnez le bouton de sélection de point et tournez-le jusqu'au symbole souhaité
ou jusqu'à ce que la lettre apparaisse dans la fenêtre "B".
Stitch length dial/
Bouton pour la longueur du point
Fonction de la largeur du point lors de la couture
La largeur maximum du zigzag est "5". Cependant, cette largeur peut être réduite ou augmentée
en tournant le bouton de "0" à "5". Aiguilles jumellées: ne jamais dépasser la largeur "3". (1)
Fonction de la longueur du point lors de la couture
La densité du point augmente lorque le réglage du bouton de longueur de point approche du "0". (2).
Pour un point zig-zag efficace, la longueur de point la longueur de point devrait être à "2.5" ou
moins.
Point satin
Lorsque le bouton de longueur de point est situé entre "0" - "1", les points sont très serrés
produisant ainsi le point satin. Ce réglage est utilisé pour la boutonnière, les points décoratifs et les
appliqués.
2
1
4
3
2
0.5
1
S1
24
2
0
Tissus fins
Lorsque le tissu à coudre est très fin, placer une mince feuille de papier sous le tissu pour le
coudre. Il est facile de déchirer et d"enlever le papier une fois la couture terminée.
3
4
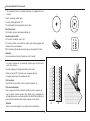
Blind hem/ Ourlet au point invisible
* The blind hem foot is an optional accessory not supplied with your machine.
For hems, curtains, trousers, skirts, etc.
Blind hem for stretch fabrics. Position "D" on selection dial.
Blind hem/ lingerie for firm fabrics. Position "E" on selection dial.
5 4 3 2
2
1
3
0
1
4
0
Set the machine as illustrated.
S1
Note:
It takes practice to sew blind hems. Always make a sewing test first.
Fold the fabric as illustrated with the wrong side uppermost. (1)
Place the fabric under the foot. Turn the handwheel forwards by hand until
the needle swings fully to the left. It should just pierce the fold of the fabric. If
it does not, adjust the stitch width accordingly. (2) Adjust the guide (3) by
turning the knob (4) so that the guide just rests against the fold. Sew slowly,
by pressing the foot control lightly guiding the fabric along the edge of the
guide.
* Le pied pour ourlet invisible est un accessoire optionnel qui n'est pas fourni
avec votre machine.
Pour ourlets, rideaux, pantalons, jupes etc.
Ourlet au point invisible pour tissus élastiques.
Ourlet au point invisible/ point de lingerie pour tissus stables.
D
E
4
1
2
Régler la machine comme indiqué sur le schéma.
Attention:
La réalisation d'un ourlet au point invisible requiert un peu d'exercice. Le
mieux est donc de toujours faire un échantillon d'essai.
Plier l'ouvrage comme indiqué sur le schéma-l'envers se trouvant en haut. (1)
Placer l'ouvrage sous le pied-de-biche. Tourner le volant vers l'avant jusqu'à
la position extrême gauche de l'aiguille.
Celle-ci ne doit piquer que sur le bord du pli. Si ce n'est pas le cas, rectifier la
largeur de tissu. (2)
Poser le guide (3) sur le pli du tissu en tournant le bouton. (4)
Piquer lentement et guider soigneusement l'ouvrage afin que la position de ce
dernier par rapport au guide ne se trouve trouve à aucun moment modifiée.
25
3
Reverse / Revés
Surface / Derecho
Overlock stitches/ Point overlock
* The overcasting foot is an optional accessory not supplied with your
machine.
5 4
S1
3
1
1 0
Turn the stitch length dial to "S1".
The stitch width can be adjusted to suit the fabric.
0
2
Seams, neatening, visible hems.
2
3
Double overlock stitch:
For fine knits, handknits, seams. (B)
F
All overlock stitches are suitable for sewing and neatening edges and
visible seams in one operation.
When neatening, the needle should just go over the edge of the fabric.
Attention:
Use new needles or ball point needles or stretch needle!
* Le pied à overlock est un accessoire optionnel qui n'est pas fourni
avec votre machine.
Coutures, plquage et surfilage des bords, ourlet visible.
Placer sur position "S1" le bouton pour la longueur de point.
La largeur du point peut être adaptée au tissu.
Point overlock:
Pour étoffes à fines mailles, tricots, encolures, bordures. (A)
Point overlock double:
Pour ouvrages tricotés fins, éléments tricotés à la main, coutures. (B)
Tous les points overlock peuvent être utilisés pour le piquage et le
surfilage des bords en une seule opération. Suivant l'effet recherché, on
peut surfiler directement le bord coupé ou piquer au ras celui-ci.
Attention:
Utiliser une nouvelle aiguille ou une aiguille à pointe sphérique!
A
26
B
4
Stretch overlock:
For fine knits, jerseys, neck edges, ribbing. (A)
G
Sewing on buttons/ Pose des boutons
Install the darning plate. (1)
0
5 4 3 2
1
2
1
Position the work under the foot. Place the button on the marked
position, lower the foot, adjust stitch width to "0" and sew a few
securing stitches. Adjust the stitch width. Turn the handwheel to
check that the needle goes cleanly into the left hole of the button
(adjust the stitch width according to the button), and sew on the button.
Adjust the stitch width to "0" and sew a few securing stitches.
0
4
3
S1
If a shank is required, place a darning needle on top of the button and
sew. (3) For buttons with 4 holes, sew through the front two holes first
(2), push work forward and then sew through the back two holes as
described. (3)
B
Placer la plaque de reprisage selon l'illustration (1).
1
Positionner l'ouvrage du dessous du pied. Poser les boutons à la
position marquée, abaisser le pied, régler la largeur du point à "0" et
coudre quelques points de sécurité. Régler la largeur du point. Tourner
le volant pour vérifier que l'aiguille va parfaitement dans le trou à
gauche du bouton (régler la largeur du point selon le bouton), et
coudre sur le bouton. Régler la largeur du point à "0" et coudre
quelques points de sécurité.
Si un tige est demandé, poser une aiguille à reprise sur le bouton et
coudre. (3) Pour les boutons à 4 trous, coudre d'abord en passant par
les 2 trous en avant (2), pousser l'ouvrage en avant et puis coudre en
passant par les 2 trous derrière comme montré. (3)
2
27
3
How to sew buttonholes
Preparation:
Remove the zigzag foot and attach the buttonhole foot. Adjust the stitch
length dial between "0.5" - "1". The density of the stitch depends on
thickness of the fabric.
Note: Always test sew a buttonhole.
5 4
1
3
0
2
4
1 0
3
2
S1
To prepare the fabric:
Measure the diameter of the button and add 0.3 cm (1/8") for the
bartacks. If you have a very thick button, add more to the diameter
measurement. Mark the position and length of the buttonhole on the
fabric.
Position the fabric so that the needle is on the mark that is furthest from
you.
Pull the buttonhole foot towards you as far as it will go.
Lower the foot.
a. Turn the pattern selector dial to . Sew at moderate speed until you
reach the end mark.
b. Turn the pattern selector dial to
and sew 5-6 bartack stitches.
c. Turn the pattern selector dial to
and sew the left side of the
buttonhole to the mark at the end which is further from you.
d. Turn the pattern selector dial to
and sew bar tack stitches.
a
Remove the fabric from under the foot. Draw the upper thread through
the backside of the fabric and knot upper and lower threads. Cut the
center of the buttonhole with the seam ripper, being careful not to cut
the stitches on either side.
e
Tips:
- Slightly reduce upper thread tension to produce better results.
- Use backing material for fine and stretchy fabrics.
- It is advisable to use a gimp cord for stretch or knit fabrics. The zigzag
should sew over the gimp. (e)
28
b
c
d
Faire les boutonnières
Préparation:
Poser le pied pour boutonnières.
Régler la longueur du point entre "0.5" - "1". La densité du point dépend
de l'épaisseur du tissu.
Note: Toujours faire une boutonnière d'essai.
5 4
1
3
0
2
4
1 0
3
2
S1
Mesurer le diamètre du bouton et ajouter 0.3cm pour la bride.
Si vous avez un bouton épais, il faut ajouter à la longueur.
Marquer la position et la longueur de la boutonnière sur le tissu.
Placer le tissu afin que l'aiguille soit au bout de la marque le plus
éloigné de vous.
Tirer le pied à boutonnière vers vous jusqu'au bout et abaisser le pied.
a. Tourner le sélecteur de point à
. Coudre à vitesse modérée
jusqu'au bout de la marque.
b. Tourner le sélecteur de point à et coudre 5-6 points d'arrêt.
c. Tourner le sélecteur de point à
et coudre le côté gauche de la
boutonnière jusqu'au point de départ.
d. Tourner le sélecteur de point à et coudre les points d'arrêt.
a
Pour nouer les fils, mettre le sélecteur de point à "B" (largeur de point à
"0") et coudre quelques points.
Suggestions:
- Pour de meilleurs résultats, réduire légèrement la tension du fil supérieur.
- Utiliser une feuille de papier pour éviter les distorsions sur les tissus
très fins ou synthétiques.
- Pour les tissus extensibles ou les tricots, il est préférable d'utiliser un
cordonnet. Le point doit couvrir complètement le cordonnet. (e)
29
e
b
c
d
Zippers and piping/ Pose d'une fermeture à glissière
4
3 2 1
2
3
1
4
5
0
Set the machine as illustrated. Dial selector on "A".
Set stitch length control between "1" - "4" (according to
thickness of fabric).
0
The zip foot can be inserted right or left, depending on which
side of the foot you are going to sew. (1)
S1
To sew past the zip pull, lower the needle into the fabric, raise
the presser foot and push the zip pull behind the presser foot.
Lower the foot and continue to sew.
A
It is also possible to sew in a length of cord, into a bias strip to
form a 'welt'. (2)
Régler la machine comme indiqué sur le schéma.
Régler la longueur de point entre "1" et "4" selon l'épaisseur
du tissu.
Le pied pour fermeture à glissière peut être fixer du côté
gauche ou du côté droit dépendant quel côté du fermoir à
glissière vous désirez coudre. (1)
Pour éviter de dévier lorsque vous arrivez près du curseur,
laisser l'aiguille piquée dans le tissu. Lever le pied-de-biche,
puis pousser le curseur derrière le pied-de-biche. Abaisser ce
dernier puis continuer à coudre.
Il est également possible d'utiliser le pied pour fermeture à
glissière pour coudre un cordonnet ou passe-poil. (2)
1
2
30
Sewing with the hemmer foot/ Coudre avec le pied ourleur
4
3 2 1
2
3
0
5
For hems in fine or sheer fabrics.
1
4
* The hemmer foot is an optional accessory not supplied with
your machine.
0
Set the machine as illustrated. Pattern selector on "A".
Neaten the edge of the fabric. At the beginning of the hem, turn
under the edge twice by about 3 mm (1/8") and sew 4-5 stitches
to secure. Pull the thread slightly towards the back. Insert the
needle into the fabric, raise the presser foot and guide the fold
into the scroll on the foot. (1)
S1
A
Gently pull the fabric edge towards you and lower the presser
foot. Begin sewing, guiding the fabric into the scroll by holding it
upright and slightly to the left. (2)
* Le pied ourleur est un accessoire optionnel qui n'est pas fourni
avec votre machine.
Pour ourler les tissus fins et légers.
Régler la machine comme indiqué sur le schéma.
Le tissu à ourler doit être coupé droit au préalable.
Replier l'extrême bord du tissu en formant un double pli d'env.
3mm et le maintenir par 4 ou 5 points. Tirer légèrement les fils
d'aiguille et de canette vers l'arrière, piquer l'aiguille dans le
tissu. Relever le pied-de-biche. Guider le bord vif du tissu pour
qu'il s'engage dans le cornet de l'ourleur. (1)
Continuer de piquer en veillant à ce que le tissu pénètre
uniformément dans le cornet de l'ourleur. (2)
1
2
31
3-step zig-zag
Sewing on lace and elastic, darning, mending, reinforcing edges.
Set the machine as illustrated. Pattern selector on "C".
C
5 4 3 2
1
0
3
2
1
4
0
Place patch in position. The stitch length can be shortened to
produce very close stitches. (1)
S1
When mending tears, it is advisable to use a piece of backing fabric
to reinforce. The stitch density can be varied by adjusting the stitch
length. First sew over the center and then overlap on both sides.
Depending on the type of fabric and damage, sew between 3 and 5
rows. (2)
Sewing elastic
1. Place the elastic on the fabric.
2. As you sew, stretch the elastic both in the front and behind the
presser foot as shown in fig. (3).
Joining fabric
The elastic stitch can be used to join two pieces of fabric together and
is very effective when sewing knitted fabrics. If nylon thread is used,
the stitch will not be visible.
1. Place the edges of the two pieces of fabric together and center
them under the presser foot.
2. Sew them together using the elastic stitch taking care to keep the
two fabric edges close together as shown in fig. (4).
1
3
32
2
4
Point zig-zag cousu
Pose d'élastique et de dentelle, ravaudage, racommodage de dechirures,
renforcement de bords.
C
5 4 3 2
3
1
0
Régler la machine comme indiqué sur le schéma.
2
1
4
0
Poser le morceau d'étoffe sur le tissu endommagé. (1)
S1
Pour le raccommodage de déchirures, il est conseillé de placer un
tissu de renforcement sur l'envers. Commencer par coudre sur le
milieu, puis coudre sur les deux côtés. Selon le genre de tissu et la
nature des dommages, faire 3 à 5 passages. (2)
Couture d'elastiques
1. Placer l'élastique sur le tissu.
2. A mesure que l'on coud, tendre l'élastique de part et d'autre du
pied-de-biche (voir fig. 3).
Assemblage de tissus
Le point élastique peut servir à assembler deux morceaux de tissu. Il
s'avère particulièrement efficace pour la couture de tricots. Avec du fil
nylon, la couture sera invisible.
1. Placer bord à bord les deux pièces de tissu et les centrer sous le
pied-de-biche.
2. Les assembler avec le point élastique, en prenant bien soin de
garder les deux pièces bord à bord comme le montre la fig. (4).
1
3
33
2
4
Stitch selection/ Sélection des points
4
S1
3 2 1
1
0
5
0
Triple straight stitch: (1)
Pattern selector on "A".
For hardwearing seams.
Turn the stitch length dial to "S1".
The machine sews two stitches forwards and one stitch backwards.
This gives triple reinforcement.
4
3
2
Triple zig-zag: (2)
Pattern selector on "B".
For hardwearing seams, hems and decorative seams.
Turn the stitch length dial to "S1".
Adjust the stitch width dial to between "3" and "5".
Triple zig-zag is suitable for firm fabrics like denim, corduroy, etc.
A
1
Triple point droit: (1)
Pour coutures à toute épreuve.
Placer sur position "S1" le bouton pour longueur de point.
La machine effectue deux points en avant et un point en arriére ce
qui permet d'obtenir une couture a triple renfort.
S1
5 4 3 2
1
0
0
1
Point zigzag triple: (2)
Pour coutures à toute épreuve, ourlets et coutures décoratives.
Placer sur position "S1" le bouton pour longueur de point.
Placer le bouton pour largeur de point entre les positions "3" - "5".
Le triple point zigzag convient pour les tissus résistants tels que jeans,
velours côtelé, etc.
4
3
2
B
2
34
Smocking stitch/ Point nid d'abeille
Seams, hems, T-shirts, underwear, etc.
5 4 3 2
Set the machine as illustrated.
S1
1
0
1
0
This stitch can be used for all types of jersey as well as for woven
fabrics. (1)
3
2
Pattern selector on "C".
Turn the stitch length dial to "S1".
C
Coutures, ourlets, T-shirts, sous-vêtements, etc.
Régler la machine comme indiqué sur le schéma.
Ce point peut être utilise: pour différents types de jersey (tricot)
ainsi que pour les étoffes tissées. (1)
Coudre l'ourlet à env. 1 cm du bord coupé, puis couper le surplus
de tissu. (2)
Placer sur position "S1" le bouton pour longueur de point.
1
35
2
4
Sew at 1 cm (1/4") from the fabric edge and trim the surplus fabric. (2)
Sewing with the cording foot/ Coudre avec le pied pour cordonnet
* The cording foot is an optional accessory not supplied with your
machine.
5 4 3 2
2
3
4
1
1
Decorative effects, cushions, tablecloths, etc.
0
0
Set the machine as illustrated. Various stitches are suitable for
sewing on cord, e.g. Zig-zag, Triple zig-zag, decorative stitches.
S1
Insert the cord between the spring covering the cord groove and
the foot. The cord should run in the groove. One, two or three
cords can be sewn on. The stitch width is adjusted according to
the number of cords and the stitch selected. (1/2)
B
* Le pied pour cordonnet est un accessoire optionnel qui n'est pas
fourni avec votre machine.
Décorations, coussins, nappes etc.
Régler la machine comme indiqué sur le schéma. On peut utiliser
divers points tels le zigzag, le triple zigzag, points décoratifs, etc.
Faire passer les fils dans le ressort de guidage puis les disposer
vers l'arrière, sous le pied-de-biche. Veiller à ce que les fils se
trouvent dans les rainures (tenir compte de l'épaisseur du
cordonnet). Le pied pour cordonnet permet de coudre un, deux ou
trois fils. La largeur de point varie en fonction du nombre de fils et
du point choisi. (1/2)
1
36
2
Free motion darning/ Reprise à main libre
* The darning foot is an optional accessory not supplied with your machine.
3 2 1
1
0
2
4
0
5
Set the machine as illustrated. Install the darning plate. (1)
4
3
S1
Remove the presser foot clamp. (2)
Attach the darning foot to the presser foot holder. The lever (A) should be
behind the needle clamp screw (B). Press the darning foot on firmly from
behind with your index finger and tighten the screw (C). (3)
A
First sew round the edge of the hole (to secure the threads). (4) First row:
Always work from left to right. Turn work by 1/4 and oversew.
A darning ring is recommended for easier sewing and better results.
* Le pied à repriser est un accessoire optionnel qui n'est pas fourni avec
votre machine.
1
Régler la machine comme indiqué sur le schéma. Installer la plaque à
reprisage. (1)
Retirer le support de pied-de-biche. (2)
A
Fixer le pied à repriser à la barre. Le levier (A) doit se trouver derrière, au
dessus de la vis de fixation de l'aiguille (B). Avec l'index, appuyer
fermement par l'arrière sur le pied à repriser, puis serrer la vis (C). (3)
B
C
Commencer par coudre tout autour du trou (pour empêcher les mailles de
filer). (4)
4
Première rangéé Travailler toujours de gauche à droite.
Tourner l'ouvrage d'un quart et finir la reprise.
2
Pour obtenir un meilleur résultat, nous conseillons d'utiliser un tambour à
repriser.
37
3
Practical stitches
Set the machine as illustrated.
Turn the stitch width dial and stitch length dial to suit the fabric.
5 4 3 2
2
1
0
3
1
Shell hem (1)
Pattern selector on "F".
For decorative edges.
Suitable for edges on sheer, fine and stretch fabrics. The larger stitch
should go just over the edge of the fabric to create the shell effect.
- This stitch requires a tighter thread tension than normal.
- Place the fabric under the presser foot so that it will be sewn along
the bias with the straight stitches sewn on the seamline and the
zigzag stitches sewn slightly over the folded edge.
- Sew at a slow speed.
4
0
S1
F G H
Rampart (2)
Pattern selector on "G".
For flat joining seams, sewing on elastic, visible hems.
This stitch can be used for firm, thicker fabrics.
Bridging (3)
Pattern selector on "H".
For seams, place mats, tablecloths.
Decorative joining seam for a fagotted effect. Gathering with cord or
shirring elastic.
1
38
2
3
Points utilitaires
Régler la machine comme indiqué sur le schéma.
La largeur et la longueur des points peuvent être adaptées à la
nature des tissus.
5 4 3 2
2
1
0
3
1
4
0
Point coquille pour ourlets (1)
Affichage du point à "F".
Pour renforcements décoratifs de bords.
Convient pour bordures de matériaux minces, stables ou élastiques.
Le grand point devrait déborder trés légèrement du tissu, pour donner
cet effet de coquille.
- La tension du fil doit être légèrement supérieure à la normale.
- Coudre le tissu sur le biais après l'avoir placé sous le pied-de-biche
de sorte que la machine puisse coudre des points droits sur la ligne
de couture et des points zigzag légèrement au-dessus du bord
replié.
- Coudre lentement.
S1
F G H
Point rempart (2)
Affichage du point à "G".
Pour coutures de raccords plates, coutures de bandes élastiques,
ourlets visibles.
Ce point permet de travailler sur divers tissus stables et à mailles.
Point de relais (3)
Affichage du point à "H".
Pour ourlets, sets, nappes.
Coutures très décoratives avec effet d´ourlet à jours. Réalisation des
rangées avec du fil normal ou du fil élastique.
1
39
2
3
Darning/ Reprisage
5
4
3 2 1
3
4
2
0
- Turn stitch length dial to the desired length.
- Turn stitch selector to straight stitch, center needle position.
- Position the fabric to be darned under the presser foot together with
the under laying fabric to be used.
- Lower the presser foot and alternately sew forward or reverse using
the lever.
- Repeat this motion until the area to be darned is filled with rows of
stitching.
1
0
S1
For reverse sewing instructions, see page 18.
A
- Régler la longueur du point selon la longueur désirée.
- Placer le sélecteur de points à la couture droite, position d'aiguille
au centre.
- Faufiler une pièce de renfort sous la section à repriser et placer le
tissu sous le pied-de-biche.
- Abaisser le pied-de-biche et coudre alternativement en marche
avant et en marche arrière en vous servant du levier de marche
arrière.
- Répéter ce mouvement jusqu'à ce que toue la surface à repriser soit
couverte.
Pour les instructions de marche arrière. Voir P. 18
40
Attaching lace/ Pose de la dentelle
- Turn stitch length dial to the desired length.
- Turn the stitch selector to straight stitch, center needle position.
5
4
3 2 1
3
4
2
0
- Fold in the edge of the fabric (approximately 6 mm 1/4").
1
0
- Place the lace under the folded edge of the fabric allowing it to
under lap the fabric slightly as required by the pattern of the lace.
- Sew on the edge of the fabric fold.
S1
- You can add a decorative touch by using the satin stitch to sew the
lace.
A
- Régler le bouton de longueur de point selon la longueur désirée.
- Placer le sélecteur de point à la couture droite, position d'aiguille au
centre.
- Plier le bord non fini de l'ouvrage environ 6mm (1/4").
- Placer la dentelle sous le bord replié de façon à ce que le dessus
chevauche légèrement le dessous tout en suivant le patron de la
dentelle.
- Coudre près du bord replié.
- Vous pouvez ajouter une touche de fantaisie en utilisant un point
satin à la place du point droit.
41
Applique/ Appliqué
- Turn stitch length dial to the desired length.
- Turn pattern selector dial to small zig zag width.
5 4 3 2
0
1
2
0
- Sew slowly around the edge of the design.
S1
4
- Trim excess material outside the stitching. Make sure not to cut any
stitches.
3
1
- Cut out the applique design and baste it to the fabric.
- Remove the basting thread.
- Tie top and bottom thread under the applique to avoid unraveling.
B
- Régler le bouton de longueur de point selon la longueur désirée.
- Placer le sélecteur de point à un point de zigzag étroit.
- Découper l'appliqué et le faufiler au vêtement.
- Coudre lentement près du bord extérieur de l'appliqué.
- Recouper tout excédent de tissu en prenant soin de ne couper
aucun des points cousus.
- Retirer le faufil.
- Tirer le fil à l'envers du tissu et attacher ensemble.
42
Twin needle/ Couture à deux aiguilles
2 1 0
2
4
3
5
4
3
1
- Turn stitch length dial to the desired stitch length.
- Turn stitch selector to straight stitch, center needle position.
- For twin needle sewing, insert the extra spool pin (included with the
accessories) into the hole on top of the machine.
- Make sure that the two threads used to thread the twin needle are of the
same weight. You can use one or two colors.
- Insert the twin needle in the same way as single needle. Flat side of
needle should face away from you.
- Follow instructions for single needle threading. Thread each needle
separately.
0
S1
A
Please note:
When sewing with twin needle, always proceed slowly, and make sure to
maintain a low speed to insure quality stitching.
When using twin needle on zig-zag make sure the stitch width dial is set
between "0" and "3". Do not use twin needle at setting above "3".
- Régler le bouton de longueur de point à la longueur désirée.
- Placer le sélecteur de point à la couture droite, position centre.
Vérifiez que la largeur de point est réglée sur "0".
- Assurez-vous que les deux fils utilisés soient de même grosseur. Vous
pouvez utiliser deux fils de même couleur ou de couleurs différentes.
- Retirer l'aiguille simple et installer l'aiguille double de la même façon que
l'aiguille simple. Le côté plat de l'aiguille doit toujours être vers l'arrière
de la machine.
- Enfiler la machine selon la procédure normale d'enfilage jusqu'à
l'aiguille. Séparer les fils et assurez-vous que le fil venant de la bobine
de droite entre dans l'aiguille de droite et que le fil venant de la bobine
de gauche entre dans l'aiguille de gauche.
Attention:
Pour bien coudre avec des aiguilles jumelées, prenez votre temps et
assurez vous que la vitesse de couture est réduite, afin d'obtenir des
points d'aspect irréprochable.
Pour coudre un zig-zag avec des aiguille double, assurez vous que le
sélecteur de largeur de points est positionnée entre "0" et "3". Ne cousez
pas avec des aiguilles jumelées si la largeur de points excède "3".
43
Monogramming and embroidering with embroidery hoop*/ Monogramme et broderie à main libre*
1
3
4
Preparation for Monogramming and Embroidering*
- Draw the desired lettering or design on the right side of the fabric.
- Stretch the fabric between embroidery hoop as firmly as possible.
- Place the fabric under the needle. Make sure the presser foot bar is down in its lowest
position.
- Turn the balance wheel towards you to bring up the lower thread through the fabric. Sew
a few securing stitches at the starting point.
- Hold the hoop with thumb and forefingers of both hands while pressing the material with
the middle and third fingers and supporting the outside of hoop with smaller finger.
* Embroidery hoop not included with machine.
-
4 3 2 1
Régler la machine tel que démontré ci-dessus.
Enlever le pied-de-biche et le portepied.
Placer la plaque de reprisage selon l'illustration (1).
Abaisser le levier du pied presseur avant de commencer à coudre.
Ajuster la largeur du zigzag selon la grandeur du monogramme ou du motif à broder.
1
Préparation pour le monogramme et la broderie à main libre*
- Dessiner le monogramme ou le motif sur l'endroit du tissu.
- Placer le tissu dans un cerceau à broder et le tendre le plus fermement possible.
- Placer le tissu sous l'aiguille. Assurez-vous que la barre du pied presseur est à sa
position la plus basse.
- En tournant le volant vers vous, faire passer le fil de la canette à travers le tissu et
ressortir sur l'endroit du tissu. Coudre quelques points d'arrêt au point de départ.
- Retenir le cerceau avec le pouce et l'index des deux mains, tout en pressant le tissu
avec les doigts du milieu alors que l'auriculaire soutient le bord extérieur du cerceau.
* Le cerceau à broder n'est pas inclus avec les accessoires de la machine.
2
44
0
B
2
5
S1
Set the machine as illustrated.
Remove the presser foot and the presser foot holder.
Attach the darning plate. (1)
Lower presser foot lever before starting to sew.
Adjust the stitch width according to the size of lettering or design.
0
-
Monogramming and embroidering (continued)/ Monogramme et broderie à main libre (suite)
Monogramming
- Sew, moving the hoop slowly along the lettering. Make sure
you maintain a constant speed.
- When the letter is finished. Secure the threads with a few
straight stitches.
Embroidering
- Stitch along the outline of the design by moving embroidery
hoop. Make sure to maintain a constant speed.
- Fill in the design working from the outline towards the inside.
Keep the stitches close together.
You will get longer stitches by moving the hoop faster and
shorter stitches by moving the hoop more slowly.
Monogramme
- Coudre en déplaçant le cerceau à broder lentement pour
vous permettre de suivre la formation des lettres.
- Garder une vitesse constante pour un meilleur contrô le sur
le cerceau.
- Lorsque vous terminez chaque lettre, faire quelques points
d'arrêt en couture droite.
- Le mouvement du cerceau est comme suit: déplacement
vertical, bouger le cerceau lentement pour former un point
satin. Déplacement horizontal: bouger le cerceau un peu
plus rapidement pour obtenir un effet décroissant ou
croissant de largeur du point.
Broderie à main libre
- Coudre le contour du motif en déplaçant le cerceau à broder.
Assurez-vous de maintenir une vitesse constante.
- Remplir le motif en travaillant de l'extérieur vers l'intérieur du
motif. Guider le cerceau lentement pour obtenir une
formation de points rapprochés tel un point satin.
Vous obtiendrez un point plus long ou distancé en déplaçant
le cerceau plus rapidement et un point plus court ou rapproché
en déplaçant le cerceau plus lentement.
45
Quilting/ Coudre avec le guide
4
3 2 1
2
3
1
0
5
4
* The quilting foot is an optional accessory not supplied with this
machine.
0
Set pattern selector as illustrated.
Insert the quilting guide in presser foot holder and set the space as
you desired.
S1
Move the fabric over and sew successive rows with the guide riding
along on the previous row of stitching.
Note:
Presser foot shown is the optional quilting foot which does not come
with your machine. If you have not purchased this foot substitute the
all purpose foot.
A
* Le pied pour quilt est un accessoire optionnel qui n'est pas vendu
avec cette machine.
Régler la machine comme indiqué.
Sélectionner le point "A".
Position de l'aiguille au milieu.
Longueur de point: selon le tissu.
Insérer le guide dans le ressort du pied et fixer dans la largeur désirée.
Coudre des lignes parallèles en s'aidant du guide.
46
Gathering/ Le fronçage
* The gathering foot is an optional accessory not supplied with this
machine.
5
4
3 2 1
4
3
0
Set the pattern selector as illustrated.
1. Attach the gathering foot.
2. Sew a single row or multiple rows of straight stitches.
3. If more gathering is required, loosen the upper thread tension to
below 2 so that the lower thread lies on the under side of the material.
4. Pull the lower thread to gather more of the material.
2
1
0
S1
Note:
Presser foot shown is the optional gathering foot which does not
come with your machine. If you have not purchased this foot
substitute the all purpose foot and gather fabric by hand by lowering
the tension setting to below 2 and pulling the lower thread to gather
the material.
A
* Le pied fronceur est un accessoire optionnel qui n'est pas vendu
avec cette machine.
Régler la machine comme indiqué.
Sélectionner le point "A".
Position de l'aiguille au milieu.
Longueur de point: selon le tissu.
1. Coudre une ou plusieurs lignes de points droits.
2. Relâcher la tension du fil supérieur (env. position 2) pour faciliter le
fronçage.
3. Tirer le fil inférieur et froncer.
47
Scallop stitching/ Point feston
This machine automatically produces a scallop stitch which may be
used as decorative edging.
1
2
0
4
1
- Set the pattern selector at "K".
0
3
5 4 3 2
- Sew the scallop stitch along the edge of the material. (1)
S1
- If desired, trim around the scallop with scissors to create a scalloped
edge. Be careful not to cut the thread. (2)
K
Cette machine crée automatiquement un point de feston qui peut
servir à réaliser des lisières décoratives (à picots).
- Tourner le bouton sélection des points à "K".
- Effectuer le point de feston le long de la lisière du tissu. (1)
- Si on le souhaite, découper autour des coquilles à l'aide d'une paire
de ciseaux pour festonner le tissu. Faire attention cependant de ne
pas couper le fil. (2)
1
48
2
Patch work/ Patchwork
These stitches are used to join two pieces of fabric while leaving a
space between their edges.
5 4 3 2
S1
1
1
0
0
1. Fold over the edges of the two pieces of fabric for the hem and
baste the edges to a thin piece of paper leaving a small space
between them.
3
2
3. Stitch along the edge, pulling both threads slightly when beginning
to sew.
* Use thicker than normal threads for sewing.
G
4. After sewing, remove the basting and the paper. Finish by tying
knots on the reverse side at the beginning and the end of the
seams.
Ces points sont destinés à unir deux pièces de tissu tout en laissant
un espace libre entre les deux rebords.
1. Pliez les rebords pour former un ourlet et bâtissez les bords sur
une fine feuille de papier en laissant un petit espace libre entre les
deux.
2. Placez la sélection de motif sur "G".
Placer sur position "S1" le bouton pour longueur de point.
3. Cousez le long du rebord en tirant les deux fils de côté au début de
la couture. Utilisez un fil plus épais que les fils standards habituels.
4. Eliminez les surfils et le papier après la couture. Nouez les fils
(début et fin de couture) sur l'envers pour arrêter.
49
4
2. Set the pattern selector on "G".
Turn the stitch length dial to "S1".
Maintenance
Caution:
Always make sure that the machine is unplugged from power source
and the main switch is on "O" before inserting or removing any parts
and before cleaning.
Remove the stitch plate:
Turn the handwheel until the needle is fully raised. Open the hinged
front cover and unscrew the needle plate screw with the screw driver. (1)
Cleaning the feed dog:
Remove the bobbin case and use the brush supplied to clean the
whole area. (2)
Cleaning and lubricating the hook:
Remove the bobbin case. Snap the two hook retaining arms (a)
outwards. Remove the hook race cover (b) and the hook (c) and clean
with a soft cloth. Lubricate at the points (d) (1-2 drops) with sewing
machine oil. Turn the handwheel until the hook race (e) is in the left
position. Replace the hook (c). Replace the hook race cover and snap
back the two hook retaining arms. Insert he bobbin case and bobbin
and replace the stitch plate.
1
2
Important: Fabric fluff and threads must be removed regularly. Your
machine should be serviced at regular intervals at one of our service
agencies.
d
e
c
b
a
3
50
Entretien de la machine
Attention:
Toujours débrancher la machine et mettre l'interrupteur principal en
position "O" pendant toute l'opération de nettoyage.
Retirer la plaque à aiguille:
Tourner le volant jusqu'à ce que l'aiguille soit à sa plus haute position.
Ouvrir le couvercle de la coursière et dévisser les vis de fixation avec
le tourne-vis fourni dans la boîte d'accessoire. (1)
Nettoyage des griffes d'entraînement:
Retirer la boîte à canette et nettoyer à fond à l'aide du pinceau. (2)
Nettoyage et huilage du crochet:
Retirer la boîte à canette. Tourner les deux leviers de fixation (a) du
crochet vers l'extérieur. Enlever l'anneau de fixation de la coursière (b)
et le crochet (c) et les nettoyer avec un tissu doux et sec. Mettre 1 ou
2 gouttes d'huile pour machine à coudre dans la coursière (d).
Tourner le volant jusqu'à ce que la coursière du crochet (e) soit à
gauche. Replacer le crochet (c) et l'anneau de fixation (a). Tourner
les deux leviers vers le centre du crochet et assurez-vous que les
leviers accroche bien sur les goujons. Remettre en place la boîte à
canette et la plaque à aiguille.
1
2
Important: La poussière et les déchets de fils doivent être nettoyés
de façon régulière. Une révision complète de la machine devrait aussi
être effectuée par un technicien à un intervalle régulier.
d
e
c
b
a
3
51
Trouble shooting guide
Problem
Cause
Correction
Upper thread breaks
1.The machine is not threaded correctly
2.The thread tension is too tight
3.The thread is too thick for the needle
4.The needle is not inserted correctly
5.The thread is round wound the spool holder pin
6.The needle is damaged
1.Rethread the machine
2.Reduce the thread tension (lower number)
3.Select a larger needle
4.Remove and reinsert the needle (flat side towards the back)
5.Remove the reel and wind thread onto reel
6.Replace the needle
Lower thread breaks
1.The bobbin case is not inserted correctly
2.The bobbin case is threaded wrongly
3.The lower thread tension is too tight
1.Remove and reinsert the bobbin case and pull on the thread. The thread
should pull easily
2.Check both bobbin and bobbin case
3.Loosen lower thread tension as described
Skipped stitches
1.The needle is not inserted correctly
2.The needle is damaged
3.The wrong size needle has been used
4.The foot is not attached correctly
1.Remove and reinsert needle(flat side towards the back)
2.Insert a new needle
3.Choose a needle to suit the thread and fabric
4.Check and attach correctly
Needle breaks
1.The needle is damaged
2.The needle is not correctly inserted
3.Wrong needle size for the fabric
4.The wrong foot is attached
1.Insert a new needle
2.Insert the needle correctly (flat side towards the back)
3.Choose a needle to suit the thread and fabric
4.Select the correct foot
Loose stitches
1.The machine is not correctly threaded
2.The bobbin case is not correctly threaded
3.Needle/fabric/thread combination is wrong
4.Thread tension wrong
1.Check the threading
2.Thread the bobbin case as illustrated
3.The needle size must suit the fabric and thread
4.Correct the thread tension
Seams gather or pucker
1.The needle is too thick for the fabric
2.The stitch length is wrongly adjusted
3.The thread tension is too tight
1.Select a finer needle
2.Readjust the stitch length
3.Loosen the thread tension
Uneven stitches, uneven feed
1.Poor quality thread
2.The bobbin case is wrongly threaded
3.Fabric has been pulled
1.Select a better quality thread
2.Remove bobbin case and retread and insert correctly
3.Do not pull on the fabric while sewing, let it be taken up by the machine
The machine is noisy
1.The machine must be lubricated
2.Fluff or oil have collected on the hook or needle bar
3.Poor quality oil has been used
4.The needle is damaged
1.Lubricate as described
2.Clean the hook and feed dog as described
3.Only use good quality sewing machine oil
4.Replace the needle
The machine jams
Thread is caught in the hook
Remove the upper thread and bobbin case, turn the handwheel backwards
and forwards by hand and remove the thread remands.
Lubricate as described.
52
Comment remédier soi-même aux petits problèmes
Problème
Le fil supérieur casse
Cause
1. L'enfilage du fil est incorrect
2. La tension du fil est trop forte
3. Le fil est trop épais pour l'aiguille
4. L'aiguille n'est pas insérée correctement
5. Le fil s'est entortillé sur la broche de la bobine
6. L'aiguille est endommagée
Remède
1. Enfiler à nouveau le fil à travers la machine et l'aiguille
2. Réduire la tension du fil supérieur (chiffre inférieur)
3. Utiliser une aiguille plus grosse
4. Enlever l'aiguille , puis la remettre en place (talon dirigé vers l'arrière)
5. Retirer la bobine et bobiner le fil
6. Remplacer l'aiguille
Le fil inférieur casse
1. La boîte à canette n'est pas placée correctement
2. La boîte à canette n'est pas enfilée correctement
3. La tension du fil est trop forte
1. Enlever la navette, puis la remettre en place et tirer sur le fil. Si le fil se déroule
facilement, la navette est bien en place.
2. Contrôler la canette et la navette
3. Rectifier la tension du fil inférieur de la manière prescrite
Les points ne se forment
pas toujours
1.
2.
3.
4.
L'aiguille n'est pas insérée correctement
L'aiguille est tordue ou épointée
L'aiguille n'a pas la classe ou la grosseur correcte
Le pied-de-biche ne convient pas
1. Enlever l'aiguille puis la remettre en place (talon dirigé vers l'arrière)
2. Remplacer l'aiguille
3. Choisir une aiguille dont la grosseur est adaptée au fil et à l'étoffe
4. Vérifier si le pied-de-biche utilisé convient pour l'ouvrage
L'aiguille casse
1.
2.
3.
4.
L'aiguille est tordue ou épointée
La boîte à canette n'est pas enfilée correctement
Tissu trop épais/ grosseur incorrecte de l'aiguille
Le pied-de-biche ne convient pas
1. Remplacer l'aiguille
2. Enlever l'aiguille, puis la remettre en place (talon dirigé vers l'arrière)
3. Choisir une aiguille dont la grosseur est adaptée au fil et au tissu
4. Changer le pied-de-biche
Des noeuds se forment au
cours du travail
1. Le fil n'est pas enfilé correctement
2. La boîte à canette n'est pas enfilée correctement
3. Le rapport aiguille/ tissu/ fil est incorrect
4. Le fil n'est pas tendu correctement
1. Enfiler correctement le fil dans la machine
2. Enfiler la navette de la manière prescrite
3. Choisir une aiguille dont la grosseur est adaptée au fil et à l'étoffe
4. Rectifier la tension du fil
Les coutures se rétractent
ou se froncent
1. L'aiguille est trop grosse pour le tissu
2. La tension du fil est trop forte
1. Utiliser une aiguille plus fine
2. Rectifier la tension du fil
Les points et l'entraînement
sont irréguliers
1. Le fil n'est pas assez solide
2. La boîte à canette n'est pas enfilée
correctement
3. Le tissu est tiré lors du piquage
1. Utiliser un fil de meilleur qualité
2. Enfiler à nouveau la boîte à canette, puis la remettre en place
3. Ne pas tirer le tissu lors de la couture. Celui-ci doit être entraîné automatiquement.
La machine est bruyante
1. La machine doit être lubrifiée
2. Présence de bourre ou de trace d'huile sur le
cro-chet ou sur la barre d'aiguille
3. L'huilage a été effectué avec une huile de auvaise
qualité
4. L'aiguille est tordue ou épointée
1. Huiler la machine en suivant les instructions
2. Nettoyer le crochet et la griffe d'entraînement en suivant les instructions
3. Pour le huilage, utiliser exclusivement une huile spéciale pour machine à
coudre
4. Remplacer l'aiguille
La machine est bloquée
Le fil est coincé dans le crochet
Enlever le fil supérieur et la navette, tourner le volant par secousses à la main en
avant et en arrière. Enlever les restes de fil. Huiler selon les instructions.
53
021V50102(B)(
) Dec/03
EURO-PRO 7535 (8500)