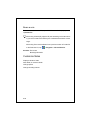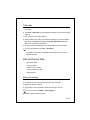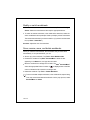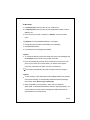
1
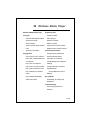
Unitech PA950
Product Reference Guide
400365 REV A
All product names mentioned in this manual may be
trademarks or registered trademarks of their respective
companies and hereby acknowledged.
1-1
Table of Contents
Chapter 1
Introduction
Chapter 2
Pocket PC Basic
Chapter 3
Setting
Chapter 4
ActiveSync
Chapter 5
Calendar
Chapter 6
Contacts
Chapter 7
Tasks
Chapter 8
Notes
Chapter 9
Pocket Word
Chapter 10
Pocket Excel
Chapter 11
Windows Media Player
Chapter 12
Microsoft Reader
1-2
Chapter 13
Calculator
Chapter 14
Games
Chapter 15
Pictures
Chapter 16
Terminal Services Client
Chapter 17
Terminal
Chapter 18
Pocket Internet Explorer
Chapter 19
Inbox
Chapter 20
MSN Messenger
Chapter 21
Bluetooth
Chapter 22
Scanner
Chapter 23
Technical Specification
Chapter 24
Contact Information
1-3
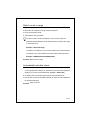
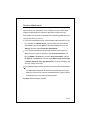
1
Introduction
Introduction
PA950
Accessories
Tour of PA950
First Step with PA950
Supplying Power to PA950
Charring the Terminal Battery
Using the PA950 Keypad
PA950
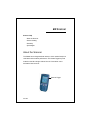
Thank you for purchasing Unitech PA950.
Your PA950 is a rugged PDA with Microsoft Windows® Mobile 2003
Software for Pocket PCs and incorporates an integrated bar code
scanning laser device, and a 19 key-keypad.
This PA950 product reference guide will guide you to access your
PA950.
1-4
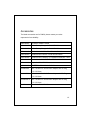
Accessories
The listed accessories are for PA950, please contact your sales
representive for availability.
5000-600627
Cradle for PA960 / PA950
5100-600635
2 Slot Battery Charger for PA960/PA950
5100-600636
4 Slot Battery Charger for PA960/PA950
1550-600622
Cable Module RS232+DC 16PIN 26AGW 200cm
1550-600623
Cable Module USB+DC 16PIN 26AGW 200cm
1550-600626
Cable Module USB(A/B) 4 Pin 8AQG2C24AWG2C 150cm
1550-600682
Cable Module PA960 DB9F to DB9M 26AWG 200cm
1979-600646
Stylus for PA960/PA950
1400-201002
BATTERY LITHIUM 7.4V 720MAH
1010000550
AC 110-240V DC 9V/2A Power Adaptor with US Plug
1.3*3.5*10mm
1010000560
AC 110-240V DC 9V/2A Power Adaptor with EU Plug
1.3*3.5*10mm
10100000570
AC 110-240V DC 9V/2A Power Adaptor with UK Plug
1.3*3.5*10mm
Car Kit
Car Kit for PA960/PA950
1-5
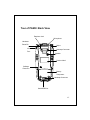
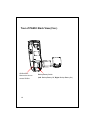
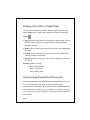
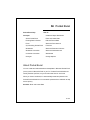
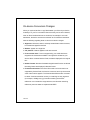
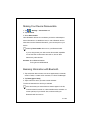
Tour of PA950: Front View
Stylus
Bar Code
LED
Scanner
Indicator
Right Scanner
Trigger
LCD Display
Power
On/Off
1-6
Keypad
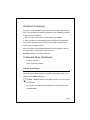
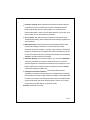
Tour of PA950: Back View
Earphone Jack
Microphone
Hardware
Reset Pin
Stylus
Infrared
Hanstrap Connector
Port
Speaker
Product Label
Software
Reset Pin
Battery
Component
Handstrap Connector
Serial/USB Port
1-7
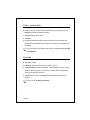
Tour of PA950: Back View (Con.)
SD Slot Door:
Remove the door to
access SD Slot.
1-8
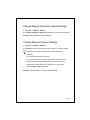
Backup Battery Switch
(Left: Backup Battery Off, Right: Backup Battery On)
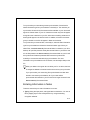
First Step with the PA950
In order to start using your PA950 for the first time:
Check that the backup battery is on.
Backup Battery Switch
(Left: Backup Battery Off, Right: Backup Battery On)
1-9
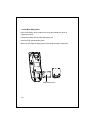
Install Main Battery Pack
Remove the battery door component by using the screwdriver, which is
integrated in stylus.
Position the battery with the label side toward you.
Insert and fully seat the battery pack.
Make sure the shape of battery pack fits the shape of battery component.
Main Battery Pack
1-10
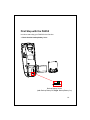
Supplying Power to the PA950
There are two ways to provide power to PA950
Using Charging Cable (USB with DC in port Cable, P/N 1550-600623).
Plug the cable to Serial/USB Port, and then plug the power adaptor to the
DC in port of the cable.
DC in Port
Using Docking Station
Plug Power Adaptor
1-11
Charging The Terminal Battery
Charging the batteries for the first time
Charging the main battery and backup battery for the first time
Before using the PA950 for the first time, charge the unit for 10 hours to
fully charge the empty backup battery.
Caution: Removing main battery with having backup battery fully charged
will cause data to be lost.
Charging the main battery
You can use the power adaptor with USB charging cable or desktop
cradle to charge the main battery. For spare batteries, please choose the
2 slot or 4 slot battery charger.
Note: Do not charge the battery under 0°C (32°F) or above 45°C
(115°F). Allow the battery to warm up to room temperature before
charging.
1-12
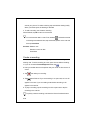
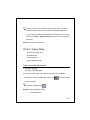
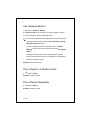
Using The PA950 Keypad
The 19 key keypad provides an easy way for fast data entry.
Cursor key
Backspace
Power On Off
TAB
Function
Alpha
Charging the main battery
Power
Function +
Function +
Function + TAB
Power on or Power off the terminal
Decrees LCD Display Backlight
Increase LCD Display Backlight
Toggle LCD Display backlight and Keypad
backlight
Function +
Toggle LCD Display backlight
1-13
Toggle Keypad backlight
Function +
Function + 7
Scanner Setting
Function + 8
Power Status
Function + 9
System Information
Alpha
Toggle numeric & alpha mode
Function + *
Get *
Function + #
Get #
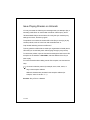
Keypad Input Method
Key
Numeric
Alpha Lowercase Mode
Alpha Uppercase Mode
Mode
+Func
1
st
2
nd
3
rd
4
th
1
st
2
nd
3
rd
4
th
Press
Press
Press
Press
Press
Press
Press
Press
1
1
F1
+
-
+
-
+
-
+
-
2
2
F2
a
b
c
a
A
B
C
A
3
3
F3
d
e
f
d
D
E
F
D
4
4
F4
g
h
i
g
G
H
I
G
5
5
F5
j
k
l
J
J
K
L
J
6
6
F6
m
n
o
M
M
N
O
M
7
7
F7
p
q
r
S
P
Q
R
S
8
8
F8
t
u
v
t
T
U
V
T
9
9
F9
w
x
y
z
W
X
Y
Z
0
0
F10
space
space
space
space
space
space
space
space
.
.
.
/
/
/
/
/
/
/
/
1-14
2 Pocket PC Basics
Pocket PC Basics Help
Concepts
Entering Information
Today screen
Pop-Up Menus
Notifications
Beaming Information
How To
Use Pocket PC
Use a Program
Get Help
Use the Input Panel
Use My Text
Find a File or an Item
Use File Explorer
Protect Device Information
Free Memory
Copyright Information
Using Pocket PC
Use
on the navigation bar, located at the top of the screen, to
quickly move to programs, files, and settings. Use the command bar at
the bottom of the screen to perform tasks in programs. The command
bar includes menus, buttons, and the input panel.
Tap and hold an item to see a pop-up menu containing a list of actions
you can perform. Pop-up menus give you quick and easy access to the
most common actions.
See Also: Entering Information
Pop-Up Menus
2-15
Get Help
For information about a program, tap
> Help while using the
program. For help with a dialog box or wizard, tap
. Use the Up/Down
control to scroll, and the Action button to close Help. To quickly find
information, tap Find and enter a word or item for which you need
information.
To see the name of a button on the navigation bar, tap and hold the
stylus on the button. Drag the stylus off the button so that the command
is not carried out.
You can also view Help by using a Web browser on your PC. First, use
ActiveSync to explore the mobile device folder. Then, copy the desired
Help file (*.htm), located in the Windows folder, to your PC, and then
use your browser to view or print it. For information on using
ActiveSync to view device files, see ActiveSync Help on the PC.
Entering Information
You can enter information on your device in several ways, depending on
the type of device you have and the program you are using.
Synchronizing: Using ActiveSync, exchange information between
your PC and device.
Typing: Using the input panel, enter typed text into the device. You can
do this by tapping keys on the soft keyboard or by using handwriting
recognition software.
Writing: Using the stylus, write directly on the screen.
2-16
Drawing: Using the stylus, draw directly on the screen.
Recording: Create a stand-alone recording or embed a recording into
a document or note. (Your device may not support recording.)
For more information on ActiveSync, see ActiveSync Help on the PC.
See Also: Use the Input Panel
Free Memory
Try the following procedures to free memory on your device.
Store files on a storage card. Tap
> Programs > File Explorer.
Tap and hold the file, and tap Cut. Browse to the storage card folder
and tap Edit > Paste.
Move mail attachments to a storage card.
Delete unnecessary files. Tap
> Programs > File Explorer. Tap
and hold the file, and tap Delete.
Delete large files. To find your largest files, tap
> Find. In the Type
list, tap Larger than 64 KB, and then tap Go.
In Internet Explorer, delete all files and clear history.
Remove programs you no longer use.
Stop programs you are not currently using. In most cases, programs
automatically stop to free needed memory. However, in some situations,
such as when confirmation dialog boxes are waiting for a user response,
the program may not be able to automatically stop. To check the state
of your active programs, tap
> Settings > System tab. Tap
Memory > Running Programs tab. Tap the program you want to view
and then tap Activate. Close any open windows or messages and
return the program to list view. If this doesn't work, you can stop the
2-17
program manually. First, make sure that your work is saved by closing
open items and returning the program to List View. Then, stop the
program by tapping Stop or Stop All on the Running Programs tab.
Reset your device, as described in your owner's manual.
See Also: Memory
Today Screen
The Today screen displays important information, such as today's
appointments and status icons for your device. Tap the information listed
on the Today screen to open the associated program. You can go to the
Today screen by tapping
> Today.
To customize what is displayed on the Today screen, including the
background image, tap Today at the top of the Today screen or tap
> Settings > Personal tab > Today.
Status icons display information such as low batteries or when the
device is connected to a PC or the Internet. You can tap an icon to
open the associated setting or program.
See Also: Use a Program
Pop-Up Menus
Use pop-up menus to quickly perform an action on an item. For example,
you can use a pop-up menu to delete or make a copy of an item. To
access a pop-up menu, tap and hold the item that you want to perform the
action on. When the menu appears, tap the action you want to perform, or
2-18
tap anywhere outside the menu to close the menu without performing an
action.
See Also: Entering Information
Notifications
When you have something to do, your device notifies you in a variety of
ways. For example, if you've set up an appointment in Calendar, an e-mail
message arrives, or a friend sends you an instant message, you'll be
notified in any of the following ways (your device may not have all of these
notification options):
A message box appears on the screen.
A sound, which you can specify, is played.
A light flashes on your device.
The device vibrates.
You can choose Notification Types.
Beaming Information
Use beaming software and hardware, such as infrared (IR), to send and
receive information and files between mobile devices. If an IR port is
installed on your PC, you can send and receive information and files
between your device and PC.
For information on the type of transfer your device supports, see the
User's Guide provided by your device's manufacturer. For information
about beaming specific information within a program, see Help on your
device for that program.
2-19
If you are unable to beam information between two devices, try the
following:
Transfer only one file, or no more than 25 contact cards, at a time.
When using IR, make sure nothing is between the two IR ports.
Adjust the room lighting or move to another location (some types of light
interfere with beaming).
Use a Program
You do not need to exit a program to open another or to conserve
memory. The system manages memory automatically. To switch between
programs, tap
or press a hardware program button.
To switch to or close programs manually, tap
System tab > Memory > Running Programs tab.
See Also: Find a File or an Item
Use the Input Panel
Show and hide the input panel
Change the input method
Use the keyboard
Use Block Recognizer
2-20
> Settings >
Show and hide the input panel
To show or hide the selected input method, tap the keyboard
on
the command bar.
See Also: Change the input method
Use the keyboard
Use Block Recognizer
Change the input method
Tap the arrow
and select a new input method.
To change the options for any input method, tap Options.
See Also: Input
Show and hide the input panel
Use Block Recognizer
Use the keyboard
2-21
Use the soft keyboard
Tap the
arrow and then Keyboard.
To type lowercase letters, tap the keys with the stylus.
To type a single uppercase letter or symbol, tap the SHIFT key. To tap
multiple uppercase letters or symbols, tap the CAP key.
To convert a letter to uppercase, tap and hold the stylus on the letter
and drag up.
To add a space, drag the stylus to the right across at least two keys.
To backspace one character, drag the stylus to the left across at least
two keys.
To insert a carriage return, tap and hold the stylus anywhere on the
keyboard and drag down.
If you want to use larger keys, tap the
arrow, Options, select
Keyboard in Input method, and then select Large Keys.
See Also: Change the input method
Show and hide the input panel
2-22
Use Block Recognizer
Character recognition software gives you a fast and easy method for
entering information in any program on your device. Letters, numbers,
and punctuation you write are translated into typed text.
To use character recognition, tap the
arrow and then Block
Recognizer. For help with writing characters, tap the question mark near
the writing area.
See Also: Change the input method
Show and hide the input panel
Find a File or an Item
1. Tap
> Find.
2. In Find, enter the file name, word, or other information you want to
search for. If you have looked for this item before, tap the Find arrow
and select the item from the list.
3. In Type, select a data type to help narrow your search.
4. Tap Go. The My Documents folder and subfolders are searched.
5. In the Results list, tap the item you want to open.
A
next to a file name indicates the file is saved on a storage card.
2-23
Use My Text
My Text is available in Inbox and MSN Messenger and provides a fast,
easy way to add common sentences to your messages.
To quickly add common messages, tap My Text and tap a desired
message.
To edit a My Text message in MSN Messenger, tap Tools > Edit My
Text Messages. Tap the message you want to edit and enter new text at
the bottom of the screen.
To edit a My Text message in the message list in Inbox, tap Tools > Edit
My Text Messages. Tap the message you want to edit and enter new
text at the bottom of the screen.
To edit a My Text message in an e-mail message in Inbox, tap Edit >
Edit My Text Messages. Tap the message you want to edit and enter
new text at the bottom of the screen.
2-24
Use File Explorer
1. Tap
> Programs > File Explorer.
2. Tap the folder list (labeled My Documents by default) and then the
folder that you want to view.
3. To open an item, tap it. To quickly delete, rename, copy, or move an
item, tap and hold. To select multiple items, tap and drag. Then, tap and
hold the selected items. On the pop-up menu, tap Copy, Delete, or
Rename.
A
next to a file name indicates that the file is saved on a storage
card.
Protect Device Information
You may keep valuable information on your device, such as names and
phone numbers of important contacts, credit card numbers, and
confidential documents. Here are some ways to protect your important
information.
Use a password. You can set a password that must be entered before
you can access the device. Tap
> Settings > Personal tab >
Password. Choose a password that's easy to remember. If you forget it,
you must clear memory to use your device again. Clearing memory will
erase all of your data.
Back up your data. You can create and maintain a backup file that
contains your device program data. If, for example, you accidentally
remove both the main and backup batteries and lose your data, you can
2-25
restore it from the backup file. For more information, see ActiveSync
Help on the PC.
Display owner information when the device is turned on. Tap
> Settings > Personal tab > Owner Information and enter your
personal information. Select Show information when device is
turned on so that if you lose your device, it can be returned to you.
Copyright Information
ActiveSync, Microsoft, Outlook, Windows, Windows NT, and the Windows
logo are registered trademarks or trademarks of Microsoft Corporation in
the United States and/or other countries. Microsoft products are licensed
to OEMs by Microsoft Licensing, Inc., a wholly owned subsidiary of
Microsoft Corporation.
Other product and company names herein may be the trademarks of their
respective owners.
Portions of International CorrectSpell spelling correction system 1993 by
Lernout & Hauspie Speech Products N.V. All rights reserved.
Create a copy
Use Tools > Save As to create a copy of a document or workbook.
To create a copy, enter a new name.
To store the item on a storage card, insert the card into your device and
select Storage Card from the Location list.
To create a new folder, in the document or workbook list, tap the folder
list (labeled All Folders by default), then tap Add/Delete.
If your Pocket Word document is simple, save it as a Plain Text
Document to save storage space.
2-26
Open an item
1. In the Folder list, select the folder the item is stored in.
2. In the Type list, select the item's file type. The folder and subfolders are
searched and the results displayed in the area below.
3. Tap the item you want to open.
To sort based on a column, tap the column heading. Tap the column
heading again to reverse the sort order (ascending to descending).
2-27
3
Settings Help
Settings
System
About
Personal
Buttons
Backlight
Certificates
Clock
Input
Contrast
Menus
Memory
Owner Information
Power
Password
Regional Settings
Sounds and Notifications
Remove Programs
Today
Screen
Connections
About Beam
About Connections
Set up a network card
Buttons
Tap
> Settings > Personal tab > Buttons.
On the Program Buttons tab, customize the program hardware
buttons to open your most used programs. In Button, tap the button
you want to assign, and select a new program in Button assignment.
Pressing and holding the Up/Down Control scrolls through the items in
a list. If scrolling is too fast or slow, adjust the delay and repeat rates on
the Up/Down Control tab. Delay before first repeat changes the time
3-28
elapsed before scrolling begins. Repeat rate changes the time it takes
to scroll from one item to the next.
Certificates
About Certificates
Manage Personal Certificates
Manage Root Certificates
Delete a Certificate
View Certificate Details
About Certificates
On your device you can add and delete public key certificates. These
certificates help establish your identity when you are logging onto a
secured network, such as a corporate network. Certificates also help
establish the identity of other computers, such as servers, with which you
connect. This helps prevent unauthorized users from accessing your
device and information.
You can store two types of certificates on your device: personal
certificates that establish your identity, and root certificates that establish
the identity of servers with which you connect. Your device may include a
set of preinstalled certificates. For information about viewing and deleting
certificates, see Manage Personal Certificates and Manage Root
Certificates.
3-29
Manage Personal Certificates
1. Tap
> Settings > Certificates. The list displays the name of the
certificate issuer and the expiration date.
2. To view more information about a certificate, tap it in the list.
3. To delete a certificate, tap and hold it in the list, and then tap Delete.
See Also: About Certificates
Manage Root Certificates
Manage Root Certificates
1. Tap
> Settings > Certificates> Root tab. The list displays the
name of the certificate issuer and the expiration date.
2. To view more information about a certificate, tap it in the list.
3. To delete a certificate, tap and hold it in the list, and then tap Delete.
See Also: About Certificates
Manage Personal Certificates
Delete a Certificate
1. Do one of the following:
o To delete a personal certificate, tap
o To delete a root certificate, tap
> Settings > Certificates.
> Settings > Certificates >
Root tab.
2. Tap the certificate in the list, and then tap Delete.
See Also: About Certificates
Manage Personal Certificates
Manage Root Certificates
3-30
View Certificate Details
1. Tap
> Settings > Certificates.
2. Tap either the Personal or the Root tab, depending on the type of
certificate to view.
3. Tap the certificate whose details you want to view.
See Also: About Certificates
Manage Personal Certificates
Manage Root Certificates
Input
Tap
> Settings > Personal tab > Input.
On the Input Method tab, select an input method and change desired
options.
On the Word Completion tab, select desired options for word
completion.
On the Options tab, select desired options for writing and recording
(your device may not support recording). These options apply to any
program on the device where you can record or write. These options do
not apply to text you enter using the input panel.
You can also change input options by tapping the
arrow and
then Options.
See Also: Entering Information
3-31
Menus
Tap
> Settings > Personal tab > Menus.
On the Start Menu tab, select the programs to appear under
.
On the New Menu tab, you can select Turn on New button menu and
then select the items to appear on the menu. When you do this, an
arrow appears next to New in the command bar of certain programs
such as Pocket Word, Pocket Excel, Contacts, Calendar, and Tasks.
You can tap this arrow and then tap a new item to create.
You can create subfolders and shortcuts to appear under
. In
ActiveSync on the PC, click Explore. Double-click My Pocket PC,
click Windows, click Start Menu, and then create the folders and
shortcuts that you want.
Owner Information
Tap
> Settings > Personal tab > Owner Information.
On the Identification tab, enter your personal information. Select
Show information when device is turned on so that if you lose your
device, it can be returned to you.
On the Notes tab, enter any additional text you want to display when
the device is turned on, such as: Reward if found.
3-32
Password
Tap
> Settings > Personal tab > Password.
Select the type of password you would like to use. A strong password
must have at least 7 characters that are a combination of uppercase
and lowercase letters, numerals, and punctuation.
Enter the password and, if necessary, confirm the password.
Select how long your mobile device must be turned off before the
password is required for using the device.
If your device is configured to connect to a network, use a strong
password to help protect network security. Password cracking tools
continue to improve and the computers used to crack passwords are
more powerful than ever.
If you forget your password, you must follow the directions in your
owner's manual to clear memory before you can access your device.
This erases all files and data you have created and program you have
installed. If you've used ActiveSync to create a backup file, all of your
program data can be restored. For more information on creating a
backup file, see ActiveSync Help on your PC.
3-33
Sounds & Notifications
Tap
> Settings > Personal tab > Sounds & Notifications.
On the Volume tab, you can select the actions for which you want to
hear sounds. If you don't want to hear sounds, move the System
volume slider to Silent.
On the Notifications tab, you can customize how you are notified about
different events. Select the event name and then select the type of
reminder. You can select a special sound, a message, or a flashing
light.
Turning off sounds and the notification light helps conserve battery
power.
Use Phone settings to change the ring type and volume for your
phone.
Today
Tap
> Settings > Personal tab > Today.
On the Appearance tab, select the desired theme for the background.
To use your own background, select Use this picture as the
background and tap Browse to locate the desired file.
On the Items tab, select the information you want displayed on the
Today screen. To customize the information further, select an
information type, and then tap Options (not available for all information
types).
To beam a favorite theme to a friend, on the Appearance tab, select
3-34
the desired theme and tap Beam.
To delete a theme, on the Appearance tab, select the desired theme
and tap Delete.
About
The Version tab displays important device information, including the
amount of memory installed.
On the Device ID tab, you may need to change the device name if you
are unable to connect to a network because another device with the
same name is already connected.
Screen
Tap
> Settings > System tab > Screen.
When aligning the touch screen, be sure to tap the target firmly and
accurately.
You can also use hardware buttons to align the touch screen. For more
information, see your owner's manual.
For easier reading of text in programs that support ClearType, select
Enable ClearType.
Backlight
Tap
> Settings > System tab > Backlight.
You will see this setting only if your device has a backlight that can be
customized.
Using the backlight while on battery power substantially reduces battery
life.
3-35
Beam
Tap
> Settings > Connections tab > Beam.
By default your device detects incoming infrared (IR) and Bluetooth
beams and prompts you to accept them. If you do not want your device to
detect or receive beams, clear the Receive all incoming beams check
box.
If someone attempts to send you an IR beam from an older device,
you may not be prompted to accept it. In this case, before the beam is
sent from the other device, tap Receive an infrared beam at the
bottom of the Beam screen.
See Also: Beaming Information
Receiving a Bluetooth Beam
Clock
Tap
> Settings > System tab > Clock.
If you visit a particular time zone often, select it as your Visiting time
zone on the Time tab so that you can quickly see the correct date and
time.
You can use your device as a travel alarm clock by setting a wake-up
alarm on the Alarms tab. Tap the alarm icon to select the type of alarm
you want.
To change the way the date or time is displayed on your device, go to
Regional Settings.
The clock is displayed on the navigation bar. Tap the clock to see
today's date.
3-36
To switch from analog to digital clock display, tap and hold the clock.
Tap the type of display you want to see.
Contrast
This setting is not available on all devices.
Tap
> Settings > System tab > Contrast.
Turning on the backlight can also make the screen easier to read.
Memory
Tap
> Settings > System tab > Memory.
The Main tab displays the amount of memory the system has allocated
to file and data storage versus program storage. This tab also displays
the amount of memory in use versus the available memory. For
information about making memory available, see Free Memory.
The Storage Card tab displays how much memory is available on a
storage card that is inserted into your device. If you have more than one
card inserted, tap the list box and then the name of the storage card
whose information you want to view.
The Running Programs tab displays the list of currently active
programs. You can stop a program by selecting it in the list and tapping
Stop. You may need to stop a program if it becomes unstable or
program memory is low.
3-37
Power
Tap
> Settings > System tab > Power.
The Battery tab displays the amount of battery power remaining. How
long your battery power lasts depends on battery type and how you use
your device.
On the Wireless tab, you can turn your device's wireless capabilities on
and off. Select the type of wireless signal(s), and then select Wireless
signals off or Wireless signals on.
On the Advanced tab, you can select options for turning off your device
to conserve battery power. To conserve the most power, select the
option to turn off the device after 3 minutes or less.
Use the AC adapter to plug your device into external power whenever
possible, especially when using a CompactFlash card, using a modem
or other peripheral, using the device backlight, connecting to a PC, or
letting the notification light flash for extended time periods.
The type of wireless signal(s) that you select on the Wireless tab are
also turned on or off when you tap
and then tap Turn wireless on
or Turn wireless off.
Regional Settings
Tap
> Settings > System tab > Regional Settings.
On the Region tab, select your region to set the default number
formats.
3-38
To change the time display to 24 hours, tap the Time tab and choose a
time style that starts with a capital H.
To customize further, tap the tabs and select desired options. The
characteristics available are determined by the region selected on the
Region tab.
Remove Programs
Tap
> Settings > System tab > Remove Programs.
You can remove programs that you installed in storage memory only.
Programs that come with your device cannot be removed.
You can quickly return your device to the factory default configuration
by clearing all memory. All data will be lost. For instructions, see your
owner's manual.
Policy
Tap
> Settings > System tab > Policy.
To prevent employees from adding new programs, select Enable
restrictions.
3-39
4 ActiveSync
ActiveSync Help
Concepts
About Microsoft ActiveSync
How To
Connect to a PC
Set Up Remote Synchronization
Start and Stop Synchronization
About Microsoft ActiveSync
With Microsoft ActiveSync on both your PC and mobile device, you can
exchange information between a PC or server and your device. To
synchronize your device with your PC, you must install ActiveSync on the
PC. Using ActiveSync, you can:
Synchronize information between your device and PC or server so that
you have the latest information in all locations.
Change synchronization settings and synchronization schedule.
Copy files between your device and PC.
Back up and restore device information.
Add and remove programs on your device.
Once ActiveSync is installed on your PC, you will be prompted to connect
and create a partnership with your device by using a cable, cradle, or
infrared connection. During this partnership you can decide exactly which
types of information you want to synchronize with your PC and which you
want to synchronize with a server. After the partnership is created, you
can also connect your device to the PC or server using a modem or a
network (Ethernet) card.
4-40
You can synchronize information between your mobile device and a
server if your company is running Microsoft Exchange Server with
Exchange ActiveSync.
See Also: Connect to a PC
Start and Stop Synchronization
Set Up Remote Synchronization
Synchronize Automatically
With ActiveSync you can schedule automatic synchronization between
your device and a server every time an item arrives or is changed at the
server. Your device is informed of that event and synchronizes
automatically to retrieve those items, making your device always
up-to-date.
1. In ActiveSync on the device, tap Tools > Options > Mobile Schedule
tab.
2. Select one or both of the following:
o To synchronize as items arrive during peak times, select As items
arrive in the During peak times, sync list.
o To synchronize as items arrive during off-peak times, select As
items arrive in the During off-peak times, sync list.
3. When finished, tap the Server tab.
4. Tap Options.
5. Tap Device Address.
6. Enter one of the following:
o If your company has instructed you to use a pre-defined service
provider profile, select Corporate Service Provider, enter the
4-41
profile name in Service Provider Name, and enter your device
phone number, if necessary, in Device Phone Number.
o Select Device SMS Address and enter the address that identifies
your device on the network. This is the same address that other
Internet users use to send SMS messages to your device.
You can synchronize information automatically as items arrive if your
company is running Microsoft Exchange Server with Exchange
ActiveSync. To set the days and hours for peak times, tap Peak Times.
See Also: Change the synchronization schedule
Start and Stop Synchronization
Change peak times
Manage Wireless Synchronization Costs
About Microsoft ActiveSync
Change peak times
Set peak times to reflect working hours or other times when you
experience high mail volume.
1. In ActiveSync on the device, tap Tools > Options > Mobile Schedule
tab.
2. Tap Peak Times.
3. Select the days and hours you want to use as peak times.
4. Tap OK to finish.
See Also: Synchronize automatically
Start and Stop Synchronization
Manage Wireless Synchronization Costs
4-42
Manage Wireless Synchronization Costs
To manage the cost of synchronizing wirelessly from your device, you
must balance the following considerations:
Battery life
Network connection or data transfer costs
How up-to-date you want your information to be
Maximize battery life
Each time your device synchronizes, some of the stored battery power is
used. Setting up ActiveSync to synchronize frequently on a schedule or
automatically when items arrive uses more battery power than
synchronizing manually. To maximize battery life, schedule
synchronization infrequently or synchronize manually.
Minimize connection and data costs
Each time your device synchronizes wirelessly, ActiveSync connects to
your service provider network. Depending on your rate plan, each
connection may have costs associated with it. Some service providers
also charge by the amount of data that you transfer across their network.
To minimize the number of times you connect to synchronize, increase
the time between scheduled synchronizations, or set the device to
synchronize manually. To get the most data each time you synchronize,
schedule synchronization more frequently for times when, for example,
you receive more mail.
4-43
If your device is set to synchronize automatically when items arrive,
ActiveSync uses SMS messaging behind the scenes to communicate to
your device when an item has arrived. Depending on your rate plan, SMS
messages may have costs associated with them on a per-message basis
or as a monthly allotment. To reduce SMS messaging costs associated
with this feature, schedule synchronization automatically when items
arrive during times when mail volume is low.
Be more up-to-date
Keeping the information on your device always up-to-date requires more
frequent synchronization. If your priority is to stay up-to-date, recharge
your battery frequently and synchronize often. During periods of high mail
volume, you can stay up-to-date efficiently by scheduling synchronization
at frequent intervals. During periods of low mail volume, you can stay
up-to-date efficiently by scheduling synchronization automatically when
items arrive.
Contact your ISP or network service provider (such as your cellular
phone network provider) to confirm the details of your rate plan.
The power-off timer is reset each time the device synchronizes. If you
set a synchronization schedule that is more frequent than the time set
for the device to automatically power off, the device will never turn off
to save battery power.
See Also: Change the synchronization schedule
Synchronize automatically
Start and Stop Synchronization
4-44
Connect to a PC
Connect to a PC via a cable or cradle
Connect to a PC via infrared
Connect to a PC via a cable or cradle
Connect your device and PC via a cable or cradle to start synchronization.
The baud rate and/or cable type is set automatically. If you have problems
connecting, try lowering the baud rate or selecting a different type of
cable, such as USB.
1. Tap
> ActiveSync > Tools > Options > PC tab.
2. Tap Options.
3. Select Enable PC sync using this connection, and select a baud rate
or cable type. The next time your device and PC are connected, this
new setting will be used.
4. To disconnect, remove your device from the cradle or detach it from the
cable.
See Also: Connect to a PC via infrared
Synchronize remotely with a PC
Connect to a PC via infrared
1. Follow the instructions in ActiveSync Help on the PC for setting up your
PC.
2. Line up the infrared (IR) ports according to the instructions in your
owner's manual so that they are unobstructed and within a close range.
4-45
3. Initiate a connection from the device by tapping
> ActiveSync >
Tools > Connect via IR.
4. Begin synchronization on your device.
See Also: Connect to a PC via a cable or cradle
Set Up Remote Synchronization
Synchronize remotely with a PC
Synchronize remotely with a server
Change the synchronization schedule
Synchronize automatically
Change peak times
Switch from synchronizing with a server to your PC
Stop synchronizing with a server
Manage Wireless Synchronization Costs
Synchronize remotely with a PC
1. In ActiveSync on the device, tap Tools > Options > PC tab.
2. In When syncing remotely with a PC, select your computer name in
the Use this PC list.
3. Select one or both of the following:
o Select Use mobile schedule to sync with this PC if you want to
synchronize with the PC at scheduled intervals.
o Select Sync with this PC during manual sync if you want the
device to sync with this PC every time you sync manually.
4. Set up a work connection.
4-46
5. Start synchronizing your device.
For more information on the conditions that must be met on the PC
and to change synchronization options, see ActiveSync Help on the
PC.
To determine the schedule on which your device will synchronize with
the PC, view or change the synchronization schedule.
See Also: About Microsoft ActiveSync
Change the synchronization schedule
Change peak times
Start and Stop Synchronization
Manage Wireless Synchronization Costs
Synchronize remotely with a server
1. In ActiveSync on the device, tap Tools > Options > Server tab.
2. Select the types of information, such as Calendar, Contacts, or Inbox
that you want to synchronize with the server.
3. To change synchronization settings, such as the amount synchronized,
select the type of information and tap Settings. Note that there are no
synchronization settings for Contacts.
4. In Use this server, enter the name of the Microsoft Exchange server to
which you want to connect.
5. Tap Options.
6. On the Connection tab, enter your user name, password, and domain
name.
4-47
7. If items change on both your device and server, conflicts will arise
during synchronization. To change the rules for resolving, tap the
Rules tab and select desired options.
8. Set your desired synchronization schedule.
9. If you want to synchronize information automatically as items arrive, set
up automatic synchronization.
10. Set up a work connection.
11. Begin synchronization on your device.
You can also set up a connection to synchronize remotely with a
server when you first create a partnership between your mobile device
and your PC. You can synchronize information between your mobile
device and a server if your company is running Microsoft Exchange
Server with Exchange ActiveSync.
You can synchronize information automatically as items arrive only if
your company is running Microsoft Exchange Server with Exchange
ActiveSync.
See Also: About Microsoft ActiveSync
Change the synchronization schedule
Synchronize automatically
Change peak times
Start and Stop Synchronization
Manage Wireless Synchronization Costs
4-48
Change the synchronization schedule
Using ActiveSync, you can schedule synchronization of your device on
two separate schedules. Use the peak times schedule to synchronize
during working hours or other times you experience higher mail volumes.
Use the off-peak schedule to synchronize during times when you
experience lower mail volumes. When you are roaming, you can
synchronize manually to reduce roaming charges, or you can synchronize
using the mobile schedules.
1. In ActiveSync on the device, tap Tools > Options > Mobile Schedule
tab.
2. To synchronize periodically during peak times, select the frequency of
synchronization in the During peak times, sync list. For more
information about synchronizing when items arrive, see Synchronize
automatically.
3. To synchronize periodically during off-peak times, select the frequency
of synchronization in the During off-peak times, sync list.
4. To synchronize while roaming, select a frequency in the When
roaming, sync list.
The power-off timer is reset each time the device synchronizes. If you
set a synchronization schedule that is more frequent than the time set
for the device to automatically power off, the device will never turn off
to save battery power.
To set the days and hours for peak times, tap Peak Times.
See Also: Synchronize automatically
Start and Stop Synchronization
Power settings
Manage Wireless Synchronization Costs
4-49
Start and Stop Synchronization
To start synchronization, make a connection between your mobile
device and PC, and then tap Sync.
To end synchronization, tap Stop.
See Also: About Microsoft ActiveSync
Stop synchronizing with a server
Connect to a PC
Set Up Remote Synchronization
Switch from synchronizing with a server to your PC
Change the synchronization schedule
Synchronize automatically
Switch from synchronizing with a server to
synchronizing with your PC
If you no longer want to synchronize an information type between your
device and a server, you can easily switch to synchronize that information
type with your PC instead.
1. In ActiveSync on the device, tap Tools > Options > Server tab.
2. Clear the check boxes next to the information types that you no longer
want to synchronize with a server.
3. Tap OK to finish.
See Also: Stop synchronizing with a server
4-50
Stop synchronizing with a server
1. In ActiveSync on the device, tap Tools > Options > Server tab.
2. Clear the check box next to the information type that you no longer want
to synchronize with a server.
See Also: Switch from synchronizing with a server to synchronizing with
your PC
4-51
5
Calendar Help
Concepts
About Calendar
Synchronizing Calendar
Why Use Categories?
What's an All Day Event?
What's a Recurrence Pattern?
C al endar
How To
View Appointments
Create and Change
Appointments
Change Options
Use Hardware Buttons
About Calendar
Use Calendar to schedule appointments, including meetings and other
events. You can check your appointments in one of several views (Day,
Week, Month, and Agenda) and set Calendar to remind you of
appointments with a sound or other method.
Appointments for the day can be displayed on the Today screen.
If you use Outlook on your PC, you can synchronize appointments
between your device and PC.
Synchronizing Calendar
Calendar items stored on your device can be synchronized with calendar
items on your PC or Microsoft Exchange Server. (Note that you can only
synchronize information directly with an Exchange Server if your company
is running Microsoft Mobile Information Server 2002 or later.) Calendar
synchronization is automatically selected in ActiveSync.
5-52
Calendar items entered on one computer are copied to the other during
synchronization. Handwritten notes and drawings are saved as metafiles
(pictures).
For more information on synchronization, see ActiveSync Help on the PC.
Why Use Categories?
Use categories to group related tasks, contacts, and appointments. Then,
use these groupings to quickly display only the information you want. For
example, you can easily share your device with another by assigning your
appointments to a category with a special project's name. You can then
use this category to filter Calendar and only display appointments for that
project.
In Month View, the day of an appointment assigned to the Holiday
category will appear in red.
See Also: Assign a contact to a category
Assign a task to a category
Assign an appointment to a category
What's an All Day Event?
An appointment can either be a normal appointment or an all day event,
which lasts the full day or spans many days. Examples include a trade
show, a vacation, or a seminar. You can also use all day events to
schedule an annual event, such as a birthday or anniversary. In this case,
change the Status box to Free (you may need to scroll to see it) so that it
does not show time as busy in your calendar. All day events do not occupy
5-53
blocks of time in Calendar; instead, they appear in banners at the top of
the calendar.
All day events with attendees cannot be modified or created on the
device. If you create all day events with attendees on your PC, use
ActiveSync to copy such events to the device. Then, view them in
Calendar. For more information on copying files, see ActiveSync Help.
To use the device to schedule an appointment with attendees lasting
all day, set type to Normal, then adjust the date and time
appropriately.
See Also: Create an all day event
What's a Recurring Pattern?
If you have an appointment or task that you do on a regular basis, such as
a weekly team meeting or a monthly status report, enter the item once and
set a recurring pattern for it. If the default patterns in the list are not what
you need, you can create your own pattern using the wizard.
See Also: Make a task recurring
Make an appointment recurring
View Appointments
You can view appointments in one of several views (Agenda, Day, Week,
and Month). In Agenda view, upcoming appointments are displayed in
bold. To see detailed appointment information in any view, tap the
appointment. To see a list of available actions for an appointment, tap and
hold the appointment.
5-54
Tap
> Today to quickly see your appointments for the day.
Month view displays symbols to indicate the types of appointments
you have on a given day. An upward triangle indicates a morning
appointment; a downward triangle indicates an afternoon
appointment. If you have appointments in the morning and afternoon,
a solid square is displayed. If you have an all day event not marked
Free, a hollow square is displayed.
See Also: Create and Change Appointments
Create and Change Appointments
Create or change an appointment
Create an all day event
Set a reminder for an appointment
Add a note to an appointment
Make an appointment recurring
Assign an appointment to a category
Send a meeting request
Beam an appointment
Find an appointment
Delete an appointment
Create or change an appointment
To create an appointment, tap New. To select a new date from a pop-up
calendar, tap the display date. To enter or select a new time, tap the
display time. Enter the appointment details, and when finished, tap OK
to return to the calendar.
5-55
If you are working in Day view, tap the time slot for the new appointment
and then New to have the time automatically entered for you.
To change an appointment, tap it in the calendar, and then tap Edit.
Change any appointment detail by tapping it and entering the new
information.
Tap the arrows to the right of the description and location boxes to
choose from previous entries.
When entering a time, you can type military and abbreviated time
forms, such as 2300 (becomes 11:00 PM), 913pm (becomes 9:13
PM), 911 (becomes 9:11 AM), and 9p (becomes 9:00 PM).
See Also: Create an all day event
Make an appointment recurring
Set a reminder for an appointment
Create an all day event
1. Tap New.
2. Tap Type and select All Day.
To change an all day event, switch to Day or Agenda view, tap the
event listed at the top of the calendar, and then tap Edit. Change any
appointment detail by tapping it and entering the new information.
All day events with attendees cannot be modified or created on the
device. If you create all day events with attendees on your PC, use
ActiveSync to copy such events to the device. Then, view them in
Calendar. For more information on copying files, see ActiveSync Help.
5-56
To use the device to schedule an appointment with attendees lasting
all day, set type to Normal, then adjust date and time appropriately.
See Also: Delete an appointment
Make an appointment recurring
Set a reminder for an appointment
What's an All Day Event?
Set a reminder for an appointment
1. In the calendar, tap the appointment, and then tap the upper portion of
the summary screen.
2. Tap Reminder and select Remind me.
3. To change how many minutes before the appointment you are
reminded, tap the minutes displayed.
To automatically set a reminder for all new appointments, in the
calendar, tap Tools > Options and select Set reminders for new
items.
To choose how you are reminded, for example by a sound, tap
>
Settings > Personal tab > Sounds & Reminders.
See Also: Make an appointment recurring
Add a note to an appointment
You can add written or typed notes and even recordings (if your device
supports recordings) to an appointment. This is a good place for maps,
drawings, and other detailed information.
5-57
1. In the calendar, tap the appointment.
2. Tap Tap here to enter notes. For specific instructions, see Notes Help.
To edit an existing note, tap the appointment in the calendar, and then
tap the note on the summary screen.
See Also: Assign an appointment to a category
Make an appointment recurring
1. In the calendar, tap the appointment, and then tap the upper portion of
the summary screen.
2. Tap Occurs and select a pattern from the list. Or, to create a new
pattern, tap Edit pattern, and follow the steps in the wizard.
See Also: What's a Recurring Pattern?
Set a reminder for an appointment
Assign an appointment to a category
1. In the calendar, tap the appointment, and then tap Edit.
2. Tap Categories.
3. On the Select tab, select the categories that you want to assign the
appointment to.
4. To create a new category, tap the Add/Delete tab, enter the category
name, and then tap Add. The new category is automatically selected in
the Select tab.
To find an appointment assigned to a category, tap Tools >
Categories and select the type of appointment that you want
displayed. To show all appointments again, tap Tools > Categories
5-58
and clear all categories.
See Also: Find an appointment
Why Use Categories?
Send a meeting request
Use Calendar to schedule meetings with people who use Outlook or
Pocket Outlook. When attendees receive a meeting request, they can
accept or decline the meeting. If they accept, the meeting is automatically
added to their schedule. In addition, their response is sent back to you,
and your calendar is updated.
Before you can send a meeting request, you must enter e-mail addresses
in Contacts Help and set up Inbox to send and receive messages.
1. Tap New.
2. Enter the meeting information.
3. Tap Attendees (you will need to hide the input panel to see this box).
4. Select the contacts you want to invite. Only those contacts with e-mail
addresses will be displayed.
5. Select other desired options and then tap OK.
6. Inbox automatically creates a meeting request and sends it to the
attendees the next time you synchronize with your PC. Any textual
notes entered in the Notes tab (excluding writing or recordings) will be
sent also.
If you are sending the meeting request through a connection to an ISP
or the network, rather than through synchronization with your PC, tap
Tools > Options. In Send meeting requests via, tap the service you
5-59
want to use to send the meeting request.
See Also: Create or change an appointment
Beam an appointment
Beam an appointment
To beam an appointment, in the calendar list, tap and hold the
appointment. On the pop-up menu, tap Beam Appointment.
When using infrared (IR), align the IR ports according to the
instructions in your owner's manual so that they are unobstructed and
within a close range.
When using IR to receive a Beam from a previous version of Pocket
PC or the Palm-size PC, tap
> Programs > Infrared Receive.
See Also: Find an appointment
Beaming Information
Send a meeting request
Find an appointment
There are two ways to find an appointment:
Tap
> Find, enter the appointment name, select Calendar for the
type, and tap Go.
In the calendar, tap Tools > Categories and select the type of
appointment you want displayed. To show all appointments again, tap
Tools > Categories and clear all categories.
In Find, you can tap the Find arrow to select from a list of items you
5-60
have looked for before.
See Also: View Appointments
Delete an appointment
1. In the calendar, tap and hold the appointment.
2. On the pop-up menu, tap Delete Appointment.The next time you
synchronize, the appointment will be deleted from the PC also.
See Also: Find an appointment
Synchronizing Calendar
Change Options
In the calendar, tap Tools > Options.
To see appointment indicators, select icons to be displayed in Show
icons. You can choose to display indicators for such things as recurring
appointments, appointments with notes, and appointments with
reminders. Tap and hold an icon to see its name.
If you are having trouble reading the calendar, select Use large font.
You will see less appointment information.
See Also: Make an appointment recurring
Send a meeting request
Set a reminder for an appointment
5-61
6
Contacts Help
Contacts
How To
View Contacts
Concepts
About Contacts
Working with Contacts
Synchronizing Contacts
Change Options
Why Use Categories?
About Contacts
Contacts maintains a list of your friends and colleagues so that you can
easily find the information you're looking for, whether you're at home or on
the road. You can enter both personal and business information.
If you use Outlook on your PC, you can synchronize contacts between
your device and PC.
See Also: Working with Contacts
View Contacts
Synchronizing Contacts
Contacts stored on your device can be synchronized with Outlook
contacts stored on your PC or with Mobile Information Server 2002 or
later.
New items entered in one location are copied to the other during
synchronization. Handwritten notes and drawings are saved as pictures
when synchronizing with your PC, but are removed when synchronizing
with a server.
6-62
For more information on synchronization, see ActiveSync Help on the PC.
Why Use Categories?
Use categories to group related contacts, tasks, and appointments. Then,
use these groupings to quickly display only the information you want. For
example, you can assign work-related contacts to the Business category
and personal contacts to the Personal category. You can then use these
categories to filter your contacts, tasks, and appointments and quickly find
the information you are looking for.
You can also create your own categories, such as Vacation Planning to
group your trip planning tasks, and Family to group your relatives' contact
information.
See Also: Assign an appointment to a category
Assign a contact to a category
Assign a task to a category
View Contacts
The contact list displays the contact name and the first primary phone
number or e-mail address specified for that contact. Contacts are ordered
by name of contact or company.
Tap letters, such as h (home), w (work), or m (mobile) to the right of the
contact to see additional phone numbers and e-mail addresses.
Select a contact and press the Left/Right controls to change the default
number, displayed as a letter to the right of the contact name.
To see more contact information, tap the contact.
To see a list of available actions for a contact, tap and hold the contact.
6-63
To see a list of contacts employed by a specific company, tap View >
By Company. Then, tap the desired company name.
You can change the appearance of the contact list by tapping Tools >
Options.
See Also: Working with Contacts
Why Use Categories?
Working with Contacts
Create or change a contact
Add a note to a contact
Assign a contact to a category
Copy a contact
Send a message to a contact
Beam a contact
Find a contact
Delete a contact
Create or change a contact
To create a contact, tap New. To enter notes, tap the Notes tab. When
finished, tap OK to return to the contact list.
To change a contact, tap it in the contact list, and then tap Edit. To
cancel edits, tap Edit > Undo. When finished making changes, tap OK
to return to the contact list.
If you enter a name with more than 2 words, the middle word will be
recorded as a middle name. If your contact has a double first or last
6-64
name, tap the Name arrow and enter the names in the proper box.
New contacts are added to the category that is currently displayed.
See Also: Add a note to a contact
Assign a contact to a category
Delete a contact
Add a note to a contact
You can add written or typed notes and even recordings (if your device
supports recordings) to a contact. Notes are handy for maps and
drawings.
1. In the contact list, tap the contact.
2. Tap the Notes tab. For specific instructions, see Notes Help.
See Also: Assign a contact to a category
Assign a contact to a category
1. In the contact list, tap the contact, and then tap Edit.
2. Scroll to and tap Categories.
3. Select the categories that you want to assign the contact to.
4. To create a new category, tap the Add/Delete tab, enter the category
name, and then tap Add. The new category is automatically selected in
the Select tab.
See Also: Find a contact
Why Use Categories?
6-65
Copy a contact
1. In the contact list, select the contact. To select multiple contacts, tap
and drag.
2. Tap Tools, and then Copy Contacts.
See Also: Create or change a contact
Send a message to a contact
1. In the contact list, tap and hold the contact. To select multiple contacts,
tap and drag. Then, tap and hold the selected contacts.
2. On the pop-up menu, tap Send E-mail or Send SMS, depending upon
the type of message to send.
To send an e-mail message, you must have an e-mail address
configured for the contact. To send an SMS message, you must have
an SMS number for the contact, which is usually the mobile phone
number.
See Also: Find a contact
Beam a contact
Beam a contact
To beam a contact, in the contact list, tap and hold the contact. On the
pop-up menu, tap Beam Contact.
To beam multiple contacts, tap and drag to select the contacts. Then,
tap Tools > Beam Contacts.
When using infrared (IR), align the IR ports according to the
instructions in your owner's manual so that they are unobstructed and
within a close range.
6-66
When using IR to receive a beam from Pocket PC 2000 or Palm-size
PC, tap
> Programs > Beam Receive.
See Also: Find a contact
Beam Information
Send a message to a contact
Find a contact
There are four ways to find a contact:
Tap
> Find, enter the contact name (first, last, or middle), phone
number, or address, select Contacts for the type, and then tap Go.
From Contacts, start typing a contact name until you see it displayed on
the screen. To show all contacts again, tap the text box at the top of the
screen and clear the text, or tap the arrow icon to the right of the text
box.
In the contact list, tap the category list (labeled All Contacts by default)
and tap the category to which you've assigned a contact. To show all
contacts again, select All Contacts.
To view the names of companies your contacts work for, in the contact
list, tap View > By Company. The number of contacts that work for that
company will be displayed to the right of the company name.
To quickly move through a long list of contacts, tap one of the sets of
letters displayed at the top of the contact list. This takes you to the
contact names beginning with those letters.
See Also: View Contacts
6-67
Delete a contact
1. In the contact list, tap and hold the contact. To select multiple contacts,
tap and drag. Then, tap and hold the selected contacts.
2. On the pop-up menu, tap Delete Contact.
The next time you synchronize, the contact will be deleted from the PC
also.
See Also: Create or change a contact
Find a contact
Synchronizing Contacts
Change Options
In the contact list, tap Tools > Options.
The area code and country/region for new contacts are automatically
entered based on the information in Country/Region settings.
If you are having trouble reading the contacts in the contact list, select
Use large font.
To increase the available space for displaying contacts in the list, clear
Show ABC tabs.
6-68
7 Tasks
Tasks Help
Concepts
How To
View Tasks
About Tasks
Create and Change Tasks
Synchronizing Tasks
Change Options
Why Use Categories?
About Tasks
Use Tasks to keep track of things you need to do. You can use categories to
help you organize your tasks and set reminders for them.
A variety of task information can be displayed on the Today screen.
If you use Outlook on your PC, you can synchronize tasks between your
device and PC.
Synchronizing Tasks
Tasks stored on your device can be synchronized with Outlook on your PC.
Task synchronization is automatically selected in ActiveSync.
New items entered on one computer are copied to the other during
synchronization. Handwritten notes and drawings are saved as metafiles
(pictures).
For more information on synchronization, see ActiveSync Help on the PC.
7-69
Why Use Categories?
Use categories to group related tasks, contacts, and appointments. Then,
use these groupings to quickly display only the information you want. For
example, you can assign work-related tasks to the "Business" category and
personal items to the "Personal" category. You can then use these categories
to filter your tasks, contacts, and appointments and quickly find the
information you are looking for.
You can also create your own categories, such as "Vacation Planning" to
group your trip planning tasks, and "Family" to group your relatives' contact
information.
See Also: Assign an appointment to a category
Assign a contact to a category
Assign a task to a category
View Tasks
The task list displays a list of your tasks. Overdue tasks are displayed in bold
(and in red on color devices). If you have a long list of tasks, tap the sort list
(labeled Priority by default) and select the option you want to sort on. To see
more task information, tap the task. To see a list of available actions for a
task, tap and hold the task. When you complete a task, tap the check box next
to it.
Tap
> Today to quickly see the number of active tasks you have.
See Also: Create and Change Tasks
Today screen
7-70
Create and Change Tasks
Create or change a task
Set a reminder for a task
Add a note to a task
Make a task recurring
Assign a task to a category
Copy a task
Beam a task
Find a task
Complete or delete a task
Create or change a task
To quickly create a task, enter text in the Tap here to add a new task box
at the top of the screen. If you don't see this box, tap Tools > Entry Bar.
To create a task with detailed information, such as start and due dates, tap
New. To enter notes, tap the Notes tab. When finished, tap OK to return to
the task list.
To change a task, tap it in the task list, and then tap Edit.
New tasks are added to the category that is currently displayed.
Tap the Subject arrow in the task details to choose from previous
entries.
See Also: Add a note to a task
Assign a task to a category
Set a reminder for a task
Set a reminder for a task
1. In the task list, tap the task, and then tap Edit.
7-71
2. Tap the Due box and set a due date if you have not already done so.
3. Tap the Reminder box and select Remind me. You will be reminded at
8:00 in the morning on the due date.
4. To change the reminder date, tap the date displayed.
To be automatically reminded of new tasks with a due date, in the task
list, tap Tools > Options and select Set reminders for new items.
To choose how you are reminded, for example by a sound, tap
>
Settings > Personal tab > Sounds & Notifications.
See Also: Make a task recurring
Add a note to a task
You can add written or typed notes and even recordings (if your device
supports recordings) to a task. Notes are handy for maps and drawings.
1. In the task list, tap the task.
2. Tap Edit > Notes tab. For specific instructions, see Notes Help.
To edit an existing note, tap the task in the task list, and then tap the note
on the summary screen.
See Also: Assign a task to a category
7-72
Make a task recurring
1. In the task list, tap the task, and then tap the upper portion of the summary
screen.
2. Tap Occurs and select a pattern from the list. Or, to create a new pattern,
tap Edit pattern, and follow the steps in the wizard.
See Also: Set a reminder for a task
Assign a task to a category
1. In the task list, tap the task, and then tap Edit.
2. Tap Categories.
3. Select the categories that you want to assign the task to.
4. To create a new category, tap the Add/Delete tab, enter the category
name, and then tap Add. The new category is automatically selected in the
Select tab.
To view a task not assigned to a category, on the task list, tap the
category list (labeled All Contacts by default) and select No
Categories.
See Also: Find a task
Why Use Categories?
Copy a task
1. In the task list, tap and hold the task. To select multiple tasks, tap and drag.
Then, tap and hold the selected tasks.
2. On the pop-up menu, tap Create Copy.
See Also: Create or change a task
7-73
Beam a Task
To beam a task, in the task list, tap and hold the task. On the pop-up menu,
tap Beam Task.
When using infrared (IR), align the IR ports according to the instructions
in your owner's manual so that they are unobstructed and within a close
range.
When using IR to receive a Beam from a previous version of Pocket PC
or the Palm-size PC, tap
> Programs > Infrared Receive.
See Also: Find a task
Beaming Information
Find a task
There are two ways to find a task:
Tap
> Find, enter the task name, select Tasks for the type, and then
tap Go.
In the task list, tap the category list (labeled All Categories by default), and
select the type of task you want displayed. To show all tasks again, select
All Categories. To view a task not assigned to a category, select None.
In Find, you can tap the Find arrow to select from a list of items you have
already looked for.
See Also: View Tasks
7-74
Complete or delete a task
To mark a task completed, in the task list, tap the check box next to the
completed task.
To delete a task, in the task list, tap and hold the task. To select multiple
tasks, tap and drag. Then, tap and hold the selected tasks. On the pop-up
menu, tap Delete Task. The next time you synchronize, the task will be
deleted from the PC also.
See Also: Find a task
Synchronizing Tasks
Change Options
In the task list, tap Tools > Options.
To see the start and due dates for a task in the task list, select Show start
and due date.
If you are having trouble reading the tasks in the task list, select Use large
font. You will see fewer tasks.
See Also: Make a task recurring
Set a reminder for a task
7-75
8 Notes
Notes Help
Concepts
How To
View Notes
About Notes
Create and Change Notes
Synchronizing Notes
Customize Notes
Entering Information in Notes
About Converting Writing to
Text
About Notes
Notes helps you quickly capture your ideas, notes, and thoughts. You can
create a note using written and typed text, drawings, and recordings. You can
also share your notes with others through e-mail, infrared, and
synchronization with your PC.
To create documents with advanced formatting or templates, such as
bulleted lists and tabs, use word processing software developed for your
device, such as Pocket Word.
Synchronizing Notes
Notes can be synchronized between your PC and device either through notes
synchronization or file synchronization. Notes synchronization synchronizes
the notes on your device with Outlook Notes on your PC. File synchronization
synchronizes all notes on your device with the device name My Documents
folder on your PC.
8-76
To synchronize your notes through notes synchronization, first select the
Notes information type for synchronization in ActiveSync. The next time you
synchronize, all notes in My Documents and its subfolder on your device will
appear in Outlook Notes on your PC. Notes that contain only text will appear
as regular notes in Outlook on your PC, while notes containing written text or
drawings will appear in the device format. In addition, all notes in the Notes
group in Outlook on the PC will appear in Notes on the device.
To synchronize your notes as files, in ActiveSync, select the Files information
type for synchronization and clear the Notes information type. When you
select Files, the device name My Documents folder is created on your PC's
desktop. All .pwi files placed in the My Documents folder on your device and
all .doc files placed in the device name My Documents folder on your PC will
be synchronized. Password-protected files cannot be synchronized.
ActiveSync converts documents during synchronization. For more
information on synchronization or file conversion, see ActiveSync Help on the
PC.
When you delete or change an item on either your PC or device, the item
is changed or deleted in the other location the next time you synchronize.
If you synchronize your notes using file synchronization and then later
decide to use notes synchronization, all of your notes will be
synchronized with Outlook on your PC and will no longer be stored in the
device name My Documents folder.
Entering Information in Notes
There are several ways to enter information into a note.
Typing. Using the input panel, enter typed text into the device. You can do
this by tapping keys on the soft keyboard or by using handwriting
recognition software.
8-77
Writing. Using the stylus, write directly on the screen.
Drawing. Using the stylus, draw directly on the screen.
Recording. Create a stand-alone recording or embed a recording into a
note.
See Also: Create and Change Notes
About Converting Writing to Text
You can convert words you write in print or cursive to text by tapping Tools >
Recognize. If a word is not recognized, it is left in its written form.
If the conversion is incorrect, you can choose different words from a list of
alternates or return to the original writing.
Tips for getting good recognition:
Write on the lines and draw descenders below the line. Write the cross of
the "t" and apostrophes below the top line so that they are not confused
with the word above. Write periods and commas above the baseline.
For better recognition, try increasing the zoom level to 300% by using the
Tools menu. Recognition will not work well below a 150% zoom level.
Write the letters of a word closely and leave big gaps between words so
that the device can easily tell where words begin and end.
Hyphenated words, foreign words that use special characters such as
accents, and some punctuation cannot be converted.
See Also: Convert written words to text
View Notes
The note list displays a list of your notes and recordings. If you have a long
list, tap the sort list (labeled Name by default), and select the option you want
to sort on. To open a note or play a recording, tap it. To see a list of available
actions for a note or recording, tap and hold the note or recording.
8-78
See Also: Create and Change Notes
Create and Change Notes
Create or change a note
Create a recording
Create a template
Create a note by using a template
Convert written words to text
Rename or move an item
Find a note
Delete a note
Copy a note
Send a note via e-mail
Beam a note
Create or change a note
To create a note, tap New.
To enter typed text, tap
and enter your text. To select text, drag
across it.
To write, tap
and use the stylus like a pen. To select writing, tap and
hold next to the writing you want to select, and when you see the insertion
point appear, drag across the writing.
To draw, tap
and use the stylus like a pen to draw a picture that
crosses at least three ruled lines. A selection box labeled Drawing appears
8-79
around your picture. To select a drawing, tap and hold the drawing briefly.
When you lift the stylus, the drawing is selected.
To add a recording, see Create a recording.
When finished, tap OK to return to the note list.
You can insert the date in a note. First, deselect
and make sure that
no drawings are selected. Next, tap and hold anywhere on the note and
then tap Insert Date.
See Also: Delete a note
Rename or move an item
View Notes
Create a recording
You can create a stand-alone recording, or you can add a recording to an
existing note. To add a recording to a note, open the note before recording.
1. If you do not see the Record/Playback toolbar, tap
.
2. Hold your mobile device's microphone near your mouth or other source of
sound.
3. Tap
and make your recording.
4. Tap
when finished. If you are recording in an open note, an icon will
appear in the note. If you are creating a stand-alone recording, it will
appear in the note list.
5. To play a recording, tap the recording icon in the open note or tap the
recording in the note list.
To quickly create a recording, hold down the Record hardware button.
8-80
When you hear the beep, begin your recording. Release the button when
you are finished. The new recording is stored in the open note or as a
stand-alone recording if no note is open.
See Also: Create or change a note
Create a template
1. Create a note as you normally would.
2. In the note list, tap and hold the note.
3. On the pop-up menu, tap Rename/Move.
4. In Folder, select Templates. The template is stored in the Templates
folder under the All Folders list.
See Also: Create or change a note
Create a note by using a template
1. Tap the folder list (labeled All Folders by default) and then Templates.
2. Tap the template you want to use and make your changes.
3. Close the note.
4. In the notes list, tap and hold the note and tap Rename/Move. Enter a new
name and location for the note.
See Also: Create or change a note
Convert written words to text
1. Tap to move the cursor to the writing you want to convert. Drag across the
writing.
2. Tap and hold the selected text and tap Recognize, or tap Tools >
Recognize. The selected writing is converted to text.
8-81
3. If the conversion is inaccurate, tap and hold the inaccurate word, and tap
Alternates on the pop-up menu. Tap the word you want in the alternates
list. If you don't find a suitable alternative, backspace and retype the word.
To quickly convert all writing in a note to text, make sure that nothing is
selected, and then tap Tools > Recognize.
See Also: About Converting Writing to Text
Create or change a note
Rename or move an item
1. In the note or document list, tap and hold the item you want to rename or
move. To select multiple notes or recordings, tap and drag. Then, tap and
hold the selected items.
2. On the pop-up menu, tap Rename/Move.
To create a new folder, in the note or document list, tap the folder list
(labeled All Folders by default), and then tap Add/Delete.
If you want to store the item on a storage card, insert the card into your
device and select Storage Card from the Location list. A
is
displayed next to the file's name to indicate the file is saved on a storage
card.
See Also: Delete a note
Find a note
There are two ways to find a note:
In the note list, tap the folder list (labeled All Folders by default) and select
the folder you want displayed. To show all folders again, select All
Folders.
8-82
Tap
> Find, enter the note or recording name, select Notes for the
type, and then tap Go.
In Find, you can tap the Find arrow to choose from a list of items you
have already looked for.
See Also: View Notes
Delete a note
1. In the note list, tap and hold the note or recording. To select multiple notes
or recordings, tap and drag. Then, tap and hold the selected items.
2. On the pop-up menu, tap Delete. The next time you synchronize, the note
or recording will be deleted from the PC also.
See Also: Display a subset of notes
Synchronizing Notes
Copy a note
1. In the note list, tap and hold the note or recording.
2. On the pop-up menu, tap Create Copy.
See Also: Create or change a note
Send a note via e-mail
1. If you haven't already set up Inbox to send and receive messages, do so
now.
2. In the note list, tap and hold the note or recording. To select multiple notes
or recordings, tap and drag. Then, tap and hold the selected items.
3. On the pop-up menu, tap Send via E-mail. A new message is created with
the item attached.
See Also: Find a note
Beam a note
8-83
Beam a note
To beam a note, in the note list, tap and hold the note. On the pop-up menu,
tap Beam File.
When using infrared (IR), align the IR ports according to the instructions
in your owner's manual so that they are unobstructed and within a close
range.
When using IR to receive a Beam from a previous version of Pocket PC
or the Palm-size PC, tap
See Also: Find a note
Beaming Information
Customize Notes
Display a subset of notes
Add, delete, or rename a folder
Change options
Change recording formats
8-84
> Programs > Infrared Receive.
Display a subset of notes
You can quickly find a note or recording by filtering the list.
1. In the note list, tap the folder list (labeled All Folders by default).
2. Select the folder you want displayed.
To show all items again, select All Folders.
See Also: Add, delete, or rename a folder
Rename or move an item
Add, delete, or rename a folder
In the note list, tap the folder list (labeled All Folders by default), and then tap
Add/Delete.
To add a folder, tap New.
To delete a folder, tap the folder and then Delete.
To rename a folder, tap the folder and then Rename.
See Also: Rename or move an item
Change options
In the note list, tap Tools > Options.
From the Default template list, you can select a predesigned template to
use with all new notes.
If you store most of your notes and recordings on a storage card, in Save to,
tap Storage card to have new items automatically stored on your storage
card.
See Also: Change recording formats
Create or change a note
Change recording formats
In the note list, tap Tools > Options > Global Input Options link (at the
bottom of the page).
8-85
Mobile Voice is a 2.4 KB audio codec (compressor decompressor). It is the
recommended format because it provides good voice recording and takes
far less storage space than PCM.
Pulse Code Modulation (PCM) provides slightly better sound quality.
However, PCM recordings may take up to 50 times more storage space
than Mobile Voice recordings. PCM cannot be used to create recordings
that are embedded in notes.
See Also: Change options
8-86
9 Pocket Word
Pocket Word Help
How To
Create and Open
Concepts
About Pocket Word
Documents
Entering Information in Pocket Word
Work in Typing Mode
Synchronizing Pocket Word
Work in Writing Mode
Documents
Work in Drawing Mode
Document Conversion
Work with Documents
On-device Conversion Changes
Change Options
About Pocket Word
You can create and edit documents and templates in Microsoft Pocket Word
just as you do in Microsoft Word on your PC. Pocket Word documents are
usually saved as .psw files, but you can also save them in other file formats,
such as .doc, .rtf or .txt.
You can enter information in a document by typing, writing, drawing, or
recording. When you close a document, it is automatically named and placed
in the Pocket Word document list.
See Also: Entering Information in Pocket Word
Work with Documents
9-87
Entering Information in Pocket Word
You can enter information by working in different modes, which you select
from the View menu. For each mode, display the toolbar for that mode by
tapping
.
Typing. Using the input panel, enter typed text into the document. You can
do this by tapping keys on the soft keyboard or by using handwriting
recognition software.
Writing. Use your stylus to write directly on the screen. Lines are displayed
as a guide.
Drawing. Use your stylus to draw directly on the screen. A drawing box
appears, indicating a single object.
Recording. Embed a recording in a document by speaking into the device
microphone.
See Also: Create a recording
Work in Drawing Mode
Work in Typing Mode
Work in Writing Mode
Synchronizing Pocket Word Documents
Pocket Word documents can be synchronized with Word documents on your
PC. To synchronize files, first select the Files information type for
synchronization in ActiveSync. When you select Files, the device name My
Documents folder is created on your PC's desktop. Place all files you want to
synchronize with the device in this folder. Password-protected files cannot be
synchronized.
9-88
All Pocket Word files stored in My Documents and its subfolders are
synchronized with the PC. ActiveSync converts documents during
synchronization.
For more information on synchronization or file conversion, see ActiveSync
Help on the PC.
When you delete a file on either your PC or your device, the file is
deleted in the other location the next time you synchronize.
See Also: Document Conversion
Document Conversion
Word documents (.doc) and templates (.dot) created in Word 6.0 or later on
the PC are converted to Pocket Word documents (.psw) and templates
(.psw):
During file synchronization.
When you copy a Word file from the PC to your device.
When you open an e-mail message with an attached Word file on your
device.
Pocket Word documents are converted to Word documents when they're
synchronized or copied back to the PC. During conversion from Word to
Pocket Word, most simple text and paragraph formatting are retained and
displayed, although some formatting attributes may be changed or lost. For
more information, see ActiveSync Help on the PC.
See Also: On-device Conversion Changes
Create and Open Documents
Create a document
Open an existing document
9-89
Create a document
In Pocket Word, tap New.
You'll see either a blank document or a template, depending on what you've
selected in the Options dialog box. Select an input mode from the View
menu.
To check spelling, select text, tap Tools > Spell Check.
To use your new document as a template, move the document to the
Templates folder.
You can insert the date in a document. First, deselect
and make sure
that no drawings are selected. Next, tap and hold anywhere on the
document, and then tap Insert Date.
See Also: Change Options
Save, rename, move, and delete documents
Select written words
Work with Documents
Open an existing document
In the document list, tap the document you want to open. If you don't see the
document in the list, make sure you've chosen the correct folder in the folder
list (labeled All Folders by default).
9-90
You can have only one document open at a time. When you open a
second document, the first one is saved and closed automatically.
If you're opening a Word document that was created on a PC, you may
want to select View > Wrap to Window so that you can see the entire
document.
See Also: View the document list
Work in Typing Mode
Type using the input panel
Find/replace text
Format typed text
Adjust paragraph format
Type using the input panel
1. Tap View > Typing.
The input panel is displayed.
2. Enter text on the screen, using either the soft keyboard, Character
Recognizer, or other available input method. Tap
to switch between
the input methods.
To display the toolbar, tap
.
See Also: Adjust paragraph format
Format typed text
9-91
Find/replace text
1. Tap Edit > Find/Replace.
2. Enter the text you want to find and tap Find. If you're replacing text, tap
Replace and enter the replacement text.
For a paragraph, enter ^p. For a tab stop, enter ^t.
3. Select the appropriate options.
4. Tap Find.
Pocket Word selects the first instance of the text in the document and
displays buttons that allow you to find the next instance or replace the text,
as desired.
Format typed text
To display the typing toolbar, in typing mode, tap
. Quickly change the
appearance of selected text or new text by tapping buttons on the toolbar.
Tap the appropriate button to bold, underline, or italicize text.
For additional formatting options, such as font size and color, tap
See Also: Adjust paragraph format
Edit objects
Format written words
9-92
.
Adjust paragraph format
Change the appearance of selected paragraphs or new paragraphs:
To create bulleted lists, tap the appropriate button on the typing toolbar and
press ENTER to create a new bulleted item. Select the button again to end
bulleted formatting.
To switch between left, center, and right paragraph alignment, tap the
appropriate button on the typing toolbar.
To change paragraph indentation, tap Edit > Paragraph. For each type of
indentation, tap the left or right arrow to change the indentation by .1"
increments.
See Also: Format typed text
Work in Writing Mode
Write using the stylus
Select written words
Format written words
Convert written words to text
Write using the stylus
1. Tap View > Writing.
Ruled lines appear as guides on the screen, and the zoom percentage
changes to make it easier to read.
2. Using the stylus, write on the screen.
If you cross three ruled lines in a single stylus stroke, the writing
becomes a drawing. Every stroke within the drawing box becomes part
of the drawing.
See Also: Format written words
Select written words
9-93
Select written words
There are two ways to select written words:
Tap and hold next to the writing you want to select, and when you see the
insertion point appear, drag across the writing.
In writing mode, tap
to display the writing toolbar. Deselect
and
drag the stylus across the written words you want to edit or format.
See Also: Format written words
Write using the stylus
Format written words
Use the writing toolbar (tap
if you don't see it) to make selected written
words bold, italic, or underlined, just as you do typed text. In addition, you can
do the following:
To change the line weight and color, tap
To add space between written words, tap
.
. Then, tap and drag the
stylus to show where you want to add space. A preview arrow gives an
indication of the amount of space that will be added.
See Also: Select written words
Write using the stylus
Convert written words to text
1. Select the writing you want to convert by tapping and holding next to the
writing. When you see the insertion point appear, drag across the writing.
9-94
2. Tap and hold the selected writing. On the pop-up menu, tap Recognize. If
you do not see the pop-up menu, tap Tools > Recognize. The selected
writing is converted to text.
3. If the conversion is inaccurate, tap and hold the inaccurate word and tap
Alternates on the pop-up menu. Tap a word in the alternates list to select it.
If you do not see a word you want to use, delete the selected word and
retype it.
To quickly convert all writing in a document to text, make sure that
nothing is selected, and then tap Tools > Recognize.
See Also: Create or change a note
Work in Drawing Mode
Draw using the stylus
Select objects
Edit objects
Draw using the stylus
1. Tap View > Drawing.
Gridlines appear as guides on the screen, and the zoom percentage
changes to make it easier to draw.
2. Using the stylus, draw on the screen.
To display the drawing toolbar, tap
.
See Also: Select objects
Edit objects
9-95
Select objects
There are two ways to select objects:
Tap and hold the object until you see the selection handles appear. You
can drag the object to another location or tap and hold it to see a pop-up
menu of actions.
In drawing mode, tap
to display the drawing toolbar. Deselect
and drag the stylus across the objects you want to edit or format.
To align selected objects, tap
, and then tap an alignment option.
See Also: Edit objects
Edit objects
You can change the appearance of a selected object in the following ways:
Resize the object by dragging a selection handle.
Convert the object to a specific shape by tapping and holding the selected
object and then tapping Shape on the pop-up menu.
Change the line weight, fill color, or line color by tapping the appropriate
button on the toolbar (tap
if you don't see the toolbar).
To change the default format options, tap
See Also: Select objects
Work with Documents
View the document list
Save, rename, move, and delete documents
9-96
.
Beam a document
Send a document via e-mail
View the document list
The document list displays all Pocket Word documents stored on your device.
You'll see the list whenever you switch to Pocket Word and whenever you
close a Pocket Word document. You can specify how the documents are
displayed:
Sort the list by name, date, size, or type. Tap the sort list (labeled Name by
default), and then tap the sort option.
Display only the contents of a specified folder. Tap the folder list (labeled
All Folders by default) and then tap the folder name.
See Also: Change Options
Save, rename, move, and delete documents
When you create a new document, the information you enter is saved
automatically and named according to the first characters of text entered in
the document. In an open document, you can:
Save a copy of the document. Tap Tools > Save Document As.
Rename the document. Tap Edit > Rename/Move. In the Name box, type
the new name.
Move the document to a storage card or folder. Tap Edit > Rename/Move.
Select the appropriate folder or location. A
is displayed next to the file's
name to indicate the file is saved on a storage card.
Delete the document. Tap Tools > Delete Document.
To move or delete multiple documents, in the document list, tap and drag
to select the documents. Then, tap and hold the selected documents. On
the pop-up menu, tap Rename/Move or Delete.
9-97
See Also: View the document list
Beam a document
To beam a document, in the document list, tap and hold the document. On
the pop-up menu, tap Beam File.
When using infrared (IR), align the IR ports according to the instructions
in your owner's manual so that they are unobstructed and within a close
range.
When using IR to receive a Beam from a previous version of Pocket PC
or the Palm-size PC, tap
> Programs > Infrared Receive.
See Also: Beaming Information
View the document list
Send a document via e-mail
You can send a document as an e-mail attachment in Inbox.
1. In the document list, tap and hold the document.
2. On the pop-up menu, tap Send via E-mail.
An e-mail message in Inbox is displayed, with the document included as an
attachment. The message can then be sent during synchronization or
through a connection to an Internet service provider.
See Also: View the document list
On-device Conversion Changes
When you synchronize files or copy files between your device and PC,
ActiveSync on your PC converts the files so that they can be read. However,
when a Word document arrives on the device, for example in an e-mail
9-98
attachment, the device converts the document to a Pocket Word document.
Note the following regarding these on-device conversion changes:
Borders and shading. Not displayed in Pocket Word but are restored
when converted back to a Word document. Shading is not restored when
used in a table, but simple borders are restored.
Character formatting. Bold, italic, strikethrough, superscript, subscript,
and hidden text are retained and displayed. Other effects are changed or
removed.
Colors. Retained and mapped to colors available on your device.
Fonts and font sizes. Fonts not supported by your mobile device are
mapped to the closest font available. The original font will be listed on your
device. When converted back to Word, the data is displayed in the original
font.
Page formatting, headers, footers. Footnotes, columns, page setup
information, and style sheets are removed during conversion to Pocket
Word. Pocket Word supports built-in headings.
Paragraph formatting. Tabs, alignment, bullets, indentation, simple
numbered lists, and paragraph spacing are retained and displayed in
Pocket Word.
Pictures. Removed during conversion.
Table of Contents. Text and some formatting are preserved. However,
any text set at right-aligned tab stops may wrap to the next line.
Index. Text and some formatting are preserved.
Tables. Table formatting is removed, but text is preserved.
OLE objects. Removed during conversion.
Revision marks, annotations, comments. Revision marks are visible but
cannot be changed. Annotations and comments are removed during
conversion.
9-99
See Also: Document Conversion
Change Options
To change defaults for creating and storing Pocket Word documents, in the
document list, tap Tools > Options.
Select a template to be used for new documents. You can change this
default when creating specific documents. Only documents saved in the
Templates folder are listed.
Select a location for storing documents. You can choose between main
memory and a storage card, if you have one installed.
Select the type of documents you want displayed in the document list.
See Also: Document Conversion
Work with Documents
9-100
10 Pocket Excel
Pocket Excel Help
How To
Concepts
Create and Open Workbooks
About Pocket Excel
Enter and Locate Data
Entering Data in Pocket
Edit and Format Data
Excel
Work with Formulas and
Synchronizing Pocket Excel
Functions
Workbooks
Work with Rows and Columns
Workbook Conversion
Work with Workbooks and
On-device Conversion
Worksheets
Changes
Change Options
About Pocket Excel
You can create and edit workbooks and templates in Microsoft Pocket Excel
just as you do in Microsoft Excel on your PC. Pocket Excel workbooks are
usually saved as .pxl files, but you can also save them in .xls format.
When you close a workbook, it is automatically named and placed in the
Pocket Excel workbook list. You can attach a password to a workbook to help
ensure privacy.
See Also: Enter and Locate Data
10-101
Entering Data in Pocket Excel
You can use Pocket Excel much the same way you use Excel on your PC.
You can enter formulas and functions, and then filter data to see the subset of
information you want. Split panes to view different parts of a worksheet at the
same time. You can also freeze the top and left-most panes in a worksheet to
keep row and column labels or other data visible as you scroll through a
sheet.
Work in full-screen mode to see as much of your workbook as possible.
Tap View > Zoom and select a percentage so that you can easily read
the worksheet.
Synchronizing Pocket Excel Workbooks
Pocket Excel workbooks can be synchronized with Excel workbooks on your
PC. To synchronize files, first select the Files information type for
synchronization in ActiveSync. When you select Files, the devicename My
Documents folder is created on your PC's desktop. Place all files you want to
synchronize with the device in this folder. Password-protected files cannot be
synchronized.
All Pocket Excel files stored in My Documents and its subfolders are
synchronized with the PC. ActiveSync converts workbooks during
synchronization.
For more information on synchronization or file conversion, see ActiveSync
Help on the PC.
When you delete a file on either your PC or your device, the file is
deleted in the other location the next time you synchronize.
See Also: Workbook Conversion
10-102
Workbook Conversion
Excel files (.xls) and templates (.xlt) created in Excel version 5.0/95 or later on
the PC are converted to Pocket Excel workbook (.pxl) or template (.pxt) files:
During file synchronization.
When you copy an Excel file to your device from the desktop.
When you open an e-mail message with an Excel file as an attachment.
Pocket Excel workbooks are converted to Excel workbooks when they're
synchronized or copied to the PC.
During conversion, some formatting attributes may be changed or lost. For
more information, see ActiveSync Help on the PC.
See Also: On-device Conversion Changes
Create and Open Workbooks
Create a workbook
Open an existing workbook
Create a workbook
In Pocket Excel, tap New.
You'll see either a blank workbook or template, depending on what youve
selected in the Options dialog box.
Tap View > Zoom and select a percentage so that you can easily read
the worksheet.
To use your new workbook as a template, move the workbook to the
Templates folder.
10-103
See Also: Change Options
Save, rename, move, and delete workbooks
Work with Workbooks and Worksheets
Open an existing workbook
In the workbook list, tap the file you want to open.
Enter and Locate Data
Go to a cell
Enter a value or text in a cell
Automatically enter a sequence of values
Find or replace data
Sort data
Filter data
Go to a cell
1. Tap Tools > Go To.
2. To go to a specific cell, type the cell reference (example: C4). If the cell has
a defined name, you can type the name instead of the reference.
3. To go to the currently selected cell, tap Current region.
To go to a specific cell, you can also enter the cell reference in the name
box.
See Also: Name a cell or range
10-104
Enter a value or text in a cell
1. Select the cell. If the cell is not visible, tap Tools > Go To, type the
reference (example: A4), and tap OK.
2. Type the value or text. You may need to first tap
to display the input
panel.
3. Tap ENTER in the input panel. Text is automatically left-aligned.
See Also: Format numbers and text
Automatically enter a sequence of values
1. Select both the range containing the data you want to reference and the
adjacent destination cells.
2. Tap Edit > Fill.
3. In Fill type, tap Series.
4. From the Direction list, tap the direction you want.
5. In Series type, tap the type of series and step value (increment) you want.
To preserve memory, Fill is limited to an area of 127 rows by 31 columns.
To copy information into more rows or columns, reduce the amount of
information copied at one time and perform the copy and paste
procedure multiple times.
See Also: Copy and paste
10-105
Find or replace data
1. Tap Edit > Find/Replace.
2. Enter the text you want to find and tap Find. If you're replacing text, tap
Replace and enter the replacement text.
3. Select the appropriate options.
4. Tap Find.
5. Pocket Excel selects the first instance of the text in the workbook and
displays buttons that allow you to find the next instance or replace the text,
as desired.
To limit your search to specific cells, select the cells before tapping Edit
> Find/Replace.
Sort data
1. Select the range you want to sort.
2. Tap Tools > Sort.
3. In Sort by, select the first column you want to sort on.
4. The Ascending check box is selected, indicating that the column will be
sorted in ascending order. If you want the column sorted in descending
order, tap to clear the check box.
5. Repeat steps 3 and 4 in the Then by lists for additional columns as
needed.
To undo a sort, tap Edit > Undo Sort.
10-106
Filter data
1. Select a cell that contains the type of information you want to filter, or select
the range.
2. Tap Tools > AutoFilter.An arrow appears at the top of each of the selected
columns.
3. Tap an arrow in one of the columns.
4. Select a value (filter criterion) from the list to display only rows containing
that value. Tap Custom to display the Custom AutoFilter dialog box,
where you can specify comparisons.
5. To further refine the displayed rows, repeat steps 3 and 4 as needed.
To turn off AutoFilter, tap Tools > AutoFilter.
To display all rows again, select All from the filter list in each of the
selected columns.
Edit and Format Data
Edit cell contents
Copy and paste
Delete a row or column
Format numbers and text
Insert symbols
Edit cell contents
1. Select the cell.
2. To activate, tap the formula bar at the top of the worksheet.
3. Replace or edit the contents.
4. Tap ENTER in the input panel to enter the changes in the cell.
To undo an action, tap Edit > Undo Typing in x.
See Also: Format numbers and text
10-107
Copy and paste
You can copy data from one cell to another by using the Copy and Paste
commands on the pop-up menu. In addition, you can do the following:
Copy data from one set of cells to another. Select the range containing the
data that you want to copy and the adjacent destination cells. Tap Edit >
Fill. In Fill type, select Copy. From the Direction list, select the direction
that you want.
Paste only formulas, values, or other options. Select the cells that you want
to copy. Tap and hold the selected area, and tap Copy. Select the
destination cells. Tap and hold on the selected area, and tap Paste.
To preserve memory, Paste is limited to an area of 127 rows by 31
columns. To copy information into more rows or columns, reduce the
amount of information copied at one time and perform the copy and
paste procedure multiple times.
Delete a row or column
1. Select one or more cells, rows, or columns that you want to delete.
2. Tap and hold the selected cells, and then tap Delete.
3. Select how you want the cells, rows, or columns deleted.
Format numbers and text
1. Select the cell or range.
2. Tap and hold the selected area, and then tap Format Cells.
3. On each tab, select the desired format options.
You can also format a value as you type it. For example:
Currency: $25 Percentage: 25% Date or time: 8-15-97 1:30 PM
10-108
Insert symbols
1. Place the insertion point where you want to insert the symbol.
2. Tap Tools > Insert Symbol.
3. Select the symbol that you want (it will be enlarged when you tap it), and
then tap Insert.
If you select a different font or subset, a different set of symbols displays.
To use Microsoft Wingdings or Microsoft Webdings that are available on
your PC, connect your device to your PC and open ActiveSync. Copy the
Wingdings.ttf and Webdings.ttf files from the Font folder on your PC to
the My Pocket PC/Windows/Fonts folder in the ActiveSync window. For
more information, see ActiveSync Help on the PC.
See Also: Format numbers and text
Work with Formulas and Functions
Name a cell or range
Enter a formula
Insert a function
Refer to a cell or range
Automatically calculate values
Automatically sum values
10-109
Name a cell or range
1. Select the cell or range you want to name.
2. Tap Tools > Define Name.
3. Type the name.
4. Tap Add.The name appears in the name box.
To delete a name, select it in the list and tap Delete.
To paste the list of cell names and their locations on the worksheet, tap
Paste List.
See Also: Go to a cell
Refer to a cell or range
Enter a formula
1. Select a cell.
2. Begin the formula with an equal sign (=).
3. Enter values, cell references, name references, operators, and functions
as appropriate.Examples:=(B4/25)+100=Revenue-Expenses
4. To enter the formula in the cell, tap ENTER in the input panel.
See Also: Refer to a cell or range
Insert a function
1. Tap Tools > Insert Function.
2. In Category, select a function category.
3. From the Function list, select a function. You can review function
information in the description area.
10-110
Refer to a cell or range
1. Begin entering the formula.
2. Select the cell or select the range to set the reference.
3. Finish entering the formula.
4. Tap ENTER in the input panel.
To refer to a cell in another worksheet, in your formula, enter the
worksheet name followed by an exclamation point (!) and the cell, range,
or name reference.
Example: =Sheet1!Earnings
To create a 3-D reference, in your formula, specify two or more sheets in
a workbook; use a colon between the first and last worksheet names.
Example: =SUM(Sheet2:Sheet6!$A$2:$C$5)
See Also: Name a cell or range
Automatically calculate values
1. Select the range of values you want to calculate. The AutoCalculate area,
on the right side of the status bar, contains a function and value (example:
SUM=0). (If you don't see the status bar, tap View > Status Bar.)
2. To display a list of calculation types, tap the AutoCalculate arrow.
3. From the list, select the calculation type that you want.The result appears in
the AutoCalculate area.
See Also: Enter a formula
10-111
Automatically sum values
1. Tap
to display the toolbar.
2. Select the cell where you want to insert the sum.
3. On the toolbar, tap
. =SUM() appears in the input box at the top of the
workbook.
4. Drag the stylus across the range of cells you want to sum. The cells will not
be highlighted, but the cell range in =SUM() is updated.
5. Tap ENTER on the input panel. The sum appears in the selected cell.
See Also: Enter a formula
Work with Rows and Columns
Insert cells, rows, and columns
Adjust column widths and row heights
Hide and display rows and columns
Fit rows and columns to data
Insert cells, rows, and columns
1. Select the location where you want to insert cells.
2. Tap and hold the selected area, and then tap Insert.
3. Select how you want the cells, rows, or columns inserted.
To delete cells, rows, and columns, select the area that you want to
delete. Tap and hold on the selected area, tap Delete, and then tap an
option.
10-112
Adjust column widths and row heights
To adjust column width, select one or more columns (drag to select multiple
columns). In the column heading, point to the right border of your selection
and drag the arrow.
To adjust row height, select one or more rows. Then point to the lower
border in the row heading and drag the arrow.
To specify an exact column width and row height, tap and hold the
column or row, tap Format Cells and enter the measurements on the
Size tab.
Hide and display rows and columns
To hide a row or column, select a cell in the row or column you want to hide.
Tap Format > Row or Column, and then tap Hide.
To display a hidden row or column, first select a cell in the hidden row or
column by tapping Tools > Go To, typing a reference, and tapping OK.
Then tap Format > Row or Column and tap Unhide.
Fit rows and columns to data
1. Select the rows or columns you want to automatically fit to their contents.
2. Double-tap the lower border of the row heading or the right border of the
column heading.
Work with Workbooks and Worksheets
Modify or switch worksheets
Adjust the view of a worksheet
Save, rename, move, and delete workbooks
Beam a workbook
Send a workbook via e-mail
10-113
Modify or switch worksheets
To add, remove, rename, or reorder worksheets, tap Format > Modify
Sheets. Select the worksheet and then tap the appropriate button.
To switch to another worksheet, in the middle of the status bar, select the
active worksheet's name (example: Sheet1) to display a list of worksheets.
Then select the worksheet you want to switch to. (If you don't see the status
bar, tap View > Status Bar.)
See Also: Adjust the view of a worksheet
Save, rename, move, and delete workbooks
When you create a new workbook, the information that you enter saves
automatically. In an open workbook, you can:
Save a copy of the workbook. Tap Tools > Save Workbook As.
Rename the workbook. Tap Edit > Rename/Move. Select the text
appearing in the Name box, and type the new name.
Move the workbook to a storage card or folder. Tap Edit > Rename/Move.
Select the appropriate folder or location. A
is displayed next to the file's
name to indicate the file is saved on a storage card.
Delete the workbook. Tap Tools > Delete Workbook.
To move or delete multiple workbooks, in the workbook list, tap and drag.
Then, tap and hold the selected workbooks. On the pop-up menu, select
Rename/Move or Delete.
10-114
Beam a workbook
To beam a workbook, in the workbook list, tap and hold the workbook. On
the pop-up menu, tap Beam File.
When using infrared (IR), align the infrared (IR) ports according to the
instructions in your owner's manual so that they are unobstructed and
within a close range.
When using IR to receive a Beam from a previous version of Pocket PC
or the Palm-size PC, tap
> Programs > Infrared Receive.
See Also: Beaming Information
Send a workbook via e-mail
1. In the workbook list, tap and hold the workbook.
2. On the pop-up menu, tap Send via E-mail. A new message is created with
the item attached.
Adjust the view of a worksheet
On the View menu, tap actions:
Display and hide window elements. Select the elements you want
displayed or hidden.
Freeze panes on a worksheet. First select the cell where you want to freeze
panes. Then tap Freeze Panes.
Zoom in on data. Tap Zoom and tap the percentage you want.
Use the full screen. Tap Full Screen to see as much data as possible. To
exit Full Screen view, tap Restore.
Split the window. Tap Split and then drag the split bar to a new location. To
remove the split bar, tap Remove Split.
See Also: Modify or switch worksheets
10-115
On-device Conversion Changes
When you synchronize files or copy files between your PC and your device,
ActiveSync on your PC converts the files so that they can be read. However,
when an Excel workbook arrives on the device, for example in an e-mail
attachment, the device converts the workbook to a Pocket Excel workbook.
Note the following regarding these on-device conversion changes:
Alignment. Horizontal, vertical, and wrap text attributes remain the same,
but vertical text appears horizontal.
Borders. Appear as a single line.
Cell patterns. Patterns applied to cells are removed.
Fonts and font sizes. Fonts not supported by your mobile device are
mapped to the closest font available. The original font is listed on your
device. When converted back to Excel, the data is displayed in the original
font.
Number formats. Numbers formatted using Microsoft Excel 97 conditional
formatting feature are displayed in Number format.
Formulas and functions. If an Excel file contains a function that is not
supported by Pocket Excel, the function is removed, and only the returned
value of the function appears. The formulas described are also converted
to values: formulas entered as an array or containing an array argument
(for example, =SUM({1;2;3;4})); formulas containing external link
references or an intersection range reference; and formulas containing
references past row 16384 are replaced with #REF!
10-116
Protection settings. Most worksheet and workbook protection features
are disabled but not removed during conversion. Workbooks that are
password protected cannot be synchronized. You must remove the
password protection in Excel or Pocket Excel and then synchronize. Once
synchronized, you can reset password protection.
Zoom settings. Not retained during conversion. Excel supports a per
worksheet zoom setting, while Pocket Excel's zoom setting is applied to the
entire workbook.
Worksheet names. Names that reference worksheets within the same
workbook are displayed accurately, but names that refer to other
workbooks, arrays (for example, ={1;2;3;4}), array formulas, or intersection
ranges are removed from the name list. If a name is removed from the list,
it is left in formulas and functions, causing those formulas to be resolved as
"#NAME?" All hidden names are unhidden.
AutoFilter Settings. Are removed. However, you can use the AutoFilter
command in Pocket Excel to perform similar functions. If you have an
AutoFilter applied to a worksheet that causes rows to be hidden, the rows
remain hidden after converting the file to Pocket Excel. Use the Unhide
command to display the hidden rows.
Unsupported worksheet features. The following features aren't
supported in Pocket Excel and are removed or modified during conversion:
chart objects are removed; hidden sheets are unhidden; chart sheets, VBA
modules, macro sheets, and dialog sheets are removed and replaced with
a place holder sheet; text boxes, drawing objects, pictures, and controls
are removed; pivot table data is converted to values.
See Also: Workbook Conversion
10-117
Change Options
To change defaults for creating and storing Pocket Excel workbooks, in the
workbook list, tap Tools > Options:
Select a template to be used for new workbooks. You can change this
default when creating specific workbooks. Only workbooks saved in the
Templates folder will be listed.
Select a location for storing workbooks. You can choose between main
memory and a storage card, if you have one installed.
Select the types of files to be displayed in the workbook list.
See Also: Workbook Conversion
Work with Workbooks and Worksheets
10-118
11 Windows Media Player
Windows Media Player Help
Concepts
Organizing Files
Create a Playlist
About Windows Media Player
Edit a Playlist
About the Controls
Rename a Playlist
About Playlists
Delete a Playlist
About Licenses and Protected
Add an Item to Web Favorites
Files
Delete an Item in Web Favorites
About the Tools Menu
Playing Files
Customizing the Player
Change Player Appearance
Copy Files to Your Pocket PC
Shrink Oversized Video
Play a File or Playlist Stored on
Play Video in Full Screen
Your Device
Change Background Playback
Play a File on a Network
Settings
Play an Item in Web Favorites
Change Network Connection
Play a File at a Specific Point
Speed Settings
Play a Playlist in a Random
Order
Play a Playlist Repeatedly
Adjust the Volume
Change Network Protocol
Settings
Accessibility
Accessibility for People with
Disabilities
Troubleshooting
Issue Playing Streams on
Intranets
11-119
About Windows Media Player
You can use Microsoft Windows Media Player 9 Series for Pocket PC to play
digital audio and video files that are stored on your device or on a network,
such as on a Web site.
You can play files in either Windows Media or MP3 format (this includes files
with the extensions .asf, .wma, .wmv, and .mp3). To find content in Windows
Media Format, see the WindowsMedia.com Web site
(http://www.windowsmedia.com).
In addition to Windows Powered Pocket PC, Windows Media Player is
available on other operating environments, including desktop computers
running the Windows operating system, Windows Powered Smartphone, and
Macintosh. In this documentation, the version of Windows Media Player for
desktop computers is called the "desktop Player" and the version for Pocket
PC is called the "Pocket PC Player."
See Also: About the Controls
About Playlists
Copy Files to Your Pocket PC
About the Controls
This
Does this
control
Plays a file.
Pauses a file.
Stops a file.
Skips to the beginning of the current file or to the previous
file.
Skips to the next file.
11-120
This
Does this
control
Adjusts the playback progress of a selected file.
Controls the volume level.
Turns the sound on or off.
Displays a video using the entire screen (full screen).
Displays the WindowsMedia.com Web site.
See Also: Adjust the Volume
Play a File at a Specific Point
About Playlists
A playlist is a list of digital media files that play in a specified order. By using
playlists, you can group audio and video files together for convenient
playback. For example, you can create a playlist of your favorite songs by a
particular artist or a playlist of work-related video clips.
The Player includes two default playlists: Local Content and Web Favorites.
Local Content lists all the compatible audio and video files on your Pocket PC
and storage card. You cannot edit Local Content, but you can create a new
playlist based on it.
Web Favorites lists your favorite streaming media files. This playlist is empty
until you add items to it.
See Also: Create a Playlist
Edit a Playlist
Copy Files to your Pocket PC
Rename a Playlist
Delete a Playlist
Add an Item to Web Favorites
11-121
About Licenses and Protected Files
Some digital media files from the Internet, CD tracks, and videos have
associated licenses that protect them from being unlawfully distributed or
shared.
Licenses are managed and created using digital rights management (DRM),
which is the technology for securing content and managing its access rights.
Some licenses may prevent you from playing files that are copied to your
Pocket PC. Files that have licenses associated with them are called protected
files.
To ensure that a license is copied with a protected file, use the desktop Player
to copy the file to your Pocket PC (instead of dragging the file from a folder on
your desktop computer to a folder on your portable device, for example). For
more information about copying files to your Pocket PC and other portable
devices, see Windows Media Player Help on your desktop computer.
To view the protection status for a file, on the playlist screen, tap
the Properties button
.
See Also: Copy Files to Your Pocket PC
11-122
About the Tools Menu
You can change the appearance of the Player, play a playlist again, shuffle
items in a playlist, or configure audio and video settings by using the
commands on the Tools menu.
To access the commands in the following table, tap Tools.
Tap
To
About
View information about the Player.
Settings
Adjust various Player options, including audio and
video, network, hardware button, and Skin
Chooser settings.
Properties
View information about the currently playing file.
Open URL
Play a streaming media file on a network.
Add Web Favorite Add a streaming media file that is currently playing
to Web Favorites.
Repeat
Play a playlist repeatedly.
Shuffle
Play items in a playlist in random order.
See Also: Use Hardware Buttons
Change Player Appearance
Play Oversized Video
Change Background Playback Settings
Copy Files to Your Pocket PC
Use the desktop Player to copy digital media files to your Pocket PC (instead
of dragging a file from a folder on your desktop computer to a folder on your
portable device, for example). Using the desktop Player ensures that licenses
are copied with protected files.
11-123
For more information about copying digital media files to portable devices
such as Pocket PCs, see Windows Media Player Help on your desktop
computer.
Audio files copy faster if the desktop Player is configured to
automatically set the quality level for audio files copied to your
Pocket PC. For more information, see Windows Media Player
Help on your desktop computer.
See Also: About Licenses and Protected Files
About Playlists
Play a File or Playlist Stored on Your Device
1. Tap Playlist.
2. In the drop-down list box, tap the playlist name, if necessary.
3. Tap the item that you want to play, and then tap the Play button
.
Tap and hold an item in a playlist to see a list of actions you can
perform.
The Local Content icon
indicates a file on a storage card.
The Network Content icon
indicates a streaming media file
on a network.
The Now Playing icon
indicates the currently selected file.
See Also: Play a File on a Network
Create a Playlist
Edit a Playlist
11-124
Play a File on a Network
1. Tap Tools > Open URL.
2. Enter a URL.
To play streaming media, you must be connected to a network. For
more information about creating a remote connection between
your portable device and a network, see Pocket PC Connections
Help.
See Also: Play a File or Playlist Stored on Your Device
Create a Playlist
Edit a Playlist
Change Network Connection Speed Settings
Change Network Protocol Settings
Issue Playing Streams on Intranets
Adjust the Volume
Drag the Volume slider
left or right.
See Also: About the Controls
Create a Playlist
1. Tap Playlist.
2. In the drop-down list box, tap Organize Playlists.
3. Tap New, and then enter a playlist name.
4. If desired, specify:
A folder in which to save the playlist.
A memory location (device RAM or storage card) in which to save the
playlist.
5. Tap the box next to each item you want to include in the playlist.
11-125
You can only create Windows Media playlists. Other playlist
types are not supported.
You cannot use the characters / \ [ ] : ; | , = " or & in playlist
names.
To control which files are displayed, tap the drop-down list box.
See Also: About Playlists
Edit a Playlist
Edit a Playlist
1. Tap Playlist.
2. In the drop-down list box, tap the playlist name, if necessary.
3. Tap any of the following.
Tap To
Add items to the playlist.
Delete the selected item from the playlist.
Move the selected item up in the playlist.
Move the selected item down in the playlist.
The name of a file on a storage card is dimmed if the storage card is
removed from the Pocket PC.
Tap and hold an item in a playlist to see a list of actions you can
perform.
See Also: Rename a Playlist
Delete a Playlist
11-126
Rename a Playlist
1. Tap Playlist.
2. In the drop-down list box, tap Organize Playlists.
3. Tap the playlist name, then tap Rename.
4. Enter a new playlist name.
Tap and hold a playlist to see a list of actions you can perform.
See Also: Delete a Playlist
Delete a Playlist
1. Tap Playlist.
2. In the drop-down list box, tap Organize Playlists.
3. Tap the playlist name, then tap Delete.
Tap and hold a playlist to see a list of actions you can perform.
See Also: Rename a Playlist
Change Player Appearance
1. Tap Tools > Settings > Skin Chooser.
2. Tap the Next Skin button >> or the Previous Skin button << to
locate a skin.
For information about adding skins to Windows Media Player for
Pocket PC, see the Windows Media Web site
(http://www.microsoft.com/windowsmedia).
To ensure that skins appear in the Skin Chooser, do not store skin
files in the Windows folder on your portable device.
11-127
Add an Item to Web Favorites
1. Play a streaming media file on a network.
2. Tap Tools > Add Web Favorite.
3. In Favorite Name, enter a name.
See Also: Play a File on a Network
Delete an Item in Web Favorites
About Playlists
Play an Item in Web Favorites
1. Tap Playlist.
2. In the drop-down list box, tap Web Favorites.
3. Tap the name of the item you want to play, and then tap the Play button
Tap and hold an item in Web Favorites to see a list of actions you
can perform.
See Also: Add an Item to Web Favorites
Delete an Item in Web Favorites
About Playlists
11-128
.
Delete an Item in Web Favorites
1. Tap Playlist.
2. In the drop-down list box, tap Web Favorites.
3. Tap the name of the item you want to delete, and then tap the Delete
button
.
See Also: Add an Item to Web Favorites
Play a File on a Network
About Playlists
Play a File at a Specific Point
1. Play a file.
2. Drag the Progress slider
to the point where you want the file to play.
See Also: Play a File or Playlist Stored on Your Device
Play a File on a Network
Shrink Oversized Video
1. Tap Tools > Settings > Audio & Video.
2. Select the Shrink to fit in window check box.
Oversized video files are larger than the video area of a skin
(typically, 240 × 176 pixels).
Selecting the Shrink to fit in window check box scales the video
to fit in the video window.
See Also: Play Video in Full Screen
11-129
Play Video in Full Screen
1. Tap Tools > Settings > Audio & Video.
2. In Play video in full screen, tap one of the following settings.
Tap
To
Never
Never play video in full screen.
Only when oversized Play only oversized video in full screen.
Play all video in full screen.
Always
Oversized video files are larger than the video area of a skin
(typically, 240 × 176 pixels).
To rotate video 180 degrees when played in full screen, select the
Rotate 180 degrees in full screen check box.
To override the Never and Only when oversized options when
playing a video, in the default skin, tap the Full Screen button
.
See Also: Play Oversized Video
Change Background Playback Settings
1. Tap Tools > Settings > Audio & Video.
2. In While using another program, tap one of the following settings.
Tap
To
Pause playback
Pause playback while using another program.
Continue playback Continue playback while using another program.
11-130
Change Network Connection Speed Settings
1. Tap Tools > Settings > Network.
2. In Internet Connection Speed, tap the speed of your network connection.
See Also: Change Network Protocol Settings
Change Network Protocol Settings
1. Tap Tools > Settings > Network.
2. In Protocol, select the check box for each protocol you want to enable.
Enter the port number for User Datagram Protocol (UDP), if
necessary.
You must select at least one protocol.
It is recommended that you select all protocols. However, if your
network implements a firewall that prevents you from receiving
streams that use the UDP or TCP protocols, you may want to
clear the UDP or TCP check boxes.
See Also: Change Network Connection Speed Settings
11-131
Use Hardware Buttons
1. Tap Tools > Settings > Buttons.
2. In Select Function, tap a function you want to assign to a button.
3. On your Pocket PC, press a hardware button.
To override the hardware button settings for the Player when you
are using another program, select the Un-map buttons during
background play check box.
To reset a hardware button to its default function, in Button
Mapping, tap and hold a button name, and then tap Un-map this
button.
Pressing a hardware button that is associated with a Player
function has the same result as if you tapped the corresponding
button on the Player screen.
See Also: About the Controls
Play a Playlist in a Random Order
Tap Tools > Shuffle.
See Also: Create a Playlist
Play a Playlist Repeatedly
Tap Tools > Repeat.
See Also: Create a Playlist
11-132
Accessibility for People with Disabilities
Microsoft is committed to making its products and services easier for
everyone to use. Many accessibility features have been built into Microsoft
products, including features for individuals who have difficulty typing or using
a mouse, who are blind or have low vision, or who are deaf or
hard-of-hearing. For more information about the following topics, see the
Accessibility section of the Microsoft Web site
(http://www.microsoft.com/enable/):
Accessibility in Microsoft Windows
Adjusting Microsoft products for people with accessibility needs
Free step-by-step tutorials
Microsoft documentation in alternative formats
Assistive technology for Windows
Customer service for people who are deaf or hard-of-hearing
Note that the information in this section applies to users who license Microsoft
products in the United States. If you obtained this product outside the United
States, your package contains a subsidiary information card that you can use
to contact your subsidiary about the products and services available in your
area.
11-133
Issue Playing Streams on Intranets
You may encounter the following error message when you attempt to play a
streaming media file on an intranet that includes an Internet proxy server:
"Windows Media Player cannot find the file. Verify that your network proxy
settings are correct, and then try again."
The problem occurs when the intranet URL of the file you are trying to play
contains periods, such as "mms://192.168.10.255/file.wma" or
"http://media.marketing.contoso.com/file.wmv".
This only pertains to URLs that are inside your organization's firewall (that is,
URLs that you can ordinarily reach without going through a proxy server).
To resolve the problem, open the Connections settings and add a work URL
exception for the address. In Work URL, enter the address of the file you
want to play.
For more information about adding a work URL exception, see Connections
Help.
You must include the protocol (for example, mms, mmst, mmsu, or
http) in the exception address.
Wildcard characters are permitted in the exception address (for
example, "mms*://192.168.*.*/*.*").
See Also: Play a File on a Network
11-134
12 Microsoft Reader
Microsoft Reader Help
For help or more information about Microsoft Reader, tap
> Programs >
Reader. Then, tap Help.
12-135
13
Calculator
Calculator Help
How To
Use Calculator
Store Numbers
Use Calculator
To open Calculator, tap
> Programs > Calculator.
Use the Calculator buttons or the input panel to enter numbers and perform
calculations.
To clear the current calculation, tap C.
To clear the displayed number, tap CE.
To clear the last digit entered in a multidigit entry, tap the arrow to the right
of the entry box.
To clear memory, tap MC.
Store Numbers
To store a number, tap the box to the left of the entry box. An M will appear
in the box.
To add the displayed number to the number that's already in memory, tap
M+.
To display the number in memory, tap MR.
To clear memory, tap MC.
13-136
14
Games
Jawbreaker Help
Playing Jawbreaker
Setting Jawbreaker Options
Statistics
Playing Jawbreaker
Jawbreaker is easy to learn, yet difficult to master. The objective is to align
similar jawbreakers in order to form large blocks of jawbreakers before
bursting them. The more jawbreakers in the block before they are burst, the
greater number of points you will receive.
In order to burst a jawbreaker, the jawbreaker must be connected to other
similar jawbreakers on the playing board. If you tap a jawbreaker that is
connected, those connected jawbreakers will be highlighted and a new
jawbreaker will pop up, displaying that block's potential jawbreaker points.
Tap on your selection again in order to burst the jawbreakers. All jawbreakers
above your burst block will now fall down.
Breaker Bonus
If you manage to leave fewer than 5 unburst jawbreakers on the board you
will be rewarded with more points at the conclusion of the game.
Undo
Moves in Jawbreaker can be undone. To take back the last move you have
made, tap the Undo button.
14-137
Setting Jawbreaker Options
Jawbreaker allows you to vary your playing experience. To set your options,
do the following:
Pop up the Game menu.
Select the Options item.
Set the controls to the desired setting.
o Play Sounds: control to set whether or not you want Jawbreaker to
make sounds
o Confirm End Game: control to set Jawbreaker to pop up a confirmation
dialog when the 'End Game' menu item is selected
o Guest Mode: check this to enable guests to play without affecting the
statistics
o Game Style: here you can set the type of game you would like to play
(changing the style affects new games started after making the
change):
o Standard - the default mode of play where there is a set number of
jawbreakers that will not increase
o Continuous - in this style, whenever a vertical set of jawbreakers has
been burst and the remaining jawbreakers have shifted over to the
right, a new randomly selected column of jawbreakers will pop up on
the left, thereby allowing a game to be played for an extended
amount of time
o Shifter - in this style, when a set of jawbreakers has been burst, all
remaining jawbreakers to the top and left will shift down and to the
right
o MegaShift - this style is a combination of the shifter and continuous
styles in that jawbreakers will shift down and to the right while empty
columns will fill on the left
14-138
Statistics
Jawbreaker records all your statistics for each playing style. In order to view
your statistics, do the following:
Pop up the Info menu.
Select the Statistics item.
The statistics recorded are:
Games - total number of games played
Average - average score across all games played in that style
High - high score for that particular style
If you would like to reset all your statistics, tap the Reset button and confirm
the resulting dialog.
Solitaire Help
Concepts
Scoring Systems
How To
Playing Solitaire
Change Options
Scoring Systems
In Standard scoring (the default), you earn points based on time and moves:
10 points for each card moved to a suit stack.
5 points for each card moved from the deck to a row stack.
5 points for each card turned face-up in a row stack.
3 points for each card moved from one row stack to another.
-2 points for each 10 seconds elapsed during a timed game.
-15 points for each card moved from a suit stack to a row stack.
-20 points for each pass through the deck after four passes (Draw Three option).
-100 points for each pass through the deck after one pass (Draw One option).
14-139
You receive a bonus when you complete a timed game. The shorter the
game, the larger the bonus.
In Vegas scoring, your ante is $52 to begin playing each game.
The object is to earn more than you wagered.
You earn $5 for each card moved to a suit stack.
There is no time penalty or bonus awarded.
If you select the Keep cumulative score option, you see a running total of
your score from game to game.
See Also: Change Options
Playing Solitaire
Playing Solitaire
To open Solitaire, tap
> Programs > Games > Solitaire.
To deal the cards, tap New.
To display cards in the upper-left stack, tap the stack.
To move a card to one of the stacks, drag the card. Build the row stacks in
descending order, from king to two, alternating between red and black cards.
In the row stacks, turn a card face-up by tapping it. You can move a king to
an empty row stack.
To undo a move, tap
.
Build the suit stacks at the top in ascending order, from ace to king.
You win the game when all cards are in the suit stacks.
14-140
Change Options
Tap Tools > Options.
To change the card style, tap a new one under Card back.
You can choose to keep a cumulative score when using the Vegas scoring system.
See Also: Scoring Systems
14-141
15 Pictures
Pictures Help
How To
Copy Pictures to your Device
Concepts
About Pictures
View Pictures
Send Pictures
View Slideshow of Pictures
Edit Pictures
Set Picture as Background
About Pictures
Use Pictures to view .jpg pictures stored on your device or on a storage card,
send pictures to others, view a slideshow of your pictures, or set a picture as
the background on the Today screen.
See Also: Copy Pictures to your Device
View Pictures
Send Pictures
View Slideshow of Pictures
Edit Pictures
Set Picture as Background
15-142
Copy Pictures to your Device
You can copy .jpg pictures from your PC and view them in Pictures.
Copy the picture files from your PC to the My Pictures folder, within the My
Documents folder on your device. For more information on copying files
from your PC to your device, see ActiveSync Help on your PC.
You can also copy pictures from your PC to your device using a memory
card. Insert the memory card into the memory card slot on your device
and then copy the picture files from your PC to the folder you created on
the memory card.
Edit Pictures
You can rotate, crop, zoom, and adjust the brightness and color contrast of
your .jpg pictures.
Tap
to rotate a picture 90 degrees counter-clockwise.
Tap
to crop a picture by dragging and selecting the crop area. Tap
outside of the box to stop cropping.
Tap
to display the Zoom panel, from which you can zoom in or out of a
picture, or return a picture to full-screen size.
Tap Edit > Brightness and Contrast to adjust the brightness and contrast
levels of a picture.
Tap Edit > Undo to undo an edit.
See Also: Copy Pictures to your Device
Send Pictures
15-143
Send Pictures
You can send a .jpg picture to others as an e-mail attachment. The picture is
resized to approximately 30 KB, making it easier to send over wireless
connections.
1. In Pictures, tap the picture you want to send as an e-mail attachment.
2. Tap Tools > Send via Email to create an e-mail message with the picture
attached.
See Also: Copy Pictures to your Device
Set Picture as Background
You can use one of your own .jpg pictures as the background on the Today
screen, and specify how you want it displayed on the screen, such as
adjusting the transparency level.
1. In Pictures, tap the picture you want to set as the background.
2. Tap Tools > Set as Today Wallpaper.
View Pictures
Using Pictures, you can view thumbnails of .jpg pictures stored in your My
Pictures folder, or on a storage card from a digital camera, and select a
picture that you want to see in full-screen view.
In Pictures, tap the thumbnail of the picture you want to view.
Tap
to view pictures stored on a storage card. Tap
pictures stored in your My Pictures folder.
See Also: View Slideshow of Pictures
Set Picture as Background
Send Pictures
15-144
to view
View Slideshow of Pictures
You can view your .jpg pictures as a slideshow on your device. Pictures will
display slides of the pictures shown in thumbnail view with 5-second intervals
between slides.
In Pictures, tap
to view pictures as a slideshow.
Tap anywhere on the screen to display the Slideshow toolbar, which you
can use to pause the slideshow, rotate the view, and more.
Press the Left/Right controls to move forward or backward through the
slides.
See Also: Copy Pictures to your Device
View Pictures
15-145
16
Terminal Services Client
Terminal Services Client Help
About Terminal Services Client
Connecting to Terminal Services
Navigating Within Terminal Services Client
Disconnecting Without Ending a Session
Disconnecting and Ending a Session
Tips and Tricks
About Terminal Services Client
Using the Terminal Services Client, you can log onto a desktop computer
running Terminal Services or Remote Desktop and use all of the programs
available on that desktop computer from your mobile device. For example,
instead of running Microsoft Pocket Word, you can run the desktop computer
version of Microsoft Word and access all of the .doc files on that desktop
computer from your device.
You cannot use Transcriber when entering information in Terminal
Services. You must use Keyboard, Block Recognizer, or Letter
Recognizer.
See Also: Connecting to Terminal Services
Disconnecting and Ending a Session
Navigating Within Terminal Services Client
16-146
Connecting to a Terminal Server
1. Start a remote connection to the server via a modem or network (Ethernet)
card.
2. Tap Start > Programs > Terminal Services Client.
3. To connect to a server you have previously connected to, in Recent
Servers, tap a server. To connect to a new server, enter the server's name
in the Server box. Select the Limit size of server desktop to fit on this
screen check box only when using applications that have been specifically
sized for use with Pocket PC.
4. Tap Connect.
If the network administrator has configured Terminal Services Client to
reconnect to disconnected sessions, and you previously disconnected
from a Terminal Server without ending the session, the Terminal Services
Client reconnects to that session.
See Also: Disconnecting and Ending a Session
Disconnecting Without Ending a Session
Navigating Within Terminal Services Client
Navigating Within Terminal Services Client
Once connected to the server, the desktop computer's screen may more than
fill your mobile device's screen. If scroll bars are displayed on the server's
screen, you will see more than one set of scroll bars on your mobile device:
one to scroll information on the desktop computer, and one to scroll the
desktop computer display through the Terminal Services window in Terminal
Services Client.
16-147
To ensure you are scrolling the desktop computer display through Terminal
Services Client, use the five directional buttons at the bottom of the Terminal
Services Client screen.
To better fit information on your mobile device's screen, select Limit size of
server desktop to fit on this screen. For best effect, programs on the
desktop computer should be maximized.
You cannot use Transcriber when entering information in Terminal
Services. You must use Keyboard, Block Recognizer, or Letter
Recognizer.
See Also: Connecting to Terminal Services
Disconnecting Without Ending a Session
The following commands must be accessed from the Start menu in the
Terminal Services window used to access the desktop computer's
commands. Do not use the Start menu on your mobile device.
1. In the Terminal Services window, tap Start > Shutdown.
2. Tap Disconnect.
If your administrator has configured Terminal Services Client to
reconnect to disconnected sessions, you will be reconnected to this
session the next time you connect to this server.
See Also: Connecting to Terminal Services
Disconnecting and Ending a Session
16-148
Disconnecting and Ending a Session
1. In the Terminal Services Client window, tap Start > Shutdown.
2. Tap Log Off.
See Also: Connecting to Terminal Services
Disconnecting Without Ending a Session
Tips and Tricks
Improving display performance
Improving browser performance
Improving display performance
Display performance is improved by decreasing the time it takes for the
screen to be refreshed on the desktop computer.
1. On your desktop computer, select Start > Settings > Control Panel.
2. Click Display.
3. Clear the Transition effects for menus and tooltips check box.
Improving browser performance
Performance with Internet Explorer on the desktop computer is improved by
decreasing the time it takes for Web pages to be refreshed.
1. In Internet Explorer on your desktop computer, select Tools > Internet
Options.
2. Click the Advanced tab.
3. Clear the Use smooth scrolling check box.
17
Terminal
Terminal Help
17-149
Using Terminal
Using Terminal
You can connect your device to an online service or corporate server that
requires TTY or VT-100 terminal emulation. For example, you can view and
download files from a bulletin board or send and receive e-mail. You can also
use Terminal to send custom modem strings to your modem.
Tap
> Settings > Connections tab and then the connection you want.
In the Advanced > Port Settings tab, select the options you want:
Use Terminal window before dialing: After you tap Connect, the
Terminal window opens. Commands you enter are not displayed in the
Terminal window (see the modem's manual for information on how to
display commands). Once you are finished entering commands, tap File >
Continue. The Terminal window is closed, and the number you specified in
the connection is dialed for you.
Use Terminal window after dialing: After you tap Connect, the number
is dialed, and then the Terminal window opens. Commands you enter are
not displayed in the Terminal window (see the modem's manual for
information on how to display commands). Once you are finished entering
commands, tap File > Continue. The Terminal window is closed.
17-150
Enter dialing commands manually: After you tap Connect, the Terminal
window opens. Commands you enter are displayed in the Terminal window.
When you are ready to connect, enter atdt followed by the number you
want dialed and then tap ENTER. Or, enter the number you want dialed
and then tap File > Continue (the Terminal window is closed).
To clear the buffer, tap Edit > Clear Buffer.
To return to the current Terminal session after switching to another
program, tap
> Settings > System tab > Memory > Running
Programs tab. Tap Post-dial Terminal, and then tap Activate.
See Also: Connect to the Internet
17-151
18 Pocket Internet Explorer
Pocket Internet Explorer Help
Concepts
How To
View Favorite Pages
About Pocket Internet Explorer
Connect to the Internet
About Favorites
View Page Properties
About Channels
View the History List
Send a Link via E-mail
Customize Pocket Internet
Explorer
About Pocket Internet Explorer
You can use Pocket Internet Explorer to view Web pages on your mobile
device in two ways: by downloading pages through synchronization or by
connecting to the Internet. While browsing, you can also download new files
and programs to your device from the Internet.
About Favorites
If you are using Microsoft Internet Explorer 4 or greater on the PC, you can
synchronize favorite links. If you are using Microsoft Internet Explorer 5 or
greater on the PC, you can also synchronize mobile favorites. Synchronizing
favorite links enables you to have the URLs of your favorite Web sites at your
fingertips. Synchronizing a mobile favorite enables you to view Internet
content on your device while you are disconnected from your Internet service
provider and PC.
18-152
Favorites are stored in the Mobile Favorites subfolder of Favorites in Internet
Explorer on the PC. This folder was created when you selected the Favorites
information type for synchronization in ActiveSync on your PC. Favorites
must be stored in this folder to be synchronized.
See Also: About Pocket Internet Explorer
About Channels
Synchronize a favorite link
Synchronize a mobile favorite
About Channels
AvantGo is a free interactive service that gives you access to personalized
content and thousands of popular Web sites. You can subscribe to AvantGo
channels directly from your device. Then, you synchronize your device and
desktop computer or connect to the Internet to download the content. For
more information, visit http://avantgo.com/help.
See Also: About Pocket Internet Explorer
About Favorites
Synchronize an AvantGo channel
View Favorite Pages
Synchronization
View favorites
Add a favorite link
Delete a favorite link
18-153
Synchronize favorites
Synchronize a favorite link
Synchronize a mobile favorite
Synchronize an AvantGo channel
Synchronize a favorite link
1. In ActiveSync on your PC, click Tools > Options, and select Favorite. For
more information on using ActiveSync, see ActiveSync Help.
2. In Internet Explorer on your PC, save or move favorite links to the Mobile
Favorites subfolder in the Favorites list. For more information on using
Internet Explorer, see Internet Explorer Help on the PC.
3. Connect your mobile device to your PC. If synchronization does not start
automatically, in ActiveSync on your PC, click Sync.
If you add or delete a favorite link in the Mobile Favorites folder on your
device, the next time you synchronize, the same change is made on the
PC.
See Also: About Favorites
View favorites
Synchronize a mobile favorite
1. In ActiveSync on your PC, click Tools > Options, and select Favorite. For
more information on using ActiveSync, see ActiveSync Help.
2. In Internet Explorer 5 or greater, browse to the page you want to view
offline.
3. Click Tools > Create Mobile Favorite.
4. To change the link name, enter a new name in the Name box.
5. In the Update box, select a desired update schedule to keep the page in
the Mobile Favorites folder up to date. You can also update content by
clicking Tools > Synchronize in Internet Explorer.
6. To save the link in a subfolder of Mobile Favorites, click Create In and
select the desired subfolder.
18-154
7. Click OK. Internet Explorer will download the latest version of the page.
8. To download the pages that are linked to the mobile favorite you just
created, in Internet Explorer on the desktop computer, right-click the mobile
favorite and then click Properties. On the Download tab, specify the
number of links deep you want to download. To conserve device memory,
only go one level deep.
9. Connect your mobile device to your PC. If synchronization between your
device and PC does not start, in ActiveSync on your PC, click Sync.
See Also: About Favorites
View favorites
Synchronize an AvantGo channel
1. In Pocket Internet Explorer on your device, tap
to display your list of
favorites.
2. Tap the AvantGo Channels link.
3. Tap Activate.
4. Follow the directions on the screen. You will need to synchronize your
device with your desktop computer and then tap My Channels to complete
the AvantGo setup.
5. When synchronization is complete, tap the AvantGo Channels link in your
list of favorites to see a few of the most popular channels.
To add or remove channels, tap the Add or Remove link.
See Also: About Channels
View favorites
18-155
View favorites
1. If favorite pages are not synchronized using a schedule for synchronization,
in Internet Explorer on your PC, click Tools > Synchronize.
2. On your device, tap
.
3. Tap the page that you want to view. For information on resizing the page or
frame to fit the screen, see Fit the page to the screen.
If a favorite link is dimmed or you get a message that the page is not
available, you must download the page to your device through
synchronization or connect to the Internet.
To prevent pictures from downloading, tap View > Show Images.
To download just one picture, connect to the Internet or intranet, tap and
hold the picture's placeholder, and then tap Show Picture.
See Also: Add a favorite link
Synchronization
Add a favorite link
1. Go to the page you want to add.
2. Tap and hold on the page and tap Add to Favorites.
3. Confirm or change the name and select a folder to store the favorite in.
To create a folder, tap
. On the Add/Delete tab, tap New Folder.
Enter a name for the folder, and tap Add.
See Also
Delete a favorite link
Synchronization
18-156
Delete a favorite link
1. Tap
.
2. Tap the Add/Delete tab and then select the link you want to delete.
3. Tap Delete.
Only the link to the page is deleted, not the page content stored on your
device. To delete the page itself, tap Tools > Options > General tab >
Delete Files.
See Also: Add a favorite link
Connect to the Internet or Corporate Intranet
Pocket Internet Explorer will automatically determine whether the page you
are opening is on the Internet or your corporate intranet (Work) and will
establish your connection accordingly. For information on configuring Internet
or Work connections, see Connections Help. You can open pages in the
following ways:
To view your Favorites, tap
and then the page you want to view.
To visit a page that is not in your Favorites, enter the address in the
address bar at the top of the screen and then tap Go. If you don't see the
address bar, tap View > Address Bar.
See Also: Change options
Synchronization
18-157
View Page Properties
Tap View > Properties.The size, security type, and full address of the current
page is displayed.
See Also: Change security options
View the History List
Tap View > History.
To view a page, tap it.
To change the information displayed in the History list, tap the sort list
(labeled Page Title by default).
To change the number of days of links stored in the History list or to clear
the History list, tap Tools > Options > General tab.
See Also: Change options
Send a Link via E-mail
1. Go to the page you want to send.
2. Tap Tools > Send Link via E-mail.A new message is created with the
page address inserted in the message body.
See Also: Connect to the Internet
Synchronization
18-158
Customize Pocket Internet Explorer
Change the text size
Fit the page to the screen
Change options
Change security options
Change the text size
Tap View > Text Size, and select the desired size.
See Also: Change options
Fit the page to the screen
By default, Pocket Internet Explorer attempts to arrange the page so that you
can see all content without scrolling horizontally. In most cases, you only
need to scroll vertically to see content. To turn this feature off, tap View > Fit
to Screen.
To resize just one frame of a page to fill the screen, tap and hold inside the
frame, and then tap Go to Frame. To refresh the frame only, tap and hold the
frame, and then tap Refresh Frame.
See Also: Change options
Change options
Tap Tools > Options.
To free storage space, in the General tab, tap Delete Files. All pages
stored on your device, including offline favorites content, will be deleted. To
further save space, tap Clear History. All cached links will be deleted.
18-159
To change your default Home page to the present page you are viewing, in
the General tab, tap Use Current.
To more easily view text in a different language, in the Advanced tab, from
the Default character set list, select a different character set.
See Also: Change security options
Connect to the Internet
Fit the page to the screen
View the History List
Change security options
Pocket Internet Explorer supports the protocols used by Secure Sockets
Layer (SSL). Access to an SSL-encrypted connection helps you to send
personal information safely. To determine if a connection uses
SSL-encryption, tap View > Properties.
To change security settings, tap Tools > Options > Advanced tab.
Cookies contain information about your identity and preferences so that a
page can tailor information to your needs. The page sends the file, and it is
stored on your mobile device. You can prevent Pocket Internet Explorer from
accepting any cookies by clearing Allow cookies.
See Also: Change options
18-160
19 Inbox
Inbox Help
Concepts
How To
Connect to a Mail Server
About Inbox
Read and Respond to
About Synchronizing Inbox
Messages
About Folders
Compose and Edit Messages
Create or change a signature
Customize Inbox
Use Keyboard Shortcuts
About Inbox
You can receive Internet e-mail messages in Inbox. Internet e-mail messages
are sent by using an address you receive from your Internet service provider
(ISP) or your employer.
You can send and receive e-mail by synchronizing with your PC, or by
connecting to a Post Office Protocol 3 (POP3) or Internet Message Access
Protocol 4 (IMAP4) mail server. You need to set up an e-mail account for
each method that you use except for Microsoft ActiveSync, which is set up by
default. The ActiveSync folder on your device is used to store messages that
you send and receive through synchronization with a PC. Account names
appear as folders in the folder list (located on the left, under the navigation
bar) in the Inbox message list.
19-161
With synchronization, messages are synchronized between the device Inbox
and the PC Inbox by using ActiveSync and Microsoft Exchange or Microsoft
Outlook. For more information, see About Synchronizing Inbox.
When connecting to a POP3 or IMAP4 server, you use a modem to connect
to your Internet service provider (ISP), or a modem or Ethernet card to
connect to the local area network that your e-mail server is connected to.
See Also: About Folders
About Synchronizing Inbox
After selecting Inbox for synchronization in ActiveSync, e-mail messages are
synchronized as part of the general synchronization process. During
synchronization:
Messages are copied from the Inbox folder on your PC or the Microsoft
Exchange server to the Inbox folder on your device. (Note that you can only
synchronize information directly with an Exchange Server if your company
is running Microsoft Mobile Information Server 2002 or later.) By default,
you'll receive messages from the last three days only, the first 100 lines of
each new message, and file attachments of less than 100 KB in size.
Messages in the Outbox folder on your device are transferred to Exchange
or Outlook and then sent from those programs.
The messages on the two computers are linked. When you delete a
message on your device, it's deleted from your PC the next time you
synchronize.
19-162
Messages in subfolders in other e-mail folders in Outlook are synchronized
only if they have been selected for synchronization in ActiveSync.
For information on initiating Inbox synchronization or changing
synchronization settings, see ActiveSync Help on the PC.
See Also: About Inbox
About Folders
Each e-mail account has its own folder hierarchy with five default folders:
Inbox, Outbox, Deleted Items, Drafts, and Sent Items. The messages you
receive and send through the mail account are stored in these folders. You
can also create additional folders within each hierarchy. The Deleted Items
folder contains messages that have been deleted on the device. The
behavior of the Deleted Items and Sent Items folders depends on the Inbox
options you have chosen.
The behavior of the folders you create depends on whether you are using
ActiveSync, SMS, POP3, or IMAP4.
If you use ActiveSync, e-mail messages in the Inbox folder in Outlook will
automatically be synchronized with your device. You can select to
synchronize additional folders by designating them for ActiveSync. The
folders you create and the messages you move will then be mirrored on the
server. For example, if you move two messages from the Inbox folder to a
folder named Family, and you have designated Family for synchronization,
the server creates a copy of the Family folder and copies the messages into
that folder. You can then read the messages while away from your PC.
If you use POP3 and you move e-mail messages to a folder you created, the
link is broken between the messages on the device and their copies on the
mail server. The next time you connect, the mail server will see that the
19-163
messages are missing from the device Inbox and delete them from the
server. This prevents you from having duplicate copies of a message, but it
also means that you will no longer have access to messages that you move to
folders created from anywhere except the device.
If you use IMAP4, the folders you create and the e-mail messages you move
are mirrored on the server. Therefore, messages are available to you anytime
you connect to your mail server, whether it is from your device or PC. This
synchronization of folders occurs whenever you connect to your mail server,
create new folders, or rename/delete folders when connected.
For all accounts except ActiveSync, you can access folder options by tapping
Tools > Manage Folders.
See Also: Manage folders
Compose and Edit Messages
Compose and send a message
Attach a file to a message
Connect to a Mail Server
Set up or change an account
Download messages from the server
19-164
Set up or change an account
To set up an account:
To set up a POP3 or IMAP4 e-mail account, tap Accounts > New Account.
Follow the instructions in the New Account Wizard.
To change options for an account:
1. Tap Accounts > Accounts.
2. Tap the name of the account, and follow the instructions on the screen.
To delete an account:
1. Tap Accounts > Accounts.
2. Tap and hold the name of the account, and then tap Delete.
You can set up several e-mail accounts including your ActiveSync
account.
You cannot add a new account while connected. Tap Accounts >
Disconnect to disconnect.
E-Mail Setup
Enter the e-mail address provided by your ISP or network administrator, such
as [email protected] or [email protected].
19-165
E-Mail Setup
Auto configuration attempts to connect to your e-mail server and download
necessary settings so that you do not need to enter them manually. If Auto
configuration is successful, you can begin downloading messages from the
server.
If Auto configuration is unsuccessful, contact your ISP or network
administrator for the following information:
Account type
POP3 or IMAP4 server name
Domain name (for network connections only)
Once you have the above information, continue with the New Account wizard.
E-Mail Setup
1. In Your name, enter the name that you want people to see when you send
them e-mail.
2. In User name, enter the user name assigned to you by your ISP or network
administrator. This is often the same user name you use to sign into your
ISP or network.
3. In Password, enter your password and select Save password to avoid
having to reenter it later.
E-Mail Setup
1. In the Account type list, tap POP3 or IMAP4. (POP3 is the most common
mail protocol for ISPs.)
2. In Name, enter a unique name for the account, such as Work or Home.
This name cannot be changed later.
19-166
E-Mail Setup
1. In Incoming mail, enter the name of your e-mail server.
2. In Outgoing mail, enter the name of your Simple Mail Transfer Protocol
(SMTP) host.
3. If you are using a network connection, in Domain, enter your domain
name.
Tap Options to access additional settings. For example:
Change the time intervals for downloading new messages.
Download attachments.
Limit the amount of messages downloaded.
Options
To change the amount of time Inbox waits to check for new messages, tap
the minute(s) box and enter a new number of minutes.
Inbox will automatically pick the correct connection to use for the e-mail
account you created. If, for some reason, you want to use a specific
connection, select that connection from the Connection list.
Connecting automatically may result in higher connection charges.
Options
To save memory, Inbox downloads e-mail message headers only instead
of the whole message. To automatically download the whole message,
from the list, select Get full copy of messages.
When using IMAP4, to save memory, Inbox does not download
attachments. To download attachments, select the appropriate option. You
can also select to limit the size of messages and attachments that are
downloaded to your mobile device.
19-167
Options
If your outgoing e-mail server (SMTP) requires authentication, select
Outgoing e-mail server requires authentication.
To ensure you always connect using an SSL connection, select Require
SSL connection. Connections that use SSL allow you send personal
information safely.
To save memory, limit the number of e-mails that are downloaded to your
device by lowering the number of days to display. You can also increase
this number. To change the number of days, tap the box with the number,
and then change the number.
Download messages from the server
In Inbox, tap Accounts > Connect to open a connection to the Internet or
your corporate network, depending on the account. For more information, see
Connections Help.
1. Tap Accounts and ensure that the account you want to use is selected
(marked by a bullet.)
2. Tap Connect. The messages on your device and e-mail server are
synchronized: new messages are downloaded to the device Inbox folder,
messages in the device Outbox folder are sent, and messages that have
been deleted from the server are removed from the device Inbox. Tap a
message in the message list to open it.
3. If you read a message and decide that you need the full copy, tap Edit >
Mark for Download while in the message window. If you are in the
message list, tap and hold the message, and then tap Mark for Download.
This will also download message attachments if you selected those options
when you set up the e-mail account. You can also choose to download full
copies of messages by default.
4. When finished, tap Accounts > Disconnect.
19-168
Receiving entire messages consumes storage memory.
The size column in the message list displays the local size and server
size of a message. Even when a message has been downloaded fully,
these numbers may differ because the size of a message can vary
between the server and the device.
See Also: About Folders
Set up or change an account
Read and Respond to Messages
Download messages
Reply to or forward a message
Find a message
Receive attachments
Receive meeting requests
Download messages
The way you download copies of messages depends on how you are
receiving messages:
If you receive e-mail messages through ActiveSync, begin synchronization.
If you receive e-mail messages through a remote e-mail server, see
Download messages from the server.
See Also: About Synchronizing Inbox
19-169
Reply to or forward a message
1. Open the message, tap
, and then tap Reply, Reply All, or Forward.
2. Enter your response. To quickly add common messages, tap My Text and
tap a desired message.
3. To check spelling, tap Edit > Spell Check.
4. Tap Send.
Selections in Tools > Options > Message tab determine whether the
original text is included.
To see more header information, tap the double arrow in the header
area. Tap it again to collapse the header area.
See Also: Change message options
Use My Text
Find a message
1. Tap
> Find.
2. Enter the subject, sender's name, or message body text. If you have looked
for this message before, tap the Find arrow and select the name from the
list.
3. Tap the Type arrow and select Inbox to narrow your search.
4. Tap Go.
5. In the Results list, tap the message you want to open.
See Also: Download messages
19-170
Receive attachments
An attachment sent with an e-mail message or downloaded from the server
appears as an icon at the bottom of the message in its own window pane.
Tapping the attachment icon opens the attachment if it has been fully
downloaded. You can mark an attachment for downloading (IMAP4 account
only) the next time you connect.
If you receive messages through synchronization, start ActiveSync on your
PC, click File, click Mobile Device, and then select your mobile device.
Click Tools, and then click Options. Select the message account, click
Settings, and then select Include File Attachments.
If you receive messages through a remote e-mail server and have an
IMAP4 account, in Inbox on the device, tap Accounts>Accounts, and
then tap IMAP4. Tap Next until you reach Server Information, and then
tap Options. Tap Next twice, and then select Get full copy of messages
and When getting full copy, get attachments. For more information, see
Set up or change an account.
Embedded images and OLE objects cannot be received as attachments.
An embedded message can be viewed as an attachment when using
IMAP4 to receive e-mail. However, this features does not work if TNEF is
enabled so that you can receive meeting requests.
See Also: Receive meeting requests
19-171
Receive meeting requests
If you receive your e-mail messages through ActiveSync, you will
automatically receive meeting requests. If you connect directly to an e-mail
server, the server must be running Microsoft Exchange Server 5.5 or 2000 for
you to receive meeting requests. If you are running Microsoft Exchange
Server 2000, you will automatically receive meeting requests in your Inbox.
To receive meeting requests on Microsoft Exchange Server 5.5:
Ask your system administrator to activate Rich Text Format and TNEF
support for your account. If TNEF is enabled, you will not receive
messages that are included in other messages as attachments, and you
will not be able to tell if a message has an attachment until you get the full
copy. In addition, download time may be longer.
While setting up your mail account, select Get file attachments.
After you are set up to receive meeting requests:
1. If you connect directly to an e-mail server and only receive message
headers and/or a limited number of lines per message, tap and hold the
message that you think is a meeting request, and then tap Mark for
Download.
2. Open the meeting request.
3. Tap
and then tap Accept, Tentative, or Decline. If you want, you can
also include a written message with the response. The response will be
sent the next time that you synchronize or connect to your e-mail server,
and your device Calendar will be updated.
See Also: Send a meeting request
19-172
Compose and send a message
1. In the message list, tap New.
2. To select an account, tap the From list and select ActiveSync, or the
desired e-mail account.
3. Enter the e-mail address of one or more recipients, separating them with a
semicolon. To access addresses and phone numbers from Contacts, tap
To.
4. Enter your message. To quickly add common messages, tap My Text and
tap a desired message.
5. To check spelling, tap Edit > Spell Check.
6. Tap Send. If you are working offline, the message is moved to the Outbox
folder and will be sent the next time you connect.
See Also: Attach a file to a message
Change address options
Use My Text
Attach a file to a message
1. With the message open, tap Edit > Add Attachment.
2. Select the file you want to attach. OLE objects cannot be attached to Inbox
messages.
Inbox automatically converts Pocket Word files that you attach to
messages to .doc format and Pocket Excel files to .xls format.
See Also: Compose and send a message
Delete a message
19-173
Customize Inbox
Manage folders
Sort the message list
Organize messages
Change message options
Change storage options
Change address options
Check Inbox status
Manage folders
To create, rename, or delete a folder:
Tap Accounts, and then select the correct account.
Tap Tools > Manage Folders.
Tap New to create a new folder under the folder that is currently selected.
Tap a current folder, and then tap Rename to change the folder name.
Default folders, such as Inbox, cannot be renamed.
Tap
to delete a folder and its contents.
Tapping Tools > Options from the Manage Folders screen allows you to set
folder synchronization settings on a per-folder basis by selecting the check
box next to the folder you want to synchronize.
You must be online and connected to delete or rename an IMAP4 folder.
Default folders (Drafts, Outbox, Inbox, Deleted Items, and Sent Items)
cannot be renamed or deleted.
See Also: About Folders
Sort the message list
If you have a long list of messages, sorting the list can help you quickly find
19-174
the item you want.
1. In the message list, tap the sort list (labeled Received Date by default) and
select a sort option.
2. Select the option again to reverse the sort order (ascending to
descending).
See Also: Clear messages and folders
Find a message
Organize messages
Move a message
Delete a message
Clear messages and folders
Move a message
In the message list, tap and hold the message. To select multiple
messages, tap and drag. Then, tap and hold the selected messages.
On the pop-up menu, tap Move.
Select where you want to move the message, and then tap OK.
Caution When you move a message that you have received through POP3
or synchronization to a folder you created on your device, the copy of the
message on the server is deleted the next time you connect. This prevents
duplicate copies of messages. Although the complete message is moved,
message attachments will be deleted if you have not selected the option to
download attachments. Once the message is moved, you will be able to
access the message only from your device.
See Also: Clear messages and folders
Manage folders
19-175
Delete a message
To delete a message, in the message list, tap and hold the message. To
select multiple messages, tap and drag. Then, tap and hold the selected
messages. On the pop-up menu, tap Delete. Messages are moved to the
Deleted Items folder and deleted according to the option that you have
selected in Tools > Options > Message tab.
If you are working offline, messages that have been deleted from the
server will be deleted from the device the next time you connect or
according to the options you have selected.
To permanently delete messages in the Deleted Items folder, tap Tools >
Empty Deleted Items.
See Also: Change message options
Change storage options
Clear messages and folders
Clear Messages and Folders
When receiving e-mail messages from a POP3 or IMAP4 server, select the
account on the device containing the folders and messages you want to
clear, and then select Accounts > Clear (Account). All messages and
folders that are linked to the selected account are cleared, and memory is
expanded on the device without deleting messages on the server. The next
time you connect, the messages and folders are downloaded again.
You cannot clear messages and folders from the ActiveSync folder.
See Also: Delete a message
Download messages
19-176
Change message options
In the message list, tap Tools > Options > Message tab.
To place a copy of the original message beneath your response text, select
When replying, include body.
By default, e-mail messages you send are not saved on your device to help
conserve memory. If you want to keep copies of sent e-mail messages, tap
Keep copy of sent mail in Sent folder.
See Also: Delete a message
Reply to or forward a message
Change storage options
In the message list, tap Tools > Options > Storage tab.
You can store attachments on a storage card rather than internal RAM. All
attachments will move to the selected card.
See Also: Receive attachments
Change address options
Many e-mail servers, including servers running Exchange Server, can verify
names with an online address book, called a directory service, using LDAP
(Lightweight Directory Access Protocol). When you create an e-mail account,
your e-mail server's directory service is added to the Address tab, and you
are given the option to enable it. After it is enabled, Inbox checks your contact
list and then the directory service to verify names that you enter in the To, Cc,
and Bcc fields. If you did not enable directory service or if you want to use
additional services, follow these steps:
1. If you are adding a new account, ask your network administrator for the
correct server name.
2. In the message list, tap Tools > Options > Address tab.
19-177
3. In the In Contacts, get addresses from list, select which e-mail address
book to check in Contacts. Contacts will be checked first unless you select
None.
4. If your mail server is already listed, select the mail server's directory service
check box to enable it. Tap OK.
5. If your mail service is not already listed, tap Add.
6. In the Directory name and Server boxes, enter the LDAP directory and
server names.
7. Ask your network administrator if authentication is necessary for your
server. If so, select Authentication is necessary on this server, and
enter your user ID and password.
8. To have Inbox check this service, select Check name against this server.
To delete a service, tap and hold the service. On the pop-up menu, tap
Delete.
While sending and receiving messages through synchronization, disable
any directory services you have installed. This helps avoid getting error
messages when Inbox tries to verify names against the service that you
are not connected to.
See Also: Compose and send a message
Check Inbox status
In the message list, tap Tools > Status. You can view details such as the
number of messages to be sent, deleted, and copied, and the number of
attachments to be downloaded.
Create or Change a Signature
1. Tap > Inbox > Tools > Options.
19-178
2. Tap Signatures.
3. Select an account for which you want to create or change a signature.
4. Select Use signature with this account if the check box is not already
selected.
5. Select Use when replying and forwarding if wanted.
6. Enter a signature in the box.
To stop using a signature, clear the Use signature with this account
check box.
You can use a different signature with each account.
19-179
20
MSN Messenger Help
MSN Messenger
How To
Concepts
Set Up an Account
About MSN Messenger
Sign In and Out
Getting Started with MSN
Add and Delete Contacts
Messenger
Manage Contacts
Block and Unblock Contacts
Send a Message
Read a Message
Tell Contacts Your Status
Change Your Displayed Name
About MSN Messenger
MSN Messenger on your mobile device provides the same chat environment
as MSN Messenger on your PC. These features include:
Seeing who is online.
Sending and receiving instant messages.
Having an instant message conversation with a group of contacts.
Telling contacts that you are unavailable.
Blocking contacts from seeing your status or sending you messages.
See Also: Getting Started with MSN Messenger
20-180
Getting Started with MSN Messenger
To use MSN Messenger, you need a Microsoft Passport account, or a
Microsoft Exchange e-mail account that your employer provides. Once you
have one of these accounts, you will need to:
1. Set up a connection on your mobile device, such as a modem or wireless
connection, that enables you to connect to the Internet.
2. Set up an account in MSN Messenger.
3. Sign in to MSN Messenger.
To set up a Microsoft Passport account, go to http://www.passport.com.
To set up a Hotmail account, go to http://www.hotmail.com.
See Also: Add and Delete Contacts
Send a Message
Read a Message
Tell Contacts Your Status
Set Up an Account
Before you can use MSN Messenger, you must set up the instant messaging
account(s) to use. For MSN Messenger Service, you must have a Microsoft
Passport or Hotmail account. For Exchange Instant Messaging, you must
have an Exchange account.
1. Create a connection for your device. To use MSN Messenger Service, set
up a connection to the Internet; to use Exchange Instant Messaging, set up
a connection to your corporate network.
2. In MSN Messenger, tap Tools > Options > Accounts tab.
3. Select Enable MSN Messenger Service and/or Enable Exchange
Instant Messaging.
20-181
4. Enter your sign-in name and password for the selected account(s). Your
sign-in name is usually in the form: [email protected].
5. If you selected both accounts, under Sign in using this account first,
select which account to sign in to first.
To set up a Microsoft Passport account, go to http://www.passport.com.
To set up a Hotmail account, go to http://www.hotmail.com.
To set up an Exchange account, see your network administrator.
See Also: Getting Started with MSN Messenger
Sign In and Out
Sign In and Out
To sign in, tap anywhere on the screen. Follow the directions on the
screen.
To sign out, tap Tools > Sign out.
To sign in upon connecting, tap Tools > Options > General and select
the Run this program upon connection box.
Signing in to an Exchange account may take several minutes depending
upon your connection speed. Reducing the number of Exchange
contacts will decrease your sign-in time.
See Also: Add and Delete Contacts
Set Up an Account
Getting Started with MSN Messenger
20-182
Add and Delete Contacts
To add a contact, tap Tools > Add a Contact and follow the directions on
the screen.
To delete a contact, tap and hold the contact's name, and tap Delete
Contact from the pop-up menu.
Tapping Tools > Options > Privacy allows you to choose to be alerted
every time you are added to a contact list.
See Also: Send a Message
Tell Contacts Your Status
Manage Contacts
Tap Tools > Options > Privacy tab.
To block a contact from seeing your status and sending you messages, tap
the contact and tap the right arrow. This moves the contact to the My Block
List.
To unblock a contact, tap the contact and tap the left arrow. This moves the
contact to the My Allow List.
To receive an alert when someone adds you to their contacts list, select
Alert me when I am added to a Passport contact list.
To see who has you listed as a contact, tap View.
See Also: Send a Message
Tell Contacts Your Status
20-183
Block and Unblock Contacts
To block a contact from seeing your status and sending you messages, tap
and hold the contact and tap Block.
To unblock a contact, tap and hold the blocked contact and tap Unblock.
To see who has you listed as a contact, tap Tools > Options > View.
See Also: Send a Message
Tell Contacts Your Status
Send a Message
1. Tap the contact to whom you want to send a message.
2. Enter your message in the text entry area at the bottom of the screen and
tap Send. To quickly add common messages, tap My Text and tap a
desired message.
To invite a contact to an ongoing chat, tap Tools > Invite and tap a
contact.
To see who is already chatting or to switch between chats, tap Chats.
See Also: Add and Delete Contacts
Change Your Displayed Name
Getting Started with MSN Messenger
Sign In and Out
Use My Text
20-184
Read a Message
When you receive a notification that a new message has been received,
tap Chat to switch to that chat or Ignore to stay in the current chat.
To switch between chats, tap Chats, and then tap the contact to resume
chatting.
See Also: Add and Delete Contacts
Getting Started with MSN Messenger
Sign In and Out
Tell Contacts Your Status
Tap Tools > My Status and select a desired status description, such as
Away.
See Also: Add and Delete Contacts
Manage Contacts
Getting Started with MSN Messenger
Change Your Displayed Name
Tap Tools > Options > General tab.
Enter the name that you want others to see when sending instant
messages.
See Also: Send a Message
20-185
21
Bluetooth Help
Concepts
Blue-tooth
How To
Turning on and off Bluetooth
About Bluetooth
Making your device
About Bluetooth modes
discoverable
About bonds
Beaming information with
Bluetooth
Receiving a Bluetooth beam
Using a Bluetooth phone as a
modem
Bonding with other devices
About Bluetooth
Bluetooth is a short-range wireless communications technology.
Devices with Bluetooth capabilities can exchange information over a
distance of about 10 meters (30 feet) without requiring a physical
connection.
Unlike infrared, you don’t need to line up the devices to beam
information with Bluetooth. The devices only need to be within a range
of about 10 meters. You can even beam information to a device in a
different room, as long as it’s within range.
Microsoft Pocket PC 2003 software allows you to use Bluetooth in the
following ways:
Beam information, such as files, appointments, tasks, and contact
cards, between devices that have Bluetooth capabilities. For
example, if you and a co-worker each have a device with Bluetooth,
21-186
you can beam items between your devices, such as files, contact
cards, appointments, tasks, and so forth.
Create a dial-up modem connection between your device and a
Bluetooth phone. You can then use the Bluetooth phone as a
modem.
Your device might include additional Bluetooth features. For more
information, see the documentation included with your device.
About Bluetooth Modes
Bluetooth operates in three different modes:
On. The Bluetooth radio is turned on and you can use Bluetooth
features.
Off. The Bluetooth radio is turned off. In this mode, you can neither
send nor receive information by using Bluetooth. You might want to
turn the radio off at times in order to conserve battery power, or in
situations where radio use is prohibited, such as on airplanes and in
hospitals.
Discoverable. The Bluetooth radio is turned on, and all of the other
Bluetooth devices within range (about 10 meters) can detect your
device and attempt to beam information to it, establish a bond, or
use a Bluetooth service. In this mode, other devices can detect your
device whether or not a bond has been created; however, in order to
receive a beam from another device, you must accept it on your
device, as described in Receiving a Bluetooth Beam.
For more information about changing the Bluetooth mode, see Turning
On and Off Bluetooth and Making Your Device Discoverable.
21-187
About Bonds
A bond is a relationship that you create between your Pocket PC and
another Bluetooth device in order to help exchange information in a
secure manner. Creating a bond involves entering the same PIN on
the two devices you want to bond. Once a bond is created, the devices
need only have their Bluetooth radios turned on to exchange
information; they do not need to be in discoverable mode. For
instructions on creating a bond, see Create a Bond. For more
information about modes, see About Bluetooth Modes.
You need only create a bond once between two devices. Thereafter,
they recognize the bond and are able to exchange information without
your entering a PIN again. For more information about exchanging
information with other devices, see Beaming Information With
Bluetooth and Receiving a Bluetooth Beam.
Turning On and Off Bluetooth
1. Tap
> Settings > Connections tab.
2. Tap Bluetooth.
3. Select On or Off.
The Bluetooth radio is turned on or off according to your
selection.
By default the Bluetooth radio is turned off. If you turn it on, and
then turn off your device, the Bluetooth radio also turns off. When
you turn on your device again, the Bluetooth radio turns on
automatically.
See Also: About Bluetooth Modes
Making Your Device Discoverable
21-188
Making Your Device Discoverable
1. Tap
> Settings > Connections tab.
2. Tap Bluetooth.
3. Select Discoverable.
Other Bluetooth devices can now detect your device and attempt to
beam information to it, establish a bond, or use a Bluetooth service.
Note that to receive beamed information, you must accept it on your
device.
Selecting Discoverable also turns on your Bluetooth radio.
If you no longer want your device to be discoverable, tap Off to
turn off the radio or On to leave the radio on, but not allow
detection by other devices.
See Also: About Bluetooth Modes
Turning On and Off Bluetooth
Beaming Information with Bluetooth
1. Tap and hold an item to beam, such as an appointment in Calendar,
a task in Tasks, a contact card in Contacts, or a file in File Manager.
2. Tap Beam [type of item].
3. Tap the device to which you want to send the beam.
The item is beamed to the device you selected.
If the device that you want to beam to doesn't appear in the list,
make sure that it is turned on, in discoverable mode, and within 10
meters (30 feet) of your device. Also, make sure that your
Bluetooth radio is turned on.
21-189
See Also: Making Your Device Discoverable
About Bluetooth
Receiving a Bluetooth Beam
Using a Bluetooth phone as a modem
Receiving a Bluetooth Beam
1. Make sure that your device is configured to receive incoming
beams.
2. Make sure that your device is within 10 meters (about 30 feet) of the
device beaming the information and that Bluetooth is in discoverable
mode.
3. When prompted to receive an incoming beam, tap Yes.
The information is received on your device.
See Also: About Bluetooth
Making Your Device Discoverable
Beaming Information With Bluetooth
Using a Bluetooth phone as a modem
Using a Bluetooth Phone as a Modem
You can use a phone that has Bluetooth capabilities as a modem for
your device. To do this, you create a Bluetooth modem connection on
your device and then send information to the phone by using Bluetooth.
The phone relays the information over the phone line and then sends
back to your device any information that you had requested over the
connection.
Once you create a modem connection to the Bluetooth phone, you can
reuse it whenever you want to use the phone as a modem.
21-190
1. Make sure that the Bluetooth phone is turned on, that your device's
and the phone's Bluetooth radios are turned on, and that your
device and the phone are within 10 meters (30 feet) of one another.
2. If you have not already done so, create a Bluetooth phone connection by following steps 3 through 16. Otherwise, skip to step 17.
3. Tap
> Settings > Connections tab.
4. Tap Connections > Add a new modem connection.
5. Enter a name for the connection.
6. In the Select a modem list, tap Bluetooth > Next.
7. Make sure that the phone is discoverable. Some phones may also
need to be pairable in order to accept a bonding request. For more
information, see your phone documentation.
8. If the phone appears in the My Connections list, skip to step 14. If
not, tap New and follow the remaining steps.
9. In the list, tap the phone and then Next.
10. In PIN, enter a PIN of between 1 and 16 characters, and tap Next.
11. Enter the same PIN on the phone.
12. If you want, in Name, edit the name of the phone.
13. Tap Finish.
14. In the My Connections list, tap the phone, and then Next.
15. Enter the phone number to dial for this connection and tap Next.
16. In User name, Password, and Domain, enter the logon
information for this connection and tap Finish.
17. Start using the program that uses the Bluetooth phone connection;
for example Inbox to send and receive e-mail, or Internet Explorer
to browse the Web.
See Also: Turning On and Off Bluetooth
Making Your Device Discoverable
Beaming Information With Bluetooth
Receiving a Bluetooth Beam
21-191
Bonding With Other Devices
Create a Bond
Accept a Bond
Rename a Bond
Delete a Bond
Create a Bond
You can create a bond between your device and another device that
has Bluetooth. Once you do this, Bluetooth doesn't need to be in
discoverable mode in order for you to beam information between the
two devices; the Bluetooth radio only needs to be turned on.
1. Make sure that the two devices are within 10 meters of one another
and that Bluetooth is in discoverable mode on both devices.
2. Tap
> Settings > Connections tab.
3. Tap Bluetooth > Bonded Devices tab > New. Your device
searches for other Bluetooth devices and displays them in the list.
4. Tap the name of the other device, and then Next.
5. In PIN, enter a PIN of between 1 and 16 characters and tap Next.
6. Enter the same PIN on the other device.
7. If you want, in Name, edit the name of the other device. You may
use any name.
8. Tap Finish.
See Also: Making Your Device Discoverable
About Bonds
Bonding With Other Devices
Beaming Information With Bluetooth
21-192
Select a Device
In the list, tap the device with which you want to create a bond.
If the device doesn't appear in the list, make sure that it is turned
on, in discoverable mode, and within 10 meters (30 feet) of your
device. Also, make sure that your device's Bluetooth radio is
turned on.
See Also: Making Your Device Discoverable
About Bonds
Bonding With Other Devices
Enter a PIN
In PIN, enter a PIN of between 1 and 16 characters, and then tap
Next. You must enter the same PIN on both devices.
See Also: About Bonds
Enter a Name
Correct the PIN
The same PIN must be entered on both devices. Verify the correct
number, enter it in PIN, and then tap Next.
See Also: About Bonds
Enter a PIN
21-193
Enter a Name
1. If you want, in Name, edit the name of the device with which you are
creating a bond. You may use any name.
2. Tap Finish.
See Also: About Bonds
Enter a PIN
Accept a Bond
1. Make sure that Bluetooth is turned on and in discoverable mode.
2. When prompted to bond with the other device, tap Yes.
3. In PIN, enter a PIN of between 1 and 16 characters, and tap Next.
You must enter the same PIN that was entered on the device
requesting the bond.
4. If you want, in Name, edit the name of the device requesting the
bond.
5. Tap Finish.
The bond is created. You can now exchange information with
the other device.
See Also: Making Your Device Discoverable
About Bonds
Bonding With Other Devices
Beaming Information With Bluetooth
Receiving a Bluetooth Beam
21-194
Rename a Bond
1. Tap
> Settings > Connections tab.
2. Tap Bluetooth > Bonded Devices tab.
3. Tap the bond to rename.
4. In Name, enter a new name for the bond.
5. Tap Finish.
See Also: About Bonds
Bonding With Other Devices
Delete a Bond
1. Tap
> Settings > Connections tab.
2. Tap Bluetooth > Bonded Devices tab.
3. Tap and hold the bond to delete.
4. Tap Delete.
See Also: About Bonds
Bonding With Other Devices
21-195
22 Scanner
Scanner Help
About the Scanner
Scanner Setting
Scan2Key
Symbologies
About the Scanner
The PA950 has an integrated laser scanner, which reads all major bar
code labels with excellent performance. The PA950 Trigger keys are
located on the left and right sides of the unit. Press either one to
activate the laser scanner.
Scanner Trigger
22-196
Scanner Setting
PA950 has a built-in Scanner Setting.exe program that allows the user
to test the barcode scan function. And when it is necessary for the user
to change the default barcode symbology for a different application,
Scanner Control Panel provides the ability to change default
symbology, place delimiter characters behind scanned data, and save
the settings.
Scanner Setting.exe is located in directory \Setting.
Note: For more information about Scanner Setting, please refer to the
PA950 Programming Manual.
22-197
Scan2Key
The Scan2Key application can route input from a scanner port to
keypad buffer, so that all input from scanner will be treated as they are
just input from keypad. With this router, scanned data can be directly
input into scanner port aware application, like MS Pocket
22-198
Symbologies
Set customization symbologies for each symbology including:
Enable
Disable
Send
Check
Digit
Max./Min
Length
Code 39
Yes
Yes
Yes
Full ASCII
Send Start/Stop Character
I 2 of 5
Yes
Yes
Yes
Send Start/Stop Character
Fix Length
S25/Toshiba
Yes
Yes
Yes
Symbology
Code 32
Send
Leading
Digit
Other
Fix Length
Yes
Send Leading Code
Send Trailing Code
Character Set
Telpen
Yes
EAN 128
Yes
Code 128
Yes
MSI/Plessy
Yes
Code 93
Yes
Code 11
Yes
Yes
Yes
One/Two Check Digit
CodaBar
Yes
Yes
Yes
Send Start/Stop Character
CLSI Format On
Yes
Yes
Yes
Check Digit Module
Yes
Label Code
Yes
Yes
UPC-A
Yes
Yes
Yes
UPC-E
Yes
Yes
Yes
Zero Expansion On
Enable NSC
EAN 13
Yes
Yes
Yes
Enable Bookland
Yes
EAN 8
Yes
Yes
Delta Code
Yes
Yes
Supplement
Calculate Check Digit
Supplement 2
Supplement 5
Space Separator Inserted
If Present, Transmit / Presence Required
22-199
23
Technical
Specification
Specification
PA950
CPU
Intel X-Scale 400MHz
OS
Microsoft Windows Mobile 2003
Flash ROM
32MB
SDRAM
64MB
Keypad
19 key keypad, including 0~9, alpha,
function key
Display
240 x 320, 64K Reflective TFT Color
LCD,
w/backlight,
and
brightness
adjustable by hot-key
Input Device
Non-electronic stylus, touch screen or
keypad
Scanner
integrated SE900 Laser Scan Engine as
optional
Main Battery
Rechargeable
Li-ION
battery
7.4V
Li-ION
battery
3.7V
720mAH
Backup Battery
Rechargeable
30mAH
Charging for the first time
10 hours
Charging Hours
Within 2.5 hours via charging cable or
cradle
Battery Life
6~10 hours depends on application
Dimension
Lx H x W: 182mmx82mmx29mm
23-200
Weight
350 gram with battery pack
Operation Temperature
-5 C ~50 C
Storage Temperature
-20 C ~60 C
Relative Humidity
5% ~ 95% (non-condensing)
Trop Test
4 feet (1.2M)
Environmental Sealing
54
Communication
Serial, USB, IrDA
SD Slot
1 for SD memory card
CF Slot
For 802.11b (pre-loaded)
ActiveSync
Via Serial or USB or IrDA
Software
Point to Point VOIP (optional)
Unitech PA950 SDK
Microsoft Development tool for Pocket
PC 2003
Regulatory
CE, FCC, VCCI, BSMI
23-201
16 Pole Connectors
Keypad side
15
16
13
14
11
12
9
10
15 Pole
7
8
5
6
3
4
1
2
SubD9 Female
DCD
1
RX
2
3
TX
3
2
DTR
4
9
S GND
5
5
DSR
6
4
RTS
7
7
CTS
8
8
RI
9
6
USB 5V
10
12V Input
11
NC (R30 == 5V Out)
12
NC
13
GND
14
UDC (USB High)
15
/UDC (USB Low)
16
23-202
24
Contact
Information
America
Unitech America www.unitech-adc.com
Telephone:
1-562-490-9550
Fax:
1-562-490-0320
E-mail:
[email protected]
Latin America
latin.unitech-adc.com
Telephone:
1-305-556-5290
Fax:
1-305-675-8111
E-mail:
[email protected]
APAC
Unitech APAC www.unitech-adc.com
Telephone:
886-2-89121122
Fax:
886-2-89121391
E-mail
[email protected]
China
Unitech China www.ute.com.cn
Telephone:
86-592-5713471
Fax:
86-592-5713862
E-mail
[email protected]
24-203
Europe
Unitech Europe www.unitech-europe.nl
Telephone:
31-13-4609292
Fax:
31-13-4609293
E-mail
[email protected]
E-mail
[email protected]
Japan
Unitech Japan www.unitech-japan.co-jp
Telephone:
81-48-4862677
Fax:
81-48-4862688
E-mail:
sales@ unitech-japan.co.jp
Taiwan
Unitech Taiwan www.adc-utt.unitech.com.tw
Telephone:
886-2-2795
Fax:
886-2-87919541
E-mail:
[email protected]
Unitech ADC Group Headquarters
www.unitech-adc.com
24-204