1
AKG.EMOTION
D 770
Bedienungshinweise . . . . . . . . . . . . . . . . . . S. 2
Bitte vor Inbetriebnahme des Gerätes lesen!
User Instructions . . . . . . . . . . . . . . . . . . . . p. 16
Please read the manual before using the equipment!
Mode d’emploi . . . . . . . . . . . . . . . . . . . . . . p. 29
Veuillez lire cette notice avant d’utiliser le système!
Istruzioni per l’uso . . . . . . . . . . . . . . . . . . . p. 42
Prima di utilizzare l’apparecchio, leggere il manuale!
Modo de empleo . . . . . . . . . . . . . . . . . . . . p. 55
Antes de utilizar el equipo, lea por favor el manual!
Instruções de uso . . . . . . . . . . . . . . . . . . . p. 68
Por favor leia este manual antes de usar o equipamento!
EMOTION
MICROPHONE
SERIES
1 Precaution/Description
1.1 Precaution
Please make sure that the piece of equipment
your microphone will be connected to fulfills the
safety regulations in force in your country and is
fitted with a ground lead.
1.2 Unpacking
1 D 770
1 SA 44
Check that the packaging contains all of the components listed above. Should anything be
missing, please contact your AKG dealer.
16
1.3 Optional
Accessories
• MK 9/10 microphone cable: 10 m (30 ft.) 2conductor shielded cable with 3-pin male and
3-contact female XLR connectors
• ST 102A, ST 200 floor stands
• ST 1, ST 12, ST 45 table stands
• W 880 windscreen
1.4 Features
• Frequency response tailored to miking instruments and backing vocals.
• Built-in windscreen/pop filter for effective suppression of pop and breath noise.
• Doubleflex™ f transducer shock mount reduces handling and cable noise.
• Frequency-independent cardioid polar response for high gain before feedback.
• New Varimotion™ diaphragm technology for
brilliant sound.
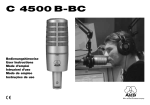
1 Description
The D 770 is a cardioid dynamic microphone. It
has been designed primarily as an instrument
microphone for rough stage use and for miking up
backing vocals. The wide frequency response of
the D 770 slightly favors the midfrequency and
treble regions and thus ensures good intelligibility.
Having a cardioid polar response, the D 770 is
most sensitive to sound arriving from in front of it,
less sensitive to sound arriving from the sides, and
least sensitive to sound arriving from the rear. This
polar pattern is virtually the same for all frequencies ("frequency independent"). The D 770 is fitted
with a shock absorbing inner grille for transducer
protection against damage. The outer grille and a
layer of special fabric beneath it form a very effective windscreen that will suppress blowing and
wind noise on open-air stages. The D 770 features
a gold plated 3-pin male XLR-type connector for
optimum electrical contact. You can connect the
microphone either to a balanced or an unbalanced
microphone input.
1.5 Brief
Description
17
2 Wiring
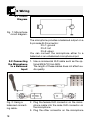
2.1 Circuit
Diagram
Fig. 1: Microphone
circuit diagram.
The microphone provides a balanced output on a
3-pin male XLR connector:
Pin 1: ground
Pin 2: hot
Pin 3: return
You can connect the microphone either to a
balanced or an unbalanced microphone input.
2.2 Connecting
the Microphone
to a Balanced
Input
1. Use a commercial XLR cable such as the optional MK 9/10 from AKG.
The length of these cables does not affect audio quality.
Fig. 2: Using a
balanced connecting cable.
2. Plug the female XLR connector on the microphone cable into the male XLR connector on
the microphone.
3. Plug the other connector on the microphone
18
2 Wiring
cable into the desired microphone input socket
on your mixer or amplifier.
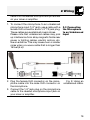
1. To connect the microphone to an unbalanced
microphone input (1/4" jack), use a cable with a
female XLR connector and a 1/4" TS jack plug.
These cables are available at music stores.
Please note that unbalanced cables may pick
up interference from stray magnetic fields near
power or lighting cables, electric motors, etc.
like an antenna. This may cause hum or similar
noise when you use a cable that is longer than
16 feet (5 m).
2. Plug the female XLR connector on the microphone cable into the male XLR connector on
the microphone.
3. Connect the 1/4" jack plug on the microphone
cable to the desired microphone input jack on
your mixer or amplifier.
2.3 Connecting
the Microphone
to an Unbalanced
Input
Fig. 3: Using an
unbalanced cable.
19
3 Using Your Microphone
The best way to get the "right" sound is to experiment with microphone placement. The following
sections contain useful suggestions.
3.1 Proximity
Effect
Please note that moving the microphone closer to
the instrument will boost the bass range of the
microphone signal. Using this effect, you can
create your personal sound by varying the working distance.
3.2 Feedback
Feedback is the result of part of the sound projected by a speaker being picked up by a microphone,
fed to the amplifier, and projected again by the
speaker. Above a specific volume or "system
gain" setting called the feedback threshold, the
signal starts being regenerated indefinitely, making the sound system howl and the sound engineer desperately dive for the master fader to reduce the volume and stop the howling.
To increase usable gain before feedback, the
microphone has a cardioid polar pattern. This means that the microphone is most sensitive to
sounds arriving from in front of it while picking up
much less of sounds arriving from the sides or rear
(from monitor speakers for instance).
Fig. 4: Microphone
placement for
maximum gain
before feedback.
20
3 Using Your Microphone
To maximize gain before feedback, place the main
("FOH") speakers in front of the microphones
(along the front edge of the stage).
Be sure never to point any microphone directly at
the monitors, or at the FOH speakers.
Feedback may also be triggered by resonances
depending on the acoustics of the room or hall.
With resonances at low frequencies, proximity effect may cause feedback. In this case, it is often
enough to move away from the microphone a little
to stop the feedback.
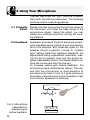
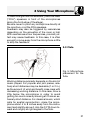
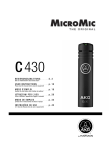
3.3 Flute
Fig. 5: Microphone
placement for the
flute.
Working distance primarily depends on the kind of
music played. For popular and jazz pieces, relatively short distances may be desirable (1 or 2 in.),
as the amount of wind and breath noise rises with
decreasing working distance. In this case, blow a
little below the microphone in order to avoid
getting too much noise by blowing at it from an extremely short distance. For classical music, which
calls for spatial reproduction, place the microphone about 4 to 8 inches away from the instrument and slightly above it. Aim the D 770 down toward and roughly at right angles to the flute.
21
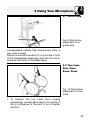
3 Using Your Microphone
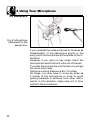
3.4 Saxophone
Fig. 6: Microphone
placement for the
saxophone.
If you consider the noise produced by the keys as
characteristic of the saxophone sound or the
song, point the microphone at the middle of the instrument.
However, if you want no key noise, direct the
microphone toward the front outer rim of the bell.
If you aim the microphone into the bell, you will get
too much wind noise.
Optimum working distance is 8 to 12 inches.
On stage, you may have to move as close as
2 inches to the microphone in order to avoid
getting feedback or spillover from other instruments. In this situation, make sure not to blow
right into the microphone.
22
3 Using Your Microphone
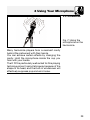
3.5 Harmonica
Fig. 7: Using the
microphone on the
harmonica.
Many harmonica players form a resonant cavity
behind the instrument with their hands.
You can achieve certain effects by changing the
cavity. Hold the microphone inside the cup you
form with your hands.
The D 770 is particularly well suited for this playing
technique since it cannot slip away because of the
shape of its head, and the built-in windscreen will
effectively suppress pop and wind noise.
23
3 Using Your Microphone
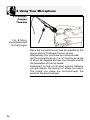
3.6 Bongos,
Congas,
Timbales
Fig., 8: Microphone placement
for the bongos.
Place the microphone as close as possible to the
drums, aiming it between the two drums.
Alternatively, you could use two microphones:
Set the microphones up in a "V" forming an angle
of about 45 degrees and aim the microphones at
the perimeters of the top heads.
Experiment to find out at what working distance
you get exactly the amount of attack you want.
The closer you place the microphone(s), the
punchier the sound will get.
24
3 Using Your Microphone
3.7 Guitar Amp
Fig. 9: Microhone
placement for a
guitar amp.
Loudspeakers radiate high frequencies within a
very narrow angle.
Place the microphone about 2 to 6 inches in front
of the loudspeaker diaphragm and aim the microphone at the center of the diaphragm.
3.8 Tom-toms,
Roto Toms,
Snare Drum
Fig. 10: Microhone
placement for tomtoms.
1. To prevent the top head from ringing
excessively, use adhesive tape to fix a strip of
felt or a Kleenex to the skin in an off-center
position.
25
3 Using Your Microphone
2. Place one D 770 about 2 to 4 inches from the
head of each tom.
3. Align the microphone with the perimeter of the
top head.
3.9 Backing
Vocals
Fig. 11: Microphone placement
for backing vocals.
1. Never let more than two persons share a
microphone.
2. Ask your backing vocalists never to sing more
than 35 degrees off the microphone axis.
The microphone is very insensitive to off-axis
sounds. If the two vocalists were to sing into
the microphone from a wider angle than
35 degrees, you may end up bringing up the
fader of the microphone channel far enough to
create a feedback problem.
4 Cleaning
To clean the microphone case, use a soft cloth
moistened with water.
26
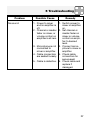
5 Troubleshooting
Problem
No sound:
Possible Cause
Remedy
1. Power to mixer
1. Switch power to
and/or amplifier is
mixer or amplifier
off.
on.
2. Channel or master 2. Set channel or
fader on mixer, or
master fader on
volume control on
mixer or volume
amplifier is at zero.
control on amplifier to desired
level.
3. Microphone is not 3. Connect microconnected to
phone to mixer or
mixer or amplifier.
amplifier.
4. Cable connectors 4. Check cable
are seated loosely.
connectors for
secure seat.
5. Cable is defective. 5. Check cable and
replace if
damaged.
27
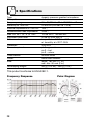
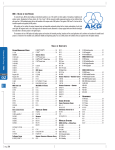
6 Specifications
Type:
Polar pattern:
Frequency range:
Sensitivity at 1000 Hz:
Electrical impedance at 1000 Hz:
Recommended load impedance:
Max. SPL for 1 % / 3 % THD:
Equivalent noise level:
Environment:
Connector:
Connector pinout:
Case material:
Finish:
Size:
Net/shipping weight:
dynamic pressure gradient microphone
cardioid
60 to 20,000 Hz; 20 to 20,000 Hz at 1 cm
2.5 mV/Pa (–52 dBV re 1 V/Pa)
≤600 Ω
≥2000 Ω
147 dB SPL / 156 dB SPL
22 dB (A) (DIN 45412)
temperature: –10°C to +60°C
rel. humidity at +20°C: 95%
3-pin XLR
pin 1 – ground
pin 2 – hot
pin 3 – return
die-cast metal
matte black enamel
length: 180 mm (7.1 in.)
max. dia.: 50 mm (2 in.)
290 g (10.2 oz.) / 650 g (1.4 lb.)
This product conforms to EN 50 082-1.
Frequency Response
28
Polar Diagram
AKG.EMOTION
The Moffatts
B*Witched
D 660 S
D 880
D 880 S
D 440
D 550
D 770
Printed in Austria on recycled paper.
For other distributors worldwide see our website: http://www.akg-acoustics.com
1449 Donelson Pike, Nashville, TN 37217, U.S.A., Tel: (615) 360-0499, Fax: (615) 360-0275,
http://www.akgonline.com, e-mail: [email protected]
AKG ACOUSTICS, U.S.
Bodenseestraße 228, D-81243 München/GERMANY, Tel: (089) 87 16-0, Fax: (089) 87 16-200,
http://www.akg-acoustics.de, e-mail: [email protected]
AKG Acoustics, Harman Pro GmbH
08/00/9100 U 0993
Lemböckgasse 21–25, P.O.B. 158, A-1230 Vienna/AUSTRIA, Tel: (43 1) 86 654-0*, Fax: (43 1) 86 654-516,
http://www.akg-acoustics.com, e-mail: [email protected]
AKG Acoustics GmbH
Technische Änderungen vorbehalten. Specifications subject to change without notice. Ces caractéristiques sont susceptibles de modifications.
Ci riserviamo il diritto di effettuare modifiche tecniche. Nos reservamos el derecho de introducir modificaciones técnicas. Especificações sujeitas à mudanças sem aviso prévio.
EMOTION
MICROPHONE
SERIES