1
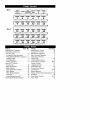
14PT6441/37
20PT6441/37
20PT6341/37
20PT5441/37
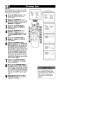
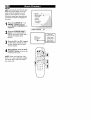
Thank you for choosing Philips.
Need help fast?
Read your User Manual first for quick tips that
your using your Phil,s product more enjoyable. If
you have read your instructions and still need
assistance you may access our online help at
_w.p4c.philips.com
or
call 1-800-531-0039
while with your product.
Model
No.:
Ser a No.:
PHILIPS
3141
055 22591 ]
Side I
P_
Sequence COVER
and
Pm_ Index _
PANEL
_D_
SAFETY
RE_'r_T_'_
_r_AT_:_
tNFO
,
,
PANEL
PANEL
PANEL
3,__3_4,_4__.,._.5_5,6
9
Side 2
PANEL
PANEL
10
PANEL
1t
PANEL
t
,.
PANEL
2
PANEL
PANEL
,7
,8
PANEL
12 13
14
PANEL
PANEL
PANEL
PANEL
PANEL
PANEL
PANEL
_15
_16
_17
_18
_19
_20
PANEL
PANEL
PANEL
PANEL
PANEL
PANEL
_21 .22
.23
.24
_25
_26
PANEL
PANEL
PANEL
PANEL
PANEL
PANEL
27
28
29
30
31
32
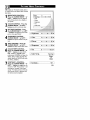
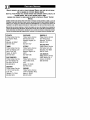
Subject
Antenna Basic Connection
AudioNideo
Connections
Panel
............
AV input jacks .....................
Component Video Input jacks
Front (Side) Audio/Video
........
No.
I
4
7
Input Jacks , , ,5
Headphone Jack ...................
AV Output Jacks ...................
S-Video input Jacks .................
AutoLock TM Controls
Access Code
PANEL
TM
TM
3
Panel
Control ..............
Control ...............
Basic Remote Operation ..............
Basic Television Operadon
............
Cable Box Connection
...............
Channel Edit ......................
Closed Caption Control
.............
Factory Service Locations
.........
Format Controls
...................
19
Language Controls
Block All Channels ................
Block Channels ...................
2I
20
Limited Warranty
..................
Picture Menu Controls
..............
Clear All Blocked Channels
21
QuadraSurf TM ...................
Remote Batteries ....................
Movie Ratings
.....................
5
8
6
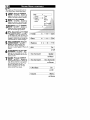
Subject
AucoPicture
AucoSound
3
.........
....................
Other Blocking Options ............
TV Ratings .......................
Understanding Au_oLock TM .........
Automcatically
Programming iV
......
22
24
23
18
13
..................
No.
25
25
3
3
2
14
25
30-3 I
17
II
32
15
27-28
3
Remote Control Button Descriptions
9-10
SIeeptimer ........................ 25
Sound Menu Controls ............ 14-15
Tuner Mode ....................... 16
"family!"
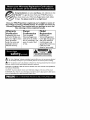
To get the most from your PHILIPS product,
you
must return your
Registration
Card within
Congratulations
on Warranty
your purchase,
and welcome
to the
10 days. So please mail it to us right now!
Once your PHILIPS purchase is registered, you're eligible to receive all
the privileges of owning a PHILIPS product. So complete and return the
Warranty Registration Card enclosed with your purchase at once. And
take advantage of these important benefits.
Warranty
Verification
Registering your product within 10 days confirms your right to max_mum protection
under the terms and
conditions of your
PH]LIPSwarranty.
Owner
Confirmation
Model
Your completed
Warranty Registration
Card serves as verification of ownership in the
eventof product_eft
Returning your
Warranty Registration
Card right away guarantees you'll receive all
the information and
special offers which you
qualify for as the
owner of your model.
or loss.
Registration
i!!i!l!
_'.
This "bolt of lightning" indicates uninsulated material within your unit may causean electrical
shock, For "-he safety of everyone in your household, piease do not remove product, covering.
_The
"e×c_amation point" calls at_endon to features for which you should read the enclosed
literature closety to prevent operating and maintenance problems.
WARNING: TO PREVENT FIRE OR SHOCK HAZARD, DO NOT EXPOSE THIS EQUIPMENT
TO RAIN OR MOISTURE.
CAUTION:
To prevent electric shock, match wide blade of plug to wide slot, and futty insert,
ATTENTION: Pour _viter les chocs _Iectriques, introduire ta lame la plus large de la fiche dans la
borne correspondante de la prise et pousser iusqu'au fond,
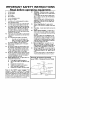
IMPORTANT
SAFETY INSTRUCTIONS
Read before operating equipment
your
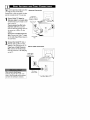
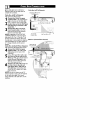
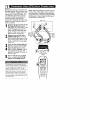
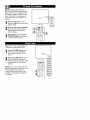
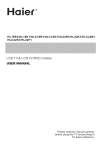
home's signal it_put might come from
sin_e (75 ohm) round cable, a
Antenna
Connection
Converter Box, or from an anteana_ In either
case the connec_onto the TV is very easy.
If your Cable
Antenna
signal"IVis signal
a roundor cable
(75 ohm) then you're
nect to the TV.
If your antenna
ready to con-
has flat twin-
lead wire (300 ohm), you first
need co attach the antenna wires to
the screws on a 300 co 75 ohm
adapter,
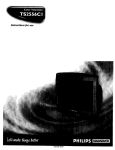
If yOU have a Cable
Box: Connect
Converter
the Cable TV signal
to the Cable Signal IN(put)
the Converter,
2
Connect
Ro_J_d Cable
75_
plug on
.
J
the Cable "rv cable or
Antenna cable (or 300 to 75 ohm
adapter) to the 75_ plug on the TV.
If you have a Cable Converter
BOX: Connect the OUT(put)
Direct
Cable
Connection
plug
from the Conver_er to the 75g_ plug
on the TV,
Cable signal
coming from
Cable Company
After usingthe AutoPt'ogram
Control, pressthe CH + and- buttens te scroll through all the channels
s_oredin the television's memory,
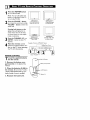
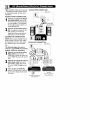
Jack Panet Back of TV
If you cable signalusesa cable box or
decoder,followthe easystepsbelowto
completethe cannectlon,
Cable
Box (w/RF
In/Outputs):
Cable Signal IN f_om the
Cable Company
Cable Box (w/RF In/Outputs):
This connection will be mono,
Connect cable
the Cable
supplied
_o theCompany
signal IN(put)
plug on the back of the Cable Box.
Using a separate
round
coaxial
cable,
connect
one end
to the
OUT(put)
(TO TV) plug on the back of the
Cable Box.
round coaxial
Connect
the other
cable end
to the
of 75_
the
input on the back of the television.
Screw it down finger tight.
NOTE: If applicable, set the OUTPUT
CHANNEL SWITCH on the back of the
cable box to CH 3 or 4. Tune the TV co
the
channelsat
Cable Box (w/Audio/Video Outputs):
the samechannelandchange
cablebox. In some cases,_hecablebox
will a_tomadcal_y tune to either channel 3
or 4, change channelsuntil the picture
appears.
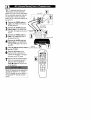
Cable BOX (w/Audio/Video
Outputs):
This connection will supply Stereo sound.
Connect the Cable Company
supplied cable to the cable signal
iN(put) plug on the back of the
Cable Box.
Using a RCA type Video Cable, connect one end of the cable to the
Video (or ANT, your cable box may be
labeled differently) Out jack on the
cable box and the other end m _he
AVI Video Input on the TV,
Connect one end of the Audio Lef_
t and Right Cable to the tef_ and
right Audio Out L & R jacks on
the cable box. Connect the other
end to die AV In Audio L & R Input
jacks on the mv.
NOTE: Use the AV bu_on on the TV
remo_e control _o tune to the AV channel
for the cable box signal. Once tuned,
change channels at the cable box, not the
television.
Cable
S,_oa_
_N ......
fromthe Cable _iiiiiiiiiiiiiiiiiiiiiiiiiiiiiiiiiiiiiiiiiiiiiiiiiiiiiiiiiiiiiiiiiiiiiiiiiiiiiiiiiiiiiiiiiiiiiiiiiiiiiiiiiiiii
Audio Cables
L (White) & R (Red)
I
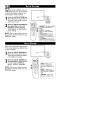
to ress
turn the
the POWER
TV ON.
button
Note: You can also
button
on the front
press any
of the TV
Eo turn
i ..................................................................
the TV ON.
Press
the VOLUME
+ button
to
increase
the sound level,
or the
VOLUME
sound level,
Pressing
button
to lower
both buttons
20PT6441 t37
Conu'ols located on
frontand topofse_-
20PT5441/37
Controls located
on front of set.
the
at the
saJTle time will display the onscreen menu, Once in the menu,
use these buttons to make adiuscments or selections,
3
4
Press
the CHANNEL
DOWN
- button
UP + or
co select TV
14PT6441/37
Contols under door
on front of set.
20PT6341/37
Controls located on
front of set_
channels,
Point
the
toward
remote
the
ExampleofControls, 14PT6441
i37 shovcn.
control
remote
sensor
win-
::::::::_Door
Cover
dow on the TV when operating
the TV with the remote.
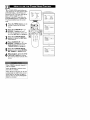
REMOTE
To
!.
CONTROL
Iood the supplied
into the remote:
Remove
partment
remote,
the
lid
battery
on the
botteries
com-
back of the
2. Place the batteries (2-AA)
in
the remote.
Be sure the (+) and () ends of the baEeries line up correctly (inside of case is marked.)
3. Reattach
the battery
lid,
f
BatLery Compartment
2-AABatLeries
_BackofRefaote
Bat_er_ Lid
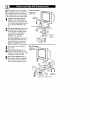
T_d e TV'saudio/videoi_p_ jacksare for
irect p!ctureoadsoundco_mectio_
betwee_the TVa_d a VCR(or similardevice)
that has audio/videoot_ut jade, Fol!owthe
easystepsbelowto co_mec_
on ocee_ory
deviceto the AV In InputJackslocatedon the
bad<of _heTV.
BackofTV
Connect
the VIDEOAV(yellow)
cable m sheVIDEO
In _ck on
the back of the TV,
2
Connect
the AUDIO
Audio
Cabl_s
(red and
white) cables ro the AUDIO (lefs
_nd right:) AV in iacks on the rear _f
video Cabl_
she TV,
Connect
the VIDEOOUT
(yellow)
cable
r_ sheVIDEO
jack on
sheback of sheVCR,
B_ck of Typical VCR
Connect cables
the AUDIO
(red and
white)
_o the AUDIO
(lefs
and righs) OUT jacks on she r_r
she VCR,
of
Turn the VCR (accessory device)
and the TV ON.
Press the AV button
on the
i romose consrol r_ selecs she AV
channel,AV will appear in the upper
left corner on she TV screen,
7With
the VCR (or accessorydevice)
ON anda prerecorded _ape(CD,
DVD, ere,) inserced,press the
pLAY I_ button so view she_ape
on sheselevision,
All the AV channels can be selected by
pressing the Channel + or- buttons,
The AV channels can also be added co
the QuadraSurf TM buttons for quick
access,
VCK _it_
At_dioiVideoO_st
Audio and _deo Front [or Side) Inputs
Front AV Inputs:
are a¢oiloblefor a quick connectionof o _PT6_ 1/37
VCR,to p?aybackvideofrom a camera, or
20PT5441/37
attach a gaming device.Usethe AV button
on the remote controtto tune these inputs,
Connect
cable
fromthe
thevideo
Video (yetlow)
output on
the Camera (or accessory device)
to the Video (yellow) Input located
on the SIDE (or FRONT) of the
TV.
Opuonal
H_adpho_es
Fro_tJack
For
Stereo
Devices:
Connect
audio
cable(red
and white)
from the
the Audio Left and Right Outputs
on the Camera to the Audlo In
(white) jack on the SIDE (or
FRONT) of the television,
Mono
Devices:
Connect one
end of the audio cable from the
Audio Out jack on the device to
the Audio In (white) iack on the
SIDE (or FRONT) of"the television,
For
Turn the TV and the accessory
device ON,
Press the AV button on the
remote control to tune the TV to
the side (or front) input iaeks, "AV"
will appear on the TV screen,
Press the PLAy _ button on
the accessory device to view playback. or to access the accessory
device (camera, gaming unit, etc,),
Side AVl_
_uts:
T_o e S(uper)-_deo connection on the rear
NOTE: When uslng addltlon_l accessories, only one
fthe TV can pravide you with better pic- external source will be _udlble, as there is only one
ture deto# and clo_ for the ployback of
set of sound inputs. Component Video (CVl) input
a_esso_ s0u_es s_ch as DBS (di_al broadCOStsutel!_e), DVD (distal video discs), video
_ames, and S-VHS VCR (v_deacassette
will dominate over all other inputs,indudlng $_Video
($_VH$) _nd AV. When $-Vldeo ($-VH$) is used, it
wal dominate over the AV input.
recorder) tapes than the normal antenna picture connections_
NOTE: The accesso_devicemusthavean
S-VIDEOOUT(put)jack in order for you to
completethe connectionon this page_
Connect
one endcoofthethe
SVIDEO CABLE
S-VIDEO
jack on the back of the TV, Then
connect one end the AUDIO (red
and white) CABLEScothe AV In
AUDIO L and R (left and right) jacks
on the rear of the TV.
Audio Cabl_
(Red & White)
ConnectCABLE
other end
of S-VHS(Sthe SVIDEO
cothe
Video) OUT jack on the back of the
VCR, Then connect the ocher ends
of the AUDIO (red and white)
CABLESto the AUDIO (left and
right) OUT jacks on the rear of the
VCR,
3
4
VCRor E×ternal
Acc_sor y Devic_
(wal_S-video
OuupuO
Turn the VCR and the "IV ON.
Press the AV button or the
CH ÷ or CH - buttons on the
remote co scroll the channels until
SVHS appears in the upper left corner of the TV screen,
Now your ready co place a prerecorded video tape in the VCR and
press the PLAY I_ button.
@@®
®®®
®®®
_®©
_.Lllr41Te]
+ I".'-+e]P.1:11P.I lEVi II+]:_ell
COhmpo++eat _deo inputs provide for the
ighest possible color and picture resoIuban in me playback of digital signal so++rce
material, such as with DVD players_ The
color difference signals (Pb, Pr) and me
luminance (¥) signal are connected and
received separately, which allows for
improved color bandwid_ information (nat
possible when _sing composite video or SVideo connections)_
l[ll_S'Al |111 + I".JI l 141[e]
i Ii I_q
NOTE: When usinga_ditlonal a.ccesso_es,only one
external source wHI be audible, asthere is only one
set of sound inputs. Component Video (CVI) input
will dominate over all other inputs, including S_Video
(S_VHS) and AV. When $+Video (S_VNS) ISused, it
will dominate over the AV input.
Back o_ TV
Connect
(Y, Pb,
Pr)
Video the
OUTComponent
jacks from the
DVD player (or s(m(lar device) to the
(Y, Pb, Pr) in(put) iack on the TV,
When using the Component Video
Inputs, it is best not to connect a
signal to the AV in Video Jack,
AUDIO
to the
Audio
Connect CABLES
the red and
white
(left and right) output iacks on the
rear of the accessory device to the
Audio (L and R) AV in input jacks
on the TV,
Turn the
TV and device)
the DVDON.
(or
digital
accessory
CH + or
Press
theCH
AV - button
buttonsortothe
scroll
the available channels until CVI
appears in the upper left corner of
the TV screen,
Componenl, Video
Insert a DVD disc into the DVD
player and press the PLAY I_
button on the DVD Ptayer.
The desc[iption
hectors
fo+' the componen_
may d+_er depei+dii+g
or accessory
digital so_rce
wdeo
equipment
h'+ Pro, P+'; Y, B+Y, R-Y; Y, Cr,
Althougk_
abbreviations
b and t stand _o+' the
conlpollellt
the
alld _erms
signal
lumil_al_ce signal
ital accessory
con_ec_o_
ow_el"s
de_ails.
R_er
Cb).
nlay vary, _he
bhJe alld
connectors+
playe_'
used (_or
example,
letters
con-
on the DVD
_ed colo+'
alld '{ indicates
to your
man_Jal
DVD
for deflllitions
or digalld
i [e] i t,."ll
_®®
®®®
©®®
6@0
T_ree AUdioiVideo Output jacks are great for
cording _itth a VCR or used _o connect
an external audio system for better sound
reprodu_on_
AUDIO
I
SYSTEM
AUDIO
SYSTEH CONNECTION:
Backof TV
CONNECTION:
onnect
end of jacks
the on
R(ight)
and
L(eft) one
AUDIO
the
TV co the R and L audio input jacks
on your amplifier or sound system_
Set the audio system's volume to a
normal listening level,
Turn To
the adjust
"IV and
ON,
the audio
volume system
on the
audio system, you will need co
change the volume at the external
audio system, noc the celevision_
SECONDVCR
CONNECTION:
NOTE: Refer to panel number 4 for the
proper hookup of the first VCR, Follow
the instruc_ons on how co tune to the
AVI
SECONDVCR
channel to view a pre-recorded
cape,
The following steps allow you to
connect a second VCR to record the
program
while your watching
it,
ConnectCable
one co
end
yellow
Video
the ofAVtheOuc
VIDEO plug, Connect the other end
co the VIDEO IN plug on the second
VCR,
2
Connect one end of the red and
white Audio cable from the AV
Out AUDIO L and R plugs on the
TV co the AUDIO IN plugs on the
VCR.
Turn
Second
VCR
insert athe
VHS
cape and
it's ON,
ready co
record what's being viewed on the
TV screen,
Vide€
Cable
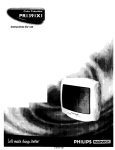
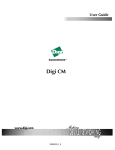
CONNECTION:
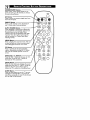
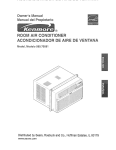
QUADRASURF
Buttons
(Red, Green, Yellow, Blue) Allows you to
score and surf up co 10 channels you choose
for each colored button,
AV Button
Press to select an accessory
the front AM inputs.
signal input from
SMILEY
Button
Press to add channels to the "QuadraSurf'
lists. Works with all colored buttons.
AUTO
SOUND
Button
Press repeatedly to choose from different facto w pre-defined sound se_ings. Choose from
Personal (how you set the Sound Menu
options), Voice (for programming with speaking only), Husk (for musical type programs
such as concerts), or Theatre (used when
watching movies).
MENU
Button
Press to display the on-screen menu. Also can
be used to back out of the on-screen menu
undl it disappears from the TV's screen.
CC Button
Press toacdvate
the CIosedCapdoning
options. Repeatedly pressing the CCbutton
will scroll the available options on the TV
screen,
VOL(ume)
+ o_ - Buttons
Press the VOL + bu_on to increase the TV's
sound level Press the VOLbutton to
decrease the TV's sound level.
MUTE
Button
Press the mute bu_on to eliminate the sound
being heard from the "I_/,
"HUTE" will be displayed on the TV's screen. Press
restore the TV's volume to
SLEEP Button
Press the Sleep button to set the TV to automaritally turn itself off after a set period of
dme. Press repeatedly to select 15, 30, 45, 60,
90, 120, 180, or 2't0 minutes.
Button
Press
to turn
the TV on or off,
IAIternate
Channel)
Press to toggle between the last viewed channel
and the channel presently being viewed.
Allows you _o delete channels from the "Quadra
Surf" lists for the cotored buttons, Works with all
colored bu_ons.
PressrepeatedJy
to choose from 5 different
factorypredefined
picturese_ings,
Choose from
Personat (how you set the Picture Menu
Adjusmlent controls), Movies (for movies), Sports
(for any sporting event), Weak Signal (used when
the signal being received is not great), or
Multimedia (for video games),
Press to display the current channel number. If the
on-screen menu is displayed, press the Status/Exit
buLton of remove it from the TV's screen,
and > Buttons
Press to navigate, select, and adiust controls within
the on-screen menu, Also use the CURSOR/_ or
CURSOR V to aedvate or deactivate the
control,
• Buttons
Press to select ehanneb inascending or descending
order,
(0-9) Bu_ons
Pressthe numbered buttons _o seteecTV channels
or to enter certain values within bheon-screen
menu. For single channel entries, press the numbered butzon for the channel you desire, The TV
witl pause for a second or two before changing _o
the chosen channel,
This buLton is dedicated to TIMER features within
certain TV models, This TV does not contain these
TIMER fea0Jres, therefore the button will have no
functionality when pressed,
_r Fren_
o,,d
Spo,,ish
speo_ng
7V
_
.7
whets
.nonscreen
_GUAGE
op_on
![
shown in English, French, or Spanish,
you can set me TV's on-screen menu to be
Press
the MENU
the
remote
control button
to show on
the
on-screen
DOWN
menu.
V buttons
co scroll
though the on-screen menu until
the word INSTALL is highlighted.
2
Press the CURSOR
UP /\ °r
Press the
RIGHT
>
button
co CURSOR
display the INSTALL
;_,_
menu features.
I_
Press thev CURSOR
DOWN
buttons
UP/\
co
scroll or
_
[
_
_
_
_
0®0
°'_
_*
through the Install features until
the word LANGUAGE
is high-
lighted,
Press the CURSOR
RIGHT
button repeatedly to select
English,Francais(French), or
Espanol(Spanish),
When
finished,
STATUS/EXIT
remove
press the
button to
the menu from
the TV's
screen,
The Language concol only makes the
TV's on-screen
MENU items appear
in English, Spanish, or French te×c.
lc does noc change the other onscreen text features such as Closed
Caption (CC) TV shows.
>
i
•
i
Tthe TUNERMODE control allowsyou
o changethe T_s i_pat signa!to either
ANTENNA, CABLE,or AUTO mode.It's
important for _heTVto know what type of
signal to look for (Cable TV or an
Antenna}. In the AUTO mode, when the
AUTOPROGRAMfeat_re is activated,_he
TV will aatomaticallychoose_hecorrect
mode.
i'i'!iiii¸]!
''4 @iiiiiiiiii@iiiiiii
........
[
•
Press the
remote
to show
MENUthe button
on-screen
on the
o_9_
menu.
2
Press the CURSOR
UP A or
DOWN
V buttons co scroll
N
3
Press the CURSOR
RIGHT
button
co display the INSTALL
menu features,
DOWN CURSOR
Press
V buttonsUP co
A scroll
or
the
Insr_ll features until the words
TUNER
MODE is highlighted,
•
N
through the on-screen menu until
the word INSTALL
is highlighted,
@@®
@@®
@@®
5@o
i Ir_
•
[
•
1
=
J
i
O_
Press the CURSOR
RIGHT
button
co select either ANTENNA, CABLE, or AUTO
mode,
When
finished, press the STATUS/EXIT
button to remove
the on-screen menu from the TV's
screen,
When CABLE is selected, channels I125 are available.
When ANTENNA is selected, channels 2-69 are available.
When AUTO is selected,
automatically set itself to
mode based on the type
detects when the AUTO
feature is activated,
the TV will
the correct
of signal it
PROGRAI_
i
;
j
ii "
your TV can automaticallyset itself for
ocalarea (or Cable TV) channels.This
makes it easy for you to selectonly the TV
sta_ons in your area when the CHANNEL
(+), (-) buttonsare presse&
Note: Make s_re the antenna or cable signal connectio_has bee_ completedbefore
AUTOPROGRAMis activated.
I
i
;
!
Press the
remote
to show
MENUthebutton
on-screen
on the
menu.
o C_=_/d4
Press theV CURSOR
DOWN
buttons toUP/\
scrollor
through the on-screen menu until
the word INSTALL is highlighted.
[
•
Press
CURSOR
button the
to display
the RIGHT
INSTALL >
menu features.
Press CURSOR
UP toA scroll
or
DOWN
V buttons
the
Install features until the words
AUTO
PROGRAM
are highlighted,
Press the CURSOR RIGHT >
button to start the Auto Program
scanning of channels.Auto
Programming will store all available
channelsin the TV's memory then
tune to the lowest availablechannel when done,
When finished, press the STATUS/EXIT
button to remove
the menu from the TV's screen.
When CABLE is selected, channels I125 are available,
When ANTENNA is selected, channels 2-69 are available,
When AUTO is selected, the TV will
automatically set itself COthe correct
mode based on the type of signal it
detects when the AUTO PROGRAM
feature is activated,
Connel Edi_mekes _teosyforyou_o,ADD
r OEbETE thonnels
_rom_heli_;
of'd_am
nelss'mredin_he7_/Is
memory,
remo_
control
to show
Press the
MENU
buttontheOn_
on the
Screen
menu,
Press the CURSOR UP/\ or
DOWN
v"buttons Co scroll though
the on-screen menu until the word
INSTALL is highlighted,
button
to display
the INSTALL
Press the
CURSOR
RIGHT >
menu features,
DOWNtheV CURSOR
buttons toUP
scroll
Press
..\ or
through the Install features until the
words CHANNEL
EDIT are highlighted.
Press the CURSOR RIGHT >
button to displaythe CHANNEL
EDIT opdons,
--
®®®
o@o
l
options
With thedisplayed,
CHANNELand CHANNEL
EDIT
NO hlghlighted
you canuse thecur_
sot buttons to scroll through all available channelsthat you wish _o add
(stripped OFF or delete (Skipped ON)
from the lVs memory. You canalso
use the NUMBERED buttons to go
direcdy _o a specific numbered chan_
nelthatyou Want toadd or skip, Or,
you can also use the CH+ or CH- to
qhUiCkiy
scanthroughthe channels
that
avenot been skipped,
]
}
[ZZZZZZZZZEZZZZZTZZ]
button,
scrolt
the menu DOWN
to hlghtight
Using the
CURSOR
V
theword SKIPPED.
Now use the CURSOR
EIGHT
">
to toggle be_en
ON
or OFF,
If
ON isselected the channels isskipped
,_inenscrolling channels With the CH÷
or CH- buttons, if OFF is selected the
channeb is not stripped when scrolling
channels with the._H÷ or CH- but_
tons,
TUS/EXIT
button
to remove
the
1 When
_m_shed,
press
the STAmenu from _e screen.
An "X" appearing in front of
any channel will indicate that
channel has skip on. When the
CH + or CH _ buttons are
used, those channels will be
sl<ipped.
Tcho adjustyour TVpicture corttroIs,se!_-'ta
anneland usethe PictureMenu Cor_rols
I_ed below:
I
Press
RIGHTNESS
the CURSOR
CONTROLRIGHT
LEFT
< buttons
-_"or
until the darkest
parts of the picture are as bright as
you prefer,
CURSOR CONTROL
COLOR
RIGHT > or- Press
LEFT the
<
buttons to add or eliminate color,
PICTURE
CONTROL
the CURSOR
RIGHT
- Press
-_"or LEFT
< buttons until lightest parts of the
picture show good detail,
SHARPNESS
CONTROL
- <
CURSOR
RIGHT
> or LEFT
buttons to improve detail in the pieture,
TINT CONTROL
- Press the
CURSOR
RIGHT > or LEFT <
buttons to obtain natural sldn tones,
COLOR
Press the TEMP
CURSOR
CONTROL
RIGHT >- or
LEFT < buttons co select NORMAL, COOL, or WARM picture
preferences, (NORMAL will keep the
whites, white', COOL will rn_ke the
whites, bluish; and WARM will make
I _Tint
_1
I 0 _!
Warm
the whites, reddish.)
CONTRAST
+ CONTROL
Press the CURSOR
RIGHT -> or
LEFT < buttons co to_le the control On or OFF, The Contrast + control helps to "sharpen" the picture
quali_/. The black potions of the picture become richer in darkness and
the whites become brighter.
Off
Ttho adjust your TV sound, select and use
e Sound Menu Controls listed below:
Main
RIGHT
LEFT
buttons Co
TREBLE: > or
Press
the < CURSOR
adjust [he control. The control will
enhance the high frequency sounds.
2
A
o Picture
_Sound
RIGHT
> or LEFT
< buttons co
ASS: Press
the CURSOR
adjust [he control. The control will
enhance [he low frequency sounds.
Treble
• I Bass
Install
iiiii:_
i_i!ii!i_i!
AVL
......................
BALANCE:
Press [he CURSOR
RIGHT > or LEFT < buttons co
adjust [he level of sound coming
from [he lefc and right speakers.
the
RIGHT Leveler)
> or LEFT
AVL:CURSOR
(Auto Volume
Press
< buttons to turn [he control On
or Off. When On, AVL will level out
[he sound being heard when sudden
changes in volume occur during cornmercial breaks or channel changes.
[ ¢ Treble
I_Bas
S
INCR, SURROUND:
Press the
CURSOR
RIGHT > or LEFT <
buttons to select between Incr,
Surround or Stereo setdnss (If
Stereo), or select Spadal or Mono (If
i_ono),
ULTRA
BASS: Press the CURSOR RIGHT > or LEFT < buttons to turn Ultra BassOn or Off,
Ultra Bass will enhance [he low frequency sound,
7
SOUND:
Press the CURSOR
RIGHT > or LEFT < buttons co
select between Stereo or _ono setdnss. Note: tf Stereo is not present
on a selected show and [he TV is
placed in [he Stereo mode, the
sound coming from [he TV will
remain in [he Mono mode.
I _AVL
_
===4=== 50 _ ]
_
50
_/
L ---t---
R )/
On
orOff
Incr. Surround
v Incr. Surround
Spatial
or Mono
Incr. Surround]
or Stereo
On
orOff
Mono
or Stereo
Many
gmes while watchingmoviesfrom
a DVD prayer the image is shown in
"letter box" forma_ This is the format that
is shown in movie theaters_when shownon
a TVscreen,me image will haveareas of
btack on top and bottom of the screen_
Press the
MENU the
button
on the
remote
to display
on-screen
rrlenu.
button
Press the
undlCURSOR
the word DOWN
Features V
is highlighted,
Press the
CURSORthe Features
RIGHT
-'>
button
co display
menu options (AutoLoek or
Ii¢ Format
4:3 Expand
Format),
button
Press the
undlCURSOR
the word DOWN
Format
Y
is
highlighced_
Press the CURSOR
or LEFT < buttons
RIGHT
>
co select one
of the two options 4:3 or Expand
4:3,
4:3 - Standard format for the TV,
4:3
Expand4:3
Expand 4:3 - Enlarges the picture
to fill ouc the entire screen area,
eliminating
the "letter
box" effee_
When
finished,
press the STATUS/EXIT
button to remove
the menu from the TV's screen.
Note: The Expand 4:3 format can also
be activated using the CURSOR
UP A,
or DOWN
V buttons when the
onsereen menu is not being displayed,
Pressing these buccons will toggle the
standard 4:3 format and the Expand 4:3
formlat_
©®®
_*
The
A(,'toLock
TM feature is an integrateddruit that receivesa_d processesdata sent by
broadcasters,or other programproviders,that
containprogramconteatadvisories,When programmedby the viewer,a TV withAatoLockTM
can re_nd to the contentadvisoriesand block
programcontentthat may be fous_d
obje_or,able (suchas offensivelanguage,violence,sexual
sitoat_orn,etc). This is a greatfeature to cernor
the type of viewingchildrenmay watch,
AutoLock TM offers various BLOCKING
controls from which to choose:
Access Code
- An Access Code must be
set to prevent children from unbloeking
questionable or censored programming set
by their parents.
Channel
Block - After an access code has
been programmed, you can block individual
channels including the AiV inputs.
Clea_ All - Allows you clear all channels
being blocked from your viewing set with
the Channel Block Control.
Block All - Allows you to block ALL channels and AJV inputs at one time.
Movie Ratings - Certain blocking options
exist which will block programming based on
ratings paccerned by the [dodon Pictures
Association of America.
TV Ratings -just like the Movie Ratings,
programs can be blocked from viewing using
s_andard TV ratings set by TV broadcasters.
MOVIE RATINGS
G: General Audience - All agesadmicced.
Most parents would find this program suitable for all ages,
PG: Parontzd Guidance Suggested - This
programmingcontainsmaterial that parents
may find unsui_btefor younger children.
PG-13: Parents Strongly Cautioned - This
programmingcontains
material that parents
may find unsui_biefor ehiidreeunder the age
ell3,
MOVIE
RATINGS
Continued
Ft'. Restricted - This is programming is spedficaIIy
designedforadults.Anyone under the
age of 17 should only view _his programming
with an accompanying parent or adut_guardian.
NC-17: No one under the age of 17 will
be admitted. - This type of programming
should be viewed by adults onty.
X: Adults Only - This _ype of programming
contains one or more of the foItowiag: very
graphic violence, very graphic and expiici_ or
indecent sexua_acts, very coarse and in_ensely
suggestive
language,
TV RATINGS
TV-Y -- Designed for a very young audience,
including children ages 2-6.
"I-'*/-'I_/-Itmay be appropriate
forchildren
age 7 and above who have acquiredthedevelopment skills
needed todistinguish
bet>Neen
make-believe and reality.
TV-G -- Suit_bie for moss audiences, this type
of programmiag contains titde or no violence,
no strong language, and Iitde or no sexuat dialogue or sir_Jations.
TV-PG
-- This program contains material
thac paranrs may find unsuil_bte for younger
children. Could contain Moderate violence (V),
some sexual siwations (S), infrequent coarse
language (L), or some suggnsdve dialogue (D).
TV-14 -- This program contains some material that many parents would find unsuitable for
children under 14 years of agn. This _ype of
programmiag conI:ains
one or more ofthefollowing:intense violence (%/),intense sexual sicuations (S), s_oag coarse Iaaguage (L), or
in_nsely saggesdve dialogue (D).
TV-MA -- This program is specifically
designed to be viewed by adutcs and therafore
may be unsuitable
forchildren
tinder17.This
type Of programming contains one or more of
the following: graphic violence 0i), expticic sexual situations (S), or crude indecent language
(L).
Over the next few panelsyou'll learn how
to block channelsand get a be_er
understandingof the rating terms for certain
programming_
%_.
_
•
i_ _
First,let'sstart by learninghow to set a personalaccesscode:
Press
MENU the
button
on the
remote the
ro display
on-screen
menu,
Press the vCURSOR
A the
or
DOWN
buttons UP
until
word FEATURES
is highlighted,
Press the
CURSOR
RIGHT _
button
to display
the FEATURES
menu
o_ons,
Press
UP ,_.
DOWN the V CURSOR
buttons until
theor
words AUTOLOCK
ed,
T_"are highlight-
Press the CURSOR
RIGHT
button. The screen will read.
"ACCESS
CODE ....
."
>
Using the NUMBERED
buttons,
enter 0, 7, I, h "XXXX"
appears
on the Access Code screen as you
press the numbered buttons,
"INCORRECT
CODE"
will
appear on the screen, and you will
need to enter 0, 7, I, I again.
The screen
_'New
Code:'willEnter
ask you
a "new"
to enter 4a
digit code using the NUMBERED buttons. The screen will
then ask you to CONFIRM the code
you iust entered, Enter your new
code again. "XXXX"
will appear
when you enter your new code and
then display the AutoLock T_"menu
options.
Proceed to the next panel to learn more,,,
®©
®®_
_
After your personal accesscodehas been
set (see previouspage),you are now
ready to select the channelsor the AiV
Inputs you want to block out or censor_
Once you've enteredyour accesscodeand
the AutoLockT_"features are displayedon
the
AutoLock
A
_ BlOCk0hanr_l
screen:
o Movi_ _l
.....
N
.........
o TV RadiiN
Press the\/buttons
CURSOR undl
UP the
A or
DOWN
words BLOCK CHANNELS are
highlight:ed,
[ ¢BlockChannel
2
Press the
CURSOR
RIGHT
On
>
button
co turn blocking ON or
OFF for chat channel When ON is
selected the channel will be
blocked,
E_iter
Access
ajAL_
_
_r_
....
:
View
TUSIEXIT
When
finished,
button
press
co remove
the STAthe
menu from the screen_
NOTE: If you ever forget your code,
the 0, 7, I, I code is the factory default
and can be used to enter and create a
new accesscode,
E
to
a _ned
channel
that
biocked
Block
Press
theother
CH channels
+ or CH you
- button
to
select
wish
to block, Repeat seep 9 to block
the new channel
your
Code
wid_
Channei,
is
After
blocking spedfic channels there
may come a _me when you wan_ _o
block or dear al! the channels at the same
time,
Once you've entered your access code and
the AutoLock _
the screen_
features are displayed on
I
Press
;\. or
DOWNtheV CURSOR
buttons toUP
select
either CLEAR ALL or BLOCK ALL
2
If CLEAR
vClearAII
Cleared
ALL is selected,
press the CURSOR
RIGHT>
button to clear all blocked channels, All channels will be viewable,
If BLOCK
ALL
is selected,
press the CURSOR
RIGHT>
button to turn the control ON or
OFF, When
o E_k Channel
o SeepCode
o ClCoJ-AII
ON is selected, ALL
available channels will be blocked
from
A
iAutoLock
o TV R_r_J
viewing,
TUSIEXIT
button
to remove
the
When finished,
press
the STAmenu from the screen,
v
_BIockAII
On
NOTE: If you ever forget your code,
the 0, 7, I, I code is the factory default
and can be used to enter and create a
new access code,
E
®®®
_®®
Tghe AutoLock TM feature can block proramming based on the Movie Industry
radngs.
Once you've entered your access code a_d
the AutoLock TM features are displayed on
the screent
o B_
Ch_lnel
G
o Setup Code
PG
o B_k i_l
R
i <Mo_e F_l_g
o TV Ra_n_
I
_i hlO-17
X
Press the\,' CURSOR
or
DOWN
buttons toUP/\.
highlight
the words MOVIE RATING.
Press
CURSOR
buttonthe
to display
the RIGHT
MOVIE -tRATING options (G, PG, PG-13,
R, NCI7, or X).
3
Press the CURSOR UP/\. or
DOWN \,' buttons to highlight
any of the Movie Rating options.
When highlighted, all these options
can be turned ON (which wil! allow
blocldng)or OFF (which will allow
viewing).
_G
On
Use on
thethe
CURSOR
> button
remote toRIGHT
turn the
rating option ON or OFF.
When a rating level is chosen to be
blocked, any higher level rating will also
be blocked from viewing. (i.e.: If "R" is
selected to be blocked, NC-17 and X
will automatically
be blocked.)
NOTE: If you ever forget your code,
the 0, 7, I, I code is the factory default
and can be used to enter and create a
new access code,
®®
®®
©®o
,
Tghe AutoLock TM feature can block proramming based on tl_e TV Industry ratings.
Once you've entered your access code and the
AutoLock TM features are displayed on the
se_'eeJ3_
Press the v'CURSOR
DOWN
buttons
words TV RATING.
UP/\
or the
to
highlight
Press the
CURSOR RIGHT
>
button
_odisplayd_e"IV
RATING
opdons (TV-Y, TV-Y7, TV-G, rvPG, TV-14, or "rV-MA),
3
Press the CURSOR
UP/\
_TV-Y
On
or
DOWN
V' buttons to highlight any
of _he TV Radng opsions, When hightighsod, all _hese opdons can be _Jrned
_ TV-Y7
I_ Block All, FV
_TV-G
Off
ON (whichw_ll
afiowblocking)
or OFF
(wbich_ttallowviewin_,
NOTE: Some TV RATING opdons also
have sub-ratings. The radngs of TV-YT, TVPG, TV-14, TV-MA can be custemized to
_ TV-PG
_TV-i4
_TV-MA
_, Block All, V, S, L, D
l, i Block All, V, S, L, D
•
btock V (violence), FV (fantasy violence), S
(sexual sicuasions), L (coarse language), or D
(suggestivedialogue).
Press theonCURSOR
button
the remote RIGHT
to _urn me
-;" TVY or TV-G rating ON or OFF, Or,
press the CURSOR RIGHT > buti;on to enter she sub=menus for she
TV-Y7, TV-PG, TV-14 or "r'V-MA m_sings.
If the TV-Y7,
TV-PG, TV-14
sub-menu
iS accessed,
press or
theTV-MA
CURSOR
UP A or DOWN
V
buttons to select one of the opsions
(Btock Ni, V, S, L, D, or FV),
Press the
button
on the
CURSOR
remote RIGHT
to turn >the
option
ON or OFF.
®®®
_®®
BlockAII, V, S, L
AutoLock
_ offem the viewer other blocking features as well. With these Blocking
Options, the censoring can be turned ON or
OFF,
o S_4upCode
o Clear/_I
o £_ock
AI
Once you've entered your access code and
the AutoLock 7_" feotures ore disployed on
the screen:
o Move Ra_ng
o TV Ra_ing
DOWN
Press the V CURSOR
buttons
words BLOCKING
until
UP/\.the or
OPTIONS
are highlighte&
2
Press the CURSOR
RIGHT
button to display the Blocking
_ _i_
On
Options (BLOCKING,
ED, or NO RATING)
_Unrated
On
UNRATmenu,
BLOCKING:
i_ighc be called the "master switch" for AutoLock #_, When ON,
No Rating
On
ALL blocldngicensoring will take place,
When OFF, ALL blocking is disabled,
UNRATED:
ALL unrated programs
based on the Movie Radngs or Parental
tTV) Guidelines can be blocked if this feature is set co ON and the BLOCKING
feature is set co OFF,
NO RATING:
ALL programming with
NO content advisory data can be
blocked if sec to ON and the BLOCKING feature is set co OFF,
Press the V CURSOR
DOWN
buttons
the desired feature,
4
or
coUP/\.
highlight
When highlighted, each feacura can
be turned ON or OFF using the
CURSOR
RIGHT > or the CURSOR LEFT <. buttons on the
remot:e,
_®®
_®®
o®®
_®o
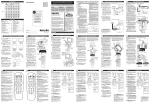
Crosed Captioning(CC) allowsyou to
ead the voicecontent of televisionprogramson the TV screen.Designedto help
the hearing impaired, this feature usesonscreen "text boxes" to show dialogueand
conversationswhilethe TV program is in
progress.
I
Press the
CC button
on theClosed
remote
to display
the current
Caption setzing.
002
co M_e
to choose
Press
the from
CC button
the four repeatedly
Closed
Caption options (CC Off, CC I,
CC2, CC Mute).
TUS/EXIT
When
finished,
button
press
to the
remove
STA-the
menu from the TV's screen,
0®®
®®®
your TVcan be set to automaticallyturn
tself off at a givenamount of time.
remote the
Press
control
SLEEP
and button
the SLEEP
on the
timer display will appearon the
screen,
iii_ii!iiiii]ili!i
2
Press the SLEEP button repeatedly to pickthe amount of time
(15, 30, 45, 60, 90, 120, 180, or 240
minutes) before the TV will turn
itself off.
Sleep45
is_p6O
NOTE:
An on-screen
count down will
appear during the last minute before the
TV shuts itself off. if any button is
pressed during the last minute of the
countdown, the Sleeptimer
be cancelled.
setting will
®®®
®o
W_sspather you're, watching a movie or a
orting event, yo_r TV has aatomatic video contro! settings matched for your
current program source or content,
Presson the
ton
the AUTO
remote
PICTURE
control, The butcur-
rent Auco Picture setting will be displayed on the screen,
[ MLk_ia
.
Pressrepeatedly
the AUTO to PICTURE
ton
select either butPERSONAL, MOVIES, SPORTS,
WEAK SIGNAL, or MULTIMEDIA
MOVIES - Preset picture options
for watching Video Tapes, or
DVDs.
picture set_ ngs,
SPORTS - Preset picture
options for watching s£orting
eying.
NOTE: The way you choose to set the
Picture Menu Controls will become your
PERSONAL setting,
WEAK SIGNAL - R-e_et pict_l_ options for watching pro_'_rns where the reception is not
at its bes_.
MULTIMEDIA
- Preset picture
options for use with video gamin_
Tehe Auto Sound feature al!owsthe listenr to select betweenfour different factory set soundoptions,
I
ton
ress
on the
the AUTO
remote
voi_
control,
SOUND Thebutcur-
Mus_
rent Auto Sound setting will appear
in the middle of the screen,
Press
the AUTOto toggle
SOUND
but_
ton
repeatedly
between
the four set_ngs, (PERSONAL,
MUSIC, VOICE, or THEATRE)
NOTE: The way you choose to set the
Sound Menu Controls will become your
PERSONAL setting,
t(_/J{ ) (_J/[e")J
_U_
@@@
@@®
@®®
o®o
VOICE - Preset sound
options for programming
where heavy dialo,_ue is £resend:.
MUSIC - Preset sound
options for musical programming where there is little dialogue.
THEATRE
- Preset sound
optfon_ for watchin_ n_ovie_.
T_u e QuodraSu_f r_" control allows you set
p four different personal channel SuB
lists using the colored buttons (on the
remote control), each holding up _:oten
channels in its quick viewing"lis_:"
Press the(orCHANNEL
or (-)
buttons
the NUMBER(+) buttons)
DOselect a channel co add to one of
the SURF lists.
Press
the SMILEY
button
the
remote
control to@ADD
the on
channel to one of the SURF lists,
3
Press the corresponding COLORED (Red, Green, Yellow or
Blue) button to add the channel co
that:bu_Don'sSurf list (Up Coten
channelsper button can be scored.)
Repeat steps I through
3 to add addi-
tional channels (up co 10) to each of the
the SURF lists.
1121
To remove
a channel
the SURF
4
from
one of
lists;
Press the COLORED
Quadra
Surf button until the desired channel appears. The screen will display
the channel number with a colored
"Smiley"
Colored
face COindicate the
button ic relates to.
While the "Smiley"
face channel indicator
is displayed, press
the FROWNIE
_ face button.
The screen will read, "Remove
item? - Press @ ."
Press
the
FROWNIE_
face
button again to confirm your
decision co remove the channel
from the Surf list
Repeat steps 4-6 to remove
nels from Surf lists.
other
chan-
®®®
T_coe QuadraSurf buttonson your remote
ntrolal!ow you to store up to 10 channelsper button (40 total). Youcan evenprogram the AiV Input channe!sfor eachbutton
making them a "source"button.
Assumingchanne!shavenow beenaddedto
the four Quadra Surflists(the four colored
buttons,seethe previouspage),let's review
how the featureworks.
Press one of
the pre-programmed
COLORED
buttons on
the remote (Red,Green, Yellow or
Blue). The screen will displaya smiley
face with the first programmed channel forchacsurflist,
2
3
@18
•
i
i02,2
J11
_ •
@2s
@41
@39.
While the colored "smiley" face
still appears on the screen, press
the same COLORED button on
the remote COtune the second channel programmed for that specificsurf
list.
Repeatedly pressing the same
COLORED button while the "smiley" face appears will curieall the programmed channels.Pressingthe COLORED button againwill return you co
the first channel in the list
4
@35
_®®
®®®
®®®
If the "smile)," face disappearsfrom the
screen and the sameCOLORED button is
pressed,the surf channelswill be displayed
starting with the FIRSTprogrammed channel again.
©®o
Repeatstepsbuttons
I-3 for (Surf
the other
COLORED
lists) ifthree
desired.
Any time the "smile)"' face appears
with the channelnumber, pressing
the '_rownie" face button will
allow you to remove ic from the list
(see the previous page[or more
details),
0"12
@ Remove Item?- Press @
No Power
• Check the TV power cord. Unplug the TV, wait 10 seconds, then reinsert the plug
into the oudet and push the POWER bu_on again.
• Check that the outlet is not on a wall switch.
• Be sure the fuse is not blown on the AC power strip, if one is being used.
No Picture
• Check antenna connections.
Are they
• Check the TUNER MODE control for
• Try running the Auto Program feature
• Press the AM button on the remote to
ed (FRONT or Current Channel).
properly secured to the TV's ANT 75_ plug?
the correct tuner setting.
to find all available channels.
make sure the correct signal source is select-
No Sound
• Check the VOLUME buttons.
• Check the MUTE button on the remote control.
• if you're attempting to hook up auxiliary equipmenr_
tions located on the front of the TV.
check the audio iack connec-
Remote Does Not Work
• Check the bakeries.
If necessary, replace them with AA Heavy Duty (Zinc Chloride)
or Alkaline bakeries.
• Clean the remote control and the remote control sensor window on the TV.
• Check the TV power cord. Unplug the TV, wait 10 seconds, then reinsert the plug
into the outlet and push the POWER button again.
• Be sure the fuse is not blown on the AC power strip, if one is being used.
• Check to be sure the TV outlet is not on a wall switch.
"IV Displays Wrong
Channel or No Channels Above
13
• Repeat channel selection.
• Add the desired channel numbers (using the CHANNEL
EDIT control) into the TV's
memory.
• Check to be sure the TUNER MODES are set to the CABLE opdon and run the
Auto Program feature to lind all available channels.
HOTE:If you residein one of our PhilipsFactorySepAceBrar]chareas(seedirectoryon
b_ck),youc_n contactthe nearestSepAceBrar]chto obtainefficientarid expedientrepairfor
your product.If your productis In-Warranty,you shouldhaveproof-of-purchaseto ensure
NoChargeService.ForOut-of-Warranty
service,catlthe toc_tionr]earestyou.
HOTA:Si vous r_sidez(lar]stu]edesr_gionsdessep/iesp_r tu]esuccurs_tede serviceapr_s
ventedu f_brica[]tPhitips voir tisteci-dessous,vous pourrezcontacterla bra[]chedeservceapr_svente a p us prosdec ]ez vouspour obte[]run servce _pr_sve[]ter_pde et effc_ce, Site produitest sousg_ra[]tie,it suffir_de presenterunepreuved'achatpour b_n_ficier (FtlnsepAcesa[;sfrais, Pour tesproduits_]o[]couverLsp_r la g_ra[]tie,co[]t_ctezte
centrete ptusprosde chezvous.
HOTA:Si Ud. resideen unade nuestraszonesp_r_sucurs_lesPhitipsde servicio3tde f_bric_ (verdirectoriom_s_b_jo),Ud,puedecomtuficarseco[] tasucurs_tde serviciom_scerc_nap_r_obtenertu]_ rep_raci(_[}
oportunay eficazde su producto, Si su productoest_
todaviab_jogarant[_,Ud.debepresentarcomprobantede comprap_ra[]o oc_sionar
m_]gunos
cargospor servicio. Pardserviciodespu_sdetvencimientode la g_ra_]tia,tI_rneat
tug_rm_scerc_node tos ab_ioi_]dicados.
t_:
Howyouc_n obtainefficient_nd expedientcarry-i_],mait-i_],or i_]-homesepAce
for your product. Pleaseco_]t_ctPhilipsat: 1-800-661-6162(Frenchspeaki_]g)
1-800-363-7278(Englishor Spa_fishspe_ki_]g)
AuCanada:Commentobtenirteservice_pr_s-ventepour tesproduits_pport_sou envoy_s
par t_poste& notrecentrede serviceoute service& domicile,
Veuitlezcontacterphitips_:
1-800-661-6162(Fr_ncopho_e)
1-800-363-7278(A_]gt_is
ou Espagnol)
Enel Canad&C6morecibirservicioefficientep_rasu producto,en perso_]_,
por correoo a
dornicitlo.Favorde comunicarseco_]Phitipsat: 1-800-661-6162(fr_nc{_fono)
1-800-363-7278(Ingt_so Esp_5ol)
OUALITYSERVICE
IS AS CLOSEASYOURTELEPHONE!
SIMPLYLOOKOVERTHELISTBELOW
FORTHE NUMBEROFA FACTORY
SERVICECENTER
NEARYOU. YOUR PRODUCT
WILLRECEIVE
EFFICIENT
ANDEXPEDIENT
CARRY'IN,MAIL'IN_ OR
IN'HOMESERVICE,ANDYOUWILLRECEIVE
PEACEOFMIND,
KNOWING
YOURPRODUCTIS BEINGGIVENTHEEXPERT
ATTENTION
OFPHILIPS' FACTORY
SERVICE.
COMMENTOBTENIRNOTRESERVICEAPNE8 VENTERAPINEETEFFICACESOIT PARCOORRIER,A DOMICILE,OU EN 8E
PNESENTAHTA UN CENTREDE SERVICEPHILIP8. PLUS DE 6C0 CENTRE8DE RECEPTIONDE PRODOIT8_ REPANER
TRAVENSLEPAYS CONTACTENLE CENTREDE SERVICEAUXCONSOMMATEUN8LEPLUS PROCHEPOUR8AVOIR L'EM"
PLACEMENTDE CE8DEPOT8OAHS UN RAYONDE 50 A 75 MILES (80 K_ A "i20 KM} OU CENTREDE SERVICELOCAL.
C_MO OBTENERUN 8ERVICIOOPORTUNOY EFICIENTEPON CONREO,EN CASA9 EN PERSONAPARASU PRODOCTOA
TRAV_SDE UN CENTROPEILIP8 DE SENVICIO. MA8 DE E00 8ITIO8 PONTODO EL PAlSPARALA RECEPCIONDE PRODOCTO8NECESITADO8DE NEPARACIONE8:C9_UffiCARSE CONEL CENTNODE SENVICIODE FABNICAMA8 CERCANO
PARAESTO8LUOARESNENTNODE UN RADIO DE SOA "iEOKM (50 A 75 MILLAS) DEL CENTR9DE 8ERVICIOLOCAL.
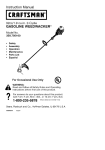
ATLANTA
Philips Factory Service
550 FranklinRoad,
Suite F
Marietta, GA 30067
800-273-1501
CLEVELAND
Philips Factory Service
950 KeynoteCi_le
Brooklyn Heights, OH
44131
800-331-7037
TAMPA
Philips Factory Service
1911 US Highway 301
North, Suite 100
Tampa,FL33619
800-442-2027
DETROIT
Philips Factory Service
25173 Dequindre
Madison Heights, M]
48071
800-438-1398
SANFRANCISCO
Philips Fa_ory Se_ice
681Ea_ B_kaw Rd.
San Jose, CA 95112
800-300-9013
DALLAS
Philips Factory Service
415 N. Main Street,
#107
Euless,TX 76040
800-952-3254
HOUSTON
Philips Fadory Se_ice
1110 N. Po_Oak Rd.,
Suite100
Hou_on, TX 77055
800-952-3254
CHICAGO
Philips Factory Service
1279 W_Hamilton Pkwy
Itasca, IL 60143
800-531-2922
KNOXVILLE
Philips FactoryService
One Philips Drive
Knoxville,TN 37914
800-821-1767
PHILADELPHIA
Philips FactoryService
352 Dunks Ferry Rd.
Bensalem,PA 19020
800-847-9320
LOSANGELES
PhilipsFactory Service
20930 Boni_,Ste. V
Ca_on, CA90746
800-300-9013
COLOR TELEVISION - 90 Days Free Labor, One Year Free Replacement of Pares
(Two Years Free Replacement on Color PictureTube) Muse be carried in for service,
WHO
15 COVERED?
You must have prOOf of purchase co receive warranty
service. A sales receipt or other docu_ent showing
thatyou purchasedthe productisconsideredproof
of purchase.
WHAT
IS COVERED?
Warranty coveragebeginsthe dayyou buy your
product, F_'90 day_ thereafter, att parts witl be
repaired or replaced free, and _abor is free. From 90
days to one year from the day of purchase, a_l parts
will be repail_d or replaced free, but you pay for all
labor charges, From one to _'o years from die day
of purchase,
you pay for die replacement or repair of
a_l parts except the pictu_ cube,and for alt labor
chargesAfter two years from the day of purchase,
you pay for the replacement or repair of alt parts,
and for all labor charges.
Att parts_ indoding repaired aid replaced pares, a_
covered only for the original wan_nty period. When
the warranty on the product expires, the warranty
on ali replaced and repaired parts atso expires.
WHAT
IS EXCLUDED?
Your warrant)' does not cover:
• labor charges for installation or setup of die
product° adjus_ent
of customer controls o11die
product_and ins_lation or repair of antenn_ s_r.ems outside of the pmduc_
• product repair and/or part replacement because
of misuse, accident_ unauthorized repair or odler
cause not widlin the con_ol of Phitips Consu_er
Electronics Comp_'_
• recep_Jon problems caused by signal conditions
Or
•
_ble
or
an_nna
systems
Outside
the
uni_
a product that requires modification or a_ptation to enable it to operate in any country ocher
than the count_ for which it was desig_led__nufactu_d,approvedandiorauthorized,
or repair
of plx:xJuccs damaged by these modifications.
• incidental or consequendal damages =_sulrJag
from the product. (Some states do not allow die
exclusion of indden_al or consequential damages,
so die above exclusion may not apply to you.
This includes, but is not limited t_ prerecorded
mate_¢al, whether copyrighted or not copyrighted.)
• a product used for commercial or ins_tudona_
purposes.
WHERE
IS SERVICE AVAILABLE?
Warranty service is available in all countries where
the product is of_cially discribeted by Philips
Consumer Electronics Compan_ I=icountries where
PhitipsConsumer Electronics
Company does not discribetedie product, the Ioc_ Philipsservice organization will attempt to provide service (aldioughthere
may be a delay if the appropriatespare paresand
technicalmanual(s)are not readily available).
MAKE 5UREYOU KEER..
P_ease
keep your salesreceipt or other document
showingproof of purchase,At_ch it to dlisowner's
manua_and keep both nearb_ Atso keep the original
box and packingmaterial in caseyou needto recurn
your preduc_
BEFORE REQUESTING SERVICE..,
P_ease
checkyour owner's manualbefore requesting
service,A_us_el_cs of the controlsdiscusseddlere
may _ you a service call
TO GET WARRANTY
SERVICE IN U.$.A.,
PUERTO RICO OR U.S. VIRGIN ISLANDS...
Con_ct a Philipsfactory service center (see
enclosed list) or audiorized service center to
an_age repair,
(In U,S_,, Puerto Rico and U,S,Virgin Islands,all
implied wa_uties,
including implied wan_nties of
merchantability and fitness for a particular purpose,
are limited in duration to the duration of this
express war_auty, Bur. because some states do not
allow limitations on how long an implied warranty
may lasrothis titn_:arJon may not apply to you.)
WARRANTY COVERAGE IN CANADA,.,
Note: ProductWarranty coveragemay vary between
countrieswhere product is distributed by Philips
Consumer Electronics
Compan_ In order to receive
full and specillcwarranty detailsfor products so!d
a_d sen,iced in Canada,pleasecon_ct Philipsat."
t-800-66t.6t62
(French SpeWing)
i-800,.53
|-0039 (English
and SpanishSpeaking)
REMEMBER,..
Pleaserecord die model and serial
numbers found
on the product below. Also, please fill out and mail
your warranty registration card pr'ompdy. It will be
easier for us to no_y you if necessary.
Th_sworI_y givesyou spedfic _%_e_
dght_ Youm_y ha_e
otherdghtswhich _o_!f_ st_eipic:_r_e to s_e/prov;nce-
Philips, P.O. Box 520890
Miami, FL 33152
(402)
536-4171