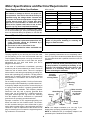
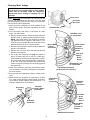
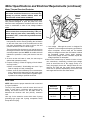
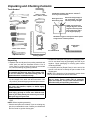
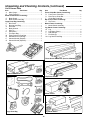
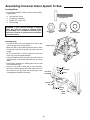
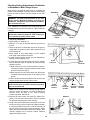
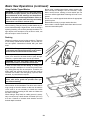
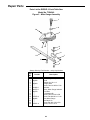
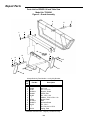
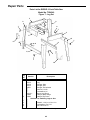
1
76 2:1(5·60$18$/ ,1&+&2175$&725 6(5,(6%(/7'5,9(6$: $VVHPEO\ 2SHUDWLRQ 5HSDLU3DUWV )RU<RXU6DIHW\ 5HDGDOOLQVWUXFWLRQVFDUHIXOO\ 48(67,21625&200(176" &$//5,'*,' Part No. SP6127 Printed in U.S.A. Table of Contents Section Page Safety Instructions For Table Saw ................................. 3 Safety Signal Words ................................................... 3 Before Using The Saw ................................................ 3 When Installing Or Moving The Saw ........................... 3 Before Each Use ......................................................... 4 To Reduce the Risk of Injury From Jams, Slips Or Thrown Pieces (Kickbacks Or Throwbacks) .............. 4 Plan Ahead To Protect Your Eyes, Hands, Face and Ears ........................................................... 5 Whenever Sawblade Is Spinning ................................ 5 Additional Safety Instructions For: Rip Type Cuts ...... 6 Additional Safety Instructions For: Crosscuts ............. 6 Additional Safety Instructions For Caster System: ...... 6 Before Using the Caster System ................................. 6 Glossary of Terms for Woodworking ............................. 7 Motor Specifications and Electrical Requirements ........ 8 Power Supply and Motor Specifications ..................... 8 General Electrical Connections ................................... 8 110-120 Volt, 60 Hz. Tool Information ........................ 8 Changing Motor Voltage ............................................. 9 Motor Thermal Overload Protector ........................... 10 Wire Sizes ................................................................. 10 Unpacking and Checking Contents ............................. 11 Tools Needed ............................................................ 11 Unpacking ................................................................. 11 List of Loose Parts .................................................... 12 List of Loose Parts (Caster) ...................................... 13 Loose Parts ............................................................... 13 Assembly .....................................................................13 Installing Handwheels ............................................... 13 Assembling Leg Stand .............................................. 14 Assembling Universal Caster System ......................... 15 Frame Assembly ....................................................... 15 Swivel Caster Assembly ...........................................16 Assembling Universal Caster System To Saw ............ 18 Locating Parts ........................................................... 18 Leveling Feet Adjustment ......................................... 19 Assembly .....................................................................20 Mounting Your Saw ................................................... 20 Assembling Table Extensions ................................... 21 Checking Table Insert ............................................... 22 Checking Heeling Adjustment or Parallelism of Sawblade to Miter Gauge Groove ........................... 23 Checking Blade Tilt, or Squareness of Blade to Table ......................................................... 24 Checking Tilt Mechanism .......................................... 25 Installing Front Rip Fence Guide Bar ........................26 Installing Rear Fence Guide Bar ............................... 27 Adjusting Rip Fence Guide Bars ............................... 28 Rip Fence Alignment Adjustment ..............................29 Rip Fence Lock Lever Adjustment ............................ 29 Section Page Installing Blade Guard .............................................. 30 Aligning Blade Guard ................................................ 31 Mounting the Motor ................................................... 32 Installing Belt ............................................................ 32 Installing Belt Guard ................................................. 33 Mounting Switch and End Caps ................................ 34 Installing Guide Bar End Caps .................................. 34 Securing Electrical Cords ......................................... 34 Getting to Know Your Table Saw ................................ 35 Safety Instructions for Basic Saw Operations ............. 39 Before Each Use ....................................................... 39 To Reduce the Risk of Injury From Jams, Slips Or Thrown Pieces (Kickbacks Or Throwbacks) ............ 39 Plan Ahead To Protect Your Eyes, Hands, Face and Ears ......................................................... 40 Whenever Sawblade Is Spinning .............................. 40 Work Feed Devices ..................................................... 41 Push Stick ................................................................. 41 Featherboard ............................................................ 41 Push Block ................................................................ 41 Auxiliary Fence ......................................................... 42 Basic Saw Operations ................................................. 43 Using the Miter Gauge .............................................. 43 Additional Safety Instructions for Crosscutting ......... 43 Crosscutting .............................................................. 43 Repetitive Crosscutting ............................................. 44 Miter Crosscutting ..................................................... 45 Bevel Crosscutting .................................................... 45 Compound Crosscutting ........................................... 45 Using the Rip Fence ................................................. 46 Additional Safety Instructions for Rip Cuts ............... 46 Ripping ...................................................................... 46 Bevel Ripping Narrow Work ...................................... 48 Using Featherboards for Thru-Sawing ...................... 48 Using Featherboards for Non Thru-Sawing .............. 49 Resawing .................................................................. 49 Using Carbide Tipped Blades ................................... 50 Dadoing .................................................................... 50 Rabbeting ................................................................. 51 Ploughing and Molding ............................................. 51 Molding ..................................................................... 52 Adjustments ................................................................. 53 Miter Gauge .............................................................. 53 Maintaining Your Table Saw ....................................... 54 Maintenance ............................................................. 54 Lubrication ................................................................ 54 RIDGID Recommends the Following Accessories ...... 55 Troubleshooting ........................................................... 55 General ..................................................................... 55 Motor ......................................................................... 56 Repair Parts ................................................................ 57 2 Safety Instructions For Table Saw Safety is a combination of common sense, staying alert and knowing how your table saw works. Read this manual to understand this table saw. Safety Signal Words WARNING: means if the safety information is not followed someone could be seriously injured or killed. CAUTION: means if the safety information is not followed someone may be injured. DANGER: means if the safety information is not followed someone will be seriously injured or killed. Before Using The Saw WARNING: to reduce the risk of mistakes that could cause serious, permanent injury, do not plug the table saw in until the following steps have been satisfactorily completed. blade tilt controls (See “Getting to Know Your Table Saw” section). • Review and understand all safety instructions and operating procedures in this manual. • Review the maintenance methods for this saw (See “Maintaining Your Table Saw” section)). • Find and read all the warning labels found on the saw (shown below). • Completely assemble and align saw (See “Assembly” section). • Learn the use and function of the ON-OFF switch blade guard, spreader, anti-kickback device, miter gauge, rip fence, table insert, blade elevation and When Installing Or Moving The Saw Reduce the Risk of Dangerous Environment. • Use the saw in a dry, indoor place protected from rain. • Keep work area well lighted. • Use recommended accessories. Consult the owner’s manual for recommended accessories. The use of improper accessories may cause risk of injury to persons. To reduce the risk of injury from unexpected saw movement. • Bolt or clamp the saw to firm level surface where there is plenty of room to handle and properly support the workpiece (See “Assembly-Mounting Your Saw” section). • Support the saw so the table is level and the saw does not rock. • When using a table extension longer than 12" attached to any side of the saw, bolt the saw to a stationary surface or prop up the outer end of the extension from the floor or bench top to keep the saw from tipping. • Put the saw where neither operator nor bystanders must stand in line with the sawblade. • To reduce the risk of injury from electrical shock, make sure your fingers do not touch the plug’s metal prongs when plugging in or unplugging the saw. • Never Stand On Tool. Serious injury could occur if the tool tips or you accidentally hit the cutting tool. Do not store anything above or near the tool where anyone might stand on the tool to reach them. 3 Safety Instructions For Table Saw (continued) Before Each Use Inspect your saw. • To reduce the risk of injury from accidental starting, turn the switch off, unplug the saw, and remove the switch key before raising or removing the guard, changing the cutting tool, changing the setup, or adjusting anything. Make sure switch is in OFF position before plugging in. •Check for alignment of moving parts, binding of moving parts, breakage of parts, saw stability, and any other conditions that may affect the way the saw works. • If any part is missing, bent or broken in any way, or any electrical part does not work properly, turn the saw off and unplug the saw. • Replace damaged or missing parts before using the saw again. • Use the sawblade guard, spreader and anti-kickback pawls for any thru-sawing (whenever the blade comes through the top of the workpiece). Make sure the antikickback pawls work properly. Make sure the spreader is in line with sawblade (See “Assembly-Aligning Blade Guard” section). • Remove adjusting keys and wrenches. Form a habit of checking for and removing keys and adjusting wrenches from table top before turning saw on. • Make sure all clamps and locks are tight and no parts have excessive play. To Reduce the Risk of Injury From Jams, Slips Or Thrown Pieces (Kickbacks Or Throwbacks) Inspect Your Blade. • Choose the right blade or cutting accessory for the material and the type of cutting you plan to do. • Use The Right Tool. Don’t force tool or attachment to do a job it was not designed for. • Never use grinding wheels, abrasive cutoff wheels, friction wheels (metal cutting blades) wire wheels or buffing wheels. They can fly apart explosively. • Cut only wood, wood like or plastic materials. Do not cut metal. • Choose and inspect your cutting tool carefully: - To reduce the risk of cutting tool failure and thrown shrapnel (broken pieces of blade), use only 10” or smaller blades or other cutting tools marked for speeds of 5000 rpm or higher. - Always use unbroken, balanced blades designed to fit this saw’s 5/8 inch arbor. - When thru-sawing (making cuts where the blade comes through the workpiece top), always use a 10 inch diameter blade. This keeps the spreader closest to the blade. - Do not over tighten arbor nut. Use arbor wrenches to “snug” it securely. - Use only sharp blades with properly set teeth. Consult a professional blade sharpener when in doubt. - Keep blades clean of gum and resin. - Never use the saw without the proper blade insert. Inspect your work area. • Keep work area clean. • Cluttered areas and benches invite accidents. Floor must not be slippery from wax or sawdust. • To reduce the risk of burns or other fire damage, never use the saw near flammable liquids, vapors or gases. • To reduce the risk of injury, don’t do layout, assembly, or setup work on the table while blade is spinning. It could cut or throw anything hitting the blade. Plan your work • Use the right tool. Don’t force tool or attachment to do a job it was not designed for. Inspect your workpiece. • Make sure there are no nails or foreign objects in the part of the workpiece to be cut. • When cutting irregularly shaped workpieces, plan your work so it will not slip and pinch the blade: • A piece of molding for example, must lie flat or be held by a fixture or jig that will not let it twist, rock or slip while being cut. Use jigs or fixtures where needed to prevent workpiece from shifting. • Use a different, better suited type of tool for work that can’t be made stable. Plan your cut. • To reduce the risk of kickbacks and throwbacks - when a part or all of the workpiece binds on the blade and is thrown violently back toward the front of the saw: - Never cut Freehand. Always use either a rip fence, miter gauge or fixture to position and guide the work, so it won’t twist or bind on the blade and kick back. - Make sure there’s no debris between the workpiece and its supports. • Use extra caution with large, very small or awkward workpieces. • Use extra supports (tables, saw horses, blocks, etc.) for any workpieces large enough to tip when not held down to the table top. Never use another person as a substitute for a table extension, or as additional support for a workpiece that is longer or wider than the basic saw table, or to help feed, support or pull the workpiece. • Never confine the piece being cut off, that is, the piece not against the rip fence, miter gauge or fixture. Never hold it, clamp it, touch it, or use length stops against it. It must be free to move. If confined, it could get wedged against the blade and cause a kickback or throwback. • Never cut more than one workpiece at a time. • Never turn your table saw “ON” before clearing everything except the workpiece and related support devices off the table. 4 Plan Ahead To Protect Your Eyes, Hands, Face and Ears Dress for safety • Do not wear loose clothing, gloves, neckties or jewelry (rings, wrist watches). They can get caught and draw you into moving parts. • Wear nonslip footwear. • Tie back long hair. • Roll long sleeves above the elbow. • Noise levels vary widely. To reduce the risk of possible hearing damage, wear ear plugs or muffs when using table saw for hours at a time. • Any power saw can throw foreign objects into the eyes. This can result in permanent eye damage. Always wear safety goggles, not glasses complying with ANSI Z87.1 (or in Canada CSA Z94-3-M88) shown on package. Everyday eyeglasses have only impact resistant lenses. They are not safety glasses. Safety goggles are available at many local retail stores. Glasses or goggles not in compliance with ANSI or CSA could seriously hurt you when they break. Plan the way you will push the workpiece through. • Never pull the workpiece through. Start and finish the cut from the front of the table saw. • Never put your fingers or hands in the path of the sawblade or other cutting tool. • Never reach in back of the cutting tool with either hand to hold down workpiece, support the workpiece, remove wood scraps, or for any other reason. • reduce the risk of hand positions where a sudden slip could cause fingers or hand to move into a sawblade or other cutting tool. • Don’t overreach. Always keep good footing and balance. • Push the workpiece against the rotation of the blade, never feed material into the cutting tool from the rear of the saw. • Always push the workpiece all the way past the sawblade. • As much as possible, keep your face and body to one side of the sawblade, out of line with a possible kickback or throwback. • Set the cutting tool as low as possible for the cut you’re planning. Reduce the Risk of Accidental Starting. • Make sure switch is “OFF” before plugging saw into a power outlet. • For dusty operations, wear a dust mask along with safety goggles. Whenever Sawblade Is Spinning WARNING: Don’t allow familiarity (gained from frequent use of your table saw) to cause a careless mistake. Always remember that a careless fraction of a second is enough to cause a severe injury. Before freeing jammed material. • Turn switch “OFF”. • Wait for all moving parts to stop. • Unplug the saw. • Check blade, spreader and fence for proper alignment before starting again. To reduce the risk of throwback of cut off pieces. • Use the guard assembly. To remove loose pieces beneath or trapped inside the guard. • Turn saw “OFF”. • Remove switch key. • Wait for blade to stop before lifting the guard. Before Leaving The Saw. • Turn the saw off. • Wait for blade to stop spinning. • Unplug the saw. • Make workshop child-proof. Lock the shop. Disconnect master switches. Remove the yellow switch key. Store it away from children and others not qualified to use the tool. • Before actually cutting with the saw, watch it while it runs for a short while. If it makes an unfamiliar noise or vibrates a lot, stop immediately. Turn the saw off. Unplug the saw. Do not restart until finding and correcting the problem. • Make sure the top of the arbor or cutting tool turns toward the front of the saw. Keep Children Away. • Keep all visitors a safe distance from the table saw. • Make sure bystanders are clear of the table saw and workpiece. Don’t Force Tool. • Let the blade reach full speed before cutting. • It will do the job better and safer at its designed rate. • Feed the workpiece into the saw only fast enough to let the blade cut without bogging down or binding. 5 Safety Instructions For Table Saws (continued) Additional Safety Instructions For: Rip Type Cuts. • Never use the miter gauge when ripping. • Use a push stick whenever the fence is 2 or more inches from the blade. • When thru-sawing, use an auxiliary fence and push block whenever the fence must be between 1/2 and 2 inches of the blade. • Never thru-saw rip cuts narrower than 1/2 inch. (See “Basic Saw Operations-Ripping and Bevel Ripping” sections.) • Never rip anything shorter than 10” long. • When using a push stick or push block, the trailing end of the board must be square. A push stick or block against an uneven end could slip off or push the work away from the fence. • A Featherboard can help guide the workpiece. (see ”Basic Saw Operation-Using Featherboards for ThruSawing.” section) • Always use featherboards for any non thru rip type cuts. (See “Basic Saw Operations - Using Featherboards for Non-Thru Sawing” section) Featherboard See “Work Feed Devices” section for Material and Dimensions Before Starting. • To reduce the risk of kickbacks and slips into the blade, make sure the rip fence is parallel to the sawblade. • Before thru-sawing, check the anti-kickback pawls. The pawls must stop a kickback once it has started. Replace or sharpen anti-kickback pawls when points become dull. (See “Maintaining Your Table Saw - AntiKickback Pawls” section.) • Plastic and composition (like hardboard) materials may be cut on your saw. However, since these are usually quite hard and slippery, the anti-kickback pawls may not stop a kickback. Therefore, be especially careful in your setup and cutting procedures. While Thru-sawing. • To reduce the risk of kickbacks and slips into the blade, always push forward on the section of the workpiece between the sawblade and the rip fence. Never push forward on the piece being cut off. Additional Safety Instructions For: Crosscut Type Cuts. Before Starting. • Use jigs or fixtures to help hold any piece too small to extend across the full length of the miter gauge face during the cut. This lets you properly hold the miter gauge and workpiece and helps keep your hands away from the blade. While Cutting • To reduce the risk of blade contact, always hold the miter gauge as shown in “Basic Saw Operations Using The Miter Gauge”. • Never use the rip fence when crosscutting. • An auxiliary wood facing attached to the miter gauge can help prevent workpiece twisting and throwbacks. Attach it to the slots provided. Make the facing long enough and big enough to support your work. Make sure, however, it will not interfere with the sawblade guard. Additional Safety Instructions For Caster System: Before Using the Caster System Read the following warning located on the center frame: To reduce the risk of injury from unexpected tool movement. • Check to make sure tool does not move prior to use. If tool moves, adjust all four leveler feet down to support the tool. • Put the tool on a firm level surface where there is plenty of room to handle and properly support the workpiece. 6 Glossary of Terms for Woodworking Anti-Kickback Pawls Device which, when properly maintained, is designed to stop the workpiece from being thrown towards the front of the saw at the operator during ripping operation. Arbor The shaft on which a cutting tool is mounted. Bevel Cut An angle cutting operation made through the face of the workpiece. Compound Cut A simultaneous bevel and miter crosscutting operation. Crosscut A cutting operation made across the width of the workpiece. Dado A non thru cut which produces a square sided notch or trough in the workpiece. Featherboard A device which can help guide workpieces during rip type operation. Freehand Performing a cut without the use of fence (guide), miter gauge, fixture, hold down or other proper device to prevent the workpiece from twisting during the cutting operation. Twisting of the workpiece can cause it to be thrown. Gum A sticky, sap based residue from wood products. Heel Misalignment of the sawblade such that the blade is not parallel to the miter gauge groove. Kerf The amount of material removed by the blade in a through cut or the slot produced by the blade in a nonthrough or partial cut. Kickback An uncontrolled grabbing and throwing of the workpiece back toward the front of the saw. Leading End The end of the workpiece which, during a rip type operation, is pushed into the cutting tool first. Miter Cut An angle cutting operation made across the width of the workpiece. Molding A non through cut which produces a special shape in the workpiece used for joining or decoration. Ploughing Grooving with the grain the length of the workpiece, using the fence. (A type of non-through cut) Push Stick A device used to feed the workpiece through the saw during narrow ripping type operations which helps keep the operator’s hands well away from the blade. Push Block A device used for ripping type operations too narrow to allow use of a push stick. Rabbet A notch in the edge of a workpiece. (A type of nonthrough cut) Resin A sticky, sap based substance that has hardened. Revolutions Per Minute (RPM) The number of turns completed by a spinning object in one minute. Rip Cut A cutting operation along the length of the workpiece. Sawblade Path The area of the workpiece or table top directly in line with either the travel of the blade or the part of the workpiece which will be, or has been, cut by the blade. Set The distance that the tip of the sawblade tooth is bent (or set) outward from the face of the blade. Throw-Back Throwing of pieces in a manner similar to a kickback. Thru-Sawing Any cutting operation where the blade extends completely through the thickness of the workpiece. Trailing End The workpiece end last cut by the blade in a ripping operation. Workpiece The item on which the cutting operation is being performed. The surfaces of a workpiece are commonly referred to as faces, ends, and edges. Cross Cut Kerf Miter Cut Molding Dado or Ploughing Rip Cut Rabbet Bevel Cut Compound Cut 7 Motor Specifications and Electrical Requirements Power Supply and Motor Specifications 60 Hz. service. Wired for 120V WARNING: To reduce the risk of electrical hazards, fire hazards or damage to the tool, use proper circuit protection. Your tool is wired at the factory for operation using the voltage shown. Connect tool to a power line with the appropriate voltage and a 15-amp branch circuit. Use a 15-amp time delay type fuse or circuit breaker. To reduce the risk of shock or fire, if power cord is worn or cut, or damaged in any way, have it replaced immediately. The A-C motor used on this tool is a capacitor start, capacitor run non-reversible type, having the following specifications. It is wired at the factory for operation on 110-120v AC, Wired for 240V Rated H.P 1-1/2 1-1/2 Voltage 110-120 220-240 Amperes 13 6.5 Hertz (Cycles) 60 50/60 Phase Single Single RPM 3450 2875 (50 Hz)/ 3450 (60 Hz) Clockwise Rotation of Shaft Clockwise General Electrical Connections DANGER: To reduce the risk of electrocution: 1. Use only identical replacement parts when servicing. Servicing should be performed by a qualified service technician. 2. Do not use in rain or where floor is wet. This tool is intended for indoor residential use only. WARNING: Do not permit fingers to touch the terminals of plug when installing or removing the plug to or from the outlet. 110-120 Volt, 60 Hz. Tool Information The plug supplied on your tool may not fit into the outlet you are planning to use. Your local electrical code may require slightly different power cord plug connections. If these differences exist refer to and make the proper adjustments per your local code before your tool is plugged in and turned on. If the grounding instructions are not completely understood, or if you are in doubt as to whether the tool is properly grounded check with a qualified electrician or service personnel. WARNING: If not properly grounded, this tool can cause an electrical shock, particularly when used in damp locations, in proximity to plumbing, or out of doors. If an electrical shock occurs there is the potential of a secondary hazard, such as your hands contacting the sawblade. In the event of a malfunction or breakdown, grounding provides a path of least resistance for electric current to reduce the risk of electric shock. This tool is equipped with an electric cord having an equipment-grounding conductor and a grounding plug, as shown. The plug must be plugged into a matching outlet that is properly installed and grounded in accordance with all local codes and ordinances. Do not modify the plug provided. If it will not fit the outlet, have the proper outlet installed by a qualified electrician. A temporary adapter may be used to connect this plug to a 2-prong outlet as shown if a properly grounded three prong outlet is not available. This temporary adapter should be used only until a properly grounded three prong outlet can be installed by a qualified electrician. The green colored rigid ear, lug or the like, extending from the adapter must be connected to a permanent ground such as a properly grounded outlet box. Improper connection of the equipment-grounding conductor can result in a risk of electric shock. The conductor with insulation having an outer surface that is green with or without yellow stripes is the equipment-grounding conductor. If repair or replacement of the electric cord or plug is necessary, do not connect the equipment-grounding conductor to a live terminal. 3-Prong Plug Properly Grounded 3-Prong Outlet Grounding Prong Grounding Lug 3-Prong Plug Make sure this Is Connected to a Known Ground 2-Prong Outlet Adapter NOTE: The adapter illustrated is for use only if you already have a properly grounded 2-prong outlet. NOTE: In Canada the use of a temporary adapter is not permitted by the Canadian Electrical Code. 8 Changing Motor Voltage WARNING: Electric shock can kill. To reduce the risk of shock, never connect plug to power source outlet until all assembly steps are completed. Unplug saw before making or changing any connections. Power Cord NOTE: Power cord lead connections for 110/120 volt and 220/240 volt applications are the same. This will show how to change the internal motor wiring to convert saw from a 120V to a 240V application. 1. Open the motor connector box cover located on the end of motor using a flat blade screwdriver to loosen screws. 2. From the factory this motor is connected for 120V usage. For 240V usage: a. Remove the brown motor lead from terminal #3 and attach it to the “P” (parking position) plastic terminal. NOTE: This brown lead is not required for the 240 volt application and is “parked” in the plastic “P” terminal to keep it insulated. Be sure the brown lead is attached securely to the “P” terminal holder. b. Remove the yellow motor lead from terminal #4 and attach it to terminal #3. c. Remove the red motor lead from terminal #2 and attach it to terminal #3. d. Cut off the 120 volt power cord plug and replace it with a (3 blade) 240 volt 15 amp U.L. listed plug. (See illustration of 240V plug & receptacle.) Connect the power cord white and black leads, respectively, to the “hot” plug blade terminals and connect the power cord green grounding wire to the plug ground prong terminal. 3. Close motor connector box being sure that the power cord is seated in the strain relief groove and tighten box cover screws. 4. Plug your saw into a 220-240V, 15amp, 3 blade receptacle. 5. Make certain the receptacle is connected to a 240V A.C. power supply through a 240V branch circuit having at least a 15 amp capacity and protected by a 15 amp time-delay fuse or circuit breaker. Grounding Prong Connector Box Cover To Switch Box Red Motor Lead On Terminal #2 Brown Motor Lead On Terminal #3 NOTE: Power Cord Not Shown For Clarity Cord Exit/ Strain Relief Groove Yellow Motor Lead On Terminal #4 110/120 Volt Connection (As Received From Factory) Yellow Motor Lead on Terminal #3 Red Motor Lead on Terminal #3 220-240V 15 Amp 3 Blade Receptacle Cord Exit/ Strain Relief Groove Grounded Outlet Box Brown Motor Lead On Terminal “P” (Plastic) 220/240 Volt Connection 9 Motor Specifications and Electrical Requirements (continued) Motor Thermal Overload Protector CAUTION: To reduce the risk of motor damage, this motor should be blown out or vacuumed frequently to prevent sawdust buildup which will interfere with normal motor ventilation. Manual Reset Button Your saw is equipped with a manual-reset thermal-overload protector designed to open the power line circuit when the motor temperature exceeds a safe level, when motor is overloaded or when a low voltage condition exists. WARNING: To reduce the risk of thrown objects or blade contact from unexpected starting. If the protector stops the saw motor, immediately turn the saw switch “OFF”, remove the key and allow motor time to cool. 1. After cooling to a safe operating temperature, the overload protector can be reset by pushing the red button on the end of the motor. If the red button will not click into place immediately, the motor is still too hot and must be allowed to cool for a while longer. The time required for the motor to cool may be equal to the length of time the saw was used before the thermal overload protector opened. NOTE: An audible click will indicate the protector is reset, push hard to hear the click. 2. As soon as the red button is reset, the saw may be started and operated normally. 3. Frequent “blowing” of fuses or tripping of circuit breakers may result if: a. Motor is overloaded - Overloading can occur if you feed too rapidly or if saw is misaligned. b. Motor circuit is fused differently from recommendations - Always follow instructions for the proper fuse/ breaker. Do not use a fuse/breaker of greater capacity without consulting a qualified electrician. c. Low voltage - Although the motor is designed for operation on the voltage and frequency specified on motor nameplate, normal loads will be handled safely on voltage not more than 10% above or below the nameplate voltage. Heavy loads, however, require that voltage at motor terminals equals the voltage specified on nameplate. 4. Most motor troubles may be traced to loose or incorrect connections, overloading, reduced input voltage (such as small size wire in the supply circuit) or to overly long supply circuit wire. Always check the connections, the load and the supply circuit whenever motor fails to perform satisfactorily. Check wire sizes and length with the Wire Size Chart below. Wire Sizes NOTE: Make sure the proper extension cord is used and is in good condition. The use of any extension cord will cause some loss of power. To keep this to a minimum and to prevent overheating and motor burn-out, use the table shown to determine the minimum wire size (A.W.G.) extension cord. Use only 3-wire extension cords which have 3-prong grounding type plugs and 3-prong receptacles which accept the tool’s plug. Extension Cord Length 0-25 Ft. 26-50 Ft. 10 Gauge (A.W.G.) 110-120V 220-240V 14 12 18 18 Unpacking and Checking Contents Tools Needed Hex “L” Wrenches 3/32 In., 2.5mm, 1/8 In., 5/32 In., 3/16 In. Combination Square must be true. Check it’s accuracy as shown below. Hammer Draw light line on board along edge Select the straight edge of 3/4” thick board. This edge must be perfectly straight. Utility Knife Pliers NOTE: The square and straight edge are used to align the saw. They must be accurate if the saw is to be aligned properly. Phillips Screwdriver Tape Rule Medium Screwdriver Should be no gap or overlap here when square is flipped over in dotted position. Small Screwdriver Combination Wrenches 7/16 In. 1/2 In. 9/16 In. Adjustable Wrench Combination Square C Clamp 4 x 4 Wood Block Framing Square Unpacking • Sometimes small parts can get lost in packaging material. Do not throw away any packaging until saw is put together. Check packaging for missing parts before contacting RIDGID. • A complete parts list (Repair Parts) is at the end of the manual. Use this list to identify the part number of the missing part. NOTE: At the beginning of each assembly section items such as nuts and bolts are shown actual size. 1. Separate saw and all parts from packing materials and check each one with the illustration and the “List of Loose Parts” to make certain all items are accounted for, before discarding any packing material. WARNING: If any parts are missing, do not attempt to assemble the table saw, plug in the power cord or turn the switch on until the missing parts are obtained and are installed correctly. WARNING: For your own safety, never connect plug to power source outlet until all assembly steps are complete, and you have read and understand the safety and operating instructions. 2. Remove the protective oil that is applied to the table top and edges of the table and table extensions. Use any ordinary household type grease and spot remover. WARNING: To reduce the risk of fire or health hazard, never use gasoline, naptha, or similar highly volatile solvents. WARNING: The saw is heavy. To reduce the risk of back injury, get help to lift the saw. Hold the saw close to your body. Bend your knees so you can lift with your legs, not your back. 3. Apply coat of paste wax to the table and table extensions. NOTE: Before beginning assembly: • Check that all parts are included. If you are missing any part, do not assemble the saw. Contact your Authorized Service Center to get the missing part. 11 Unpacking and Checking Contents (continued) List of Loose Parts Item Part Name Qty. Fence Guide Bar Carton Containing: R Front Fence Guide Bar ......................................... 1 S Rear Fence Guide Bar ......................................... 1 T Guide Bar Parts Bag ............................................ 1 Rip Fence Carton Containing: U Rip Fence ............................................................. 1 Motor Carton Containing: V Motor/Switch Assembly ........................................ 1 Leg Stand Carton Containing: W Leg ....................................................................... 4 X Leg Brace (Short)................................................. 2 Y Side Stringer ........................................................ 2 Z End Stringer ......................................................... 2 AA Leg Stand Parts Bag ............................................ 1 Item Part Name Qty. A Miter Gauge.......................................................... 1 B Table Extension .................................................... 2 Blade Guard Carton Containing: C Blade Guard .........................................................1 D Blade Guard Parts Bag ........................................ 1 Large Parts Bag Containing: E Belt Guard ............................................................ 1 F Storage Hook Bag ................................................ 1 G Drive Belt .............................................................. 1 H Blade Wrench ....................................................... 1 J Wire Tie ................................................................ 2 K Handwheel ........................................................... 2 L Trim Parts Bag ...................................................... 1 M Table Extension Parts Bag ................................... 1 N Miscellaneous Parts Bag ...................................... 1 P Owners Manual (English) ..................................... 1 Q Owners Manual (Spanish) .................................... 1 A B R T S Fence Guide Bar Carton (Service #509469) C U D Blade Guard Carton G Rip Fence Carton L V H M E J Motor Carton N K W F P AA Q Y X Z Leg Stand Carton Large Parts Bag 12 List of Loose Parts (Caster) Item A B C D Description Qty. Center Frame ...................................................... 1 Center Frame w/Actuator ..................................... 1 End Frame without Wheel.................................... 2 End Frame with Fixed Wheel ............................... 2 Item E F G H Description Qty. Handle ..................................................................1 Hinge Plate ...........................................................1 Swivel Caster ........................................................1 Bag Loose Parts Labeled "Caster" .......................1 Loose Parts A B C D F G H E Assembly Installing Handwheels 1. From the bag labeled “Miscellaneous” remove only the following hardware: 2 Pan Head Screws, 10 - 32 x 5/8" long 2 Lockwashers, #10 External Type From among the loose parts find the following: 2 Handwheels 2. Line up flat spots on shaft and handwheel, push handwheel onto shaft. Install screw and lockwasher to lock handwheel on shaft. Repeat for the other handwheel. 10-32 x 5/8 Pan Head Screw #10 External Lockwasher Handwheel Shaft Lockwasher Elevation Handwheel 13 Bevel Handwheel Pan Head Screw Assembly (continued) Assembling Leg Stand 1. Locate the carton containing the leg stand. Remove all parts from packing material. 2. From the bag labeled “Legs” remove the following hardware: 20 Truss Head Screws, 1/4-20 x 1/2” long 20 Lockwashers, 1/4” External Type 20 Hex Nuts, 1/4-20 From leg stand carton find the following: 4 Legs 2 End Stringers 2 Side Stringers 2 Leg Braces 3. From among the loose parts find the following: 2 Miter Gauge Storage Hooks 2 Rip Fence Storage Hooks 1/4 In. External Lockwasher 1/4-20 x 1/2 In. Truss Head Screw 1/4-20 Hex Nut Side Stringer End Stringers Leg Brace Miter Gauge Storage Hooks Rip Fence Storage Hooks Leg 4. See special instruction sheet for installing storage hooks. 5. Assemble the legs as shown. Insert the truss head screws through the holes in the legs, then through the holes in the side and end stringers. Legs must be assembled on top of stringers 6. Install the lockwashers. Screw on the nuts hand tight. 7. Insert the truss head screws through the holes in the legs, then through the holes in the leg braces. 8. Install the lockwashers. Screw on the nuts but do not tighten until completely assembled. Side Stringers 1/4-20 Hex Nut Legs Swivel Caster Assembly Will Be Installed Here Truss Head Screw Lockwasher Leg Brace 14 End Stringers Assembling Universal Caster System Frame Assembly Locating Parts 1. From the bag labeled "Caster" remove only the following hardware: 24 Truss Head Screws, 1/4-20 x 1/2" Long 24 Lockwashers, 1/4" External Type 24 Hex Nuts, 1/4-20 2. From the caster carton find the following: 2 End Frames Without Wheel 2 End Frames With Wheel 1 Center Frame with Actuator 1 Center Frame Truss Hd. Screw 1/4-20 x 1/2" Lockwasher Ext 1/4" End Frame With Wheel End Frame Without Wheel Center Frame Center Frame w/Actuator Setup 1. The end frame will be assembled to the center frame per the following instructions. Use the holes shown with a “•” for your saw. Assembly 1. Position the two end frames, without wheels, inside the center frame containing the swivel caster as shown. Align holes in end frames (shown with a “•” for your saw type) with the holes in the center frame. Fasten each end frame, to the center frame using six 1/4-20 x 1/2 truss head screws, lockwashers, and nuts as shown. The bottom of each end frame should be level with the bottom of the center frame as illustrated. Tighten all nuts with a 7/16" wrench. Level Bottom With Edge 2. Position the two end frames, with fixed wheels, inside the center frame as shown. Align holes in end frames (shown with a "•") with the holes in the center frame. Fasten each end frame to the center frame using six 1/4-20 x 1/2 truss head screws, lockwashers, and nuts as shown. The bottom of each end frame should be level with the bottom of the center frame as illustrated.Tighten all nuts with a 7/16" wrench. End Frames With Wheels Level Bottom With Edge 15 Hex Nut 1/4-20 Assembling Universal Caster System (continued) Swivel Caster Assembly Locating Parts 1. From the bag labeled "Caster" remove the following hardware: 4 Hex Head Bolts, 5/16-18 x 5/8" Long 4 Lockwashers, 5/16" External Type 5 Hex Nuts, 5/16-18 1 Hex Lock Nut 5/16-18 1 Button Head Bolt 5/16-18 x 1" 1 Hex Head Bolt 5/16-18 x 4-1/4 2. From the caster carton find the following: 1 Swivel Caster 1 Hinge Plate 1 Center Frame w/Actuator Hex Hd. Bolt 5/16-18 x 5/8 Lockwasher 5/16 Hex Nut 5/16-18 Button Head Bolt 5/16-18 x 1 Hex Lock Nut 5/16-18 (Plastic Inner Ring) Hex Hd. Bolt 5/16-18 x 4-1/4 Assembly Instructions 1. Thread a 5/16-18 nut onto the 5/16-18 x 1 button head cap screw all the way to the screw head. Then finger tighten the cap screw into the actuator stem all the way in. This will be adjusted later. Actuator 5/16-18 Nut 5/16-18 Bolts 2. Mount the swivel caster wheel to the hinge plate using four 5/16-18 x 5/8 bolts, lock washers, and nuts as shown. Tighten all nuts securely with 1/2" wrench. Lockwasher Nuts 16 5/16-18 x 1 Button Head Cap Screw 3. Hold the hinge plate with the caster in the center of the frame as shown. Slide the 5/16-18 x 4-1/4 bolt through frame and hinge plate. Finger tighten lock nut. Tighten nut with a 1/2" and adjustable wrench but do not over tighten. The hinge plate should freely pivot inside the frame. NOTE: The hinge plate can be mounted in either set of holes as shown. 5/16-18 Lock Nut Alternate Mounting Location 5/16-18 x 4-1/4 Bolt 4. From the bag labeled "Caster" remove the following hardware: 1 Hex Head Screw, 1/4-20 x 3/4" Long 1 Lockwasher, 1/4" External Type 1 Hex Nut, 1/4-20 5. From the caster carton find the following: 1 Handle Hex Hd. Bolt 1/4-20 x 3/4" Ext Lockwasher 1/4" Hex Nut 1/4-20 Handle 6. Slide handle all the way down, over actuator and fasten using 1/4-20 x 3/4 hex head screw, lockwasher and nut as shown. Tighten nut securely using a 7/16" and adjustable wrench, compressing handle over stem. 1/4-20 Nut 1/4 Lockwasher Actuator 1/4-20 Screw Swivel Caster Adjustment 1. Rotate handle so that stem is fully extended inside center frame. Using fingers adjust button head cap screw so that the caster is aligned parallel with the bottom of the center frame as illustrated. Tighten nut securely against stem. NOTE: If actuator loosens, tighten using an adjustable wrench on sides of actuator as shown. Handle Rotate Handle Extending Stem Inside Frame Tighten with Adjustable Wrench If Necessary Tighten Nut Against Stem 17 Align Edges Parallel as Shown Caster Pivots Up Inside Frame When Stem Is Released Assembling Universal Caster System To Saw Locating Parts 1. From the bag labeled "Caster" remove only the following hardware: 8 Hex Jam Nut, 3/8-16 4 3/8 Spring Lockwasher 8 Washer, 3/8 x 7/8 x 5/64 4 Foot Leveling Leveling Foot WARNING: If your saw has damaged or missing parts, they must be repaired or replaced before this assembly can be completed. Reference your saw owner’s manual or Authorized Service Department if necessary. Nut Hex Jam 3/8-16 Assembly Hints: • The swivel caster may be mounted on the left or right side of the leg stand. See illustration. • Make sure the leg and stiffener bolts are loose in order to align the holes in the legs with the holes in the end frames. • All four connections to your leg stand are done the same way, using the same hardware. • It may be helpful to place the frame on blocks of wood approximately 4" thick while assembling it to the leg stand. • Install frame assembly so warning label can be read from outside the legs. 2. There are two holes in each end of the end frames. Mount the casters through the holes which will be to the outside of your leg stand. Use leveling feet, nuts, lockwashers and washers as shown. Lockwasher Spring 3/8 Swivel Caster Nut Lockwasher Use Holes On Outside Washer Washer Nut Leveling Foot Wood Block 18 Washer 3/8 x 7/8 x 5/64" Leveling Feet Adjustment 1. Adjust fixed wheel caster frame leveling feet so that the saw is resting on two wheels. The leveling feet should not touch the floor and should be adjusted about 3/4" from the bottom of the end frame to the bottom of the foot as shown. Tighten all nuts using 9/16" wrench. 3/4" Fixed Wheel Frame 2. Adjust the swivel caster frame leveling feet so that the saw does not rock when the swivel caster is disengaged and the saw is resting on these two feet and the two fixed wheels. The leveling feet should be approximately 1-3/4" from the bottom of the frame (on a level floor surface) as shown. Make final adjustment to the leveling feet to ensure that when the swivel caster is disengaged, the caster can be rotated 360° by hand. Tighten all nuts using 9/16" wrench. 1-3/4" Swivel Caster Frame Rotate Caster 19 Assembly Mounting Your Saw 1. From the bag labeled “Legs” remove the following hardware: 4 Hex Head Screws, 5/16-18 x 1-1/4" Long 4 Hex Nuts, 5/16-18 4 Lockwashers, 5/16" External Type 8 Flat Washers, 11/32 x 11/16 x 1/16 2. Place the saw upside down onto a smooth piece of cardboard or heavy paper, on the floor, so the saw is resting on the table top. 5/16-18 x 1-1/4 In Hex Head Screw 5/16-18 Hex Nut 5/16 In External Lockwasher WARNING: The saw is heavy. To reduce the risk of back injury, get help to lift the saw. Hold the saw close to your body. Bend your knees so you can lift with your legs, not your back. 11/32 I.D. Flat Washer 3. Place legs on saw so that holes in saw base and leg set line up and trim label is facing front. 4. Install screw, washers, lockwasher and nut as shown. 5. Tighten all leg assembly and mounting hardware at this time. Hex Nut Lockwasher Leg Set Flat Washer End Stiffener Cardboard Flat Washer Hex Head Screw 7/16 Dia. Mounting Holes Saw Base 7/8 11-1/4 + Bench Mounting If you do not use the legset and mount the saw on a bench, make sure that there is an opening in the top of the bench the same size as the opening in the bottom of the saw so that the sawdust can drop through. Recommended working height is 33 to 37 inches from the top of the saw table to the floor. + 13 Bench Opening 16-3/4 15-3/4 + + Front of Saw NOTE: All dimensions in inches 20 1/2 Assembling Table Extensions 1. From the bag labeled “Table Extensions” remove the following hardware: (Quantity indicated is for two extensions) 8 Hex Head Screws, 5/16-18 x 1-1/4" Long 8 Flat Washers, 11/32 x 11/16 x 1/16 8 Lockwashers, 5/16" External Type 8 Hex Nuts, 5/16-18 NOTE: Assemble with saw upside down. 5/16-18 x 1-1/4 In Hex Head Screw WARNING: Stock table extensions must be installed. They help support the fence guide bars. An unsupported guide bar can twist. Twisted guide bars can misalign fence. A misaligned fence can cause binding or kickback. You could be hit or cut. 5/16 In External Lockwasher 5/16-18 Hex Nut 11/32 I.D. Flat Washer 2. Insert four (4) 5/16-18 x 1 in. long screws through the holes in each extension. 3. Position extension against table so screws extend through hole in table. 4. Install flat washers, lockwasher, and nuts on the screws. With a 1/2" wrench, snug the four nuts just enough to take the play out between the table and extension. Do not tighten. 5. Repeat steps 1-4 to install the other extension. 6. Stand saw upright on legs. Roll saw over onto front then up onto feet. WARNING: The saw is heavy. To reduce the risk of back injury, get help to lift the saw. Hold the saw close to your body. Bend your knees so you can lift with your legs, not your back. 7. Line up the front edge of extension with the front edge of the table. At the spots marked “X” in the drawing, tighten a “C” Clamp over the edge of table and extension. Use a combination square to check the alignment of the front and top edges nearest the “X”’s. Tighten the two corner nuts only with a 1/2" wrench. NOTE: This assembly may also be done without the use of a “C” Clamp. Nut Flat Washer Lockwasher “C” Clamps WARNING: Table extensions must be installed. Front edge of table and extensions must be lined up. An uneven front edge can twist the fence guide bar. Twisted guide bars can misalign fence. A misaligned fence can cause binding or kickback. You could be hit or cut. 8. Tighten a “C” clamp over the edge of table and extension at the center until the extension is even with the table surface as shown. Tighten the two center nuts with a 1/2" wrench. 9. Repeat steps 7 and 8 to align the other extension. 21 Hex Screw Align Front Edges “C” Clamp Assembly (continued) Checking Table Insert WARNING: To reduce the risk of injury from accidental start, make sure switch is “OFF” and plug is not connected to power source outlet. Table Insert 1. Insert should be flush with table top. Check as shown. Loosen flat head screw that holds insert and adjust the four set screws as necessary. Tighten flat head screw. Do not tighten screw to the point where it bends the insert. CAUTION: Insert must be even with the table surface. Inserts too high or low can let the workpiece “snag” or catch on uneven edges. Workpiece could twist and kickback. 3/32 In. Hex “L” Wrench 2. To remove insert. a. Make sure saw is off and unplugged. b. Loosen flat head screw. c. Lift insert from front end, and pull toward front of saw. 3. To replace insert. a. Make sure saw is off and unplugged. b. Place insert into insert opening in table and push toward rear of saw to engage spring clip and until keyslot in insert will drop over flat head screw. Tighten screw. c. Do not tighten screw to the point where it bends the insert. Flat Head Screw 22 Set Screws Checking Heeling Adjustment or Parallelism of Sawblade to Miter Gauge Groove While cutting, the material must move in a straight line parallel to the sawblade. Therefore, both the miter gauge groove and the rip fence must be parallel to the sawblade. Sawblade WARNING: The blade must be parallel to the miter gauge groove. Misaligned blades could bind on workpiece. Workpiece could suddenly kickback. You could be cut or hit. If the sawblade is not parallel to the miter gauge groove, the blade will bind at one end of the cut. This is known as “Heeling”. WARNING: To reduce the risk of injury from accidental start, make sure switch is “OFF” and plug is not connected to power source outlet. Combination Square To check for parallelism: 1. Raise blade to 3" depth of cut. 2. Mark an “X” on one of the teeth which is set (bent) to the left. 3. Place the head of a combination square in the groove. Adjust blade of square so that is just touches the tip of the marked tooth. 4. Move square to rear, rotate blade to see if marked tooth again touched blade of square. 5. If tooth touches square at front and rear sawblade is parallel to miter gauge groove. 6. If tooth does not touch the same amount, the mechanism underneath must be adjusted to make the blade parallel to groove. A. Rear trunnion must be moved toward the combination square if there is a space between marked tooth and end of square in step 4. B. Rear trunnion must be moved away from the square if marked tooth pushed square out of position in the groove. 7. Loosen all three screws that hold the rear trunnion and all three screws that hold the front trunnion. Miter Gauge Groove Front Trunnion WARNING: When reaching under table, the sawblade teeth may be contacted causing injury. Wear glove or remove blade. Front Trunnion Screws NOTE: All six screws can be reached through back of saw. Use a 9/16 inch wrench. To reach left-hand front trunnion screw, tilt blade to 45°. After loosening screws, reposition blade at 90°. 8. Remove the table insert and lower the blade completely. The front and rear trunnion can be accessed for adjustments through the insert opening. 9. Using a wood block and hammer, as shown, move rear trunnion to right or left as required to realign the blade. If necessary, shift front trunnion in similar manner, but do not move front trunnion unless necessary. Raise blade and recheck the alignment with the square, then securely retighten all six trunnion screws. Recheck alignment. Replace insert. Rear Trunnion Rear Trunnion Screws Hammer 23 Rear Front Trunnion Trunnion Screws Screws Assembly (continued) Checking Blade Tilt, or Squareness of Blade to Table Tilt Lock Handle When the bevel pointer is pointing directly to the “0” mark on the bevel scale, the sawblade should make a square cut 90° to the table. WARNING: For your own safety, turn switch “OFF” and remove plug from power source outlet. To check for squareness, 90° position. 1. Raise blade to 3" depth of cut. 2. Operate the tilt lock handle (counterclockwise) to loosen the tilt clamp screw. Bevel Pointer NOTE: Handle is spring loaded for engagement with screw head - must be pushed inward for disengagement whenever necessary to obtain a new grip on screw head. 3. Rotate tilt handwheel clockwise a few turns to tilt blade. Now, rotate handwheel counterclockwise until it stops. Blade should now be square with table and pointer should point to “0”. Tilt Handwheel Pointer 4. Place the square against blade. Make sure square is not touching the tip of one of the saw teeth. Blade Square Pointer at 0° Position A. If blade is square to table 1. Check pointer. If pointer does not point to the “0” mark on the bevel scale. a. Remove elevation handwheel. b. Loosen screw and adjust pointer using medium screwdriver. c. Install elevation handwheel. Pointer Adjusting Screw 24 Scale Adjusting Screw B. If blade is not square to table...the 90° stop screw must be adjusted. 1. Unscrew 90° stop screw three to four turns using 3/16 inch hex “L” wrench. 2. Turn tilt handwheel clockwise one turn, then turn handwheel counterclockwise until blade is square with table. 3. Screw 90° stop screw in until it stops. Check once again for squareness and readjust screw, if necessary. 4. Check pointer as described in step A. 90° Stopscrew To check for alignment, 45° Position 1. Tilt blade to left as far as it will go. 2. Place an accurate square against blade. Make sure square is not touching the tip of one of the saw teeth. A. If blade is 45° to table; 1. Check pointer. If pointer does not point to the 45° mark on the scale, the scale must be adjusted. a. Remove elevation handwheel. b. Loosen two screws on scale and adjust scale until pointer points to 45° mark. c. Install elevation handwheel. 45° Stopscrew B. If blade is not 45° to table, stop screw and scale must be adjusted. 1. Unscrew 45° stop screw three to four turns using 3/16 inch setscrew wrench. 2. Turn tilt handwheel until blade is 45° to the table. 3. Screw 45° stop screw in until it stops. Check once again and readjust screw, if necessary. 4. Check pointer as described in step A above. Scale Screws Retainer Bearing Checking Tilt Mechanism The handwheel should turn freely without binding. The turning section can be adjusted by tightening or loosening the screws in the bearing retainer. NOTE: Tilt handwheel must be removed to adjust. When adjusting the screws in the bearing retainer, hold the nut inside using a 3/8 inch wrench. Screws Tilt Handwheel 25 Assembly (continued) Installing Front Rip Fence Guide Bar 1. From the bag labeled “Guide Bars” remove only the following hardware: 5 Square Head Bolts, 5/16-18 x 1" Long 5 Lockwashers, 5/16 External Type 5 Flat Washers, 21/64 x 5/8 x 1/16 5 Hex Nuts, 5/16-18 2. From the fence guide bar carton find the following: 1 Front Guide Bar (Long) 3. Insert five 5/16-18 x 1” long square head bolts into the holes as shown. 4. Attach flat washer, lockwasher and hex nut loosely, as shown, so the bolt head protrudes through the front edge of the table and extension. 5/16-18 x 1 In. Square Head Bolt 5/16 In. External Lockwasher 21/64 I.D. Flat Washer 5/16-18 Hex Nut Hex Nut Lockwasher Flat Washer Square Head Bolt 5. Slide the front guide bar slot over each of the square head bolts as shown and finger tighten the five nuts. 6. The front guide bar must be aligned left to right at this time. Align the 7-1/8 inch mark on the right rip scale with the right edge of the cast iron table top. 7. Push front guide bar against the saw table and extensions. Finger tighten each nut on the table and extensions. The guide bars will be aligned and the nuts tightened at a later time. Front of Table Or Extension Square Head Bolt WARNING: Front and rear guide bars must be aligned with blade. Misaligned guide bars could twist. Twisted guide bars could misalign fence. A misaligned fence could cause binding or kickback. You could be hit or cut. Front Guide Bar Miter Gauge Groove Right Edge of Table Front Guide Bar 26 7-1/8" Mark on Right Hand Rip Scale Installing Rear Fence Guide Bar 1. From the bag labeled “Guide Bars” remove only the following hardware: 5 Square Head Bolts, 5/16-18 x 1" Long 5 Lockwashers, 5/16 External Type 5 Flat Washers, 21/64 x 5/8 x 1/16 5 Hex Nuts, 5/16-18 2. From the fence guide bar carton find the following: 1 Rear Guide Bar (Short) 3. Insert five 5/16-18 x 1” long square head bolts into the holes as shown. 4. Attach flat washer, lockwasher and hex nut loosely, as shown, so the bolt head protrudes through the rear edge of the table and extensions. 5/16-18 x 1 In. Square Head Bolt 5/16 In. External Lockwasher 21/64 I.D. Flat Washer 5/16-18 Hex Nut Lockwasher Flat Hex Nut Washer Square Head Bolt 5. Slide the rear guide bar slot over each of the square head bolts, similar to the front guide bar assembly. 6. Position a framing square or straightedge against either side of the blade. Move the rear guide bar right or left until the indicator mark is aligned with the straightedge. 7. Push rear guide bar against the saw table and extensions. Finger tighten each nut on the table and extensions. The guide bars will be aligned and the nuts tightened at a later time. 8. Shims may be required between the rear guide bar and saw table. See instructions for adjusting rip fence guide bars. Rear Guide Bar Rear of Table or Extension Square Head Bolt WARNING: Front and rear guide bars must be aligned with blade. Misaligned guide bars could twist. Twisted guide bars could misalign fence. A misaligned fence could cause binding or kickback. You could be hit or cut. Straight Edge Mark on Rear Guide Bar 27 Assembly (continued) Adjusting Rip Fence Guide Bars WARNING: Front and rear guide bars must be aligned with blade. Misaligned guide bars could twist. Twisted guide bars could misalign fence. A misaligned fence could cause binding or kickback. You could be hit or cut. Very Thin Shim Washer Installing Shims 1. From the bag labeled “Guide Bars” remove the following hardware: *10 Very thin shim washers. 2. Loosen the 5 nuts holding the rear guide bar in place. 3. Holding the guide bar against the rear of saw table and extensions, note if there is any gap between the table or extension and the inside face of the rear guide bar. If no gap exists, finger tighten nuts. If gap appears, slip shim washers into gap until space is full. 4. Stack shim washers on table or extension nearest to bolt that is affected. 5. When all five bolt locations have been checked, slide guide bar off of bolts and install stacks of shim washers under head of appropriate bolt(s). 6. Reinstall rear guide bar and realign the “mark” on rear guide bar as described earlier. Finger tighten nuts. Shim Washers Table or Extension Rear Guide Bar Aligning Rip Fence Guide Bars 1. Position rip fence over right miter gauge groove. While holding up rear of rip fence engage front end of rip fence onto the front guide bar. Now lower rip fence down onto table. 2. Open owners manual so that 8 pages are separated from the rest of the book. Use these pages like a feeler gage to set the spacing between the bottom of the fence and the table top. 3. Rip fence should clear saw table/extension surface just enough to allow pages to slide back and forth under rip fence. If rip fence is too high or too low, loosen nuts holding front guide bar and adjust bar up or down. Wrench tighten nuts when proper alignment is achieved. 4. Adjust rear guide bar, as noted above. 5. Slide fence left and right on guide bar to ensure clearance from side to side and from front to back. If necessary readjust rip fence guide bars to get proper clearance. Wrench tighten all nuts holding guide bars in place. NOTE: During this adjustment, the left/right positioning of the guide bars could be affected. Realignment may be necessary. Owners Manual 8 Pages 28 Rip Fence Alignment Adjustment WARNING: A misaligned fence can cause kickbacks and jams. To reduce the risk of injury, follow these instructions until the fence is properly aligned. 1. The rip fence must be PARALLEL with the sawblade and miter gauge grooves. Clean any debris off the fence guide bars. Move fence until it is along side the miter gauge groove and lock it. It should be parallel to groove. If it is not: a. Unlock fence. b. Using a 5/32" hex “L” wrench, loosen the four button head screws located to each side of the rip fence handle. c. Hold fence head tightly against front guide bar. Align fence channel so that it is parallel with groove. Carefully lock the fence in this position. d. Alternately tighten the screws. e. Recheck alignment. f. Repeat steps as needed until fence channel is aligned with miter gauge groove. Miter Gage Groove Button Head Screws for Adjusting Fence Parallelism Rip Fence Lock Lever Adjustment WARNING: Make sure the fence lock works in the center and at each end of the fence guide bar. An improperly adjusted fence could move. Movement could cause binding or kickback. You could be hit or cut. 1. The rip fence lock lever when locked down should hold the rip fence securely. The lever should not be difficult to push down and lock. To assure proper fence lock adjustment: a. Raise lock lever and push fence head toward rear of saw. b. Hold fence head down onto front guide bar while lifting rear of fence up and down. c. Tighten adjusting nut until fence clamp just barely touches rear guide bar. d. This should provide the best fence adjustment possible without over tightening. Check fence lock across entire bar length. Recheck fence parallelism with miter slot in locked position and adjust if necessary. If the fence does not clamp the same across the entire length of the bars, the guide bars may need to be readjusted with shims provided. Adjusting Nut Fence Clamp Rear Guide Bar Fence Clamp and Rear Guide Bar Should Barely Touch When Fence is Raised Adjusting Fence Indicator 1. Place rip fence on saw table so that it lightly touches the right side of the blade and lock it in this position. 2. Loosen pan head screw. Adjust the indicator so that the red line is located over the “Zero” line of the right rip scale and tighten screw. Indicator at “Zero” Line 29 Assembly (continued) Installing Blade Guard 1. From the bag labeled “Blade Guard” remove the following parts: 2 Hex Head Screws, 1/4-20 x 5/8" Long 2 Hex Nuts, 1/4-20 2 Lockwashers, 1/4 External Type 1 Thumb Screw 1 Spreader Support From the blade guard carton find the following: 1 Blade Guard 1/4-20 x 5/8 In Hex Hd Screw 1/4 In. External 1/4-20 Hex Nut Lockwasher Thumb Screw Spreader Support 2. Slide spreader support onto spreader rod until notches engage pin. Thread thumbscrew into tapped hole and hand tighten. 3. Attach spreader to spreader support so that the edge of the spreader is even with the edge of the spreader support as shown. Tighten screws with a 7/16 wrench. 4. Raise blade all the way up, make sure it is square with table. 5. Loosen both hex head screws holding blade guard support to cradle. 6. Raise blade guard. Lift up both anti-kickback pawls. Insert a large set screw wrench in the notches of the pawls to hold the pawls out of the way. Align spreader square to table as shown. 7. Tighten both hex head screws. Blade Guard 1/4-20 Hex Head Screw Spreader Align Edges Spreader Support Lockwasher Hex Nut Square Blade Guard Support Cradle Hex Hd. Screws Pin in Notches of Support Spreader Rod Located in Blade Guard Support 30 Thumb Screw Aligning Blade Guard 1. Lay blade of square or other straightedge alongside of blade. 2. Loosen socket set screw in guard support and move spreader left or right so that it touches blade of square. Tighten screw. Socket set screw must tighten against the spreader rod flat. NOTE: The spreader is now square with the table and approximately in line with the sawblade. The spreader requires further adjustment to align it parallel to the blade and in the middle of the cut (kerf) made by the sawblade. Anti-Kickback Pawls Set Screw Wrench Spreader Straightedge Along Side of Blade Socket Set Screw In Guard Support IMPORTANT: To work properly, the spreader must always be adjusted so the cut workpiece will pass on either side of the spreader without binding or skewing to the side. NOTE: The spreader is thinner than the width of the cut (kerf) by approximately six thicknesses of paper. Space Equal to Approx. 3 Thicknesses of Paper Wood Kerf 3. Make two folds in a small piece (6 x 6 inch) of ordinary newspaper making three thicknesses. The folded paper will be used as “spacing gauge”. Spreader Looking Down on Saw 4. Place rip fence on the right hand side of table. Carefully move it against blade so that it is parallel to the blade, and just touches tips of saw teeth. Tighten rip fence lock lever. 5. Insert folded paper between spreader and fence. 6. Using 7/16 wrench loosen the 1/4-20 hex head screws so the spreader can slide sideways. 7. Hold spreader flat against folded paper and fence. Tighten screws using 7/16 inch wrench. 8. To remove blade guard and spreader, loosen thumbscrew. Do not loosen other screws. This allows you to remove and replace the guard for non-through cuts without disturbing the spreader alignment. Paper Folded Paper 7/16 In. Wrench Hex Head Screws 31 Blade Assembly (continued) Mounting the Motor 1. Remove Motor Assembly from motor carton. 2. Loosen the two hex head screws that lock the pins in the cradle. 3. Lift motor and insert the two pins on motor support assembly into holes in cradle. Push motor in as far as it will go. Do not tighten screws at this time. Motor Pins Hex Head Screws Motor Support Assembly Cradle Installing Belt 1. Locate the motor belt 2. Lower the blade all the way down and set bevel to 0°. 3. Install belt on saw pulley and motor pulley. 4. Sight along edges of both pulleys check that the belt is parallel to the edges of both pulleys. If not, use a Hex “L” wrench to loosen the setscrew on the motor pulley. Reposition the motor pulley and securely tighten the set screw on the motor pulley. 5. Raise saw blade all the way up. 6. Lift motor until edge of washer (see illustration) is even with end of slot in motor support assembly. In this position, pull motor toward you (pins will slide in the cradle) until slack is removed from belt. Make sure edge of washer is still even with end of slot. Using a 1/2 inch wrench tighten the two motor support assembly clamp screws. Poly-V Belt Motor Support Assembly Pins Motor Support Assembly Clamp Screws Cradle Motor Washer Slot in Bracket Pivot Screw 32 Edge of Washer Even With End of Slot in Bracket 7. Put your hand around the belt half way between the two pulleys and squeeze belt until two sides of belt touch. The motor should move freely as you squeeze the belt. If motor does not move freely, belt tension must be readjusted. Installing Belt Guard 1. From the bag labeled “Miscellaneous” remove the following hardware: 4 Hex Nuts, 10-32 8 Flat Washers, 13/64 x 3/8 x 1/32. From among the loose parts find the following: 1 Belt Guard Press Down on Tab Lock To Open 13/64 I.D. 10-32 Hex Nut Flat Washer Belt Guard 2. Lower blade all the way down and remove the motor belt. 3. Install one flat washer onto each of the four motor studs. 4. Open the hinged belt guard by pressing down on the tab lock as shown. 5. Position the guard so the large hole fits around the pulley. Insert the motor studs through the four small holes as shown. 6. Attach another washer and one nut to each motor stud as shown and tighten securely. 7. Reposition the belt on the motor and arbor pulley. 8. Close the hinged cover securely until the tab snaps and locks the cover closed. 9. Check the belt clearances on the guard by raising the blade to full height using the elevation handwheel. 10. Check motor clearances by rotating the bevel handwheel located on the right side until the indicator is set at 45°. Motor Stud Flat Washer 33 Belt Guard Flat Washer Hex Nut Assembly (continued) Mounting Switch and End Caps 1. From the bag labeled “Miscellaneous” remove only the following hardware: 2 Pan Head Screws, 10-32 x 3/8" Long 2 Lockwashers, #10 External Type 2 Square Nuts, 10-32 4 Pan Head Screws, Type “AB” 8 x 1/2" Long 2 Rear Stop Washers From the bag labeled “Trim” remove the following: 4 Plastic End Caps 1 Key Switch 2. Insert the 2 10-32 x 3/8" pan head screws with lockwashers through the outermost holes in switch assembly. 3. Install the 2 square nuts on the screws so that there is an 1/8"+ clearance between the inside of the nut and the top of the switch assembly bracket. 4. Slide the nuts into the lower slot of the front guide bar from the right end, with the switch facing front. 5. Slide switch assembly left until the left side of switch assembly is in line with right side of main saw table tighten screws. 10-32 x 3/8" Pan Head Screw Pan Head Screw Type “AB” 8 x 1/2 #10 External Lockwasher 10-32 Square Nut Rear Stop Washer Key Switch Plastic End Caps Square Nut Bracket Lockwasher 10-32 x 3/8 Pan Head Screw Front Guide Bar Switch Assembly Front End Cap Installing Guide Bar End Caps 1. The left and right end caps for front guide bar can be installed at this time. Align the plastic end cap to match profile of bar. 2. Install self tapping 8-32 pan head screw into each hole. 3. The left and right end caps for rear guide bar can be installed at this time. NOTE: Two large washers are supplied. These act as fence stops so the rear of the fence does not fall off the rear guide bar. 4. Install rear end caps and fence stops as shown. 8 x 1/2 Ty “AB” Pan Head Screw Rear Stop Washer Rear End Cap Wire Tie Securing Electrical Cords 1. From the bag labeled “Large Parts” find the following: 2 Wire Ties 2. Route motor cord and power cord along right side of cabinet. Use a hammer to lightly tap the pointed tabs on the wire ties into the holes provided on side of cabinet. Secure both cords in wire ties. NOTE: This completes the assembly of your table saw. Do not throw away any remaining hardware until you have read the entire owners manual. Two Cords Wire Tie 34 Getting to Know Your Table Saw 6 Miter Gauge 7 Blade Guard 9 Sawblade 5 Rip Fence 10 Ind-I-Cut 8 Table Insert 2 Elevation Wheel 11 Micro-Adjust Rip Fence 1 On-Off Switch 12 Casters 13 Miter Gauge and Rip Fence Storage Hooks 1. On-Off Switch. CAUTION: Before turning switch “ON”, make sure the blade guard is correctly installed and operating properly. The On-Off Switch has a locking feature. This feature is intended to help prevent unauthorized and possible hazardous use by children and others. A. To turn saw ON, insert key, stand to either side of the blade, never in line with it, place finger under switch lever and pull end of lever out. After turning switch ON, always allow the blade to come up to full speed before cutting. Do not cycle the motor switch on and off rapidly, as this may cause the sawblade to loosen. In the event this should ever occur, allow the sawblade to come to a complete stop and retighten the arbor nut normally, not excessively. Never leave the saw while the power is “ON”. B. To turn saw OFF, PUSH lever in. Never leave the saw until the cutting tool has come to a complete stop. C. To lock switch in OFF position, hold switch IN with one hand, REMOVE key with other hand. Switch WARNING: For your own safety, lower blade or other cutting tool below table surface. (If blade is tilted, return it to vertical, 90°, position.) Always lock the switch “OFF”. When saw is not in use, remove key and keep it in a safe place. Also, in the event of a power failure (all of your lights go out) turn switch off, lock it and remove the key. This will prevent the saw from starting up again when the power comes back on. 35 Key Getting to Know Your Table Saw (continued) 2. Elevation Handwheel...elevates or lowers the 6. Miter Gauge...head is locked in position for cross blade. Turn clockwise to elevate, counterclockwise to lower. Tilt Handwheel...tilts the blade for bevel cutting. Turn clockwise to tilt toward left, counterclockwise to tilt toward right. When the blade is tilted to the left as far as it will go, it should be at 45° to the table and the bevel pointer should point 45°. NOTE: There are limit stops inside the saw which prevent the blade from tilting beyond 45° to the left and 90° to the right. (See “Adjustments and Alignments” section “Blade Tilt, or Squareness of Blade to Table”). Tilt Lock Handle...locks the blade in the desired tilt position. To loosen, turn counterclockwise. Push handle in and turn it to another position if necessary in order to tighten or loosen. IMPORTANT: Be sure handle is hanging in the “DOWN” position before tilting blade. If it is pointing to the 1 o’clock position it may jam on underside of the table and bend the locking bolt. Rip Fence...is locked in place by pushing the lock lever down until the lever rests on the stop. To move the fence, lift the lock lever and grasp the fence with one hand at the front. A “T” slot is provided in the rip fence for attaching a wood facing when using the dado head, or molding head. Select a piece of smooth straight wood approximately 3/4 inch thick, and the same size as the rip fence. Attach it to the fence with the three square head bolts, nuts and washers provided in bag labeled “Miscellaneous”. To remove the facing, loosen the hex nuts, slide the facing toward the rear and out of the fence slot. cutting or mitering by tightening the lock knob. Always securely lock it when in use. There are adjustable screw stops for the stop pin 0° and 45° right and left positions for conveniently setting the miter gauge to cut miters at these standard angles. 3. 4. 5. 7. Blade Guard...must always be in place and working properly for all thru-sawing cuts. That is, all cuts where the blade cuts completely through the workpiece. To remove the guard for special operations, loosen the thumbscrew and slide the guard off the rod. Do not disturb the setting of the rod. When replacing the guard make sure the pin in the rod engages with the notch in the spreader support. Make sure the thumbscrew is tightened securely. 8. Table Insert...is removable for removing or installing blade or other cutting tools. WARNING: To reduce the risk of injury from accidental start, turn switch “OFF” and remove plug from power source before removing insert. A. Lower the blade below the table surface. B. Raise blade guard. C. Loosen insert screw. D. Lift insert from front end, and pull toward front of saw. WARNING: Never operate saw without the proper insert in place. Use the sawblade insert when sawing. Use the combination dado molding insert when using a dado or molding head. 3/4" Square Head Bolt 3" Minimum Counterbore 3/4 Diameter x 3/8 Deep 9/32 Diameter Hole Flat Washer Hex Nut 1-3/8 Lockwasher Fence Wood Facing 36 9. Removing and Installing Sawblade Lo os en WARNING: To reduce the risk of injury from accidental start, turn switch “OFF” and remove plug from power source outlet before removing or installing sawblade. A. Raise blade guard, remove insert. B. To remove blade, place a block of wood against front of blade, pull arbor wrench toward you to loosen arbor nut. C. To tighten arbor nut, place a block of wood against rear of blade, push wrench away from you. When installing the blade, make sure the teeth are pointing toward the front of the saw and that the blade and collars are clean, and free from any burrs. The hollow side of the collar must be against the blade. Always tighten the arbor nut securely. NOTE: When using the dado or molding head, it is not necessary to install the outer (loose) blade collar. D. To replace insert, place insert into opening in table and push toward rear of saw to engage rear spring on insert and until keyslot in insert will drop over screw. Tighten screw. Do not tighten screw to the point where it will deflect the insert. Ti g ht en Wood Block Wood Block Arbor WARNING: To reduce the risk of injury from a thrown workpiece, blade parts, or blade contact, never operate saw without the proper insert in place. Use the sawblade insert when sawing. Use the proper size dado/molding insert for dado blades and molding heads. Teeth Pointing To Front of Saw Blade Collar Arbor Nut 10. Ind-I-Cut The plastic disc embedded in the table in front of the sawblade, is provided for marking the location of the “sawcut” (kerf) on the workpiece. Check disk location: If it is above table surface, place a piece of hardwood on top of it and tap it down with a hammer. Marking the Ind-I-Cut: A. With blade 90° (square to table) and miter gauge in left groove, cross cut a piece of wood holding the wood firmly against miter gauge. B. Pull miter gauge back until freshly cut edge of wood is over disk. Using a sharp pencil, mark a line on disk at freshly cut edge of wood. C. With miter gauge in right hand groove, follow same procedure and mark another line on disk. D. These lines indicate the “path” of the cut (kerf) made by the sawblade. E. When cutting the workpiece, line up mark on workpiece with line on disk. NOTE: When the blade is changed, or a dado/molding head installed these lines will need to be erased and reset. Marking Ind-I-Cut Using Ind-I-Cut 37 Getting to Know Your Table Saw (continued) 11. Micro-Adjust Rip Fence...allows the operator to accurately adjust the rip fence using only one hand. To move the fence push in on the micro-adjust knob and rotate. Micro Adjust Knob 12. Universal Caster System The caster system is activated by rotating the handle 180° to engage the swivel caster, lifting the one side of the saw off the floor. The handle can be operated by hand or foot. Hold the saw in place while activating the swivel caster handle (see illustration). Care should be taken when activating the mechanism with your foot. Too much force beyond the 180° travel may damage the actuator. Feet on Floor When Sawing Only operate your saw when feet nearest swivel caster are on floor. Keep floor area clean. Rubber feet on swivel caster side of base should be lowered onto a clean floor to help prevent unexpected tool movement during use. Before raising and moving unit, remove all work pieces to reduce weight. Unit can be moved by pulling or pushing. Pulling the unit by the side with the swivel caster leading, is the preferred method when moving tool over a door threshold or crack. The swivel caster moves easier over obstructions by lifting up on the tool. 13. Storage Hooks Conveniently holds rip fence and miter gauge when not in use Miter Gauge Rip Fence 38 Safety Instructions for Basic Saw Operations Before Each Use • Replace damaged or missing parts before using the saw again. • Use the sawblade guard, spreader and anti-kickback pawls for any thru-sawing (whenever the blade comes through the top of the workpiece). Make sure the antikickback pawls work properly. Make sure the spreader is in line with sawblade. • Remove adjusting keys and wrenches. Form a habit of checking for and removing keys and wrenches from table top before turning saw on. • Make sure all clamps and locks are tight and no parts have excessive play. Inspect your saw. • To reduce the risk of injury from accidental starting, turn the switch off, unplug the saw, and remove the switch key before raising or removing the guard, changing the cutting tool, changing the setup, or adjusting anything. • Check for alignment of moving parts, binding of moving parts, breakage of parts, saw stability, and any other conditions that may affect the way the saw works. • If any part is missing, bent or broken in any way, or any electrical part does not work properly, turn the saw off and unplug the saw. To Reduce the Risk of Injury From Jams, Slips Or Thrown Pieces (Kickbacks Or Throwbacks) Inspect Your Blade. • Choose the right blade or cutting accessory for the material and the type of cutting you plan to do. • Never use grinding wheels, abrasive cutoff wheels, friction wheels (metal cutting blades) wire wheels or buffing wheels. They can fly apart explosively. • Cut only wood, wood like or plastic materials. Do not cut metal. • Choose and inspect your cutting tool carefully: - To reduce the risk of cutting tool failure and thrown shrapnel (broken pieces of blade), use only 10” or smaller blades or other cutting tools marked for speeds of 5000 rpm or higher. - Always use unbroken, balanced blades designed to fit this saw’s 5/8 inch arbor. - When thru-sawing (making cuts where the blade comes through the workpiece top), always use a 10 inch diameter blade. This keeps the spreader in closest to the blade. - Do not over tighten arbor nut. Use arbor wrenches to “snug” it securely. - Use only sharp blades with properly set teeth. Consult a professional blade sharpener when in doubt. - Keep blades clean of gum and resin. - Never use the saw without the proper blade insert. Inspect your work area. • Keep work area clean. • Cluttered areas and benches invite accidents. Floor must not be slippery from wax or sawdust. • To reduce the risk of burns or other fire damage, never use the saw near flammable liquids, vapors or gases. • To reduce the risk of injury, don’t do layout, assembly, or setup work on the table while blade is spinning. It could cut or throw anything hitting the blade. Plan your work • Use the right tool. Don’t force tool or attachment to do a job it was not designed for. Inspect your workpiece. • Make sure there are no nails or foreign objects in the part of the workpiece to be cut. • When cutting irregularly shaped workpieces, plan your work so it will not slip and pinch the blade: • A piece of molding for example, must lie flat or be held by a fixture of jig that will not let it twist, rock or slip while being cut. Use jigs or fixtures where needed to prevent workpiece shifting. • Use a different, better suited type of tool for work that can’t be made stable. Plan your cut. • To reduce the risk of kickbacks and throwbacks which occur when a part or all of the workpiece binds on the blade and is thrown violently back toward the front of the saw: - Never cut Freehand. Always use either a rip fence, miter gauge or fixture to position and guide the work, so it won’t twist or bind on the blade and kickback. - Make sure there’s no debris between the workpiece and its supports. • Use extra caution with large, very small or awkward workpieces. • Use extra supports (tables, saw horses, blocks, etc.) for any workpieces large enough to tip when not held down to the table top. Never use another person as a substitute for a table extension, or as additional support for a workpiece that is longer or wider than the basic saw table, or to help feed, support or pull the workpiece. • Never confine the piece being cut off, that is, the piece not against the fence, miter gauge or fixture. Never hold it, clamp it, touch it, or use length stops against it. It must be free to move. If confined, it could get wedged against the blade and cause a kickback or throwback. • Never cut more than one workpiece at a time. • Never turn your table saw “ON” before clearing everything except the workpiece and related support devices off the table. 39 Safety Instructions for Basic Saw Operations (continued) Plan Ahead To Protect Your Eyes, Hands, Face and Ears Dress for safety • Do not wear loose clothing, gloves, neckties or jewelry (rings, wrist watches). They can get caught and draw you into moving parts. • Wear nonslip footwear. • Tie back long hair. • Roll long sleeves above the elbow. • Noise levels vary widely. To reduce the risk of possible hearing damage, wear ear plugs or muffs when using table saw for hours at a time. • Any power saw can throw foreign objects into the eyes. This can result in permanent eye damage. Always wear safety goggles, not glasses, complying with ANSI Z87.1 (or in Canada CSA Z94-3-M88) shown on package. Everyday eyeglasses have only impact resistant lenses. They are not safety glasses. Safety goggles are available at many local retail stores. Glasses or goggles not in compliance with ANSI or CSA could seriously hurt you when they break. Plan the way you will push the workpiece through. • Never pull the workpiece through. Start and finish the cut from the front of the table saw. • Never put your fingers or hands in the path of the sawblade or other cutting tool. • Never reach in back of the cutting tool with either hand to hold down or support the workpiece, to remove wood scraps, or for any other reason. • Reduce the Risk of hand positions where a sudden slip could cause fingers or a hand to move into a sawblade or other cutting tool. • Don’t overreach. Always keep good footing and balance. • Push the workpiece against the rotation of the blade, never feed material into the cutting tool from the rear of the saw. • Always push the workpiece all the way past the sawblade. • As much as possible, keep your face and body to one side of the sawblade, out of line with a possible kickback or throwback. • Set the cutting tool as low as possible for the cut you’re planning. Reduce the Risk of Accidental Starting. • Make sure switch is “OFF” before plugging saw into a power outlet. • For dusty operations, wear a dust mask along with safety goggles. Whenever Sawblade Is Spinning WARNING: Don’t allow familiarity (gained from frequent use of your table saw) cause a careless mistake. Always remember that a careless fraction of a second is enough to cause a severe injury. Before freeing jammed material. • Turn switch “OFF”. • Wait for all moving parts to stop. • Unplug the saw. • Check blade, spreader and fence for proper alignment before starting again. To reduce the risk of throwback of cut off pieces. • Use the guard assembly. To remove loose pieces beneath or trapped inside the guard. • Turn saw “OFF”. • Remove switch key. • Wait for blade to stop before lifting the guard. Before Leaving The Saw. • Turn the saw off. • Wait for blade to stop spinning. • Unplug the saw. • Make workshop child-proof. Lock the shop. Disconnect master switches. Remove the yellow switch key. Store it away from children and others not qualified to use the tool. • Before actually cutting with the saw, watch it while it runs for a short while. If it makes an unfamiliar noise or vibrates a lot, stop immediately. Turn the saw off. Unplug the saw. Do not restart until finding and correcting the problem. • Make sure the top of the arbor or cutting tool turns toward the front of the saw. Keep Children Away. • Keep all visitors a safe distance from the table saw. • Make sure bystanders are clear of the table saw and workpiece. Don’t Force Tool. • Let the blade reach full speed before cutting. • It will do the job better and safer at its designed rate. • Feed the workpiece into the saw only fast enough to let the blade cut without bogging down or binding. 40 Work Feed Devices Before cutting any wood on your saw, study all of the “Basic Saw Operations”. As you learn new table saw woodworking techniques, you’ll see that many types of cuts need different support and feeding devices, known as jigs or fixtures. They can help you make cuts more accurately. By helping to steady the workpiece and keep you away from the blade, they can help you safely use your saw for certain cuts. Many people custom build their own jigs and fixtures. Jigs and fixtures are often designed for a particular cut. You can use your table saw to easily make many jigs and fixtures. To get you started, we’ve included instructions for some simple ones. After you have made a few practice cuts, make up these jigs before starting any projects. The use of these devices is explained in “Basic Saw Operations” section. Push Stick Featherboard Make the push stick from a piece of solid wood. Use a piece of 1 x 2 (3/4" x 1-5/8" actual) by 15" long. Make the featherboard from a piece of 8” x 24” x 3/4” thick solid wood. 24" Slightly Less Than Thickness Of Workpiece Up To 3/8" Kerfs About 5/16" Apart Grain 4-1/2" 8" 5" 90° Notch Material for Push Block Push Block There are any number of ways to properly cut your workpieces to make a push block. The following steps describe one way you can make a push block. Making the base: • Start with a piece of 3/8 inch plywood at least 5-5/8 inches wide or wider and 12 inches long or longer. • Make two ripcuts. Perform the first ripcut along the side of the 3/8" wide strip. Next, ripcut the 3/8" plywood to a width of 5-1/8". • Crosscut the 3/8" plywood to 12" long. • Crosscut a 2-1/2" piece off the 3/8" wide by 3/8" thick strip and save this short piece for later. • The next cuts will create the 3/8" by 9-1/2" notch in the base. Mark the long edge of the board 2-1/2" from one end. Make a crosscut into the edge on the mark, stopping about 3/4" into the board. Set the saw and rip the width to 4-3/4" along the same edge as the stopped crosscut. Stop the ripcut where the two cuts intersect. Turn off the saw and remove the base piece. The base should now measure as shown. At Least 12" 3/8" Thick Plywood Base At Least 12" 3/4" Thick Plywood Handle 3/8" Creating the Notch 41 At Least 5-5/8" Cutting Out the Base Finished Base These Edges Must Be Parallel At Least 5-5/8" Work Feed Devices (continued) Making the handle: • Miter crosscut a piece of 3/4 inch thick plywood to shape and size shown: NOTE: The mitered corners can be any size that looks like the drawing (about 1-1/2" by 1-1/2"). Putting it Together • Using good quality woodworking glue, glue the 3/8" x 3/8" x 2-1/2" piece strip saved earlier to the base as shown. IMPORTANT: Do not use nails or screws. This is to prevent dulling of the sawblade in the event you cut into the push block. • Position the handle at the center of the plywood base as shown. Fasten them together with glue and wood screws. IMPORTANT: Make sure the screw heads do not stick out from the bottom of the base, they must be flush or recessed. The bottom must be flat and smooth enough to slide along the auxiliary fence you are now ready to make. 3/4" Plywood Handle Glue Only Screw Head Must Be Flush Or Recessed Finished Push Block 3/8" Plywood Base Auxiliary Fence Cutting Out the Base Making the base: • Start with a piece of 3/8 inch plywood at least 5-1/2 inches wide or wider and 30 inches long or longer. • Cut the piece to shape and size shown: Making the side: • Start with a piece of 3/4 inch plywood at least 2-3/8 inches wide or wider and 27 inches long or longer. • Cut the piece to shape and size shown: Putting it together: • Put the pieces together, as shown: IMPORTANT: Make sure the screw heads do not stick out from the bottom of the base, they must be flush or recessed. The bottom must be flat and smooth enough to rest on the saw table without rocking. 30" 2-5/8 3/8" Thick Plywood Base 3-1/2 5-1/2 Cutting Out the Side 27" 3/4" Thick Plywood Side Finished Auxiliary Fence 3/4" Plywood 4-3/4" 3/8" Plywood This Face and This Edge Must Be Parallel 42 1-1/4 Basic Saw Operations • An auxiliary wood facing attached to the miter gauge can help prevent workpiece twisting and throwbacks. Attach it to the slots provided. Make the facing long enough and big enough to support your work. Make sure, however, it will not interfere with the sawblade guard. • Use jigs or fixtures to help hold any piece too small to extend across the full length of the miter gauge face during the cut. This lets you properly hold the miter gauge and workpiece and helps keep your hands away from the blade. While cutting: • To reduce the risk of blade contact, always hold the miter gauge as shown in the this section. Using the Miter Gauge The miter gauge is used when crosscutting, miter cutting, bevel cutting, compound miter cutting, dadoing and when rabbeting across the end of a narrow workpiece. WARNING: For your own safety, always observe the following safety precautions in addition to the safety instructions of pages 3, 4, 5, 6, 39 & 40. Additional Safety Instructions for Crosscutting Before Starting: • Never use the rip fence when crosscutting except as specifically instructed. Crosscutting Definition: A cutting or shaping operation made across the width of a workpiece. The graduations on the miter gauge provide ample accuracy for average woodworking. In some cases where extreme accuracy is required, make a trial cut and then recheck it with a precision square, or protractor. NOTE: The space between the miter gauge bar and the groove in the table is held to a minimum during manufacturing. For maximum accuracy when using the miter gauge, always favor one side of the groove in the table. In other words, don’t move the miter gauge from side to side while cutting but keep one side of the bar riding against one side of the groove. NOTE: Gluing a piece of sandpaper to the face of the miter gauge head can help prevent the workpiece from “creeping” while it is being cut. The miter gauge head is locked in position by twisting the lock knob clockwise. Always tighten it securely when in use. Always Support Long Workpieces Sandpaper WARNING: To reduce the risk of blade contact or kickback, hold miter gauge properly. The miter gauge may be used in either of the grooves in the table. When using the miter gauge in the left hand groove, hold the workpiece firmly against miter gauge head with your left hand, and grip the lock knob with your right hand. When using the miter gauge in the right hand groove, hold the workpiece with your right hand and the lock knob with your left hand. 43 Basic Saw Operations (continued) Crosscutting (continued) Lock Knob Slots are provided in the miter gauge for attaching an auxiliary facing to make it easier to cut very long or short pieces. Select a suitable piece of smooth wood, drill two holes through it and attach with screws. Make sure the facing does not interfere with the proper operation of the sawblade guard. When cutting long workpieces, you can make a simple support by clamping a piece of plywood to a sawhorse. (As seen on previous page.) Use the hold-down clamp (optional accessory) on the miter gauge for greater accuracy. Stop Pin Miter Gauge Head 45° Stop Screw Auxiliary Facing Repetitive Crosscutting Definition: Cutting a quantity of pieces the same length without having to mark each piece. • Use the stop rods (optional accessory not shown) only for cutting duplicate pieces 6 inches long and longer. • Follow all safety precautions and operational instructions for cross cutting. • When making repetitive cuts from a long workpiece, make sure it is adequately supported. “C” Clamp WARNING: Never use the rip fence as a direct length stop because the cutoff piece could bind between the fence and the blade causing a kickback. Wood Block • When making repetitive cuts shorter than 6 inches, clamp a block of wood 3” long to the fence at desired length to act as a length stop. • Slide the workpiece along the miter gauge until it touches the block...hold the workpiece securely against the miter gauge or clamp it with the hold-down clamp (optional accessory not shown). • Make the cut...turn the saw off...remove the piece after the blade has stopped and before cutting the next piece. Cut Off Piece WARNING: To reduce the risk of kickback from twisting the workpiece, when clamping the block make sure that the end of the block is well in front of the sawblade. Be sure it is clamped securely. 44 Miter Crosscutting Miter cutting is known as cutting wood at an angle other than 90° with the edge of the wood. Follow the same procedure as you would for crosscutting. • Adjust the miter gauge to the desired angle, and lock it. • The miter gauge may be used in either of the grooves in the table. Make sure it is locked. • When using the miter gauge in the left hand groove, hold the workpiece firmly against the miter gauge head with your left hand, and grip the lock knob with your right hand. • When using the miter gauge in the right hand groove, hold the workpiece with your right hand and the lock knob with your left hand. Bevel Crosscutting Bevel crosscutting is the same as crosscutting except that the wood is cut at an angle...other than 90° with the bottom flat side of the wood. • Adjust the blade to the desired angle. • Always use the miter gauge in the groove to the right of the blade. It cannot be used in the groove to the left because the blade guard will interfere. Hold the workpiece with your right hand and the lock knob with your left hand. • Use the auxiliary fence/work support for additional support of the workpiece. Compound Crosscutting Compound cutting is a combination of miter cutting and bevel crosscutting. The cut is made at an angle other than 90° to both the edge and the bottom flat side of the wood. • Adjust the miter gauge and the blade to the desired angle...Make sure miter gauge is locked. 45 Basic Saw Operations (continued) Using the Rip Fence • A featherboard can help guide the workpiece. (See “Basic Saw Operation-Using Featherboards for ThruSawing” section.) • Always use featherboards for any non thru-sawing rip type cuts. (See “Basic Saw Operations-Using Featherboards for Non Thru-sawing” section) Before Starting: • To reduce the risk of kickbacks and slips into the blade, make sure the rip fence is parallel to the sawblade. • Before thru-sawing, check the anti-kickback pawls. the pawls must stop a kickback once it has started. Replace or sharpen anti-kickback pawls when points become dull. • Plastic and composition (like hardboard) materials may be cut on your saw. However, since these are usually quite hard and slippery, the anti-kickback pawls may not stop a kickback. Therefore, be especially careful in your setup and cutting procedures. While Thru-sawing: • To reduce the risk of kickbacks and slips into the blade, always push forward on the section of the workpiece between the sawblade and the rip fence. Never push forward on the piece being cut off. Ripping, bevel ripping, resawing and rabbeting are performed using the rip fence together with the auxiliary fence/work support, push stick or push block. WARNING: For your own safety, read and always observe all safety precautions listed in manual and on saw. Additional Safety Instructions for Rip Cuts • Never use the miter gauge when ripping • Use a push stick whenever the fence is 2 or more inches from the blade. • When thru-sawing, use an auxiliary fence and push block whenever the fence must be between 1/2 and 2 inches from the blade. • Never thru-saw rip cuts narrower than 1/2 inch. • Never rip anything shorter than 10” long. • When using a push stick or push block, the trailing end of the workpiece must be square. A push stick or block against an uneven end could slip off or push the workpiece away from the fence. Ripping Definition: Cutting operation along the length of the workpiece. Position the fence to the desired width of rip and lock in place. Before starting to rip, be sure: 1. Rip fence is parallel to sawblade. 2. Spreader is properly aligned with sawblade. 3. Anti-kickback pawls are functioning properly. When ripping long boards or large panels, always use a work support. A simple support can be made by clamping a piece of plywood to a sawhorse. WARNING: To reduce the risk of kickback, push forward only on the part of the workpiece that will pass between the blade and the fence. Keep your hands out of the blade path. Feed the workpiece by pushing forward only on the part of the workpiece that will pass between the blade and the fence. Stop your left thumb at the front edge of the table. Finish the cut with the appropriate pusher. Feed Force Blade Path 46 Once the trailing end is on the table: Push Stick When “width of rip” is 2” or wider, use the push stick to finish the work all the way past the blade. When “width of rip” is narrower than 2” the push stick cannot be used because the guard will interfere...use the auxiliary fence and push block. Attach auxiliary fence to rip fence with two “C” clamps. Auxiliary Fence Feed the workpiece by hand along the auxiliary fence until the end is approximately 1” past the front edge of the table. Continue to feed using the push block. Hold the workpiece in position and install the push block by sliding it on top of the auxiliary fence/work support (this may raise guard). “C” Clamp Push Block Workpiece 47 Auxiliary Fence Basic Saw Operations (continued) WARNING: To reduce the risk of injury from blade contact never thru-saw cuts narrower than 1/2” wide. Baffle Narrow strips thicker than the auxiliary fence/work support may enter the guard and strike the baffle. Carefully raise guard only enough to clear the workpiece. Use push block to complete cut. Bevel Ripping Narrow Work When bevel ripping material 6” or narrower, use fence on the right side of the blade only. This will provide more space between the fence and the sawblade for use of a push stick. If the fence is mounted to the left, the sawblade guard may interfere with proper use of a push stick. Using Featherboards for Thru-Sawing Work Support Featherboards are not employed for thru-sawing operations when using the miter gauge. Featherboards are used to keep the work in contact with the fence and table as shown, and to help stop kickbacks. Add a 7-1/2” high flat facing board to the fence, the full length of the fence. Mount featherboards to facing board and table as shown, so that leading edges of featherboards will support workpiece. “C” Clamps Featherboard Facing Board WARNING: Make sure the featherboard against the edge presses only on the uncut portion (in front of the blade). It might otherwise pinch the blade in the kerf and cause a kickback. Before starting the operation (switch “OFF” and blade below table surface): 1. Install featherboards so they exert pressure on the workpiece; be positive they are securely attached. 2. Make sure by trial that the featherboards will stop a kickback if one should occur. Featherboard Workpiece Push Stick 48 Using Featherboards for Non Thru-Sawing Work Support Featherboards are not employed during non thru-sawing operations when using the miter gauge. Use featherboards for all other non thru-sawing operations (when sawblade guard must be removed). Featherboards are used to keep the work in contact with the fence and table as shown and to stop kickbacks. Add a 7-1/2” high flat facing board to the fence, the full length of the fence. Mount featherboards to facing board and table as shown, so that leading edges of featherboards will support workpiece until cut is complete, and the workpiece has been pushed completely past the cutter (sawblade, dado-head, etc.) with a push stick, as in ripping. Before starting the operation (switch “OFF” and blade below table surface): 1. Install featherboards so they exert pressure on the workpiece; be positive they are secure. 2. Make sure by trial the featherboards will stop a kickback if one should occur. “C” Clamp Featherboard “C” Clamp Facing Board Featherboard “C” Clamp Push Stick WARNING: For your own safety, replace the sawblade guard as soon as the non thru-sawing operation is complete. Resawing Auxiliary Fence/ Work Support Resawing is a rip cut made in a piece of wood through its thickness. The piece is typically positioned on its edge. If the piece is narrower than 3-3/8" it can be resawn in one pass with the blade guard in place. Extra supports or fixtures will be required when the edge resting on the table is too narrow for the piece to be stable and when the fence interferes with the blade guard. (See method described below) “C” Clamp WARNING: Do not attempt to resaw bowed or warped material. It can’t be properly supported. It could kickback or bind. Workpiece Wood Block NOTE: To resaw a piece of wood wider than 3-3/8”, or a piece needing extra support, it will be necessary to remove the blade guard and use the auxiliary fence/work support. (See “Workfeed Devices”.) Clamp the auxiliary fence/work support to the table so that the workpiece will slide easily without binding between the two fences and it will not tilt or move sideways. Do not clamp directly to the bottom edge of the table because the “swivel” of the clamp will not grip properly. Place a small block of wood between the bottom edge of the table and the “C” clamp. “C” Clamp WARNING: For your own safety 1. Do not “Backup” (reverse feeding) while resawing because this could cause a kickback. 2. Make first pass to a depth slightly more than one half the width of the board. 3. Keeping the same face of board against the fence rotate it end over end and make the second pass. WARNING: For your own safety, install blade guard immediately upon completion of the resawing operation. 49 Basic Saw Operations (continued) Using Carbide Tipped Blades Before using a carbide tipped blade, always examine the blade and tips for damage. Look for bent teeth, a bent blade, cracks, broken, missing or loose carbide tips. Do not use a carbide tipped blade if damage is found or suspected. Do not use a carbide tipped blade without all appropriate guards in place. Mount blade securely in proper rotation direction. Never rotate a carbide tipped blade faster than its maximum recommended speed. WARNING: To reduce the risk of cutting tool failure and thrown shrapnel (broken pieces of blade) read and understand all the warnings and instructions which come with carbide tipped blades. Failure to heed all carbide tipped blade warnings and safety instructions can result in serious injury. Carbide is a very hard but brittle material. Take care when mounting, using and storing carbide blades to prevent accidental damage. Slight shocks, such as striking a tip during handling, can seriously damage the blade. Foreign objects in the workpiece, such as wire or nails, can also cause tips to crack or break off. Dadoing Dadoing is cutting a groove into the workpiece. There are a wide variety of dado heads available - be sure and consult the specific instructions included with your dado head. WARNING: For your own safety; always read, understand and follow all directions in the instructional booklet furnished with the dado head. The slot provided for the saw blade in the regular table insert is too small for the dado head to pass through. Therefore, a special dado insert must be purchased. WARNING: For your own safety, always use dado insert listed under recommended accessories. Dado Insert Saw Arbor A dado is never used for thru-sawing or cutting completely through a workpiece. It is used for non-thru sawing, cutting part way into the workpiece. Therefore, the blade guard and spreader cannot be used and must be removed. Use caution. Use miter gauge, rip fence, featherboards, or push sticks as required. WARNING: For your own safety, always replace the blade, table insert, guard and spreader when you are finished dadoing. The dado head is assembled to the saw arbor in the same manner as the saw blade. The arbor on the saw, is long enough so that the widest cut that can be made is 13/16" wide. It is not necessary to install the outside loose collar before screwing on the arbor nut. Make sure the arbor nut is tight. When cutting a “deep” dado or a wide groove it is necessary to remove only a small amount of material (1/8"-1/4") at a time. Continue to increase dado elevation until the desired depth is reached. 50 Rabbeting Second Cut Rabbeting is known as cutting out a section of the corner of a piece of material, across an end or along an edge. To make a rabbet requires cuts which do not go all the way through the material. Therefore, the blade guard must be removed. 1. Remove blade guard. 2. For rabbeting along an edge (long way of workpiece) as shown add facing to rip fence approximately as high as the workpiece is wide. Adjust rip fence and blade to required dimensions; then make first cut with board flat on table as any rip (type) cut; make second cut with workpiece on edge. Follow all precautions, safety instructions, and operational instructions as for ripping, or rip type operations, including featherboards and push stick, etc. 3. For rabbeting across an end, for workpiece 10-1/2” and narrower, make the rabbet cut with the board flat on the table. Using the miter gauge fitted with a facing, follow the same procedures and instructions for cross cutting making successive cuts across the width of the workpiece to obtain the desired width of cut. Do not use the rip fence for rabbeting across the end. This Side Against Fence When Making Second Cut Rabbet First Cut Second Cut Etc. First Cut Rabbet WARNING: For your own safety, install blade guard immediately upon completion of rabbeting operation. Some rabbet cuts can also be made in one pass of the workpiece over the cutter using a dado head. Ploughing and Molding Ploughing is grooving with the grain the long way of the workpiece, using the fence. Use featherboards and push sticks as required. Molding is shaping the workpiece with the grain the long way of the workpiece, using the fence. Use featherboards and push sticks as required. Ploughing 51 Basic Saw Operations (continued) Molding Molding is cutting a shape on the edge or face of the workpiece. With a molding head and a selection of different knife shapes it is possible for almost any kind of molding (base, cove, bead, etc.) to be produced. There are a wide variety of molding heads available as well as many different shapes of knives. Be sure and consult the specific instructions included with your molding head. Molding WARNING: For your own safety; always read, understand, and follow all directions in the instructional booklet furnished with the molding head. The slot provided for the sawblade in the regular table insert is too small for the dado head to pass through. Therefore, a special molding insert must be purchased. WARNING: For your own safety, always use molding insert listed under recommenced accessories. When using the molding head it will be necessary to remove the blade guard and spreader. Use caution. Use miter gauge, fence, featherboards, or push sticks, etc., as required. WARNING: For your own safety, always replace the blade, table insert, guard and spreader when you are finished molding. A typical molding head is shown. The various shapes of knives are fitted into a groove in the cutterhead and secured with a screw(s). The molding head is assembled to the saw arbor in the same manner as the saw blade. Make sure the arbor nut is tight. It is necessary to use an auxiliary fence when shaping edges of a workpiece. Position the auxiliary fence over the cutterhead with the cutter head below the surface of the saw table. Turn the saw “ON” and slowly raise the cutterhead. The cutterhead will then cut its own groove in the auxiliary fence. Auxiliary Fence 52 Adjustments WARNING: For your own safety, turn switch “OFF” and remove plug from power source outlet before making any adjustments. Knob Miter Gauge Head Miter Gauge NOTE: The graduations are manufactured to very close tolerances which provide ample accuracy for fine woodworking. In some cases where extreme accuracy is required, when making angle cuts, for example, make a trial cut and then recheck it. There are adjustable screw stops for the stop pin at 0° and 45° right and left positions for conveniently setting the miter gauge to cut miters at these standard angles. Bar Pointer Adjustment Screw Adjusting Stop Screws A. Loosen lock nut of screw for 0° stop. B. Place 90° square against the miter gauge bar and the face of the miter gauge head. C. If adjustment is needed loosen handle of miter gauge. Adjust miter gauge head flush to square. Tighten lock knob. D. Adjust stop screw until it rests against the stop pin and tighten lock nut. E. Adjust 45°, left and right using a 45° triangle or a protractor of a square using the above procedure. The miter gauge head should swivel smoothly on the bar after the knob is loosened. To adjust this swivel movement: A. Loosen the knob. B. Loosen set screw with a 2.5mm hex wrench. C. If the head is too loose turn the flathead screw in a clockwise direction. If the head is too tight and will not swivel smoothly turn the flathead screw counterclockwise. D. Tighten set screw. Stop Pin Flat Head Screw Set Screw 53 Maintaining Your Table Saw Maintenance Anti-Kickback Pawl WARNING: For your own safety, turn switch “OFF” and remove plug from power source outlet before maintaining or lubricating your saw. Spreader • Do not allow sawdust to accumulate inside the saw. Frequently blow out any dust that may accumulate inside the saw cabinet and the motor. • Clean your cutting tools with a gum and pitch remover. • The cord and the tool should be wiped with a dry clean cloth to prevent deterioration from oil and grease. • A coat of automobile-type wax applied to the table will help to keep the surface clean and allow workpieces to slide more freely. • If the power cord is worn, cut, or damaged in any way, have it replaced immediately. Anti-Kickback Pawls Make sure the teeth of the anti-kickback pawls are always sharp. To sharpen: 1. Remove blade guard. 2. Rotate pawl toward rear of spreader so that teeth are above top of spreader. 3. Hold spreader with left hand and place pawl over corner of workbench as shown. 4. Using a small round file (smooth cut) sharpen the teeth. Round File Teeth Oil Actuator 5. Reinstall blade guard Universal Caster System Periodically clean actuator and apply one to two drops of household machine oil or motor oil to stem. Lubrication 2 The saw motor bearings have been packed at the factory with proper lubricant. See motor label for lubrication instructions. The following parts should be oiled occasionally with SAE no. 20 or no. 30 engine oil. 1. Tilt screw threads and pivot nut. (First clean with a solvent recommended for gum and pitch removal.) 2. Elevation screw threads and pivot nuts. (First clean with a solvent recommended for gum and pitch removal). 3. Cradle bearing points. 4. Bearing points in blade guard and miter gauge. 4 3 4 4 3 54 3 1 RIDGID Recommends the Following Accessories Item SKU No. Molding/Dado Insert for 7 In. Dia. Molding or Dado Head......................................................AC1025 Dust Collector .....................................................AC1098 Caster System ....................................................AC1050 Miter Gauge ........................................................AC1021 Do not use any accessory unless you have received and read complete instructions for its use. WARNING: Use only accessories recommended for this saw. Using other accessories may be dangerous. Troubleshooting WARNING: For your own protection, turn switch “OFF” and always remove plug from power source outlet before troubleshooting. General Trouble Probable Cause Remedy Excessive Vibration 1. Blade out of balance 1. Discard blade and use a different blade. Cannot make square cut when crosscutting. 1. Miter gauge not adjusted properly. 1. See “Adjustments” section “Miter Gauge.” Cut binds, burns or stalls motor when ripping. 1. Dull blade or improper tooth set. 1. Sharpen or replace blade. 2. Blade is heeling. 2. See “Adjustments” section, “Heeling Adjustment”. 3. Warped, cupped or twisted 3. Consider cutting from other side or use a jig or fixboard. ture to make stable. To reduce the risk of kickback the board must be made stable and not rock or tip during cutting. If the board can not be held stable discard board. 4. Rip fence not parallel to blade. 4. See “Assembly” section, “Aligning Rip Fence.” 5. Spreader out of alignment. 5. See “Assembly” section, “Installing Blade Guard.” Cut not true at 90° or 45° positions. 1. Stop collars not properly adjusted. 1. See “Adjustment” section, “Blade Tilt, or squareness of blade to table. Tilt and elevating hand- 1. Sawdust on threads of tilt screw 1. See “Maintenance” and “Lubrication” sections. wheel turn hard. or elevating screw. 2. Bearing retainers too tight. 2. See “Assembly” section, “Checking Tilt Mechanism” 55 Troubleshooting (continued) Motor NOTE: Motors used on wood working tools are particularly susceptible to the accumulation of sawdust and wood chips and should be blown out or “Vacuumed” frequently to prevent interference with normal motor ventilation. Trouble Probable Cause Remedy Excessive Noise 1. Motor 1. Have motor checked by qualified service technician. Repair service is available at your nearest Authorized Service Center. Motor fails to develop full power. NOTE: Low Voltage: (Power output of motor decreases rapidly with decrease in voltage at motor terminals. For example, a reduction of 10% in voltage causes a reduction of 19% in maximum power output of which the motor is capable, and a reduction of 20% in voltage causes a reduction of 36% in maximum power output.) 1. Circuit overloaded with lights, appliances and other motors. 2. Undersize wires or circuit too long. 1. Do not use other appliances or motors on same circuit when using the saw. 2. Increase wire sizes, or reduce length of wiring. See “Motor Specifications and electrical Requirements” section. 3. Request a voltage check from the power company. Motor starts slowly or fails to come up to full speed 1. Low voltage. 2. Windings burned out or open. 3. Starting switch not operating Motor overheats 1. Motor overloaded 1. Feed work slower into blade. 2. Improper cooling. (Air circulation 2. Clean out sawdust to provide normal air circulation restricted through motor due to through motor. See “Maintenance” and “Lubrication” sawdust, accumulating inside of section. saw.) 3. General overloading of power company facilities. (In some sections of the country, demand for electrical power may exceed the capacity of existing generating and distribution systems.) 4. Incorrect fuses of circuit break- 4. Install correct fuses or circuit breakers. ers in power line. 1. Request voltage check from the power company. 2. Have motor repaired or replaced. 3. Have switch replaced. Starting switch in motor 1. Burned switch contacts (due to 1. Have switch replaced and request a voltage check will not operate extended hold-in periods from the power company. caused by low line voltage, etc.) 2. Shorted capacitor (when 2. Have capacitor tested and replace if defective. equipped) 3. Loose or broken connections. 3. Have wiring checked and repaired. Motor stalls (resulting in 1. Starting switch not operating. 1. Have switch replaced. blown fuses or tripped 2. Voltage too low to permit motor 2. Request voltage check from the power company. circuit breakers) to reach operating speed. 3. Fuses or circuit breakers do not 3. Install proper size fuses or circuit breakers. have sufficient capacity. Frequent opening of 1. Motor overloaded 1. Feed work slower into blade. fuses or circuit breakers 2. Fuses or circuit breakers do not 2. Install proper size fuses or circuit breakers. have sufficient capacity. 3. Starting switch not operating 3. Have switch replaced. (motor does not reach speed.) 56 Repair Parts Parts List for RIDGID 10 Inch Table Saw Model TS24240 Figure 1 - ON-OFF Power Outlet 10 9 7 1 2 3 9 4 8 11 5 6 7 Always Order by Part Number - not by Key Number Key No. 1 2 3 4 5 6 7 8 9 10 11 Part No. 822150-1 * * 826121 826123 826122 * 826452 826450 826451 63467 Description Bracket, Switch Housing Lockwasher #10 Nut Hex 10-32 Box Switch Switch Locking Key Switch Screw, Pan Hd. Ty “T” 10-32 x 3/8” Cord Strain Relief Cord w/Plug Cap, Insulator * Standard Hardware Item - May be purchased locally 57 35 36 34 30 Repair Parts Parts List for RIDGID 10 Inch Table Saw Model No. TS24240 Figure 2 16 41 37 1 33 32 45 4 2 5 3 31 39 28 29 16 41 26 27 43 6 44 58 42 4 7 7 8 9 40 23 8 9 10 11 25 24 12 13 14 38 16 17 15 16 16 14 13 11 22 21 16 12 45 46 18 19 12 20 Repair Parts Parts List for RIDGID 10 Inch Table Saw Model No. TS24240 Figure 2 Always Order by Part Number - not by Key Number Key No. 59 1 2 3 4 5 6 7 8 9 10 11 12 13 14 15 16 17 18 19 20 21 22 23 Part No. 509492 * 826390 824609-2 ——— ——— * * * 71165 824572 * * 826505 826518 * 824345 822138-1 ——— * 824341-1 159653-38 826465 Description Insert (Includes Key #37) Screw Flat Hd 10-32 x 1 Insert Ind-I-Cut Extension Table Fence Asm (See Fig 4) Miter Gauge (See Fig 5) Nut Hex 5/16-18 Lockwasher 5/16 Washer 21/64 x 5/8 x 1/16 Tie Wire Wheel Hand Lockwasher #10 Screw Pan Hd 10-32 x 5/8 Knob Handwheel Scale Adjustable Bevel Screw Pan Hd Ty “AB” 8 x 1/2 Rail Front w/Scales Nut Sq 10-32 Switch Box (See Fig 1) Screw Pan Hd 10-32 x 3/8 Cap Front Rail Left Bolt Sq. Hd 5/16-18 x 1 Base * Standard Hardware Item - May be purchased locally Key No. 24 25 26 27 28 29 30 31 32 33 34 35 36 37 38 39 40 41 42 43 44 45 46 Part No. * * * 824360-1 * 824373-1 824340-6 826187 * * * ——— 824372-1 104879 824339-1 818463 3540 805548-11 SP6127 SP6163A SP6163B 818309 824357 Description Screw Hex Hd 3/8-16 x 1/2 Lockwasher 3/8 Screw Hex Hd 5/16-18 x 1-1/4 Guard Belt Nut 10-32 Cap Rear Rail Left Rail Rear • Motor Nut Hex 1/4-20 Lockwasher 1/4 Screw Hex Hd 1/4-20 x 5/8 Guard Assembly (See Fig 6) Cap Rear Rail Right Screw Lock Set 10-32 x 3/16 Cap Front Rail Right Screw Soc Set Oval 3/8-16 x 3/4 Wrench, Arbor Washer 3/16 x 1 x 1/16 Owners Manual Owners Manual-Spanish Owners Manual-French Washer Shim Tape Fence 24" • Any attempt to repair this motor may create a hazard unless repair is done by a qualified service technician. Repair service is available at your nearest Authorized Service Center. Repair Parts Parts list for RIDGID 10 Inch Table Saw Model No. TS24240 Figure 3 1 2 5 3 6 7 8 9 10 4 60 49 8 57 58 59 11 12 13 14 15 18 56 60 48 64 52 53 54 46 15 43 45 25 26 47 27 50 61 51 22 20 42 44 49 21 17 16 55 19 32 41 23 28 24 13 40 29 62 63 39 38 37 36 30 35 34 33 32 31 Always Order by Part Number - not by Key Number Key No. 61 1 2 3 4 5 6 7 8 9 10 11 12 13 14 15 16 17 18 19 20 21 22 23 24 25 26 27 28 29 30 31 32 Part No. 804846-1 60204 * 62585 * 825914-2 * * * * 60205 * 63011 62295 810867-1 826454-1 826482 804667-1 6362 824637-1 826392 * * * * * 826391 63054 37828 162000-1 37829 * Description Support, Spreader Screw, Thumb 5/16-18 x 1 Pin, Roll 3/16 x 1-1/4 Rod Spreader Screw, Socket Set 5/16-18 x 1/2 Support, Guard Nut, Hex 5/16-18 Lockwasher, External 5/16 Bolt, Carriage 5/16-18 x 3/4 Screw, Hex Ind. Wash. Hd. 1/4-20 x 1-1/2 Spring Washer, .380 x 47/64 x 3/32 Washer, Knob Clamp Spacer Table, Trunnion Table, 10 In. Saw Blade, Saw 10" 40T Carbide Collar, Blade Nut, Arbor Stiffener Base Screw, Tilt Screw, Pan Hd. 10-32 x 3/8 Screw, Pan Hd. Ty AB #10 x 1/2 Nut, Lock 10-32 Lockwasher, External 3/8 Screw, Hex Hd. 3/8-16 x 1 Nut, Tilt Ring, Retaining 3/4 Spring, Clamp Screw Handle Clamp Screw Screw, Clamp Ring, Retaining * Standard Hardware Item - May be purchased locally Key No. 33 34 35 36 37 38 39 40 41 42 43 44 45 46 47 48 49 50 51 52 53 54 55 56 57 58 59 60 61 62 63 64 Part No. 37838 60178 * 62697 62699 * * 509495 30767 * 508511 * 826464 820015 * 826475 * 816439-3 826476 * 37823 509494 818527 509491 30628 * 818528 * 6527 * * * Description Washer, .629 x 7/8 x 1/64 Washer, Spring O-Ring Screw, Lift Pointer Screw, Pan Hd. Ty “T” 10-32 x 3/8 Lockwasher, External No. 10 Cradle Washer, End Play (.010 Thick) Screw, Hex Hd. 5/16-18 x 5/8 Arbor Key, Woodruff #9 Housing, Arbor (Includes Keys 43 thru 47 & 62, 63) Bearing, Saw Arbor Ring Retaining 5/8 Pulley, Poly-V 2.2 Screw, Soc Set Oval 5/16-18 x 5/16 Belt, Poly-V 41.7 Pulley, Poly-V 2.5 Ring, Retaining 3/8 Pin Hinge Base, Motor Spring Support, Motor Base Screw, Hex Lock 1/4-20 x 5/8 Washer, 17/64 x 47/64 x 1/16 Spacer Screw Hex Hd 5/16-18 x 1 Ring Retaining 3/4 Screw Ty “T” 8-32 x 3/8 Washer 3/16 x 5/8 x 1/16 Key Square 3/16 x 1-1/4 Repair Parts Parts List for RIDGID 10 Inch Table Saw Model TS24240 Figure 3 Repair Parts Parts List for RIDGID 10 Inch Table Saw Model No. TS24240 Figure 4 - Fence Assembly 1 10 2 3 9 4 6 7 11 5 12 8 13 14 37 39 15 13 16 38 34 36 17 18 19 33 35 32 20 21 31 30 29 28 27 22 23 24 25 26 Always Order by Part Number - not by Key Number Key No. Part No. Key No. Description 1 809492-7 Screw Pan Hd. Ty “T” 8-32 x 1 2 824350-1 Cap Channel Rear 3 Nut Lock 5/16-18 * 4 Washer 21/64 x 5/8 x 1/16 * 5 Screw Pan Hd. Ty “T” 10-32 x 5/8 * 6 824328-1 Plate Lock 7 824332 Spring Lock 8 824349-1 Slide Rear Fence 9 824346 Channel Fence 10 824329 Pin Cam 11 824342 Rod Fence Lock 12 824353-1 Handle Cam 13 824326 Bearing Ball Angular Contact 14 824347-2 Scr Hex Soc Butt Hd 1/4-20 x 3/4 15 824279-1 Housing Rip Fence 16 Screw Pan Hd Ty “T” 8-32 x 1/2 * 17 Screw Pan Hd 10-32 x 1/2 * 18 Washer 13/64 x 5/8 x 1/32 * 19 824334-1 Indicator 20 826032 Head 21 822138-1 Nut Sq 10-32 * Standard Hardware Item - May be purchased locally 22 23 24 25 26 27 28 29 30 31 32 33 34 35 36 37 38 39 62 Part No. Description Nut Sq 1/4-20 Bracket Micro Adjust Bushing Spring Compression Knob Micro Adjust Screw Pan Hd. Ty “T” 10-32 x 1/2 * 802612-13 Nut Push 7/16 Washer 13/64 x 3/8 x 1/32 * 826196 Bumper Rubber Lockwasher #10 * Screw Pan Hd 10-32 x 3/4 * 9422329 Screw Hex Wash Hd Ty “T” 1/4-20 x 3/4 824330-1 Plate Fence Channel Screw Pan Hd. Ty “T” 8-32 x 3/8 * 825823 Slide Fence Hd. Hardware For Attaching Wood Facing 159653-3 Bolt Sq. Hd. 1/4-20 x 3/4 Washer 17/64 x 5/8 x 1/16 * Nut Hex 1/4-20 * 62636 824325-1 824282 824356 824355-1 Repair Parts Parts List for RIDGID 10 Inch Table Saw Model No. TS24240 Figure 5 - Miter Gauge Assembly 1 2 14 3 4 13 12 5 6 7 11 10 8 9 Always Order by Part Number - not by Key Number Key No. — 1 2 3 4 5 6 7 8 9 10 11 12 13 14 Part No. 826661 826506 * 826663 * 123069-1 824573-1 824570 * * 818470-4 826662 * * 818471-6 Description Miter Gauge, Complete Knob Washer 8 x 23 x 1.8 Gauge, Miter Screw, Pan Hd. 8/32 x 5/16 Indicator Block, Miter Gauge Indicator Pin, Miter Lockwasher #8 Screw, Pan Hd 8-32 x 5/8 Screw Flat Hd. M6 x 1.0-16 Rod, Miter Gauge Nut Hex 6-32 Screw Pan Hd. 6-32 x 5/8 Screw, Set 5 x 0.8-5 63 Repair Parts Parts List for RIDGID 10 Inch Table Saw Model No. TS24240 Figure 6 - Guard Assembly 1 4 5 3 2 1 12 7 11 1 6 7 1 6 8 10 9 8 Always Order by Part Number - not by Key Number Key No. — 1 2 3 4 5 6 7 8 9 10 11 12 Part No. 826519 60208 62391 803528-1 826466 62390 * 62520 813146-1 804845-1 62410 * 62519 Description Guard Asm. Complete Nut Push Pin 1/4 x 1-1/2 Support, Guard Guard, Saw Pin, 1/4 x 1-3/4 Washer, 17/64 x 5/8 x 1/16 Spacer, Pawl Pawl Spreader Blade Pin, 1/4 x 1 Pin, Roll 3/16 x 15/16 Spring, Pawl * Standard Hardware Item - May be purchased locally 64 Repair Parts Parts List for RIDGID 10 Inch Table Saw Model No. TS24240 Figure 7 - Leg Set 3 11 2 2 4 12 1 7 6 6 12 13 14 7 3 5 2 1 9 8 6 1 7 8 6 7 1 10 Key No. 1 2 3 4 5 6 7 8 9 10 11 12 13 14 Part No. Description 805589-5 826113 826116 826115 509511 Screw, Serrated Truss Head. 1/4-20 x 1/2 Leg Stringer, Side Stringer, End Stringer, End w/Label Nut Hex, 1/4-20 * Lockwasher 1/4 * 826114-1 Brace Leg (Short) 824832 Hanger, Miter Gauge 824833 Hanger, Rip Fence Hardware for Attaching Legs to Saw Screw, Hex Hd. 5/16-18 x 1-1/4 * Washer, 11/32 x 11/16 x 1/16 * Lockwasher, Ext. 5/16 * Nut, Hex 5/16-18 * * Standard Hardware Item - May be purchased locally 65 Repair Parts Parts List for RIDGID Universal Caster System Model No. TS24240 2 3 4 1 6 2 3 23 7 22 8 29 2 19 11 3 21 9 10 12 13 8 14 20 15 12 17 7 20 19 Swivel Caster Frame 16 18 30 12 15 7 12 15 12 12 15 25 2 8 15 3 24 24 27 7 24 24 25 26 25 27 26 28 25 27 27 Fixed Wheel Caster Frame 28 66 Repair Parts Parts List for RIDGID Universal Caster System Model No. TS24240 Always order by part number - Not by key number Key No. 1 2 3 4 5 6 7 8 9 10 11 12 13 14 15 16 17 18 19 20 21 22 23 24 25 26 27 28 29 30 Part No. 825899 * * 826824 * 825904-1 805589-5 826594 805466-13 60484 * 806481-1 * * 825898 825905-1 803835-2 * * * * * * * 825910 825902 825901 * 825903-1 Description Actuator Caster Nut Hex 1/4-20 Lockwashers 1/4 Handle Caster Screw Hex Hd. 1/4-20 x 3/4 Frame Caster End Screw Truss Hd. 1/4-20 x 1/2 Frame Caster w/Label Bolt Hex Hd. 5/16-18 x 4-1/4 Nut Hex 3/4-16 Nut Hex 5/16-18 Bolt Soc Button Hd. 5/16-18 x 1 Bolt Hex Hd. 5/16-18 x 5/8 Lockwasher 5/16 Caster Swivel Hinge Caster Foot Leveling 3" Nut Hex 3/8-16 Washer 3/8 x 7/8 x 5/64 Lockwasher 3/8 Nut Lock 5/16-18 Washer 3/4 x 1-15/32 x 3/32 Ring Retaining Washer 17/64 x 5/8 x 1/32 Shaft Caster Mount Axle Caster Wheel Rubber 2-1/2 3/4" External Tooth Lockwasher Frame Caster Center * Standard hardware item - may be purchased locally 67 Lifetime Warranty On RIDGID Tools The RIDGID REPUTATION is the result of the consistent product quality and years of pride in workmanship. Rigorous checks and controls from raw materials to packaged products insure product confidence widely accepted as the mark of the professional trades. Therefore, RIDGID covers its products with a LIFETIME WARRANTY against defects in material or workmanship. To take advantage of this warranty, the complete product must be delivered prepaid to any RIDGID AUTHORIZED SERVICE CENTER. Obviously, failures due to misuse, abuse or normal wear and tear are not covered by this warranty. NO OTHER WARRANTY, WRITTEN OR ORAL, APPLIES. No employee, agent, dealer or other person is authorized to give any warranty on behalf of RIDGID Power Tools, Emerson Electric Co. Warranted products will be repaired or replaced, at our option, at no charge to you and returned to you via prepaid transportation. Such replacement or repair is the exclusive remedy available from RIDGID Power Tools, Emerson Electric Co. Emerson Electric Co. is not liable for damage of any sort, including incidental and consequential damages. Some U.S.A. states do not allow the exclusion or limitation of incidental or consequential damages, so the above limitation or exclusion may not apply. This warranty gives you specific legal rights, and you may have other rights which vary from state to state. Stock No. TS2424 Model No. TS24240 Model and serial numbers may be found on a plate attached to the saw at the right rear side of the base. You should record both model and serial number in a safe place for future use. QUESTIONS OR COMMENTS? CALL 1-800-4-RIDGID RIDGID Power Tools Emerson Electric Co. © 1998 Emerson Electric Co. Part No. SP6127 Form No. SP6127-3 Printed in U.S.A. 5/99