1
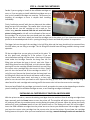
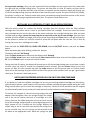
REFILLABLE CARTRIDGE SYSTEM FOR THE
EPSON STYLUS PRO 4000, 7600, & 9600
Thank you for purchasing an Ink2image refillable cartridge system. You have just taken the first step to
enjoying the cost saving and superior performance benefits of using Ink2image bulk ink. Ink2image refillable
cartridge systems are simple to install, easy to use, and will provide you with many hours of trouble free and
lower cost printing. However, the successful use of the system is dependent on how accurately you follow this
guide during installation. Please read these instructions and familiarize yourself with the system components
before you start the installation. Please also remember that you are now about to start working with bulk ink
instead of sealed cartridges. During installation, protect the area around your printer in case of ink spillage and
wear the disposable gloves included with the kit. Have a roll of paper towel handy. Remember, accidents can
happen!
SYSTEM COMPONENTS
1. Refillable Cartridges.
4000 = 8 Cartridges. 7600/9600 = 7 Cartridges
2. Disposable gloves
3. Priming syringe with end adaptor.
4. Filling funnels.
5. Instruction CD or printed instructions.
STEP 1
Before starting the installation, print a good nozzle check print using the existing inks installed on your printer.
Write the date on the print and keep it. No warranty claim regarding the bulk ink feed system will be accepted
unless it is supported by a good nozzle check print produced before the system was installed. The utility for
producing a nozzle check print can be found under the ‘Maintenance’ or ‘Utilities’ tab of the Epson print driver
software supplied with your printer. A good nozzle check print should look like this:-
STEP 2
If you are currently using original Epson Ultrachrome inks in the printer and are about to install Cave Paint
Elite inks, Cave Paint Photochrome V2 inks, or Media Street by Ink2image Generations G6X inks in the
refillable cartridges, then proceed to step 3. If you are currently using a different ink type, or intend to install a
different Ink2image ink than mentioned above, it is a good idea to flush out your printer before installing the
system. Otherwise, you will waste a lot of time and ink purging through one ink type to another, or potentially
clog your printer. Ink2image supplies Dead Head cleaning fluid in bulk for the purpose of flushing the printer
and this can be obtained from your local Ink2image supplier. If you are in doubt about the need to flush your
printer, then contact your local supplier or e-mail Ink2image at [email protected]. Ink2image will not
be held responsible for problems caused by the incompatibility of different ink types.
If you do need to flush out your printer, then fill each refillable cartridge with about 1” of Dead Head cleaning
fluid and perform an initial fill routine as outlined in the ‘Installing all cartridges at once’ section below. Ideally
let the printer ‘soak’ overnight to allow the cleaning fluid to dissolve any dried ink deposits. Remove the
refillable cartridges and return any remaining cleaner in the cartridges to the cleaning fluid bottle by pouring
the fluid out through the cartridge filling hole. Fill the cartridges with the new ink, and perform another initial
fill routine to prime the ink system with ink.
STEP 3
Ink2image refillable cartridges for the Epson Pro 4000/7600/9600 are fitted with normal ink monitor chips
that will allow you to use the cartridges once before the printer will show an ‘empty cartridge’ warning. This
makes it possible to install the cartridges one at a time so that existing standard cartridges in the printer can
be used up. However, once the printer is installed with the complete set of refillable cartridges, the chip
reading function on the printer will need to be turned off so that the cartridge chips do not monitor ink levels.
This can be done by turning on the printer in ‘self testing’ mode and following the procedure below. This
process is reversible should you want to use normal cartridges again in the future. If you are going to install
the refillable cartridges one at a time then only turn off the chip readers once the printer has the complete set
of refillable cartridges installed.
Turning off the chip readers on an Epson 4000 Printer
It is recommended that this procedure only be used on machines running a full set of refillable cartridges. The
machine will no longer count ink usage, and will not show an ‘empty cartridge’ condition. The printer operator
is responsible for ensuring that refillable cartridges are not allowed to run empty. Please follow the
instructions carefully, as incorrect entries could result in problems that would require a service call to reload
the printer firmware.
Start with the printer turned off.
Press and hold the Left Arrow, Up Arrow, and Down Arrow buttons, and push the Power button to turn on
the printer.
When the display shows ‘SELF TESTING’, release all buttons.
Press Down Arrow once, until you see ‘SERVICE CONFIG’ on the display.
Press the MENU button once. The display will read ‘CHANGE DEVICE-ID’.
Press the Down Arrow button two times, until the display reads ‘ED MODE’.
Press the MENU button once.
The display reads ‘*X’.
Press the Down Arrow button until the display reads ‘O’.
Press the MENU button once, and the display will read ‘*O’.
Note: Options in the Ed Mode function are: X = UK AND NORTH AMERICA – CHIP ON N= ASIA - CHIP ON O=
CHIP OFF - ALL COUNTRIES. Should you ever want to turn the chip readers back on then you would enter ‘X’ as
the Ed Mode setting.
Push the Power button to turn the machine off.
Push the Power button to turn the machine on.
The printer will display ‘Ready’ with ‘OXXXXXXXX’ in place of the normal ink cartridge status bars. Note that
the status of all ink cartridges will no longer be monitored. This setting is written to the printer’s memory, and
will not change when the power is cycled.
Turning off the chip readers on EPSON 7600/9600 Printers
It is recommended that this procedure only be used on machines running a full set of refillable cartridges. The
machine will no longer count ink usage, and will not show an ‘empty cartridge’ condition. The printer operator
is responsible for ensuring that refillable cartridges are not allowed to run empty. Please follow the
instructions carefully, as incorrect entries could result in problems that would require a service call to reload
the printer firmware.
Start with the printer turned off.
Press and hold the ENTER, PAPER FEED DOWN, and PAPER SOURCE buttons, and push the Power button to
turn on the printer.
When the display shows ‘VIEW COUNTERS’, release all buttons.
Press the PAPER FEED DOWN button two times until you see ‘SERVICE CONFIG’ on the display.
Press
the SELECT TYPE button once.
Press the PAPER FEED DOWN button five times until the display reads ‘ED MODE’.
Press the ENTER button once.
The display reads ‘*X’.
Press the PAPER FEED DOWN button until the display reads ‘O’
Press the ENTER button once, and the display will read ‘*O’.
Note: Options in the Ed Mode function are: X = UK AND NORTH AMERICA – CHIP ON N= ASIA - CHIP ON O=
CHIP OFF - ALL COUNTRIES. Should you ever want to turn the chip readers back on then you would enter ‘X’ as
the Ed Mode setting.
Push the Power button to turn the machine off.
Push the Power button to turn the machine on.
The printer will display “Ready” with a “O” to the left of the ink cartridge status bars. Note that the status of
all ink cartridges will always show full. This setting is written to the printer’s memory, and will not change
when the power is cycled.
STEP 4 – FILLING THE CARTRIDGES
Decide if you are going to install all the refillable cartridges at
once, or if you are going to install individual cartridges one at a
time as the standard cartridges are used up. The process for
installing all cartridges at once is simpler than installing
individually.
Firstly, familiarize yourself with the two holes and the rubber
bungs on top of the cartridges. The smaller hole is the air vent
hole that lets air into the cartridge as ink is used up. The
rubber bung must be removed from the air vent hole when
printer is being used or ink will not be allowed to flow out of
the cartridge. The only times that you should push the rubber
bung into the air vent hole is when you have the cartridge out of the printer, or if you intend not to use the
printer for an extended period of time – putting the bung in the air vent hole will prevent ink evaporation.
The bigger hole on the top of the cartridge is the ink filling hole and the bung should only be removed from
this hole when you are filling a cartridge. The ink filling hole should have the bung pushed in during normal
operation.
Fill the cartridges that you are going to install at this point. To
do this, place each cartridge on a flat surface. If you are
concerned about spilling ink then place a few layers of paper
towel under the cartridge. Remove the bung from the ink
filling hole and leave the bung in the air vent hole. Place a
clean filling funnel into the filling hole, as in this picture. Before
pouring ink into the cartridge, double check that you are filling
the correct color cartridge with the correct ink color. Slowly
poor ink into the funnel and fill the cartridge to within ½” (1
cm) of the top. Remove the funnel and put the bung back into
the filling hole. Wash out the funnel with water under a faucet,
dry the funnel with paper towel, and store in a clean, safe
place for use the next time you need to refill. Repeat the filling process with each cartridge in turn using a
clean funnel for each cartridge and ensuring you fill the correct color ink into the correct color cartridge.
Once you have filled all the cartridges you intend to install, proceed to the next section depending on whether
you are installing all the refillable cartridges at once, or are installing cartridges individually.
INSTALLING ALL CARTRIDGES AT ONCE ON AN EPSON 4000
With the printer turned on, remove the existing cartridges from the machine. Once all existing cartridges have
been removed, push the Power button to turn the printer off. The machine will take a minute or two to turn
off, and you will hear the machines pump running during this power off process. When the printer has finally
switched off, push the Power button to turn the printer back on. The display will read ‘Set Ink Cartridges’.
Insert the filled refillable cartridges into the printer one at a time as you would normal ink cartridges. Ensure
you insert the correct color cartridge into the correct color slot on the printer. Do not lower the cartridge
locking levers at this point. After you have installed each cartridge, remove the bung from the air vent hole on
the top of each cartridge. Once you have inserted all of the cartridges into the correct color slots, lower both
the right and left cartridge locking levers. The printer will now start an initial fill routine to prime the ink
system with ink. This process will take a few minutes to complete and the machine’s display will prompt you
to lift the cartridge locking levers up and down a few times during this routine. Once the initial fill has finished,
the printer is ready to use. Perform nozzle check prints and cleanings using the utilities section of the printer
driver software until you get a good nozzle check print. The printer is now ready to use.
INSTALLING ALL CARTRIDGES AT ONCE ON AN EPSON 7600/9600
With the printer turned on, remove the existing cartridges from the machine. Insert the filled refillable
cartridges into the printer one at a time as you would normal ink cartridges. Ensure you insert the correct
color cartridge into the correct color slot on the printer and lower the cartridge locking lever. After you have
installed each cartridge, remove the bung from the air vent hole on the top of each cartridge. Once you have
installed all of the refillable cartridges, turn off the printer by pushing the Power button. You will now need to
set the printer to perform an initial fill routine to prime the ink system with the new inks. This is done by
turning the printer on in self diagnostic mode:Press and hold the PAPER FEED UP, PAPER FEED DOWN, and the CUT/EJECT buttons, and push the Power
button.
When the power light starts blinking, release the buttons.
The display will read ‘Self Testing’.
Press the Down arrow button twice until the display reads ‘Cleaning’.
Press the Right arrow button once, and then the Down arrow button three times until the display reads 'init
fill'. Press the Enter button to start the initial fill routine.
During the initial fill routine, the display will prompt you to lift the cartridge locking lever up and own a couple
of times. Once the initial fill routine has completed (several minutes), push the Power button to turn the
printer off. Wait for a few seconds and push the Power button to turn the printer back on. Perform nozzle
check prints and cleanings using the utilities section of the printer driver software until you get a good nozzle
check print. The printer is now ready to use.
INSTALLING CARTRIDGES INDIVIDUALY ON AN EPSON 4000/7600/9600
If you decide to install the refillable cartridges one at a time so existing standard cartridges can be used up,
you will need to extract a small amount of air from each refillable cartridge that gets trapped during the initial
filling process before you first install the cartridge in the printer. Failure to do this will mean that this trapped
air will eventually make its way to the print head and cause some nozzle drop outs during printing.
To remove this trapped air, take the priming syringe with end
adaptor fitted and gently insert the syringe through the rubber
seal in the ink exit valve at the front of a cartridge, as in this
picture. Remove the rubber bung from the air vent hole on the
top of the cartridge and gently pull on the syringe plunger until a
small amount of ink is sucked into the syringe. Replace the
rubber bung in the air vent hole and remove the syringe from
the ink exit hole. Any ink in the syringe can be returned to the
ink bottle of the appropriate color. Wash the syringe out with
water under a faucet. Repeat this process with each cartridge you intend to install at this point, remembering
to wash out the syringe between colors so that no cross contamination of colors can occur. Once you have
removed the air from all the cartridges, install the cartridge or cartridges into the printer just as you would
with normal cartridges. Remember to remove the rubber bung from the air vent hole on each cartridge as
you install them. The printer is now ready to be used. Please note that this process of using a syringe to
remove air is not required when installing all the cartridges at one time – the machine’s initial fill routine as
described in the previous sections will automatically remove the trapped air.
REFILLING THE CARTRIDGES
Cartridges should be refilled before the ink levels get to within ½’ (1 cm) of the bottom of the cartridge.
Refilling a cartridge is easy and can be preformed with the cartridge in the printer. Before refilling, always
double check you are putting the correct color ink into the correct color cartridge. To refill a cartridge, simply
remove the bung from the filling hole and using a clean funnel, fill the cartridge with ink to within ½” (1 cm) of
the top surface. Remove the funnel and push the bung back into the filling hole. Wash out the funnel with
water under a faucet and keep safe for the next time you need to refill.
USER TIPS
The use of an Ink2image refillable cartridge system is very simple as long as you remember these important
points:1. Top up the cartridges regularly with ink. Be aware that certain colors will be used more quickly than others
depending on what type of printing you do. For instance, the black ink will be used quicker than the other
colors if you print a lot of text. Or, if you print mainly photos, then the light cyan and light magenta will run
down first. Never let the ink levels drop below ½” (1 cm) from the bottom of the cartridge and don’t fill
higher than ½” (1 cm) from the top of cartridge.
2. If you do accidently let a cartridge run dry, refill the cartridge as described above and then perform two to
three power cleans to re-prime the printer’s ink system with ink. Unfortunately, this will waste ink of the
other colors but there is no way round this. It is best to check ink levels regularly and not let a cartridge run
dry.
3. When you have finished printing, always turn your printer off.
4. Always try and use your printer at least once a week, even if you only print one small color print. This will
keep the ink fresh in the printer’s print heads and reduce the chance of clogging or drying out of the inks. If
you are not going to use your printer for more than four weeks, then we recommend removing the ink
from the cartridges and flushing the printer with cleaning fluid.
5. The ink cartridge chips can fail from time to time. A failed chip will show up as an ‘Install cartridge’
message on the printer display. If this happens, then the cartridge will need to be replaced and spare
refillable cartridges are available from Ink2image. Replacing the cartridge is simple – just follow the
‘Installing cartridges individually’ section above. You may want to consider keeping a spare set of refillable
cartridges on hand if your printer is used in a production environment where down time is critical.
Apart from these points, you should use your printer just as you would with normal cartridges and, as long
as you follow these simple guidelines, you will enjoy trouble free and cost saving printing.
If you require technical assistance or support with your Ink2image refillable cartridge system, please initially
contact the store or dealer where the system was purchased. All Ink2image dealers are well trained in the
operation of the system and can help with most problems. Alternatively, contact Ink2image technical support
on 1-800-443-9508 or 847-827-0747, or at [email protected].
30 DAY GUARANTEE TO REPLACE DEFECTIVE PARTS
Ink2image guarantees all parts are defect-free for a period of 30 days from the date that you receive your new
Ink2image refillable cartridge system. If you have received a defective part, please initially contact the retailer
or dealer from where the system was purchased.
DISCLAIMER
Because Ink2image refillable cartridges are self installed by the user, Ink2image is not responsible for any
damages to your printer, whether they are or are not related to the Ink2image refillable cartridge system.
Please contact the store or dealer where the printer was purchased, or the printer manufacturer for any
problems or questions related to the printer and its operation.
If the Customer chooses to use ink in the system from another manufacturer other than Ink2image, and is not
satisfied with the ink, or it clogs the printer or the bulk feed system, it will be the Customers responsibility to
pay for the parts to repair the system and restore it to normal usage. We can only guarantee that the
Ink2image refillable cartridge system will deliver Ink2image ink just as well as a normal ink cartridge. We will
not accept returns of used systems, or systems filled with third party ink that the customer later decides does
not meet their specific needs.