1
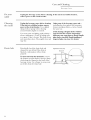
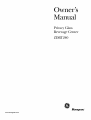
Owner's
Manual
Privacy Glass
Beverage Center
ZDBT240
Monogram:
www.monogram.com
Consumer
Information
Beverag'_, ( _,*_ler
Introduction
Your new Monogram
beverage
cenmr makes an eloquent
statement
of style,
convenience
and kitchen planning
flexil)ility. Whether
you chose it tbr its purity of
design or the assiduous
attention
to detail, you will find that yonr Monogram
beverage
center's
superior
1)lend of tbrm and flmction will delight you for years to come.
The in%rmation
bmerage
center
on the %llowing
properly.
If you hane any other
Contents
Built-In
Dimensions
questions,
pages will help you operate
using
your
beverage
center
and
Serial
................
Nmnbers
13
11, 12
19
8-10
...........
2
Read this manual carefiflly. It is intended
to help you operate
and maintain
your
new bmerage
center properly.
Kee I) it handy
questions.
for answers
maintain
vonr
xisit our X4:ebsite at: www.monogram.com
Care and Cleaning
..............
Consumer
Services
................
Controls
and Features
............
Model
and
Problem
Solver.
................
14-16
Product Registration
................
2
Repair Service
..................
3, 19
Safety' Instructions
................
4-7
VVarranty .................
Back Cover
If you don't understand
something
or
need more help, there is a list of toll-fiee
consumer
sernice numbers
included
in
the back section of this mannal.
to your
OR
Visit our X4:ebsite at: www.monogram.com
Wdte
You will find
down
the
ceiling
model
&
them on a label on the
inside
the bexerage
Please
write these
Model
Number
numbers
here:
center.
serial
n u fl_tD_s
Serial
Number
Use these
or sernice
center.
ATTENTION
This
unit is designed
Do not
store
CONSUMER.
for storing
perishable
foods
and
t
cooling
beverages.
in this unit.
ATTENTION
CONSOMMATEUR
Cet
est conqu
appareil
Ne mettez
m6nager
pas
de biens
numbers
in any correspondence
calls concerning
your bmerage
perissables
pour
conserver
dans
.t
et rafraichir
cet appareil
m4nager.
des
boissons.
Consumer
Infi)rmation
Beverag'e
(enter
If you received
a damaged
appliance
Tile warranty does not coxer damage
caused after delix err.
Immediately
contact the dealer (or
builder)
that sold you the bexerage
center.
Save time
& monu
Before you request serxice, check the
Problem Solxer ira the back of this mannal,
It lists causes of minor operating
that you can correct yourself.
J_eTH_ove
Before using, be sure all packing
and tape haxe been remoxed.
new appliances
is an application
of
household
liquid detergent.
Apply with
a soft cloth and allow m soak. Wipe d W
and then apply an appliance
polish m
thoroughly
clean and protect the surface.
packaging
materials
To assure no damage is done to the finish
of the product,
the safest way to remoxe
the adhesixe left flom packaging
tape on
lJyou
need
service
To obtain service, see the Consumer
Services pag> ira the back of this manual.
_.A:eare proud of our service and want you
m be pleased. If for some reason you are
not happy with the service you receive,
here are steps to follow for fllrther help.
For customers
in the USA:
FIRST, contact the people who serviced
vonr appliance.
Explain why you are not
pleased. Ira most cases, this will solve the
problem.
problems
For customers in Canada:
FIRST, contact the people who serviced
your appliance.
Explain why you are not
pleased. Ira most cases, this will solve the
problem.
NEXT, if you are still not pleased, wrim
all the details--including
your phone
nnn/ber
to:
Manager, Consumer
Camco Inc.
Relations
l Facto_ T Lane, Suite 310
Moncton,
N.B. El C 9M3
NEXT, if you are still not pleased, wrim
all the details--including
your phone
number--m:
Manager,
Customer
Relations
GE Appliances
Appliance
Park
I,ouisville, KY 40925
Afio
installation
• The location should
direct sunlight,
heat
is completed
• Promptly inspect your new Monogram
bexerage
center. If it has been damaged,
contact the Installer or Dealer
not be subject
or moistnre.
to
or catch on adjacent cabinet W. Noti_' the
installer if the door makes contact with
cabinetry.
Please
immediately.
• This beverage
center must be properly
lexeled to ensure correct door alignment
and door closure. Contact the Installer
if
the unit is not lexel.
• The unit should
,, Test the door swing. Careflflly open and
close tile door. The door should not rub
be centered
ira the
opening.
The flont face of the door
should be l" forward of adjacent
cabinetr T. Contact the installer if
clearance
is not correct.
Contact
you experience
Yonr
black
the Installer
any of these
or Dealer
if
problems.
bexerage center is shipped with a
toekick on the flont of the unit. For
shipping
purposes,
an optional stainless
steel toekick is secured to the back or on
the inside of the unit. That toekick should
haxe been remoxed
and installed, or gixen
to yon. Keep the unused toekick and other
unused or remoxed parts tbr possible
fllttlre
use.
3
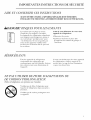
IMPORTANT
READ AND
SAVE THESE
SAFETY INSTRUCTIONS
INS TR UCTIONS
BEFORE
IT IS USED, THE APPLIANCE
MUST BE PROPERLY
AND LOCATED
AS DESCRIBED
IN THIS MANUAL.
RISK
OF CHILD
INSTALLED
ENTRAPMENT
Child entrapment
and sufl%cafion
are not problems
of tile past. Junked
or
ahandoned
refrigeration
products
are
still dangerous...even
if they will sit for
'_ust a few days." If you are getting rid of
your old appliance,'please
follow these
instructions
to help prevent accidents.
Before You Throw Away Your Old
Refrigeration
Product:
• _ke
off the doors.
• Leave the shelves in place so that
children
may not easily climb inside.
REFRIGERANTS
All refrigeration
products
contain
refrigerants,
which under federal law must
be remoxed
prior to product
disposal.
If you, are _oetting_ rid of an old refrigeration
product,
check with tile company handling
the disposal about what to do.
DO NOT USE AN ADAPT_R PLUG OR EXT_TNSION CORD
(Adaptoplug:s
not p_rnitted
in Canada)
Do not use an adapter plug to connect
refrigerator
to a 9-prong outlet.
Do not use
appliance.
an extension
cord
with
this
the
IMPORTANTES
LIRE ET CONSERVER
INSTRUCTIONS
DE SI_CURITI_
CES INSTRUCTIONS
AVANT D'I_TRE
UTILISI_,
L'APPAREIL
MI_NAGER
DOIT I_TRE BIEN
INSTALLI_
ET SE TROUVER
A L'ENDROIT
DI_CRIT
DANS CETTE
MANUEL.
li DANGER
! RIS Q UE S POUR LE S E NFA NT S
Les enfants pris au pi_ge oil morts
d'asphyxie
sont toujours d'actualit_,
Les appareils
de rOflig_rafion
abandonOs
sont toujours aussi dangereux,
m_me si
on n'attend
que "quelquejours"
pour
s'en d_barasser.
Si vous ne gardez pas
votre ancien appareil,
veuillez suivre
les directives ci-dessous afin de pr_venir
les accidents.
Avant de vous d6barasser
appareil
de r6frig6ration
• D_montez
de votre vieux
:
les portes.
• Laissez les clavettes en place afin
d'emp&cher
les enfants de grimper
l'int_rieur.
REFRIGERANTS
Tousles
appareils
de r_Dig_rafion
confiennent
des refligerants
qui,
conform_ment
aux lois f_dOrales, doivent
&tre enlev_s avant toute _liminafion
de
Si xous xous d_barrassez
de xieux appareils
de r_fiig_ration,
x_rifiez, aupr&s de la
soci_t_ qui s'occupe
de leur _limination,
ce que xous dmez faire.
l'appareil.
NE PAS UTILISER
DE CORDON
(Fiches d'adaptation
DE FICHE D'ADAPTATION
PROLONGAT_2UR
non p_'mis_s au Canada)
N'utilisez pas de fiche d'adaptation
pour
1)rancher le r_fl_ig_rateur dans une prise
9 1)roches.
N'utilisez pas de cordon
cet appareil.
prolongateur
mec
OU
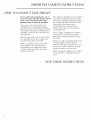
IMPORTANT
HOW
7"0 CONNECT
SAFETY INSTRUCTIONS
EI 2CTRICITY
Do not, under any circumstances,
cut or
remove the third (ground)
prong from the
power cord. For personal
safety, this
appliance
must be properly
grounded.
Tile power cord of this appliance
is
equipped
with a 3-prong
(grounding)
plug which mates with a standard
3-prong
(gronnding)
wall outlet to minimize
the
possibility of electric shock hazard from
this appliance.
Haxe
tile wall outlet
and circuit
by a qualified
electrician
to make
the outlet is properly
grounded.
checked
sure
Where a standard
2-prong wall outlet
is encounmred,
it is your personal
responsibility
and obligation
m have
it replaced
with a properly
grounded
3-prong wall outlet.
Tile appliance
should
into its own individual
always be plugged
electrical outlet
which has a voltage rating that matches
the rating plate. This provides the best
performance
and also prevents
overloading
house wiring circuits
which could cause a fire hazard Dora
overheated
wires.
Nmer unplug all appliance
by pnlling
on tile power cord. Always grip the
ping firmly and pull straight out Dora
the outlet.
Repair or replace immediamly
all power
cords that have become flayed or
otherwise
damaged.
Do not use a cord
that shows cracks or abrasion
damage
along its length or at either end.
When moxing the appliance,
be careflfl
not to roll oxer or damage the power
cord.
SA l/E THESE INSTRUCTIONS
IMPORTANTES
_
_"
"7
4
_
INSTRUCTIONS
_"
7
DE SI CURITI
4
RA CCORDEMEN7 ETJ ;CT'RIQUE
Ne coupez ni retirez en aucun cas la
troisi&me broche (raise _t la terre) de la
fiche du cordon d'aJimentation.
Pour
votre s_curit_, cet appareil doit _tre
correctement
mis _t la terre.
Le cordon d'alimentafion
de cet appareil
est mnni d'nne fiche _ 3 broches
(raise fi
la terre) qui se branche
dans une prise
nnlral ordinaive
fi 3 alv_oles (raise _qla
terre) pour r_duire au minimum
les
risqnes du chocs 6lectriques.
Faites examiner
la prise de courant
et le
circuit par un 6lectricien
qnalifi_ ponr
xons assurer que la prise est correctement
raise fi la terre.
Si la prise mnrale est du type standard
fi 9 aE6oles, il xous irrcombe de la faire
remplacer
par nne prise _ 3 alx6oles
correctement
raise _qla telre.
Le appareil doit toujours &tre branch6
dans sa propre prise de courant,
dont la
tension nominale
est identiqne
_ celle
irrdiqu6e sill" la plaque signal6tiqne.
Cetm pr6caufion
est recommand6e
pour
garantir
un rendement
optimum
et 6viter
nne surcharge
des circuits 6lectviques
de
la r6sidence,
ce qni pourrait
cr6er un
risque d'incendie
par surschanft>
des ills.
Ne d_branchezjamais
l'appareil
era
tirant le cordon d'alimentation.
Saisissez fermement
la fiche du cordon
et tirez droit
pour
la retirer
de la prise.
R6parez oil remplacez
imm_diamment
rout cordon effiloch6 oil endommag6.
N'nfilisez
pas nn cordon fendill6 oil
pr6sentant
des signes d'nsnre.
Lorsque xous d6placez l'appareil
dn tour,
t:aites attention
de ne pas la faire rouler
sill" le cordon d'alimentation
afin de ne
pas 1 endomnmgei.O
CONSER VEZ CES DIPd 2CTIVES
Controls
and Features
B_,verag'e ( er_t_,*"
Tile operating
temperatures
beverage
center range flom
of tile
40°F to 65°E
Do not install tile beverage
cenmr where
tile temperature
will go below 55°F or
above 90°E
The mmperature
display shows tile acutal
temperature
of tile beverage centen Tile
actual temperature
may vat T slightly flom
the set temperature
based on factors such
as door openings,
amount of beverages
and room temperature.
After making
adjustments,
allow 19 m 94 hours for tile
beverage
center to reach tile mmperature
you have set and before making ally
fltrther adjustments.
The factor T setting
is 45°E
To change the temperature
settings,
press the + and - pads until you reach
the desired set temperature.
After several
seconds, tile display will return to tile
actual temperatm_e. The actual temperatm_e
will be displayed while tile unit moves
toward the set temI)erature.
Allow 12 to 24 hours for tile beverag_
center to reach tile temperature
you have
set and before making ally adjustments
to the initial setting.
TEMR CONTROL
WARMER
Child control
lockout
This child control
Interior
lighting and
glass activation
The interior light makes it easy to view
your beverage
labels and enhances
tile
display of your collection.
Tile privacy
glass allows you to view your wine and
bmerages
with a simple press of a button,
without opening
tile door. These two
features work jointly to display your
beverages.
lockout
prevents
unwanted
changes
temperature
settings.
Normal
tbature
to your
operation
When tile door is opened,
tile light will
come on and the door will become cleat.
Special
features
Tile light and glass activation
button,
locamd at tile top of the handle, will
switch the glass flom opaque to cleat and
will, at tile same time, turn on the ligilt.
Tile light will stay on and the glass will
remain clear for one hour fiom the last
time the button was pressed. To turn tile
light off and make the glass opaque,
press
COLDER
'After tile desired temperature
is set the
temperature
can be locked. To lock, press
both the + and - pads at tile same time tbr
five seconds. To unlock, press both + and
- pads t_r five seconds.
the button again. The opaque setting
conceals
the contents
flom view.
Tile light will come on only when the
door is opened or tile button is pressed.
If you choose to activate the light and
door while the door is open, you may
notice that tile word ON is displayed.
If you press tile light button a second
time, while tile door is open the word
OFF will be displayed.
For best viewing, do not store a bottle
on tile top shelf directly under tile light.
Remember
to utrn off the light when it
is no long>r needed.
Controls
and Features
Br,verag'e ( e_lr, r
Glass
shelves
Tempered
glass shelxes in the bmerage
center unit are remoxable
for easy
cleaning
or for storing larger items.
To remove
completely
tile gasket.
slightly. Tilt
angle while
Appearance
a shelf, open tile door
to avoid potential
damage to
Lift up on the back of tile shelf
tile shelf to one side at all
pnlling forward.
gently
may vary
To remove, lift up on the back of the shelf
To replace a shelf, open tile door
complemly
to avoid pomntial
damage
m tile gasket. Tilt the shelf to one side
at all angle and slide toward the back wall,
placing one side onto tile shelf support.
Place tile other side onto tile opposite
shelf support. Ensure rear locking tabs
are engaged.
When installed properly,
tile shelf will not slide forward when
pulled.
Tiltthe shelf at an angle while removing
or replacing
This shelf splits in half and slides under
itself fbr storage of tall items on the shelf
belox_
Step l : Lift the back edge of the flont
of the shelf.
Place in slots when replacing the shelf
Step 1
half
Step 2: Pull slightly forward.
Step 3: Lower the back edge of tile flont
half of the shelf while sliding it underneath
the back half.
Tile entire Quick Space shelf call be
remoxed
and replaced
(see (;lass Shelxes
section).
Step 3
Interior
fan
The
inmrior
fan is located
in the rear wall
of tile beverage
cenmr, and is designed
to
run continuously
to help maintain
the
proper cooling mmperamre.
The inmrior
fail will only tnrn off when the door is
opened.
Controls
and Features
Beverag'e ( enlr, r
Loading
tips and
suggestions
Tile
hold
bottom
two fldl extension
fixe bottles
each and are
necks facing
the rear.
not be loaded
on the
because
closing,
they
may
drawers
loaded
with
Tall bottles
should
1)ottom
drawer
prexent
the
door
fiom
• Do not block the thermistor, located oi1
the right hand side,just
above the top
shelf of the beverage cenmr. Blocking
the thermistor
could impair the air
circu]ation
and temperature
control.
NOTE: This unit is for storing bmerages
only and not intended
for the storage of
perishable
foods.
Removing
.i: ll
Bottom
drawer
arrangement
The bottom fllll extension
drawers pull
out so bottles can conveniently
be added
oi removed.
extension
drazvers
The upper fllll extension
slide can be
removed
for nlagnums
or larger bottles.
To remove:
1. Pull the fllll extension
drawer
Tab (push tab down on right
drawer guide, pull tab up on
left drawer guide)
out to the
STOP position.
2. Push the tab on right drawer guide
down while pulling the tab on left guide
up, and pull the drawer out.
Appearance
may vary
To replace:
1. Push the drawer
the unit.
slide arm back into
2. Pull the small slide sub assembly
completely
forward.
3. Insert
the sides of the drawer
back
into the guides.
4. Push until
the tabs lock into place.
Wood
The fllll extension
drawer
bmerage
center are unfinished
cheriy
wood. During use, oil from hands may
accumulate
and stain the wood.
fronts
drawer
fronts
oi1 the
• The drawer flonts may be stained and
sealed to match adjacent cabinet1T. The
tinmd glass will make the stained wood
appear darker. A true color match can be
seen only when the door is opened.
10
To replace, push drawer slide
arm back into unit
NOTE:
Make
Pull small slide sub assembly
completely forward
sure the tabs on the fllll
extension
drawer guides are flllly engaged
before loading any bottles. Pull the drawers
out all the way to the STOP position and
push back in several times m make sure
locking tabs are properly
engaged.
• Apply the stain and sealer according
to
the manufacturer's
instructions.
To avoid
unpleasant
odor, keep the door open to
ventilate and allow the stain/sealer
to dry
completely
before using the product.
NOTE: Natural wood
grain and color.
may xary slightly
in
Care and Cleaning
Bcverag'e (enter
Unplug
remove
Cleaning
the outside
the beverage center before cleaning.
power at the circuit breaker.
Tile exterior
surfaces
can be washed
with
mild soap arrd water. Rinse thoroughly
with cleat water. Never use abrasive
scouring
powders.
If the unit is in a built-in
location,
Do not use scouring pads, powdered
cleaners, bleach or cleaners containing
bleach because these products can scratch
and damage the finish.
Warranty does not cover damage
improper cleaning methods.
Glass door
Use a glass cleaner or mild soap and water
and a soft cloth to clean the glass door
Do not use any abrasive powders.
due to
Do not place magnets on or near the
glass door. Magnets may cause permanent
damage to the door.
Avoid cleaning cold glass with hot water
because the extreme temperature
difference
may cause it to break. Rough
handling of tempered glass can cause it
to shatter.
Door
gasket
Light bulb
replacement
In
the event
4 a powo
failure
Preparing
to 17_love
Tile vinyl gasket may be cleaned with mild
soap and water, a baking soda solution or
a mild scouring powden Rinse well.
Alter
thin
jelly'
This
arrd
Unplug the beverage center before
replacing
the light bulb. If the unit is
in a built-in location, remove power
at the circuit breaker.
To remove tire light shield, push in the tab
on the left side of the shield and lower it.
If tire power fails, open
irffrequently
as possil)le
the temperature.
Do not store or use gasoline or other
flammable vapors and liquids in the
vicinity of this or any other appliance.
the door as
to maintain
Secure all loose items such as shelves arrd
drawers by taping them securely ira place
to prevent damage.
cleaning
tire door gasket, apply a
layer of paraffin wax or petroleum
to the door gasket at the hinge side.
helps kee I) the gasket fiom sticking
bending
out of sit ape.
Replace
with a 15 watt appliance
bull).
Be sure the beverage
center stays in an
upright position during moving.
11
re and (;leaning
Beverage
Unplug
remove
Cleaning
the inside
the beverage
center
power at the circuit
before cleaning.
breaker.
Unplug the beverage center before cleaning.
If the unit is in a built-in location, remove
power at the drcuit breaker. Use a slightly
damp clofl_ or spong_ when cleaning
around switches, lights or controls.
Use warm water and baking soda solution-about a tablespoon
(15 ml) of baking soda
to a quart (1 liter) of water This both cleans
and neutralizes odors. Thoroughly
rinse and
wipe dry.
Drain
hole
Periodically check the drain hole and
channel tbr any debris. If the drain is
blocked, condensation
will not drain
properly.
To check and clean the drain hole, remoxe
fire bouom two glass shelves. Sweep a damp
cloth along the channel in the back of the
1)ex_rage cenmn Use a finger to sweep away
any del)ris fiom the drain hole.
12
( er_ler
If the unit is in a built-in
location,
Other parts of the beverage center unit-including the door gaskets, rill exmnsion
drawers and glass shelxes---can be cleaned
the same wW.
Avoid cleaning coM gla_s shelves with hot
water because the exlreme temperature
difference may cattse them to break. Handle
glass shelves carefully. Rough handling of
tempered glass can cattse it to shatter.
Appearance
may vary
Drain hole
/
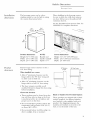
Built-In Dimensions
Beverag'e ( enl_,r
Installation
dimensions
Tile bexerage center can be a Deestanding model or can be buih in using
the cut-out dimensions
below.
When building
in tile bmerage
center,
be snre to allow tBr a flfll door swing so
you haxe flfll access to the pull-out flfll
extension
drawers.
See the Installation
Instructions
(Pub. No.
49-60910) for complete
directions.
347{"
(876mm)
Product
€lg(lr(l_lCgS
Product
dimensions:
NOTE:
Height:
'_A'idth:
Depth:
341/2" (876 ram)
23:%" (603 ram)
z:"/4 (60: ram)
Handle
handle
The bexerage center
l l 0 ° door swing.
When
installed
depth
hinge
clearance
10" Minimum
to Wall
90° DoorSwin(
minimum
,
swing and
clearance
21-5/8"
h
i
l
I
t'
23-5/8"
on tile
swing.
',110° ..
ill,\
90°
4" Minimum
to Wall
location:
These products
may be closed in on the
top and three sides as long as tile flont
is unobstructed
for air circulation
and
proper
t***
on the
side tbr a flfll 110 ° door
the
cl_{/
is 1:%"
Tile door swing is rexersible on all
models. If desired, change the door swing
before installation.
Choose
Height: 34/2-3a
i
r.,, (876-889 ram)
XA'idth: z:'/4
(603 ram) minimum
Depth:
94" (610 ram)
is t:actorv set for a
hinge side for the 90 ° door
to allow racks to slide ont.
t!
and
standoff
dimensions:
in a corner:
• Allow 4" minimum
Allow l0
Cut-out
access
to the door.
Do not install these products
where
temperature
will go below 55°F (1,
or aboxe 90°F (, 9 C).
• Do not install where
direct sunlight,
heat
it will be subject
or moisture.
the
C)
Black
or Stainless
Steel Toekick
Options
These products
are shii)ped with a black
toekick installed. All optional stainless
smel mekick is also supplied with each
product.
For shii)ping purposes,
the
stainless smel toekick is secured
to the
back or on the inside of the unit.
to
13
The Problem
NOF_I([[
opiating
Newer appliances
sound different
features
and use newer technolog
from
T.
older
appliances.
Solver
Beverage
(enter
Modern
appliances
have more
SO_lg_l(lS
Do you hear what I hear?
--
HUMMM...
WHOOSH...
The new high efficiency compressor
may run fasmr and longer than your
old appliance
and you may hear a highpitched
hum or pnlsaung
sounds while
it is operating.
Sometimes
the appliance
runs for an
extended
period, especially when the
doors are opened
Dequently.
You may hear a whooshing
sound when
the doors close. This is due to pressure
equalizing
within the appliance.
These sounds are normal.
WHIB/
You may hear the fans spinning
at
high speeds. This hai)pens when the
appliance
is first plugged
in, when the
door is opened flequently
or when
larg_ amounts
of beverages
are added
to the appliance.
The fans hel I) maintain
desired temperatures.
If the door is open for over 3 minums,
you may hear a fan come on in order
to cool the appliance.
The fans change speeds in order to
provide optimal cooling and energy saving:s.
CLICKS, POPS,
CRACKS
and CHIRPS
You may hear cracking or popping sounds
when the appliance is first i)lugged in.
This happens as the appliance cools to
rise correct temperature.
14
WATERSOUNDS
6
The flow of refligerant
througt_ the
appliance
cooling coils may make a
gurgling noise like boiling water.
Expansion
and contraction
of cooling
coils during and after defrost can cause
cracking or popping
sounds.
A wamr dripping
noise may occur as
water flom the evaporator
flows into the
drain pan.
The electronic
control board may cause
a clicking sound when relays activate to
control appliance
components.
Closing the door may cause a gurgling
sound due to pressure
equalization.
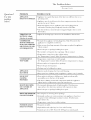
The Problem
Solver
Beverage
Questions
Use this
problem
solver, t
?
PROBLEM
APPLIANCE
DOES NOT
OPERATE
POSSIBLE
CAUSE
• Appliance
operating
is so quiet
noise.
that
most
• Appliance
mav be in defl'ost
operate
fin" up to 2 hours.
(artier
of the time vou will hear
cycle when
compressor
low or no
motor
does not
• If interior
light is not on, al)l)liance
inav not be plugged
in at
wall outlet. Push the plug comi)letely
into the wall outlet.
• The fllse is blown/circuit
the breaker.
VIBRATION
OR
• A(!iust
breaker
is trii)ped.
the lexeliw*_ legs, as shown
Replace
in the Installation
fllse or reset
Instructions.
RATTLING
(Sfight
vibration
is normal.)
COMPRESSOR
MOTOR OPERATES
• Normal when appliance
appliance
to completely
FOR LONG PERIODS
OR CYCLES ON AND
• Often occm_ when large amounts
This is normal.
is first plugged
cool down.
in. X4'ait 24 horn's for the
of beverages
are placed
in appliance.
OFF FREQUENTLY
• Door
• Hot
COMPARTMENT
TOO
WARM
APPLIANCE
HAS ODOR
DOOR
NOT
CLOSING
PROPERLY
MOISTURE
FORMS
ON OUTSIDE
OF
APPLIANCE
FROST OR MOISTURE
COLLECTS
INSIDE
let* open
weather
holding
or fl'equent
door
door
open.
openings.
This is normal.
• Temperatm'e
control set at the coldest setting.
See Temperature
Control.
Allow 24 horn's tot temperature
to change.
• Temperatm'e
control
not set cold enough.
See Telnperature
(_ontrol. Allow 24 hours
to change.
• X_'arln weather
or fl'equent
• Door
fi)r long
lett open
door
time.
may be holding
door
• Interior
needs
See Care
• Kee I) open
cleaning.
box
tor telnl)erature
ol)ei_ings.
• Package
of baking
soda
open.
and Cleaning.
in appliance;
replace
• Door gasket is sticking or folding over. Apply
or paraffin
wax to the tace of the gasket.
eve_ T 3 months.
petroleum
jelly
• The door is hitting an internal
component
inside the appliance.
At!just interior
components
to prevent
interference.
• Not Ilnllstlal
wipe surtace
• Door
during periods
dry; otherwise,
let* open
• Too frequent
or package
or too hmg
of high humidity:
If bothersome,
moisture
will ewq)orate
in time.
holding
door
• In humid weather, air carries
is opened.
Unit will dissipate
wipe surtace dry.
• Temperatm'e
INTERIOR
LIGHT
DOES NOT WORK
or package
• No power
• I,ight
open.
openings.
moisture
moisture
set at coldest
into appliance
when door
in time. If bothersome,
setting.
at outlet.
bulb
• Controls
control
door
needs
replacing.
are set to OFE Press
See Care and
ON/OFF
Cleaning.
pad on control
panel.
15
The Problem
Solver
Beverag'e
Questions
Use this
problem
solver, t
?
( e*_t_,r
PROBLEM
POSSIBLE
HOT AIR FROM
BOTTOM
OF
APPLIANCE
• Normal air flow cools the motor. In the refl'igeration
process,
it is normal that heat be expelled
in the area under the appliance.
Some floor coverings are sensitive and will even discolor
at these
sati _ and normal
temperatures.
APPLIANCE
• Adaptive deti'ost keeps compressor
running
during door openings.
This is normal.
The appliance
will cycle off alter the door remains
closed ti)r two hours.
NEVER SHUTS OFF
BUT TEMPERATURES
ARE OK
• NoI'II/al
TEMPERATURE
WILL NOT ADJUST
CAUSE
operation
in
extrei/le
teil/l)erattlres.
• Temperature
may be in lockout
mode.
5 seconds to unlock the temperature.
Press both
+ and - pads ti)r
• Thermistor
may be blocked,
which can atti_ct the overall temperature.
The thermistor
is located on the right hand side just above the
top shelf.
LIGHT
REMAINS ON
AND DOOR IS CLEAR
WHILE DOOR IS
• Normal operation.
The light and door can be actiw_ted by pressing
the button at the top of the handle. The light will remain on fi)r one
hour. Press the button to turn the door to opaque and turn the light oIt.
CLOSED
OPAQUE
GLASS
BECOMES
CLI_R
WHEN THE DOOR
IS OPEN
16
Normal
operation.
The
light
and
glass
features
times.
See h_lerior l_t_'hli_g a_d g'lass aclivalio_
Fealure,s section
fi)r more
details.
workjointl)
in
( o_lrol, s a_d
at all
_Aqne or Beverage
Storage
and Handling
Notes
Be_e*'ag'e ( e*_t_,*"
17
_Aqne or Beverage
Storage
and Handling
Be_e*'ag'e ( e*_t_,*"
18
Notes
Consuiner Services
Beverage
(an let
With the purchase
of your new Monogram
appliance,
receive the
assurance
that if you ever need information
or assistance from GE,
we will be there. All you have to do is call---toll-free,
t
GE Answer
Center ®
In the USA:
800.626.2000
Whatever
vour question
about any Monogram
major appliance,
GE Answer Cente_ _'_
information
service is awfilable to hell). Yore" call--and
yore" question--will
be answered
promptly
and com'teouslv.
And wm can call any time. GE Answer Cente_ _'_service is open
24 hom_ a da> 7 days a week.
OR
Visit ottr Website
In Canada,
In-Home
Service
Repair
In the USA:
800. 444.1845
call 1.888.880.3030.
AGE
consumer
that's
convenient
w)u
service
9:00
a.m.
inside
at: www.monogrmn.com
setwice
today
or
to 2:00
and
protessional
fin" win.
will
or
at vom"
Saturdays).
most
provide
expert
GE Consumer
tomorro_,
p.m.
out--so
Manv
can
convenience
be handled
setwice,
scheduled
company-ol)erated
(7:00
Ore" tactory-trained
repairs
repair
Service
a.m.
to 7:00
technicians
in just
one
at a time
locations
know
p.m.
otter
weekdays,
yotu"
appliance
visit.
In Canada:
1.888.880.3030
For Customers
GE offers
Braille
controls
for a variety
With Special
Needs...
brochure
to assist in I)lanning,
with limited
mobility.
In the USA:
800.626.2000
TDD
Consumers
(800.833.4322)
s_loN
Service
Contracts
You
can
impaired
heating
or speech
teletypewriter
to request
kitchen
*sho
ma)
call
or
set\ice.
infi_rmation
and
for
have
a
persons
access
to a
800.TDD.(;EAC
_A
have
warranty
ln the USA:
800.626.2224
*sith
or a conxentional
of GE appliances,
a barrie_=fl'ee
the
secm'e
expires.
teeling
Pro'chase
receive
a substantial
service
at today's
that
a GE
discotmt.
GE Consumer
contract
while
Setwice
wmr
will
warranty
_]th
a multil)le-year
contract,
their
own
can
still
be
is still
you're
there
in ettect
assm'ed
after
wmr
and
vou'll
of fllture
prices.
In Canada:
1.888.880.3030
Par_ and
Accesso_es
Individuals
directly
all GE
ln the USA:
800.626.2002
are
User
In Canada:
1.888.880.3030
qualified
to their
Genuine
to service
home.
Renewal
The
GE parts
Parts
are
applimaces
s):stem
flfllv
provides
warranted.
have
access
VISA,
parts
or accessories
to over
47,000
MasterCard
and
sent
parts...and
Discover
cards
accepted.
maintenance
instructions
performed
by any user.
persmmel.
Caution
must
Other
contained
servicing
be exercised,
in this
generally
since
mmmal
cover
should
improper
procedures
be referred
servicing
may
intended
to qualified
cause
mlsafe
to be
service
operation.
19
Warranty
Beverage
YOUR
MONOGRAM
BEVERAGE
CENTER
(enter
WARRANTY
Staple sales slip or canceled check here. Proof of original
date is needed to obtain service under warranty.
WHATIS
COVERED
P)om the Date
of the O'_¢inal
Purchase
FULL
ONE-YEAR
purchase
WARRANTY
For one year from (late of original i)urchase, we will proxide, free of charge, parts and serxice
labor in )our home to repair or replace any part q/lhe beverage _enler that tails because of a
manufacturing
detect.
FULL FIVE-YEAR WARRANTY
For fi;e years from date of original i)urchase, we will proxide, free of charge, parts and serxice
labor in xotu" home to repair/it" replace any pat7 o./tt_e,sealedr@'i_'eralin_':
,
, ,.,system(the compressor,
condenser, e;aporator
and all connecting tubing) that tails because of a manulhctm'ing
defect.
This warran U is extended
to the original
i)m'chaser
and any succeeding
owner for products
i)urchased
fin" ordinary
home use in the 48 mainland
states, Hawaii, Washington,
D.C. or
Canada.
In Alaska the warranty
is the same except that it is I,IMITED
because wm must pay to
ship the product
to the setwice shop or tot the setMce technician's
travel costs to wmr home.
All warranty
Custon_er
service
will
Care '_servicers
Should
vour
800.444.1845.
WHAT
IS NOT
COVERED
• Service
al)pliance
need
service,
during
In Canada:
888.880.3030.
trips
to use
the
be provided
by our Factoi
during
nornml
working
to your
home
to teach
you
y Service
hours.
warranty
how
fuses
or resetting
of
caused
God.
• Failure of the product
other than its intended
commercially.
if it is used for
purpose or used
of
If you
your
• Damage
to the product
fire, floods
or acts of
• Replacement
period
for
by accident,
have
• Loss
of
states/i)rovinces
damages,
so the
above
do
not
allow
the
exchtsion
or exchtsion
specific
legal rights,
and you inay also have
to i)rovince.
To know what w)ur legal rights
state/i)rovincial
consun_er
attairs
or
by possible
bulbs.
lilnitation
ottice
or
contact
axe responsible
electrical,
plumbing
facilities.
to spoilage
(in
the
USA
tufty).
• Damage
Some
due
call
problem,
You
adequate
cmmecting
• Incidental
the light
or installer.
food
USA
delivery
an installation
providing
other
authorized
in the
installation,
dealer
and
or bv our
or beyond,
• Improper
maintenance.
product.
• Replacement
of house
circuit
breakers.
(_enters
not
other
rights
are in wmr
or wmr
caused
or litnitation
may
state's
consequential
defects
apply
after
damage
this
This
fl'Oln
caused
applim_ce.
delivery.
of incidental
to you.
which
wu'v
state/i)rovince,
Attorney
with
lit" consequet_tial
warranty
state
consult
gives
you
to state/i)rovince
wmr local or
General.
WaJcrantor in USA: General Electric Compm_y,
Louisville, KY 40225
Waxrantor
197D5891PO08
49-60311
in Canada:
Cmnco
Inc.
Monogram:
GEConsumer & Industrial
11-04 J R
Louisville, KY 40225
Printed in Slovenia
©2004 GE Company