1
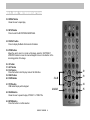
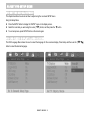
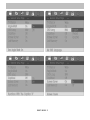
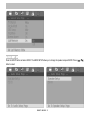
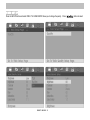
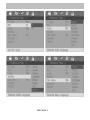
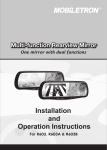
IMPORTANT NOTICE z z z z z z z z Before operating the unit, please read these instructions carefully. Retain the manual for future reference. You are advised to follow the instructions carefully when operating the unit. Do not use any chemical solvent, clean agent or corrosive detergent to clean away dirt of the surface of the screen. By doing so, you may cause irreversible damage to the surface of the TFT screen. To clean off dirt or fingerprints, we recommend the use of a soft damp lens cleaning cloth. Using spare parts from another manufacturer may caused permanent damage to the unit. When operating the display unit, avoid touching or pressing the LCD glass panel. Excessive force may cause irreparable damage to the LCD screen. It is unlawful in most jurisdictions for a person to drive a motor vehicle which is equipped with a screen that is located in the motor vehicle at any point forward of the back of the driver’s seat, or that is visible, directly or indirectly, to the driver while operating the vehicle. In the interesting of safety, this monitor should never be installed where it will be visible, directly or indirectly, by the operator of the motor vehicle. Lock the LCD screen in the fully closed position when not in use. z Remember to leave the dome light switch in the off or auto positions when the vehicle is unattended, as the dome lights can drain the vehicle’s battery. SDM107 / SDM185 1 MAIN FEATURES z z z z z z z z z FLIP DOWN 10.2” / 8.5” 16:9 WIDE SCREEN TFT-LCD MONITOR BUILT IN 1/4 DIN Full Function DVD Player BULIT IN USB 1.1 PORT BUILT IN WIRELESS HEADPHONE IR TRANSMITTER 1 AUDIO/VIDEO INPUT 1 AUDIO/VIDEO OUTPUT FULL FUNCTION WIRELESS REMOTE CONTROL (OSD) ON SCREEN DISPLAY FOR CONTROL OF PICTURE QUALITY AND FUNCTIONS DOME LIGHTS MAIN SPECIFICATIONS DISPLAY: RESOLUTION: PIXEL PITCH(mm): VIEWING ANGLE: BRIGHTNESS: CONTRAST RATIO: POWER SOURCE: POWER CONSUMPTION: OPERATING TEMPERATURE: STORAGE TEMPERATURE: DIMENSIONS (W x D x H): NET WEIGHT: SDM107 10.2” wide screen TFT LCD active matrix 800RGB(W) X 480(H) 0.0925(W) X 0.2775(H) Left/Right 130°, Up/Down 45°/65° 250 NITS 300:1 DC 12V ( NEGATIVE GROUND) 20W ( Max.) 0к~60к (32л~140л) -20к~70к(-4л~158л) SDM185 8.5” wide screen TFT LCD active matrix 800RGB(W) X 480(H) 0.13(W) X 0.45(H) Left/Right 130°, Up/Down 45°/65° 250 NITS 300:1 DC 12V ( NEGATIVE GROUND) 20W ( Max.) 0к~60к (32л~140л) -20к~70к(-4л~158л) 335x280x45 mm 3Kgs. (6.6lbs) 290x280x45 mm 1.9Kgs. (4.2lbs) SDM107 / SDM185 2 DVD PLAYER z Supports DVD, SVCD, VCD, AUDIO CD, and MP3 format. MEDIA PLAYER z z z z Support USB 1.1 Drive. Equipped with USB Socket. Plays MP3 music. Applies to NTSC or PAL system. STANDARD ACCESSORIES PACKAGE CONTENTS z z z Remote control (CR2025 x 1 Lithium Battery) Operating manual Power connection cable SDM107 / SDM185 3 CONTROLS & CONNECTORS z z z z z z POWER button: MENU button: UP/DOWN buttons: IR Sensor: Dome lights: Dome lights switch: z z z z USB port: IR transmitter: DVD player: A/V input jack: Press to turn the monitor on/off. Press menu button to active OSD feature and select OSD features. Adjustment buttons. IR sensor for remote control. Provide additional interior illumination. Press to loop OFF / ON / DOOR (SDM107). Slide from front to rear OFF / AUTO / ON (SDM185). Plays USB 1.1 Drive. Transmit audio to wireless headphones. Plays DVD, SVCD, VCD, AUDIO CD and MP3 format. Connecting to your Game port or any A/V device. USB port DVD player A/V input jack IR transmitter Dome lights Dome lights switch (SDM107) Buttons Panel lock Eject Key SDM107 / SDM185 4 MONITOR FUNCTION DESCRIPTIONS 1. 2. 3. 4. 7 MUTE button Press to mute the audio, press the button again to restore sound to the previous audio level. 8 9 MENU button Press this button to active the OSD menu screen. 1 2 3 MENU Adjust Up button MENU Adjust Down button Use this button to change the value of the menu option. 4 5 6 5. 6. VOLUME UP button VOLUME DOWN button Use this button to raise the volume level of the audio output. 7. SOURCE button Press to enter the GAME input mode. 8. POWER button Press this button to turn on the monitor, press again to turn off the monitor. 9. DVD button Press DVD button to play DVD or change to USB Mode. SDM107 / SDM185 5 DVD FUNCTION DESCRIPTONS 10. NUMBER buttons Allows the user to enter the numbers 0 to 10 for selection of CD track, DVD chapters, and password setting. 11. PBC button Allows the user to select the subtitle when playing the VCD 2.0 version only. 12. TITLE button Some DVDs come with title selection. For such case, allows the user to select desired title. 13. SUBTITLE button Allows the user to select a subtitle display in various languages. 14. BWD button Allows the user to search in a backward direction. 15. UP button 16. FWD button Allows the user to search in a forward direction. 10 11 12 13 14 15 16 17. LEFT button 17 18 19 18. PLAY button Press this button to active the play mode while a disc is loaded into the disc compartment. 19. RIGHT button 20 21 22 20. PREVIOUS button Allows the user to return to the previous chapter or track. 21. DOWN button 22. NEXT button Allows the user to skip to the next chapter or track. SDM107 / SDM185 6 26 23. STOP button DVD disc play will be stopped. 24. PAUSE button Allows the user to pause the playback. 25. ENTER button Press this button to confirm selection. 26. EJECT button Press this button to eject the DVD disc. 27. A-B button Allows the user to repeat play of a DVD or CD from point A to point B. Press button once to set point A once again to set point B. 28. REPEAT button Allows the user to repeat play various positions of a DVD, CD or MP3. (Track/Chapter/All). 27 29. SET UP button Allows the user to select the DVD player’s options ( Display, OSD language, Defaults, Parental Control, Password, Exit Setup). 28 29 30. DISPLAY button Press to display DVD disc current information. 31. ZOOM button Allows the user to zoom in or zoom out the image, press the “LEFT/RIGHT/UP/DOWN” buttons to move the zoomed image to move in the direction of the remaining portion of the image. SDM107 / SDM185 7 30 23 24 25 31 USB 1.1 DRIVE FUNCTIONS DESCRIPTIONS 32. REPEAT button Allows the user to repeat play. 33. SETUP button Press to enter the SETUP MENU MAIN PAGE. 34. DISPLAY button Press to display the Media Card current information. 35. ZOOM button Allows the user to zoom in or zoom out the image, press the “LEFT/RIGHT UP/DOWN” buttons to move the zoomed imaged to move in the direction of the remaining portion of the image. 36. UP button 37. LEFT button 38. PLAY button Press this button to start the play mode of the USB drive. 39. RIGHT button 40. DOWN button 32 36~40 33 34 41. STOP button USB media file play will be stopped. 41 42 43 42. PAUSE button Allows the user to pause the play of “MUSIC” or “VIDEO” file. 43. ENTER button Press this button to confirm selection. SDM107 / SDM185 8 35 MONITOR OPERATION Slide the screen release lock forward will unlock the LCD screen and the LCD screen will drop down slightly. Pivot the screen downward until a comfortable viewing angle is reached. z z z z z Press the POWER button on the unit or remote to turn on the monitor. Press the SOURCE button to select viewing source. Press the MENU button to active the OSD menu shown on the LCD screen. Press the MENU button again to select the adjustment item, press the “Ÿ” or “ź” button to enter the sub menu and adjust function/value. “FM PRESET”: press the “Ÿ” button to select M1 ~ M6; press “ź” button 1 sec. to change present FM channel or press “ź” button more than 2 sec. to cover and save a new FM channel. SDM107 / SDM185 9 OVERHEAD DOME LIGHTS The lights are controlled by a bush button switch. Push the button to change “ON” Æ “DOOR” Æ “OFF” function by loop (SDM107) or slide the button to change “OFF” / “AUTO” / “ON” (SDM185). The “ON” function will turn the lights on. The “OFF” position will prevent the lights from turning on at all times, and the “DOOR” or “AUTO” position will allow the lights to turn on and off with the vehicle’s interior lighting. Do not leave the vehicle unattended with the dome light switch in the “ON” position, as this could result in a discharged battery. DVD OPERATING The DVD player has the ability to play DVD, VCD, Audio CD and MP3 audio. Make sure you read this section completely before using the DVD section. REGIONAL CODING Both the DVD player and DVD disc are coded by region. These regional codes must match in order for the disc to play. If the codes don’t match, the disc won’t play. This DVD player will only region 1 DVD disc. TO PLAY A DVD OR VCD z z z z z Press the DVD button on the remote control. Insert DVD or VCD disc (Label Up), the disc will automatically load. Press the “PLAY” button on the remote to play selected title. NOTE: The On Screen Display will show “INVALID DISC” if the disc region code does not correspond with the unit setting. Press the “PAUSE” button to pause, press the “PLAY’ button to resume play. Press the “STOP” button to stop play. SDM107 / SDM185 10 ADJUST DVD SETUP MENU DVD SETTING AND ADJUSTMENT ϧ ϰ This chapter describes how to set and how to adjust using the on-screen SETUP menu. Using the Setup Menu: z Press the SETUP button to display the “SETUP” menu on the display screen. z Select the main item you want using the cursor ( ) button, and then press the ϰ button. z To exit setup menu, press SETUP button on the remote again. The OSD Language Menu allows the user to select the language for the on-screen display. Press Setup and then use the ( button to select the desired language. SDM107 / SDM185 11 ϧ ϰ OSD (ON-SCREEN DISPLAY) LANGUAGE MENU ϰϧ) SDM107 / SDM185 12 Press the SETUP button and select AUDIO. The AUDIO SETUP allows you to change the speaker setup and HDCD. Press ( button to select. SDM107 / SDM185 13 ϧ ϰ AUDIO SET UP ϰϧ) SDM107 / SDM185 14 Press the SETUP button and select VIDEO. The VIDEO SETUP allows you to change the quality. SDM107 / SDM185 15 Press ( ϧ ϰ VIDEO SET UP ϰϧ ) button to select. SDM107 / SDM185 16 PREFERENCE SET UP ϧ ϰ THIS SETTING HAVE TO STOP PLAYING DISC. Press the SETUP button and select Preference. The Preference SETUP allows you to change the quality. Press ( ϰϧ ) button to select. SDM107 / SDM185 17 SDM107 / SDM185 18 NEW PASSWORD SET UP (PARENTAL CONTROL PASSWORD) ϰ Press the SETUP button and select PASSWORD. The PASSWORD SETUP allows you to change the parental control password. Press and then press number and then Enter to implement it. SDM107 / SDM185 19 SDM107 / SDM185 20 AUDIO / MP3 CDs PLAYING AUDIO CDs When playing an audio CD, It displays the current track and time for that track playing. USING THE REPEAT FEATURE The default mode for the Repeat feature is OFF. Pressing REPEAT consecutively changes the repeat options: REP-ONE-repeats the track that is playing. REP-ALL-repeats the disc that is playing. REPEAT OFF. The repeat option changes every time REPEAT is pressed. When the track/tracks has/have ended, the selected repeat option loops repeatedly unit you turn it off. PLAYING MP3 DISCS MP3 is a format for storing digital audio. An audio CD-quality song can be compressed into the MP3 format with very little loss of quality, while taking up much less space. CD-R discs that have been encoded in MP3 format can be played on your DVD player. Press the DISPLAY button on the remote to DISPLAY Banner. The options below show you what happens when you press the DISPLAY button. SDM107 / SDM185 21 SELECTING FOLDERS AND SONGS When an MP3 disc is inserted in the player, the monitor appears automatically. You can change folders and songs through screen. The DVD player plays the songs in order they were burned on to the disc. If a disc is playing, press STOP. Press the up or down arrow button to go through the folder list on the right side of the screen. Once the folder you want is highlighted, press Enter (the folder list shifts to the left side of the songs in the folder appear on the right). Press the up or down arrow button to go through the song list and highlight the song you want. Press Enter to begin playback of the highlighted song. SKIPPING SONG Use the next ( ) button on the remote control to move to the next song. Use the Previous ( currently playing song. Press the ( ) button to move the beginning of the )button 2 times to move to the previous song. USING THE REPEAT FEATURE The default mode for the Repeat feature is OFF. Pressing REPEAT consecutively changes the repeat options: Repeat ONE - repeats the song that is playing. Repeat Folder - repeats the folder that is playing. Folder - repeats all folders that is playing. Shuffle. Random. SDM107 / SDM185 22 USB 1.1 DRIVE OPERATION USB Socket z z z z A/V Input Jacks Insert a USB 1.1 Drive into the proper socket as shown on the above figure. Use caution when inserting Digital Media Card into the port. Press the DVD button on the remote control. CAUTION: USB Socket can be damaged if the wrong side is inserted or it is force in. It will automatic reading files from USB. Press the “ϧ” or “ϰ” buttons to highlight the source, press the “PLAY” button to start playing your selection. MP3 Music z Highlight the MUSIC mode and press the “PLAY” button to start playing your music. z The MUSIC LIBEARY menu will display on the screen. z Press the “DISPLAY”, track information will be shown on the screen. Press the “DISPLAY” button again to go back to the MUSIC LIBEARY menu. z Press the “REPEAT” button to change music repeat mode. SDM107 / SDM185 23 OTHER INFORMATION A/V INPUT z z Connect your Game A/V output to the A/V input jacks. Press the “SOURCE” button on the remote control to select the GAME mode. WIRELESS IR HEADPHONE TRANSMITTER This monitor includes a built in Wireless IR transmitter, for use with Myron & Davis wireless headphones (Part number: AE51). The volume can be adjusted using the controls on screen. The wireless headphones must be used within a line of sight from the transmitter, as infrared transmissions like visible light travel only in a straight line. FM MODULATOR The audio sound forms your vehicle’s sound system by tuning your vehicle’s radio to the selected FM frequency. This feature is accessed by using the remote control enter the “Fm Mod.” mode to set the selected frequency. (full channels to select). (Channels from 88.1 to 107.9) A/V OUTPUT This monitor provides a video/audio output for an optional monitor (such as headrest monitors). This output will provide a video/audio signal that duplicates the signal displayed by this monitor to an optional monitor. SDM107 / SDM185 24 LIMITED ONE-YEAR WARRANTY (NON-TRANSFERABLE) Myron & Davis warrants to the original purchaser a non- transferable warranty to repair or replace, free of charge, the video product(s) in materials and workmanship under normal use and conditions for a period of one (1) year from date of purchase. Limited warranty excludes: z Labor cost for removal, reinstallation, and trouble shooting of the video product(s). z Damage to DVD discs, CDs, videotapes, accessories, or vehicle electrical parts. z Damage due to improper installation, modification of existing equipment, abuse, neglect, or improper service. z Damage due to accidents, fire, theft or vandalism. TROUBLE SHOOTING PROBLEM SOLUTION PROBLEM Poor in vehicle radio reception Check the condition of the vehicle’s radio antenna. Verify that the antenna is fully raised. Try change the FM modulators frequency from the OSD menu. No sound or distorted sound IR sensor inoperative Verify that the batteries in the remote are fresh Verify that the remote sensor eye is not obstructed. Can’t advance through a movie Disc won’t play Insert a disc with the label side facing up. Check the type of disc you put into disc tray. This DVD only plays DVD’s, audio CDs and MP3s. Both the unit and the disc are coded by region. If the regional codes doesn’t match, the disc can’t be played. This DVD play is Region Number 1 The disc is dirty. Clean it. Condensation has formed. Allow player to dry out. Invalid key appears on screen Play starts, but then stops immediately SOLUTION Make sure your DVD player is connected properly. Make sure all cables are securely inserted into the appropriate jacks. If you are using the IR headphones, make sure you turn on the IR power. Make sure Modulator‘s frequency has been proper selected. You can’t advance through the opening credits and warning information that appears at the beginning of movies because the disc is programmed to prohibit that action. The feature or action can’t be completed at this time because: 1. The disc’s software restricts it. 2. The disc’s software doesn’t support the feature. 3. The feature is not available at the moment. 4. You’ve requested a title or chapter number that is out of range. SDM107 / SDM185 25 PROBLEM SOLUTION Picture is distorted The disc might be damaged. Try another disc. It is normal for some distortion to appear during forward or reverse scan. No forward or reverse scan Some discs have sections that prohibit rapid scanning or title and chapter skip. If you try to skip through the warning information and credits at the beginning of a movie, you won’t be able to. This part of the movie is often programmed to prohibit skipping through it. The Equipment has been tested and found to comply with the limits for a Class B Digital Device, pursuant to part 15 of the FCC Rules. These limits are designed to provide reasonable protection against harmful interference in a residential installation. This equipment generates, uses and can radiate radio frequency energy and, if not installed and used in accordance with the instruction, may cause harmful interference to radio or television reception, which can be determined by turning the equipment off and on, the user is encouraged to try to correct the interference by one or more of the following measures: -- Reorient or relocate the receiving antenna. -- Increase the separation between the equipment and receiver. -- Connect the equipment into an outlet on a circuit different from that to which the receiver is connected. -- Consult the dealer or an experienced radio/TV technician for help. The user should not modify or change this equipment without written approval from CENEC CORP. Modification could void authority to use this equipment. SDM107 / SDM185 26 NOTES SDM107 / SDM185 27 NOTES SDM107 / SDM185 28 NOTES SDM107 / SDM185 29 NOTES SDM107 / SDM185 30 NOTES SDM107 / SDM185 31 NOTES SDM107 / SDM185 32