1
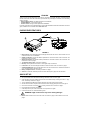
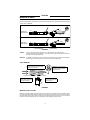
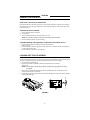
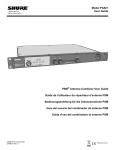
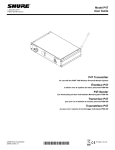
Model P4R
User Guide
P4R Receiver
for use with the
PSM®
400 Wireless Personal Monitor System
Récepteur P4R
à utiliser avec le système de retour personnel PSM 400
P4R-Empfänger
Zur Verwendung mit dem individuellen Monitorsystem PSM 400
Receptor P4R
para uso con el sistema de monitor personal PSM 400
Ricevitore P4R
da usare con il sistema di monitoraggio individuale PSM 400
©2008 Shure Incorporated
27D8711 (Rev. 6) Patent Des. 442,938
Printed in U.S.A.
ENGLISH
ENGLISH.................................................................................................................................................... 2
FRANÇAIS ................................................................................................................................................. 8
DEUTSCH ................................................................................................................................................15
ESPAÑOL ................................................................................................................................................22
ITALIANO .................................................................................................................................................28
DECLARATION OF CONFORMITY ........................................................................................................35
WARNING!
USING THIS SYSTEM AT EXCESSIVE VOLUMES CAN CAUSE
PERMANENT HEARING DAMAGE.
USE AS LOW A VOLUME AS POSSIBLE.
In order to use this system safely, avoid prolonged listening at excessive sound pressure levels. Please
use the following guidelines established by the Occupational Safety Health Administration (OSHA) on
maximum time exposure to sound pressure levels before hearing damage occurs.
90 dB SPL at 8 hours
95 dB SPL at 4 hours
100 dB SPL at 2 hours
105 dB SPL at 1 hour
110 dB SPL at 1/2 hour
115 dB SPL at 15 minutes
120 dB SPL - avoid or damage may occur
It is difficult to measure the exact Sound Pressure Levels (SPL) present at the eardrum in live applications.
In addition to the volume setting on the PSM, the SPL in the ear is affected by ambient sound from floor
wedges or other devices. The isolation provided by the fit of quality earphones is also an important factor
in determining the SPL in the ear.
Here are some general tips to follow in the use of this product to protect your ears
from damage:
1. Turn up the volume control only far enough to hear properly.
2. Ringing in the ears may indicate that the gain levels are too high. Try lowering the
gain levels.
3. Have your ears checked by an audiologist on a regular basis. If you experience wax buildup in your
ears, stop using the system until an audiologist has examined your ears.
4. Wipe the earphones with an antiseptic before and after use to avoid infections. Stop using the earphones if they are causing great discomfort or infection.
This symbol indicates that there are important operating and maintenance instructions in the literature
accompanying this unit.
2
ENGLISH
Thank you for buying the P4R Receiver. The P4R is a component in the PSM® 400 family of wireless personal
monitors. When used with a P4T Transmitter, it provides the many advantages of a wireless, in-ear monitoring
system, including:
• Improved Sound Quality - high fidelity without the risk of feedback,
• Increased Mobility - your mix moves with you,
• Personal Control - through volume adjustment and MixMode®.
For further information on the PSM 400 system, see the PSM 400 Wireless Personal Performance Pack user's
guide, available on the world wide web at www.shure.com.
P4R RECEIVER FEATURES
9
1
7
P4R TOP PANEL
8
FREQ
MIX
EQ
LIM
6
4
5
3
2
FIGURE 1
1.
2.
3.
4.
5.
6.
7.
8.
9.
Balance Knob: This thumbwheel adjusts the left/right balance when the unit is in stereo and the mix 1/mix
2 balance when the unit is in MixMode.
SCROLL Pushbutton: Use with the SELECT pushbutton to control the functions in the LCD screen. See
Pushbutton Controls on page 6.
SELECT Pushbutton: Use with the SCROLL pushbutton to control the functions in the LCD screen. See
Pushbutton Controls on page 6.
1/8" Earphone Output Jack: Connects to earphones.
Belt Clip: Securely attaches the receiver to a belt, guitar strap or waist band.
LCD Screen: The LCD screen displays the status of various functions. See LCD Screen on page 4.
ON/OFF/VOLUME Knob: Turn clockwise past click to turn ON. Continue to turn clockwise to increase volume, counterclockwise to decrease volume.
Battery Compartment Door: See Battery Installation on page 4.
Antenna: An attached, flexible whip antenna receives radio frequency (RF) from the transmitter.
QUICK SET UP
1.
2.
3.
4.
Set up and activate a P4T transmitter according to directions in the P4T user's guide.
Open the battery door of the P4R receiver and insert a 9V alkaline battery, following the correct +/- alignment. See Battery Installation on page 4.
Turn the ON/OFF/VOLUME knob clockwise past click (ON). Keep volume set at minimum.
Set the P4R to the same reception channel as the P4T. See Changing Reception Channel on page 6.
5.
Check the LCD screen to see if RF(
6.
7.
8.
Plug earphones into earphone output jack.
Insert earphones into your ears as instructed in the earphone's user guide.
Increase the volume to a comfortable listening level.
) is being received. See LCD Screen on page 4.
WARNING: High volume levels may cause hearing damage!
9.
Set the desired functions in the LCD screen. See LCD Screen on page 4, and Pushbutton Controls on
page 6.
3
ENGLISH
BATTERY INSTALLATION
1.
2.
3.
Open the battery compartment door by pushing down and sliding towards
antenna.
Insert a fresh 9V alkaline battery with the +/– terminals properly positioned (see
Figure 2).
Close the battery compartment door.
NOTE: If battery compartment door will not close, the battery is
not properly inserted.
FIGURE 2
LCD SCREEN
The LCD screen on the top panel displays the status
of various functions. The status of these functions
can be changed using the SCROLL and SELECT
pushbuttons (see Pushbutton Controls on page 6).
2.
Battery Life Meter: Indicates the approximate
amount of voltage left in the battery. These voltages translate to time as follows:
HIGH: 4-8 hours of operation.
MEDIUM: 1-4 hours of operation.
LOW: less than 1 hours of operation.
NOTE: If no bars are present within
the battery life gauge,
change the battery
immediately. Battery life
depends on many
variables, including battery
type (brand), earphones
FIGURE 3
1.
RF: Indicates the P4R receiver is receiving a
transmission. Always check for RF reception
prior to inserting earphones into ears.
WARNING! Turning the Limiter OFF defeats protection against
hazardous sound levels!
4
ENGLISH
MIXMODE/STEREO
The P4R receiver receives two signals (1/L and 2/R) from the P4T transmitter. The P4R processes these signals
in either stereo or MixMode:
STEREO
Signal from
Audio Source
1/L
1/L
2/R
2/R
MIXMODE
Signal from
Audio Source
1/L + 2/R
1/L
MIXED
2/R
P4T transmitters
P4R receivers
FIGURE 4
STEREO:
In stereo, the signals remain separate so 1/L is heard through the left earphone and
2/R is heard through the right earphone. The balance knob on the receiver adjusts the balance
between the left and right earphones.
MIXMODE:
In MixMode, the signals are “mixed” in relation to one another using the balance knob, blending
into one signal. The mixed signal is sent to both the left and right earphones.
USING MIXMODE
Step Two: Using the balance knob, the
user blends the two signals until the
correct mix is achieved.
MIXMODE
channel 1
MIXMODE
channel 2
COUNTERCLOCKWISE MID-POINT
Step One: The P4R receives TWO signals from
the P4T transmitter.
Step Four: The user may continue to adjust the blend using
the balance knob throughout
the performance.
CLOCKWISE
Step Three: The P4R
sends the mixed signal to
both earphones.
FIGURE 5
MIXMODE IN APPLICATIONS
MixMode is most useful when two distinct mixes are provided to the P4T transmitter, such as a band mix and a
vocal mix. MixMode combines these two signals into one monitor mix and allows you to control this mix during
the performance with the P4R receiver. For example, if the band overpowers the vocals in the mix, increase the
level of the vocals and decrease the level of the band by simply adjusting the balance knob.
5
ENGLISH
PUSHBUTTON CONTROLS
USING SCROLL AND SELECT PUSHBUTTONS
Push either pushbutton to activate the LCD screen. Push and hold the SCROLL pushbutton to scroll through
the functions. The current function is underscored. Use the SELECT pushbutton to change the status of the
underscored function.
CHANGING RECEPTION CHANNEL
1.
2.
3.
Push and hold the SCROLL pushbutton.
Scroll to FREQ.
Push the SELECT pushbutton to select a channel (0-9 or A-F).
4.
Push the SCROLL pushbutton to confirm changes.
NOTE: Use the same reception channel as the matching P4T transmitter.
CHANGING MIXMODE, HIGH FREQUENCY EQUALIZATION AND LIMITER STATUS.
1.
2.
3.
Push and hold the SCROLL pushbutton. Scroll to the desired function
(MIX, EQ, or LIM).
Push the SELECT pushbutton to toggle the function ON or OFF. A function is ON when a dot appears to
the right of the function symbol.
Push the SCROLL pushbutton to confirm changes.
LOCKING OUT THE LCD SCREEN
Once the P4R's functions are set for use, lock out the LCD screen and pushbuttons to prevent unwanted changes during or between performances. Use the following instructions to lock out the front panel:
1. Set all functions to desired settings.
2. Hold down the SCROLL and SELECT pushbuttons simultaneously for five seconds
(Figure 4 [A]).
NOTE: The reception channel will be replaced by dashes (Figure 4 [B]) when lock-out
is engaged.
3.
4.
When lock out is engaged, the SCROLL and SELECT pushbuttons light the LCD display, but cannot
change the status of any of the functions.
To disengage the lock out, hold the SCROLL and SELECT pushbuttons for five seconds until the reception
channel is displayed again.
FIGURE 6
6
ENGLISH
SPECIFICATIONS
Power Requirements
9 V alkaline battery
Battery Life
up to 8 hours, volume dependent
Audio Output Connector
3.5 mm Stereo
(Left = tip, Right = ring, Ground = sleeve)
Minimum Load Impedance
16 Ω
Net Weight
125 g (.28 lbs.)
Overall Dimensions
82.6 mm X 63.5 mm X 26.2 mm
(3 1/4 in. X 2 1/2 in. X 1 1/32 in.)
RF Frequency Range
722 to 952 MHz (country dependent)
Operating Range
300 feet (environment dependent)
Audio Frequency Response
50 Hz to 12 kHz (± 3 dB)
RF Sensitivity
1 μV typical
Image Rejection
55 dB typical
Spurious Rejection
60 dB typical
Squelch Threshold
4.5 μV typical
Antenna
attached whip
CERTIFICATION
Approved under the DECLARATION OF CONFORMITY provision of FCC Part 15. Certified by IC in
Canada under RSS-123. Meets essential requirements of European R&TTE Directive 99/5/EC, eligi-
SHURE
P4R
Tested To Comply
With FCC Standards
ble to bear the
mark. Meets requirements of
EMC standards EN 300 422 Parts 1 and 2 and EN
301 489 Parts 1 and 9.
FOR HOME OR OFFICE USE
LICENSING
Changes or modifications not expressly approved by
Shure Incorporated could void your authority to operate the equipment. Licensing of Shure wireless microphone equipment is the user's responsibility, and
licensability depends on the user's classification and
application, and on the selected frequency. Shure
strongly urges the user to contact the appropriate
telecommunications authority concerning proper licensing, and before choosing and ordering frequencies.
THORIZED IN YOUR REGION. PLEASE CONTACT
YOUR NATIONAL AUTHORITY TO OBTAIN INFORMATION ON AUTHORIZED FREQUENCIES
FOR WIRELESS MICROPHONE PRODUCTS IN
YOUR REGION
THIS RADIO EQUIPMENT IS INTENDED FOR USE
IN MUSICAL PROFESSIONAL ENTERTAINMENT
AND SIMILAR APPLICATIONS.
SHURE, the Shure logo, PSM and MIXMODE are
registered trademarks of Shure Incorporated. DURACELL is a registered trademark of its respective
owner.
Licensing: Note that a ministerial license to operate
this equipment may be required in certain areas.
Consult your national authority for possible requirements.
NOTE: THIS EQUIPMENT MAY BE CAPABLE OF
OPERATING ON SOME FREQUENCIES NOT AU-
7
Note: This equipment has been tested and found to comply with the limits for a Class
B digital device, pursuant to part 15 of FCC Rules. These limits are designed to
provide reasonable protection against harmful interference in a residential installation.
This equipment generates, uses and can radiate radio frequency energy and, if not
installed and used in accordance with the instructions, may cause harmful
interference to radio communications. However, there is no guarantee that
interference will not occur in a particular installation. If this equipment does cause
harmful interference to radio or television reception, which can be determined by
turning the equipment off and on, the user is encouraged to try to correct the
interference by one or more of the following measures:
•
Reorient or relocate the receiving antenna.
•
Increase the separation between the equipment and the receiver.
•
Connect the equipment into an outlet on a circuit different from that to which the receiver
is connected.
•
Consult the dealer or an experienced radio/TV technician for help.
35
36
www.shure.com
United States:
Shure Incorporated
5800 West Touhy Avenue
Niles, IL 60714-4608 USA
Europe, Middle East, Africa:
Shure Europe GmbH
Wannenäckestr. 28,
74078 Heilbronn, Germany
Phone: 847-600-2000
Fax: 847-600-1212
Email: [email protected]
Phone: 49-7131-72140
Fax: 49-7131-721414
Email: [email protected]
©2008 Shure Incorporated
Asia, Pacific:
Shure Asia Limited
Unit 301, 3rd Floor
Citicorp Centre
18, Whitfield Road
Causeway Bay, Hong Kong
Phone: 852-2893-4290
Fax: 852-2893-4055
Email: [email protected]
Canada, Latin America,
Caribbean:
Shure Incorporated
5800 West Touhy Avenue
Niles, IL 60714-4608 USA
Phone: 847-600-2000
Fax: 847-600-6446
Email: [email protected]