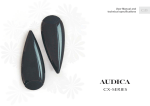
1
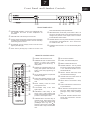
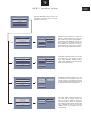
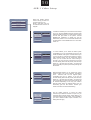
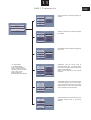
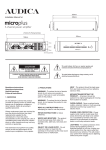
3
GB
Welcome
FR
Thank you for choosing AUDICA
Audica AV products have been designed and engineered to the highest standards, combining style with
functionality and ergonomics. To extract the best from your system, please refer closely to this manual. It
may also be necessary for you to refer to other components’ user guides to prevent any damage or loss in
performance which may occur from incorrect installation.
IT
Enjoy...
DE
Contents
Read this before you begin
-
-
-
-
4
Connecting a TV and speakers-
-
-
-
-
5
Optional connections-
-
-
-
-
6
Front panel and handset controls
-
-
-
-
7
Setting up the AVR-1
-
-
-
-
-
8
Playing a DVD
-
-
-
-
-
-
12
Playing a CD
-
-
-
-
-
-
12
Playing MP3 discs -
-
-
-
-
-
12
Viewing JPG photo discs
-
-
-
-
-
13
Playing the radio
-
-
-
-
-
13
Playing from an external source
-
-
-
-
13
On-screen toolbar -
-
-
-
-
-
14
Troubleshooting
-
-
-
-
-
-
15
Specifications
-
-
-
-
-
-
15
Remote Control
-
-
-
-
-
-
15
Guarantee
-
-
-
-
-
-
15
-
-
ESP
RU
SOURCE
4
Important Safety Information
1. GENERAL INFORMATION
The AUDICA AVR-1 DVD/Receiver includes four system
components in one box - a DVD player, FM/AM radio, surround
sound decoder and 6 channel amplifier. In addition to the AVR-1
you will need a TV and a speaker system with between two and
six channels. A full six channel speaker system is recommended
to deliver the most realistic surround-sound experience.
2. UNPACKING YOUR SYSTEM
Care must be taken whilst unpacking your system that no part is
damaged or lost. For an inventory of what should be supplied
with the system, please refer to system specifications on page
16. Retain packaging materials so the system can be re-packed
and shipped if necessary.
3. SERVICING
Do not attempt to service this product yourself as opening covers
or panels may expose you to dangerous voltages or other
hazards. Refer all servicing to qualified personnel.
Where replacement parts are required be sure the service
technician has used replacements supplied by the manufacturer
or have the same characteristics as the original part. Use of
unsuitable parts could cause fire, electrical shock or other
hazards and may void any warranty or guarantee.
The technician must perform any safety checks to test the
performance of any repairs.
CAUTION!
RISK OF ELECTRIC SHOCK
DO NOT OPEN
TO REDUCE THE RISK OF ELECTRIC SHOCK DO
NOT REMOVE COVER (OR BACK)
This symbol indicates that there are
important operating and maintenance
instructions in the literature
This symbol indicates that dangerous
voltage constituting a risk of electric
4. PRECAUTIONS
! Read these instructions.
! Keep these instructions.
! Heed all warnings.
! Follow all instructions.
! Do not use this apparatus near water.
! Clean only with a slightly damp cloth.
! Do not block any ventilation openings.
! Install in accordance with the manufacturer's instructions.
! Do not install or operate near any heat sources such as
radiators, stoves, or other apparatus that produce heat.
! Unplug this apparatus during lightning storms or when
unused for long periods of time.
! Refer all servicing to qualified service personnel. Servicing is
required when the apparatus has been damaged in any way,
such as the power-supply cord or plug is damaged, liquid
has been spilled or objects have fallen into the apparatus,
the apparatus has been exposed to rain or moisture, does
not operate normally, or has been dropped.
! Warning: To reduce the risk of fire or electrical shock, do not
expose this product to rain or moisture. The product must not
be exposed to dripping and splashing and no object filled
with liquids such as a vase of flowers should be placed on the
product.
! No naked flame sources such as candles should be placed
on the product.
Caution: Changes or modifications not expressly approved by
the manufacturer could void the user's authority to operate this
device.
Caution: Usage of controls or adjustments or performance of
procedures other than those specified herein may result in
hazardous exposure.
These labels tell you that the unit contains a Laser component.
Do not stare at the laser lens.
IMPORTANT
This equipment has been tested and found to comply with the
limits for a Class B digital device pursuant to part 15 of the FCC
rules. These limits are designed to provide reasonable protection
against harmful radiation in a residential installation. This
equipment generates, uses and can radiate radio frequency
energy and, if not installed and used in accordance with the
instructions, may cause harmful interference to radio
communication. However, this is no guarantee that interference
will not occur in a particular installation. If this equipment does
cause harmful interference to radio or television reception, which
can be determined by turning the equipment off and on, the user
is encouraged to try to correct the interference by one of the
following measures:
! Reorient or relocate the receiving antenna.
! Increase the separation between the equipment and
receiver.
! Connect the equipment into an outlet on a circuit different
from that to which the receiver is connected.
! Consult the dealer or an experienced radio/TV technician for
help.
ELECTRICAL INFORMATION
Mains Supply: The mains operating voltage of this unit is on the
rating plate on the rear. In the UK this is 230/240 V.
The AVR-1 is supplied with a power cord terminated with a UK
approved mains plug fitted with a 3A fuse. If the fuse needs to be
replaced, an ASTA or BSI approved BS1362 fuse rated at 3A
must be used. If you need to change
the mains plug, remove the fuse and
dispose of this plug safely
3A FUSE
immediately after cutting it from the
BS 1362
cord.
MAINS POWER SWITCH
BLUE
BROWN
(Live)
The AVR-1 does not have a power (Neutral)
Class II construction double insulated. This
product must not be connected to earth.
switch. If you need to switch off the mains power to the AVR-1,
remove the mains plug from the wall outlet. For this reason,
ensure that the mains plug remains easily accessible when
installing the AVR-1.
Dolby 5.1ch
Manufactured under license from Dolby Laboratories. “Dolby”,
“Pro-logic" and the double-D symbol are trademarks of Dolby
Laboratories.
DTS
Manufactured under license from Dolby Laboratories. Dolby,
and the double-D symbol are trademarks of Dolby Laboratories.
Additionally, software products running on a computer must also
be marked with: Confidential unpublished works. Copyright
1992-2002 Dolby Laboratories .All rights reserved.
copyright protection
This product incorporates copyright protection technology that is
protected by method claims of certain U.S. patents and other
intellectual property rights owned by Macrovision Corporation
and other rights owners. Use of this copyright protection
technology must be authorized by Macrovision Corporation, and
is intended for home and other limited viewing uses only unless
otherwise authorized by Macrovision Corporation. Reserve
engineering or disassembly is prohibited.
5
GB
Connecting a TV and speakers
CONNECTING THE AVR-1 TO A TV
The highest quality connection is at the top, the lowest at the
bottom. Your TV will probably have several connection options
for picture (video) input. For the best quality picture, check which
connections are available on your TV and use the one nearest
the top of the list.
There are 5 video output connections to take the picture to your
TV. These are 1. HDMI digital output (picture and sound)
2. PrPbY component (picture only)
3. SCART (picture and sound, 240V version only)
4. S-Video (picture only)
5. CVBS composite video (picture only)
TV VIDEO CONNECTIONS
d
e
a
S-VIDEO CVBS HDMI
b
c
PR PB Y
SCART
CONNECTING SPEAKERS, A SUBWOOFER AND AERIALS TO THE AVR-1
There are speaker connections for up to 6 speakers set up in a
surround sound configuration. The speaker connections are
labelled to match the position of each speaker as follows - FR is front right
- FL is front left
- RR is rear right
- RL is rear left
- CEN is front centre
- RCEN is rear centre
Position your speakers as instructed in the handbook for the
speakers. Connect the wires from each speaker to the correct
terminals at the rear of the AVR-1 for that speaker. Ensure that
the + speaker terminals (coloured red) connect to the top +
terminals of the AVR-1 by connecting the striped wire to the +
terminals.
CAUTION:- When connecting speaker wires make sure that no
loose wire strands can touch another terminal. This may
permanently damage the circuitry of the AVR-1.
FM AERIAL
Subwoofer
Front
left
SPEAKER
LOCATIONS
Centre
front
Front
right
Rear
right
Rear
left
Centre
rear
AM AERIAL
6
Optional connections
CONNECTING TV SOUND AND OTHER SOURCES TO THE AVR-1
Both TV Audio and AUX inputs are available on the AVR-1 for the
connection of other signal sources. If your TV is connected with a
SCART cable, then no further connection is necessary to listen
to TV sound through your AVR-1. If your TV is not using the
SCART connector and has a stereo audio output, we
recommend that you connect it to the TV AUDIO in connections
of the AVR-1. You can then play sound from your TV through the
TV AUDIO
OUTPUT
CONNECTIONS
multi-channel surround decoder built into the AVR-1 by selecting
the TV input of the AVR-1.
Similarly, you may have another stereo audio-visual source such
as a VCR that can be connected to the AUX input of the AVR-1.
The VCR sound can then be played through the AVR-1 on the
main system speakers and decoded into multi-channel sound if
preferred.
VCR/AUX
AUDIO OUTPUT
CONNECTIONS
CONNECTING AN EXTERNAL SURROUND-SOUND DECODER TO THE AVR-1
The AVR-1 may also be used as a source for an external
surround-sound decoder or receiver. An external decoder or
receiver may be used in a large room with large speakers to
achieve more output power than the internal amplifiers of the
AVR-1 can produce. All channels of the multi-channel signal from
the AVR-1 are connected to the Decoder/Receiver through a
single digital coaxial phono cable. NOTE:- FM/AM radio and Aux
input signals connected to the AVR-1 are not available through
the digital output.
Coaxial
digital input
EXTERNAL SURROUND
DECODER OR RECEIVER
7
GB
Front Panel and Handset Controls
SOURCE
ab
c de f g
h
FRONT PANEL KEYS
a HEADPHONE SOCKET. Connect your headphones here.
The speakers will switch off when headphones are
connected.
b DISC UNLOAD. Press this key to remove a disc.
c Volume controls. These keys control the volume of speakers
or headphones connected to the AVR-1. NOTE:- these keys
will not change the TV volume.
d PLAY/PAUSE. This key will play a DVD or CD disc. Press
again to pause disc play.
erase a FM/AM radio preset if pressed twice.
f NEXT/PREVIOUS. Press briefly to fast search a disc or to
skip to the next radio preset. Press and hold these keys to
change to the previous or next chapter, track or to search
tune the band for another station.
g SOURCE SELECT. This key selects the source you want to
play on the AVR-1 from DVD/CD disc - AUX - OPTICAL IN TV - SCART IN - FM - AM.
h STANDBY. Switch the AVR-1 on or off. Set to Standby when
not in use.
e STOP. This key will stop play of a DVD or CD disc. It will
REMOTE CONTROL KEYS
a POWER. Press to switch on or off.
b NUMERIC KEYPAD. For direct access
selection of tracks, DVD chapters
(when used with the GOTO key) or
radio presets.
a c STORE. For programming discs or for
b
storing radio presets. Hold down this
button to start auto-programming for
the radio.
d GO TO. Quick selection of a particular
c
e
g
h
1!
1#
1$
1^
1&
1*
DVD title or chapter.
d
e STOP. Stop DVD/CD playback or FM
f
scanning. Clears radio presets when
held.
h
Instantly mutes the sound.
i f MUTE.
Press again to cancel.
1)
Plays a disc. Press
1@ g PLAY/PAUSE.
again to pause.
1%
h PREV/NEXT.
1(
Press briefly to fast
search a disc or select another radio
preset. Press and hold to change to the
previous or next chapter or track.
i CURSOR KEYS. Use these keys to
navigate menus. When playing a disc
use
to change the camera angle
(multi-angle discs only) and
to
playback in slow motion. Press
to
tune the radio in steps, hold to search
tune.
1) OK. Confirms a selection.
1! SLEEP. Activates the sleep timer.
1@ MENU. Activates the disc menu.
1# SOURCE SELECT. This key selects
the source you want to play on the AVR1 from DVD-AUX1-OPTICAL IN-TVSCART IN-FM-AM.
1$ SELECT.
Selects audio bass, treble
and channel balance settings.
1% VOLUME. Sets the master volume of
speakers or headphones.
1^ SETUP. Enter or exit the AVR-1 setup
menu .
1& TOOLS. Activates the on-screen menu
for special features.
1* EQ. Selects an audio equaliser mode
from FLAT - EQB+ (bass boost, EQM+
(midrange boost), EQM- (midrange
cut).
1( AV MODE. Switches between stereo
sound and multi-channel surroundsound modes.
8
AVR-1 General set-up
GENERAL PAGE
AUTO
PIC MODE
FILM
AUDIO OUT
GENERAL SETUP
Press the SETUP key on the handset. There
are 4 set-up options. Use the cursor key to
navigate the menu options and press OK to
select your chosen menu. The menus
available are shown at the right.
NOTE:- Video setup and Preferences menus
are not accessible when a disc is playing.
D.R.C.
VIDEO
ANGLE MARK
SMART
OSD LANGUAGE
SUPER SMART
SCREEN SAVER
PIC MODE optimises the video performance
of the AVR-1. Select AUTO and the AVR-1
will optimise automatically. FILM setting
optimises for films, VIDEO for best
resolution, SMART for additional vertical
processing when progressive and SUPER
SMART for motion adaptive processing.
MAIN PAGE
GENERAL PAGE
PIC MODE
AUDIO OUT
SPDIF/RAW
D.R.C.
SPDIF/PCM
AUDIO OUT sets the digital audio output
format. If you have an external surroundsound decoder, choose SPDIF/RAW. If you
have a stereo DAC, choose SPDIF/PCM.
ANGLE MARK
SETUP MENU MAIN PAGE
OSD LANGUAGE
SCREEN SAVER
GENERAL SETUP
SPEAKER SETUP
MAIN PAGE
VIDEO SETUP
PREFERENCES
EXIT SETUP
GENERAL PAGE
FULL
PIC MODE
AUDIO OUT
6/8
D.R.C.
ANGLE MARK
D.R.C. sets the audio dynamic range
compression. Set this FULL or to a high value
for small speakers. Set to OFF or to a low
value for large speakers.
4/8
OSD LANGUAGE
SCREEN SAVER
2/8
MAIN PAGE
OFF
Angle mark sets the ANGLE symbol to
appear automatically when a DVD includes
multi-angle information.
GENERAL PAGE
PIC MODE
AUDIO OUT
D.R.C.
ANGLE MARK
ON
OSD LANGUAGE
OFF
SCREEN SAVER
MAIN PAGE
OSD language sets the language for the onscreen menus. The choices are English,
French, German, Spanish, Italian. The
default is English.
GENERAL PAGE
PIC MODE
AUDIO OUT
D.R.C.
ANGLE MARK
OSD LANGUAGE
ENGLISH
SCREEN SAVER
GERMAN
FRENCH
MAIN PAGE
ITALIAN
SCREEN SAVER sets the screen saver on or
off. If the AVR-1 is left in STOP or PAUSE
mode for more than 5 minutes, the screensaver will start. We recommend that this is
set to ON.
GENERAL PAGE
PIC MODE
AUDIO OUT
D.R.C.
ANGLE MARK
OSD LANGUAGE
SCREEN SAVER
ON
OFF
MAIN PAGE
9
GB
AVR-1 Speaker Setup
SETUP MENU MAIN PAGE
GENERAL SETUP
SPEAKER SETUP
Select the SPEAKER SETUP menu to set
your AVR-1 to correctly match your system
speakers and your room.
VIDEO SETUP
PREFERENCES
EXIT SETUP
SPEAKER SETUP PAGE
SPEAKER TYPE
SPEAKER TYPE
FRONT SPEAKER
CS-C1
SPEAKER POSITION
CENTER SPEAKER
CS-LCR
SPEAKER DISTANCE
REAR SPEAKER
GENERIC
SPEAKER TEST TONE
REAR C SPEAKER
OFF
SUBWOOFER
MAIN PAGE
PREVIOUS PAGE
SPEAKER SETUP PAGE
SPEAKER POSITION
SPEAKER TYPE
FRONT SPEAKER
ON WALL
ON SHELF
SPEAKER POSITION
CENTER SPEAKER
SPEAKER TEST TONE
REAR SPEAKER
FREE 1
SPEAKER DISTANCE
REAR C SPEAKER
ON GEO STAND
SPEAKER TYPE enables you to select the
model of Audica speaker you are using for
each position in your system. If the speaker is
not an Audica, select GENERIC. If you do not
have a speaker in this position (centre and
rear speakers only), select OFF. If using an
Audica CS-LCR set the centre to LCR and
the front left and right will default to LCR also.
SPEAKER POSITION enables you to select
the placement of your speakers. Choose
from WALL-MOUNT, SHELF-MOUNT,
FREE 1 (floor standing) or ON GEO STAND
(front centre and LCR only).
MAIN PAGE
PREVIOUS PAGE
SPEAKER SETUP PAGE
SPEAKER DISTANCE
SPEAKER TYPE
CENTER DISTANCE
SPEAKER POSITION
FRONT DISTANCE
SPEAKER DISTANCE
REAR DISTANCE
SPEAKER TEST TONE
SUB DISTANCE
5 FT/1.5M
SPEAKER DISTANCE enables you to set
the distance that each speaker is from the
listener. The AVR-1 will automatically correct
for these distances when playing. use the
CURSOR key to scroll through distances.
MAIN PAGE
PREVIOUS PAGE
SPEAKER SETUP PAGE
SPEAKER TYPE
SPEAKER TEST TONE
TEST TONE
MANUAL
SPEAKER POSITION
SPEAKER DISTANCE
SPEAKER TEST-TONE
MAIN PAGE
AUTO
PREVIOUS PAGE
With TEST TONE and AUTO selected, you
can check that all speaker volumes are
equal. If you want to adjust the volume of a
particular speaker, select the 'MANUAL'
option and choose the speaker to adjust with
the CURSOR key. Then you can set the
relative volume of that speaker with the
VOLUME keys.
10
AVR-1 Video Setup
SETUP MENU MAIN PAGE
GENERAL SETUP
SPEAKER SETUP
VIDEO SETUP
PREFERENCES
EXIT SETUP
Select the VIDEO SETUP
menu to set up your AVR-1 to
correctly match your TV.
NOTE:- This menu can only
be selected when the disc is
stopped.
VIDEO SETUP
TV DISPLAY
NORMAL/PS
TV TYPE
NORMAL/LB
RESOLUTION
WIDE/HDTV
VIDEO OUTPUT
MAIN PAGE
VIDEO SETUP
TV DISPLAY
TV TYPE
MULTI
RESOLUTION
NTSC
VIDEO OUTPUT
PAL
MAIN PAGE
VIDEO SETUP
TV DISPLAY
TV TYPE
SD INTERLACE
RESOLUTION
SD PROGRESSIVE
VIDEO OUTPUT
720P
1080I
MAIN PAGE
VIDEO SETUP
TV DISPLAY
TV TYPE
RESOLUTION
VIDEO OUTPUT
YPRPB
RGB
MAIN PAGE
TV DISPLAY enables you to choose the screen shape
of your TV. Choose NORMAL/PS (Pan & Scan) mode
to display a wide picture on a 4:3 size screen by cutting
the left and right sides of the picture. Choose
NORMAL/LB (Letterbox) to display the the full
widescreen picture on a 4:3 screen with bands at the
top and bottom. Choose WIDE/HDTV for a 16:9 widescreen TV.
TV TYPE enables you to select the video system
compatibility of your TV. Choose MULTI if your TV has
a dual PAL/NTSC video system. Choose NTSC if your
TV is a U.S. spec TV. Choose PAL to match TVs sold in
other markets. NOTE:- Do not change this setting
unless you are certain that the current setting is
incorrect, you may lose the TV picture.If you set the
incorrect setting and loose the picture press the stop
button for 5 seconds and the AVR-1 will reset and
return to standby. On power up the factory settings will
be restored.
RESOLUTION enables you to change the picture
quality to match your TV from Interlace - Progressive
720P - Interlace 1080. Set the highest quality
compatible with your TV. NOTE:- If you set the
incorrect setting and loose the picture press the stop
button for 5 seconds and the AVR-1 will reset and
return to standby. On power up the factory settings will
be restored. Depending on the way your screen's
internal scaling works the highest setting may not
necessatirly give the best results. Consult your
screen's manual to confirm the best setting.
Set the VIDEO OUTPUT to match the video
connection you made from the AVR-1 to your TV. If you
connected with a SCART cable, choose RGB. If you
connected with Component Video, choose YPRPB. If
you used a different video output connection, this
setting does not apply.
11
GB
AVR-1 Preferences
PREFERENCES
AUDIO
ENGLISH
SUBTITLE
GERMAN
DISC MENU
FRENCH
PARENTAL
SPANISH
PASSWORD
ITALIAN
AUDIO selects the preferred language for
dialogue.
DEFAULTS
SETUP MENU MAIN PAGE
MAIN PAGE
GENERAL SETUP
SPEAKER SETUP
VIDEO SETUP
PREFERENCES
EXIT SETUP
SUBTITLE selects the preferred language
for subtitles.
PREFERENCES
AUDIO
SUBTITLE
ENGLISH
DISC MENU
GERMAN
PARENTAL
FRENCH
PASSWORD
SPANISH
DEFAULTS
ITALIAN
OFF
MAIN PAGE
DISC MENU sets the preferred language for
disc menus.
PREFERENCES
AUDIO
SUBTITLE
DISC MENU
ENGLISH
PARENTAL
GERMAN
PASSWORD
FRENCH
DEFAULTS
SPANISH
ITALIAN
MAIN PAGE
1 G - Kids material
2 - General audience
3 PG - Parental guidance
4 PG13 - Over 13 years old
5/6 PG-R Under 17 with adult
7 NC-17 Over 17 only
8 ADULTAdults only
NO PARENTAL Plays all discs
PREFERENCES
2
AUDIO
SUBTITLE
3 PG
DISC MENU
4 PG13
5
PARENTAL
PASSWORD
PG-R
DEFAULTS
NC-17
MAIN PAGE
NO PARENTAL
PARENTAL sets the access level to
restricted access discs. The setting levels
are shown in the table on the left. The factory
setting is NO PARENTAL.
NOTE:- Not all DVD discs have parental
restriction.
ADULT
PREFERENCES
AUDIO
SUBTITLE
DISC MENU
PARENTAL
PASSWORD
CHANGE
PASSWORD protects the parental settings.
The factory setting is 1234. Use this menu
option to change the password. To clear the
password back to 1234, press STOP 4 times
when prompted for the old password.
DEFAULTS
MAIN PAGE
Select the RESET menu option to set all user
adjustable settings back to the factory
defaults.
PREFERENCES
AUDIO
SUBTITLE
DISC MENU
PARENTAL
PASSWORD
DEFAULTS
MAIN PAGE
RESET
12
Playing a DVD
PLAYING A DVD-VIDEO DISC
Switch on the AVR-1 and your TV. Select the correct AV input of
your TV (if you are using SCART connection the input may select
automatically). Load your DVD disc into the front panel loading
slot. The disc menu will appear on your TV screen. Use the
cursor keys to navigate the on-screen menu and play the movie
or press the key.
Press the GOTO key. Enter the title or chapter numbers with the
NUMBER keys. Use the
CURSOR keys to switch between
title/chapter selection. Press the key to go.
SETTING THE VOLUME
Use the VOLUME keys to set the volume level from the
speakers. NOTE:- The AVR-1 volume control will not control the
volume from the TV speakers.
SLOW MOTION
To view a section of the movie in slow motion, press the
CURSOR key repeatedly to set the slow motion speed and
direction. Continue pressing to return to play the movie.
FAST SEARCH
Press the
keys, fast search will begin in your chosen
direction. Press again to change the search speed x2, x4, x6, x8.
Press
to cancel. This function is only available from the
remote control.
DISC MENU
Press MENU at any time to return to the disc menu. You can
access disc options encoded in the disc by the publisher. This
may include direct title/chapter access, soundtrack settings,
special features etc.
STEPPING THROUGH CHAPTERS
Hold down the
keys to step through chapters.
AUDIO MODE SELECTION
When playing a DVD you can select different sound modes with
the AV MODE key. The sound modes available will depend on
the soundtracks available on the DVD.
GO DIRECTLY TO A NEW TITLE OR CHAPTER
STILL FRAME
To freeze the picture in still frame, press the
to cancel and return to play.
key. Press again
Playing a CD
PLAYING A CD AUDIO DISC
Switch on the AVR-1. Select DVD with the SOURCE key. Load
your CD disc into the front panel loading slot. The disc will play
automatically.
SETTING THE VOLUME
Use the VOLUME keys to set the volume level from the
speakers. NOTE:- The AVR-1 volume control will not control the
volume from the TV speakers.
FAST SEARCH
Press the
keys, fast search will begin in your chosen
direction. Press again to change the search speed x1, x2, x3, x4.
Press
to cancel. This function is only available from the
remote control.
JUMP DIRECTLY TO ATRACK
Enter the track number with the number pad. Press the
go.
PAUSE
To pause the music, press the
return to play.
key to
key. Press again to cancel and
STORING A PROGRAM SEQUENCE
To store a sequence of tracks, stop the disc and press the
STORE key. Now enter each track you want to program in turn
with the NUMBER keys, then OK to store it. Press to play the
program. Press repeatedly to stop playback and clear the
program.
AUDIO MODE SELECTION
When playing a CD you can select different sound modes with
the AV MODE key. 2 channel stereo and Dolby Pro Logic II Music
modes are recommended for CD sound.
STEPPING THROUGH THE TRACKS
Hold down the
keys to select tracks.
Playing an MP3 Disc
PLAYING AN MP3 DISC
You can listen to a CD-R or DVD-R disc of your MP3 music files
with the AVR-1.
Switch on the AVR-1. Select DVD with the SOURCE key. Load
your MP3 disc into the front panel loading slot. Press
to play
the disc.
SETTING THE VOLUME
Use the volume keys to set the volume level from the speakers.
NOTE:- The AVR-1 volume control will not control the volume
from the TV speakers.
STEPPING THROUGH THE TRACKS
Hold down the
keys to select tracks.
JUMP TO ATRACK
Enter the track number with the NUMBER keys. The AVR-1 will
jump to this track.
FAST SEARCH
Press the
keys briefly, fast search will begin in your
chosen direction. Press again to change the search speed x2,
x4, x6, x8. Press to cancel.
PAUSE
To pause the music, press the
return to play.
key. Press again to cancel and
ON-SCREEN NAVIGATION
You can switch on the TV to navigate folders of tracks more
easily on-screen when the disc is stopped. You will see a folder
list on the left of the screen and a list of your music files on the
right. Navigate the folder list to find your music folder, with the
CURSOR keys, then press OK to select the folder. Press the
CURSOR key to move to the file list of MP3 tracks. Navigate the
list with the
CURSOR keys. Select file number 0 at the top of
the list to move back up the folder list.
13
Viewing JPG Digital Photos on a CD-R or DVD-R
VIEWING JPG DIGITAL PHOTOS
You can view a CD-R or DVD-R disc of your digital photos or
other JPG files with the AVR-1.
Switch on the AVR-1 and your TV. Select DVD with the SOURCE
key. Load your disc into the front panel loading slot.
FINDING YOUR PHOTOS ON THE DISC
You can navigate the disc on the TV screen. The screen will show
a map of the disc folders, Press OK to select a folder and display
sub-folders or files on the disc. Use the
CURSOR keys
to navigate the folder list. Selecting number 0 at the top of the list
will move back up the folder list.
When you find the folder you want, select a file in the folder and a
slide-show will begin. You can pause the slide-show with the
key. Press again to start the slide-show. You can also change
the picture displayed by holding down the
keys. When all
pictures in the folder have been shown, the AVR-1 will move to
the next folder (if available).
ROTATING THE PICTURES
Use the
CURSOR keys to rotate or mirror pictures when they
are on the screen.
RETURNING TO THE FOLDER LIST
To return to the folder list, press the STOP key.
SLIDESHOW
Playing The Radio
PLAYING THE RADIO
Switch on the AVR-1. Press the SOURCE key to select the FM or
AM band you require.
SETTING THE VOLUME
Use the volume keys to set the volume level from the speakers.
NOTE:- The AVR-1 volume control will not control the volume
from the TV speakers.
AUTO-TUNING
The AVR-1 radio will auto-tune all local stations automatically
and program them into preset locations. To auto-tune, press the
GOTO key. AUTOPROG will show in the display. Wait briefly
while the AVR-1 searches out all available stations and programs
them into memory. If the display shows FULL, then more than 40
stations were found.
MANUAL TUNING
The AVR-1 can also be tuned manually. Press the
CURSOR keys to tune manually in steps. Hold down these keys
to scan to the next station up or down the band.
STORING A PRESET STATION
There are 40 preset radio station memories available for FM or
AM stations. To STORE a station, first tune in to a station, then
press the STORE key, followed by one or two digits with the
NUMBER keys to set the preset number, then press STORE
again. This station will be stored in memory for future use.
PLAYING A PRESET STATION
Pressing a NUMBER key will recall a preset station. If the station
number has two digits, press the two numbers in sequence.
STEPPING THROUGH PRESET STATIONS
Use the
keys to step through each preset in turn.
or
Playing From an External Source
PLAYING AN EXTERNAL SOURCE
Three additional sources may be connected to the AVR-1 such
as TV sound (via SCART cable or TV input), a digital source (to
OPTICAL input) or another analogue source such as tape. See
page 6 for connection instructions.
SELECT THE CORRECT SOURCE
To select one of these external sources, press the SOURCE key.
This will change the source from DVD-AUX1-OPTICAL IN-TVSCART IN-FM-AM
SETTING THE VOLUME
Use the volume keys to set the volume level from the speakers.
NOTE:- The AVR-1 volume control will not control the volume
from the TV speakers.
GB
14
AVR-1 On-Screen Toolbar
The on-screen TOOLBAR gives quick access to certain
features while a movie is playing.
SWITCHING ON THE TOOLBAR
Press the TOOLS key to switch on the on-screen toolbar.
SWITCHING OFF THE TOOLBAR
Press the TOOLS key again to switch off the toolbar when you
are finished.
SELECTING ATOOLBAR SYMBOL
You can choose a Toolbar symbol with the
CURSOR keys.
CHANGING ATOOLBAR SETTING
The CURSOR key changes toolbar settings.
A-B
SUBTITLES
AUDIO
REPEAT
A-B LOOP
ZOOM
Choose this toolbar symbol to
switch the subtitles on or off or scroll
through the available languages
using the CURSOR key.
DISPLAY
RETURN
Press RETURN to go back to
main page when playing a disc.
Choose the DISPLAY symbol to switch on a
status display on the TV screen. You can
choose different display options by pressing
repeatedly the DOWN key.
Choose the AUDIO symbol to change the
audio language. This is only possible if the
disc includes multiple languages.
Choose the REPEAT symbol if you want to
set the whole disc to repeat, or to repeat
only a title, chapter or track on the disc.
When the symbol is selected, use the
CURSOR key to choose the repeat option
you want.
Choose the ZOOM symbol to zoom into the
centre of the picture. Press the CURSOR
key to set the zoom level you want.
Choose A-B LOOP if you want to repeat a
section of a movie. Press the
CURSOR
key once when you are ready to start the loop
(A point). Press the CURSOR key again
when you want to end the loop. The AVR-1
will now play the loop between start and end
continually. Press the CURSOR key again
to cancel the A-B LOOP.
15
Troubleshooting
NO PICTURE ON THE TV
Make sure that you have selected the correct AV input channel
on your TV for the video connection that you have used.
DISTORTED, UNSTABLE TV PICTURE
The TV TYPE or RESOLUTION settings may be incorrect for
your TV. To reset resolution to factory settings, press
OPEN/CLOSE, then the NEXT key.
WRONG REGION MESSAGE ON THE TV SCREEN WHEN
PLAYING A DVD
The disc you are playing was purchased in another DVD region.
You can only play DVD discs purchased in the same region as
your player. The region setting for the AVR-1 is marked on the
rear panel and will appear as a number inside a globe. The disc
will also carry the same region marking.
GB
A disc may be playing. These menus are only accessible when
the disc is stopped.
NO SOUND FROM THE CENTRE OR REAR SPEAKERS
Check that the speaker has not been switched off in the
SPEAKER SETUP menu.
POOR QUALITY FM RADIO RECEPTION
The aerial is not connected or is not sensitive enough - an
outdoor aerial may be required in some areas. Check the aerial
connection or ask a local aerial fitter to recommend a better
aerial system for your AVR-1.
NO SOUND FROM AN EXTERNAL SURROUND SOUND
DECODER
Check that the digital audio output is switched on in the
GENERAL SETUP menu.
UNABLE TO ACCESS VIDEO OR PREFERENCES MENUS
Specifications
POWER SUPPLY
Voltage requirement . . . . . . . . . . . . . . . . . 220V-240V ~50Hz
Power consumption . . . . . . . . . . . . . . . . . . . . . . . . . . . 280W
Dimensions (mm) . . . . . . . . . . . . . . 430 (W) x 360 (D) x 62(H)
1 ....Power cable
2 ....Remote control with batteries
3 ....FM aerial
4 ....AM aerial
5 ....Auxiliary phono cable
6 ....This handbook
Amplifier power output. . . . . . . . . . . . . . . . . . . . . . . . 6 x 60W
Video outputs . . . . . . . HDMI, SCART, YCrCb, SVideo, CVBS
Audio decoding . . . . . . . . . . . . . . . . . . . . . Dolby digital, DTS
ITEMS SUPPLIED WITH THE AVR-1
Remote control battery
REPLACING THE REMOTE CONTROL BATTERY
+
+
If the remote control is not working, remove the battery
compartment and replace the battery with the same type 3V
CR2025 as shown in the diagram.
Guarantee
Your Audica product is warranted for a period of two years from
date of purchase. If during this period the system malfunctions, it
will be repaired or replaced at Audica's option.
The warranty excludes fare wear and tear and all damage due to
misuse, however caused. The warranty lies in the first instance
with the retailer from whom you purchased the equipment and to
whom equipment service should be sent, preferably in the
original packing, carriage paid. Please include your proof of
purchase. Goods in transit to Audica are at the risk of the sender.
If this is not possible, contact Audica at:
Audica UK
Armour Home electronics
Stortford Hall Industrial Park
Dunmow Road
Bishops Stortford
Hertfordshire
CM23 5GZ
UNITED KINGDOM
or e-mail [email protected]