1
!
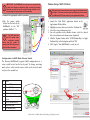
IMPORTANT: The RAIDBank5 can only use one connection at
a time. Host plugs are shaped so they can only be properly
inserted one way; be sure to insert the plugs properly or you
may damage the system and void the warranty.
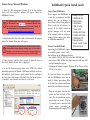
Volume Setup- MAC OS Hosts
!
2. Connect the appropriate cable to your host.
3.Flip the power switch
located on the back of the
RAIDBank5 to the “ON”
position (labelled “-”.)
e
HIGH SPEED
USB
SATA
M
mac
win
If Any LED glows red
and the system emits
a continuous beeping
sound, then the system is
reporting fault. Refer to your user
guide for further information.
!
Configuration via RAID Mode Selector Switch
The Micronet RAIDBank5 supports RAID configuration via a
rotary switch located on the back panel. To change operating
mode, please select turn the rotary switch to the desired mode
and press the commit key.
Pos
Mode
0
Stripe (RAID 0)
1
Mirror (RAID 10)
2
Cloned Mirror (N Way RAID 1)
3
RAID 3 (Fixed Parity)
4
Graphic User Interface (GUI)
Control
5
RAID 5 (Distributed Parity)
6
Large Mode (Span)
7
Port Multiplier (JBOD)
Before you begin, please make sure you are logged in with administrative
privileges. If you are unsure about your privilege level, please consult
your Macintosh OS-X user manual or your system administrator.
1 Launch the “Disk Utility” application located in the
Applications/Utilities folder.
2 Highlight your new drive and select the “Partition” tab
3 Select the new partition map type.
4 For each partition in the volume scheme, select the desired
file system format and volume name (optional)
5 Click the “Options” button. Select “GUID Partition Map” or “Apple
Partition Map” in the dialog box and click “OK”.
6 Click “Apply.” Your RAIDBank5 is ready to use!
3
3
4
2
commit RAID Mode
8-16-2010 Rev 1.0. ©2010 MicroNet Technology. All rights reserved.
5
6