1
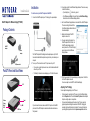
Installation Guide
Installation
To install and set up the Push2TV adapter with Intel WiDi:
1.
Connect the Push2TV adapter to your TV and plug in the power adapter.
Push2TV Adapter for Wireless Display (PTV3000)
Package Contents
Push2TV
adapter
Power
adapter
The Push2TV adapter LED is blinking when the adapter powers up. The LED
turns solid to indicate that the adapter is ready, but is not yet connected to your
computer.
2. Turn on your TV and select the correct TV input source for your TV.
• If you are not sure which input source to use, check the documentation that
came with your TV set.
• The Ready for Connection screen displays on your TV within 30 seconds.
USB power cable
Push2TV Front and Back Views
7. Within a few seconds, the TV screen displays your laptop screen. The LED on
the Push2TV adapter turns solid.
You are now ready to use Push2TV for Intel Wireless Display.
LED
Wireless
Display
Mode /
WPS
Adjusting Your TV Display
Reset
HDMI
USB Power
3. On your laptop, launch the Intel Wireless Display software. There are two ways
to launch the software
• If your laptop has a
button or key, press it.
• From Windows, select Start. In the search field, type Intel Wireless Display.
Select and run the Intel Wireless Display software.
4. Use the Intel Wireless Display software to scan and find the Push2TV adapter.
The screen on the right shows that the
Intel Wireless Display software has found
the wireless adapter.
5. Double-click the detected Push2TV
adapter to connect to it.
6. If you are connecting the laptop to the
Push2TV adapter for the first time, the
Push2TV adapter displays a 4-digit
security code on the TV. Enter this 4-digit
security code into the Intel Wireless
Display software.
If you do not see this screen, make sure that the TV input is set to the HDMI
port where the Push2TV adapter is connected and all cable connections are
firmly secured.
You can adjust the image display on the TV screen:
• To change how the image fits on the TV screen, on the Intel Wireless Display,
click the Properties button. Then click the Resize TV picture button and adjust
the picture using the plus or minus symbols.
• To remove black bars displayed on the sides of your TV screen, open the
graphics properties and change the resolution to 1280x720. Changing the
resolution might result in black bars on the laptop. To remove the black bars,
open the graphics properties and clear the preserve aspect ratio check box.
Miracast Wireless Display
Push2TV now supports Miracast™ Wireless Display. To switch between Intel WiDi
and Miracast modes, press the button on the side of the Push2TV for 2 seconds.
You can then launch the wireless display application on a Miracast-compatible
smartphone, tablet, or laptop, and connect.
FAQs
1.
2.
3.
4.
5.
6.
Can I display different content on the TV while I’m using my laptop?
Yes. To display different content, change the screen display setting on your
computer to extend mode.
Can I close the laptop lid and still use Wireless Display?
Closing the laptop lid might put the system to sleep or turn it off and, as a result,
close the connection. To prevent this from happening, from Windows select
Start > Search, type Closing lid in the search field, and change the settings to
do nothing.
Why can’t I play some DVD and Blu-ray discs?
Many discs have copy protection mechanisms that prevent playback on Intel
Wireless Display before software version v2.1.0.0. However, personal content
you have burned to a disc will play.
Can I mute my laptop and still watch videos with sound?
Yes. Even if your laptop has sound muted, the sound for the media you are
playing will play on your TV.
How can I fix the delay in the cursor?
You cannot change the delay, but you can turn off the cursor on the TV and use
the laptop to navigate. To do this, connect to the adapter using Intel WiDi
software on your PC, and click Properties.
What should I do if I get a Windows Firewall security alert?
From Windows, select Start > Search and in the search field type Allow a
program through a Windows Firewall. Add WiDiApp and Wireless PAN
DHCP Server to the list of allowed programs. Make sure both the private and
public check boxes are selected. If you are not using Windows Firewall, consult
your firewall user’s manual.
August 2012
7. What should I do if the TV stops showing my laptop screen?
Use Intel Wireless Display to check the wireless connection and reconnect to
the Push2TV adapter if necessary. If the situation continues, try moving your
laptop closer to the Push2TV adapter or place it in a location with a clear line of
sight to the Push2TV adapter. Changing the channel of your WiFi router might
also help.
For more information, launch Intel Wireless Display and select Help.
8. How can I restore factory settings to the Push2TV?
The Reset button is on the bottom of the unit. Use a paper clip to press and hold
the Reset button for 10 seconds.
9. How can I update my Push2TV?
a. Use your computer and navigate to http://www.netgear.com/stream to check
for and download the latest firmware.
b. Press the Wireless Display Mode / WPS button on the side of the
Push2TV unit for more than 5 seconds.
c. Using the wireless network manager utility on your computer, search for the
Push2TV wireless network name (SSID) and connect.
d. Open a browser on your computer, and you are automatically redirected to
the Push2TV update page. If you are not automatically redirected, type
http://192.168.3.1/ into the browser address bar.
e. Follow the steps on the web page to upload the firmware image you
downloaded in step a and complete the installation.
10. Where can I find information about updating my wireless display?
Go to http://www.intel.com/go/wirelessdisplayupdate.
11. What is Miracast and which devices are supported?
The new Miracast standard enables media content to be transmitted over a
WiFi connection, directly from a compatible smartphone, tablet, or laptop to the
Push2TV. The standard is new and smartphones, tablets, and laptops
supporting Miracast will be available in late 2012 or early 2013.
This symbol was placed in accordance with the European Union Directive 2002/96 on the Waste
Electrical and Electronic Equipment (the WEEE Directive). If disposed of within the European Union,
this product should be treated and recycled in accordance with the laws of your jurisdiction
implementing the WEEE Directive.
Technical Support
Thank you for selecting NETGEAR products.
After installing your device, locate the serial number on the label of your product and
use it to register your product at http://my.netgear.com. You must register your
product before you can use NETGEAR telephone support. Also go to http://
support.netgear.com for product updates, additional documentation, and support.
For complete DoC, go to the NETGEAR EU Declarations of Conformity website at:
http://support.netgear.com/app/answers/detail/a_id/11621/
For indoor use only in all EU countries and Switzerland.
WARNING: Do not stack equipment, or place equipment in tight spaces, in drawers,
or on carpets. Make sure your equipment is surrounded by at least 2 inches of air
space.
Get the user manual at http://downloadcenter.netgear.com or through a link in
the product user interface.
Technical Specifications
Compatible laptops
• Intel Core i3, i5, or i7 processor
• Intel Graphics Media Accelerator HD graphics
adapter
• Intel WiFi Link wireless networking adapter
• Microsoft Windows 7 operating system
• Intel Wireless Display software
Network interface
IEEE 802.11 a/b/g/n wireless
Power
5V/1A
Physical dimensions (d x w x h)
84 x 51 x 12 mm (3.3 x 2.01 x 0.47 inches)
Weight
48 g
Operating temperature
0 to 40º C (32 to 105º F)
Electromagnetic compliance
CE mark, Commercial; FCC Part 15, Class B; EN 55
022 (CISPR 22) Class B, C-Tick
Power adapter safety approval
CE mark, Commercial UListed (UL 1950), C-Tick
©2012 by NETGEAR, Inc.. All rights reserved. NETGEAR and the NETGEAR logo are registered trademarks of
NETGEAR, Inc. in the United States and/or other countries. Other brand and product names are trademarks or
registered trademarks of their respective holders. Information is subject to change without notice.